D1LC compact Air Heater - Espar
D1LC compact Air Heater - Espar
D1LC compact Air Heater - Espar

You also want an ePaper? Increase the reach of your titles
YUMPU automatically turns print PDFs into web optimized ePapers that Google loves.
7<br />
Installation Procedures<br />
<strong>Heater</strong> Location<br />
Depending on the type of vehicle, the best location for<br />
mounting the heater will vary. Typically, heaters are mounted<br />
inside tool or luggage compartments. However, the<br />
heater may be mounted anywhere inside the vehicle provided<br />
you adhere to the following conditions:<br />
Note: Tighten screws sufficiently to ensure positive seal<br />
between mounting plate and mounting surface.<br />
Do not over tighten.<br />
• Combustion air intake, exhaust and fuel inlet must be<br />
located outside of the vehicle.<br />
• <strong>Heater</strong> must be mounted on flat horizontal surface<br />
providing an air tight seal between heater and vehicle.<br />
• Do not mount the heater outside the vehicle, unless care<br />
is taken to protect the heater from the weather.<br />
When selecting the location, consider the following:<br />
• Combustion air and exhaust connections.<br />
• Ducting.<br />
• Fuel line connections.<br />
• Electrical connections.<br />
<strong>Heater</strong> Mounting<br />
A mounting plate and hardware are provided with the truck<br />
heater kit.<br />
• Choose heater location.<br />
• Using template provided, drill and cut center hole. Cut<br />
one (1) four and one half inch (4 1/2”) diameter hole or<br />
one rectangular hole four (4”) by five (5”) inches.<br />
• Mount heater on mounting plate with nuts and spring<br />
washers provided.<br />
• For ease of installation make the exhaust, combustion<br />
air intake and fuel connections at base of heater before<br />
mounting the heater into the vehicle.<br />
• Position heater in vehicle and secure with “Tek” screws<br />
provided.<br />
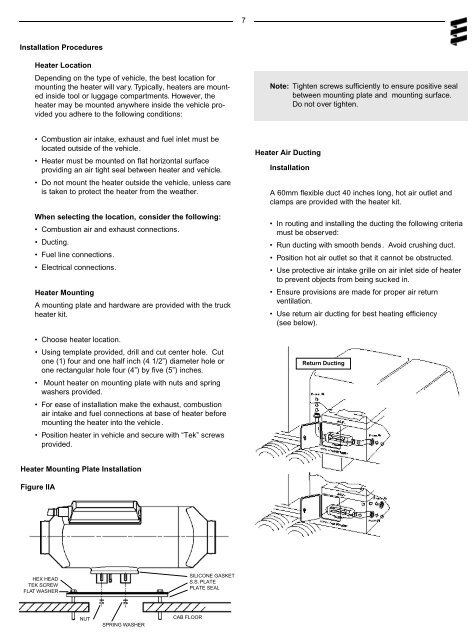
<strong>Heater</strong> <strong>Air</strong> Ducting<br />
Installation<br />
A 60mm flexible duct 40 inches long, hot air outlet and<br />
clamps are provided with the heater kit.<br />
• In routing and installing the ducting the following criteria<br />
must be observed:<br />
• Run ducting with smooth bends. Avoid crushing duct.<br />
• Position hot air outlet so that it cannot be obstructed.<br />
• Use protective air intake grille on air inlet side of heater<br />
to prevent objects from being sucked in.<br />
• Ensure provisions are made for proper air return<br />
ventilation.<br />
• Use return air ducting for best heating efficiency<br />
(see below).<br />
Return Ducting<br />
<strong>Heater</strong> Mounting Plate Installation<br />
Figure IIA<br />
HEX HEAD<br />
TEK SCREW<br />
FLAT WASHER<br />
SILICONE GASKET<br />
S.S. PLATE<br />
PLATE SEAL<br />
NUT<br />
SPRING WASHER<br />
CAB FLOOR