
Create successful ePaper yourself
Turn your PDF publications into a flip-book with our unique Google optimized e-Paper software.
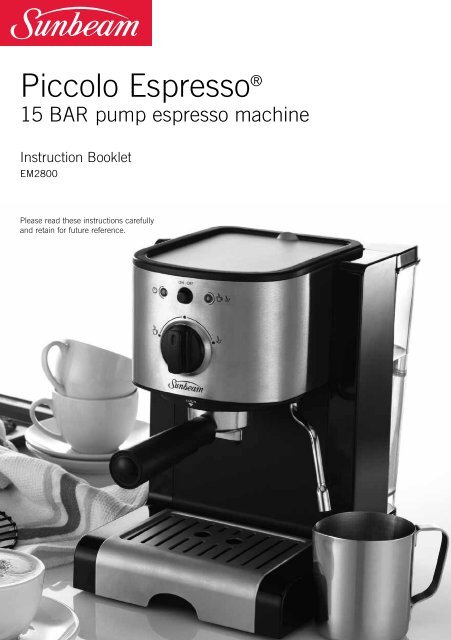
<strong>Piccolo</strong> Espresso ®<br />
15 BAR pump espresso machine<br />
Instruction Booklet<br />
EM2800<br />
Please read these instructions carefully<br />
and retain for future reference.
Heading<br />
Sub Heading<br />
Body copy with not indent applied.<br />
• Bullet copy Bullet copy Bullet copy Bullet<br />
copy Bullet copy Bullet copy Bullet copy<br />
Bullet copy<br />
2
Contents<br />
<strong>Sunbeam</strong>’s Safety Precautions 2<br />
About espresso coffee 3<br />
Features of your <strong>Piccolo</strong> Espresso ® 4<br />
Operations guide for your <strong>Piccolo</strong> Espresso ® 7<br />
Secrets to the perfect cup 10<br />
Before using your <strong>Piccolo</strong> Espresso ® 11<br />
Functions of your <strong>Piccolo</strong> Espresso ® 12<br />
Care and Cleaning 15<br />
Descaling 17<br />
Trouble shooting guide 19<br />
Recipes 22
<strong>Sunbeam</strong>’s Safety Precautions<br />
SAFETY PRECAUTIONS FOR YOUR SUNBEAM<br />
ESPRESSO MACHINE.<br />
• Always place the unit on a flat, level surface.<br />
• Do not operate without water in reservoir.<br />
• Do not remove the filter holder during water flow or<br />
coffee flow as the unit is under pressure. Removing<br />
the filter holder during operation can lead to a<br />
scalding or injury.<br />
• Clean the steam nozzle only when the unit has been<br />
switched off and allowed to cool.<br />
• Disconnect the plug from the power outlet if there<br />
is any problem during the coffee making process or<br />
prior to cleaning your appliance.<br />
• Do not allow the power cord to come into contact<br />
with the hot parts of the appliance (cup warming<br />
plate, filter holder, steam nozzle).<br />
• Keep hands away from hot parts of the appliance,<br />
including the cup warming plate, filter holder and<br />
steam nozzle.<br />
<strong>Sunbeam</strong> is very safety conscious when<br />
designing and manufacturing consumer products,<br />
but it is essential that the product user also<br />
exercise care when using an electrical appliance.<br />
Listed below are precautions which are essential<br />
for the safe use of an electrical appliance:<br />
• Read carefully and save all the instructions<br />
provided with an appliance.<br />
• Always turn the power off at the power outlet<br />
before you insert or remove a plug. Remove<br />
by grasping the plug - do not pull on the cord.<br />
• Turn the power off and remove the plug<br />
when the appliance is not in use and before<br />
cleaning.<br />
• Do not use your appliance with an extension<br />
cord unless this cord has been checked and<br />
tested by a qualified technician or service<br />
person.<br />
• Always use your appliance from a power<br />
outlet of the voltage (A.C. only) marked on the<br />
appliance.<br />
• This appliance is not intended for use by<br />
persons (including children) with reduced<br />
physical, sensory or mental capabilities, or<br />
lack of experience and knowledge, unless they<br />
have been given supervision or instruction<br />
concerning use of the appliance by a person<br />
responsible for their safety.<br />
• Children should be supervised to ensure that<br />
they do not play with the appliance.<br />
• The temperature of accessible surfaces may be<br />
high when the appliance is operating.<br />
2<br />
• Never leave an appliance unattended while<br />
in use.<br />
• Do not use an appliance for any purpose<br />
other than its intended use.<br />
• Do not place an appliance on or near a hot gas<br />
flame, electric element or on a heated oven.<br />
• Do not place on top of any other appliance.<br />
• Do not let the power cord of an appliance hang<br />
over the edge of a table or bench top or touch<br />
any hot surface.<br />
• Do not operate any electrical appliance with<br />
a damaged cord or after the appliance has<br />
been damaged in any manner. If damage is<br />
suspected, return the appliance to the nearest<br />
<strong>Sunbeam</strong> Appointed Service Centre<br />
for examination, repair or adjustment.<br />
• For additional protection, <strong>Sunbeam</strong><br />
recommend the use of a residual current<br />
device (RCD) with a tripping current not<br />
exceeding 30mA in the electrical circuit<br />
supplying power to your appliances.<br />
• Do not immerse the appliance in water<br />
or any other liquid unless recommended.<br />
• Appliances are not intended to be operated<br />
by means of an external timer or separate<br />
remote control system.<br />
• This appliance is intended to be used in<br />
household and similar applications such<br />
as: staff kitchen areas in shops, offices and<br />
other working environments; farm houses; by<br />
clients in hotels, motels and other residential<br />
type environments; bed and breakfast type<br />
environments.<br />
If you have any concerns regarding the performance and use of your appliance,<br />
please visit www.sunbeam.com.au or contact the <strong>Sunbeam</strong> Consumer Service Line.<br />
Ensure the above safety precautions are understood.
About espresso coffee<br />
The <strong>Sunbeam</strong> range of espresso machines<br />
are sure to satisfy lovers of coffee. With its<br />
Italian designed and made 15 BAR pump,<br />
a thermoblock heating system and Italian<br />
designed ‘crema’ system the <strong>Sunbeam</strong><br />
<strong>Piccolo</strong> Espresso ® will provide endless cups<br />
of quality coffee.<br />
Coffee is an integral part of Australian<br />
culture. With café numbers increasing, the<br />
demand for the perfect cup combined with<br />
the right atmosphere is the goal of many<br />
coffee connoisseurs.<br />
What makes a good coffee?<br />
<strong>Sunbeam</strong> have consulted with experienced<br />
coffee makers and appreciators of coffee<br />
through every stage of design, to ensure the<br />
machine delivers a great coffee every time.<br />
There are many factors that contribute to the<br />
perfect coffee. The words’ ‘taste’ and ‘aroma’<br />
are consistently used when describing the<br />
perfect cup.<br />
The sweet aroma and taste of the perfect<br />
coffee is largely due to the correct<br />
combination of temperature and pressure<br />
during the brewing process. The thermoblock<br />
heating system ensures the water is at the<br />
correct temperature, so that the full coffee<br />
flavour is extracted.<br />
Secondly, the combination of the Italian<br />
designed and made 15 BAR pump, Italian<br />
designed dual-wall filter and stabilising baffle<br />
ensures the correct pressure at which the liquid<br />
espresso is released from the spout. The flow<br />
should consist of both liquid and cream. This<br />
cream is commonly known as the ‘crema’. The<br />
perfect ‘crema’ should be thick and stable<br />
and preserve the coffee flavour, aroma and<br />
temperature.<br />
We hope you have many enjoyable coffee<br />
experiences with the <strong>Sunbeam</strong> <strong>Piccolo</strong><br />
Espresso ®.<br />
Should you need any further assistance<br />
please don’t hesitate to contact the <strong>Sunbeam</strong><br />
coffee hotline on free call 1300 881 861 .<br />
3
Features of your <strong>Sunbeam</strong><br />
<strong>Piccolo</strong> Espresso ®<br />
Power button<br />
On/off indicator light<br />
Operating dial<br />
Easy to operate selector dial - turn to the<br />
left to make espresso ( ) or to the right for<br />
steam ( ).<br />
Group handle<br />
Removable drip tray and grill<br />
Designed with no dirt traps for small coffee<br />
granules, milk or any other spills. The drip<br />
tray and grill can be removed completely for<br />
easy cleaning.<br />
Non-slip rubber feet<br />
Makes the unit sturdy, preventing it<br />
from slipping or scratching the bench top.<br />
Measuring spoon with tamp<br />
1 cup filter 2 cup filter<br />
4
1.3L removable water reservoir<br />
The water reservoir is removable for easy<br />
filling. Simply lift the lid, or remove the<br />
reservoir and take to the tap.<br />
Warming plate<br />
Gently pre-heats espresso cups and glasses<br />
before use. Removable for easy cleaning.<br />
<strong>Sunbeam</strong>/espresso indicator light<br />
Lights up green to indicate the espresso<br />
machine has reached temperature.<br />
Steam wand<br />
Extra cup height clearance<br />
Additional clearance between the coffee<br />
handle and the drip tray - designed to suit<br />
taller cups.<br />
500mL jug<br />
5
Features of your <strong>Piccolo</strong> Espresso ®<br />
15 BAR pump<br />
Crema System<br />
The <strong>Piccolo</strong> Espresso ® is fitted with a 15<br />
BAR pump delivering the pressure required<br />
for complete extraction of oils, coffee solids<br />
and aroma.<br />
The dual-wall filter creates additional back<br />
pressure and stabilising baffle produces a<br />
steady pour and maintains the temperature of<br />
the espresso.<br />
Thermoblock heating system<br />
Ensures the precise temperature is achieved.<br />
As espresso is made with hot rather than<br />
boiling water and the thermoblock heats the<br />
water to 92°C (just below boiling point) for<br />
optimum extraction of oils from the coffee<br />
grinds. Temperatures above this will burn the<br />
coffee grinds resulting in a bitter taste.<br />
6
Operations Guide for your<br />
<strong>Piccolo</strong> Espresso ®<br />
The diagrams below and on the following pages are to assist you in using your <strong>Sunbeam</strong><br />
<strong>Piccolo</strong> Espresso ® . Each of the diagrams is numbered. Throughout this instruction manual<br />
these numbers will be referred to.<br />
For example: Fill the water reservoir (1) (2) (3) (4) (5) with cold tap water...<br />
Each time you see these numbers please refer back to the diagrams at the front of the<br />
instruction manual.<br />
Filling the water reservoir.<br />
1 2 3<br />
Open lid of water reservoir. Fill with cold water, OR Remove water reservoir.<br />
4 5<br />
6<br />
Fill at sink with cold water. Replace the water reservoir. Press ‘Power’ button to<br />
turn unit on.<br />
Preparing the espresso machine.<br />
2 cup<br />
filter<br />
1 cup<br />
filter<br />
7 8 9<br />
Select filter.<br />
Place filter handle onto<br />
brewing head.<br />
Turn filter handle to the right.<br />
7
Operations Guide for your <strong>Piccolo</strong> Espresso ® (continued)<br />
10 11 12<br />
Place container under filter<br />
handle.<br />
Turn operating dial to the<br />
espresso ( ) setting and<br />
allow water to run through.<br />
Warming espresso cups.<br />
Making an Espresso.<br />
13<br />
14 15<br />
Fill group handle with<br />
ground coffee.<br />
Tamp the coffee.<br />
Wipe the edge of filter to<br />
remove any coffee grinds.<br />
16<br />
17<br />
18<br />
8<br />
Place filter handle onto<br />
brewing head and turn<br />
handle to the right.<br />
Turn operating dial to the<br />
espresso ( ) setting to make<br />
an espresso.<br />
Remove used coffee grinds.
Operations Guide for your <strong>Piccolo</strong> Espresso ® (continued)<br />
Frothing Milk.<br />
19<br />
20 21<br />
Turn the steam wand into<br />
the drip tray. Turn the<br />
operating dial to steam ( )<br />
setting. Purge for 5 sec.<br />
Care and Cleaning.<br />
Return the operating dial to<br />
stand-by ( ) position and<br />
place milk jug with milk<br />
under steam wand.<br />
Turn the steam dial to the<br />
steam ( ) setting to froth<br />
milk.<br />
22<br />
Insert end of paper clip<br />
into the hole in the base of<br />
the steam nozzle.<br />
23<br />
Remove steam nozzle from<br />
steam wand.<br />
24<br />
Insert a pin into the single<br />
hole in the base of the<br />
filter.<br />
Remove the drip tray grill.<br />
25<br />
26<br />
To remove drip tray, lift out<br />
and toward you.<br />
9
Secrets to the perfect cup<br />
With your <strong>Piccolo</strong> Espresso ® coffee<br />
machine and a little experience, you can<br />
create cafe quality coffee at home. Here<br />
are a few helpful suggestions:<br />
• A single shot of espresso should result in<br />
only 30-35mls of coffee.<br />
• The grind of coffee is critical. Use a fine<br />
to medium grind for domestic espresso<br />
machines.<br />
• A common mistake is running too much<br />
water through the ground coffee, resulting<br />
in a thin and bitter tasting espresso.<br />
• Ensure your coffee grinds are ‘tamped’<br />
evenly. ‘Tamping’ refers to the amount<br />
of pressure with which coffee grinds are<br />
packed into the filter.<br />
• If your espresso pours too slowly, tamp the<br />
coffee grind more lightly, or try a coarser<br />
grind.<br />
• If your espresso is thin and watery, tamp<br />
the coffee grinds harder, or try a finer<br />
grind.<br />
• Always use cold milk and a clean stainless<br />
steel jug when steaming.<br />
• Don’t boil the milk when steaming. The<br />
ideal temperature is when the jug becomes<br />
too hot to touch.<br />
• Always use the freshest beans or ground<br />
coffee available and store in an airtight<br />
container in a cool, dry, dark place.<br />
• Whole bean coffee stays fresh longer than<br />
ground coffee.<br />
• When grinding your own coffee, never<br />
grind more than you will use for immediate<br />
brewing. Once ground, the coffee will begin<br />
to loose its flavour.<br />
• Keep your espresso machine clean and<br />
thoroughly rinsed. Run water through the<br />
brewing head and flush the steaming arm<br />
in fresh water after each use.<br />
• Little things count – warming your cups,<br />
using filtered water and serving the coffee<br />
immediately after brewing do make a<br />
difference.<br />
10
Before using your <strong>Piccolo</strong> Espresso ®<br />
Before using your <strong>Piccolo</strong> Espresso ® for the<br />
first time or if you have not used it for some<br />
time, rinse the machine by running water<br />
through without coffee in the filter handle, as<br />
follows:<br />
Note: Throughout these instructions the<br />
numbers you see highlighted and in brackets<br />
refer back to the diagrams at the start of this<br />
instruction manual.<br />
• Open the lid of the water reservoir (1) and<br />
fill with cold water (2). Alternatively you<br />
can open the lid and remove the water<br />
reservoir using the handle (3). Then fill<br />
with cold water (4).<br />
• Replace the water reservoir firmly into the<br />
unit (5) and close lid.<br />
• Insert the power cord into a 230-240V AC<br />
power outlet and turn the power on. Start<br />
the unit (6) by pressing the ‘Power’ button.<br />
The power light will illuminate amber and<br />
remain on until the power outlet is turned<br />
off. In addition, you will need to wait<br />
until the steam/espresso light illuminates<br />
green to indicate the machine has reached<br />
temperature and is ready to use.<br />
Note: Before turning on your <strong>Piccolo</strong><br />
Espresso ® ensure that the dial on the control<br />
panel is in the stand-by ( ) position.<br />
• Place one of the filters in the filter handle<br />
(7). Then position the filter handle onto<br />
the machines brewing head.<br />
• To ensure that the filter handle is in<br />
the correct position, turn the handle so<br />
it points to the left and place the filter<br />
handle flat against the brewing head (8),<br />
then turn the handle towards the right (9),<br />
as far as it can go.<br />
Note: Do not over tighten.<br />
• Place a sufficiently large container under<br />
the filter handle (10).<br />
• As soon as the steam/espresso indicator<br />
light illuminates green, your <strong>Piccolo</strong><br />
Espresso ® is ready to use.<br />
• Turn the operating dial to the espresso ( )<br />
setting and allow water to run through.<br />
Note: Make sure the water reservoir is<br />
clean and free of any debri, as any fine<br />
particles can block the water flow.<br />
11
Functions of your <strong>Piccolo</strong> Espresso ®<br />
1. ESPRESSO FUNCTION<br />
For best results, it is ideal to pre-heat your<br />
cups, filter handle and filter as follows:<br />
• Insert the power cord into a 230-240V AC<br />
power outlet and turn the power on.<br />
• Fill the water reservoir (1) (2), (3) (4) (5)<br />
with cold water and start the appliance (6).<br />
• Put the filter handle and an empty filter<br />
in place (7) (8) (9), and place cups<br />
underneath the filter handle.<br />
• As soon as the steam/espresso indicator<br />
light is illuminated green the <strong>Piccolo</strong><br />
Espresso ® is ready to use.<br />
• Turn the operating dial to the espresso<br />
( ) setting (17). When the cups are full<br />
of hot water return the dial to the stand-by<br />
( ) position.<br />
Note: Once the appliance has been on for<br />
a while, the coffee cups can be warmed<br />
by placing them upside down on the cup<br />
warming plate (12), or alternatively, fill with<br />
boiling water from a kettle and discard.<br />
Preparing an espresso:<br />
• Insert the power cord into a 230-240V AC<br />
power outlet and turn the power on.<br />
• Fill the water reservoir (1) (2), (3) (4) (5)<br />
with cold water.<br />
• Turn the <strong>Piccolo</strong> Espresso ® ‘On’ (6). The<br />
power light will illuminate amber. When<br />
the steam/espresso indicator light is<br />
illuminated green the <strong>Piccolo</strong> Espresso ®<br />
is ready to prepare an espresso.<br />
• Pre-heat your coffee cups.<br />
• Select the required filter (7) for 1 or 2<br />
cups of coffee and place in the filter<br />
handle.<br />
• Using the measuring spoon supplied, place<br />
one or two measures of ground coffee into<br />
the filter (13). With the other end of the<br />
measuring spoon, use the tamper to push<br />
(pack) down the coffee grinds (14). Do not<br />
apply too much pressure.<br />
Important: Be sure not to over-fill the filter<br />
with too much coffee. Wipe around the edge of<br />
the filter to remove any coffee grinds (15).<br />
• Place the filter handle on the machine's<br />
brewing head. Position the handle so it<br />
points to the left, place the filter handle<br />
flat against the brewing head, then turn<br />
the handle towards the right (8), (9) as far<br />
as it can go.<br />
Note: Do not over tighten.<br />
• Place 1 or 2 pre-heated cups below the<br />
pouring spouts.<br />
• When the <strong>Piccolo</strong> Espresso ® is at the<br />
correct temperature for preparing espresso<br />
the steam/espresso indicator light will<br />
illuminate green.<br />
• To make an espresso, turn the operating<br />
dial to the espresso ( ) setting (17). Once<br />
the cups are filled to the desired level, turn<br />
the operating dial back to the stand-by ( )<br />
position.<br />
• Remove the filter handle and the filter by<br />
turning the filter handle to the left.<br />
• To remove the used coffee grinds from the<br />
filter, simply turn the filter handle upside<br />
down and bang into a knock-bin (18).<br />
12
Functions of your <strong>Piccolo</strong> Espresso ® (continued)<br />
Important: For best results when making<br />
consecutive cups of espresso we recommend<br />
that you flush a small amount of water<br />
through the machine after each use. With<br />
the filter handle removed from the brewing<br />
head simply turn the operating dial to the<br />
espresso ( ) setting (17) and allow the water<br />
to run through. Once you have a consistent<br />
flow of water, return the operating dial to the<br />
stand-by ( )<br />
position. This will wash out any old or used<br />
coffee grinds stuck to the underside of the<br />
brewing head while also ensuring the correct<br />
water temperature for your next shot of<br />
espresso.<br />
Note: Do not leave the filter handle locked<br />
in position for extended periods, or when<br />
machine is not in use. This shortens the life<br />
of the brew head rubber seal.<br />
2. STEAM FUNCTION<br />
Note: We recommend that you prepare the<br />
espresso first, then steam the milk.<br />
• Fill the water reservoir (1) (2) (3) (4) (5)<br />
with cold water.<br />
• Turn the <strong>Piccolo</strong> Espresso ® ‘On’. Wait<br />
for the steam/espresso indicator light to<br />
illuminate green. Turn the steam wand into<br />
the espresso machine drip tray (19).<br />
• Pour cold milk into a stainless steel<br />
frothing jug to no more than ¹/ ³<br />
full.<br />
Note: For best results we recommend to use<br />
refrigerated milk and a stainless steel jug<br />
that is chilled.<br />
• Turn the steam/espresso dial to the steam<br />
( ) setting and allow the steam wand to<br />
purge for 5 seconds into the drip tray.<br />
• Return the operating dial to the stand-by<br />
( ) position, swing the steam wand to the<br />
side of the machine and place milk jug<br />
with milk under the steam wand (20).<br />
Caution: The steam wand will be hot. Use<br />
a cloth to move the steam wand back into<br />
position.<br />
• Turn the operating dial to the steam ( )<br />
setting. The steam/espresso indicator light<br />
may turn off, however will illuminate green<br />
again after a short time.<br />
• Ensure the tip of the steam wand is just<br />
below the surface of the milk as you are<br />
frothing the milk.<br />
Important: Do not allow the tip of the<br />
steam arm to touch the bottom of the<br />
container because this could obstruct the<br />
passage of the steam.<br />
• Position the tip of steam arm to one side<br />
of the jug to create a whirlpool motion in<br />
the milk. As the milk begins to rise in the<br />
jug, follow the level of milk, always keeping<br />
the tip of the steam arm just below the<br />
surface.<br />
• Cease steaming when the frothing jug<br />
becomes too hot to continue holding the<br />
palm of your hand against the side. Simply<br />
turn the operating dial to the stand-by ( )<br />
position and remove the jug.<br />
Note: Do not boil the milk.<br />
• Pour the textured milk into your espresso<br />
as soon as possible.<br />
13
Functions of your <strong>Piccolo</strong> Espresso ® (continued)<br />
Cleaning the steam wand<br />
You must clean the steam wand immediately<br />
after each use. Simply wipe the stainless<br />
steel wand clean with a damp cloth. Also<br />
swing the steam wand into the drip-tray and<br />
briefly turn the operating dial to the steam<br />
( ) setting to clear any remaining milk out<br />
of the steam wand.<br />
Caution: Steam from the wand is extremely<br />
hot and there is danger of scalding.<br />
Note: Should your steam wand become<br />
blocked, insert the end of a paper clip into<br />
the hole at the bottom of the steam nozzle<br />
(22). and see Figure 1.<br />
Figure 1<br />
Should the steam wand remain blocked<br />
unscrew the steam nozzle from the steam<br />
arm (23). Clean the steam nozzle by once<br />
again using the paper clip and flush under<br />
running water.<br />
14
Care and Cleaning<br />
The coffee making process involves extracting<br />
oils out of coffee grinds to make espresso<br />
coffee. Deposits of these oils build up over time<br />
and affect the taste of the coffee and operation<br />
of the espresso machine.<br />
Regular cleaning to remove these oils is<br />
essential for espresso machines to keep<br />
operating effectively. Flushing water through<br />
the brewing head and the steam wand is the<br />
easiest way to keep your machine clean after<br />
making each coffee, and at the end of your<br />
coffee making session.<br />
Important: Never wash your espresso machine<br />
accessories in the dishwasher.<br />
Drip tray<br />
Remove the grill and drip tray at regular<br />
intervals to empty (25), (26).<br />
Clean the drip tray and its grill with water and<br />
a little non-abrasive washing up liquid, rinse<br />
and dry.<br />
Over time it is normal for the inside of the drip<br />
tray to be stained by the oils in the coffee.<br />
The brewing head, filters & group handle<br />
The filter and group handle should be washed<br />
after each use by rinsing them under warm<br />
water. Wash at regular intervals in warm soapy<br />
water using a mild detergent.<br />
To clean the brewing head, flush water through<br />
and wipe the head and around the inside rim<br />
with a damp cloth.<br />
To assist in keeping the filter and the brew<br />
head clean, at the end of each coffee making<br />
session we recommend you run the machine,<br />
with the filter in place, without coffee – using<br />
water only.<br />
Important: Should the coffee filter remain<br />
blocked after normal cleaning, insert a pin into<br />
the single hole in the base of the coffee filter.<br />
See Figure 2.<br />
Figure 2<br />
15
Care and Cleaning (continued)<br />
Brew head rubber seal<br />
This seal is located in the brewing head and<br />
creates a seal against the filter handle when<br />
making an espresso.<br />
Note: When your <strong>Sunbeam</strong> <strong>Piccolo</strong> Espresso ® is<br />
not being used, we recommend that you do not<br />
leave the filter handle attached to the machine<br />
as this will reduce the life of the seal.<br />
Over time this seal loses its elasticity and<br />
will require replacement – usually every 6-12<br />
months. Signs that the seal is deteriorating are<br />
when: the filter handle rotates to the far right<br />
and feels loose, or steam escapes from around<br />
the brewing head during use.<br />
The cup warming plate and exterior<br />
Wipe over the unit with a damp cloth and wipe<br />
dry. Do not use abrasives or metal scourers, as<br />
these will scratch the exterior surface.<br />
Steam wand<br />
The steam wand needs to be cleaned each<br />
time you texture milk. To clean the steam<br />
wand, wipe with a damp cloth and for the froth<br />
attachment, simply rinse it under warm water.<br />
Note: After each use we recommend that a<br />
small amount of steam is purged from the<br />
steam wand.<br />
On a monthly basis we recommend thoroughly<br />
cleaning the steam wand.<br />
To do this soak the wand in water with the<br />
stainless jug resting on the drip tray. Ensure<br />
that the water level in the jug is over the wand.<br />
Run steam through the wand for 30 seconds,<br />
then leave to soak overnight.<br />
In the morning turn the machine on and run<br />
steam through the wand again for 30 seconds.<br />
Important: Do not wash parts in the dishwasher.<br />
Do not immerse the unit in water.<br />
Important: Should your steam wand become<br />
blocked, insert the end of a paper clip into the<br />
hole at the bottom of the steam nozzle (22)<br />
and see Figure 3.<br />
Figure 3<br />
Should the steam wand remain blocked<br />
unscrew the steam nozzle (23). Clean the<br />
steam nozzle by once again using the paper<br />
clip and flush with water.<br />
16
Descaling<br />
After continued use, your espresso machine<br />
may develop a build-up of mineral deposits.<br />
Thus your machine will require occasional<br />
‘descaling’.<br />
We recommend that you descale your machine<br />
every 2-3 months, although this period will<br />
depend on the hardness of water and frequency<br />
of use of the machine.<br />
Descaling solution<br />
Use <strong>Sunbeam</strong> Liquid Descaler, available at<br />
any <strong>Sunbeam</strong> Service Centre listed at www.<br />
sunbeam.com.au. Alternatively, dissolve 3<br />
tablespoons of vinegar in two litres of lukewarm<br />
water.<br />
Descaling the espresso machine<br />
Note: Ensure that the espresso machine is<br />
turned off and the power cord is unplugged.<br />
1. Remove the water reservoir from the<br />
machine and if necessary empty any water.<br />
2. Remove the drip tray and place it out of the<br />
way.<br />
3. Remove the group handle from the machine<br />
and rinse it thoroughly under running water<br />
and set aside.<br />
4. Place a cloth/tea towel on the bench<br />
and carefully turn the machine upside<br />
down. The machine should now be on<br />
the warming plate resting on the cloth/tea<br />
towel.<br />
5. Using a screwdriver, unscrew the shower<br />
screen from the brewing head.<br />
6. Remove the shower screen from the<br />
centre hold using the tip of a fork or<br />
skewer. Wash the shower screen in hot<br />
soapy water, rinse and dry well. Set aside<br />
in a safe place with the screw and the<br />
blue rubber seal.<br />
7. Using a small brush, scrub in and around<br />
the area of the brewing head, removing all<br />
coffee granules.<br />
8. Wipe down the steam wand with a small<br />
brush.<br />
Note: Follow the steps on page 14 'Cleaning<br />
the steam wand' for a more thorough cleaning<br />
procedure.<br />
9. Turn the machine upright, so that it is now<br />
sitting correctly on the bench.<br />
10. Fill the water reservoir with water to the<br />
'MAX' line and add 1 capful of <strong>Sunbeam</strong><br />
Liquid Descaler or, alternatively fill the<br />
water reservoir with the vinegar solution.<br />
Place the water reservoir onto the espresso<br />
machine.<br />
11. Place a large container under the brewing<br />
head.<br />
12. Insert the power plug into a 230-240V AC<br />
power outlet and turn the power ‘On’.<br />
13. When the steam/espresso indicator light<br />
is fully illuminated, turn the selector dial<br />
to the espresso ( ) setting. Run through<br />
about 1/3 of the liquid immediately and<br />
return the dial to stand-by ( ) position<br />
14. Angle the steam wand over the drip tray.<br />
When the steam/espresso indicator is<br />
illuminated, turn the selector dial to the<br />
steam ( ) setting.<br />
15. Allow the solution to come through the<br />
steam wand for 1 min.<br />
16. After 1 minute, stop the machine by<br />
turning the operating dial to stand-by<br />
( ) position.<br />
17. Leave the machine off for 10-15 minutes<br />
to allow the descaler to take effect.<br />
18. Turn the dial to the espresso ( ) setting<br />
and allow ½ of the rest of the descaler<br />
solution to run through the brewing head.<br />
19. Turn the dial to the stand-by ( ) position.<br />
Place the steam wand over the drip tray.<br />
20. Once the steam/espresso indicator light is<br />
illuminated, turn the dial to the steam<br />
( ) position.<br />
17
Descaling (continued)<br />
21. Allow the solution to run through the<br />
wand for 1 minute. Return the dial to the<br />
stand-by ( ) position.<br />
22. Turn the dial to the espresso ( ) setting<br />
and allow the remaining solution in the<br />
water reservoir to run through the brewing<br />
head.<br />
23. Remove the water reservoir from the<br />
machine and rinse thoroughly under<br />
running water, ensuring that all traces of<br />
the descaling solution is removed. Fill the<br />
water reservoir with clean water and place<br />
onto the machine.<br />
24. Run two (2) full water reservoirs through<br />
the brewing head. Refill the water reservoir<br />
and run the steam nozzle for 4-5 minutes.<br />
Note: Ensure that you continue to run water<br />
through the machine until the water runs clean<br />
and clear.<br />
25. When this is finished, remove the water<br />
reservoir and set aside. Remove the water<br />
containers and give the machine a good<br />
wipe over.<br />
26. Turn the machine upside down. The<br />
machine should now be on the warming<br />
plate resting on the cloth/tea towel once<br />
again.<br />
Important: The brewing head will be hot from<br />
the descaling process. Allow this to cool down<br />
before replacing any parts.<br />
27. Carefully replace the rubber seal, filter,<br />
washer and screw. Tighten well.<br />
28. Turn the machine upright, so that it is now<br />
sitting correctly on the bench.<br />
29. Replace the drip tray.<br />
30. Fill the water reservoir with water and<br />
position it on to the machine.<br />
18
Trouble Shooting Guide<br />
Problem Possible cause What to do<br />
Coffee runs down the side of the<br />
filter handle<br />
Filter handle is not attached correctly, See “Preparing an espresso” pg12<br />
or filter handle has not been tightened<br />
sufficiently<br />
Edge of filter insert is not free of Clean around the top edge of the filter<br />
coffee granules<br />
and wipe the brewing head clean of<br />
coffee.<br />
The brewing head is dirty<br />
The brewing head is defective<br />
Brew head rubber seal is damaged<br />
or worn<br />
Wipe brewing head with a damp cloth.<br />
Contact a <strong>Sunbeam</strong> Service Centre.<br />
Contact a <strong>Sunbeam</strong> Service Centre.<br />
No coffee runs through No water in the water reservoir Fill reservoir with water.<br />
Water reservoir not correctly<br />
assembled<br />
Press firmly down on the water reservoir<br />
to ensure it is correctly positioned.<br />
Steam dial set to ‘ ’ setting Ensure the steam dial is in the ‘ ’ off<br />
position.<br />
Brewing filter may be blocked<br />
See “Descaling the espresso machine”<br />
pg17.<br />
The filter is blocked, the coffee Empty out the filter and rinse under<br />
grounds are too fine or tamped water to clean. Wipe the brewing<br />
down too hard<br />
head with a cloth. Repack the filter<br />
with coffee and tamp down coffee.<br />
See “Care & Cleaning” pg15.<br />
Coffee pours through very slowly Coffee grounds are too fine or are Ensure you are using an evenly<br />
too compacted<br />
ground coffee and do not compact<br />
the grounds so firmly.<br />
Machine blocked by scale build up<br />
Espresso does not have any Crema Coffee is old or dry<br />
See “Descaling the espresso machine”<br />
pg17.<br />
Use fresh coffee and once you open<br />
the coffee be sure to store it in an<br />
airtight container.<br />
Coffee not compacted firmly enough Compact coffee grounds more firmly.<br />
Coffee too coarse<br />
Grind the coffee to a finer texture or<br />
change brands of espresso coffee<br />
to a finer grind.<br />
19
Trouble Shooting Guide (continued)<br />
Problem Possible cause What to do<br />
Espresso does not have any Crema Not enough coffee in filter See “Functions of your <strong>Piccolo</strong><br />
(Continued)<br />
Espresso ® ” pg12.<br />
Handle comes off during brewing Coffee tamped too hard Tamp the coffee grinds lighter<br />
Coffee grind is too fine<br />
Change to a coarser grind of coffee<br />
Filter handle is not attached correctly, See “Preparing an espresso” pg12<br />
or has not been tightened sufficiently.<br />
Top edge of filter is not free<br />
of coffee granules.<br />
The brewing head is dirty<br />
The brewing head is defective<br />
Brew head rubber seal is worn<br />
or damaged.<br />
Clean around the edge of the filter and<br />
wipe the brewing head clean of coffee.<br />
Wipe brewing head with a damp cloth.<br />
Contact a <strong>Sunbeam</strong> Service Centre.<br />
Contact a <strong>Sunbeam</strong> Service Centre.<br />
Coffee is too cold Cups, filter and filter handle are cold Pre-heat cups, filter, handle and filter<br />
See “Functions of your <strong>Piccolo</strong><br />
Espresso ® ” pg12.<br />
If making a cappuccino or latte<br />
the milk may not be heated enough.<br />
Ensure that milk is heated properly<br />
during frothing, but be sure not to<br />
boil the milk.<br />
No steam from the steam wand/arm Steam wand/arm is blocked.<br />
See “Cleaning the steam wand” pg14.<br />
Not enough froth when<br />
frothing milk Milk is not fresh Ensure the milk is fresh<br />
Milk temperature is too warm<br />
Frothing jug<br />
Steam wand/arm is blocked<br />
Milk has been boiled<br />
Ensure that the milk is well refrigerated<br />
before use.<br />
For best frothing results use a stainless<br />
steel jug and if possible refrigerate or<br />
run the jug under cold water before use.<br />
See Cleaning the steam wand” pg14.<br />
Start again with fresh, chilled milk<br />
Please contact <strong>Sunbeam</strong> directly on Freecall 1300 881 861, if this guide does not solve<br />
your query. We have experienced staff on hand to assist, Monday to Friday.<br />
20
Trouble Shooting Guide (continued)<br />
Not enough froth when The milk is making bubbles rather The tip of the steam wand should be<br />
frothing milk than correctly frothing. positioned just below the surface of<br />
the milk.<br />
Uneven cup filling Uneven tamping or obstruction in the Ensure coffee is tamped evenly and<br />
pouring spouts.<br />
check that there is nothing obstructing<br />
the pouring spouts.<br />
Defective baffle in filter handle<br />
Contact a <strong>Sunbeam</strong> Service Centre.<br />
Espresso tastes burnt Type of coffee being used Experiment with different brands of<br />
coffee.<br />
Appliance has not been rinsed<br />
properly after descaling.<br />
Run a reservoir full of water through the<br />
machine and steam wand before<br />
making another coffee.<br />
See 'Descaling' pg17.<br />
Pump makes an unusually No water in reservoir Fill the water reservoir<br />
loud noise<br />
Water reservoir not correctly<br />
Replace the water reservoir firmly into<br />
positioned.<br />
the unit.<br />
Espresso machine does not operate Brewing filter may be blocked<br />
Machine blocked by scale build up<br />
Remove filter holder and clean brewing<br />
head. See “Care & Cleaning” pg15.<br />
See “Descaling the espresso machine”<br />
pg17.<br />
21
Recipes<br />
ESPRESSO (SHORT BLACK)<br />
Espresso is a concentrated, full bodied coffee<br />
with a stable layer of cream on top – known<br />
as ‘crema’. An espresso is the foundation of<br />
all café coffee. Variations are achieved by<br />
adding different amounts of milk and froth.<br />
• 90mL espresso glass or demitasse cup<br />
• single espresso (30-35mL)<br />
MACCHIATO<br />
Macchiato, Italian for ‘to stain or mark’.<br />
Traditionally served as a standard espresso<br />
with a dash of milk and a small dollop of<br />
froth into the middle of the ‘crema’.<br />
• 90mL espresso glass or demitasse cup<br />
• single or double espresso<br />
• marked with steamed milk froth<br />
LONG BLACK<br />
A standard espresso with hot water, served in<br />
a regular coffee cup or mug. The hot water is<br />
added first so that the ‘crema’ is maintained.<br />
• 190mL cup<br />
• hot water (to taste)<br />
• single or double espresso<br />
FLAT WHITE<br />
Another old favourite, the Flat White is<br />
an espresso with steamed milk, served in<br />
a regular coffee cup or mug. The layer of<br />
frothed milk on top should be 2mm to seal<br />
the coffee.<br />
• 190mL cup<br />
• single or double espresso<br />
• steamed milk<br />
22
Recipes (continued)<br />
CAFFE LATTE<br />
An espresso with steamed milk, typically<br />
served in a glass. The layer of frothed milk on<br />
top should be 10mm to seal the coffee.<br />
• 220mL glass or cup<br />
• single or double espresso<br />
• steamed milk<br />
CAFFE MOCHA<br />
Made in a similar way to a cappuccino but<br />
with the addition of drinking chocolate.<br />
Simply stir the chocolate into the espresso<br />
prior to adding the steamed milk and froth.<br />
• 190-240mL cup or tall glass<br />
• single or double espresso<br />
• two teaspoons of drinking chocolate<br />
• two-thirds milky coffee, one-third froth<br />
CAPPUCCINO<br />
This delicious drink is an espresso with<br />
steamed milk, topped with creamy froth and<br />
a dusting of chocolate. The resulting drink is<br />
approximately two-thirds milky coffee, onethird<br />
froth.<br />
• 190-240mL cup<br />
• single or double espresso<br />
• two-thirds milky coffee, one-third froth<br />
• dusted with chocolate<br />
CON PANNA<br />
A variation on the original Vienna coffee, this<br />
delicious drink is made up of an espresso<br />
topped with lightly whipped cream. It can<br />
also be dusted with cinnamon or drinking<br />
chocolate.<br />
• 190mL cup<br />
• single or double espresso<br />
• lightly whipped cream<br />
23
Notes
12 Month Replacement Guarantee<br />
In the unlikely event that this appliance develops any malfunction<br />
within 12 months of purchase (3 months commercial use) due to<br />
faulty materials or manufacture, we will replace it for you<br />
free of charge.<br />
Should you experience any difficulties with<br />
your appliance, please phone our customer<br />
service line for advice on 1300 881 861 in<br />
Australia, or 0800 786 232 in New Zealand.<br />
Alternatively, you can send a written claim<br />
to <strong>Sunbeam</strong> at the address listed below.<br />
On receipt of your claim, <strong>Sunbeam</strong> will<br />
seek to resolve your difficulties or, if the<br />
appliance is defective, advise you on how<br />
to obtain a replacement or refund.<br />
Your <strong>Sunbeam</strong> 12 Month Replacement<br />
Guarantee naturally does not cover misuse<br />
or negligent handling and normal wear and<br />
tear.<br />
Similarly your 12 Month Replacement<br />
Guarantee does not cover freight or any other<br />
costs incurred in making a claim. Please<br />
retain your receipt as proof of purchase.<br />
The benefits given to you by this guarantee<br />
are in addition to your other rights and<br />
remedies under any laws which relate to the<br />
appliance.<br />
Our goods come with guarantees that cannot<br />
be excluded under the Australian Consumer<br />
Law and under the New Zealand Consumer<br />
Guarantees Act.<br />
In Australia you are entitled to a<br />
replacement or refund for a major failure and<br />
for compensation for any other reasonably<br />
foreseeable loss or damage. You are also<br />
entitled to have the goods repaired or<br />
replaced if the goods fail to be of acceptable<br />
quality and the failure does not amount to<br />
a major failure.<br />
Should your appliance require repair or<br />
service after the guarantee period, contact<br />
your nearest <strong>Sunbeam</strong> service centre.<br />
For a complete list of <strong>Sunbeam</strong>’s authorised<br />
service centres visit our website or call:<br />
Australia<br />
www.sunbeam.com.au<br />
1300 881 861<br />
Units 5 & 6, 13 Lord Street<br />
Botany NSW 2019 Australia<br />
New Zealand<br />
www.sunbeam.co.nz<br />
0800 786 232<br />
26 Vestey Drive, Mt Wellington<br />
Auckland, New Zealand
Need help with your appliance?<br />
Contact our customer service team or visit<br />
our website for information and tips on<br />
getting the most from your appliance.<br />
In Australia<br />
Visit www.sunbeam.com.au<br />
Or call 1300 881 861<br />
In New Zealand<br />
Visit www.sunbeam.co.nz<br />
Or call 0800 786 232<br />
is a registered trademark.<br />
‘<strong>Piccolo</strong> Espresso’ is a trademark of <strong>Sunbeam</strong> Corporation.<br />
Made in China.<br />
Due to minor changes in design or otherwise,<br />
the product may differ from the one shown in this leaflet.<br />
© Copyright. <strong>Sunbeam</strong> Corporation Limited 2011.<br />
ABN 45 000 006 771<br />
Units 5 & 6, 13 Lord Street<br />
Botany NSW 2019 Australia<br />
Unit 3, Building D<br />
26 Vestey Drive<br />
Mt Wellington Auckland<br />
New Zealand<br />
<strong>Sunbeam</strong> Corporation is a division of GUD Holdings Ltd. 8/11