Manual (pdf) - Sunbeam
Manual (pdf) - Sunbeam
Manual (pdf) - Sunbeam
You also want an ePaper? Increase the reach of your titles
YUMPU automatically turns print PDFs into web optimized ePapers that Google loves.
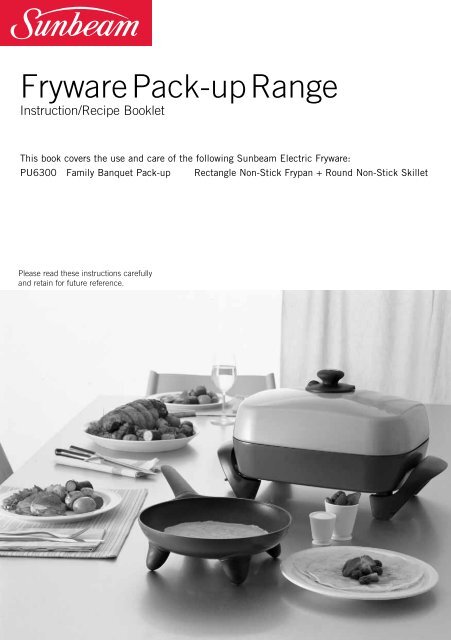
Fryware Pack-up Range<br />
Instruction/Recipe Booklet<br />
This book covers the use and care of the following <strong>Sunbeam</strong> Electric Fryware:<br />
PU6300 Family Banquet Pack-up Rectangle Non-Stick Frypan + Round Non-Stick Skillet<br />
Please read these instructions carefully<br />
and retain for future reference.
Contents<br />
<strong>Sunbeam</strong>’s Safety Precautions 1<br />
Features of your <strong>Sunbeam</strong> Fryware<br />
<strong>Sunbeam</strong> Family Banquet Frypan 2<br />
<strong>Sunbeam</strong> Classic ® Skillet 4<br />
Temperature Setting Guide 6<br />
Using your Fryware 7<br />
Care and Cleaning 10<br />
Recipes 11
<strong>Sunbeam</strong>’s Safety Precautions<br />
SAFETY PRECAUTIONS FOR YOUR<br />
SUNBEAM FRYWARE.<br />
• Use your frypan at least 200mm away from<br />
walls and curtains.<br />
• Do not immerse the control probe in water.<br />
• If using a plastic spatula do not leave in<br />
cooking vessel when hot.<br />
• The frypan must only be used with the control<br />
probe provided.<br />
<strong>Sunbeam</strong> is very safety conscious when<br />
designing and manufacturing consumer products,<br />
but it is essential that the product user also<br />
exercise care when using an electrical appliance.<br />
Listed below are precautions which are essential<br />
for the safe use of an electrical appliance:<br />
• Read carefully and save all the instructions<br />
provided with an appliance.<br />
• Always turn the power off at the power outlet<br />
before you insert or remove a plug. Remove<br />
by grasping the plug - do not pull on the cord.<br />
• Turn the power off and remove the plug<br />
when the appliance is not in use and<br />
before cleaning.<br />
• Do not use your appliance with an extension<br />
cord unless this cord has been checked<br />
and tested by a qualified technician or<br />
service person.<br />
• Always use your appliance from a power<br />
outlet of the voltage (A.C. only) marked<br />
on the appliance.<br />
• This appliance is not intended for use by<br />
persons (including children) with reduced<br />
physical, sensory or mental capabilities, or<br />
lack of experience and knowledge, unless they<br />
have been given supervision or instruction<br />
concerning use of the appliance by a person<br />
responsible for their safety.<br />
• Children should be supervised to ensure that<br />
they do not play with the appliance.<br />
• The temperature of accessible surfaces may be<br />
high when the appliance is operating.<br />
• Avoid using on metal surfaces e.g. sink,<br />
hotplate.<br />
• Remove the control probe before cleaning the<br />
frypan.<br />
• After cleaning the frypan ensure that the<br />
control probe inlet area is completely dry<br />
before using again.<br />
• Never leave an appliance unattended while<br />
in use.<br />
• Do not use an appliance for any purpose<br />
other than its intended use.<br />
• Do not place an appliance on or near a hot gas<br />
flame, electric element or on a heated oven.<br />
• Do not place on top of any other appliance.<br />
• Do not let the power cord of an appliance hang<br />
over the edge of a table or bench top or touch<br />
any hot surface.<br />
• Do not operate any electrical appliance with<br />
a damaged cord or after the appliance has<br />
been damaged in any manner. If damage is<br />
suspected, return the appliance to the nearest<br />
<strong>Sunbeam</strong> Appointed Service Centre<br />
for examination, repair or adjustment.<br />
• For additional protection, <strong>Sunbeam</strong><br />
recommend the use of a residual current<br />
device (RCD) with a tripping current not<br />
exceeding 30mA in the electrical circuit<br />
supplying power to your appliances.<br />
• Do not immerse the appliance in water<br />
or any other liquid unless recommended.<br />
• Appliances are not intended to be operated<br />
by means of an external timer or separate<br />
remote control system.<br />
• This appliance is intended to be used in<br />
household and similar applications such<br />
as: staff kitchen areas in shops, offices and<br />
other working environments; farm houses; by<br />
clients in hotels, motels and other residential<br />
type environments; bed and breakfast type<br />
environments.<br />
If you have any concerns regarding the performance and use of your appliance,<br />
please visit www.sunbeam.com.au or contact the <strong>Sunbeam</strong> Consumer Service Line.<br />
Ensure the above safety precautions are understood.<br />
1
Heading Features of your <strong>Sunbeam</strong><br />
Family Banquet Frypan – FP5900<br />
Part of pack-up PU6300<br />
Integrated knob and adjustable steam vent<br />
Allows you to accurately control moisture levels<br />
during cooking.<br />
High grade non-stick cooking surface<br />
Enables fat-free cooking and easy<br />
wipe down cleaning.<br />
Adjustable lid holder<br />
A stepped catch on the side of the lid enables<br />
the lid to be tilted above the frypan, to help<br />
maintain temperatures. Both hands are then free<br />
for stirring, etc. When the lid is in position it<br />
acts as a splatter shield. The lid can<br />
rest on either of the sides without handles.<br />
Control probe inlet<br />
Pan tilt lever<br />
When the lever is in the lowered position the<br />
cooking pan is tilted, forcing juices<br />
to collect at one end of the pan.<br />
Both hands are then free for basting.<br />
2
2<br />
1<br />
S<br />
10<br />
3<br />
4<br />
I M M E R<br />
5<br />
6<br />
7<br />
8<br />
9<br />
Trigger release control probe<br />
The probe is thermostatically controlled<br />
and incorporates an indicator light that<br />
switches off automatically when the<br />
selected temperature has been reached,<br />
it then cycles on and off to indicate that<br />
the temperature is being maintained.<br />
Metal lid<br />
Turns your frypan into a compact oven.<br />
Ideal for roasts, stews and casseroles.<br />
Extra large cooking vessel<br />
The large rectangular frypan (380mm<br />
x 292mm) is 78mm deep, ideal for<br />
cooking 2 chickens, the largest roast or<br />
liquid-based dishes.<br />
Cast-in rectangle element<br />
The rectangle element is completely<br />
cast into the heavy duty base providing<br />
superior heat distribution.<br />
3
Features of your <strong>Sunbeam</strong><br />
Classic ®<br />
Skillet - SK4200<br />
Included in pack-up PU6300<br />
Cool touch handle<br />
For safe cooking and carrying of your skillet.<br />
Control probe inlet<br />
Cast-in element<br />
The element is completely cast into<br />
the heavy duty base providing<br />
superior heat distribution.<br />
4
2<br />
1<br />
S<br />
10<br />
3<br />
4<br />
I M M E R<br />
5<br />
6<br />
7<br />
8<br />
9<br />
Trigger release control probe<br />
The probe is thermostatically controlled<br />
and incorporates an indicator light that<br />
switches off automatically when the<br />
selected temperature has been reached,<br />
it then cycles on and off to indicate that<br />
the temperature is being maintained.<br />
High grade non-stick cooking surface<br />
Enables fat-free cooking and easy wipe<br />
down cleaning.<br />
5
Heading Temperature Setting Guide<br />
The following table provides approximate temperatures for each setting on the control probe.<br />
Preheat your frypan/skillet on setting 7-8, then change to your desired setting.<br />
DIAL<br />
SETTING<br />
1<br />
2<br />
CELSIUS<br />
(approx)<br />
100°C<br />
110°C<br />
FARENHEIT<br />
(approx) SUGGESTED USES TEMPERATURE<br />
212°F<br />
230°F<br />
Keeping food warm<br />
LOW<br />
3<br />
4<br />
125°C<br />
140°C<br />
260°F<br />
285°F<br />
Simmering, slow cooking<br />
5<br />
6<br />
150°C<br />
160°C<br />
300°F<br />
320°F<br />
Pan frying, roasting<br />
MEDIUM<br />
7<br />
8<br />
175°C<br />
185°C<br />
350°F<br />
365°F<br />
Shallow frying<br />
9<br />
10<br />
200°C<br />
210°C<br />
390°F<br />
410°F<br />
Searing, sealing and baking<br />
HIGH<br />
Note: The suggested uses above are provided as a guide only and may require adjustment to<br />
suit different foods and individual tastes.<br />
When the dial is set to a low setting, it is normal for food to stop and start bubbling, as the<br />
thermostat maintains the selected temperature.<br />
6
Using your Fryware<br />
Before the first use: Wash, rinse and dry your<br />
frypan/skillet and lid. Season the cooking<br />
surface by applying a thin coat of cooking oil<br />
and rub in with paper towelling.<br />
1. Insert the control probe into the inlet on<br />
the frypan/skillet.<br />
2. Plug the cord into a 230-240V power<br />
outlet and turn the power on.<br />
3. Preheat the frypan/skillet on setting 7-8.<br />
Then set the control probe dial to the<br />
desired temperature setting. Refer to page<br />
8 for the temperature guide.<br />
Note: The light on the control probe will<br />
illuminate and will remain on until the set<br />
temperature is reached. It will then cycle<br />
on and off throughout cooking, as the<br />
temperature is maintained by the thermostat.<br />
On initial heating of the frypan/skillet, it<br />
is recommended that the temperature be<br />
allowed to cycle (the light cycling on and<br />
off) several times. This will help the cooking<br />
surface to adjust to a more accurate cooking<br />
temperature.<br />
Using the pan tilt lever<br />
The pan tilt lever is positioned under the inlet<br />
where the control probe is inserted.<br />
To tilt the frypan, push the lever down. This<br />
allows the fat and juices to drain from the<br />
food for crisp, low fat cooking. It also makes it<br />
easier to baste food and serve sauces or gravy.<br />
Note: Any discolouration on the cooking<br />
surface that may occour will not affect the<br />
cooking performance. Do not use metal<br />
utensils, these will scratch and damage<br />
the non-stick cooking surface. <strong>Sunbeam</strong><br />
recommends only using heat-proof plastic<br />
or wooden utensils to stir food.<br />
Adjustable lid holder<br />
This is a stepped catch on the side of the lid.<br />
It allows the lid to rest above the frypan and<br />
eliminates the need to find a spot on the<br />
bench. When in position the lid also acts as a<br />
spatter shield. The lid can rest on either side<br />
of the handle for the FP5900.<br />
FP5900<br />
7
Cooking with your <strong>Sunbeam</strong><br />
Fryware<br />
Baking<br />
Your frypan can be used for baking cakes,<br />
with deliciously moist results.<br />
1. Preheat the frypan to setting 10,<br />
with the lid on.<br />
2. Elevate the cake pan or tray from the base<br />
of the frypan using a small wire rack.<br />
Cooking times will be longer than those of a<br />
conventional oven.<br />
Basting<br />
The pan tilt lever makes basting easy as it<br />
allows the juices to drain to one side of the<br />
pan. Reduce the temperature to prevent any<br />
fat and juices spattering. Position the pan tilt<br />
lever and spoon the juices over the food as<br />
desired.<br />
Boiling Pasta<br />
1. Bring 6 cups of water to the boil on setting<br />
5. Add 1-2 teaspoons of oil to stop the<br />
pasta from sticking together.<br />
2. Add 250g (1½ cups) of pasta and cook<br />
until tender, for approximately 8-12<br />
minutes.<br />
3. Reduce to a lower setting if the water boils<br />
too rapidly.<br />
Note: Cooking times will vary with different<br />
types of pasta.<br />
Boiling Rice<br />
1. Bring 6 cups of water to the boil on setting<br />
5. Add 200g (1 cup) of rice and position<br />
the lid.<br />
2. Cook until tender, approximately 10-12<br />
minutes, and then drain.<br />
3. Reduce to a lower setting if the water boils<br />
too rapidly. Stir occasionally so that the<br />
rice does not stick.<br />
Browning and Sealing Meat<br />
(All models)<br />
It is necessary to brown and seal meat in<br />
many recipes. Meat retains its juices and the<br />
flavours develop after browning and sealing.<br />
This also prevents it from sticking when<br />
baking or roasting. Preferably use meat that<br />
is at room temperature, as this reduces the<br />
cooking time.<br />
1. Preheat the frypan to settings 8-9.<br />
2. Brown meat on all sides, with the lid off.<br />
3. After sealing, reduce the temperature to<br />
settings 4-5 and replace the lid until the<br />
meat is cooked as desired.<br />
8
Cooking with your <strong>Sunbeam</strong> Fryware continued<br />
Frying<br />
The frypan and skillet are ideal for shallow<br />
or dry frying. Deep frying is not particularly<br />
suitable as both the frypan and skillet have<br />
shallow sides and a greater surface area,<br />
which results in heat loss and the possible<br />
overflow of oil.<br />
Pan frying: Suitable for eggs, omelettes,<br />
bacon, sausages, steaks and chicken pieces.<br />
Preheat to settings 5-6 with a little oil to add<br />
flavour. Non-stick cooking surfaces do not<br />
require a large amount of oil. Steaks should<br />
only be turned once during cooking.<br />
Shallow frying: Suitable for vegetable pieces<br />
e.g roast pumpkin and potato, and crumbed<br />
food. Preheat on settings 6-8 with sufficient<br />
oil so that the food is half immersed. Cook<br />
food with the lid off.<br />
Sauteéing: Preheat on settings 5-6 with a<br />
little oil to add flavour.<br />
Stir frying: Food is cooked quickly, over a high<br />
heat and vegetables retain their flavour and<br />
crispness. For best results and even cooking,<br />
cut food into even sized, smaller pieces.<br />
1. Preheat the frypan on setting 8-9.<br />
2. Slice meat into strips. Coat meat in a little<br />
oil and stir-fry in batches until browned.<br />
This prevents meat from stewing.<br />
3. Add vegetables and seasoning, stirring<br />
continuously. Vegetables which take longer<br />
to cook, such as carrots, should be cooked<br />
first, adding the other ingredients later.<br />
Cook until the vegetables are still slightly<br />
crisp. Return the meat back into the pan<br />
when the vegetables are almost cooked.<br />
The lid can be in position in the last few<br />
minutes of cooking.<br />
Roasting<br />
Meat and poultry: The frypan and skillet are<br />
ideal for roasting meat and poultry, as the<br />
meat retains the flavour and juices.<br />
1. Preheat the frypan/skillet to settings 8-9.<br />
Use only a small amount of oil for less<br />
fatty joints and no oil for fattier joints of<br />
meat.<br />
2. Brown and seal the meat on all sides and<br />
position the lid.<br />
3. After browning, turn the dial to settings 4-<br />
5 to cook the meat as desired. Turn meat<br />
occasionally during cooking to ensure even<br />
cooking.<br />
4. Remove meat from pan and cover with<br />
foil. Allow meat to rest for 5-10 minutes,<br />
meanwhile you can make a gravy from the<br />
juices in the frypan.<br />
Vegetables: Cut into even sized pieces. Add<br />
to the frypan 45-60 minutes before serving.<br />
For crisper vegetables, remove the meat and<br />
increase the heat for the last few minutes of<br />
cooking.<br />
Roasting times:<br />
Note: These times are for well done. Reduce<br />
the times to suit personal taste.<br />
PORK: 30-40 minutes per 500g after browning.<br />
VEAL: 30-40 minutes per 500g after browning.<br />
LAMB: 25-30 minutes per 500g after<br />
browning.<br />
CHICKEN: 30-35 minutes per 500g after browning.<br />
9
Care and Cleaning<br />
Always turn the power off and remove the<br />
plug from the power outlet after use and<br />
before cleaning. Allow appliance to cool<br />
before cleaning.<br />
Control probe<br />
If cleaning is necessary, wipe over with a<br />
damp cloth.<br />
Note: The control probe must be removed<br />
before the frypan/skillet is cleaned and the<br />
control probe inlet must be dried before the<br />
frypan/skillet is used again.<br />
Important: Do not immerse the control probe in<br />
water or other liquid.<br />
Store the control probe carefully. Do not<br />
knock or drop it as this can damage the<br />
probe. If damage is suspected, return the<br />
control probe to your nearest <strong>Sunbeam</strong><br />
Appointed Service Centre for inspection.<br />
Refer to the separate warranty and service<br />
centre booklet.<br />
High domed metal lid<br />
Wash the lid in warm soapy water using a<br />
soft sponge, rinse and dry thoroughly. Metal<br />
scourers will scratch the surface and should<br />
be avoided. Some food such as tomato paste<br />
and curry may stain the surface. This staining<br />
may be removed or reduced by rubbing with<br />
a cream cleanser or a paste of bicarbonate of<br />
soda and water.<br />
Note: Do not place metal lid in a dishwasher.<br />
To clean interior and exterior surface.<br />
• When cleaning the non-stick coating do<br />
not use metal (or other abrasive) scourers.<br />
After cleaning, dry the frypan and lid with<br />
a soft cloth before storing.<br />
• Wash in hot soapy water or in a dishwasher.<br />
Remove stubborn spots with a plastic<br />
washing pad or sponge.<br />
• The heating element is totally sealed,<br />
making the frypan safe to fully immerse in<br />
water, or place in a dishwasher.<br />
• Wash as directed, and re-season the<br />
frypan/skillet before using again. In some<br />
instances this may not remove all the<br />
staining.<br />
10
Frypan Recipes<br />
For recipes for your Classic Skillet see page 21.<br />
Note: The temperature settings stated in these recipes are a guide only and will vary by model.<br />
Corn Fritters Serves 4<br />
Makes approx. 20 fritters<br />
1 cup self raising flour<br />
½ teaspoon bicarbonate soda<br />
½ teaspoon sweet paprika<br />
½ teaspoon ground coriander<br />
²/ ³ cup buttermilk<br />
2 eggs<br />
2 cups corn kernels<br />
1 small red capsicum, diced finely<br />
3 small green onions, sliced<br />
2 tablespoons chopped fresh parsley<br />
1 tablespoon chopped fresh coriander<br />
Sea salt<br />
Freshly ground black pepper<br />
Olive oil<br />
Tomato chilli jam, to serve<br />
1. Combine flour, soda, paprika in a bowl;<br />
whisk through buttermilk and eggs to form<br />
a batter.<br />
2. Combine corn, capsicum, green onions,<br />
parsley and coriander in a large bowl. Stir<br />
through the batter; season with salt and<br />
pepper.<br />
3. Heat frypan on setting 8. Drizzle a little<br />
olive oil in frypan and spoon tablespoonfuls<br />
of mixture into pan. Cook fritters for 2-3<br />
minutes on each side until golden.<br />
4. Serve with tomato chilli jam if desired.<br />
Gyoza (Japanese Dumplings) Makes approx. 50<br />
150g pork mince<br />
150g chicken mince<br />
2 tablespoons kecap manis (sweet soy)<br />
1 teaspoon sugar<br />
1 tablespoon mirin<br />
1 egg<br />
2 teaspoons sesame oil<br />
2½ cups Chinese cabbage, shredded finely<br />
¹/ ³ cup finely chopped water chestnuts<br />
4 green onions, chopped finely<br />
50 sheets gow gee wrappers<br />
vegetable oil for pan frying<br />
Dipping Sauce<br />
2 tablespoons kecap manis<br />
1 tablespoon black vinegar<br />
1. Combine all ingredients in a bowl and mix<br />
well.<br />
2. Lay several sheets of gow gee wrappers out<br />
onto a bench top. Have a tray lined with<br />
baking paper ready to place the prepared<br />
gyoza onto.<br />
3. Place a rounded teaspoon of filling into<br />
the centre of the wrapper. Moisten the<br />
edges with a little water. Fold the wrapper<br />
over the filling but before sealing carefully<br />
pleat on one side. The pastry will look<br />
plain on one side but have a small pleat on<br />
the other. Gently press the pastry to seal.<br />
Repeat with remaining wrappers.<br />
11
Frypan recipes continued<br />
4. Heat frypan on setting 8. Heat 1<br />
tablespoon of oil in the frying pan and<br />
place the dumplings, in batches, into<br />
the pan, pleat side up. Cook until the<br />
dumplings are golden on the bottom. Do<br />
not turn. Carefully pour enough water in<br />
the frying pan so that the dumplings are<br />
half covered. Place the lid on the frying<br />
pan and cook, covered for 1 minute.<br />
Remove lid and cook, uncovered, until all<br />
the water has evaporated. Remove from<br />
pan, repeat with remaining dumplings.<br />
Note: The water should be simmering the<br />
whole time. If this does not happen increase<br />
the heat to setting 10.<br />
5. Serve with dipping sauce.<br />
Tip: Kecap manis, mirin and black vinegar are<br />
available at Asian grocery stores.<br />
Soya Sauce Chicken Wings Serves 4<br />
1½ kg chicken wings<br />
¹/ ³ cup honey<br />
½ cup low salt soy sauce<br />
2 teaspoons Chinese cooking wine<br />
2 cloves garlic, crushed<br />
3 teaspoons grated fresh ginger<br />
1. Cut wings at joints and discard tips.<br />
2. Combine remaining ingredients in a jug.<br />
3. Place wings in a single layer in electric<br />
frying pan. Pour sauce over wings and turn<br />
to coat.<br />
4. Turn electric frying pan onto setting 6.<br />
Cook wings, turning occasionally. Cook for<br />
about 30 minutes or until browned and<br />
cooked through.<br />
5. Serve with rice.<br />
Tip: Chinese cooking wine is available from<br />
Asian grocery stores. If you cannot find it<br />
simply replace with sherry or omit completely.<br />
Spanish Paella Serves 6-8<br />
8 large green prawns<br />
8 small black mussels<br />
3½ cups fish/chicken stock<br />
1 teaspoon saffron threads<br />
180g chorizo sausage, sliced<br />
200g chicken thighs, halved<br />
1 tablespoon extra virgin olive oil<br />
1 medium onion, chopped finely<br />
1 clove garlic, crushed<br />
¼ teaspoon smoked paprika<br />
1 x 400g canned tomatoes<br />
1½ cups Arborio or Spanish rice<br />
300g whole pipis, purged<br />
½ cup frozen peas<br />
1 small roasted red capsicum, sliced<br />
1. Peel four of the prawns and devein. Leave<br />
the other four whole for presentation. Clean<br />
and de-beard mussels.<br />
2. Place stock and saffron in a saucepan<br />
and heat gently to infuse. Cover and keep<br />
warm.<br />
3. Heat the electric frying pan on setting 8.<br />
Cook chorizo in pan until golden; drain on<br />
paper towelling.<br />
4. In same pan cook the chicken thighs<br />
and whole prawns in chorizo oil until just<br />
cooked through; set aside.<br />
5. Reduce heat to 6 add extra virgin olive<br />
oil, if needed, in electric frying pan and<br />
cook onions and garlic until the onions are<br />
translucent; add paprika and cook for a<br />
further 30 seconds.<br />
6. Add tomatoes and cook on setting 6 for 2-<br />
3 minutes. Add rice and cook, stirring until<br />
well coated. Add stock and stir to combine.<br />
Reduce heat to 3 and cook, covered for 10<br />
minutes.<br />
12
Frypan recipes continued<br />
7. After 10 minutes check rice, add a little<br />
water if the rice looks too dry. Cook,<br />
covered, for a further 5 minutes if the rice<br />
is still quite hard.<br />
8. Arrange raw seafood, chicken, chorizo,<br />
whole prawns, peas, roasted capsicum,<br />
over rice and cook, covered for a further 5<br />
minutes or until the seafood is cooked and<br />
the rice is tender. Turn heat off and keep<br />
covered for 5 minutes before serving.<br />
Pan fried Chicken Breast with<br />
Salsa Verde Serves 6<br />
1-2 tablespoons olive oil<br />
6 chicken breast fillets<br />
Salsa Verde<br />
1 cup flat leaf parsley<br />
½ cup dill<br />
½ cup mint leaves<br />
2 cloves garlic<br />
1 tablespoon small capers<br />
1 tablespoon grated lemon rind<br />
Sea salt and freshly ground black pepper<br />
¾ cup extra virgin olive oil<br />
1. Heat frying pan on setting 7. Add oil and<br />
cook chicken, uncovered, until browned on<br />
both sides and cooked through. Remove<br />
from heat and serve with Salsa Verde<br />
2. To make the Salsa Verde, blend or process<br />
all ingredients until a chunky sauce texture<br />
is achieved.<br />
Tip: Salsa Verde also goes very well with pan<br />
fried fish fillets.<br />
Pan Fried Fish with Garlic and Lemon Serves 4<br />
4 fillets (800g) white fish fillets<br />
2 tablespoons olive oil<br />
2 cloves garlic, crushed<br />
2 tablespoons lemon juice<br />
2 eschalots, minced<br />
¼ cup shredded fresh basil leaves<br />
Sea salt<br />
Freshly ground black pepper<br />
Steamed New Potatoes or Mash, to serve<br />
Steamed Broccolini, to serve<br />
1. Place fish in a shallow baking dish. In<br />
a small bowl combine the garlic, lemon<br />
juice, eschalots, basil, salt and pepper and<br />
mix well.<br />
2. Pour marinade over fish and allow to sit at<br />
room temperature for 20 minutes.<br />
3. Heat frying pan on setting 9. Add oil and<br />
cook fish for 3-5 minutes on both sides<br />
until just cooked through.<br />
Note: Cooking time will vary depending on<br />
the thickness of each fillet.<br />
4. Serve fish with potatoes and steamed<br />
broccolini.<br />
13
Frypan recipes continued<br />
Beef Stroganoff Serves 4<br />
2 tablespoons flour<br />
1 kg beef strips<br />
2 tablespoons olive oil<br />
2 small cloves garlic, crushed<br />
¼ cup tomato paste<br />
1 cup beef stock<br />
250g mushrooms, sliced<br />
150ml sour cream<br />
Salt and freshly ground black pepper<br />
1. Dust beef in flour, shaking off excess flour.<br />
Heat oil in frying pan on a setting 6; cook<br />
beef in batches until browned.<br />
2. Return all beef to pan and add remaining<br />
ingredients, except sour cream. Cover and<br />
cook on setting 4 for about 45 minutes or<br />
until the beef is tender.<br />
3. Stir through sour cream. Season with salt<br />
and pepper. Serve with buttered noodles.<br />
Creamy Oyster Chicken Serves 4<br />
800g chicken tenders<br />
¼ cup flour<br />
1 tablespoon olive oil<br />
300ml cream<br />
¼ cup oyster sauce<br />
200g small button mushrooms, quartered<br />
freshly ground black pepper<br />
steamed broccoli, to serve<br />
steamed rice, to serve<br />
1. Lightly coat chicken in flour. Heat oil in<br />
frying pan on setting 8. Cook chicken,<br />
in batches, until golden on each side.<br />
Remove from pan. The chicken should not<br />
be completely cooked through at this stage.<br />
2. Add cream and oyster sauce to frying pan;<br />
stir to combine. Add mushrooms and cook<br />
for 1 minute. Return chicken to frying pan<br />
and cook, stirring occasionally until the<br />
sauce has thickened and the chicken is<br />
cooked through.<br />
3. Serve with steamed broccoli and rice.<br />
14
Frypan recipes continued<br />
Steamed Salmon Parcels Serves 4<br />
4 x 180g Atlantic salmon fillets<br />
1 stalk lemon grass, white only, chopped<br />
finely<br />
4 Eschalots, sliced thinly<br />
¹/ ³ cup coriander leaves<br />
1 large red chilli, seeded and sliced<br />
2 cloves garlic, crushed<br />
2 teaspoons grated fresh ginger<br />
½ cup coconut milk<br />
Sea salt<br />
Freshly ground black pepper<br />
1 tablespoon peanut oil<br />
4-6 baby bok choy, quartered<br />
Steamed jasmine rice, to serve<br />
1. Preheat electric frypan on heat 8 with the<br />
lid on for 5 minutes.<br />
2. Combine the lemon grass, eschalots,<br />
coriander, chilli, garlic, ginger, coconut<br />
milk and salt and pepper in a bowl and mix<br />
well.<br />
3. Place each piece of salmon on four<br />
individual pieces of aluminium foil. Divide<br />
the coconut mixture evenly over the tops of<br />
the salmon. Fold each piece of foil up to<br />
make four sealed parcels.<br />
4. Place four parcels in frying pan and<br />
cook, covered, on setting 6 for about 12-<br />
15 minutes or until cooked as desired.<br />
Remove from heat.<br />
5. Quickly increase heat in electric frying pan<br />
and heat oil; toss bok choy for 1-2 minutes<br />
until wilted; season with salt and pepper.<br />
6. Serve salmon with bok choy and steamed<br />
jasmine rice.<br />
Dhal Serves 4<br />
1 tablespoon vegetable oil<br />
1 medium onion, finely chopped<br />
1 clove garlic, crushed<br />
3 teaspoons ground cumin<br />
½ teaspoon cumin seeds<br />
1 teaspoon black mustard seeds<br />
2 tablespoons tomato paste<br />
2 cups red lentils, rinsed and drained<br />
2 cups vegetable stock<br />
1 litre water<br />
400g can chopped tomatoes<br />
3 baby eggplants, chopped coarsely<br />
4 hard boiled eggs, optional<br />
salt to taste<br />
1. Heat oil in frying pan on setting 4. Add<br />
onion and garlic and cook, stirring, for 2-3<br />
minutes or until onion is soft.<br />
2. Add dried spices and cook a further 1<br />
minute, or until spices are fragrant. Stir<br />
through tomato paste and cook for 2<br />
minutes.<br />
3. Increase heat to setting 9; add lentils,<br />
stock and water and bring mixture to the<br />
boil. Reduce heat to setting 3 and cook,<br />
uncovered, stirring occasionally, until the<br />
mixture thickens slightly.<br />
4. Add the tomatoes and eggplant and<br />
cook for a further 10 minutes then cook,<br />
covered, for another 10 minutes or until<br />
the dhal has thickened and the eggplant is<br />
soft.<br />
5. Add whole peeled eggs and stir gently until<br />
heated through.<br />
6. Season to taste.<br />
15
Frypan recipes continued<br />
Penne Boscaiola Serves 4<br />
6 rashers bacon<br />
200g sliced button mushrooms<br />
²/ ³ cup white wine<br />
300ml cream<br />
Freshly ground black pepper<br />
500g penne<br />
shaved parmesan, to serve<br />
1. Have a large pot of boiling water ready.<br />
2. Remove rind from bacon and slice into<br />
5mm pieces.<br />
3. Heat frying pan on setting 8. Cook bacon<br />
until golden. Add mushrooms and stir<br />
through.<br />
4. Add wine and cook, stirring, until the wine<br />
has reduced by half. Add cream and cook,<br />
stirring occasionally, until the sauce has<br />
thickened slightly.<br />
5. Cook pasta until just tender, drain and add<br />
to sauce and stir through. Season with salt<br />
and pepper and serve immediately with<br />
shaved parmesan.<br />
Lamb Rack with Garlic<br />
and Parmesan Crust Serves 4<br />
2 x 400g lamb rack roast, French trimmed<br />
4 slices of day old bread, crust removed<br />
2 cloves garlic, chopped<br />
2 tablespoons of grated fresh parmesan<br />
1 tablespoon of chopped fresh rosemary<br />
2 tablespoons of seeded mustard<br />
Olive oil spray<br />
Mashed potatoes, to serve<br />
1. Preheat frying pan on setting 7.<br />
2. Place lamb racks on a chopping board,<br />
having the bones interlocked in the middle.<br />
3. Combine bread, garlic, parmesan and<br />
rosemary in a food processor. Process until<br />
mixture resembles fine breadcrumbs<br />
4. Spread mustard evenly over the outside of<br />
the cutlets flesh.<br />
5. Press the bread mixture over the mustard<br />
and spray well with olive oil spray.<br />
6. Place lamb racks in frying pan, reduce heat<br />
to setting 3 and cook, covered, for about<br />
35 minutes or until cooked as desired.<br />
Remove from frying pan and cover with<br />
foil. Allow to rest 5-10 minutes.<br />
7. Cut lamb into individual cutlets and serve<br />
with mashed potatoes.<br />
Tip: Recipe can be doubled to serve 8.<br />
16
Heading<br />
Frypan recipes continued<br />
Roast Chicken with Stuffing Serves 4<br />
1.2kg whole fresh chicken<br />
sea salt<br />
freshly ground black pepper<br />
Stuffing<br />
1 onion, chopped finely<br />
2 teaspoons olive oil<br />
3 cups fresh bread crumbs<br />
30g softened butter<br />
1 teaspoon grated lemon rind<br />
2 tablespoons chopped fresh parsley<br />
2 teaspoons chopped fresh thyme<br />
1. Wash and clean chicken thoroughly. Pat<br />
dry with paper towelling.<br />
2. To make stuffing, cook onion in oil until<br />
softened. Add to remaining stuffing<br />
ingredients and mix well.<br />
3. Place the stuffing inside the cavity of the<br />
chicken. Tuck the wings back and tie the<br />
base of the chicken with cooking string<br />
so that the legs are crossed and securely<br />
positioned.<br />
4. Preheat frying pan on setting 7. Brush<br />
chicken with a little oil and salt and<br />
pepper.<br />
5. Brown chicken on all sides; reduce heat to<br />
setting 5 and cook, covered, with the vent<br />
open, for about 1½ hours or until cooked<br />
through.<br />
Tip: If cooking roast vegetables, place in<br />
frying pan ¾ to 1 hour before the end of<br />
cooking.<br />
Roast Lamb Serves 4-6<br />
1 leg lamb<br />
4-6 garlic cloves, sliced<br />
3-4 sprigs rosemary, snipped into small<br />
pieces<br />
2 tablespoons olive oil<br />
sea salt<br />
freshly ground black pepper<br />
6 small picking onions<br />
400g pumpkin, cut into chunks<br />
½ bunch baby carrots, trimmed<br />
2 potatoes, cut into chunks<br />
1 sweet potato, peeled and thickly sliced<br />
1. Using a small sharp knife, pierce the lamb<br />
all over, making indentations about 2cm<br />
deep. Push a piece of garlic into each<br />
slit and a small piece of rosemary. The<br />
rosemary should be poking out slightly.<br />
2. Heat frying pan to setting 10. Add oil and<br />
brown lamb all over. Season with salt and<br />
pepper; add onions to pan. Reduce heat to<br />
setting 6. Cook lamb, covered, for about 1<br />
hour and 15 minutes.<br />
3. Add vegetables to pan and cook for a<br />
further 25 minutes. Remove lamb and<br />
allow to rest, covered, until the vegetables<br />
are cooked as desired.<br />
17
Frypan recipes continued<br />
Heading<br />
Mustard Seed Potatoes Serves 8<br />
1.5kg baby new potatoes<br />
2 tablespoons extra virgin olive oil<br />
2 tablespoons black mustard seeds<br />
1-2 teaspoons sea salt flakes<br />
1. Place potatoes into frypan and pour enough<br />
water in to cover. Cook potatoes, covered,<br />
on Setting 10 until tender. Drain well for<br />
10 minutes.<br />
2. Heat frypan on Setting 8, add oil, potatoes,<br />
mustard seeds and salt; stir to coat.<br />
Place lid on potatoes and cook, stirring<br />
occasionally, until the potatoes are golden.<br />
Tip: Keep the lid on during cooking as the<br />
mustard seeds pop!<br />
Family Beef Casserole Serves 4<br />
with Semi Dried Tomatoes<br />
1kg chuck steak, cut into 2cm cubes<br />
¼ cup flour<br />
2 tablespoons olive oil<br />
1 bunch of spring onion, stalk trimmed,<br />
peeled and left whole<br />
1 clove garlic, crushed<br />
2 tablespoons tomato paste<br />
¼ cup red wine<br />
2 small carrots, diced<br />
1 celery stalk, sliced<br />
½ cup beef stock<br />
½ cup water<br />
1 tablespoon chopped fresh thyme<br />
1 bay leave<br />
½ cup semi dried tomatoes<br />
Salt and freshly ground black pepper<br />
1. Dust beef in flour, shaking off excess flour.<br />
Heat oil in frypan and cook beef in batches<br />
until brown. Set aside.<br />
2. To the same pan, add onion and garlic,<br />
cook stirring for 1-2 minutes, or until onion<br />
starts to colour. Stir tomato paste cook 1<br />
minute.<br />
3. Add wine and allow alcohol to evaporate<br />
and liquid to reduce slightly. About 2<br />
minutes.<br />
4. Place beef, vegetables, stock, water,<br />
thyme and bay leaves in frypan. Cover<br />
and cook on setting 4 for 1 hour stirring<br />
occasionally. After 1 hour add tomatoes<br />
and cook for a further 20-30 minutes or<br />
until beef is tender.<br />
5. Season to taste and serve hot with mashed<br />
potatoes or rice.<br />
18
Frypan recipes continued<br />
Caramelised bananas with Serves 4<br />
Hot Chocolate Sauce and Whipped Cream<br />
4 large bananas<br />
¼ cup firmly packed brown sugar<br />
1 teaspoon cinnamon<br />
Whipped cream, to serve<br />
Hot chocolate sauce<br />
100g dark chocolate, chopped<br />
30g white marshmallows, chopped<br />
150ml thickened cream<br />
1. Preheat frying pan on setting 4.<br />
2. Cut bananas in half lengthways, leaving<br />
the skin on. Sprinkle the combined sugar<br />
and cinnamon over the cut bananas. Press<br />
gently into the banana.<br />
3. Place bananas, cut side down and cook,<br />
uncovered, for about 6 minutes or until the<br />
sugar has caramelised and the banana has<br />
softened. Serve bananas with hot chocolate<br />
sauce and whipped cream.<br />
4. To make the hot chocolate sauce, combine<br />
all ingredients in a small saucepan and<br />
cook, stirring, over a low heat, until<br />
melted.<br />
Spiced Rhubarb and Berry Compote Serves 4-6<br />
2 bunches of rhubarb, cut into 2cm pieces<br />
500g frozen mixed berries<br />
¾ cup sugar<br />
1 cinnamon stick<br />
3 whole cloves<br />
1 teaspoon grated orange rind<br />
1. Combine all ingredients into the frying pan.<br />
Cook, stirring gently, on setting 8 until<br />
the sugar dissolves. Cover and cook on<br />
setting 5 for about 15 minutes or until the<br />
rhubarb is tender.<br />
2. Serve hot with ice cream, custard or with<br />
your favourite pudding.<br />
19
Frypan recipes continued<br />
Crème Caramel Serves 6<br />
1 cup sugar<br />
½ cup water<br />
¹/ ³ cup caster sugar<br />
3 eggs<br />
2 egg yolks<br />
250ml cream<br />
250ml milk<br />
1 vanilla bean, seeds scraped<br />
1. Combine sugar and water in a small<br />
saucepan. Stir over a low heat until the<br />
sugar has dissolved. Increase heat; boil<br />
without stirring, until the toffee turns a<br />
golden colour.<br />
2. Remove from heat, once the bubbles have<br />
subsided, pour into 6 individual 1-cup<br />
capacity metal moulds. Allow to cool.<br />
3. Beat eggs and sugar until light and creamy.<br />
4. Heat milk, cream, vanilla bean and seeds<br />
until almost boiling. Whisk hot milk into<br />
egg mixture. Pour mixture through a<br />
strainer.<br />
5. Pour mixture into moulds. Place moulds<br />
into frying pan. Pour enough boiling hot<br />
water to come halfway up the sides of the<br />
moulds.<br />
6. Cook, covered, on setting 6 for about 15<br />
minutes or until the custard has set.<br />
Note: Be careful when removing lid to check<br />
custard that no water from the lid goes into<br />
the moulds<br />
Individual Sticky Date Puddings Serves 8<br />
200g coarsely chopped dried dates<br />
1 teaspoon bicarbonate soda<br />
1¼ cups boiling water<br />
60ml olive oil<br />
1 cup firmly packed brown sugar<br />
1 cup self raising flour<br />
¼ teaspoon mixed spice<br />
2 eggs<br />
Butterscotch sauce<br />
160g butter<br />
²/ ³ cup firmly packed brown sugar<br />
1 cup (250ml) thickened cream<br />
1. Preheat frying pan on setting 4 with the<br />
lid on. Grease 8 individual 1-cup capacity<br />
metal moulds<br />
2. Place dates, soda and boiling water into a<br />
blender or food processor. Place lid on and<br />
allow the mixture to stand for 5 minutes.<br />
3. Add oil and sugar and pulse 3 times.<br />
4. Add remaining ingredients and pulse<br />
mixture until just combined. Scrape down<br />
sides of bowl if necessary. Do not over<br />
process.<br />
5. Pour mixture into prepared moulds. Place<br />
moulds in frying pan and carefully pour<br />
enough boiling water to come half way up<br />
the sides of the moulds. Cook for about<br />
25 minutes or until cooked when tested<br />
with a wooden skewer. Carefully remove<br />
from frying pan; stand for 5 minutes before<br />
turning out onto a wire rack.<br />
6. Serve pudding with butterscotch sauce. To<br />
make sauce, heat all ingredients in a small<br />
saucepan over a low heat until combined.<br />
Tip: Puddings can be made in advance and<br />
then rewarmed in a microwave.<br />
20
Skillet Recipes<br />
The following recipes are also suitable for your Classic Skillet. Please note that it will be<br />
necessary to cook in batches.<br />
Corn Fritters Page 11<br />
Pan Fried Chicken Breast with Salsa Verde Page 13<br />
Pan Fried Fish with Garlic and Lemon Page 13<br />
Caramelised Bananas with Hot Chocolate sauce Page 19<br />
Buttermilk Pancakes Makes 8<br />
1 cup self raising flour<br />
2 tablespoons sugar<br />
½ teaspoon bicarbonate of soda<br />
1 egg, lightly beaten<br />
2 tablespoons vegetable oil<br />
1 cup buttermilk<br />
60g butter<br />
1. Sift dry ingredients into a large bowl. Make<br />
a well in the centre.<br />
2. Whisk the combined wet ingredients into<br />
the dry ingredients until smooth.<br />
3. Heat skillet on setting 6. Melt some of the<br />
butter and spoon ¼ cupfuls of mixture at a<br />
time into the frying pan. Turn the pancakes<br />
once the bottom is golden and the tops<br />
starts to bubble. Cook until the underside<br />
is golden.<br />
4. Serve with extra butter and maple syrup.<br />
Pikelets Makes approx 12<br />
1 egg<br />
¼ cup sugar<br />
1 cup self raising flour<br />
¾ cup milk<br />
pinch salt<br />
butter for frying<br />
1. Beat egg and sugar with an electric mixer<br />
until light and creamy.<br />
2. Add flour, milk and salt and beat until<br />
smooth.<br />
3. Heat skillet on setting 8. Melt a little<br />
butter in frying pan and wipe away any<br />
excess with paper towelling.<br />
4. Spoon heaped spoonfuls of batter in frying<br />
pan and cook on both sides until golden.<br />
5. Serve with butter, jam, cream or chocolate<br />
hazelnut spread.<br />
For savoury pikelets: Reduce sugar to 2<br />
tablespoons and stir through chopped fresh<br />
herbs of choice. Top with slices of prosciutto,<br />
goats cheese and rocket or cream cheese,<br />
smoked salmon and capers.<br />
21
Skillet Recipes continued<br />
Scrambled Eggs Serves 2<br />
4 large eggs<br />
²/ ³ cup cream<br />
Sea salt<br />
Freshly ground black pepper<br />
20g butter<br />
Toast, to serve<br />
1. In a medium bowl, whisk the eggs, cream,<br />
salt and pepper until well combined. Heat<br />
butter in skillet over a medium heat until it<br />
bubbles.<br />
2. Pour in the egg mixture and cook, stirring<br />
with a wooden spoon, until the eggs are<br />
just starting to firm but are still quite<br />
moist.<br />
3. Serve immediately with hot, buttered toast.<br />
Sweet crepes<br />
Makes approximately<br />
<br />
16 crepes<br />
3 eggs<br />
60g butter, melted<br />
1¾ cups milk<br />
250g plain flour<br />
2 tablespoons caster sugar<br />
pinch salt<br />
1. Place crepe ingredients into a blender jug<br />
and blend on low for about 20 seconds<br />
or until combined. Strain into a jug and<br />
stand for 30 minutes.<br />
2. Heat skillet on setting 7. Pour about ¼<br />
cup of batter into the greased pan. Tilt the<br />
pan to spread the mixture evenly. Cook<br />
over a low heat on both sides until golden.<br />
Repeat with remaining mixture.<br />
3. Serve crepes with lemon juice and sugar or<br />
hazelnut spread.<br />
Omelette with Porcini Mushrooms Serves 2<br />
40g dried porcini mushrooms<br />
4 eggs<br />
sea salt<br />
freshly ground black pepper<br />
butter<br />
¼ cup grated cheese<br />
1. Soak mushrooms in hot water for 10<br />
minutes; drain and roughly chop.<br />
2. Whisk eggs, mushrooms, salt and pepper in<br />
a medium bowl until combined.<br />
3. Melt butter in skillet on setting 8; once<br />
bubbles have subsided pour in egg<br />
mixture. Once the egg mixture has begun<br />
to cook underneath use a wooden spoon<br />
bring in the edges of the egg mixture<br />
into the centre of the skillet (this creates<br />
height in your omelette). Do this 2-3 times<br />
then allow the omelette to brown slightly<br />
underneath and almost set on the top.<br />
4. Sprinkle the cheese over half of the<br />
omelette, then using a spatula, carefully<br />
fold the omelette in half. Cook for a further<br />
30 seconds.<br />
5. Carefully tip omelette onto a serving plate.<br />
22
Notes
Notes
12 Month Replacement Guarantee<br />
In the unlikely event that this appliance develops any malfunction<br />
within 12 months of purchase (3 months commercial use) due to<br />
faulty materials or manufacture, we will replace it for you<br />
free of charge.<br />
Should you experience any difficulties with<br />
your appliance, please phone our customer<br />
service line for advice on 1300 881 861 in<br />
Australia, or 0800 786 232 in New Zealand.<br />
Alternatively, you can send a written claim<br />
to <strong>Sunbeam</strong> at the address listed below.<br />
On receipt of your claim, <strong>Sunbeam</strong> will<br />
seek to resolve your difficulties or, if the<br />
appliance is defective, advise you on how<br />
to obtain a replacement or refund.<br />
Your <strong>Sunbeam</strong> 12 Month Replacement<br />
Guarantee naturally does not cover misuse<br />
or negligent handling and normal wear and<br />
tear.<br />
Similarly your 12 Month Replacement<br />
Guarantee does not cover freight or any other<br />
costs incurred in making a claim. Please<br />
retain your receipt as proof of purchase.<br />
The benefits given to you by this guarantee<br />
are in addition to your other rights and<br />
remedies under any laws which relate to the<br />
appliance.<br />
Our goods come with guarantees that cannot<br />
be excluded under the Australian Consumer<br />
Law and under the New Zealand Consumer<br />
Guarantees Act.<br />
In Australia you are entitled to a<br />
replacement or refund for a major failure and<br />
for compensation for any other reasonably<br />
foreseeable loss or damage. You are also<br />
entitled to have the goods repaired or<br />
replaced if the goods fail to be of acceptable<br />
quality and the failure does not amount to<br />
a major failure.<br />
Should your appliance require repair or<br />
service after the guarantee period, contact<br />
your nearest <strong>Sunbeam</strong> service centre.<br />
For a complete list of <strong>Sunbeam</strong>’s authorised<br />
service centres visit our website or call:<br />
Australia<br />
www.sunbeam.com.au<br />
1300 881 861<br />
Units 5 & 6, 13 Lord Street<br />
Botany NSW 2019 Australia<br />
New Zealand<br />
www.sunbeam.co.nz<br />
0800 786 232<br />
26 Vestey Drive, Mt Wellington<br />
Auckland, New Zealand
Need help with your appliance?<br />
Contact our customer service team or visit<br />
our website for information and tips on<br />
getting the most from your appliance.<br />
In Australia<br />
Visit www.sunbeam.com.au<br />
Or call 1300 881 861<br />
In New Zealand<br />
Visit www.sunbeam.co.nz<br />
Or call 0800 786 232<br />
is a registered trademark.<br />
‘Classic’ is a trademark of <strong>Sunbeam</strong> Corporation.<br />
Made in China.<br />
Due to minor changes in design or otherwise,<br />
the product may differ from the one shown in this leaflet.<br />
© Copyright. <strong>Sunbeam</strong> Corporation Limited 2005.<br />
ABN 45 000 006 771<br />
Units 5 & 6, 13 Lord Street<br />
Botany NSW 2019 Australia<br />
Unit 3, Building D<br />
26 Vestey Drive<br />
Mt Wellington Auckland<br />
New Zealand<br />
<strong>Sunbeam</strong> Corporation is a division of GUD Holdings Ltd. 8/11


