Create successful ePaper yourself
Turn your PDF publications into a flip-book with our unique Google optimized e-Paper software.
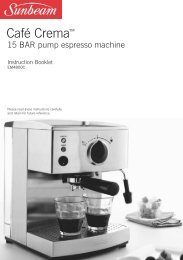
Functions of your <strong>Piccolo</strong> Espresso ® (continued)<br />
Important: For best results when making<br />
consecutive cups of espresso we recommend<br />
that you flush a small amount of water<br />
through the machine after each use. With<br />
the filter handle removed from the brewing<br />
head simply turn the operating dial to the<br />
espresso ( ) setting (17) and allow the water<br />
to run through. Once you have a consistent<br />
flow of water, return the operating dial to the<br />
stand-by ( )<br />
position. This will wash out any old or used<br />
coffee grinds stuck to the underside of the<br />
brewing head while also ensuring the correct<br />
water temperature for your next shot of<br />
espresso.<br />
Note: Do not leave the filter handle locked<br />
in position for extended periods, or when<br />
machine is not in use. This shortens the life<br />
of the brew head rubber seal.<br />
2. STEAM FUNCTION<br />
Note: We recommend that you prepare the<br />
espresso first, then steam the milk.<br />
• Fill the water reservoir (1) (2) (3) (4) (5)<br />
with cold water.<br />
• Turn the <strong>Piccolo</strong> Espresso ® ‘On’. Wait<br />
for the steam/espresso indicator light to<br />
illuminate green. Turn the steam wand into<br />
the espresso machine drip tray (19).<br />
• Pour cold milk into a stainless steel<br />
frothing jug to no more than ¹/ ³<br />
full.<br />
Note: For best results we recommend to use<br />
refrigerated milk and a stainless steel jug<br />
that is chilled.<br />
• Turn the steam/espresso dial to the steam<br />
( ) setting and allow the steam wand to<br />
purge for 5 seconds into the drip tray.<br />
• Return the operating dial to the stand-by<br />
( ) position, swing the steam wand to the<br />
side of the machine and place milk jug<br />
with milk under the steam wand (20).<br />
Caution: The steam wand will be hot. Use<br />
a cloth to move the steam wand back into<br />
position.<br />
• Turn the operating dial to the steam ( )<br />
setting. The steam/espresso indicator light<br />
may turn off, however will illuminate green<br />
again after a short time.<br />
• Ensure the tip of the steam wand is just<br />
below the surface of the milk as you are<br />
frothing the milk.<br />
Important: Do not allow the tip of the<br />
steam arm to touch the bottom of the<br />
container because this could obstruct the<br />
passage of the steam.<br />
• Position the tip of steam arm to one side<br />
of the jug to create a whirlpool motion in<br />
the milk. As the milk begins to rise in the<br />
jug, follow the level of milk, always keeping<br />
the tip of the steam arm just below the<br />
surface.<br />
• Cease steaming when the frothing jug<br />
becomes too hot to continue holding the<br />
palm of your hand against the side. Simply<br />
turn the operating dial to the stand-by ( )<br />
position and remove the jug.<br />
Note: Do not boil the milk.<br />
• Pour the textured milk into your espresso<br />
as soon as possible.<br />
13