Grand Theft Auto 4: The Lost and Damned ... - SuperCheats.com
Grand Theft Auto 4: The Lost and Damned ... - SuperCheats.com
Grand Theft Auto 4: The Lost and Damned ... - SuperCheats.com

You also want an ePaper? Increase the reach of your titles
YUMPU automatically turns print PDFs into web optimized ePapers that Google loves.
<strong>SuperCheats</strong>.<strong>com</strong> Unoffical <strong>Gr<strong>and</strong></strong> <strong><strong>The</strong>ft</strong> <strong>Auto</strong> 4: <strong>The</strong> <strong>Lost</strong> <strong>and</strong> <strong>Damned</strong> Guide<br />
http://www.supercheats.<strong>com</strong>/guides/gr<strong>and</strong>-theft-auto-4:-the-lost-<strong>and</strong>-dam<br />
ned<br />
Check back for updates, videos <strong>and</strong> <strong>com</strong>ments for this guide.<br />
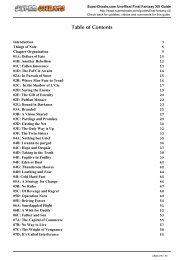
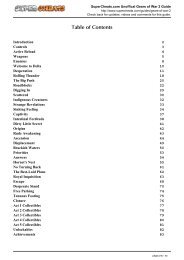
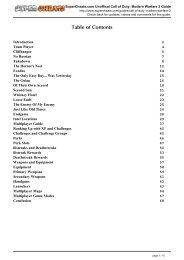
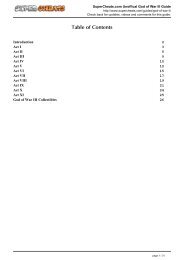
Table of Contents<br />
Introduction 2<br />
About <strong>The</strong> <strong>Lost</strong> <strong>and</strong> <strong>Damned</strong> 3<br />
<strong>The</strong> Brothers 4<br />
Billy's Missions 5<br />
Jim's Missions 12<br />
Elizabeta’s Missions 18<br />
Stubb's Missions 20<br />
Ashley's Missions 22<br />
Ray's Missions 23<br />
Finale 25<br />
Side Missions 26<br />
Stubbs' Optional Jobs 27<br />
Mini-games 29<br />
R<strong>and</strong>om Characters 30<br />
100% Completion Requirements 31<br />
Multiplayer Modes 32<br />
Cheats 33<br />
Xbox 360 Achievements 34<br />
Videos 35<br />
More on <strong>SuperCheats</strong> 36<br />
GTA 4 Guide 37<br />
page 1 / 38
<strong>SuperCheats</strong>.<strong>com</strong> Unoffical <strong>Gr<strong>and</strong></strong> <strong><strong>The</strong>ft</strong> <strong>Auto</strong> 4: <strong>The</strong> <strong>Lost</strong> <strong>and</strong> <strong>Damned</strong> Guide<br />
http://www.supercheats.<strong>com</strong>/guides/gr<strong>and</strong>-theft-auto-4:-the-lost-<strong>and</strong>-dam<br />
ned<br />
Check back for updates, videos <strong>and</strong> <strong>com</strong>ments for this guide.<br />
<strong>SuperCheats</strong>.<strong>com</strong>'s Unoffical Guide to<br />
<strong>Gr<strong>and</strong></strong> <strong><strong>The</strong>ft</strong> <strong>Auto</strong> 4: <strong>The</strong> <strong>Lost</strong> <strong>and</strong> <strong>Damned</strong><br />
by Michael Monette<br />
This is an unofficial game guide for <strong>Gr<strong>and</strong></strong> <strong><strong>The</strong>ft</strong> <strong>Auto</strong> 4: <strong>The</strong> <strong>Lost</strong> <strong>and</strong> <strong>Damned</strong>, it is not official, or endorsed by or connected to the game developer or publisher. All<br />
characters, locations, images <strong>and</strong> video game content are copyright to their respective owners. Any trademarks displayed in the guides are exclusive property of their<br />
respective owners. Images <strong>and</strong> videos used in this game guide have only been inserted to illustrate our words more effectively.<br />
This guide may be not be reproduced under any circumstances except for personal, private use. It may not be placed on any web site or otherwise distributed publicly without<br />
advance written permission. Use of this guide on any other web site or as a part of any public display is strictly prohibited, <strong>and</strong> a violation of copyright.<br />
page 2 / 38
<strong>SuperCheats</strong>.<strong>com</strong> Unoffical <strong>Gr<strong>and</strong></strong> <strong><strong>The</strong>ft</strong> <strong>Auto</strong> 4: <strong>The</strong> <strong>Lost</strong> <strong>and</strong> <strong>Damned</strong> Guide<br />
http://www.supercheats.<strong>com</strong>/guides/gr<strong>and</strong>-theft-auto-4:-the-lost-<strong>and</strong>-dam<br />
ned<br />
Check back for updates, videos <strong>and</strong> <strong>com</strong>ments for this guide.<br />
SuperCheat.<strong>com</strong> Unofficial Guide to GTA 4: <strong>The</strong> <strong>Lost</strong> <strong>and</strong> <strong>Damned</strong><br />
<strong>The</strong> <strong>Lost</strong> <strong>and</strong> <strong>Damned</strong> is the first of two planned episodic expansion packs for the Xbox 360 version of <strong>Gr<strong>and</strong></strong> <strong><strong>The</strong>ft</strong><br />
<strong>Auto</strong> IV. <strong>The</strong> expansion pack offers a bevy of new features, including a new story arc played from the perspective of<br />
Johnny Klebitz, a veteran member of <strong>The</strong> <strong>Lost</strong> Motorcycle Club.<br />
If you were not a fan of the st<strong>and</strong>-alone game, <strong>The</strong> <strong>Lost</strong> <strong>and</strong> <strong>Damned</strong> is unlikely to change your opinion, but for fans<br />
of <strong>Gr<strong>and</strong></strong> <strong><strong>The</strong>ft</strong> <strong>Auto</strong> IV, this content offers a worthwhile experience.<br />
This guide contains a <strong>com</strong>plete walkthrough of Johnny’s storyline, as well as information on every side mission,<br />
mini-game, r<strong>and</strong>om character, <strong>and</strong> new multiplayer mode.<br />
page 3 / 38
GTA 4: <strong>The</strong> <strong>Lost</strong> <strong>and</strong> <strong>Damned</strong> Guide<br />
<strong>SuperCheats</strong>.<strong>com</strong> Unoffical <strong>Gr<strong>and</strong></strong> <strong><strong>The</strong>ft</strong> <strong>Auto</strong> 4: <strong>The</strong> <strong>Lost</strong> <strong>and</strong> <strong>Damned</strong> Guide<br />
http://www.supercheats.<strong>com</strong>/guides/gr<strong>and</strong>-theft-auto-4:-the-lost-<strong>and</strong>-dam<br />
ned<br />
Check back for updates, videos <strong>and</strong> <strong>com</strong>ments for this guide.<br />
About <strong>The</strong> <strong>Lost</strong> <strong>and</strong> <strong>Damned</strong><br />
<strong>The</strong> <strong>Lost</strong> <strong>and</strong> <strong>Damned</strong> is a downloadable expansion of sorts for <strong>Gr<strong>and</strong></strong> <strong><strong>The</strong>ft</strong> <strong>Auto</strong> IV, available exclusively on the<br />
Xbox LIVE Marketplace.<br />
If you’re wondering why this content is Xbox 360 exclusive, here’s why in a nutshell: Take-Two Interactive, the<br />
game’s publisher, offered additional downloadable content to both Sony <strong>and</strong> Microsoft, for a price. Microsoft paid a<br />
reported $50-million for two episodic expansion packs, while Sony passed. <strong>The</strong>refore unfortunately, only those with<br />
an Xbox 360 <strong>and</strong> the Xbox 360 version of <strong>Gr<strong>and</strong></strong> <strong><strong>The</strong>ft</strong> <strong>Auto</strong> IV can experience <strong>The</strong> <strong>Lost</strong> <strong>and</strong> <strong>Damned</strong>.<br />
As of this writing, <strong>The</strong> <strong>Lost</strong> <strong>and</strong> <strong>Damned</strong> is available for download on the Xbox 360 marketplace for 1600 Microsoft<br />
Points, which equates to roughly $20 USD. <strong>The</strong> content requires 1.78 GB of free HDD space.<br />
After downloading the content, make sure you remain connected to Xbox Live <strong>and</strong> download the latest update for<br />
<strong>Gr<strong>and</strong></strong> <strong><strong>The</strong>ft</strong> <strong>Auto</strong> IV. To switch from <strong>Gr<strong>and</strong></strong> <strong><strong>The</strong>ft</strong> <strong>Auto</strong> IV to <strong>The</strong> <strong>Lost</strong> <strong>and</strong> <strong>Damned</strong>, select “New Game” under the<br />
“Game” section of the pause menu, <strong>and</strong> then select “<strong>The</strong> <strong>Lost</strong> <strong>and</strong> <strong>Damned</strong>.”<br />
<strong>The</strong> <strong>Lost</strong> <strong>and</strong> <strong>Damned</strong> downloadable content includes the following:<br />
*23 new missions, played from the perspective of Johnny Klebitz, co-leader of <strong>The</strong> <strong>Lost</strong> Motorcycle Club.<br />
*New side missions <strong>and</strong> mini-games.<br />
*Six new weapons: the Grenade Launcher, Assault Shotgun, <strong>Auto</strong>matic 9mm Pistol, Sawed-off Shotgun, Pipe Bomb,<br />
<strong>and</strong> the Pool Cue melee weapon.<br />
*A collection of new bikes: the Diabolus, Hexer, Lycan, Hellfury, Innovation, Revenant, Wayfarer, Daemon,<br />
Wolfsbane, Angel, Nightblade, Double T, Double T Custom, Hakuchou, Hakuchou Custom, Bati 800, <strong>and</strong> the Bati<br />
Custom.<br />
*Three new vehicles: the Towtruck, Gang Burrito, <strong>and</strong> Slamvan.<br />
*Six new multiplayer modes: Chopper vs. Chopper, Club Business, Lone Wolf Biker, Own the City, Motorcycle<br />
Races, <strong>and</strong> Witness Protection<br />
*Over 50 new tracks added to the L.C.H.C., Liberty Rock Radio, Beat 102.7, <strong>and</strong> Radio Broker radio stations.<br />
*Additional TV <strong>and</strong> internet content.<br />
*Five new achievements worth 250 gamer points.<br />
page 4 / 38
GTA 4: <strong>The</strong> <strong>Lost</strong> <strong>and</strong> <strong>Damned</strong> Guide<br />
<strong>The</strong> Brothers<br />
<strong>SuperCheats</strong>.<strong>com</strong> Unoffical <strong>Gr<strong>and</strong></strong> <strong><strong>The</strong>ft</strong> <strong>Auto</strong> 4: <strong>The</strong> <strong>Lost</strong> <strong>and</strong> <strong>Damned</strong> Guide<br />
http://www.supercheats.<strong>com</strong>/guides/gr<strong>and</strong>-theft-auto-4:-the-lost-<strong>and</strong>-dam<br />
ned<br />
Check back for updates, videos <strong>and</strong> <strong>com</strong>ments for this guide.<br />
Being a high-ranking member of <strong>The</strong> <strong>Lost</strong> Motorcycle Club has its perks. Several of Johnny’s friends offer services<br />
which appear as an option in their respective Phonebook menu.<br />
Clay’s Bike Garage: If Clay is available, you can have him drive over a bike to your current location. Select “Bikes”<br />
from Clay’s phonebook menu <strong>and</strong> then choose one of the bikes from the list. As you progress through the storyline,<br />
more bikes will be added to the list.<br />
Terry’s Gun Van: Select “Gun Van” from Terry’s phonebook menu <strong>and</strong> if he is available, Terry will drive his van out<br />
to a nearby location that is then marked on the radar. You can purchase weapons <strong>and</strong> armour from Terry at a<br />
reduced price by traveling to this location.<br />
Jim’s Guns: From Jim’s phonebook menu, select “Weapons” <strong>and</strong> then choose one of the weapons from the list to<br />
have him deliver that weapon to <strong>The</strong> <strong>Lost</strong> clubhouse. Once you’ve spoken to him, you can find the weapon on a<br />
table in the arm-wrestling room on the second floor of the clubhouse.<br />
Backup: Call either Clay or Terry for backup <strong>and</strong> if they are available, both of them will drive to your current<br />
location to aid you. <strong>The</strong>y both have a motorcycle of their own, <strong>and</strong> will follow you until the end of the mission, or if<br />
they sustain too much damage. During certain missions, calling Clay or Terry for backup can be of great benefit.<br />
page 5 / 38
GTA 4: <strong>The</strong> <strong>Lost</strong> <strong>and</strong> <strong>Damned</strong> Guide<br />
Billy's Missions<br />
<strong>SuperCheats</strong>.<strong>com</strong> Unoffical <strong>Gr<strong>and</strong></strong> <strong><strong>The</strong>ft</strong> <strong>Auto</strong> 4: <strong>The</strong> <strong>Lost</strong> <strong>and</strong> <strong>Damned</strong> Guide<br />
http://www.supercheats.<strong>com</strong>/guides/gr<strong>and</strong>-theft-auto-4:-the-lost-<strong>and</strong>-dam<br />
ned<br />
Check back for updates, videos <strong>and</strong> <strong>com</strong>ments for this guide.<br />
Mission 1: Clean <strong>and</strong> Serene<br />
Follow the marked route on the GPS to <strong>The</strong> <strong>Lost</strong> clubhouse. Stick close to the gang on the way there to hear their<br />
chatter. When you reach the spot, hit the yellow marker to trigger a cutscene.<br />
Your first task is to retrieve Billy’s bike from the chop shop in Bohan. Make your way to the chop shop <strong>and</strong> hit the<br />
yellow marker outside to trigger another cutscene. Unfortunately, Billy’s bike has long since changed h<strong>and</strong>s, <strong>and</strong> is<br />
currently in the possession of a rival gang, known as the Angels of Death. <strong>The</strong>ir hangout is located in Northwood,<br />
Algonquin. So start towards there.<br />
When you reach the place, a number of red markers will appear on the GPS. <strong>The</strong>se markers denote enemies, <strong>and</strong><br />
there are about eight of them. Fortunately you aren’t flying solo, so clearing the place <strong>and</strong> procuring Billy’s bike is<br />
not an overly difficult task. You’re armed with only a Sawed-off Shotgun, so you’ll have to get fairly close to your<br />
target to do any real damage. <strong>The</strong>re are a couple of wrecked cars at the top of the area that can be used as cover.<br />
<strong>The</strong>re are also several explosive barrels scattered about, so take advantage if an unwitting enemy decides to seek<br />
cover by one.<br />
page 6 / 38
<strong>SuperCheats</strong>.<strong>com</strong> Unoffical <strong>Gr<strong>and</strong></strong> <strong><strong>The</strong>ft</strong> <strong>Auto</strong> 4: <strong>The</strong> <strong>Lost</strong> <strong>and</strong> <strong>Damned</strong> Guide<br />
http://www.supercheats.<strong>com</strong>/guides/gr<strong>and</strong>-theft-auto-4:-the-lost-<strong>and</strong>-dam<br />
ned<br />
Check back for updates, videos <strong>and</strong> <strong>com</strong>ments for this guide.<br />
Once the Angels of Death have been dealt with <strong>and</strong> Billy has his bike, hop on your own bike <strong>and</strong> trail after him.<br />
While Billy is leading the gang, periodically a gang badge will appear on the road in the middle of the formation. If<br />
you keep in the badge for a short while, you’ll gain some health back <strong>and</strong> have your bike repaired. Follow Billy <strong>and</strong><br />
the gang back to <strong>The</strong> <strong>Lost</strong> clubhouse to <strong>com</strong>plete the mission.<br />
Mission 2: Angels in America<br />
You’re tasked with taking out some fleeing Angels of Death members. You have gang support here, but your allies<br />
tend to be more of a hindrance than a help, so it’s essentially up to you. Armed with a Sawed-off Shotgun, drive up<br />
behind a fleeing biker <strong>and</strong> use LB <strong>and</strong> the Right Thumbstick to send him to the asphalt. Be sure to take out the driver,<br />
as well as the passenger.<br />
<strong>The</strong>re are six bikes total to pursue; try to take as many of them out as possible before they reach the end of the line. If<br />
you take too much time in stopping the enemy bikers, you’ll have to face the remaining Angels of Death outside of<br />
their clubhouse in Middle Park, without any support from your allies.<br />
page 7 / 38
<strong>SuperCheats</strong>.<strong>com</strong> Unoffical <strong>Gr<strong>and</strong></strong> <strong><strong>The</strong>ft</strong> <strong>Auto</strong> 4: <strong>The</strong> <strong>Lost</strong> <strong>and</strong> <strong>Damned</strong> Guide<br />
http://www.supercheats.<strong>com</strong>/guides/gr<strong>and</strong>-theft-auto-4:-the-lost-<strong>and</strong>-dam<br />
ned<br />
Check back for updates, videos <strong>and</strong> <strong>com</strong>ments for this guide.<br />
When every one of the fleeing bikers has been taken care of, you’ll get a call from Billy, instructing you to meet with<br />
the gang in Northwood. Make your way to the meeting spot to <strong>com</strong>plete the mission.<br />
Mission 3: It’s War<br />
Something more suitable than a Sawed-off Shotgun will be necessary here. You can get a fully-loaded Micro-SMG<br />
by calling Jim. From Jim’s phonebook menu, select “Weapons” <strong>and</strong> then “Micro-SMG” to have him leave the weapon<br />
for you in <strong>The</strong> <strong>Lost</strong> clubhouse. Once you’ve spoken to him, you can find the weapon on a table in the arm-wrestling<br />
room on the second floor.<br />
A.O.D. members have been actively attacking members of <strong>The</strong> <strong>Lost</strong> MC, so you’re going to have to hit two of their<br />
<strong>com</strong>pounds to send a message. Follow Billy <strong>and</strong> the gang to the first spot, dismount, <strong>and</strong> then quickly grab some<br />
cover. <strong>The</strong>re are several large propane tanks scattered throughout the area, <strong>and</strong> shooting at one will eventually cause<br />
it to explode. Be wary of taking cover behind one of these tanks yourself, because even a single bullet will puncture<br />
the tank <strong>and</strong> send flames streaming out. Keep a safe distance from the propane tank before setting it off, hopefully<br />
taking out any enemies that happen to be within its blast radius.<br />
page 8 / 38
<strong>SuperCheats</strong>.<strong>com</strong> Unoffical <strong>Gr<strong>and</strong></strong> <strong><strong>The</strong>ft</strong> <strong>Auto</strong> 4: <strong>The</strong> <strong>Lost</strong> <strong>and</strong> <strong>Damned</strong> Guide<br />
http://www.supercheats.<strong>com</strong>/guides/gr<strong>and</strong>-theft-auto-4:-the-lost-<strong>and</strong>-dam<br />
ned<br />
Check back for updates, videos <strong>and</strong> <strong>com</strong>ments for this guide.<br />
<strong>The</strong>re are a couple of enemies on the rooftop as well; you’ll want to take these guys out first, since they can easily<br />
get a bead on you even while you’re behind cover. Check your radar for markers with an arrow pointing upward, as<br />
these denote enemies that are above. <strong>The</strong>re is plenty of cover to choose from in the field, so don’t st<strong>and</strong> out in the<br />
open. A health pack can be found by the trailer parked at the south end of the <strong>com</strong>pound.<br />
Once the first group of enemies have been taken care, return to your bike <strong>and</strong> follow Billy <strong>and</strong> the gang to the next<br />
<strong>com</strong>pound. <strong>The</strong>re are even more enemies here, <strong>and</strong> several of them have taken to the elevated pipeline. Take cover<br />
behind the red pipe piece by the entrance <strong>and</strong> start picking off the enemies visible in the distance. <strong>The</strong>re is a health<br />
pack near some rubble on the west side of the road. Some Body Armor can be found in the small building along the<br />
west side of the stone wall, however there are likely enemies hiding inside, so leave it alone until the area is clear.<br />
page 9 / 38
<strong>SuperCheats</strong>.<strong>com</strong> Unoffical <strong>Gr<strong>and</strong></strong> <strong><strong>The</strong>ft</strong> <strong>Auto</strong> 4: <strong>The</strong> <strong>Lost</strong> <strong>and</strong> <strong>Damned</strong> Guide<br />
http://www.supercheats.<strong>com</strong>/guides/gr<strong>and</strong>-theft-auto-4:-the-lost-<strong>and</strong>-dam<br />
ned<br />
Check back for updates, videos <strong>and</strong> <strong>com</strong>ments for this guide.<br />
When the enemies at the front of the <strong>com</strong>pound has been dealt with, move around to the back. A couple of vans<br />
will soon drive up <strong>and</strong> park nearby; they should park right by an explosive barrel, so set it off as soon as the enemy<br />
gang members step out. Throughout the battle, keep an eye on your GPS for any enemies that have migrated to the<br />
pipeline. When each <strong>and</strong> every marked enemy has been taken care of, scour the battlefield for ammo, <strong>and</strong> grab the<br />
Body Armor in the small building where <strong>The</strong> <strong>Lost</strong> gang parked their bikes. When you’re ready to move on, approach<br />
Johnny’s Hexer to <strong>com</strong>plete the mission.<br />
Mission 4: Action/Reaction<br />
It’s time to take this fight straight to the A.O.D. clubhouse. Follow Billy <strong>and</strong> the gang until a marked route appears on<br />
the GPS, <strong>and</strong> then race for the clubhouse in Middle Park. When you reach the place, you’re h<strong>and</strong>ed a Grenade<br />
Launcher <strong>and</strong> instructed to launch a grenade through the second-floor window. Enter Free Aim by holding LT <strong>and</strong><br />
aim slightly higher than your target. Aim just below the top of the window frame <strong>and</strong> the grenade should make it<br />
through.<br />
Immediately after the grenade goes off, a drove of enemies will funnel out of the clubhouse <strong>and</strong> into the street. Keep<br />
your head down <strong>and</strong> launch a grenade or two into a cluster of enemies. <strong>The</strong>se grenades take a bit of time to go off,<br />
which unfortunately affords your adversaries plenty of time to scatter. Nevertheless, the grenades can quickly destroy<br />
the parked van by the alleyway, likely taking out a number of enemies in the explosion. Stay behind the barrier <strong>and</strong><br />
pick off the marked enemies until their spawning ceases.<br />
page 10 / 38
<strong>SuperCheats</strong>.<strong>com</strong> Unoffical <strong>Gr<strong>and</strong></strong> <strong><strong>The</strong>ft</strong> <strong>Auto</strong> 4: <strong>The</strong> <strong>Lost</strong> <strong>and</strong> <strong>Damned</strong> Guide<br />
http://www.supercheats.<strong>com</strong>/guides/gr<strong>and</strong>-theft-auto-4:-the-lost-<strong>and</strong>-dam<br />
ned<br />
Check back for updates, videos <strong>and</strong> <strong>com</strong>ments for this guide.<br />
<strong>The</strong> next step is to enter the clubhouse. Follow Billy through the front entrance <strong>and</strong> take cover by the door at the end<br />
of the hall. Blast the enemies that are visible in the bar, <strong>and</strong> then move in <strong>and</strong> take cover behind the counter. An<br />
enemy armed with a Sawed-off Shotgun sits behind the bar, so quickly blast to avoid taking a hard hit. Grab the<br />
health kit behind the counter if necessary, <strong>and</strong> remain then remain behind the counter <strong>and</strong> pick off any enemies that<br />
enter from the next room.<br />
When the bar is clear, follow Billy downstairs <strong>and</strong> take out the guys there. After the cutscene, head back outside,<br />
hop on the Hexer, <strong>and</strong> clear the area before the cops arrive to <strong>com</strong>plete the mission.<br />
Mission 5: This Shit’s Cursed<br />
Complete “Off Route” in Stubbs’ mission line to trigger this mission. While following Billy <strong>and</strong> the gang, get in<br />
formation as often as the gang badge appears, because you’ll need the extra health <strong>and</strong> armour for the firefight to<br />
<strong>com</strong>e.<br />
When you reach the marker, a couple of cutscenes will ensue. After the second cutscene, as soon as you gain<br />
control over Johnny, grab some cover behind the nearby generator. <strong>The</strong>re are two Triads on the walkway, <strong>and</strong> one<br />
on the roof. Concentrate on taking out the two guys nearest to the generator first, however. Keep to the left end of the<br />
generator <strong>and</strong> blast them before they can get too close.<br />
page 11 / 38
<strong>SuperCheats</strong>.<strong>com</strong> Unoffical <strong>Gr<strong>and</strong></strong> <strong><strong>The</strong>ft</strong> <strong>Auto</strong> 4: <strong>The</strong> <strong>Lost</strong> <strong>and</strong> <strong>Damned</strong> Guide<br />
http://www.supercheats.<strong>com</strong>/guides/gr<strong>and</strong>-theft-auto-4:-the-lost-<strong>and</strong>-dam<br />
ned<br />
Check back for updates, videos <strong>and</strong> <strong>com</strong>ments for this guide.<br />
Pick off the Triads up above, <strong>and</strong> then help Jim take out the remaining enemies at the other end of the roof.<br />
Afterwards, start following Jim around the side of the building. Keep an eye on your radar, because a couple of<br />
enemies will slide in as you near the corner. You’ll eventually <strong>com</strong>e to an open room. This room is, of course, full of<br />
enemies, so don’t rush in there. Stay outside <strong>and</strong> eliminate as many of them as you can see, <strong>and</strong> then slowly move<br />
forward <strong>and</strong> take out those that were out of view. A health kit can be found at the end of the walkway, so once the<br />
room is clear, be sure to collect it before moving on.<br />
Your next task is to make it back to street level. You’ll meet more enemies along the way, but luckily you’ll have a<br />
height advantage this time. Before climbing down one of the ladders, be sure to clear the enemies on the floor below<br />
from up above. Once you’ve made your way to the second floor, a cutscene will ensue.<br />
After the cutscene, return to the parked Hexer, hop on, <strong>and</strong> lead the gang back to <strong>The</strong> <strong>Lost</strong> clubhouse to <strong>com</strong>plete<br />
the mission.<br />
page 12 / 38
GTA 4: <strong>The</strong> <strong>Lost</strong> <strong>and</strong> <strong>Damned</strong> Guide<br />
Jim’s Missions<br />
<strong>SuperCheats</strong>.<strong>com</strong> Unoffical <strong>Gr<strong>and</strong></strong> <strong><strong>The</strong>ft</strong> <strong>Auto</strong> 4: <strong>The</strong> <strong>Lost</strong> <strong>and</strong> <strong>Damned</strong> Guide<br />
http://www.supercheats.<strong>com</strong>/guides/gr<strong>and</strong>-theft-auto-4:-the-lost-<strong>and</strong>-dam<br />
ned<br />
Check back for updates, videos <strong>and</strong> <strong>com</strong>ments for this guide.<br />
You’ll get a call from Jim after <strong>com</strong>pleting “Serene <strong>and</strong> Clean” in Billy’s mission line. He wants you to meet him in<br />
Acter; just a short ways from <strong>The</strong> <strong>Lost</strong> clubhouse. Make your way to Jim’s location <strong>and</strong> hit the marker there to get<br />
started.<br />
Mission 1: Liberty City Choppers<br />
<strong>The</strong> truck is in Alderney City, so follow the marked route on your radar. When you reach the truck, dismount <strong>and</strong> get<br />
in the driver’s seat. You’re headed for a diner in Tudor, where you’ll be seizing some A.O.D. bikes. Drive the trunk<br />
into the marker in the diner parking lot to begin.<br />
<strong>The</strong>re are five bikes parked in the lot. A ramp has been affixed to the back of truck, allowing you load the bikes into<br />
the back. Get on the first bike <strong>and</strong> drive it up onto the back of the truck. A group of enemies will <strong>com</strong>e out of the<br />
diner as soon as the first bike has been taken. Bring up your cell phone <strong>and</strong> call either Terry or Clay for backup. A<br />
good spot to sit is on the road along the west-end of the parking lot. From there, you have a full view of the enemies<br />
around the diner.<br />
Once the enemies have been dealt with, continue loading the bikes onto the back of the truck. Load four bikes onto<br />
page 13 / 38
<strong>SuperCheats</strong>.<strong>com</strong> Unoffical <strong>Gr<strong>and</strong></strong> <strong><strong>The</strong>ft</strong> <strong>Auto</strong> 4: <strong>The</strong> <strong>Lost</strong> <strong>and</strong> <strong>Damned</strong> Guide<br />
http://www.supercheats.<strong>com</strong>/guides/gr<strong>and</strong>-theft-auto-4:-the-lost-<strong>and</strong>-dam<br />
ned<br />
Check back for updates, videos <strong>and</strong> <strong>com</strong>ments for this guide.<br />
the truck, then get in <strong>and</strong> pull out of the parking lot. Some more gang members will start tailing you here, but don’t<br />
bother trying to fight them off. Just speed to Jim’s the drop-off point. Drive the truck into the marker to <strong>com</strong>plete the<br />
mission.<br />
Mission 2: Bad Cop Drop<br />
Race Jim to the marker outside of the police station to trigger a cutscene. After the cutscene, start toward the yellow<br />
marker on your radar. You have to lure the crooked cops to an ambush spot, so don’t ride too fast, otherwise they’ll<br />
lose sight of you. When you reach the spot, get ready for a fight. Drive to two stacks of oblong boxes at the back of<br />
the area <strong>and</strong> take cover there.<br />
<strong>The</strong> two cops that were pursuing you call in backup, <strong>and</strong> a lot of backup at that. Luckily there are some conveniently<br />
placed explosive barrels that the cops tend to huddle around. If you take advantage of these barrels, surviving here<br />
shouldn’t be overly difficult. If you’re taking cover behind one of the stacks of boxes, you should be able to spot a<br />
pair of explosive barrels out in the open further ahead. Blast one of these until it goes off, hopefully clearing out<br />
some of the enemies. Take out as many of the enemies as you can from your current shelter <strong>and</strong> then move over to<br />
the west side of the south-most building.<br />
If you peek around the corner here, you should be able to spot another pair of explosive barrels. Set these off to wipe<br />
out more enemies. Your best bet afterwards is to run around to the other side of this building, <strong>and</strong> hit the remaining<br />
enemies from behind. Take cover behind the base of the post at the west end of the area, <strong>and</strong> pick off as many of the<br />
page 14 / 38
<strong>SuperCheats</strong>.<strong>com</strong> Unoffical <strong>Gr<strong>and</strong></strong> <strong><strong>The</strong>ft</strong> <strong>Auto</strong> 4: <strong>The</strong> <strong>Lost</strong> <strong>and</strong> <strong>Damned</strong> Guide<br />
http://www.supercheats.<strong>com</strong>/guides/gr<strong>and</strong>-theft-auto-4:-the-lost-<strong>and</strong>-dam<br />
ned<br />
Check back for updates, videos <strong>and</strong> <strong>com</strong>ments for this guide.<br />
enemies as you can from there. Crouch down <strong>and</strong> move up slowly if the remaining enemies are too far off to hit.<br />
Clear each <strong>and</strong> every one of the marked enemies on the GPS, <strong>and</strong> then get on your bike <strong>and</strong> shake the cops to<br />
<strong>com</strong>plete the mission.<br />
Mission 3: Hit the Pipe<br />
Sometime after <strong>com</strong>pleting “This Shit’s Cursed” in Billy’s mission line, you’ll get a call from Jim. You can then begin<br />
this mission. <strong>The</strong> starting point for this mission is in Northwood, Algonquin. Follow the “J” symbol on the GPS <strong>and</strong> hit<br />
the marker there to get started.<br />
You’re given a small supply of Pipe Bombs, which can be used to destroy the three Angel of Death vans that are<br />
driving around Alderney. Pipe bombs can be thrown while on a bike. When LB is pressed, Johnny will lob one of the<br />
Pipe Bombs to his left. <strong>The</strong> longer the LB button is held, the shorter the fuse, <strong>and</strong> the sooner the bomb will go off.<br />
Since it takes a moment for the bomb to go off, your best bet is to drive a bit ahead of the target while holding the LB<br />
button, release the LB button to lob the bomb in its path, <strong>and</strong> then speed past it. <strong>The</strong> Pipe Bombs have a decent blast<br />
radius, so you don’t have to have impeccable aim or timing to demolish one of the targets. Just be careful that you<br />
aren’t caught in the blast yourself.<br />
<strong>The</strong> goon in the passenger’s seat of each van will open fire as soon as you <strong>com</strong>e into view, so it might be best to take<br />
page 15 / 38
<strong>SuperCheats</strong>.<strong>com</strong> Unoffical <strong>Gr<strong>and</strong></strong> <strong><strong>The</strong>ft</strong> <strong>Auto</strong> 4: <strong>The</strong> <strong>Lost</strong> <strong>and</strong> <strong>Damned</strong> Guide<br />
http://www.supercheats.<strong>com</strong>/guides/gr<strong>and</strong>-theft-auto-4:-the-lost-<strong>and</strong>-dam<br />
ned<br />
Check back for updates, videos <strong>and</strong> <strong>com</strong>ments for this guide.<br />
out the vans as they’re <strong>com</strong>ing toward you. This way you won’t need to trail after them, <strong>and</strong> can avoid taking some<br />
damage. If you just drive on the side of the road opposite that the target vehicle is headed down, you can simply toss<br />
a live bomb in its path <strong>and</strong> continue on your way.<br />
One or more of the vans (most certainly the last) will have a number of escorts on motorcycles. Another motorcycle<br />
will spawn if manage to take one of the escorts out, so don’t bother. At this point it’s definitely best to hit the van as<br />
its <strong>com</strong>ing toward you, since the escorts always follow behind the van.<br />
It’s not imperative that you use the Pipe Bombs to destroy the vans; you can switch between weapons in your<br />
inventory while driving by pressing the X button. Furthermore, if you happen to have an RPG in your possession, it<br />
takes little effort to wait in a van’s path <strong>and</strong> send a rocket straight for it once it <strong>com</strong>es into view.<br />
Destroy all three vans to <strong>com</strong>plete the mission.<br />
Mission 4: End of Chapter<br />
Make your way to Port Tudor to meet with Brian. Hit the marker there to trigger a cutscene. After the cutscene,<br />
remain crouched behind the stack of boxes <strong>and</strong> start blasting the enemies as they drive by on their motorcycles.<br />
<strong>The</strong>y just continually circle the boxes in the middle of the dock, so stay behind cover until they’ve all been taken<br />
care of.<br />
If you have leftover Pipe Bombs from the previous mission, they’ll be useful here, however be sure to save a good<br />
number of them for later on in the fight, when several vans full of enemies show up. As per usual, there are a number<br />
of explosive barrels scattered about the battlefield. Use these to your advantage, but make sure that none of your<br />
allies are st<strong>and</strong>ing by before setting one off.<br />
page 16 / 38
<strong>SuperCheats</strong>.<strong>com</strong> Unoffical <strong>Gr<strong>and</strong></strong> <strong><strong>The</strong>ft</strong> <strong>Auto</strong> 4: <strong>The</strong> <strong>Lost</strong> <strong>and</strong> <strong>Damned</strong> Guide<br />
http://www.supercheats.<strong>com</strong>/guides/gr<strong>and</strong>-theft-auto-4:-the-lost-<strong>and</strong>-dam<br />
ned<br />
Check back for updates, videos <strong>and</strong> <strong>com</strong>ments for this guide.<br />
Once the first batch of enemies have been dealt with, move up to one of the pieces of cover further ahead. A van full<br />
of enemies will eventually appear, so throw a Pipe Bomb next to it if you have one h<strong>and</strong>y. A couple more vans will<br />
appear soon after, so be ready with an explosive. A pair of bikers will then enter the fray, so have a Sawed-off<br />
Shotgun or similar weapon out so you can quickly knock them off their bikes.<br />
<strong>The</strong> last wave of enemies <strong>com</strong>es from the south; there’s a large propane tank by the fence that they scale, so set it off<br />
with gunfire when they appear.<br />
Afterwards, you’re tasked with taking out the remainder of Brian’s faction. <strong>The</strong>se guys promptly take off on<br />
motorcycles, so you’ll have to go after them. Trail after the enemy bikers <strong>and</strong> send them to the asphalt. Once the<br />
stragglers have been dealt with, regroup with Jim to <strong>com</strong>plete the mission.<br />
Mission 5: Bad St<strong>and</strong>ing<br />
Brian’s safehouse is located in Tudor, so make your way over there <strong>and</strong> hit the marker outside to trigger a cutscene.<br />
<strong>The</strong> safehouse is heavily guarded, so phone Clay or Terry for backup before heading in. When Terry <strong>and</strong> Clay arrive,<br />
they’ll head to the back of the house <strong>and</strong> cover the rear exit. Once Terry <strong>and</strong> Clay are in position, st<strong>and</strong> in front of<br />
the safehouse <strong>and</strong> ready a Pipe Bomb. Aim the Pipe Bomb at the second floor, right-most window, <strong>and</strong> lob it<br />
through.<br />
As soon as the Pipe Bomb goes off, dash to the back of the house with a gun ready. <strong>The</strong>re’s a getaway bike waiting<br />
page 17 / 38
<strong>SuperCheats</strong>.<strong>com</strong> Unoffical <strong>Gr<strong>and</strong></strong> <strong><strong>The</strong>ft</strong> <strong>Auto</strong> 4: <strong>The</strong> <strong>Lost</strong> <strong>and</strong> <strong>Damned</strong> Guide<br />
http://www.supercheats.<strong>com</strong>/guides/gr<strong>and</strong>-theft-auto-4:-the-lost-<strong>and</strong>-dam<br />
ned<br />
Check back for updates, videos <strong>and</strong> <strong>com</strong>ments for this guide.<br />
for Brian behind the house, <strong>and</strong> if he’s able to escape, you’ll have to chase him through the streets. If you can kill<br />
Brian before he can escape, all you’ll have to do then is clear out the safehouse.<br />
<strong>The</strong>re is another way you can go about <strong>com</strong>pleting this mission: if you actually go inside of the house first, rather<br />
than using a Pipe Bomb to smoke Brian out, you can fight your way to Brian <strong>and</strong> have the option of killing or sparing<br />
him. If you spare him, he will later appear as a R<strong>and</strong>om Character. Note, however, that the mission associated with<br />
Brian’s r<strong>and</strong>om encounter does not count towards the 100% <strong>com</strong>pletion stat, so <strong>com</strong>pleting the mission as outlined<br />
above is probably your best bet.<br />
With this mission <strong>com</strong>plete, you can now stop by Brian’s old safehouse <strong>and</strong> save your game there.<br />
page 18 / 38
GTA 4: <strong>The</strong> <strong>Lost</strong> <strong>and</strong> <strong>Damned</strong> Guide<br />
Elizabeta’s Missions<br />
<strong>SuperCheats</strong>.<strong>com</strong> Unoffical <strong>Gr<strong>and</strong></strong> <strong><strong>The</strong>ft</strong> <strong>Auto</strong> 4: <strong>The</strong> <strong>Lost</strong> <strong>and</strong> <strong>Damned</strong> Guide<br />
http://www.supercheats.<strong>com</strong>/guides/gr<strong>and</strong>-theft-auto-4:-the-lost-<strong>and</strong>-dam<br />
ned<br />
Check back for updates, videos <strong>and</strong> <strong>com</strong>ments for this guide.<br />
After <strong>com</strong>pleting “Action/Reaction” in Billy’s mission line, you’ll receive a text message from Billy, instructing you to<br />
see a woman named Elizabeta in South Bohan. Follow the “E” symbol on the GPS <strong>and</strong> hit the yellow marker there to<br />
accept a mission from Elizabeta.<br />
Mission 1: Buyer’s Market<br />
Make sure you have a fully-loaded Micro-SMG before beginning this mission. From Jim’s phonebook menu, select<br />
“Weapons” <strong>and</strong> then “Micro-SMG” to have him leave the weapon for you in <strong>The</strong> <strong>Lost</strong> clubhouse. Once you’ve<br />
spoken to him, you can find the weapon on a table in the arm-wrestling room on the second floor.<br />
Follow the marked route to meet with Brian in Cerveza Heights, Broker. Once you have the package, head for the<br />
apartment in Schottler. <strong>The</strong> deal is going down on the third floor. A shotgun can be found leaning against the<br />
window across from the entrance, so swap it with your Sawed-off Shotgun or other weapon if you wish. Take the<br />
stairs up to the third floor <strong>and</strong> hit the marker by the window. Wait here for Niko <strong>and</strong> Playboy X.<br />
As your radar lets on, the place is now crawling with SWAT members. Keep behind cover <strong>and</strong> hit the officers in the<br />
room across from you. <strong>The</strong>re are more off to your right, so once you’ve dealt with all of those in the room ahead,<br />
move away from cover, enter Free Aim, <strong>and</strong> mow down every enemy in the hallway. Before leaving this room, be<br />
sure to grab the Body Armor through the doorway at the north end of the room. You’ll surely need it.<br />
Stay in Free Aim <strong>and</strong> start descending down the stairs. Mow down any SWAT member in your sight <strong>and</strong> keep<br />
moving until you’re back on the first floor. <strong>The</strong>re are cops waiting for you outside, since you’ve now amassed at least<br />
a three-star wanted level. To <strong>com</strong>plete the mission, you’ll have to escape from the cops. Nudge open the door <strong>and</strong><br />
clear away enough of the cops outside to give yourself some room to operate. When the way is relatively clear,<br />
make a beeline for one of the parked police cruisers, hop in, <strong>and</strong> tear out of there.<br />
Mission 2: Heavy Toll<br />
Complete “This Shit’s Cursed” in Billy’s mission line to unlock this mission.<br />
When you’re ready to set out, make your way to the toll both on Charge Isl<strong>and</strong> <strong>and</strong> hit the marker there. After the<br />
cutscene, lie in wait as the convoy draws near. You’re after the white van, so keep behind cover as the two cars in<br />
front of it pass through. When the van reaches the toll booth, wait until Malc draws his pistol before springing into<br />
action.<br />
You have a fantastic weapon in the Assault Shotgun. Use it to blast the goons that step out of the target vehicle, <strong>and</strong><br />
then quickly get in the driver’s seat. Since you’re under fire, drive a bit away from the mayhem <strong>and</strong> let Malc catch up<br />
on foot. With Malc in tow, shake the cops <strong>and</strong> start toward the lock-up in Chase Point. Drive the van into the<br />
lock-up to <strong>com</strong>plete the mission.<br />
Mission 3: Marta Full of Grace<br />
Make sure you have a suitable weapon before starting this mission. You can get a fully-loaded Micro-SMG from Jim.<br />
From Jim’s phonebook menu, select “Weapons” <strong>and</strong> then “Micro-SMG” to have him leave the weapon for you in <strong>The</strong><br />
<strong>Lost</strong> clubhouse. Before setting out, it might be a good idea to give Terry or Clay a call to have them <strong>com</strong>e along as<br />
backup.<br />
Once you’re all set, head to the Francis International Airport to meet with the drug mule. Hit the marker to trigger a<br />
page 19 / 38
<strong>SuperCheats</strong>.<strong>com</strong> Unoffical <strong>Gr<strong>and</strong></strong> <strong><strong>The</strong>ft</strong> <strong>Auto</strong> 4: <strong>The</strong> <strong>Lost</strong> <strong>and</strong> <strong>Damned</strong> Guide<br />
http://www.supercheats.<strong>com</strong>/guides/gr<strong>and</strong>-theft-auto-4:-the-lost-<strong>and</strong>-dam<br />
ned<br />
Check back for updates, videos <strong>and</strong> <strong>com</strong>ments for this guide.<br />
cutscene<br />
You have to get Marta out of there, however you first have to deal with the police force in front of the terminal<br />
building. A helicopter is flying overhead; if you acquired a fully-loaded SMG from Jim, use it to shoot down the<br />
copter from behind cover. It takes a considerable amount of gunfire to bring the helicopter down, however you<br />
should be fairly safe behind the cover you’ve been provided with. Luckily, the two-star wanted level ascribed to you<br />
won’t climb any higher until after the fight.<br />
Once every marked target on the GPS has been eliminated, regroup with Marta. You should now have a three-star<br />
wanted level, which means shaking the cops will be a bit more difficult since there are now helicopters flying<br />
overhead. Your best bet is to take Johnny’s Hexer; though it’s not as safe as a car, it’s much faster <strong>and</strong> can easily<br />
out-manoeuvre the police cruisers. Drive up to Marta, wait for her to hop on, <strong>and</strong> then take off. Just be extra careful<br />
not to crash.<br />
Lose the cops, <strong>and</strong> then take Marta to Elizabeta’s place in South Bohan to <strong>com</strong>plete the mission.<br />
Mission 4: Shifting Weight<br />
You definitely need Body Armor for this one. You can buy Body Armor from Terry. Just select “Gun Van” from Terry’s<br />
phonebook menu <strong>and</strong> then make your way to the “T” symbol that appears on your radar. You can purchase Body<br />
Armor <strong>and</strong> weapons from Terry for a reduced price.<br />
Before going to the deal, give Terry or Clay a call to have them along as backup. This is an entirely on-rails mission,<br />
so it’s your job to fend off the cops in hot pursuit. You’ve been outfitted with an Assault Shotgun that has unlimited<br />
ammo <strong>and</strong> never needs reloading. Just keep RT held down <strong>and</strong> pepper the police cruisers with bullets. Aim at the<br />
windshield, with the intent of killing the driver, or at the cruiser’s hood to disable it.<br />
At the start of the circuit, a helicopter will appear <strong>and</strong> begin flying alongside the bike. Immediately focus your<br />
attention upon downing this helicopter. It shouldn’t take much.<br />
Only police cruisers will pursue you during the next stretch. Keep an eye on the right side of the road for clusters of<br />
red gas tanks; blast them as your pursuers near to hopefully wipe them out, but be careful not to detonate them too<br />
soon. Eventually you’ll pass a gas station, which automatically explodes in a cinematic fashion as you whizz by.<br />
Immediately after the gas station, face forward because a pair of heavily-armed enemies will appear in the back of an<br />
armoured truck. Blast them before they can do too much damage.<br />
Shortly after, the police will have you cornered. Blast the windows of the nearby showroom <strong>and</strong> Malc will drive the<br />
bike through there. Sometime after, Malc will h<strong>and</strong> over some Pipe Bombs. Hold on to a Pipe Bomb for three or so<br />
seconds before letting it go. Once you’re out of the tunnel, an attack chopper appears overhead. Immediately start<br />
hitting it with gunfire. Shoot down the helicopter to <strong>com</strong>plete the mission.<br />
No worries about the Hexer; you can call Clay <strong>and</strong> have him deliver another bike to you. Select “Bikes” from Clay’s<br />
phonebook menu, <strong>and</strong> then choose the bike you want from the menu. He’ll deliver it right to you.<br />
page 20 / 38
GTA 4: <strong>The</strong> <strong>Lost</strong> <strong>and</strong> <strong>Damned</strong> Guide<br />
Stubb’s Missions<br />
<strong>SuperCheats</strong>.<strong>com</strong> Unoffical <strong>Gr<strong>and</strong></strong> <strong><strong>The</strong>ft</strong> <strong>Auto</strong> 4: <strong>The</strong> <strong>Lost</strong> <strong>and</strong> <strong>Damned</strong> Guide<br />
http://www.supercheats.<strong>com</strong>/guides/gr<strong>and</strong>-theft-auto-4:-the-lost-<strong>and</strong>-dam<br />
ned<br />
Check back for updates, videos <strong>and</strong> <strong>com</strong>ments for this guide.<br />
A marker pointing to Stubbs’ location will appear on your radar once you’ve <strong>com</strong>pleted “Buyer’s Market” in<br />
Elizabeta’s mission line. Follow the marker to Stubbs’ home in Middle Park, Algonquin <strong>and</strong> hit the yellow marker<br />
there to get started.<br />
Mission 1: Politics<br />
Tom Stubbs’ uncle is set to arrive at the Francis International Airport by helicopter in a short while. It’s your job to<br />
eliminate him so Stubbs can reap his fortunes. <strong>The</strong>re are a couple of ways you can go about <strong>com</strong>pleting this task.<br />
<strong>The</strong> easiest <strong>and</strong> quickest way to eliminate the target is to blast his helicopter just as it l<strong>and</strong>s. First, make your way to<br />
the gate by following the marked route on your radar. Don’t get to close to the gate, otherwise the guards will open<br />
fire. Just wait on the path to the gate until the target’s helicopter can be seen descending toward the helipad. At this<br />
point, drive to up to just a few paces short of the gate, dismount, switch to the RPG you’ve been provided with, <strong>and</strong><br />
enter Free Aim. Just when the helicopter makes contact with the helipad, send a rocket towards it. If done correctly,<br />
the helicopter should be destroyed, <strong>and</strong> the target eliminated.<br />
It should be noted that the guards will start firing at you, but the case is either a) they have horrible aim, or b) they<br />
are not all that interested in stopping you. Most of their shots will miss, <strong>and</strong> the rate at which they fire is pitiful. You’ll<br />
likely take minimal damage before you’re back on your bike on racing away from the scene.<br />
If the target manages to make it safely out of the helicopter <strong>and</strong> joins the convoy, you’ll have to trail after his car<br />
instead. This route is decidedly more difficult, since he’s being escorted by a couple of cars full of armed guards who<br />
open fire if you get too close. You may be able to use the RPG to take out the convoy, however you won’t be able to<br />
use the RPG Launcher while riding.<br />
Despite how you go about it, once the target is eliminated, all you must do then is escape the police to <strong>com</strong>plete the<br />
mission.<br />
Mission 2: Off Route<br />
Your job is to secure a bus full of prisoners <strong>and</strong> lead them to freedom. <strong>The</strong> prison transport bus is over in Leftwood,<br />
Alderney. When you reach the place, just vault over the barrier, head down the decline, <strong>and</strong> make a beeline for the<br />
prison bus. Gun down any officers st<strong>and</strong>ing in your path, <strong>and</strong> approach the driver’s side door. When you get close<br />
enough to the bus, a cutscene will begin, <strong>and</strong> you will have secured your spot in the driver’s seat.<br />
page 21 / 38
<strong>SuperCheats</strong>.<strong>com</strong> Unoffical <strong>Gr<strong>and</strong></strong> <strong><strong>The</strong>ft</strong> <strong>Auto</strong> 4: <strong>The</strong> <strong>Lost</strong> <strong>and</strong> <strong>Damned</strong> Guide<br />
http://www.supercheats.<strong>com</strong>/guides/gr<strong>and</strong>-theft-auto-4:-the-lost-<strong>and</strong>-dam<br />
ned<br />
Check back for updates, videos <strong>and</strong> <strong>com</strong>ments for this guide.<br />
Once you’re in the driver’s seat, you first must shake a three-star wanted level. Outrunning the police here can be<br />
difficult, since the bus moves rather slowly, <strong>and</strong> it can’t make sharp turns. On the upside, the bus is incredibly<br />
sturdy, <strong>and</strong> can barrel over smaller vehicles, including, most importantly, police cruisers. It might help to set a<br />
waypoint on your map somewhere far so you’ll have something to follow on your radar.<br />
When you’ve successfully evaded the police, drive the prison transport bus to the marker by the docks at the south<br />
end of Acter Industrial Park to <strong>com</strong>plete the mission.<br />
page 22 / 38
GTA 4: <strong>The</strong> <strong>Lost</strong> <strong>and</strong> <strong>Damned</strong> Guide<br />
Ashley's Missions<br />
Mission 1: Coming Down<br />
<strong>SuperCheats</strong>.<strong>com</strong> Unoffical <strong>Gr<strong>and</strong></strong> <strong><strong>The</strong>ft</strong> <strong>Auto</strong> 4: <strong>The</strong> <strong>Lost</strong> <strong>and</strong> <strong>Damned</strong> Guide<br />
http://www.supercheats.<strong>com</strong>/guides/gr<strong>and</strong>-theft-auto-4:-the-lost-<strong>and</strong>-dam<br />
ned<br />
Check back for updates, videos <strong>and</strong> <strong>com</strong>ments for this guide.<br />
You’ll get a call from Ashley at some point during the main storyline, after which this mission automatically starts.<br />
She’s in Northwood, Algonquin, <strong>and</strong> needs help. Hit the yellow marker outside of the apartment, dismount, <strong>and</strong><br />
enter the building.<br />
Ashley is in one of the rooms on the second floor, so find your way over to the stairs <strong>and</strong> take them up. She isn’t in<br />
the room at the top of the stairs, but in the enterable room around the corner. <strong>The</strong>re are several armed thugs inside,<br />
so crouch down, push open the door slightly, <strong>and</strong> gun down anyone in the hallway. <strong>The</strong> remaining thugs will likely<br />
take cover in one of the rooms along the hall, so shoot their arms as they fire at you to lure them out.<br />
When every marked enemy has been dealt with, head into the room at the end of the hall to find Ashley. With<br />
Ashley in your <strong>com</strong>pany, head back outside, hop on Johnny’s Hexer, <strong>and</strong> then take Ashley to her home in Berchem<br />
to <strong>com</strong>plete the mission.<br />
Mission 2: Roman’s Holiday<br />
This mission be<strong>com</strong>es available sometime after “Shifting Weight” in Elizabeta’s mission line. Follow the marker on<br />
the GPS to meet up with Malc in Northwood. Head to the gambling den in Schottler next. Hit the marker <strong>and</strong> wait a<br />
moment for Roman to appear. After the cutscene, start toward the warehouse in Bohan.<br />
At one point, Roman may get out of the car <strong>and</strong> stumble off in a pitiful attempt to escape. If this occurs, knock him<br />
over with a nudge from the front of your car, <strong>and</strong> then get out <strong>and</strong> point a gun at him to coax him back inside. Make<br />
your way to the warehouse in Bohan with Roman, <strong>and</strong> hit the marker there to <strong>com</strong>plete the mission.<br />
page 23 / 38
GTA 4: <strong>The</strong> <strong>Lost</strong> <strong>and</strong> <strong>Damned</strong> Guide<br />
Ray's Missions<br />
<strong>SuperCheats</strong>.<strong>com</strong> Unoffical <strong>Gr<strong>and</strong></strong> <strong><strong>The</strong>ft</strong> <strong>Auto</strong> 4: <strong>The</strong> <strong>Lost</strong> <strong>and</strong> <strong>Damned</strong> Guide<br />
http://www.supercheats.<strong>com</strong>/guides/gr<strong>and</strong>-theft-auto-4:-the-lost-<strong>and</strong>-dam<br />
ned<br />
Check back for updates, videos <strong>and</strong> <strong>com</strong>ments for this guide.<br />
You’ll get a call from Ashley sometime after the <strong>com</strong>pletion of “Shifting Weight” in Elizabeta’s mission line. She asks<br />
you to meet Ray in Little Italy, Algonquin. Follow the “RB” symbol on the GPS <strong>and</strong> hit the marker outside to get<br />
started.<br />
Mission 1: Diamonds in <strong>The</strong> Rough<br />
Make sure you have a fully-loaded Micro-SMG before starting this mission. From Jim’s phonebook menu, select<br />
“Weapons” <strong>and</strong> then “Micro-SMG” to have him leave the weapon for you in <strong>The</strong> <strong>Lost</strong> clubhouse. Once you’ve<br />
spoken to him, you can find the weapon on a table in the arm-wrestling room on the second floor.<br />
Meet up with <strong>The</strong> <strong>Lost</strong> gang members by the south bridge to Broker <strong>and</strong> make your way to the front of the pack.<br />
Lead the gang to the dock in East Wood <strong>and</strong> hit the marker there to trigger a cutscene. After the cutscene, start after<br />
that limo. To get the diamonds, you first must damage the limo enough to force the carrier to bail out. <strong>The</strong> gunners in<br />
the limo <strong>and</strong> the gunners in the car ac<strong>com</strong>panying the limo can make retrieving the diamonds fairly difficult.<br />
Work on taking out the support vehicle first, even if just the gunman. If you acquired a fully-loaded SMG from Jim,<br />
wrecking the limo shouldn’t be too difficult a task. Silence the gunman first, <strong>and</strong> then start hitting the limo with<br />
gunfire. If you can, get in front of the limo <strong>and</strong> take out the driver. When the diamond-carrier bails out, kill him <strong>and</strong><br />
pick up the bag of diamonds he drops.<br />
With the diamonds in your possession, stash them in the two trash bags marked on your GPS to <strong>com</strong>plete the<br />
mission.<br />
Mission 2: Collector’s Item<br />
You’ll get a call from Ray sometime after the <strong>com</strong>pletion of “Roman’s Holiday” in Ashley’s mission line. <strong>The</strong> mission<br />
<strong>com</strong>mences automatically after the call. <strong>The</strong> diamond deal is set to happen at the Libertonian museum in Middle<br />
Park, so make your way over there. When you reach the museum, head through the front door <strong>and</strong> climb up the<br />
steps. Be sure to grab the Body Armor on the table in the main exhibit hall. Follow the marker on your GPS to meet<br />
up with Niko.<br />
After the cutscene, stay behind cover <strong>and</strong> gun down the enemies along the walkway as they pop out. <strong>The</strong>re’s one<br />
live enemy along the walkway behind you, so take him out first. When the enemies closest to you have been dealt<br />
with, move to one of the pieces of cover further ahead. Keep moving up <strong>and</strong> killing the enemies as they pop out<br />
until you’re at the end of the walkway. <strong>The</strong>re’s a health pack attached to the wall before the next room, so be sure to<br />
grab it if necessary.<br />
Take out the two guys in this room, <strong>and</strong> then make your way down to the main exhibit hall. <strong>The</strong>re are likely a<br />
couple of live enemies here, but Niko has evidently taken care of the majority. If the enemies are at the other end of<br />
the hall, just ignore them. If you didn’t pick up the Body Armor on the desk on your way in, grab it now before<br />
continuing through the marked door.<br />
Have your gun ready, because an enemy will rush you in the next room. Once he’s been taken care of, continue to<br />
the exit, but don’t head through the door just yet. A large number of Ray’s goons are waiting for you outside, so<br />
you’re going to have to take it slow here. <strong>The</strong>re should be a car parked just over to the left of the door which you<br />
can take cover behind, but don’t step out of the museum yet. When the goons spot you, a number of them should<br />
<strong>com</strong>e right up to the door, so be ready to blast them as soon when they step through.<br />
page 24 / 38
<strong>SuperCheats</strong>.<strong>com</strong> Unoffical <strong>Gr<strong>and</strong></strong> <strong><strong>The</strong>ft</strong> <strong>Auto</strong> 4: <strong>The</strong> <strong>Lost</strong> <strong>and</strong> <strong>Damned</strong> Guide<br />
http://www.supercheats.<strong>com</strong>/guides/gr<strong>and</strong>-theft-auto-4:-the-lost-<strong>and</strong>-dam<br />
ned<br />
Check back for updates, videos <strong>and</strong> <strong>com</strong>ments for this guide.<br />
If you can get your h<strong>and</strong>s on a fallen enemy’s Carbine Rifle, it will definitely <strong>com</strong>e in h<strong>and</strong>y here. When the majority<br />
of the enemies outside have been eliminated, some of them will take off in a couple of cars. Quickly get in one of<br />
the vehicles parked outside <strong>and</strong> start after them. Chase after the fleeing enemies marked on the radar <strong>and</strong> kill each of<br />
them.<br />
Bring the money to Jim in East Holl<strong>and</strong> to <strong>com</strong>plete the mission.<br />
Mission 3: Was It Worth It?<br />
After the cutscene, travel to <strong>The</strong> <strong>Lost</strong> clubhouse to meet with Ashley. While on your way to clubhouse, Ashley calls<br />
to inform you that Ray has sent a number of hitman your way. You have to kill each <strong>and</strong> every one of them before<br />
they can kill you. You’ll definitely want help from Clay <strong>and</strong> Terry; phone either one for backup, <strong>and</strong> they will set up<br />
an ambush in Alderney City. Quickly get to the ambush spot <strong>and</strong> climb up the ladder on the front of the building.<br />
If you have some Pipe Bombs or any other thrown explosive h<strong>and</strong>y, they will be of great use here. Five or so cars,<br />
each packed with four goons, will pull up in the lot below. You have a nice vantage point up on this roof, so<br />
surviving this onslaught shouldn’t be overly difficult. If you have explosives, just toss them by the parked cars as the<br />
enemies step out.<br />
After the battle, scour the wreckage for ammo <strong>and</strong> then make your way to <strong>The</strong> <strong>Lost</strong> clubhouse in Acter. Hit the<br />
marker outside of the clubhouse to <strong>com</strong>plete the mission.<br />
page 25 / 38
GTA 4: <strong>The</strong> <strong>Lost</strong> <strong>and</strong> the <strong>Damned</strong> Guide<br />
Finale<br />
Finale: Get <strong>Lost</strong><br />
<strong>SuperCheats</strong>.<strong>com</strong> Unoffical <strong>Gr<strong>and</strong></strong> <strong><strong>The</strong>ft</strong> <strong>Auto</strong> 4: <strong>The</strong> <strong>Lost</strong> <strong>and</strong> <strong>Damned</strong> Guide<br />
http://www.supercheats.<strong>com</strong>/guides/gr<strong>and</strong>-theft-auto-4:-the-lost-<strong>and</strong>-dam<br />
ned<br />
Check back for updates, videos <strong>and</strong> <strong>com</strong>ments for this guide.<br />
Complete the “Was It Worth It?” mission in Ray’s mission line, <strong>and</strong> eventually Stubbs will give you a call. Meet<br />
Stubbs at <strong>The</strong> <strong>Lost</strong> clubhouse to get started.<br />
Travel to the prison in Acter Industrial Park <strong>and</strong> hit the marker outside to trigger a cutscene. After the cutscene, you’ll<br />
have free-reign over Terry’s gun van. Everything is free, so grab whatever you need. Take a fully-load Carbine Rifle,<br />
Assault Shotgun, RPG Launcher, SMG, Sniper Rifle, Pipe Bombs, <strong>and</strong> anything else you can carry. Be sure to grab<br />
some Body Armor as well.<br />
Hit the prison gate with an RPG, <strong>and</strong> then switch to your Carbine Rifle. You’ll first have to fight your way to the<br />
prison yard. <strong>The</strong> guards in the prison are heavily armed, <strong>and</strong> there are a lot of them. <strong>The</strong> Carbine Rifle is incredibly<br />
accurate <strong>and</strong> can make short work of them, so hang back <strong>and</strong> start picking off the guards visible beyond the gate.<br />
When the first batch of guards has been dealt with, follow Terry <strong>and</strong> Clay to the next area.<br />
Another batch of guards will run around the corner, so hang back <strong>and</strong> pick them off. Grab the health pack on the<br />
stack of bricks if necessary, <strong>and</strong> then continue moving forward. Be sure to pick up any ammo along the way. <strong>The</strong>re’s<br />
a sniper on the building around the corner, so take him out first. Clear the next group of guards, <strong>and</strong> then press on to<br />
the prison yard.<br />
A couple of helicopters full of N.O.O.S.E. agents enter the prison yard. <strong>The</strong> cover you’re put behind after the<br />
cutscene isn’t the best, especially since there are a number of enemies up in the central tower <strong>and</strong> along the<br />
connected walkways. If you have plenty of health, it might help to sprint away from the <strong>com</strong>motion, so you can pick<br />
off the enemies with the Carbine or Sniper Rifle from afar. Don’t go too far, otherwise you’ll fail the mission for<br />
ab<strong>and</strong>oning Clay <strong>and</strong> Terry. You’ll be taking fire out in the open, so quickly start picking off the enemies on the<br />
ground <strong>and</strong> walkway closest to you.<br />
After dealing with the enemies nearest to you, switch to your Sniper Rifle <strong>and</strong> start killing the guards further out.<br />
When the prison yard is nearly clear, a red marker denoting Billy’s location will appear on your radar. Sprint over to<br />
Billy <strong>and</strong> switch to your pistol. Lock-on to Billy <strong>and</strong> press RT to initiate the execution cutscene.<br />
Once the deed has been done, sprint over to Johnny’s Hexer <strong>and</strong> hop on. Follow Terry <strong>and</strong> Clay out of the prison<br />
yard <strong>and</strong> through the front gate. Lead the gang back to <strong>The</strong> <strong>Lost</strong> clubhouse to <strong>com</strong>plete the mission <strong>and</strong> trigger the<br />
endgame cutscene.<br />
page 26 / 38
GTA 4: <strong>The</strong> <strong>Lost</strong> <strong>and</strong> the <strong>Damned</strong> Guide<br />
Side Missions<br />
Races<br />
<strong>SuperCheats</strong>.<strong>com</strong> Unoffical <strong>Gr<strong>and</strong></strong> <strong><strong>The</strong>ft</strong> <strong>Auto</strong> 4: <strong>The</strong> <strong>Lost</strong> <strong>and</strong> <strong>Damned</strong> Guide<br />
http://www.supercheats.<strong>com</strong>/guides/gr<strong>and</strong>-theft-auto-4:-the-lost-<strong>and</strong>-dam<br />
ned<br />
Check back for updates, videos <strong>and</strong> <strong>com</strong>ments for this guide.<br />
<strong>The</strong> <strong>Lost</strong> <strong>and</strong> <strong>Damned</strong> introduces a decidedly more brutal style of racing to <strong>Gr<strong>and</strong></strong> <strong><strong>The</strong>ft</strong> <strong>Auto</strong> IV. You’re goal here is<br />
to not only reach the final checkpoint while at the head of the pack, but also to dethrone your fellow bikers by<br />
delivering a solid hit to the chops with your trusty bat.<br />
You’ll get a call from Terry at some point during the storyline. He invites you to participate in a street race. To<br />
participate, drive to the red <strong>and</strong> white motorcycle helmet icon on the GPS <strong>and</strong> touch the marker while on a bike.<br />
You can use any motorcycle you wish. If you are without a motorcycle, you can call Clay <strong>and</strong> have him deliver one<br />
to you if he is available. If you’ve <strong>com</strong>pleted the storyline, there should be a better variety of bikes to choose from.<br />
<strong>The</strong> Diabolus seems to be a good choice.<br />
page 27 / 38
GTA 4: <strong>The</strong> <strong>Lost</strong> <strong>and</strong> the <strong>Damned</strong> Guide<br />
Stubbs' Optional Jobs<br />
<strong>SuperCheats</strong>.<strong>com</strong> Unoffical <strong>Gr<strong>and</strong></strong> <strong><strong>The</strong>ft</strong> <strong>Auto</strong> 4: <strong>The</strong> <strong>Lost</strong> <strong>and</strong> <strong>Damned</strong> Guide<br />
http://www.supercheats.<strong>com</strong>/guides/gr<strong>and</strong>-theft-auto-4:-the-lost-<strong>and</strong>-dam<br />
ned<br />
Check back for updates, videos <strong>and</strong> <strong>com</strong>ments for this guide.<br />
Sometime after <strong>com</strong>pleting “This Shit’s Cursed” in Billy’s mission line, you’ll get a call from Stubbs. He tells you to<br />
call him when you’re looking for work. Select “Job” from Stubbs’ phonebook menu to get started.<br />
Knowing Me, Knowing You<br />
<strong>The</strong> target vehicle is parked outside of one of the mansions up in Westdyke, so make your way over there by<br />
following the marked trail on your radar. When you reach the vehicle, get in <strong>and</strong> start towards the bugging expert in<br />
Acter Industrial Park. You have a limited amount of time to bring the car back, so get going immediately.<br />
<strong>The</strong>re’s no problem if the car gets a bit busted up on the way there, since the bugging expert can buff out any<br />
scratches. Once the car has been bugged, you’ll have to get it back to Deputy Mayor Dawkins home before he<br />
notices that it’s missing <strong>and</strong> reports it as stolen. <strong>The</strong> car has to be in pristine condition, otherwise Dawkins will<br />
realise that it’s has been tampered with. You don’t have a whole lot of time, so you won’t be able to get the car<br />
repaired in the event of a collision. Drive steadily around corners, but speed down large stretches of road to make up<br />
for lost time.<br />
Get the car back to Dawkins house in time <strong>and</strong> park it back in its place, facing the same direction it was before you<br />
got to it. Once the car is in place, flee the area to <strong>com</strong>plete the mission.<br />
Phone Ho’<br />
Head to the marked location in Port Tudor. You’ll have to climb up on the building here to reach the lookout spot.<br />
You can get up onto the roof by st<strong>and</strong>ing on the platform along the south side of the building, jumping onto the crate<br />
there, <strong>and</strong> then climbing up onto the roof. When you reach the lookout point, Johnny will call Stubbs. Stubbs should<br />
inform you that the politician drives a red Cognoscenti.<br />
<strong>The</strong> first car that arrives is not the politician’s, but it does show you where to look. When the politician’s car pulls up,<br />
take out your cell phone, select “Camera” from the menu <strong>and</strong> then snap a picture of the politician through the<br />
windshield. Afterwards, send the photo to Stubbs to <strong>com</strong>plete the mission.<br />
Communication Breakdown<br />
<strong>The</strong> contact is over in Hove Beach, so travel there to get started. <strong>The</strong> contact promptly takes off, so get back in your<br />
vehicle <strong>and</strong> chase after him. All you must do is kill the contact to <strong>com</strong>plete the mission.<br />
When <strong>The</strong> Blue Chips Are Down<br />
<strong>The</strong> CEO is being held in an alley in Birchem, Alderney, so make your way over there. Mow down the officer<br />
blocking your path <strong>and</strong> sprint over to the cuffed CEO. Press LB to uncuff her, <strong>and</strong> then immediately get in the car<br />
<strong>and</strong> tear out of the alley. You need to bring the CEO to the helipad on top of the Booth Tunnel so she can escape.<br />
This will be difficult with the three-star wanted level that has been attributed to you, so you have to make it there<br />
quickly before your pursuers manage to wreck the car.<br />
When you reach the helipad, get out of the car <strong>and</strong> protect the CEO from her pursuers while she boards the<br />
helicopter. <strong>The</strong> mission is <strong>com</strong>plete when the CEO escapes in the helicopter.<br />
page 28 / 38
<strong>SuperCheats</strong>.<strong>com</strong> Unoffical <strong>Gr<strong>and</strong></strong> <strong><strong>The</strong>ft</strong> <strong>Auto</strong> 4: <strong>The</strong> <strong>Lost</strong> <strong>and</strong> <strong>Damned</strong> Guide<br />
http://www.supercheats.<strong>com</strong>/guides/gr<strong>and</strong>-theft-auto-4:-the-lost-<strong>and</strong>-dam<br />
ned<br />
Check back for updates, videos <strong>and</strong> <strong>com</strong>ments for this guide.<br />
First Impressions<br />
This is the last of Stubbs’ optional phone-in missions. This time Stubbs wants you to eliminate a friend of his. Travel<br />
to the Superstar Cafe in Lancaster, Algonquin. Just walk in there <strong>and</strong> blast him. <strong>The</strong>re are some armed guards inside<br />
though, so you may want to bring along some Body Armor to absorb their bullets while you dash out.<br />
When the target is dead, flee the scene to <strong>com</strong>plete the mission.<br />
page 29 / 38
GTA 4: <strong>The</strong> <strong>Lost</strong> <strong>and</strong> the <strong>Damned</strong> Guide<br />
Mini-games<br />
<strong>SuperCheats</strong>.<strong>com</strong> Unoffical <strong>Gr<strong>and</strong></strong> <strong><strong>The</strong>ft</strong> <strong>Auto</strong> 4: <strong>The</strong> <strong>Lost</strong> <strong>and</strong> <strong>Damned</strong> Guide<br />
http://www.supercheats.<strong>com</strong>/guides/gr<strong>and</strong>-theft-auto-4:-the-lost-<strong>and</strong>-dam<br />
ned<br />
Check back for updates, videos <strong>and</strong> <strong>com</strong>ments for this guide.<br />
<strong>The</strong>re are two playable mini-games introduced in <strong>The</strong> <strong>Lost</strong> <strong>and</strong> <strong>Damned</strong>: arm wrestling <strong>and</strong> the hi-lo card game.<br />
Arm Wrestling<br />
For $100 or so, you can test your strength in an arm wrestling match. It’s best two out of three. Rapidly move the<br />
Right Thumbstick left <strong>and</strong> right to overpower your opponent. Simply using your thumb is probably not enough, but<br />
by using your palm you should be able to move the Right Thumbstick much more rapidly.<br />
You might want to limit the amount of times you play this mini-game, since it seems like a good way to wreck a<br />
controller.<br />
This mini-game is initially playable on the second floor of <strong>The</strong> <strong>Lost</strong> clubhouse, but there are a couple of other<br />
locations that pop up around Alderney as you progress through the storyline. Make your way to one of the arm icons<br />
that appear on the map to participate.<br />
Hi-lo Cards<br />
This is a very simple card game. When a card is thrown down, you have to guess whether the next card will be<br />
higher or lower than the current card’s value. Guess incorrectly, <strong>and</strong> you’re out. <strong>The</strong> last person in the game wins.<br />
It’s a $10 wager per h<strong>and</strong>.<br />
This game can be played in <strong>The</strong> <strong>Lost</strong> Clubhouse. <strong>The</strong> location of this mini-game is marked by a spade symbol on the<br />
radar <strong>and</strong> map.<br />
page 30 / 38
GTA 4: <strong>The</strong> <strong>Lost</strong> <strong>and</strong> the <strong>Damned</strong> Guide<br />
R<strong>and</strong>om Characters<br />
<strong>SuperCheats</strong>.<strong>com</strong> Unoffical <strong>Gr<strong>and</strong></strong> <strong><strong>The</strong>ft</strong> <strong>Auto</strong> 4: <strong>The</strong> <strong>Lost</strong> <strong>and</strong> <strong>Damned</strong> Guide<br />
http://www.supercheats.<strong>com</strong>/guides/gr<strong>and</strong>-theft-auto-4:-the-lost-<strong>and</strong>-dam<br />
ned<br />
Check back for updates, videos <strong>and</strong> <strong>com</strong>ments for this guide.<br />
<strong>The</strong>re are two new R<strong>and</strong>om Character encounters in <strong>The</strong> <strong>Lost</strong> <strong>and</strong> <strong>Damned</strong>. As you progress through the story, an<br />
icon denoting their location will appear on your map.<br />
David<br />
David can be encountered in <strong>The</strong> Exchange, which is in the southeast corner of Algonquin. David needs you to deal<br />
with a pesky lawyer who is threatening to expose him. After the cutscene, make your way to the red marker on the<br />
GPS to locate the lawyer. You have to chase him down <strong>and</strong> intimidate him by firing at his car. Just drive after him<br />
<strong>and</strong> continue shooting at his vehicle until he stops. Drive up to the parked car to trigger a cutscene.<br />
Malc<br />
1: You can first meet Malc in Northwood, which is in the northwest corner of Algonquin. Make sure you have a bike<br />
beforeh<strong>and</strong>. Follow Malc to his friend DeSean, <strong>and</strong> then follow DeSean to where the cheating bikers are hanging<br />
out. When you reach the place, just fire at the explosive barrels that the bikers are st<strong>and</strong>ing by to wipe them all out.<br />
2: Malc will appear again in Northwood, Algonquin sometime after the first encounter. Complete a few missions <strong>and</strong><br />
the pedestrian icon should then appear on the map. Malc challenges you to a race. You’ll need a bike. When you<br />
have a bike, follow Malc to the starting line.<br />
To win the race, you must hit the final checkpoint before any of the other bikers. <strong>The</strong> checkpoints appear on your<br />
radar, <strong>and</strong> inside of each checkpoint is an arrow pointing in the direction that the next checkpoint will be.<br />
To use your bat during the race, press the X button to swing the bat to the left, <strong>and</strong> the B button to swing the bat to<br />
the right. Hold either button to perform a powered-up swing, capable of knocking a target off of their bike. Simply<br />
tapping the X or B button is not enough to send an opponent to the asphalt, although you may be able to set them off<br />
course that way. Be careful yourself, however, as the other bikers are armed with bats as well.<br />
page 31 / 38
GTA 4: <strong>The</strong> <strong>Lost</strong> <strong>and</strong> the <strong>Damned</strong> Guide<br />
<strong>SuperCheats</strong>.<strong>com</strong> Unoffical <strong>Gr<strong>and</strong></strong> <strong><strong>The</strong>ft</strong> <strong>Auto</strong> 4: <strong>The</strong> <strong>Lost</strong> <strong>and</strong> <strong>Damned</strong> Guide<br />
http://www.supercheats.<strong>com</strong>/guides/gr<strong>and</strong>-theft-auto-4:-the-lost-<strong>and</strong>-dam<br />
ned<br />
Check back for updates, videos <strong>and</strong> <strong>com</strong>ments for this guide.<br />
100% Completion Requirements<br />
Complete all 23 missions.<br />
Complete all five of Stubbs’ optional jobs.<br />
Complete all 10 of Angus’ motorcycle export missions.<br />
Complete all 25 gang war scenarios.<br />
Complete all 12 motorcycle races.<br />
Win every activity (air hockey, darts, <strong>and</strong> pool) against a r<strong>and</strong>om <strong>com</strong>puter opponent or friend once.<br />
Win an arm wrestling match.<br />
Take Clay <strong>and</strong> Terry to every activity available via their Phonebook menu.<br />
Meet r<strong>and</strong>om characters <strong>and</strong> <strong>com</strong>plete their tasks (David once, Malc twice).<br />
Find <strong>and</strong> kill all 50 hidden seagulls.<br />
page 32 / 38
GTA 4: <strong>The</strong> <strong>Lost</strong> <strong>and</strong> the <strong>Damned</strong> Guide<br />
Multiplayer Modes<br />
<strong>SuperCheats</strong>.<strong>com</strong> Unoffical <strong>Gr<strong>and</strong></strong> <strong><strong>The</strong>ft</strong> <strong>Auto</strong> 4: <strong>The</strong> <strong>Lost</strong> <strong>and</strong> <strong>Damned</strong> Guide<br />
http://www.supercheats.<strong>com</strong>/guides/gr<strong>and</strong>-theft-auto-4:-the-lost-<strong>and</strong>-dam<br />
ned<br />
Check back for updates, videos <strong>and</strong> <strong>com</strong>ments for this guide.<br />
<strong>The</strong> <strong>Lost</strong> <strong>and</strong> <strong>Damned</strong> introduces six new multiplayer modes. <strong>The</strong> st<strong>and</strong>ard Deathmatch, Team Deathmatch, <strong>and</strong><br />
Free modes are still present, but the new modes warrant explanation. Below is an overview of each new multiplayer<br />
mode.<br />
Races<br />
While the main idea remains, <strong>The</strong> <strong>Lost</strong> <strong>and</strong> <strong>Damned</strong> variant of the Races multiplayer mode introduces one major<br />
change: if motorcycles are the vehicles being used, each biker will have a bat which they can use to whack other<br />
players as they drive by. Use the X button to swing the bat to the left, <strong>and</strong> the B button to swing to the right. Hold X<br />
or B to perform a powered-up swing. Knocking another player off of their bike doesn’t work the same way as<br />
knocking off a CPU opponent in the single-player races. In multiplayer you must deplete another player’s health bar<br />
entirely, which requires three or four good hits. Hold Y at any time during the race to warp back to the previous<br />
checkpoint. For 2-16 players.<br />
Club Business<br />
This mode is inherently similar to the Mafiya Work modes from the st<strong>and</strong>-alone game, however Club Business is<br />
both <strong>com</strong>petitive <strong>and</strong> co-operative. Each player controls a member of <strong>The</strong> <strong>Lost</strong> Motorcycle Club, so players are not<br />
actively fighting each other. However, players are <strong>com</strong>peting to <strong>com</strong>plete tasks in order to gain status in the gang.<br />
<strong>The</strong> player who currently has the most money be<strong>com</strong>es the chapter leader, which means that other players gain<br />
health, armour, <strong>and</strong> money by following them. Occasionally, NPCs will spawn <strong>and</strong> attack; killing these NPCs is<br />
worth money as well. Each player walks away with the money they earned at the end of the match. For 2-16 players.<br />
Lone Wolf Biker<br />
A single player is assigned the role of lone wolf, <strong>and</strong> they must survive for as long as possible with every other player<br />
in the match hunting for them. <strong>The</strong> lone wolf must run through checkpoints only they can see while being pursued.<br />
<strong>The</strong> player that manages to kill the lone wolf then takes the role. <strong>The</strong> player who reaches the most checkpoints as<br />
the lone wolf wins. If there is a tie, the player that spent the longest amount of time as the lone wolf wins. For 2-16<br />
players.<br />
Chopper vs. Chopper<br />
This is a 2-player game mode that pits a motorcycle against an attack helicopter. <strong>The</strong> player on the motorcycle must<br />
race through checkpoints, while the player in the helicopter must stop the biker.<br />
Witness Protection<br />
Players on the N.O.O.S.E. team must escort witnesses to police stations around the city, while players on <strong>The</strong> <strong>Lost</strong><br />
team have to try <strong>and</strong> kill these witnesses. One player on the N.O.O.S.E. side must drive the transport bus, while the<br />
others are in police cruisers. <strong>The</strong> <strong>Lost</strong> players are all on motorcycles. <strong>The</strong> team that succeeds in their mission wins<br />
the game. For 2-16 players.<br />
Own <strong>The</strong> City<br />
Sections of Liberty City are designated as territories, <strong>and</strong> teams must fight to control them. Allied NPCs spawn in<br />
every territory to defend it from the opposing team. To capture a territory, every NPC <strong>and</strong> opposing player in that<br />
territory must be eliminated. NPCs can be outfitted with better weaponry from a team’s gun van, the location of<br />
which is marked by a square blip on the radar .For 2-16 players.<br />
page 33 / 38
GTA 4: <strong>The</strong> <strong>Lost</strong> <strong>and</strong> the <strong>Damned</strong> Guide<br />
Cheats<br />
<strong>SuperCheats</strong>.<strong>com</strong> Unoffical <strong>Gr<strong>and</strong></strong> <strong><strong>The</strong>ft</strong> <strong>Auto</strong> 4: <strong>The</strong> <strong>Lost</strong> <strong>and</strong> <strong>Damned</strong> Guide<br />
http://www.supercheats.<strong>com</strong>/guides/gr<strong>and</strong>-theft-auto-4:-the-lost-<strong>and</strong>-dam<br />
ned<br />
Check back for updates, videos <strong>and</strong> <strong>com</strong>ments for this guide.<br />
<strong>The</strong>se five cheats can only be used while playing <strong>The</strong> <strong>Lost</strong> <strong>and</strong> the <strong>Damned</strong>. <strong>The</strong>y do not work with the st<strong>and</strong>alone<br />
game.<br />
Inputting Cheats Clip<br />
Enter these codes using Johnny’s cell phone to trigger the indicated effect. To bring up the keypad, press up on the<br />
d-pad again when you have the phone out.<br />
Note: Entering vehicle spawn codes does not disable achievements.<br />
826-555-0150 – Spawns a Burrito.<br />
245-555-0125 – Spawns a Double T.<br />
245-555-0199 – Spawns a Hakuchou.<br />
245-555-0150 – Spawns a Hexer.<br />
245-555-0100 – Spawns an Innovation.<br />
826-555-0100 – Spawns a Slamvan.<br />
page 34 / 38
GTA 4: <strong>The</strong> <strong>Lost</strong> <strong>and</strong> <strong>Damned</strong> Guide<br />
Xbox 360 Achievements<br />
<strong>SuperCheats</strong>.<strong>com</strong> Unoffical <strong>Gr<strong>and</strong></strong> <strong><strong>The</strong>ft</strong> <strong>Auto</strong> 4: <strong>The</strong> <strong>Lost</strong> <strong>and</strong> <strong>Damned</strong> Guide<br />
http://www.supercheats.<strong>com</strong>/guides/gr<strong>and</strong>-theft-auto-4:-the-lost-<strong>and</strong>-dam<br />
ned<br />
Check back for updates, videos <strong>and</strong> <strong>com</strong>ments for this guide.<br />
<strong>The</strong> <strong>Lost</strong> <strong>and</strong> <strong>Damned</strong> adds five achievements worth 250 points total to <strong>Gr<strong>and</strong></strong> <strong><strong>The</strong>ft</strong> <strong>Auto</strong> IV. Each achievement<br />
unlocked contributes a certain amount of points to your overall gamerscore.<br />
1. TLAD: One Percenter<br />
Help Billy get his bike back.<br />
5 points<br />
2. TLAD: <strong>The</strong> <strong>Lost</strong> Boy<br />
Be<strong>com</strong>e leader of <strong>The</strong> <strong>Lost</strong>.<br />
25 points<br />
3. TLAD: Easy Rider<br />
Finish the story.<br />
100 points<br />
4. TLAD: Get Good Wood<br />
In the bike races, whack off 69 bikers with a bat.<br />
50 points<br />
5. TLAD: Full Chat<br />
Build Terry <strong>and</strong> Clay's toughness to 100%.<br />
70 points<br />
page 35 / 38
<strong>SuperCheats</strong>.<strong>com</strong> Unoffical <strong>Gr<strong>and</strong></strong> <strong><strong>The</strong>ft</strong> <strong>Auto</strong> 4: <strong>The</strong> <strong>Lost</strong> <strong>and</strong> <strong>Damned</strong> Guide<br />
http://www.supercheats.<strong>com</strong>/guides/gr<strong>and</strong>-theft-auto-4:-the-lost-<strong>and</strong>-dam<br />
ned<br />
Check back for updates, videos <strong>and</strong> <strong>com</strong>ments for this guide.<br />
http://www.supercheats.<strong>com</strong>/video/<strong>Gr<strong>and</strong></strong> <strong><strong>The</strong>ft</strong> <strong>Auto</strong> 4: <strong>The</strong> <strong>Lost</strong> <strong>and</strong><br />
<strong>Damned</strong>/Latest,All/gr<strong>and</strong>theftauto4thelost<strong>and</strong>damned.htm<br />
page 36 / 38
<strong>SuperCheats</strong>.<strong>com</strong> Unoffical <strong>Gr<strong>and</strong></strong> <strong><strong>The</strong>ft</strong> <strong>Auto</strong> 4: <strong>The</strong> <strong>Lost</strong> <strong>and</strong> <strong>Damned</strong> Guide<br />
http://www.supercheats.<strong>com</strong>/guides/gr<strong>and</strong>-theft-auto-4:-the-lost-<strong>and</strong>-dam<br />
ned<br />
Check back for updates, videos <strong>and</strong> <strong>com</strong>ments for this guide.<br />
http://www.supercheats.<strong>com</strong>/xbox360/gr<strong>and</strong>theftauto4thelost<strong>and</strong>damned.htm<br />
page 37 / 38
Powered by TCPDF (www.tcpdf.org)<br />
<strong>SuperCheats</strong>.<strong>com</strong> Unoffical <strong>Gr<strong>and</strong></strong> <strong><strong>The</strong>ft</strong> <strong>Auto</strong> 4: <strong>The</strong> <strong>Lost</strong> <strong>and</strong> <strong>Damned</strong> Guide<br />
http://www.supercheats.<strong>com</strong>/guides/gr<strong>and</strong>-theft-auto-4:-the-lost-<strong>and</strong>-dam<br />
ned<br />
Check back for updates, videos <strong>and</strong> <strong>com</strong>ments for this guide.<br />
http://www.supercheats.<strong>com</strong>http://www.supercheats.<strong>com</strong>/guides/gr<strong>and</strong>-theft-auto-4<br />
page 38 / 38