Dragon Age: Origins Unofficial guide - SuperCheats.com
Dragon Age: Origins Unofficial guide - SuperCheats.com
Dragon Age: Origins Unofficial guide - SuperCheats.com

Create successful ePaper yourself
Turn your PDF publications into a flip-book with our unique Google optimized e-Paper software.
<strong>SuperCheats</strong>.<strong>com</strong> Unoffical <strong>Dragon</strong> <strong>Age</strong>: <strong>Origins</strong> Guide<br />
http://www.supercheats.<strong>com</strong>/<strong>guide</strong>s/dragon-age:-origins<br />
Check back for updates, videos and <strong>com</strong>ments for this <strong>guide</strong>.<br />
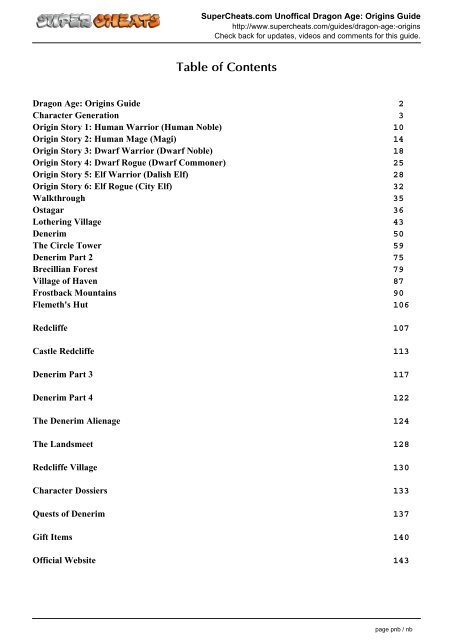
Table of Contents<br />
<strong>Dragon</strong> <strong>Age</strong>: <strong>Origins</strong> Guide 2<br />
Character Generation 3<br />
Origin Story 1: Human Warrior (Human Noble) 10<br />
Origin Story 2: Human Mage (Magi) 14<br />
Origin Story 3: Dwarf Warrior (Dwarf Noble) 18<br />
Origin Story 4: Dwarf Rogue (Dwarf Commoner) 25<br />
Origin Story 5: Elf Warrior (Dalish Elf) 28<br />
Origin Story 6: Elf Rogue (City Elf) 32<br />
Walkthrough 35<br />
Ostagar 36<br />
Lothering Village 43<br />
Denerim 50<br />
The Circle Tower 59<br />
Denerim Part 2 75<br />
Brecillian Forest 79<br />
Village of Haven 87<br />
Frostback Mountains 90<br />
Flemeth's Hut 106<br />
Redcliffe 107<br />
Castle Redcliffe 113<br />
Denerim Part 3 117<br />
Denerim Part 4 122<br />
The Denerim Alienage 124<br />
The Landsmeet 128<br />
Redcliffe Village 130<br />
Character Dossiers 133<br />
Quests of Denerim 137<br />
Gift Items 140<br />
Official Website 143<br />
page pnb / nb
<strong>SuperCheats</strong>.<strong>com</strong> Unoffical <strong>Dragon</strong> <strong>Age</strong>: <strong>Origins</strong> Guide<br />
http://www.supercheats.<strong>com</strong>/<strong>guide</strong>s/dragon-age:-origins<br />
Check back for updates, videos and <strong>com</strong>ments for this <strong>guide</strong>.<br />
page 2 / 145
<strong>SuperCheats</strong>.<strong>com</strong> Unoffical <strong>Dragon</strong> <strong>Age</strong>: <strong>Origins</strong> Guide<br />
http://www.supercheats.<strong>com</strong>/<strong>guide</strong>s/dragon-age:-origins<br />
Check back for updates, videos and <strong>com</strong>ments for this <strong>guide</strong>.<br />
<strong>SuperCheats</strong>.<strong>com</strong>'s Unoffical Guide to<br />
<strong>Dragon</strong> <strong>Age</strong>: <strong>Origins</strong><br />
by Chris Boots-Faubert<br />
This is an unofficial game <strong>guide</strong> for <strong>Dragon</strong> <strong>Age</strong>: <strong>Origins</strong>, it is not official, or endorsed by or connected to the game developer or publisher. All characters, locations, images<br />
and video game content are copyright to their respective owners. Any trademarks displayed in the <strong>guide</strong>s are exclusive property of their respective owners. Images and videos<br />
used in this game <strong>guide</strong> have only been inserted to illustrate our words more effectively.<br />
This <strong>guide</strong> may be not be reproduced under any circumstances except for personal, private use. It may not be placed on any web site or otherwise distributed publicly without<br />
advance written permission. Use of this <strong>guide</strong> on any other web site or as a part of any public display is strictly prohibited, and a violation of copyright.<br />
page 3 / 145
<strong>SuperCheats</strong>.<strong>com</strong> Unoffical <strong>Dragon</strong> <strong>Age</strong>: <strong>Origins</strong> Guide<br />
http://www.supercheats.<strong>com</strong>/<strong>guide</strong>s/dragon-age:-origins<br />
Check back for updates, videos and <strong>com</strong>ments for this <strong>guide</strong>.<br />
<strong>Dragon</strong> <strong>Age</strong>: <strong>Origins</strong> Guide<br />
<strong>Unofficial</strong> Guide by Chris Boots-Faubert for <strong>SuperCheats</strong>.<strong>com</strong><br />
In an interview with polygamia.pl, Bioware online producer Fernando Melo provided some insight into the game<br />
and the <strong>com</strong>parisons that were being made online and in the gaming press with the <strong>com</strong>pany's other games:<br />
“<strong>Dragon</strong> <strong>Age</strong> was always thought of as a a successor to Baldur's Gate, there were many things that we wanted to<br />
transfer from there, and part of that is what we enjoy about that kind of game, the <strong>com</strong>bat system, pause and play<br />
tactics, party members, these things are the core of the game, and it doesn't translate as well to an action game. But<br />
it depends on the kind of gamer that you are. You can totally play it without pausing as well, but on the PC you have<br />
a lot more advantage, a lot more incentive to use pause and play and more tactics than you would on the console.”<br />
You might expect that as an action game, being <strong>com</strong>pared to the other smash-hit Bioware title, Mass Effect, is a given<br />
- and strictly from a technical viewpoint, that makes a lot of sense - but if you are expecting the play experience to<br />
be on-par with that title, you may be in for a surprise! There is a much greater depth to the experience in <strong>Dragon</strong><br />
<strong>Age</strong> over Mass Effect, and it is evident that great care was taken to build upon the experiences that the <strong>com</strong>pany had<br />
with Mass Effect and improve upon it as the same dynamics were applied to <strong>Dragon</strong> <strong>Age</strong>, with great effectiveness.<br />
According to the manual that <strong>com</strong>es with the game: "<strong>Dragon</strong> <strong>Age</strong>: <strong>Origins</strong> is a modern re-imagination of an epic<br />
party-based fantasy role-playing game, dense with story and tactical <strong>com</strong>bat."<br />
This is a pretty accurate assessment - though it does not quite do justice to the intensity and scope of the game. It is<br />
massive in its content and unique variations in story line, and immersion in the story is very easy to experience.<br />
There is a subtle flavor to your interaction with the characters you encounter in the game that encourages the<br />
development of a moral identity for your avatar that succeeds in making it a personal experience where other games<br />
fail.<br />
There are six unique story lines - called <strong>Origins</strong> - that you can experience, based upon the race and origin of your<br />
avatar. In most RPG games these different origins would be a simple rehashing of the same basic story - but that is<br />
not the case here. Each origin line is unique, contains original plot material, and quests that appear only in that<br />
origin story. This is in my opinion a brilliant approach and is the kernel through which your attachment and<br />
empathy for your avatar begins.<br />
If video games were listed in a restaurant menu format, a lot of games would fill the appetizer sections, and still more<br />
would populate the dessert section - <strong>Dragon</strong> <strong>Age</strong>: <strong>Origins</strong> however would have to be listed in the "All-You-Can-Eat<br />
don't plan on doing anything for a week" section. Borrowing from the stuffed shirts who write wine reviews, I might<br />
add: "This game displays an underlying characteristic of adventure with noticeable hints of blood, valor, and rage. It<br />
presents to the palate in a very entertaining manner, yet stays with you long after you turn off your console in<br />
exhaustion and often makes its way into your dreams at night. I give it a 10.0 out of 10.0!"<br />
page 4 / 145
<strong>SuperCheats</strong>.<strong>com</strong> Unoffical <strong>Dragon</strong> <strong>Age</strong>: <strong>Origins</strong> Guide<br />
http://www.supercheats.<strong>com</strong>/<strong>guide</strong>s/dragon-age:-origins<br />
Check back for updates, videos and <strong>com</strong>ments for this <strong>guide</strong>.<br />
Character Generation<br />
If you have played RPG type games in the past than you already know how important the process of creating your<br />
character can be because the choices that you make in the process are not just cosmetic! You tweak the stats and<br />
skills in the creation process, settings that can determine whether or not you can create potions, poisons, or even<br />
when you can start wearing better armor and using better weapons. In short, this is a process that often has an<br />
immediate and meaningful impact on your gaming experience - and unfortunately only works best when you<br />
already understand what your immediate needs are going to be in the game!<br />
Because of that, this section is probably the most important for you to read if you have yet to play the game, because<br />
it will help you in making decisions that may well flavor your ultimate impressions of game play, the story, and your<br />
overall satisfaction with the experience. It is not rocket science, but making some decisions early on can have a<br />
measurable impact later in the game.<br />
Consider for a moment that your character represents you in the game - call it your Avatar - and to really enjoy the<br />
game you should have a connection to it, one that satisfies you, because you are going to be spending a big chunk<br />
of time with it. Ideally you should want to take your time, play around with the settings, and make a toon that<br />
appeals to you, but that will require you to actually play through - at a minimum - the origin story several times,<br />
using different settings.<br />
Since it takes anywhere from an hour to two to do that just once, that may not be the ideal solution for you. To help<br />
you make informed choices so that you can jump right into the game, this section covers the character creation<br />
process in some detail, and highlights a few of the choices that may be more helpful to you.<br />
While the origin stories are all different, there are several <strong>com</strong>mon points to creating characters for the game that are<br />
essentially the same:<br />
- Gender<br />
- Race<br />
- Class<br />
- Background<br />
- Gender: Male or Female<br />
Sex does not appear to play any particular role in the game as far as character effectiveness is concerned - I tried<br />
both male and female and did not see a difference in <strong>com</strong>bat, stat performance, or skills.<br />
Having said that, you should be aware that there are Achievements/Trophies in the game that are dependent upon<br />
the sex of your character - because they involve romancing specific characters that you recruit into your party. If<br />
you want to obtain those Achievements / Trophies, you are going to have to play the opposite gender, so you may<br />
want to bare that in mind as you plan out your play or re-play strategies.<br />
- Race: Human, Elf, or Dwarf<br />
What you choose will have a decided impact upon how you play the game and your game experience and you will<br />
certainly re-play the game as a different race later, so if you are making your first character on your first<br />
play-through, just pick what you like best for now.<br />
- Class: Warrior, Mage, or Rogue<br />
While the first two selections have some impact, the third, Class, has a very obvious impact on how you play the<br />
game and what your experience will be. Give each class some thought before you make your decision and jump<br />
into the game!<br />
Warrior is going to be predominantly hack-and-slash, using a variety of weapons and weapon styles to do damage.<br />
Magic is not part of the Warrior's skills set, though some magic stats are important because they do effect how well<br />
potions and magic items will work on you. If you like wading in and getting a little blood on your armor, Warrior is<br />
page 5 / 145
<strong>SuperCheats</strong>.<strong>com</strong> Unoffical <strong>Dragon</strong> <strong>Age</strong>: <strong>Origins</strong> Guide<br />
http://www.supercheats.<strong>com</strong>/<strong>guide</strong>s/dragon-age:-origins<br />
Check back for updates, videos and <strong>com</strong>ments for this <strong>guide</strong>.<br />
a good choice for you.<br />
Mage is just what you are likely thinking it is - a Magic-centric class that is not going to have a wide selection of<br />
armor and weapons, but nonetheless is able to deliver serious hurt on the enemy! When you are playing a magical<br />
character, your tactics must be different - like a Ranger, you do your damage from distance rather than wading right<br />
into the fight - and like a Ranger, you are not as adept at soaking up damage as a Warrior or Rogue. No, there is no<br />
Ranger class in this game, but you get the idea.<br />
Rogue - the Thief Class. There is a lot of the Warrior in the Rogue, but there is a finesse and a set of opportunities to<br />
this class that Warrior does not possess. Considering that there are Achievements / Trophies in the game for<br />
persuading (Warrior will likely be who you use to get the intimidation ones) it makes sense that you will be earning<br />
those as a Rogue.<br />
You do not soak up as much damage as the Warrior Class, but you can handle more than the Mage can, because<br />
you can wear most of the same armor that the Warrior uses. Like the Mage there will be some weapons and armor<br />
in the game that only your class can wear as well.<br />
A more significant aspect of this class is its ability to open locks - and there are a surprising amount of locked chests<br />
and containers in the game! Being able to get into those will help you to quickly amass wealth, gear, armor, and<br />
weapons, which you can equip on your character and your party members or sell to merchants for more wealth. It is<br />
a decided advantage in the game, which is something for you to think about.<br />
- Background: Varies by the above choices.<br />
There are six Origin stories that are associated with the Background choice - and in the next section we will explore<br />
all of these, but for now, here is the basic rundown:<br />
Human Warrior = Human Noble<br />
Human Mage = Magi<br />
Human Rogue = Human Noble<br />
Elven Warrior = Dalish Elf -OR- City Elf<br />
Elven Mage = Magi<br />
Elven Rogue = Dalish Elf -OR- City Elf<br />
Dwarven Warrior = Dwarf Commoner -OR- Dwarf Noble<br />
Dwarven Rogue = Dwarf Commoner -OR- Dwarf Noble<br />
- Appearance and Voice<br />
After you select the first three main traits, you are given the chance to name your character and then to adjust its<br />
appearance and voice. You do that by using the sliding menus for each option as follows:<br />
- Appearance: multiple selections for hair, features and skin tone.<br />
This is your chance to personalize your character - decide how he or she looks, their hairstyle, even their voice. As<br />
you are going to be spending a considerable amount of time playing this character and since in a way it represents<br />
you in the game, you may want to seriously consider spending a few minutes playing with these settings so that you<br />
end up with a character that you like.<br />
If you are a serious RPG fan - consider what that means: (R)ole (P)laying (G)ame. Creating a persona and personality<br />
for your character that you can play and remain true to is not just a good idea, it will actually make the game more<br />
interesting and fun. You will not have to be confused about the choices that you will be making in the game,<br />
because you already know based on your character persona what sort of choices they would make.<br />
I always try to play each character as true to form as I can - even when they make decisions that might make me<br />
page 6 / 145
<strong>SuperCheats</strong>.<strong>com</strong> Unoffical <strong>Dragon</strong> <strong>Age</strong>: <strong>Origins</strong> Guide<br />
http://www.supercheats.<strong>com</strong>/<strong>guide</strong>s/dragon-age:-origins<br />
Check back for updates, videos and <strong>com</strong>ments for this <strong>guide</strong>.<br />
un<strong>com</strong>fortable or give me reason to pause - just remember it is not YOU making these choices, it is your character!<br />
Attributes<br />
You begin with a set number of attributes in each category and have a number of points to spend as you like in<br />
addition to those. Unlike the Skills and Specializations, your attributes have a much deeper impact on game play<br />
than you may realize, so we are going to go into some detail here so that you have a firm understanding of what they<br />
are and how they work. First though, let us look at the present levels and the choice of how to spread out the<br />
additional points.<br />
You are given 5 points to spend in addition to the base attributes already assigned to your character - for a Male<br />
Human Noble Warrior these are:<br />
Strength - 15<br />
Dexterity - 14<br />
Willpower - 10<br />
Magic - 11<br />
Cunning - 11<br />
Constitution - 13<br />
You can add all of the points to one or spread them among several of the attributes - how you do that should<br />
correspond to the how you plan to play the character. For instance it is possible to select any of the skills next that<br />
normally would apply to a different class - like trap-making or herbalism - and if you decide to go that route and<br />
create a hybrid-class, you may want to invest a few points in Cunning or Magic even though you are creating a<br />
Warrior.<br />
For a pure Warrior, the most important stats are going to be Strength, Dexterity, and Constitution for now - but<br />
remember that every time you level up, you are given additional points that you can spend improving these<br />
attributes. Now let us examine what each of these attributes actually does in detail.<br />
STRENGTH: Measures a characters physical prowess and directly effects the damage that a character does in<br />
physical <strong>com</strong>bat. Your strength stat contributes to the accuracy of melee attacks, and is an essential stat for warriors,<br />
especially if they intend to use two-handed weapons. The strength stat is almost as critical for Rogues as it is for the<br />
Warrior.<br />
- What Strength Does -<br />
Increases damage from all weapons except crossbows and staves.<br />
Increases attack score in melee <strong>com</strong>bat by 0.50 for each point purchased.<br />
Is a prerequisite for most weapon talents and higher-level armor and weapons.<br />
Contributes to physical resistance and intimidation.<br />
DEXTERITY: Is the measure of agility, reflexes, and balance. Higher dexterity improves a character's chances to hit,<br />
makes the character more likely to dodge in<strong>com</strong>ing blows, and contributes to the damage dealt by piercing weapons<br />
such as daggers, arrows, and bolts. Archery and dual-weapon fighting styles require high dexterity to master, making<br />
this attribute of particular importance for the Rouge Class.<br />
- What Dexterity Does -<br />
Increases the attack score for melee <strong>com</strong>bat by 0.50 for each point purchased.<br />
Increases the attack score for ranged <strong>com</strong>bat by 1.0 for each point purchased.<br />
Increases defense by 1.0 for each point purchased.<br />
Increases damage from piercing weapons.<br />
Is a prerequisite for some weapon talents.<br />
Contributes to physical resistance.<br />
page 7 / 145
<strong>SuperCheats</strong>.<strong>com</strong> Unoffical <strong>Dragon</strong> <strong>Age</strong>: <strong>Origins</strong> Guide<br />
http://www.supercheats.<strong>com</strong>/<strong>guide</strong>s/dragon-age:-origins<br />
Check back for updates, videos and <strong>com</strong>ments for this <strong>guide</strong>.<br />
WILLPOWER: Represents a character's determination and mental fortitude. With high willpower, mages can cast<br />
more spells due to the larger mana pool this stat provides. For Warriors and Rogues, willpower gives a larger<br />
stamina pool for <strong>com</strong>bat techniques, and for special attacks.<br />
- What Willpower Does -<br />
Increases Mana or Stamina by 5.0 for each point purchased.<br />
Contributes to mental resistance.<br />
MAGIC: Is the measure for a character's natural affinity for the arcane arts. This is a crucial attribute for mages, as it<br />
directly increases their spell power score, and as a result of that, the potency of all of their spells. In addition to the<br />
above, the Magic score also has a significant impact upon the effectiveness of potions, poultices, and salves for all<br />
classes of character.<br />
- What Magic Does -<br />
Increases Spell Power by 1.0 for each point purchased.<br />
Increases the effectiveness of potions, poultices, and salves.<br />
Is a prerequisite for higher-level spells.<br />
Is a prerequisite for higher-tier staves.<br />
Contributes to mental resistance.<br />
CUNNING: Determines how effectively a character learns and reasons. Most skills like Herbalism and Combat<br />
Tactics require a quick mind (and high Cunning) to master them. This stat also helps your character to find<br />
weaknesses in enemy armor and in attack and defense tactics. Rogue's in particular benefit from this stat, as many of<br />
their class talents and special attacks rely upon it.<br />
- What Cunning Does -<br />
Increases the effectiveness of Rogue Talents.<br />
Is a prerequisite for many skills.<br />
Contributes to armor penetration, persuasion, and mental resistance.<br />
CONSTITUTION: Represents health and resilience. A higher constitution stat directly increases the amount of<br />
damage a character can receive before falling on the battlefield.<br />
- What Constitution Does -<br />
Increases health by 5.0 for each point purchased.<br />
Contributes to physical resistance,<br />
Skills<br />
You are provided with a point to spend on a skill here.<br />
Coercion (Passive)<br />
With this skill your character be<strong>com</strong>es influential and is able to convince others to change their views or decisions.<br />
Depending upon whether you have a higher strength or cunning stat, you will be better at either intimidating or<br />
persuading respectively.<br />
There are three upgrades to this skill - Improved Coercion, Expert Coercion, and Master Coercion.<br />
Stealing (Activated)<br />
This stat permits you to steal small items from others - whether enemy or friend - as long as you do not alert them to<br />
what you are doing.<br />
page 8 / 145
<strong>SuperCheats</strong>.<strong>com</strong> Unoffical <strong>Dragon</strong> <strong>Age</strong>: <strong>Origins</strong> Guide<br />
http://www.supercheats.<strong>com</strong>/<strong>guide</strong>s/dragon-age:-origins<br />
Check back for updates, videos and <strong>com</strong>ments for this <strong>guide</strong>.<br />
There are three upgrades to this skill - Improved Stealing, Expert Stealing, and Master Stealing.<br />
Trap-Making (Activated)<br />
With this skill you can construct traps and lures from basic <strong>com</strong>ponents.<br />
There are three upgrades to this skill - Improved Trap-Making, Expert Trap-Making, and Master Trap-Making.<br />
Survival (Passive)<br />
This skill gives you improved situational awareness and the ability to detect lower level creatures nearby you, as well<br />
as a small increase to nature resistance.<br />
There are three upgrades to this skill - Improved Survival, Expert Survival, and Master Survival.<br />
Herbalism (Activated)<br />
This skill permits you to create potions, poultices, and salves from herbs.<br />
There are three upgrades to this skill - Improved Herbalism, Expert Herbalism, and Master Herbalism.<br />
Poison-Making (Activated)<br />
This skill permits you to make poisons and grenades.<br />
There are three upgrades to this skill - Improved Poison-Making, Expert Poison-Making, and Master Poison-Making.<br />
Combat Training (Passive)<br />
This skill permits Warriors and Rogues to access higher tier weapon skills, and allows Mages to take more damage<br />
without their spells being interrupted.<br />
There are three upgrades to this skill - Improved Combat Training, Expert Combat Training, and Master Combat<br />
Training.<br />
Combat Tactics (Passive)<br />
This skill adds a <strong>com</strong>bat tactics slot and helps you to formulate battle strategy in <strong>com</strong>bat.<br />
There are three upgrades to this skill - Improved Combat Tactics, Expert Combat Tactics, and Master Combat Tactics.<br />
Next you can choose specialization skills that are based upon your class.<br />
These skills are broken out by type, and by line - in a given line there may be four skills you can select, but in order<br />
to select the 4th skill in that line you must have already selected the first three skills. Some of the skills will already<br />
be selected for you as part of the basic skills set of the class you are playing.<br />
There are three types of skills - Passive, Sustained, and Activated.<br />
Passive skills are just what they sound like - skills that you learn like muscle memory that you perform without the<br />
need to do anything special or make them happen.<br />
Sustained skills use your stamina to maintain them, and you must turn them on in the trigger menus. When they are<br />
active, their icon in the trigger menus will have glowing stars on it. For this sort of skill there is an upkeep drain, and<br />
they add to your fatigue level as you use them. If you turn them off, there is a brief cooldown period before you can<br />
reactivate the skill.<br />
Activated skills are just what they sound like - you select them from the trigger menu, and they effect whatever you<br />
have currently targeted. There is an activation cost to your stamina, and each has a more lengthy cooldown period<br />
before it can be used again.<br />
page 9 / 145
<strong>SuperCheats</strong>.<strong>com</strong> Unoffical <strong>Dragon</strong> <strong>Age</strong>: <strong>Origins</strong> Guide<br />
http://www.supercheats.<strong>com</strong>/<strong>guide</strong>s/dragon-age:-origins<br />
Check back for updates, videos and <strong>com</strong>ments for this <strong>guide</strong>.<br />
Some of the skills in each line will not be available to you even if it is the next selection in that line, because of<br />
specific requirements you may not meet at the present moment in stats - like Strength or Dexterity, or your current<br />
level is too low. Some of the skills have multiple requirements like Strength and Level. It is best to review these -<br />
especially the ones you are likely to want as the game progresses - to give yourself an idea on how you should be<br />
spending your upgrade points later.<br />
For example, if you are playing Warrior and you know you are going to want the Death Blow skill (the 4th selection<br />
in Warrior, Line 1), you note that the requirements for that are Level 12, and a Strength of 25, so as you get closer to<br />
Level 12, you will want to be spending more points in Strength than you might otherwise do in dividing them<br />
between the attributes so that when you level up you can actually choose that skill.<br />
A description of each skill is provided in the menu when you can select them - and it would be a good idea to read<br />
these descriptions and be<strong>com</strong>e familiar with what each skill does, so that you can plan out how you will build your<br />
character as you level.<br />
Warrior<br />
- Line 1<br />
Powerful (Passive)<br />
Threaten (Sustained)<br />
Bravery (Passive)<br />
Death Blow (Passive)<br />
- Line 2<br />
Precise Striking (Sustained)<br />
Taunt (Activated)<br />
Disengage (Activated)<br />
Perfect Striking (Activated)<br />
Dual-Weapon<br />
- Line 1<br />
Dual-Weapon Training (Passive)<br />
Dual-Weapon Finesse (Passive)<br />
Dual-Weapon Expert (Passive)<br />
Dual-Weapon Mastery (Passive)<br />
- Line 2<br />
Dual Striking (Sustained)<br />
Riposte (Activated)<br />
Cripple (Activated)<br />
Punisher (Activated)<br />
- Line 3<br />
Dual-Weapon Sweep (Activated)<br />
Flurry (Activated)<br />
Momentum (Sustained)<br />
Whirlwind (Activated)<br />
Archery<br />
- Line 1<br />
Melee Archer (Passive)<br />
Aim (Sustained)<br />
Defensive Fire (Sustained)<br />
Master Archer (Passive)<br />
- Line 2<br />
page 10 / 145
<strong>SuperCheats</strong>.<strong>com</strong> Unoffical <strong>Dragon</strong> <strong>Age</strong>: <strong>Origins</strong> Guide<br />
http://www.supercheats.<strong>com</strong>/<strong>guide</strong>s/dragon-age:-origins<br />
Check back for updates, videos and <strong>com</strong>ments for this <strong>guide</strong>.<br />
Pinning Shot (Activated)<br />
Crippling Shot (Activated)<br />
Critical Shot (Activated)<br />
Arrow of Slaying (Activated)<br />
- Line 3<br />
Rapid Shot (Sustained)<br />
Shattering Shot (Sustained)<br />
Supressing Fire (Sustained)<br />
Scattershot (Activated)<br />
Weapon and Shield<br />
- Line 1<br />
Shield Bash (Activated)<br />
Shield Pummel (Activated)<br />
Overpower (Activated)<br />
Assault (Activated)<br />
- Line 2<br />
Shield Defense (Sustained)<br />
Shield Balance (Passive)<br />
Shield Wall (Sustained)<br />
Shield Expertise (Passive)<br />
- Line 3<br />
Shield Block (Passive)<br />
Shield Cover (Sustained)<br />
Shield Tactics (Passive)<br />
Shield Mastery (Passive)<br />
Two-Handed<br />
- Line 1<br />
Pommel Strike (Activated)<br />
Indomitable (Sustained)<br />
Stunning Blows (Passive)<br />
Critical Strike (Activated)<br />
- Line 2<br />
Sunder Arms (Activated)<br />
Shattering Blows (Passive)<br />
Sunder Armor (Activated)<br />
Destroyer (Passive)<br />
- Line 3<br />
Mighty Blow (Activated)<br />
Powerful Swings (Sustained)<br />
Two-handed Strength (Passive)<br />
Two-handed Sweep (Activated)<br />
page 11 / 145
<strong>SuperCheats</strong>.<strong>com</strong> Unoffical <strong>Dragon</strong> <strong>Age</strong>: <strong>Origins</strong> Guide<br />
http://www.supercheats.<strong>com</strong>/<strong>guide</strong>s/dragon-age:-origins<br />
Check back for updates, videos and <strong>com</strong>ments for this <strong>guide</strong>.<br />
The Origin Stories<br />
There are a total of six unique Origin Stories that are based upon the Race and Background you selected when<br />
creating the character. As these are each different, we will cover them all as Part 1 of the walkthrough.<br />
There are minor variations based upon the gender of the character, and you will notice that at some points in the<br />
story lines, the developers missed some gender-specific settings and the characters you interact with may address<br />
you as the incorrect gender. Just ignore that - nothing is wrong with your character :)<br />
Origin Story 1: Human Warrior (Human Noble)<br />
Default Male Name: Aedan<br />
Default Female Name: Elissa<br />
As the story opens you learn that you are part of a long hereditary line of the aristocracy for your lands, and that your<br />
elder brother (and heir to the title) will be taking <strong>com</strong>mand of part of your father's forces. You are introduced to your<br />
father and his advisor, and learn through their conversation you get a bit of the background for current events.<br />
Your first interaction is with Arl Howe, your father's advisor, and this is where you start deciding what the personality<br />
of your avatar will be! Sarcastic? Rude? Polite? The choice is yours, but be aware that while it may not be obvious,<br />
some of your choices in interacting in conversation can have an impact later in the game.<br />
NOTE - There are so many lines of influence in this game that no <strong>guide</strong> or walkthrough could easily cover them all.<br />
These Origin lines are based upon my choices - yours may vary - but the overall experience should be the same.<br />
I chose to be polite and Arl Howe mentions his daughter - and you are once again given a selection of choices on<br />
how to reply. Since I am a polite gentleman warrior, I say "I'd like that" to which he replies that he is pleased,<br />
mentioning that his daughter talks about me a lot.<br />
Now you learn that you are being left in charge of the castle while your father and older brother go off to war. I of<br />
course will do my best, and I tell pops that, and then we get a surprise - pop now introduces us to Duncan, a visiting<br />
Grey Warden!<br />
You can now learn a bit about the Grey Wardens as you progress through the dialogue, and you learn thay Duncan<br />
thinks you might make a good Grey Warden. How cool is that? Well, not so much according to your Pops, who has<br />
no desire for you to join. Well, we will see about that, right?<br />
Your next task issued by your father is to find your brother and tell him to lead the troops to Ostagar ahead of your<br />
father. You should ask where Fergus is so that you have an idea of where you are going I suppose, but after you<br />
agree to deliver that message, you should note that a white arrowhead has now appeared on your radar map. This<br />
will lead you to your brother - the goal in this quest - but before we do that, there are some other things we can do!<br />
- Learning about the backstory<br />
Each of the key characters in the game can be talked to - and presents a set of questions you can ask that will result<br />
in information being provided. Try that out on Arl Howe now.<br />
When you ask him how long he has been friends with your father, you learn that they really are old friends as well as<br />
past <strong>com</strong>rades in arms. While you are talking, why not find out how interested his daughter really is in you?<br />
There are some nuggets of information that you will obtain in this way that can provide foreshadowing and a deeper<br />
understanding of the story, so it would be an idea to indulge in this exploration as it really does add to the enjoyment<br />
of the game.<br />
page 12 / 145
<strong>SuperCheats</strong>.<strong>com</strong> Unoffical <strong>Dragon</strong> <strong>Age</strong>: <strong>Origins</strong> Guide<br />
http://www.supercheats.<strong>com</strong>/<strong>guide</strong>s/dragon-age:-origins<br />
Check back for updates, videos and <strong>com</strong>ments for this <strong>guide</strong>.<br />
Despite the fact that Duncan will try to dissuade you from talking to him, if you tell him you have just a few<br />
questions, he will indulge you. The information he gives is interesting, and again adds to the backstory so go ahead<br />
and insist!<br />
Now you have pretty much exhausted your conversations here, so hit the door behind you and start exploring the<br />
castle. Do not head directly for your brother, instead explore every room that you have access to now, because<br />
pretty soon entire sections of the castle will no longer be accessible to you, and there are things you can collect and<br />
learn now that are worth the effort.<br />
- The Codex<br />
Behind Mother Mallol in the chapel you will notice a glowing spot - that is a book on the lectern before the alter.<br />
Go ahead and examine the book to add it to your Codex now. Hit the BACK button and then LT to select the Quests<br />
menu, then use the right stick to change the sub-selection to Codex, and highlight Magic and Religion and hit A.<br />
Now look at the bookshelf to the right of the alter for another book.<br />
The book you just added to your Codex - Andraste: Bride of the Maker - is now here, and you can read its entry if<br />
you select it, Go ahead and do that now. There are two more selections under religion, and then you can read<br />
about Castle Highover under Culture and History, and biographical sketches of Duncan and Arl Howe under<br />
Characters. Finally there is a section called Controls that details how the different sections relate to your game pad.<br />
First Origin Quest<br />
As you move towards the section of the castle where you brother is, you will be stopped by a red-headed warrior<br />
named Ser Gilmore who has a message for you - your dog is raising hell in the kitchen pantry and the Major Domo<br />
wants you to do something!<br />
Go ahead and select the option to head to the kitchen and deal with the matter now, but do not stop exploring! The<br />
door nearby leads to a classroom in which some Squire's are being educated. Head on in with your new party<br />
member and talk to the teacher to learn about the story of your family. There is some foreshadowing to be found<br />
here with respect to Werewolves and volatile nature of politics in the Kingdom.<br />
This interaction may be a bit on the long side but it gains you several new Codex entries that are worth reading. In<br />
addition, in the rear of this chamber you will find two books (one to the left, one to the right) that detail the history of<br />
Ferelden (Chapters 1 & 2) and, in the room through the door to the right as you are leaving the chamber you will find<br />
another Codex entry - a book on the culture of Ferelden.<br />
Now go ahead and run to the Kitchens - and get a Cutscene (CS) that tells you what your dog has been up to - and<br />
gives you a chance to defuse the situation through conversation with Nan.<br />
Now head inside the pantry and either chastise or encourage your dog - I praised him myself, and lucky I did<br />
because it turns out he was not up to mischief after all! As giant rats stream out from hiding to attack, you are given<br />
the opportunity to name your dog - I called mine Calvin after my pittbull in a dachshund suit - and then killed some<br />
rats for our first <strong>com</strong>bat XP.<br />
Seriously... Giant Rats... Why not a Giant Spider? Yes, I know, this is the stereotypical and traditional first <strong>com</strong>bat of<br />
the Fantasy RPG, I am not <strong>com</strong>plaining mind you. But still... Giant Rats?<br />
In a sack and a crate in the pantry is some Elfroot - go ahead and take that - it is used for making health potions, and<br />
even if you have not selected Herbalism as one of your skills, eventually you will have a party member who does<br />
have that skill, and once you acquire an inventory of empty bottles, you can make your own potions! Yay You!<br />
Now exit the pantry and talk to Nan, so she can change her mind about your pooch - and give him a treat as his<br />
reward. As you exit you can go to the feast hall down the way but there is nothing there for you - but if you look up<br />
page 13 / 145
<strong>SuperCheats</strong>.<strong>com</strong> Unoffical <strong>Dragon</strong> <strong>Age</strong>: <strong>Origins</strong> Guide<br />
http://www.supercheats.<strong>com</strong>/<strong>guide</strong>s/dragon-age:-origins<br />
Check back for updates, videos and <strong>com</strong>ments for this <strong>guide</strong>.<br />
the next path you will see a group of people standing there - run to them and you are introduced to your mother!<br />
Now you get to meet your fathers guests - Iona is quite the babe - but the conversation is rather abrupt, so no<br />
romancing for you, bud! Once the guests depart, take this moment to talk to your mother - you will be glad you did<br />
later...<br />
- Fergus<br />
Now head on up and enter your brother's chambers - and meet your nephew and sister-in-law, Pass on the<br />
message, and your brother makes a macho declaration - and then your mother and father arrive for a proper<br />
send-off. You are treated to an amusing CS, and then You get the quest <strong>com</strong>pleted notice after that.<br />
In the bookshelf nearby is another book - Politics of Ferelden - go ahead and grab that to add it to your Codex now,<br />
because once you leave the room, you are irrevocably set upon the beginning of the end of the Origin Story!<br />
- The Sneak Attack<br />
Your dog wakes you - and then there is pounding upon the door! You can hear noises - disturbing noises that make<br />
no sense to you... The door bursts open, a screamed warning from a servant, and then you must fight! Try to take<br />
out the archer first, and of course your dog will be a great help with this battle as you are outnumbered - until after<br />
the battle, when your mother arrives with her own bow and arrows, and you learn that she is a warrior in her own<br />
right.<br />
Howe has betrayed your family - this is a coup of sorts!<br />
Now before you head on to find your father, take a moment to loot and gather supplies here. The bodies of the<br />
enemies have items on them - so loot those - and then go back into your room and you will see a cabinet. Loot that<br />
to obtain a Lesser Health Poultice and a Small Grease Trap.<br />
Run across the hall and open the door only to discover - gasp! The bodies of your brother's wife and son! That<br />
bastard! He killed Kenny!<br />
In the adjacent chamber there are more enemy to kill - and another gruesome discovery - the body of your mother's<br />
friend. Before you take the door nearby to exit the living chambers, run back to your parents room and empty the<br />
crate there - it holds some weapons and you can sell those later for money.<br />
From here on out this is pretty much a rail - most of the other passages are blocked either by rubble or fiery debris,<br />
so work your way from chamber to chamber, taking out the enemy as you encounter them, and be sure to loot as<br />
you finish each battle.<br />
- The Family Treasury<br />
This is easy to miss if you are not going from chamber to chamber, so be sure that you do not miss it! When you<br />
reach the door to the treasury room, your mother will offer you her key, and tell you that Howe must not obtain the<br />
family sword! Enter the armory, and loot it to get some pretty good stuff that you will want to have.<br />
The Family Sword is better than the one you have now - 7.70 damage vs. the 7.0 damage of yours - but more<br />
important, it has 1 damage and 4 Attack modifiers on it! There is also the Cousland Guard Shield - but that requires<br />
18 strength so you may not be able to use it - I could :)<br />
That was nice for a few seconds, until I looted the Shield of Highever - but that requires 20 Strength so YMMV.<br />
There is also a nice set of Scale Armor, so go ahead and upgrade your gear now.<br />
After you finish looting more enemy will attack, and after you take them out, continue along the path, checking each<br />
chamber. In a nearby chamber you can loot a leather helm off of a knight - go ahead and equip that, and then head<br />
page 14 / 145
<strong>SuperCheats</strong>.<strong>com</strong> Unoffical <strong>Dragon</strong> <strong>Age</strong>: <strong>Origins</strong> Guide<br />
http://www.supercheats.<strong>com</strong>/<strong>guide</strong>s/dragon-age:-origins<br />
Check back for updates, videos and <strong>com</strong>ments for this <strong>guide</strong>.<br />
to the chamber across the corridor to help rescue Ser Gilmore, and learn the location of your father.<br />
- Your Father in the Pantry<br />
As you fight your way to the larder and discover your father, it turns out he is hurt much worse than you had hoped.<br />
Your father is pissed - understandably - but knows that he is too badly hurt to go on - he is dying. Your mother is<br />
unwilling to leave him to a solitary death, and chooses to stay and ac<strong>com</strong>pany him in that last journey - and your<br />
father urges you to escape, to send word to the King of this betrayal, and to avenge the family.,<br />
As this conversation concludes, Duncan the Grey Warden appears - remember Duncan?<br />
Duncan agrees to help, but only if you join him as his recruit - well, you wanted to be a Grey Warden anyway,<br />
right? A final farewell with your parents, and then into the tunnel with Duncan to escape!<br />
- To Ostagar<br />
A brief CS sees you arriving at Ostagar with Duncan and your dog. The King himself greets you, and you are<br />
introduced. When the King learns of what has happened, he is outraged and promises you justice - after the battle<br />
tomorrow of course. Your brother is out on patrol and will not return until after the battle, leaving you time to<br />
explore, <strong>com</strong>plete a few quests, and officially join the Grey Wardens by passing their tests, as you have <strong>com</strong>pleted<br />
the Origin Story! Good on ya!<br />
---=== Now jump ahead to Part 2 of the walkthrough, Ostagar! ===---<br />
page 15 / 145
<strong>SuperCheats</strong>.<strong>com</strong> Unoffical <strong>Dragon</strong> <strong>Age</strong>: <strong>Origins</strong> Guide<br />
http://www.supercheats.<strong>com</strong>/<strong>guide</strong>s/dragon-age:-origins<br />
Check back for updates, videos and <strong>com</strong>ments for this <strong>guide</strong>.<br />
Origin Story 2: Human Mage (Magi)<br />
Default Male Name: Daylen<br />
Default Female Name: Solona<br />
As your story begins you learn that the life of the mage is one of suspicion and second-class status in the world.<br />
Oppressed by the Templar, restricted by your own class, and blamed for all of the bad in the world - including the<br />
destruction of heaven - it is a pretty grim picture painted for you. But hey, on the plus side - You are a MAGE!<br />
Woohoo!<br />
The Harrowing - the graduation test of a Mage - approaches - and it is time to enter the dream world and take on a<br />
demon - are you ready? Sure you are! Oh, one more thing - if you fail this test, the Templar will kill you. No<br />
pressure, right?<br />
- The Harrowing<br />
You touch the glowing stuff in the basin and FLASH! You are in the otherworld! Now first thing you should do is go<br />
examine that scary-looking statue to pick up a Codex entry - and then grab the healing potions from the nearby pot.<br />
Around the bend and down from there is your first opponent - a white glowing wisp thingy.<br />
Depending on what magic you chose you either need to get close to cast, or you can cast from a distance - either<br />
way do what you need to do to be able to kill it - and kill it! Now continue on and kill a few more until you run into<br />
a talking rat who morphs into a human and tells you his name is... Mouse. Umkay...<br />
Mouse appears to be the spirit of a Magi who was killed by the Templar for taking too long in doing the Harrowing -<br />
might want to hurry this up a bit so we don't have to join him, right?<br />
As you drop down into the flaming area, you should see a green glowing stone on your right - go collect that to gain<br />
a Codex entry for Lyrium - the stuff that makes magic - and folding - happen. You'll want to be collecting a lot of<br />
that right?<br />
- The Spirit of Valor<br />
There is another vase of healing with healing potions just past this area after you fight two more wisps - and behind<br />
the vase is a Codex entry you can pick up by clicking on it. Turning around you should see a glowing gold figure in<br />
the distance - that is the Spirit of Valor - go say hello!<br />
There are several paths you can take with the Spirit - I chose not to fight him, rather I asked all of the questions that<br />
you can ask that do not provoke, and then asked about the weapons. His offer to give a weapon - if you duel him<br />
first - did not strike me as a good idea, so I chose instead the insolent reply - so you can kill me yourself. That really<br />
made him angry, but I followed it up with the - Prove you are a Warrior and help be kill the Demon answer, and that<br />
got me Valor's Staff - a two-handed staff that does 3 Damage, 20 Armor Penetration, and increases spellpower by 1 -<br />
not a bad reward for a conversation right?<br />
The staff has a range of 50 for the spell it cast - a glowing white energy ball - and the casting is automatic when you<br />
attack. As you continue along the path you will encounter a trio of wolf phantoms that you can test out the staff on -<br />
a <strong>com</strong>bination of the staff and some fire spells should quickly settle their hides!<br />
- Sloth Demon<br />
Laying on the path ahead is a minor demon who, after an ominous CS, you have the option of conversing with. As<br />
you inquire you get a better idea of what he is, and after a few dialogue choices, you can ask him for help. Mouse<br />
suggests that you convince the demon to teach you how to be like him - to change your form - but you end up<br />
page 16 / 145
<strong>SuperCheats</strong>.<strong>com</strong> Unoffical <strong>Dragon</strong> <strong>Age</strong>: <strong>Origins</strong> Guide<br />
http://www.supercheats.<strong>com</strong>/<strong>guide</strong>s/dragon-age:-origins<br />
Check back for updates, videos and <strong>com</strong>ments for this <strong>guide</strong>.<br />
convincing Mouse to learn the Sloth form - and you convince the Sloth to help.<br />
The choice <strong>com</strong>es down to answering three riddles - answer correctly and you gain his help, fail and he will kill<br />
you! You can also provoke him into fighting you and, if you defeat him, he will then teach Mouse how to change<br />
forms, but hey, a riddle beats a fight any day!<br />
The first riddle is: I have seas with no water, coasts with no sand, towns without people, mountains without land.<br />
What am I?<br />
The obvious answer is: A Map!<br />
The second riddle is: I am rarely touched, but often held. If you have wit, you will use me well. What am I?<br />
The tricky answer is: My Tongue!<br />
The third and final riddle is: Often I will spin a tale, never will I charge a fee. I'll amuse you an entire eve, but, alas,<br />
you won't remember me. What am I?<br />
The simple answer is: A dream!<br />
Having answered the three riddles correctly you have won Sloth's challenge, and Mouse quickly learns the spell to<br />
change into a bear!<br />
Now that you have succeeded, head back along the path towards the fiery clearing, fighting a few more Spirit<br />
Wolves along the way, and you will encounter the Demon that you came to fight - if you are confused simply follow<br />
the arrow marker.<br />
Before you begin your epic battle, you get to have a little chat with the demon first - Joy! Ah but we learn that<br />
Mouse was not exactly what he said he was - but that is okay because he is still on our side! As the fight opens, the<br />
demon is joined by a pair of wisps - you can just ignore them, as taking out the demon ends the fight with the wisps.<br />
As the fight ends, you enter into another conversation with Mouse - and again, all may not be as you thought it<br />
was... Are you really surprised that Mouse was the true demon? Yes, me either - but I was surprised that we did not<br />
have to fight him to end the Harrowing.<br />
- The Dormitory<br />
You awake in bed, with your friend Jowan waking you up. Of course the first thing that he asks is what it was like -<br />
but you know you are not supposed to tell him, right? Not telling sort of irritates him but on the plus side, he starts<br />
telling you about himself, and the Tranquil. That is worth the effort - gives you a better idea of just how nasty those<br />
Templar fellas are!<br />
Eventually you learn that the reason that Jowan came to wake you was that he has a message for you - you have<br />
been summoned. Boy takes his time telling you that, doesn't he? Well we need to get on with it, but as we do not<br />
know what the future holds, take a moment to loot the two items that are in this area - one in a nearby chest, one in<br />
the bathroom.<br />
When you reach the library chambers - there are two - you can loot a book in each that adds new Codex entries -<br />
and once you are satisfied that you have looted everything there is, head to the exit marked on your map - not the<br />
Basement one, that just leads to a door you cannot open - and not the one with the two Templar guarding it - the<br />
Tower Entrance - which is also locked. No, the one you want is the door to the second floor - which is at the center<br />
of the Library chamber :)<br />
On your way why not stop to talk to Owain, the Tranquil who mans the stockroom? Interesting story he has - but<br />
now let us run through all the chambers on this level a-looting as we go, shall we? There is a good number of<br />
page 17 / 145
<strong>SuperCheats</strong>.<strong>com</strong> Unoffical <strong>Dragon</strong> <strong>Age</strong>: <strong>Origins</strong> Guide<br />
http://www.supercheats.<strong>com</strong>/<strong>guide</strong>s/dragon-age:-origins<br />
Check back for updates, videos and <strong>com</strong>ments for this <strong>guide</strong>.<br />
lootables here - supplies and books that add Codex entries. Do not ignore the books because each Codex entry you<br />
add also nets you 50 XP!<br />
Once you have looted all kit and books, head into the last room for your meeting and a CS that gives you some more<br />
of the Magi backstory. The Templar there has a serious attitude, yes? But it is Irvine you came to see, not that<br />
tin-suit. And who do you see standing there with Irvine? Why Duncan of the Grey Wardens of course!<br />
- Meeting Duncan<br />
After you get the congratulations speech from Irvine - and your new Mage Robes and Staff - he asks you to escort<br />
Duncan back to the guest quarters. Now is a good time - once you are in the hall - to have a chat with this Grey<br />
Warden. If you ask about the darkspawn and then about the Grey Wardens you will add a Codex entry on the<br />
Darkspawn as a result.<br />
As you move through the tower, there are a few more books to pick up, and some additional Codex entries to be had<br />
through conversation. Stop and chat with Senior Enchanter Torrin to learn about the Magi Fraternities, and be sure<br />
to check out the empty bookshelf that is missing its books - that could be an interesting gap...<br />
Once you get Duncan back to his room, you get yet another Codex entry for your troubles, and now it the time to<br />
have another chat with him, learn something about the outside, and this is also your chance to mention to Duncan<br />
that you believe that you could be of aid to the army too.<br />
As you exit the chamber, Jowan is waiting for you - and he wants to talk.<br />
- A Private Chat with Jowan<br />
Once you are in a secluded spot, Jowan introduces you to Lilly - an initiate - and you learn he is carrying on a<br />
proscribed relationship with her! And what is more, Jowan is convinced that the Circle intends to make him a<br />
Tranquil - and they want your help.<br />
Here is where you have to make a decision - I chose to help them.<br />
So the plan is to get Jowan's blood tag and destroy it - but to do that you have to get into the chamber where they are<br />
stored. You need a Fire Rod from the supply room - so that is the first step.<br />
Outside the storerooms you find Senior Enchanter Leorah, who as it turns out is the person in charge of the Circle's<br />
stores. She is acting rather suspiciously - so go ahead and have a chat with her - and be circumspect about her<br />
answers. Accusations will not go far wrong here, and eventually she should clue you in on her true problem - one<br />
you can help her with that will also get you access to the stores, which is what you want anyway!<br />
- Spiders in the Storerooms<br />
If it is not spiders it is giant rats - but that is how it goes when you are learning to fight or use magic, right? The<br />
caverns are basically a large loop - and your task is to run through that loop, killing the giant spiders you encounter<br />
there, and of course looting whatever there is to be looted!<br />
Once you have finished that - you will get the quest updated notice - go ahead and return to Leorah and let her<br />
know that you have taken care of the spiders. With that done, go ahead and see Owain at the stockroom in the<br />
center of the tower - and request the rod. He will not give it to you unless you get the request form counter-signed<br />
by a Senior Enchanter - and now you know why we stopped to kill a bunch of spiders, don't you?<br />
So a quick trip back to Leorah to get the form signed, and then right back to Owain, where you turn in the form and<br />
get your Rod of Fire! Some more running I am afraid as we head back to tell Jowan and Lily that you have what you<br />
need.<br />
page 18 / 145
<strong>SuperCheats</strong>.<strong>com</strong> Unoffical <strong>Dragon</strong> <strong>Age</strong>: <strong>Origins</strong> Guide<br />
http://www.supercheats.<strong>com</strong>/<strong>guide</strong>s/dragon-age:-origins<br />
Check back for updates, videos and <strong>com</strong>ments for this <strong>guide</strong>.<br />
Remember that door to the basement we did not want to go to earlier? Yup, that is where we are going now, so hit<br />
the door down to the first floor, and then make your way through the library chambers to the inner ring, and thus to<br />
the door leading down to the basement - and the door we are actually interested in torching.<br />
- The Repository<br />
Once you reach the door to the Repository Lily explains how you get in - and uses the password to prime the door so<br />
that your magic spell will open it. Once you are inside and at the right door, you are faced with a major impediment<br />
- magic does not work here! It looks like you will have to find another way - starting at the other nearby door!<br />
As you burn through the lock on that door, the suit of armor nearby that looked like, well, a suit of armor, magically<br />
<strong>com</strong>es alive - it is a sentinel guarding that door! Time to fight! Once you take him down and enter the new<br />
chamber there are a few more sentinels to be dealt with - and then loot your way through the long corridor as you<br />
take on another group of sentinels.<br />
Once you get past the next group there will be a group of Deep Stalkers to kill - and then you will work you way<br />
along through a few more groups of sentinels - just kill them, heal, rinse and repeat, and eventually you will arrive at<br />
the Repository's other entrance.<br />
Inside you will find some good loot items - and an artifact that is puuurrrfect for your problem!<br />
Using the cat statue and the rod you manage to break your way in. Inside there are a few more guardians to fight<br />
that seemed a bit tougher than the others, but you manage. There is a chest here with a better cowl - so grab that,<br />
and then up the stairs nearby to find Jowan's phylactery!<br />
In a brief CS Jowan breaks the vial and Lily tells you she does not want to stay a moment longer - and you make for<br />
the exit only to find... The man is waiting for you!<br />
- Is this the End?<br />
Irvine and Gregor knew all along, and were waiting for the proof - and you have pretty much handed them that.<br />
Clearly Lily and Jowan are sunk - but what about you? And yet - when push <strong>com</strong>es to shove, Jowan shows his true<br />
colors, casting a blood magic spell to make his escape!<br />
Fortunately for you, when it looks like things have gotten as bad as they can get, Duncan shows up and demands<br />
that you be allowed to join the Grey Wardens as a recruit! Gregor is not happy - but in the end, Duncan has his<br />
way, and you reach the end of the second Origin Story!<br />
page 19 / 145
<strong>SuperCheats</strong>.<strong>com</strong> Unoffical <strong>Dragon</strong> <strong>Age</strong>: <strong>Origins</strong> Guide<br />
http://www.supercheats.<strong>com</strong>/<strong>guide</strong>s/dragon-age:-origins<br />
Check back for updates, videos and <strong>com</strong>ments for this <strong>guide</strong>.<br />
Origin Story 3: Dwarf Warrior (Dwarf Noble)<br />
Default Male Name: Duran<br />
Default Female Name: Sereda<br />
You are the second child of Lord Aeducan, the ruler of the Dwarven holds, and today is the day that your father will<br />
present you to the Dwarven Nobility - call it your <strong>com</strong>ing-out day.<br />
In your chambers your friend and <strong>com</strong>panion, Gorim, is helping you to get ready for your big day. He suggests that<br />
as there is time, perhaps it would be an idea to visit the Provings - a tournament of <strong>com</strong>bat held in your honor to put<br />
on display the best of the best and warrior prowess. Gorim thinks that you should make an appearance there and, if<br />
you like, fight as well. That sounds like an excellent idea!<br />
Before we leave there are a few lootable items we should grab, and then hit the door to the hall, where we can find<br />
another lootable item - a book that adds a Codex entry. Take a right turn and head along to the first door on the<br />
right, where we startle a mistress exiting your brothers room!<br />
Follow her in and loot the room, and then have a chat with her! As your brother's mistress she is clearly beneath<br />
your station - and Gorim's tone illustrates that. In one of the containers was a Dwarven Merchant's belt that adds to<br />
your money intake - go ahead and put that on now!<br />
The Diamond Quarter<br />
Once you have all there is to grab in your brother's room, head down the hall to the entrance to the Diamond<br />
Quarters. What we will be doing here is a few minor quests and some schmoozing before we go to fight in the<br />
Proving - and it begins as we enter the area and hear an argument nearby.<br />
Scholar Gertek is being accosted by Bruntin Vollney, a noble with a grudge. Talk to the Scholar to find out what this<br />
is about...<br />
How you interact depends upon your nature and your character - I chose to support the Scholar and the truth, but of<br />
course that did not make Bruntin my friend. Gorim suggests that you have the idiot killed, and the Scholar agrees<br />
with that - and hey, when in Rome, right? You do what you like, but I decided that he needed killing :)<br />
Move down the hall and do some shopping - stopping to talk to each of the merchants on the way. You can also sell<br />
off the extra and unneeded items that you have already looted - may as well do that now.<br />
As you move up the hall you will run into your brothers Trian and Bhelen. Trian is a jerk, and Bhelen is a suck-up -<br />
what a family! I did not take well to Trian's nasty attitude so I dished it back with as little respect as I could manage,<br />
and was happy to see them stalk off.<br />
The Armor Merchant is next - and then ahead on the right are a pair of Noble-hunters - Dwarven woman whose only<br />
interest is to carry the child of a high-born noble! Go ahead and chat them up why don't you? It will be a long day,<br />
and the night is cold, why not have a warm bed - or a very warm bed if you can handle both? What can I say, I<br />
guess my Prince is a horndog!<br />
There are three barrels nearby that you can loot - do that - and then hit the Weapon Merchant's booth - he has a<br />
proposition for you! He tells you about the dagger that he had made especially for your day, and how your brother<br />
Trian rejected it - and him - and asks that you accept it. Doing so will surely anger your brother - but so what? It is<br />
not like you are on good terms anyway, and I have a feeling that you are not going to remain brothers for long, so...<br />
Next on the list is the Magic Merchant - but you will not be doing any trade with him because he fainted at the sight<br />
of you! Just past this last merchant's booth is a guard who was dispatched to be your escort through the <strong>com</strong>mon<br />
page 20 / 145
<strong>SuperCheats</strong>.<strong>com</strong> Unoffical <strong>Dragon</strong> <strong>Age</strong>: <strong>Origins</strong> Guide<br />
http://www.supercheats.<strong>com</strong>/<strong>guide</strong>s/dragon-age:-origins<br />
Check back for updates, videos and <strong>com</strong>ments for this <strong>guide</strong>.<br />
areas - at your father's orders. Go ahead and let him do his job and take you to the Proving Arena now.<br />
The Proving Arena<br />
Now this is a battle tournament that is put on to honor you - but it is your right and prerogative to participate in it if<br />
you desire - and you desire! So tell the Proving Master that you want to fight, and then get to it!<br />
The first match is with Aller Bemot, youngest son of Lord Bemot. He seems like a nice enough fellow, certainly<br />
polite, but you know you have to kick his butt right? That should have been a pretty easy fight for you - and an easy<br />
84XP - and you get a quest update as well - so let us move on to the next fight!<br />
The second match is with Adal Helmi - a woman! Well, she is wearing armor and has a weapon - she knew what<br />
she was getting into when she entered the Proving, so you know what you have to do, right? Yes, kick her butt!<br />
Actually she fought better than the first guy, but you beat her anyway, so it is on to the next match!<br />
The third match is with Ser Blackstone, who is supposed to be one of the better warriors having achieved glory in<br />
<strong>com</strong>bat in the deep road. The announcer is pretty enthusiastic about his job - and Blackstone thinks a lot of himself<br />
too! Try to learn, he says... Let's teach HIM a lesson, shall we?<br />
The fourth and final match it with Frandlin Ivo, who even Ser Gorim seems to respect. Will this be a challenge for<br />
you? Let's find out!<br />
And once again we kick Dwarven butt! Now the question is do we keep the reward for winning the Proving or not?<br />
It is a nice helm, sure - but would giving it to a loser be honorable? You decide for yourself on that one.<br />
Be presented to the Nobility<br />
After you decide, talk to the guard to head back to the Diamond Quarter - and then head back to the Orzammer<br />
Royal Palace. Straight ahead is the throne room - where you are to be officially presented to the nobility and receive<br />
your assignment as a <strong>com</strong>mander! May as well head in there now.<br />
As you enter, Ser Gorim remarks on the presence of the Grey Wardens, and you will notice that there is a small<br />
crowd here. Before you talk to your father, stop and talk to Lord Ronus Dace - on the right as you move ahead. He<br />
has a matter he wishes to discuss with you - you have to love Dwarven politics!<br />
As you talk to Lord Dace, you learn about the fate of the Dwarfs who leave the kingdom to live on the surface, and<br />
how they are stripped of their associations and position when they do this. If you listen to Dace, you get the idea<br />
that while it is convenient to say that he is concerned about their welfare, but you soon learn that the real story<br />
involves his wife's cousin, who is trapped on the surface, unable to return to the fold as it were.<br />
That sounds like a pretty good reason to help him out - I know I decided to - but as you move towards your father,<br />
you hear Lady Helmi insult you! "You're a fool!" she declares. Well, you have to hear her out, right?<br />
According to Lady Helmi, Lord Dace is conning you! Last Spring she says, Dace backed the merchant guild on a<br />
trade expedition to the surface that ended in disaster - and according to her his losses were severe, and he hopes to<br />
recover them by helping exiled nobility regain their status. According to her, helping him will cost you severely<br />
when it <strong>com</strong>es to support of the other noble families, but hey, we don't plan on sticking around anyway - we are<br />
destined to join the Grey Wardens - and besides, she has a bad attitude!<br />
Now is the time to go over to dad - who is still discussing politics with the nobles - and you get an idea that your<br />
father is not as concerned with profit as many of the nobility. The conversation ends and your father greets you. He<br />
has heard about your winning the Proving, and asks if you are ready to be presented. Well yeah!<br />
page 21 / 145
<strong>SuperCheats</strong>.<strong>com</strong> Unoffical <strong>Dragon</strong> <strong>Age</strong>: <strong>Origins</strong> Guide<br />
http://www.supercheats.<strong>com</strong>/<strong>guide</strong>s/dragon-age:-origins<br />
Check back for updates, videos and <strong>com</strong>ments for this <strong>guide</strong>.<br />
Your father asks if any of the nobles have questions for you - and Dace asks his. This is one of the ways that the<br />
game can change - you decide what you want to do here, and it does influence the game, though the influence is<br />
subtle. Since I agreed to help him and I did not much care for Lady Helmi, I made good on my promise and<br />
supported the surface Dwarves.<br />
The people seem to be as happy as ever - maybe Lady Helmi is wrong about the general consensus. After the<br />
cheering abates, you learn that your mission tomorrow is related to the Grey Wardens - and Duncan makes a short<br />
statement before your father opens the feast and you are set to your own again.<br />
Now would be a good time to say hello to Duncan - maybe get to know him a little. Duncan has heard of you -<br />
mostly from your father - and he implies that you would be a wel<strong>com</strong>e addition to the ranks of the Grey Wardens!<br />
Now would be a good time to look into that, yes?<br />
Chatting with Duncan gets you three new Codex entries - you may want to read those as they are interesting. On the<br />
way out say hello to Dace - he seems pleased doesn't he?<br />
Another Meeting with Prince Trian<br />
After you depart the feast you will notice the white arrow on your radar map. Following that will take you to your<br />
brother Trian's chambers - where you will find him with your other brother, Bhelen. You know I don't think he likes<br />
you much :)<br />
You pass on the message that your father wants to see him, and off he goes, leaving you with Bhelen, who actually<br />
has something that he wants to tell you. According to Bhelen, Trian plans to kill you in the confusion of the battle<br />
tomorrow!<br />
Bhelen explains that Trian believes that you are a threat to his taking the throne when our father dies; Bhelen talks<br />
about the manner in which kings are chosen, and implies that you have a better than average chance of being<br />
declared king by the Assembly should you father die. Bhelen adds that as you are his favorite brother, he would<br />
hate to see you die - and Trian be made king. While he may not have any idea how you should proceed, Bhelen<br />
declares that he will follow your lead whatever your decision.<br />
Now is it just me, or does this seem too good to be true? Maybe I am naturally suspicious - Gorim seems to think<br />
that you should kill Trian, and Bhelen, well, like he said, he will follow your lead - but all that really means is he<br />
does not want to go on the record as having an opinion one way or the other! I don't trust him - I just don't trust<br />
him.<br />
That out of the way, Ser Gorim reminds you that you have a menage-a-trois awaiting you back in your quarters - and<br />
away you go!<br />
The Battle Arrives<br />
A cinematic CS ensues in which your father fires up the troops and Duncan puts in a word, before you discuss the<br />
plans for the day. Bhelen seems to have grown a backbone, but he still heads off on the mission your father assigned<br />
to him.<br />
You are briefed on your special mission - to reclaim the shield of your ancestor. There is glory to be had here - and<br />
if we have any luck, some fighting as well! Finish out the CS to learn what you are supposed to do, and then head<br />
on out to battle and glory!<br />
You gain the Codex entry for the Deep Roads, and then you begin at their entrance. moving to the right over the<br />
rubble you can enter the Roads proper, where you will soon find yourself facing - wait for it - a Giant Spider! Yeah,<br />
it is a cliche, but if it was not a Giant Spider, it would be a Giant Rat, right? That is how first <strong>com</strong>bat in an RPG works<br />
:)<br />
page 22 / 145
<strong>SuperCheats</strong>.<strong>com</strong> Unoffical <strong>Dragon</strong> <strong>Age</strong>: <strong>Origins</strong> Guide<br />
http://www.supercheats.<strong>com</strong>/<strong>guide</strong>s/dragon-age:-origins<br />
Check back for updates, videos and <strong>com</strong>ments for this <strong>guide</strong>.<br />
Before you go on make sure you chat with Ser Gorim - he has some pointed observations to make about your<br />
activities last night. He is a little disappointed that you did not invite him to the um, festivities...<br />
Make sure you loot the corpse of the spider before you move on - he actually has a healing potion on him - what<br />
was he doing with that?!<br />
As you run ahead you should encounter a pair of darkspawn just after you trigger a trap that you did not see on the<br />
ground - and after you finish them off take a quick look at the body in the alcove to the right - he has a pair of<br />
Dwarven Armored Boots on him you can loot - and while they are no better than what you and Gorim are wearing,<br />
you can always sell them later...<br />
Meet with Frandlin Ivo<br />
As you move along the tunnel you will enter a large chamber in which Frandlin Ivo is waiting for you - yes this us<br />
the same Frandlin Ivo you defeated and (hopefully) who you gave the prize to. Actually it will not matter that much<br />
if you did not give it to him, now that I think on it, but still... He joins your party, and you move on through the<br />
tunnel to the left.<br />
In the next chamber there are more darkspawn - I took out the archer first - but with all of the help you have it<br />
should not take long to win this battle. There are a few chests behind the rocks near the fire - the first contains a<br />
small darkspawn shield that is the same stat-wise as the one you are using. The second chest is locked, and since<br />
you are not a Rogue, unavailable to you.<br />
Continue on through the next tunnel and you will meet up with the first scout who was sent ahead to gather<br />
intelligence about the darkspawn presence. After you receive his report, you he joins your party - and now is a good<br />
time to take advantage of the shield and boots you looted - by allowing the Scout to equip them, along with a<br />
dagger. My you are thoughtful and nice!<br />
As you continue into the next large chamber you encounter a more powerful darkspawn raiding party - and take<br />
them out! There is another chest here you cannot loot near the wagon - just ignore that and head into the next<br />
tunnel, but be sure to loot the bodies before you go.<br />
When you reach the next chamber you get a CS in which you learn that someone has beaten you to the door to the<br />
sacred chamber! The darkspawn bodies are still fresh, so whoever it is, they are still in there. It is time to find out<br />
who that might be!<br />
The Shield Chamber<br />
Inside the chamber entrance (before the bridge) on the left is the body of a Dwarf with a war ax on it - go ahead and<br />
loot that and have the Scout equip it as it is a better weapon than the dagger he is presently using. With that minor<br />
task finished, head on over the bridge to discover that the party that arrived ahead of you is a mercenary band - and<br />
they have been waiting for you!<br />
In a brief CS you learn that the mercenary band was hired by someone - it is implied that it was Prince Trian, since<br />
one of his men brought them the signet ring that they used to gain access to the chamber itself - but that is all the<br />
information you are going to get for now, as it is time to kill!<br />
After the battle, make sure you loot the corpses - on the leader you find Trian's signet ring - as they contain some<br />
good stuff. There is a barrel that has ammo for the artillery piece - and if you time it well you could even use that as<br />
part of the fight - but I did not discover that until after the fact. You can use the armor to improve the Scout's stats if<br />
you like, and then it is time to find the Shield!<br />
Finding the Shield<br />
page 23 / 145
<strong>SuperCheats</strong>.<strong>com</strong> Unoffical <strong>Dragon</strong> <strong>Age</strong>: <strong>Origins</strong> Guide<br />
http://www.supercheats.<strong>com</strong>/<strong>guide</strong>s/dragon-age:-origins<br />
Check back for updates, videos and <strong>com</strong>ments for this <strong>guide</strong>.<br />
The door to the Thaig Chamber is nearby and marked on the map - go ahead and move through it now and as you<br />
enter the chamber you get a brief CS after which you issue your orders - Look around, there must be a clue.<br />
There is a sarcophagus in the center of the chamber, and it contains a slot in which your signet ring can fit - but<br />
using that appears to do nothing. A closer examination of the floor however reveals that there are three oddly<br />
colored tiles.<br />
To trigger these, switch to each of your three party members and position one on each of the tiles, and then insert the<br />
signet ring again and voila! Access granted!<br />
Look the Aeducan Shield from the sarcophagus for a brief CS, you exit the chamber only to be confronted by more<br />
darkspawn forces, but they are more an irritation than any real threat. After you take them out, retrace your steps<br />
over the bridge and through the tunnels to the rendezvous point, where you are surprised to discover the bodies of<br />
your brother Trian and his men!<br />
The Betrayal<br />
Gorim thinks it was a darkspawn attack, but Ivo does not agree - pointing out that there are no bites, scratches, or<br />
mutilation. Suddenly you hear the noise of an approaching party - it is your father and he has Bhelen with him!<br />
What first seems like a good thing quickly turns sour, as Bhelen accuses you of the treacherous slaying of your<br />
brother Trian!<br />
Clearly you have been set up by Bhelen - as has Trian, but he is beyond caring about that now. Your father does not<br />
want to believe it, but Bhelen has constructed a very convincing plot, and the Scout and Ivo, it turns out, are part of<br />
the conspiracy, lying as they accuse you of killing Trian!<br />
There really is nothing you can do to make this better mate, it is part of the Origin Story and it is working as intended<br />
- after all you have to be put in a position wherein you are free to join the Grey Wardens, right? You are taken<br />
prisoner and thrown into a cell, awaiting the judgment of the Assembly - but you will not have to wait long.<br />
Ser Gorim arrives at your cell to give you the news: Bhelen moved to have you condemned without a trial and the<br />
Assembly approved, sentencing Gorim to exile on the surface, and you to death. You are to be sealed into the Deep<br />
Roads where you will fight the darkspawn until they kill you. Gorim actually came not just to say goodbye, but to<br />
let you know that Duncan and the Grey Warden party is in the Roads near where you will be sealed off, and<br />
suggests that you should seek them out and join them to escape the fate that Bhelen has arranged for you.<br />
That sounds like a good idea to me! Perhaps we will meet with Ser Gorim again some day?<br />
The Beginning of the End?<br />
You get a brief CS in which you receive your sentence and are cast into the Deep Roads, given a sword and shield<br />
and sent to your fate. Once you are inside the tunnels you prepare to fight your way to Duncan. You are already<br />
wielding the shield but not the sword, so you might want to equip that in place of the dagger you are wielding - you<br />
have nothing else to equip at the moment - though interestingly they did not take away your money!<br />
There will be a checkpoint save as you enter the tunnel that leads into the Deep Roads - this is the same entrance we<br />
used before on the Shield mission by the way - and just inside the tunnel you will see the body of a human knight<br />
just as you are attacked by the same Giant Spider you killed here last time. After you dispatch the spider - again -<br />
loot the body, as it has some armor and a greatsword.<br />
Note that the greatsword is a two-handed weapon and not a bad one really - it has a Damage level of 10 and armor<br />
penetration of 3, with a strength modifier, but if you are like me and spent some points upgrading the sword and<br />
shield skills set, this may not be the best choice, as the shield gives added defense and is necessary for some of your<br />
special moves. Either way, once you have equipped what you want to, continue into the Deep Roads.<br />
page 24 / 145
<strong>SuperCheats</strong>.<strong>com</strong> Unoffical <strong>Dragon</strong> <strong>Age</strong>: <strong>Origins</strong> Guide<br />
http://www.supercheats.<strong>com</strong>/<strong>guide</strong>s/dragon-age:-origins<br />
Check back for updates, videos and <strong>com</strong>ments for this <strong>guide</strong>.<br />
The Deep Road to Duncan<br />
Around the next bend in the tunnel is more darkspawn - so quickly take them out and then loot the bodies here -<br />
theirs and ones that were killed prior to your arrival. I only found money on the darkspawn, but the other body<br />
nearby had a pair of leather gloves on it, which adds a little to your armor and protection.<br />
Ahead around the next bend is a camp with a chest and a crate - I could not open the chest, but I did loot the crate,<br />
and then continued into the next set of tunnels. In an alcove on the right shortly after you enter there is a pair of<br />
Deep Stalkers to kill - one of them has a health potion on it to loot - and further into the alcove is a skeleton with a<br />
darkspawn dagger on it.<br />
In the alcove directly across from here there is a Giant Spider to be killed and the corpse of a darkspawn that has a<br />
Darkspawn Longsword on it. This sword has the same basic stats as yours but has a slight bonus to armor<br />
penetration - unfortunately it also has a negative dexterity stat, so while I looted it, I did not choose to equip it.<br />
Further into the tunnel we encounter more darkspawn, near the body of a dead Dwarf. Once the fight is over, loot<br />
the dwarf, as his body contains a set of Superior Dwarven Guard Armor - and this is a lot better than what we are<br />
presently wearing!<br />
A word about armor and this armor in particular - You will notice that the new armor is Tier 2 (our old armor is Tier<br />
1) - which means even though you cannot see that now, it has specific requirements in order to be worn. In this<br />
case, strength and level.<br />
The armor has two basic stats: Armor and Fatigue. The Armor stat is a basic estimate of the amount of protection that<br />
it provides, with a higher number being better, while the Fatigue level indicates how much of a hit on your available<br />
endurance pool this piece of armor will take. Our old armor's stats were 3 and 2% respectively, while the new<br />
armor is 7.50 and 14.7% which means that it provides a lot more protection, but at the cost of a chunk of<br />
endurance.<br />
Endurance is a simple thing - the yellow bar on your character status indicator tells you how much of a load you can<br />
manage - and this armor is going to significantly dent that pool, but not enough to make it not worth wearing. Be<br />
aware though that the things you wear, equip - and carry - have an impact on your endurance pool - you will notice<br />
that some of the heavier items that you loot can visibly show the changes that they make simply by being in your<br />
bag.<br />
Finally, unlike our old armor, this new set has some special modifiers to it: a 1 to Armor and 10 to physical<br />
resistance, which is in part why the hit to our endurance pool is worth taking, because the protection level this armor<br />
offers is far greater than the penalties for wearing it.<br />
Four Deep Stalkers!<br />
Around the next bend are four Deep Stalkers for you to fight - and just past them when you are done is a pair of dead<br />
Dwarves. This is a good loot opportunity because one of the bodies holds a battleaxe that has much better stats than<br />
our current sword that can be used with the shield - giving us a better attack rate. There is also a set of Dwarven<br />
Armored Boots - which you should equip immediately as we do not presently have any foot armor at all.<br />
The body also contains a few health poultices and an Injury Kit - if you do not know this already, the Injury Kit is<br />
what you use when a party member has fallen in <strong>com</strong>bat. The description explains that it consists of bandages and<br />
other healing aids (potions) that will, when applied, cure a small amount of health and up to three injuries.<br />
The passage here is actually blocked-off by a rock fall, so even though it looks like this is the right way to go on the<br />
radar map, we are going to have to backtrack a bit to work our way around it. On your way back head into the<br />
tunnel with the red glowing light as that will lead to the next large open chamber of the Deep Roads, where you will<br />
encounter the Grey Warden party - including Duncan.<br />
page 25 / 145
<strong>SuperCheats</strong>.<strong>com</strong> Unoffical <strong>Dragon</strong> <strong>Age</strong>: <strong>Origins</strong> Guide<br />
http://www.supercheats.<strong>com</strong>/<strong>guide</strong>s/dragon-age:-origins<br />
Check back for updates, videos and <strong>com</strong>ments for this <strong>guide</strong>.<br />
The Grey Warden Reunion<br />
Duncan is surprised to see you here - and alone - but you explain that you are no longer a Lord and he instantly<br />
understands your situation. Though curiosity is understandable, Duncan chides his fellow Grey Wardens not to pry,<br />
though I personally had no issue with that, and explained that I had been betrayed by my brother. Duncan instantly<br />
assumes that I mean Trian - but I set him straight on that account, and surprisingly he does not seem all that shocked<br />
by Bhelen being the betrayer.<br />
After a brief CS in which Duncan reprises the situation, you are formally invited to join the Grey Wardens - and<br />
while you really do not have a choice in the matter, it is an honor nonetheless, and as you make that choice, you<br />
<strong>com</strong>plete the Dwarven Noble Origin Story!<br />
Good on ya mate!<br />
At this point you get the CS and travel to Ostagar - and as you have now <strong>com</strong>pleted the Origin Story, you should<br />
now skip ahead to Part 2 of the Walkthrough, where we begin the main storyline.<br />
page 26 / 145
<strong>SuperCheats</strong>.<strong>com</strong> Unoffical <strong>Dragon</strong> <strong>Age</strong>: <strong>Origins</strong> Guide<br />
http://www.supercheats.<strong>com</strong>/<strong>guide</strong>s/dragon-age:-origins<br />
Check back for updates, videos and <strong>com</strong>ments for this <strong>guide</strong>.<br />
Origin Story 4: Dwarf Rogue (Dwarf Commoner)<br />
Default Male Name: Faren<br />
Default Female Name: Natia<br />
As the story opens you are treated to a CS that tells you a little about where you are, and what your life is like in the<br />
Dwarven city. As a castless person, you are less than the lowest of the low, but hey look on the bright side, it can<br />
only get better from here, right?<br />
Being the victim is never a pleasant thing, but being forced to witness your sister filling that role? The task that he<br />
has for your sister is simple enough - she is supposed to hunt down a noble and get with child - that being the<br />
quickest way up the social ladder for those who have not got even a finger-hold to begin with. Not a very pleasant<br />
thought, eh?<br />
Your sister seems to have something going - but you have yet to learn what your days work is - so say goodbye to<br />
your sister and head on out to discover what it is that Beraht needs you to do today! Actually, before you go why<br />
not do a little looting here first - you never know what you will be facing out there and a few poultices and a dagger<br />
might just <strong>com</strong>e in handy!<br />
Attitude Ajustment<br />
After you exit the chamber you get a brief CS during which he demonstrates that he has a lot less respect for you<br />
and your sister than you think he should.<br />
As your conversation progresses you learn that Beraht wants you two to hunt down a smuggler named Oskias who<br />
has been making deals behind Beraht's back, and hiding the profits from those deals with the surface dwellers. You<br />
need to deliver an attitude adjustment to this non-to-reliable partner in crime, but first you have to locate him!<br />
As there is not much to do here in the slums, go ahead and head for the zone exit to the Commons - where you will<br />
enter the City of Orzammar. Now would be a good time to check out the Codex entries that you have gained so far<br />
- one on the City, and one on your class, the Castless. You can also re-read the conversation that you just had if you<br />
are unclear as to what you are doing - and who you are looking for.<br />
On the left as you enter the Commons is a merchant named Olinda - go ahead and have a chat with her and then<br />
take a look at her goods. You don't really need to buy anything now, but she is a good place to sell the loot you get,<br />
and the things you do not need, so remember her!<br />
Tapster's Tavern<br />
The first stop on our search for the smuggler, Tapster's Tavern is almost directly across from Olinda's stall. And look!<br />
There sitting at a table in the Tavern is Oskias!<br />
Let's have a seat and a chat with the little worm - who seems very surprised to be receiving a visit such as ours.<br />
Once we clue him in on the reason for our chat, he makes a not-too-subtle attempt at bribing us, but you can<br />
probably figure out why that would not be a good idea. The question is do we kill him now or later?<br />
For a cheating smuggler he is pretty responsive with information - so you may as well get as much of that out of him<br />
first before you decide how to deal with him - and if you are like me, how you deal with him is simple enough: you<br />
separate his head from his body!<br />
With Oskias dead, you can chat with your partner Leske, but he is just going to remind you that you need to get the<br />
Lurium, back to Beraht before he starts wondering what you have been doing, so it is off to Beraht we go!<br />
page 27 / 145
<strong>SuperCheats</strong>.<strong>com</strong> Unoffical <strong>Dragon</strong> <strong>Age</strong>: <strong>Origins</strong> Guide<br />
http://www.supercheats.<strong>com</strong>/<strong>guide</strong>s/dragon-age:-origins<br />
Check back for updates, videos and <strong>com</strong>ments for this <strong>guide</strong>.<br />
Beraht's Shop<br />
After you exit the Tavern turn right and head along the street to Beraht's shop, where you are treated to a brief CS in<br />
which some political intrigue is discussed, and then Beraht demands that you report on your mission.<br />
You have a choice here - you can turn over all of the lyrium you took off of Oskias and report his death, or you can<br />
try to keep some of it. It is your call, but in the interest of speeding things along I just gave him all of it and told him<br />
that Oskias is dead. His response was to tell us about the Proving and the Grey Wardens - and Beraht outlines his<br />
plans to take bets - and make bets - on the fights.<br />
Basically he wants you to help Everd, the fighter he has bet on, to win the Proving. You need to find Everd, learn<br />
who he is to fight against, and then use the drugs that Beraht gave you to modify the odds in his favor. Sounds<br />
simple enough, right?<br />
Make sure that you ask where the proving is so you get the pass from Beraht, then head north to the Proving grounds,<br />
and go to the Fighter's Quarters, under the stands.<br />
The Proving Grounds<br />
At the entrance there is a Proving Ground Guard you need to speak to and show your pass in order to enter - and<br />
once you manage that, you are on your own... Just kidding!<br />
As you are moving through the chamber Leske notices Duncan, the Grey Warden, and dares you to go over and say<br />
hello - so of course you do! Unlike the locals, Duncan is a lot friendlier, and seems almost happy to be chatting<br />
with us. Since he is here, and we are here, we may as well pump him for some information, right? That brief<br />
conversation nets us a chunk of new Codex entries, and lays the groundwork for what is to <strong>com</strong>e, but I am sure you<br />
figured that out already :)<br />
Before you move on head back to the first pillar in the middle - there is a Dwarven carving there that you can<br />
examine for a Codex entry. Do that, and then head for the open passage - just follow the white arrow - where you<br />
find Everd. Oh man, this guy is blitzed! He will not be fighting anything by the porcelain throne!<br />
Leske was going to suggest that you go up into the stands and start a rock slide to cover up this mess, but he likes<br />
your idea better - you put on Everd's armor and fight in his place. You vow to win by skill alone, refusing to use the<br />
drug, and then open the armor chest and climb into the armor (equip it) and head for the fight!<br />
Your first fight is with Officer Mainar. That fight was pretty easy, but you are not done yet - now you get to fight<br />
Adalbo - and again the fight went a lot easier than I would have thought. Your next opponent is a woman! Lenba is<br />
her name, and I think she plans to kill you!<br />
Taking down an opponent who is fighting case - sword and dagger - is not an easy task, but you make it look really<br />
easy mate! Finally you are to fight the fourth and final bout - but then Everd shows up screaming that you are<br />
wearing his armor!<br />
After you remove your helmet, the feces implodes upon the rotary cooling device, and while Duncan protests, the<br />
Proving Master is convinced that you need to be made to pay for your insult to the honor of his Proving! The Master,<br />
it seems, wins out, because the next CS finds us in a cell, as prisoner and not as Champion.<br />
Beraht's Hideout<br />
Leske is also locked up - and he fills you in on what has happened. A visit from Jarvia fills in the rest - you are not in<br />
the official jail, you are Beraht's prisoner, and he intends to kill you for the disgrace that you have caused for him -<br />
and the money you lost him.<br />
page 28 / 145
<strong>SuperCheats</strong>.<strong>com</strong> Unoffical <strong>Dragon</strong> <strong>Age</strong>: <strong>Origins</strong> Guide<br />
http://www.supercheats.<strong>com</strong>/<strong>guide</strong>s/dragon-age:-origins<br />
Check back for updates, videos and <strong>com</strong>ments for this <strong>guide</strong>.<br />
A guard approaches and I am starting to feel like I am in a spaghetti western - but what the heck - you should lure<br />
him near and then crush his skull, grab the cell door key and his battle ax and then free yourself and Leske. There is<br />
a chest nearby with our kit in it - go ahead and grab that now and equip your kit.<br />
Clearly it is time to have you an escape, so make for the door and into the Roads, where you find another door and<br />
beyond that a trap! After you take out the thugs there are three lootable containers so loot those and then continue<br />
on, taking out the next two groups of thugs. Remember to loot the bodies and containers before you go through the<br />
nearby door, but go through it you must!<br />
The groups of thugs are getting larger I noticed, but that is okay, it just gets us more XP! After you take them out, loot<br />
their bodies and the containers - one of which has a better pair of gloves than the ones you are presently wearing, so<br />
go ahead and equip them now.<br />
The open door to the tunnel on the right leads to a dead-end with a chest, and you can loot another ax from that<br />
chest, but then you need to backtrack and go through the next door.<br />
Beraht is standing in the next chamber giving your sister away to his cohorts - and the fight ensues! You knew that<br />
this was leading up to a boss fight, right?<br />
Beraht has a Dwarven Warrior Belt on him so loot that and equip it after your chat with Leske, and then loot the<br />
chests in the room nearby before you head into the next tunnel - the exit that opens onto Beraht's Shop.<br />
The Commons<br />
As soon as you exit the shop you are confronted by a unit of the guards, and ordered to surrender. Duncan is here,<br />
and your admission that you slain Beraht has impressed both the leader of the guards AND Duncan!<br />
As you stand stunned, Duncan makes you a formal offer to be<strong>com</strong>e a Grey Warden. The guardsman protests, but<br />
hey, we knew this had to happen, right? Leske is proud,<br />
You have now <strong>com</strong>pleted the Dwarven Commoner Origin Story. Go ahead and skip to Part 2 of the Walkthrough<br />
now, and pick up the story in Ostagar!<br />
page 29 / 145
<strong>SuperCheats</strong>.<strong>com</strong> Unoffical <strong>Dragon</strong> <strong>Age</strong>: <strong>Origins</strong> Guide<br />
http://www.supercheats.<strong>com</strong>/<strong>guide</strong>s/dragon-age:-origins<br />
Check back for updates, videos and <strong>com</strong>ments for this <strong>guide</strong>.<br />
Origin Story 5: Elf Warrior (Dalish Elf)<br />
Default Male Name: Theron<br />
Default Female Name: Lyna<br />
You discover three humans lurking in the underbrush, and you and your <strong>com</strong>panion confront them. The decision as<br />
to what to do with them appears to be up to you - I chose to act with mercy but YMMV!<br />
In sparing them the humans seem grateful, and tell you about a cave that they found nearby - a cave that has<br />
interesting drawings. You demand proof and the human turns over a stone with carved Elvish writing - an artifact<br />
that stuns you.<br />
The human tells you of a demon that chased them away from the cave and then gives you directions to it, and then<br />
you have to decide their fate. I let them go, but again, YMMV. After they run off, you decide to explore this cave, so<br />
head for the white arrow on the radar map now!<br />
Ahead up the path you encounter a pack of wolves - and kill them. At least they were not giant rats or giant spiders,<br />
right?<br />
Ahead of you is a chest that you cannot open, and behind it a stump that contains a Codex entry. Once you grab<br />
that, continue along the path to the cave - grab the two elfroot from the plants and the velum from the rubble on the<br />
way.<br />
The Cave<br />
You are supposed to be familiar with the area and yet you have never seen this cave before. As you enter, Tamlen<br />
<strong>com</strong>ments that the ruins look more human than Elven, but then again if they are old enough they could date back to<br />
the era when Elves were the dominant social culture on the planet, right?<br />
There is a cocoon ahead on the right, and when you examine it Tamlen has another chat with you, in which you<br />
speculate on the nature of the cave itself. Okay, remember when we fought the wolves and I said - at least it wasn't<br />
giant spiders? Right, well, yeah it is.<br />
Explore the areas you move through carefully - in this chamber there is a body you can loot, and a chest you cannot<br />
open. The two spiders also have items worth looting, so do that before you move on through the nearby door, and<br />
encounter your next group of spiders.<br />
I took the right side hallway at the split - and mind you there are traps laid in these passages so mind them if you<br />
can. The hallways are not a big circle, and there are chambers off of them, so doing the loop in one direction to take<br />
out the threats and then the other so you eliminate them in one go is an idea.<br />
At the back of the right side hallway is a statue of a creator, and Ramlen speculates that these ruins date back to that<br />
ancient time. The left hand hall leads to a large chamber and eventually also reaches the statue mentioned earlier - if<br />
you can pick the lock on the door in the rear - which I could not.<br />
The metal doors on the sides link the two halls, so if you went left to clear out the spiders there, just cut through the<br />
middle to get back to the statue and continue past it through the door there.<br />
Moving close to the door in the back triggers a poison trap and a pair of undead guards, and once you have dealt<br />
with them and opened the door you encounter the demon that the humans must have been referring to - a large<br />
monster called a Bereskarn - and while it is ferocious it cannot be a major demon, probably just a demon's pet<br />
demon :)<br />
page 30 / 145
<strong>SuperCheats</strong>.<strong>com</strong> Unoffical <strong>Dragon</strong> <strong>Age</strong>: <strong>Origins</strong> Guide<br />
http://www.supercheats.<strong>com</strong>/<strong>guide</strong>s/dragon-age:-origins<br />
Check back for updates, videos and <strong>com</strong>ments for this <strong>guide</strong>.<br />
In some rubble to the right past its body is a better helm, so loot and equip that, and then equip your old helm on<br />
Tamlen.<br />
In the center of the room is an alter-like structure with a mirror - and as you get close to it you think you see<br />
something moving inside of it. Tamlen examines it and gets a vision, and then you are knocked out. When you<br />
awaken you see the Grey Warden Duncan standing over you, apologizing.<br />
The Elven Camp<br />
You awake to a brief CS that show you back at camp, and you learn that Duncan brought you back to the camp two<br />
days before, and you have been unconscious ever since. The Keeper <strong>com</strong>es to talk to you, and tells you that you<br />
nearly died.<br />
You learn that Tamlen is still missing, and the Keeper is worried about him. While Duncan has returned to the cave,<br />
the Keeper feels that it is necessary for a party of Elves to be sent to see if they can find Tamlen - and she wants you<br />
to lead them to the cave.<br />
With Merrill, you head off for the cave while the Keeper oversees the packing up of the camp, but before you go do<br />
a little camp looting and talk to the Elven folk that you can to get some background. There are some Codex entries<br />
to be had and some odds and ends of resources, but the conversations are more interesting, so taking the time to<br />
meet the City Elf, and the others is worth it.<br />
A Chat with Paivel<br />
Over by the bonfire in the camp is an older elf named Paivel who is teaching the children. When you approach he<br />
upbraids you for the risks you took and for the loss of Tamlen - and you know you deserve his harsh words.<br />
You have the option of joining him to tell the story of the Dalish to the children - you really should do that because it<br />
fills in a lot of the backstory about your race and origins, and it is a good story. When you have finished helping him<br />
tell it, you can then ask him some more questions about the Grey Wardens and the Darkspawn - and your Dalish<br />
heritage.<br />
I thought that this was a very nice touch, and added to the story - and of course after that there are a bunch of<br />
lootables just over his shoulder :)<br />
A Chat with Ilen<br />
The resident merchant and bowman, Ilen is standing with a hunter to whom he has just given a bow. If you talk to<br />
him you can hear the story of the bow and of his father, and get some background on the battle that the Dalen<br />
fought that established their reputation with the humans that made them the feared force that they remain today.<br />
You can also ask Ilen for a bow for yourself, and he is easy to persuade, and after all a free bow is a free bow!<br />
Take this opportunity to sell off all of the loot you have no use for now as well, to free up the space in your bags and<br />
the weight.<br />
A Chat with Maren<br />
The young woman standing near the fence is Maren, and she takes care of the beasts that carry your burdens. A chat<br />
with her teaches you a little about those animals, and how your people view them.<br />
A Chat with Merrill<br />
page 31 / 145
<strong>SuperCheats</strong>.<strong>com</strong> Unoffical <strong>Dragon</strong> <strong>Age</strong>: <strong>Origins</strong> Guide<br />
http://www.supercheats.<strong>com</strong>/<strong>guide</strong>s/dragon-age:-origins<br />
Check back for updates, videos and <strong>com</strong>ments for this <strong>guide</strong>.<br />
While you can just tell her it is time to head out, there are some chat options with her, so go ahead and do them<br />
now!<br />
Merrill will direct you to Ilen if you need supplies, and she will admit that while she knows a little about the artifacts,<br />
she does not know as much as the Keeper - and then reminds you that artifacts are not why you are being sent back<br />
to the cave.<br />
If you have all that you need from Ilen and you have exhausted the chat options with her, it is time to head out - so<br />
let us do that.<br />
Back to the Cave<br />
After the loading screen you find yourself back on the path near the cave with Merrill. This time you are not facing<br />
wolves, you face some darkspawn! After the fight you pass the bodies of the wolves you fought a few days ago and<br />
then discover a camp site that was not there last time you were here, and after a brief conversation another group of<br />
darkspawn attack. After that it is a clear run to the cave, and after you enter it, it is no different than the last time.<br />
In the first chamber there is a brief CS in which Merrill confirms your earlier speculation about the nature of the<br />
cave, and then you proceed along the right hallway again, this time to fight more darkspawn in place of the spiders.<br />
A second larger group is encountered near the statue, including a Genlock Emissary who is probably the strongest<br />
enemy you have faced so far.<br />
I ended up killing the first two without having to heal, but the Emissary took down Merrill and nearly killed me! I<br />
used all but one of my poultices defeating it.<br />
The Mirror Chamber<br />
As you approach the mirror chamber you encounter Duncan, who is standing in front of the mirror apparently<br />
studying it. He expresses his surprise that you managed so quick a recovery,<br />
As you talk with Duncan you learn the origins of the mirror, and the reason that you became so ill. According to<br />
Duncan you have to destroy the mirror - and he does that - and then you must leave so that he can consult with the<br />
Keeper to devise a cure for you. Tamlen is beyond help according to Duncan, and though you do not want to<br />
believe that - you don't want to right? - he explains that the body would have been taken by the darkspawn, and<br />
urges you to leave the matter at that.<br />
Duncan may be sure, but you are still convinced that you owe it to your friend to at least look. The Grey Warden<br />
departs, and you and Merrill are once again on your own.<br />
Behind the broken mirror on the left is a sarcophagus with a pair of Heavy Chainmail Gloves and a Dalish Leather<br />
belt that you can loot. The belt gives you a stamina regeneration bonus in <strong>com</strong>bat, so it is worth equipping, but the<br />
gloves may not be - it is a decision you have to make. On the one hand the gloves have better armor protection, but<br />
the Dalish Gloves you are now wearing give you a 1 point Dexterity bonus, so you have to weigh the additional<br />
half-point of armor protection against that.<br />
There is a ramp leading up to a tunnel here, and you will pass a chest you cannot open as you enter the tunnel<br />
mouth. There is another chest at the rear of this tunnel with a strange statue - and when you examine the statue all<br />
of the bodies that we passed on the way in re-animate and attack you. Roh Noh's! It is the undead!<br />
They actually do a fair bit of damage, but mostly because in addition to the warriors you are fighting as a group there<br />
are three or four archers taking shots at you. Try to remember to heal Merrill so she does not get incap'd as fighting<br />
the entire group solo will cost you most if not all of your potions.<br />
On the way back out of the cave you will find more darkspawn in the center chamber, but there is no evidence of<br />
page 32 / 145
<strong>SuperCheats</strong>.<strong>com</strong> Unoffical <strong>Dragon</strong> <strong>Age</strong>: <strong>Origins</strong> Guide<br />
http://www.supercheats.<strong>com</strong>/<strong>guide</strong>s/dragon-age:-origins<br />
Check back for updates, videos and <strong>com</strong>ments for this <strong>guide</strong>.<br />
what befell Tamlen anywhere in the cave as far as I could tell.<br />
Back at the Camp<br />
The Keeper greets you, Merrill, and Duncan as you return to the camp, and asks you what you found in the cave?<br />
The Keeper is disturbed at the news of darkspawn, and seeks a private meeting with Duncan, leaving you to let the<br />
others know what has happened.<br />
You tell Paivel what happened - and he mourns the loss. In a touching CS you see him as he mourns, offering a<br />
poem slash prayer to the Maker, and then you pass on the message that the Keeper wants him to organize a service<br />
for Tamlen. He asks you about Duncan - clearly he is curious - and he suggests that you should ask the Keeper<br />
exactly what it is that she and Duncan are discussing about you.<br />
So now it is back to Duncan, who tells you that the Keeper and he have <strong>com</strong>e to an agreement - the Keeper has<br />
decided that you can leave with him to be<strong>com</strong>e a Grey Warden! Evidently the Grey Wardens have a cure but to<br />
undertake it you must join them.<br />
Clearly this is our destiny! The Keeper gives you a ring, and Duncan asks if you are ready to depart. There is little<br />
left here for you, so you may as well leave - after the clan says goodbye of course.<br />
You get a nice CS of your departure, and you have <strong>com</strong>pleted the Dalish Elf Origin Story! Good on ya! Now go<br />
ahead and skip ahead to Part 2 of the Walkthrough and begin your journey at Ostagar!<br />
page 33 / 145
<strong>SuperCheats</strong>.<strong>com</strong> Unoffical <strong>Dragon</strong> <strong>Age</strong>: <strong>Origins</strong> Guide<br />
http://www.supercheats.<strong>com</strong>/<strong>guide</strong>s/dragon-age:-origins<br />
Check back for updates, videos and <strong>com</strong>ments for this <strong>guide</strong>.<br />
Origin Story 6: Elf Rogue (City Elf)<br />
Default Male Name: Darrian<br />
Default Female Name: Kallian<br />
As you begin the final Origin Story, you find that you are a City Elf living in Denerim, the largest city and the Capitol<br />
City. You live here ins a walled-off <strong>com</strong>munity, and your people work as either servants or laborers. As the CS ends<br />
you find yourself being awoken by your cousin, who remarks that she wonders why you are still in bed, it being your<br />
big day after all.<br />
It turns out that a marriage has been arranged for you - and your future husband has arrived. You are not all that<br />
happy with the idea or the event, but what can you do? Well, that remains to be seen - in the meantime, go ahead<br />
and loot and explore!<br />
Your father Cyrion is waiting for you around the corner, and you learn that you mother is dead, and your father does<br />
love you. The last thing he says to you is that it would be best if you did not mention to your betrothed that you are<br />
a trained warrior. Hmm, I wonder why?<br />
You have just received a handful of Codex entries - now would be a good time to review those - are you done?<br />
Interesting, eh?<br />
Elven Alienage<br />
You exit your hut and enter the Elven Alienage - the warren that is the home to your people. Call it a slum, call it a<br />
ghetto, call it whatever you like, just know that Mr. Spock would be right at home here! As you can see, there is a<br />
quest pointer on the radar map, but before you follow that little white arrow, let us look around, explore, and see<br />
what there is to see.<br />
To the right is a Drunken Elf spouting a poem - actually it is sort of funny, so pause to hear him out :)<br />
After he concludes his fishy tale, go say hello - and hear him cheer on your wedding day!<br />
There is a sign at the open center area that gets you a Codex entry, and as you collect it you overhear a conversation<br />
that may well be about you that questions your breeding and social position. It is bad enough that the humans treat<br />
you like slaves, but to get that sort of thing from one of your own kind? Revolting!<br />
You can stop and chat with Tacodor, but that does not result in much of interest other than that he is looking for<br />
Soris. He asks that if you see him, you pass on the message that he should <strong>com</strong>e say hello.<br />
Conveniently Soris is just down the way - and as he greets you with the suggestion that you two celebrate your last<br />
day of independence together. Evidently he does not think much of the bride that has been arranged for him!<br />
Soris joins your party at this point, and suggests that he go introduce you to your betrothed. As there really is<br />
nothing more for you to do otherwise, head back towards the tree - where you will encounter a CS with a bunch of<br />
humans looking for sexual thrills. This cannot be good.<br />
It turns out that the jerk is actually the son of a very important human noble, and the undertones suggest that this<br />
may well be a pivot-point in the story.<br />
I don't know, he does not seem all that handsome to me, but then again I am not really an Elven female, so maybe<br />
he is the George Clooney of Elves, and then again maybe not. Your betrothed heads off to get ready for the<br />
ceremony, and as they walk away another human enters the area - a Grey Warden named Duncan!<br />
page 34 / 145
<strong>SuperCheats</strong>.<strong>com</strong> Unoffical <strong>Dragon</strong> <strong>Age</strong>: <strong>Origins</strong> Guide<br />
http://www.supercheats.<strong>com</strong>/<strong>guide</strong>s/dragon-age:-origins<br />
Check back for updates, videos and <strong>com</strong>ments for this <strong>guide</strong>.<br />
Meet the Grey Warden<br />
As you run around to the other side of the tree you get your first look at Duncan, and as you approach he offers his<br />
congratulations on your impending wedding. For a human he is pretty well informed on the plans and events of the<br />
City Elf <strong>com</strong>munity, isn't he?<br />
You try to politely send him on his way - or maybe you tried to rudely send him on his way - never mind, the point is<br />
that Duncan has no intentions of leaving. It turns out that Duncan was actually invited here, so your concerns were<br />
unfounded - this you learn from an elder elf who approaches during your conversation.<br />
Here is your chance to get some information about the Grey Wardens and learn about the darkspawn! You get a<br />
Codex entry for the Grey Wardens and the darkspawn - may as well read those now. Done? Good! Now you can<br />
continue on with the quest, or question Duncan - I say question the Grey Warden, I mean you are here, he is here,<br />
why not?<br />
You learn that some of the greatest Grey Warden heroes were Elven - though he could have given you more details.<br />
After all, considering your plight, a few hero stories would be a wel<strong>com</strong>e thing. Duncan lets slip the fact that twenty<br />
years before he had tried to recruit your mother into the Grey Wardens, a fact that is a surprise to you!<br />
Duncan seems to know a lot about you - could it be that you are the reason that he has <strong>com</strong>e to the Alienage in the<br />
first place?<br />
Now that you have all that there is to get from the Dunc for the moment, go ahead and change into your wedding<br />
clothes and head for the quest marker on platform on the other side of the tree. You get a brief CS in which you see<br />
the assembled wedding party, and then the ceremony begins.<br />
The village elder begins his address, providing some more background on your people - and the priestess starts the<br />
ceremony - when (big surprise) the Lords son returns, seeking sexual toys. This guy is a real jerk - I mean really!<br />
Clearly this is not going to end well.<br />
In the Clutches of the Pig<br />
You start with a CS in which you learn that you hfave all been kidnapped and made prisoner in the Palace, where<br />
you are being kept until the Lord's son is ready to umm, yeah, you get the idea.<br />
After checking the doors - you cannot open them - you talk to Shianni, who suggests that you just cooperate and get<br />
it over with. As the guardsmen enter, the matter is pretty much taken out of your hands and they kill one of you and<br />
grab the rest. Just as things look grim Soris arrives - and the guards think that he has <strong>com</strong>e to fight them. They are<br />
shocked however when he slides the sword to YOU.<br />
I am not sure I have ever felt better about killing two humans than I did about this fight...<br />
The armor you looted from the body will be usable if you raised your strength to at least 14 - I did not so I could only<br />
use the weapons. Go ahead and loot each room as you pass through, and meet up with the elven kitchen helper -<br />
who helps you!<br />
In the next room there are some off-duty guards to take on - and taking them out gets you your next level-up, so if<br />
you did not have at least 14 Strength now you can. Make sure you equip that armor, right? There are some<br />
lootables in the adjacent rooms and after you get all that, continue on your way to the rescue.<br />
Through the next door there is another guard, and the door on the left down the hall appears to be an armory - so kill<br />
the guard there and loot loot loot! Equip most of this new armor on you, and the body armor on Soris - and you may<br />
want to change his weapons as well, since a crossbow is not what you might call a melee weapon! I gave him a<br />
page 35 / 145
<strong>SuperCheats</strong>.<strong>com</strong> Unoffical <strong>Dragon</strong> <strong>Age</strong>: <strong>Origins</strong> Guide<br />
http://www.supercheats.<strong>com</strong>/<strong>guide</strong>s/dragon-age:-origins<br />
Check back for updates, videos and <strong>com</strong>ments for this <strong>guide</strong>.<br />
mace and dagger, and I think that is a good <strong>com</strong>bination for two-handed fighting - crushing and slicing, oh yeah!<br />
The trio of guards you kill next include a Guard Captain - and they kill your betrothed right in front of your eyes, so<br />
putting them to the blade is a pleasure. The Guard Captain has a Fencer's Cinch on him (a belt) that gives 4 Attack,<br />
so go ahead and equip that now.<br />
The Rescue<br />
Basically you are going to fight your way along the corridors, taking out the guards as you go. There are useful loot<br />
items in the rooms off of the corridors - and additional enemy to kill - so take your time and work your way along.<br />
You can safely ignore the whole "we must hurry" thing, but you will know you are close when you <strong>com</strong>e up against<br />
a bodyguard - and he is a lot tougher than the usual guards as well.<br />
Once you pass into the personal quarters where the "party" is being held, you will have the opportunity to give the<br />
three young Lord's the death they so richly deserve. I guess you could choose to follow the whole talking strategy as<br />
that is an option, but for myself, by the time I got to them I just wanted the satisfaction of ending them. Make sure<br />
you loot everything that you intend to before talking to the Elven girl on the floor, because once you do you get a<br />
series of CS and interaction that ends in a load screen.<br />
You and up back in the Alienage, where you report the events to the elder and Duncan. As this conversation is<br />
taking place, the guards show up, seeking the elder. The guard <strong>com</strong>mander demands the names of the elves who<br />
<strong>com</strong>mitted the "murders" in the palace.<br />
The guard <strong>com</strong>mander intends to take you to the dungeons - but Duncan steps forward and evokes the Grey Warden<br />
Right of Conscription, demanding that you be turned over to his custody. The guard <strong>com</strong>mander agrees to do that<br />
under the condition that Duncan agree to get you out of the city immediately. He tells you to make your goodbye's<br />
- which should not take you long - so do that and then talk to Duncan again.<br />
Here ends the last Origin Story - congratulate yourself - and now skip ahead to Part 2 of the Walkthrough, for the<br />
Rest of the Story!<br />
page 36 / 145
<strong>SuperCheats</strong>.<strong>com</strong> Unoffical <strong>Dragon</strong> <strong>Age</strong>: <strong>Origins</strong> Guide<br />
http://www.supercheats.<strong>com</strong>/<strong>guide</strong>s/dragon-age:-origins<br />
Check back for updates, videos and <strong>com</strong>ments for this <strong>guide</strong>.<br />
Walkthrough<br />
Each Origin Story is unique, and each can add a different flavor to the way that you view the game. In many ways<br />
they each make this a different game, which is rather cool if you think about it. Before we begin there are some<br />
facets to the game that you should be aware of because knowing about them will save you some frustration and help<br />
your game play along.<br />
Relationships: As you add party members, you begin to develop relationships with each. Some of the characters you<br />
will identify with, like, and trust, while others you will not. Depending upon how you play the game, some will end<br />
up being part of your active party more often than others, but even if you only add one to your group and never<br />
actively use it in party play, you should make the effort to both develop your relationship with them, and maintain it.<br />
At various points in the game you are going to be asked to make decisions of a moral nature that not only impact the<br />
path you follow in the story, but also have a direct effect on some of your party members. If you have played RPG<br />
games in the past, you know about alignment - if you have not, alignment is a basic identification of the moral<br />
outlook for a character. They can be good, evil, or neutral, but their alignment directly effects what they think of you<br />
when you make these pivotal decisions.<br />
If certain characters are important to you, you will have to take that into consideration when you make decisions -<br />
for example you may want to kill someone in the game very badly, but if you do, it could force you to have to kill<br />
one of your party members! While you cannot always keep everyone happy all the time, there is usually a way to<br />
keep from having to kill them.<br />
Throughout the game you will have the opportunity to loot and purchase items that are tagged as "Gifts" that can be<br />
given to your party members to increase their positive feelings towards you. Some gifts are general and can be given<br />
to anyone, and result in a 1 or 2 point raise, while other gifts are exclusive to a specific party member. If you give<br />
that gift to the wrong person, you only get the usual 1 or 2 point raise, but if you give it to the correct person, the<br />
raise can be anywhere from 5 to 10 points! Consult the Gift List in the Appendixes to determine who to give what.<br />
In addition to showing approval for your moral decisions, the amount that a party member likes you is also important<br />
if you want to earn the Achievements / Trophies for romancing them. This does not apply to all of the party<br />
members, just to Alistair, Leliana, Morrigan, and Zeveran. The details and requirements for romancing each is noted<br />
in their dossier. Be aware that if you are romantically involved with one, the others will be aware of it, even if you<br />
never make them active as a party member!<br />
There are certain items in the game that are part of quests. These usually appear in the Plot Items heading in your<br />
inventory, but not always. Great care should be taken in disposing of items that are quest related, since losing or<br />
selling them can make it so that you can no longer <strong>com</strong>plete a given quest. To learn what items you need to hold on<br />
to and in what quantities, see the Quest Items List in the Appendixes before you continue on to learn what you need<br />
to hold on to.<br />
Finally, there is the issue of inventory. At the start of the game you have a backpack that only holds a certain<br />
number of items. Items that stack only count as one item, but as you play and loot you will quickly discover how<br />
easy it is to end up full! Certain merchants that you meet in the game have backpacks that they can sell you that will<br />
add 10 slots to your inventory - always check a merchant to see if they sell this, and always buy it if they do.<br />
Now that you have <strong>com</strong>pleted your Origin Story, it is time to begin the story line of the game, so good on ya mate!<br />
Let's get adventuring!<br />
page 37 / 145
<strong>SuperCheats</strong>.<strong>com</strong> Unoffical <strong>Dragon</strong> <strong>Age</strong>: <strong>Origins</strong> Guide<br />
http://www.supercheats.<strong>com</strong>/<strong>guide</strong>s/dragon-age:-origins<br />
Check back for updates, videos and <strong>com</strong>ments for this <strong>guide</strong>.<br />
Ostagar<br />
The main storyline begins with the King himself meeting and greeting your party as you enter the stronghold. While<br />
this is basically the same for each background, there will be minor variations depending upon which you are<br />
playing. For instance for the Human Noble Origin you will tell the King about the betrayal and he will vow to take<br />
revenge after the up<strong>com</strong>ing battle, whereas with the other <strong>Origins</strong> you will simply be greeted and then receive the<br />
same instructions from Duncan.<br />
Play through the dialogue in a manner which fits the personality and alignment of your character, and then after<br />
Duncan leaves you, continue on. There are a few small quests for you to undertake prior to beginning the path to<br />
the ritual that will make you a Grey Warden - so let us do those now!<br />
Note: You will have the opportunity to collect some resources and to sell off the loot you have collected up to this<br />
point - and it is a good idea to do that - but as for purchasing new gear from the Quartermaster, I would hold off on<br />
doing that for now. Money in your pouch is worth more than a few points or stats at this early stage - but I am<br />
getting ahead of the story now, so just bare that in mind and continue on with the story and the small quests to<br />
<strong>com</strong>e!<br />
The Ostagar Quests<br />
First head back through the arch towards where you entered and gather the Elfroot that is growing near the trees, and<br />
then head out on to the balcony and check out the view - stunning!<br />
Now back through the arch and over the bridge to the main camp area. If you bear right after crossing the bridge<br />
you will pass the mage encampment - you will not be permitted to enter there, as the mages are in training, but<br />
nearby you will find Wynne, a mage summoned by the King. A brief chat with her gives you some more backstory,<br />
and then you will learn about The Fade.<br />
Now continue past her and across the path to the Quartermaster - you can sell him the stuff you have that you do not<br />
need - though I would hold on to some of the better gear - the special shield and any choice pieces of armor and<br />
weapons you have - because you can use them to equip party members you will be obtaining later.<br />
If you chose Herbalism Skill now would be the time to purchase a supply of flasks - actually even if you did not<br />
choose it, now would be a good time to do that anyway, since you will eventually have a party member who can<br />
make you health potions, and let me tell you, being able to make them will <strong>com</strong>e in handy later!<br />
As you exit the Quartermaster camp you will encounter Daveth, another of the Grey Warden Candidates. Go ahead<br />
and have a chat with him now - you can learn a bit about the ritual and what is <strong>com</strong>ing from him. After you chat<br />
with him, he tells you he is heading back to Duncan - which is fine since you needed to tell the candidates to do that<br />
anyway.<br />
Prisoner Quest<br />
As you head up the nearby ramp and around the bend you will encounter a prisoner in a cage - this is your first<br />
quest. After you talk to the prisoner you learn that he has not received food or water since being put in the cage.<br />
You can talk to the guard and try to persuade him but if your coercion skills are not high that will fail. You should<br />
have the 10 silver it will take to bribe him, however, and that will get you the food for the prisoner.<br />
After you bribe the guard, talk to the prisoner again and give him the food. You will receive a blessing of sorts from<br />
him - nice touch but there is no real value to it, but nearby is a priestess who can give you The Maker's Blessing - I<br />
did that because I am a good Catholic boy and I know that it never hurts, especially when you are facing danger :)<br />
If you did not get the books in the Chapel back in the castle, one of them is on a bench here, so you can get it now.<br />
If you did, it will not be glowing because you already have it.,<br />
page 38 / 145
<strong>SuperCheats</strong>.<strong>com</strong> Unoffical <strong>Dragon</strong> <strong>Age</strong>: <strong>Origins</strong> Guide<br />
http://www.supercheats.<strong>com</strong>/<strong>guide</strong>s/dragon-age:-origins<br />
Check back for updates, videos and <strong>com</strong>ments for this <strong>guide</strong>.<br />
Hear those dogs? Run past the nurse and the wounded soldiers, then down and around to the left and you will see<br />
some Ash Warriors - you can talk to their leader to learn about them - go ahead and do that now.<br />
The Kennel Quest<br />
Nearby the Ash Warrior is the Dog Kennels - look for the fence and gates - and at the kennels is the Kennel Master -<br />
go over and talk to him for your next quest - he will ask you to keep an eye out for a special flower when you go into<br />
the wilds.<br />
Once you return from the mission for Duncan - take that flower to the Kennel Master to <strong>com</strong>plete this quest.<br />
Seek out Alistair<br />
It is now time to seek out Alistair - and when you find him by following the white arrow on the screen you will<br />
witness an amusing CS. You can ask him a few questions - and you probably should - and then you can agree that it<br />
is time to see Duncan - and get the Quest update.<br />
You should get your next level here - so go ahead and upgrade your attributes as you like, and pick two new skills.<br />
If you head to the right on your way back near the priestess you will find the Knight, Jory, who is the third recruit.<br />
Talk to him for a bit to get him headed back to Duncan, and then head back yourself.<br />
The Ritual<br />
After a brief CS in which Alistair gets his peepee slapped by Duncan for being rude and causing trouble, Duncan<br />
outlines your tasks. It is pretty simple really... You need to go into the WIlds and kill darkspawn until you obtain<br />
three vials of their blood, and then you need to search for an abandoned Grey Warden archive and recover some<br />
scrolls that were left there.<br />
While Alistair is in charge of your group, you do most of the leading on this mission - so head for the gates now, and<br />
enter the Wilds!<br />
As you enter the wilds you will be attacked by a pack of wolves - after you kill them be sure to loot their pelts - you<br />
can sell those later. Nearby in the marsh you will find the body of Missionary Jogby, who is carrying a letter. Be<br />
sure to grab that to start the Quest Missionary Jogby.<br />
A bit further in you will find a wounded soldier - who you can patch up so that he can get back to the base to<br />
report. At this point Ser Jory starts freaking out - you can reassure him or mock him, it is your call. As you explore<br />
keep an eye out for plants - you will want to get any that you encounter including the special one that the Kennel<br />
Master needs.<br />
The next large group you encounter will get you the third bottle of blood - and you should see the body of<br />
Missionary Rigby nearby - loot him to get a quest of the same name as you take his Last Will from his very dead<br />
body.<br />
The Missionary Quest<br />
On the corpse of Missionary Jogby you found a letter that details a path through the Wilds that leads to the<br />
rendezvous location mentioned in the letter. Read the letter for the details of the path of the following landmarks:<br />
1. Look for a tree leaning on a ruined building<br />
2. Pass under the fallen tree "bridge"<br />
3. Pass a submerged tower on the right<br />
page 39 / 145
<strong>SuperCheats</strong>.<strong>com</strong> Unoffical <strong>Dragon</strong> <strong>Age</strong>: <strong>Origins</strong> Guide<br />
http://www.supercheats.<strong>com</strong>/<strong>guide</strong>s/dragon-age:-origins<br />
Check back for updates, videos and <strong>com</strong>ments for this <strong>guide</strong>.<br />
4. Look between a high, ruined arch and a mossy standing stone.<br />
5. Walk along a path of roots and stones<br />
6. Look for two large statues with a chest between them.<br />
On your way to the Chasind camp you will pass an aqueduct that is largely intact that crosses over the water - and<br />
beside it is a path of stones and roots - cross that path and you will be attacked by a pack of wolves. After you kill<br />
them continue on and you will spot the two large statues on the right as you exit this path. There is a chest in<br />
between them - it contains a Chasind Flatblade, some Slintmail armor, and A Letter.<br />
The Letter is titled "Farewell Letter to Jogby" and it <strong>com</strong>municates a father's last thoughts to his son on his failure to<br />
bring the Word of the Maker to the Chasind. You should read this, and the other Codex notes that are quest-related<br />
mate, it really adds to the story!<br />
Last Will and Testament Quest<br />
On a body you find in the central area of the Wilds is a last will and testament. Seek out the cache mentioned in the<br />
will and then take it to Jetta in the town of Redcliffe.<br />
When you reach the camp in the West by the ruins of an aqueduct and you discover the Chasind Codex Entry, you<br />
are in the right place. Examine the fire pit here to find the locked box that you need to take to Redcliffe.<br />
Chasind Trail Sign Quest<br />
You will find targetable spots in the Wilds that are labeled "Chasind Trail Sign" that you should click on - and follow<br />
from sign to sign. When you reveal each area of map the signs will appear as small x's to make finding them easier<br />
for you to locate.<br />
Follow the signs from one to the next until you reveal the spot marked "Chasind Cache (Chasind Trail Sign)" on your<br />
map.<br />
Notes: You will be attacked by a group of warriors as you enter the camp. The cache is located in a fallen tree<br />
trunk. If you did not find the other flower that the Kennel Master is looking for, there is a second one here in the rear<br />
of the camp.<br />
Back on the Trail<br />
You have now <strong>com</strong>pleted or updated all of the quest activity for this zone save for the main story line quest we are<br />
presently doing. It is time to head towards the arrow on the radar map!<br />
As you work your way through the Wilds you will have several fights before you end up arriving at the tower ruins,<br />
where you will fight a fairly large band of darkspawn. Be sure that you loot their bodies prior to entering the ruins,<br />
as once you enter you are on a rail-section of the quest and returning here is inconvenient to the story.<br />
Inside the tower ruins is a broken chest labeled "Warden's Cache" that you can click on - and doing so causes the CS<br />
with the illegal mage Morrigan, who accuses you of trespassing. This is a fairly lengthy CS that is followed by a<br />
conversation with Morrigan. You may want to be polite as she will eventually be joining your party :) though I do<br />
not know if being polite or rude here actually has any impact on her initial admiration of you...<br />
She reveals that she has been observing your progress through the Wilds - shiver - and makes a good job of posturing<br />
and playing on your party member's fears, but there really is no reason not to be polite to her - unless you are rude<br />
by nature of course.<br />
The Witch of the Wilds<br />
page 40 / 145
<strong>SuperCheats</strong>.<strong>com</strong> Unoffical <strong>Dragon</strong> <strong>Age</strong>: <strong>Origins</strong> Guide<br />
http://www.supercheats.<strong>com</strong>/<strong>guide</strong>s/dragon-age:-origins<br />
Check back for updates, videos and <strong>com</strong>ments for this <strong>guide</strong>.<br />
Once you ask that she take you to her mother the scene shifts, and you meet the legendary Witch of the Wilds - but<br />
you don't know that yet...<br />
As you listen you learn that stories are often exaggerated - or maybe not - who can say? Must be your lucky day<br />
though, because the Witch actually wants to help you! Maybe she fears the darkness more than she dislikes you -<br />
but either way she gives you the Treaties that you were looking for, and tells you that she has been protecting them<br />
since the seals wore off the chest that guarded them.<br />
Personally I prefer to be polite in situations like this - but you use your best judgment mate - it really will not matter<br />
because mom has her daughter escort you safely out of the woods - and after the load screen you are - tah dah!<br />
Back at the base!<br />
The Ritual Ceremony<br />
First go see the Kennel Master and give him the flower - whether you take the reward or not is up to you (and the<br />
personality of your character) but you still get the XP for <strong>com</strong>pleting the quest, so it is all good!<br />
Now head on over to the fire and talk to Duncan - you might want to mention Morrigan and her mother as Duncan<br />
would be interested in them - and then on with the ceremony! I was not expecting the Knight to go all, well, weasel<br />
on us, but I did expect that someone had to die, and I was not disappointed!<br />
"At last we <strong>com</strong>e to the Joining," Duncan says, and then explains what you have to do. Oh my!<br />
The thing is I rather liked Daveth, and while I will not miss Jay, I would have liked that Rogue to be a part of my<br />
party still. Interesting the way that Duncan executed the coward though, with an apology, but really he knew too<br />
much to let him live, right?<br />
Of course we do not die - we just have a really bad trip - and then tah dah! We are Grey Wardens! Woohoo!<br />
You are revived and Duncan instructs you on what is next - attending the meeting. At this point you should have hit<br />
your next level - so go ahead and apply the points and pick your skills - and be sure to check your dog too because<br />
he should have leveled and you will need to either click the auto-apply button or apply his points and choose his<br />
skill upgrade as well.<br />
The Meeting<br />
Now that you have taken care of that minor chore, go ahead and make the meeting. You will watch as the King and<br />
his advisor Loghain argue - and if you are thinking that something is not right here, well...<br />
Pay attention because this is about to get very interesting. Loghain makes <strong>com</strong>ments that clearly indicate that he has<br />
little but contempt for the King - not an attitude one would expect, even from a Noble secure in his position in the<br />
realm.<br />
As a minor diversion and to rebuff Loghain, the King addresses you, offering you his congratulations on your<br />
be<strong>com</strong>ing a Grey Warden - which you politely thank him for. Mr. Sunshine Attitude once again runs his mouth, and<br />
then he and the King reveal the plan to you.<br />
The King explains what his men will be doing, Loghain points out what HIS man are supposed to do, and then the<br />
King selects you and Alistair to handle the whole lighting of the signal fire to signal Loghain's men chore - notice<br />
how Loghain does not like that? Hmm.<br />
Duncan cautions the King about the possible presence of the Arch Demon, Loghain's Mage objects to your<br />
assignment and finally, the confrontation ends with Duncan giving you your final instructions. Alistair is not happy -<br />
page 41 / 145
<strong>SuperCheats</strong>.<strong>com</strong> Unoffical <strong>Dragon</strong> <strong>Age</strong>: <strong>Origins</strong> Guide<br />
http://www.supercheats.<strong>com</strong>/<strong>guide</strong>s/dragon-age:-origins<br />
Check back for updates, videos and <strong>com</strong>ments for this <strong>guide</strong>.<br />
but I doubt that is a reflection on you, so much as his bruised ego at not being allowed to march into battle at<br />
Duncan's side.<br />
Duncan gives you detailed instructions - and away you go!<br />
Note: If you have not already done so, now is a good time to save.<br />
The Tower Quest<br />
Go ahead and run for the tower - through the gateway you originally entered the base by - and pause for a cinematic<br />
CS in which you see Duncan and the King ready to fight. Here <strong>com</strong>e the darkies and boy do they look fearsome!<br />
But hey, it is all good, because you have Loghain backing your play, right? Right?<br />
As the battle ensues you are back in control of yourself - now make your run for the tower - and if you did not make<br />
potions to replace the ones you used earlier, do that if you can!<br />
Woops! As you reach the ramp to the tower you meet with some guards who inform you that the tower has been<br />
taken by darkspawn, and pretty much everyone is dead! As you make your way up towards the tower there will be<br />
groups of darkspawn for you to battle - and after each battle you should be sure that you loot their corpses - and loot<br />
any plants or chests that you <strong>com</strong>e across as well.<br />
If you find more Elfroot - and assuming that you stocked a supply of flasks and you have the Herbalism skill - you<br />
should always try to replace the health potions that you have used up.<br />
There will be a few minor fights on the way to the tower doors, and of course once you are inside there are some<br />
more frantic fights - just keep on eye on everyone's health and switch to them and apply a potion when you see<br />
them getting low.<br />
You will be working your way through three levels to the fourth - the Top Level - where you will confront a nasty<br />
Ogre (Boss Mob), and along the way there will be many opportunities to loot items and money. A lot of this stuff<br />
will be useful later, so you should try to remember to loot! That is the last time I will emphasize that strongly - if you<br />
have not figured out that you need to be looting at this point, well...<br />
As you light the signal fire you are treated to a CS in which Loghain retreats like a coward, refusing to send his troops<br />
in, and the darkspawn cut down the King and his forces like a scythe harvesting ripe barley. Duncan himself must<br />
take on the Ogre that slayed the King - and he does - but at what cost?<br />
The Ogre is dead - the King is dead - and now so is Duncan. Oh man!<br />
Just when you think things could not get any worse, darkspawn appear out of nowhere in the tower and you are<br />
taken down by a well-aimed shot. The world goes dark - is this death? Nope!<br />
Rescued by the Witch of the Wilds<br />
You awaken in the Witch's hut to find Morrigan standing over you. She tells you that her mother rescued you from<br />
the top of the tower by turning into a giant bird and grabbing you and Alistair in her talons. Believe that or do not,<br />
but now is the time to talk to Morrigan and get as much information as you can from her.<br />
A note about the dialogue options - talking with the characters that you meet is one of the best ways to develop a<br />
basic relationship with them - and for characters like Morrigan, who will be joining your party, you should always<br />
take advantage of the opportunities to chat. You want them to like you, because it helps in certain parts of the game<br />
later - and of course if they happen to be either of the opposite sex or so inclined to the same sex, there are some<br />
Achievements / Trophies that you can earn for romancing them. Add to that the fact that often the information you<br />
page 42 / 145
<strong>SuperCheats</strong>.<strong>com</strong> Unoffical <strong>Dragon</strong> <strong>Age</strong>: <strong>Origins</strong> Guide<br />
http://www.supercheats.<strong>com</strong>/<strong>guide</strong>s/dragon-age:-origins<br />
Check back for updates, videos and <strong>com</strong>ments for this <strong>guide</strong>.<br />
obtain can grant new Codex entries or provide you with details that strengthen the story line for you, and it is easy to<br />
see why it is a good idea anyway.<br />
Once you have had your chat with Morrigan loot the gloves from the crate near the bed and then exit the hut to<br />
speak with Flemeth - who more or less admits that she is indeed the Witch of the Wilds from the old legend. Take<br />
this opportunity to chat with her - she has some useful background on the Arch Demon, and indirectly she helps<br />
Alistair figure out what you need to do next.<br />
Flemeth tells Morrigan that you will be leaving shortly - and that Morrigan would be leaving with you when you<br />
depart - and Morrigan is not happy to hear this. Clearly she sees it as something of a betrayal by her mother - but<br />
then again, she does not think much of her mother anyway from the things she has said in the past. Still, an ally is<br />
an ally, and we can use the help!<br />
Morrigan suggests that we visit the village North of the Wilds as our starting point - and that sounds like a good idea<br />
to me, but first we should give Morrigan a chance to speak her mind, right? Her sarcasm aside, I suspect that we will<br />
be glad that we accepted Morrigan into our party.<br />
Into The Wilds<br />
As you leave Flemeth's hut you are once again in the Wilds - but this is the same area that we were in before when<br />
we were preparing for the Ritual, so there should be no confusion as to the lay of the land, right? Directly ahead<br />
(look for the torches) there is a zone point marked World Map - this is what we want - and as you approach it you<br />
are asked if you want to gather your party to leave, the answer to that being Yes!<br />
The village of Lothering is the only choice that we can make on the map right now, so go ahead and choose that, so<br />
that we can begin our journey through the Wilds to Lothering!<br />
Before we arrive at Lothering, we are treated to a CS of Loghain Mac Tir adressing a crowd - and a noble steps<br />
forward from the crowd and questions the events that the traitor is describing. Loghain has usurped power, declaring<br />
himself the guardian of the Queen, but clearly he has plans of his own on the question of who is actually in charge!<br />
It may help in understanding Loghain to read his Codex entry now - the man was not born a member of the nobility -<br />
in fact he was a <strong>com</strong>moner - and that explains the brash relations that he has with the nobility and his contempt for<br />
them. He is something of a self-made man, and certainly he has a very large ego. He is not a stupid man, but<br />
perhaps he is partly blinded by his ambition, and he has already demonstrated a willingness to betray even his<br />
closest associates to attain his own goals.<br />
Interrupted Journey<br />
After the CS with Loghain you are treated to a CS of a group of darkspawn who are blocking your path to Lothering -<br />
and a fight ensues!<br />
- OPTIONAL EVENT -<br />
If you are playing the Human Noble Warrior origin line, you already have your own pet Mabari warhound - but if<br />
you are playing one of the other origins, this is where you acquire your pet dog and where he joins your party!<br />
After assisting you in the fight with the darkspawn, the dog happily approaches you, and Alastair <strong>com</strong>ments a little<br />
about the breed of dog and why he seems attached to you. You are given the chance to name him now - I called<br />
mine Clavin after my real life pet dog, who is a Pitbull in a Dachshund suit - but you can leave his name as just<br />
"Dog" if you like.<br />
If you check the Codex entry for your new pet, you will learn that he is the mabari that you helped the Kennel<br />
Master cure back in Ostagar! He has sought you out and clearly as far as he is concerned, you are now his new<br />
page 43 / 145
<strong>SuperCheats</strong>.<strong>com</strong> Unoffical <strong>Dragon</strong> <strong>Age</strong>: <strong>Origins</strong> Guide<br />
http://www.supercheats.<strong>com</strong>/<strong>guide</strong>s/dragon-age:-origins<br />
Check back for updates, videos and <strong>com</strong>ments for this <strong>guide</strong>.<br />
master!<br />
Check your pack - you should have some Double-Baked Mabari Crunch in the Useable Items section - that is a treat<br />
for your dog, and while you cannot give it to him now, remember it is there for later :)<br />
Entering Lothering<br />
Turn around and move back to the boulders behind you and loot the deathroot before you continue on, and do you<br />
see that elfroot plant ahead on the left? Loot that too, and then continue to the end of the road where you are once<br />
again presented with the World Map selection. This time though, you simply continue your journey rather than<br />
select a destination.<br />
When you arrive outside of Lothering you are confronted by a group of bandits who have set themselves up as<br />
unofficial toll collectors on the road leading into the village. As you approach, their leader makes it clear that they<br />
expect to either collect a toll or outright rob you - he does not care which.<br />
You have the option of trying to solve this via conversation, or a more direct approach - through killing them. You<br />
will probably end up killing them anyway, but go ahead and explore some of the chat options because some of the<br />
responses you get are rather funny - especially when his less than bright cohort provides the responses.<br />
Whether you decide to kill them outright or do the right thing and turn them over to the Templar Knights the<br />
confrontation still results in a battle to the death as far as I could tell, so you may as well enjoy it - and besides some<br />
of the items that you loot from their corpses trigger small quests - so make sure that you read the quest entries in the<br />
Codex once you are finished looting them.<br />
Head down the stairs nearby to get a CS in which Morrigan gives Alistair a hard time, and then he brings up the<br />
subject of what the plan is and where you intend to go. Clearly Alistair has some thoughts on the matter, so go<br />
ahead and hear him out.<br />
First he covers the treaties - the Elves, the Dwarves and the Arl Eamon - and suggests that Arl Eamon may be a good<br />
first destination. Getting in touch with the other Grey Wardens is not really an option, and Morrigan thinks you<br />
should ignore the rest of the options and go after Loghain straight away!<br />
Finally you conclude that you need to find these people from the treaties, and Alistair offers to give you directions -<br />
which you should go ahead and let him do because it adds markers to the map for you.<br />
Arl Eamon will be at Castle Redcliffe to the far West.<br />
The Dalish Elves will be to the East towards the Brecillian Forest.<br />
The Dwarves to the West in Orzammer near the Frostback Mountains.<br />
The Circle of Magi will be in their tower in Lake Calenhad to the North.<br />
Loghain will be at the Palace in Denerim.<br />
For now though, let us head to the nearby village - but first have a look around outside the village for some lootable<br />
items including elfroot, deathroot, and items.<br />
page 44 / 145
<strong>SuperCheats</strong>.<strong>com</strong> Unoffical <strong>Dragon</strong> <strong>Age</strong>: <strong>Origins</strong> Guide<br />
http://www.supercheats.<strong>com</strong>/<strong>guide</strong>s/dragon-age:-origins<br />
Check back for updates, videos and <strong>com</strong>ments for this <strong>guide</strong>.<br />
Lothering Village<br />
As you enter the main gates you will encounter a Templar who you can chat with. He suggests that you move on,<br />
but as you chat with him you learn that the reason he thinks you should move on has more to do with the<br />
overcrowding than anything else. You can learn who is in charge from him Ser Bryant who you can find in the<br />
Chantry.<br />
To the right are some wagons and a merchant who is having an argument with a priestess the merchant is being<br />
chastised for predatory pricing, and tries to pay you to deal with the matter. I don't know about you but the idea of<br />
profiteering under these circumstances strikes me as offensive. Morrigan on the other hand thinks he is doing<br />
nothing wrong go figure.<br />
This confrontation presents one of the rare intimidation opportunities there are two Achievements / Trophies<br />
connected to using that skill so if you have it, now would be a good time to use it!<br />
Either way once you resolve the matter go chat with the Chanter Devon nearby it soon be<strong>com</strong>es evident that he can<br />
only answer you in scripture from his holy book which makes for a rather odd conversation but the young boy next<br />
to him helps to fill in the details. I got him to say 'What?" by saying "A Chanter says what?" and you can too!<br />
Once you are dong with this bit of silliness, go check out the Chanter's Board and see if there are any missions on it<br />
that you want to do. You should see one called "Bandits, Bandits, Everywhere" that you can take that involves killing<br />
a certain number of bandits around the town.<br />
Head into the gates nearby and you will find a man scaring the people by foretelling doom and gloom, and who<br />
accuses you of being darkspawn minion. You have a few choices on how to deal with him violence or persuasion I<br />
chose to talk with him. After all it is not very polite to kill crazy people.<br />
If you show some sympathy as you question him, you learn that the real reason he is so distraught is because of his<br />
personal cowardliness when he failed to defend his family, and instead ran away to save himself. It turns out that he<br />
can be reasoned with and he finally stops screaming and leaves the area. You get the chance to use your persuasion<br />
skills on a member of the crowd, and then this interruption ends.<br />
The Lothering Chantry<br />
After you enter the Chantry, you will hear a conversation taking place go over and talk to the speaker, who turns out<br />
to be Ser Bryant. Once you identify yourself as a Grey Warden, Ser Bryant informs you of the price that has been<br />
placed upon your head and admits that he has trouble believing the charges himself. While he has no plans to<br />
enforce the order, he would prefer it if you leave soon, but before you do leave, go ahead and get as much<br />
information as you can from him.<br />
One thing that you learn is that the Templar guarding the Circle of Mages tower have asked for authorization to kill<br />
all of the mages and destroy the tower so it might be a good idea to kick them a notch higher on your plans on who<br />
to visit first, yes?<br />
You learn from Ser Bryant that Arl Eamon has fallen ill, and has sent his knights out in search of a magical cure and<br />
one of the knights is there in the Chantry now. Remember the items we looted from the dead Templar? It would be<br />
an idea to have a talk with this knight but before you do that, there is a book by the far wall across from Ser Bryant<br />
that covers the blight go ahead and add that to the Codex now.<br />
Ser Donall<br />
The knight from Redcliffe is Ser Donall, someone that Alistair knows well. He says that he is here searching for the<br />
page 45 / 145
<strong>SuperCheats</strong>.<strong>com</strong> Unoffical <strong>Dragon</strong> <strong>Age</strong>: <strong>Origins</strong> Guide<br />
http://www.supercheats.<strong>com</strong>/<strong>guide</strong>s/dragon-age:-origins<br />
Check back for updates, videos and <strong>com</strong>ments for this <strong>guide</strong>.<br />
Urn of the Sacred Ashes, and as you converse with him you get a better idea of why defeating Loghain may be a<br />
bigger task than you thought.<br />
Giving Donall Ser Henrick's locket and note let Donall know that he may as well leave now, as there is no longer a<br />
need to wait for a meeting that will never happen. You can ask for a reward if you like I chose not to. As your<br />
conversation ends, Donall departs and you get some Codex entries.<br />
There are some books to the left ahead that will add Codex entries and there is a gift item in a chest behind the<br />
shelves there as well that you may want to collect.<br />
The Revered Mother<br />
Inside the study you will find the Revered Mother the first thing that she asks you is to make a donation to the<br />
Chantry and 30 silver does not sound like a lot to me under the circumstances, so why not?<br />
Telling her that you are a Grey Warden puts her in a difficult position, and though she wants to help you, the only<br />
thing she can do for you is to keep your presence a secret. You may as well ask for her blessing it couldn't hurt but<br />
now it is time to go, but before you do look to the pile of books to the left side of the room for another Codex entry<br />
you are reading these as we get them, right?<br />
Once you leave the Chantry, head back through its gates and around to the right you see the bridge here? There is a<br />
little boy standing at the base of the bridge who is looking for his mother. As you chat with him you realize that<br />
chances are really good that his mother is dead she certainly has not joined him as she said she would. There does<br />
not seem to be much that you can do for him except give him a silver piece so he can get some dinner, which is a<br />
nice thing to do.<br />
The Bridge<br />
On the other side of the bridge is the village proper. To the left side is a woman named Allison who is looking for<br />
someone to make her some traps if you can make traps go have a chat with her, otherwise not.<br />
Across from her is Elder Miriam, who asks you if you have a bed for the night? She is coordinating aid for the<br />
refugees, and fills you in on what has been happening.<br />
Nearby is a group of Chasind fighters who a farmer is accusing of stealing food from his cart. They are part of a<br />
group of deserters from the army, and they are causing trouble all over the town.<br />
Nearby on the right side of the village is a tavern called Dane's Refuge. Outside is a Helpful Refugee who you can<br />
talk to and who will let you know that there is trouble in the tavern. He will tell you about the soldiers, and you get<br />
the idea that you should probably look into this. When he learns that you are the group that took out the bandits<br />
who were blocking the road into town he thanks you isn't that nice?<br />
Dane's Refuge Tavern<br />
As you enter the tavern you are confronted by the soldiers that the refugee was talking about. It turns out that they<br />
are Loghain's men and they were sent here to look for YOU. A priestess named Leliana, a lay-sister of the Chantry,<br />
tries to intervene on your behalf but that does not work out. There is no avoiding this fight, so you may as well take<br />
them out as fast as you can once you exhaust the conversation options. Sadly you do not actually kill them they give<br />
up once you start putting the beat-down on them.<br />
You may feel like killing these soldiers heck I would not blame you if you did but consider a few things before you<br />
do that. You can use them to take a message to Loghain that will help to force him to grow more paranoid, and if<br />
you do that, you will not receive a negative downcheck from Leliana. Why is that important? Because she is one of<br />
page 46 / 145
<strong>SuperCheats</strong>.<strong>com</strong> Unoffical <strong>Dragon</strong> <strong>Age</strong>: <strong>Origins</strong> Guide<br />
http://www.supercheats.<strong>com</strong>/<strong>guide</strong>s/dragon-age:-origins<br />
Check back for updates, videos and <strong>com</strong>ments for this <strong>guide</strong>.<br />
the people you want to recruit into your party!<br />
As you chat with her she mentions that she wants to kill darkspawn, and tells you that she is <strong>com</strong>ing with you note<br />
that I said tells, not asks. Nice. Go ahead and go through the chat options that she has available both to get<br />
information and because doing so helps to increase your relationship levels with her.<br />
A NOTE ABOUT GAINING PARTY MEMBERS<br />
Obviously you can only have three party members in addition to yourself in your party, but you can gather<br />
additional members and, at various points in the story, switch them in and out of your group as you like. Turn<br />
nobody away there are Achievements / Trophies connected to acquiring party members and besides, it gives you<br />
more options for creating a stronger party.<br />
Be aware though that you will need to level them up to maintain their usefulness to you...<br />
Blackstone Liaison<br />
On the left side of the tavern room there is an armored fighter a Blackstone Liaison go over and have a chat with him<br />
now, and learn that he represents a mercenary <strong>com</strong>pany that is seeking your help. He explains that each of their<br />
posts stationed throughout the lands will be receiving letters for you from their leaders, offering missions to you.<br />
When you encounter a Blackstone outpost you can check it for letters (missions) and accept them. When you<br />
<strong>com</strong>plete one of these missions, you can go to any of their outposts to collect your reward and to obtain a new<br />
mission. Simple enough, yes?<br />
Next to the Liaison is a metal chest that is sparkling access the chest to obtain your first Blackstone mission there are<br />
actually two available:<br />
Scraping the Barrel<br />
A delivery job take these letters of conscription and deliver them to Dernal Garrison in Redcliffe, Patter Gritch in<br />
Lothering, and Vatel Baern in Denerim. Sounds simple enough!<br />
Dereliction in Duty<br />
Track down and deal with deserters, Punish the deserters and recover the supplies that they have stolen.<br />
Since you are not restricted to taking only one mission, you may as well take both, right? You are in Lothering now,<br />
so before you depart, be sure to deliver that conscription notice!<br />
Danal the Innkeeper<br />
You may have noticed that your inventory is just about full, so now would be a good time to have a chat with Danal,<br />
the owner of this Tavern so you can apologize for messing up the tavern and see what news and rumors he has to<br />
share. This is a very pragmatic individual though I have to wonder just how valuable the information he has to share<br />
really is.<br />
Barlin the Merchant<br />
Standing in the center of the tavern is Barlin, a merchant. Running across him is very fortuitous as our bags are now<br />
full of loot and there are a few supplies we could use. First though, have a chat with him and see what he has<br />
available.<br />
You should have already upgraded the gear for your party before selling anything if you have not done that, do it<br />
now. Selling off the items that you cannot use makes good sense as it gains you money, space, and of course the<br />
ability to buy the things you can use.<br />
page 47 / 145
<strong>SuperCheats</strong>.<strong>com</strong> Unoffical <strong>Dragon</strong> <strong>Age</strong>: <strong>Origins</strong> Guide<br />
http://www.supercheats.<strong>com</strong>/<strong>guide</strong>s/dragon-age:-origins<br />
Check back for updates, videos and <strong>com</strong>ments for this <strong>guide</strong>.<br />
Note: From a practical point of view you should be making the potions, poultices and salves that you need, not to<br />
mention the traps, poisons, and other craftables, because you can easily gather the ingredients as a by-product of<br />
adventuring, and it is a LOT cheaper to do it that way. You do not have to craft, but it is not that difficult, and as<br />
long as you keep your eyes out for plans and recipes on the merchants you encounter, you should quickly amass the<br />
ones you need to make what you need.<br />
If you are not a magic user as your main, that does NOT mean that having Lyrium related items is a waste remember<br />
you have a mage in your party and THEY can use that, so do not ignore things that are not particular to your<br />
specialization since they are still useful to the party.<br />
A short list of items you may want to stock up on here include:<br />
Distillation <strong>Age</strong>nt<br />
Elfroot<br />
Flasks (empty)<br />
Gifts<br />
Plans<br />
Recipes<br />
Items you should not sell (in other words hold on to because you can use them later) include Runes, Gifts, and<br />
crafting agents that you can actually use. The later is relative to what skills you have for instance if you cannot make<br />
traps than holding on to trap <strong>com</strong>ponents does not make sense...<br />
A Note on Gifts<br />
Gifts will increase the amount of affection/like that your party members have for you. To ascertain what that level<br />
presently is, open the Equipment menu and select each party member below their doll and load-out window is a<br />
sliding guage with dislike on the left, and like (a heart) on the right. Their present level of affection is indicated by<br />
the arrows marking the bar obviously you want this to be as high as you can get it!<br />
Giving a gift to them will increase their like for you and giving the right gift to the right party member can have an<br />
even greater increase on like. If you examine each gift that can give you an idea of who it would be most<br />
appropriate for.<br />
Back to Barlin<br />
After you have bought and sold all that you need to, ask Barlin if he knows of any well-paying jobs in town. First he<br />
will loudly answer that you should check the Chanter's Board but we already know about that don't we? In a much<br />
more discrete voice he will then ask if you happen to know anything about poison?<br />
Well as a matter of fact I do!<br />
Barlin would like to purchase some poison from you nothing fancy, just something that he can use to and I quote<br />
"slow them beasties down."<br />
To <strong>com</strong>plete this quest you need to make three flasks of venom which means you need some Toxin extract.<br />
You may need to purchase some ingredients from him to make the poison but you are better off gathering the<br />
ingredients yourself. Just keep in mind that you have a standing order from him and now exit the tavern.<br />
Sten of the Beresaad<br />
In a cage further down the road from the tavern is a prisoner named Sten. When you go and chat with him, you<br />
learn that he has been imprisoned by the Chantry because he slaughtered an entire family including their children<br />
page 48 / 145
<strong>SuperCheats</strong>.<strong>com</strong> Unoffical <strong>Dragon</strong> <strong>Age</strong>: <strong>Origins</strong> Guide<br />
http://www.supercheats.<strong>com</strong>/<strong>guide</strong>s/dragon-age:-origins<br />
Check back for updates, videos and <strong>com</strong>ments for this <strong>guide</strong>.<br />
and he even admits that he did do this.<br />
He is Sten of the Beresaad, as he says, the vanguard of the Qunari Peoples. Would it surprise you to learn that this<br />
murderer is one of the people that you can add to your group? Well, he is but you have to figure out how to get him<br />
out of this cage and gain his willing cooperation without alienating the town, the Chantry AND your group!<br />
Introduce yourself and feel him out he can provide you with the information you need. As you chat with him you<br />
will notice that Alistair does not like him, and Morrigan likes him. Leliana does not think that even a murderer<br />
deserves the fate that is in store for Sten, and you have to decide what you are going to do but the task begins with<br />
revisiting the Revered Mother.<br />
If you have Leliana in your party, the Revered Mother will give you the keys because she trusts Leliana and because<br />
you want to put Sten under your control. If you do not have her in your party, your options are limited. Be aware<br />
though that if you choose to intimidate or threaten, you will have alienated the Revered Mother, the Chantry, and<br />
lost some of the respect that Alistair feels for you.<br />
Once you have the keys, return to the cage and free Sten, adding him to your party pool if not necessarily your party.<br />
Before you head on to <strong>com</strong>plete your current missions, run back over and chat with Elder Miriam again, and she will<br />
offer you a mission to gather herbs and create some healing poultices for her. Accept that mission, as there are quite<br />
a few elfroot plants in the area that you will be covering to do the Chanter's Board mission!<br />
Wrapping up the Lothering Missions<br />
The requirements for the mission you accepted from the Chantry Board are to eliminate the bandits there are three<br />
groups of bandits on the North side of the village outside. The three groups of bandits are marked on your radar map<br />
with white arrows and labeled on the map itself as Chanter's Board targets.<br />
Leave town and seek out these bandits and slay them! As you move towards each group keep your eyes peeled for<br />
plants you can harvest and lootable containers there are a few in the area outside of town.<br />
The group of refugees that you encounter as you leave town are not part of the Chanter's Board quest, but you still<br />
need to take them out. That is a pity since they are not evil in their own right, but what can you do?<br />
The group of bandits with the Bandit Leader in it around the far hill were a lot tougher than I was expecting I had to<br />
burn through a large number of healing potions to defeat them and you likely will too so keep your eyes out for<br />
elfroot to replace what you use up!<br />
After you take out the third group of bandits you can loot the two containers in their camp for some money and<br />
items, and then instead of heading straight back to the Chanter's Board, follow the river here in the general direction<br />
of town and you will be set upon by a group if giant spiders.<br />
After you slay the spiders you will loot some toxin from each this is the ingredient that you need to make the poison<br />
that Barling wants. After you loot the toxin, open your <strong>com</strong>mands menu and select poisoning, then the poison<br />
crafting icon, and create three Venom Potions.<br />
Now you are ready to return to the Chanter's Board, Elder Miriam, and to visit with Barlin. Do that now.<br />
Elder Miriam pays you a small amount of silver for helping her to restock her healing supplies.<br />
Barlin pays you 75 silver for supplying him with the three vials of venom that he needs to poison the traps that he<br />
wants to place on his farm.<br />
The Chanter's Board quest gives you a whopping 3 gold for <strong>com</strong>pleting it when you talk to Chanter Devons, who<br />
tells you that you have done the Maker's work this day! Three gold! I'd do that again ten times if it would let me :)<br />
page 49 / 145
<strong>SuperCheats</strong>.<strong>com</strong> Unoffical <strong>Dragon</strong> <strong>Age</strong>: <strong>Origins</strong> Guide<br />
http://www.supercheats.<strong>com</strong>/<strong>guide</strong>s/dragon-age:-origins<br />
Check back for updates, videos and <strong>com</strong>ments for this <strong>guide</strong>.<br />
In addition to the gold you are paid, you also unlock the Achievement / Trophy "Pilgrim" (10 GS) for <strong>com</strong>pleting a<br />
Chanter's Board quest. Good on ya! That is the first Achievement / Trophy we have unlocked since the Origin<br />
Stories!<br />
If you are in the mood to do a few more quests, the Chanter's Board now has two more: When Bears Attack, and A<br />
Last Keepsake. Doing these quests is an opportunity to gain some XP and money, and besides, they are quests! You<br />
gotta do quests!<br />
When Bears Attack<br />
A family of bears in the North woods of Lothering have killed a boy named Eneth. The Chanters are offering a<br />
reward for any warrior who kills the bears.<br />
A Last Keepsake<br />
The young boy we gave a silver piece to earlier is the subject of this Chanter's Board mission. The Chanters would<br />
like someone to locate the mother's body and bring her effects back to give to the boy.<br />
Head outside of town to the north and you will be attacked by a pack of wolves a large pack of wolves and once<br />
you take them out, you will discover the body of the boys mother. Loot that to gather the items you need for the<br />
quest, and then continue towards the next quest marker.<br />
After you take out the three bears head back to Chanter Devons and get your 50 silver for <strong>com</strong>pleting the two<br />
quests. You also get some XP I got enough to put me up to the next level which is nice :)<br />
That wraps up almost everything you have left to do in Lothering save for delivering the conscription notice for the<br />
Blackstone. You are looking for Patter Gritch, in Lothering, but making this your active quest does not create a<br />
marker directing you to them.<br />
You will find Patter Gritch in the read of the Chantry just past the entrance to the Revered Mother's study and he<br />
does not seem happy to get your letter! At least he does not try to run...<br />
Once you deliver that message you have pretty much exhausted the quests in Lothering and you can now head<br />
towards the last marker on the radar map, which is the route out of the area.<br />
Leaving Lothering-Vegas<br />
As you approach the exit to the zone you encounter a party of darkspawn attacking a Dwarvish trader and his son<br />
and you quickly take the darkspawn out! There is an item that gets you a Codex entry on the body of one of the<br />
darkspawn, and as you approach the Dwarves you get a CS in which they thank you for <strong>com</strong>ing to their rescue.<br />
The Dwarves are Bodahn Feddic and his son Sandal, and they do not want to ac<strong>com</strong>pany you at the moment. They<br />
go about cleaning up the mess that the darkspawn made of their caravan and you head out via the nearby zone<br />
point. Do not worry, you will be seeing them again :)<br />
When you select the zone point you get a CS that shows the nightmare you are having, and then you wake up.<br />
Alistair tells you about your bad dream that it is actually rather real, as it is the Archdemon talking to the hordes.<br />
Alistair tells you that eventually you will be able to block out the bad dreams and then suggests that as you are<br />
awake, it is time to pull up camp and get moving.<br />
Before you do that, take a look around the area you are camping in and low! There is Bodahn and his son! They<br />
may not want to travel with you, but they are certainly willing to enjoy the protection that camping with you brings<br />
and to show their appreciation, Bodahn is willing to give you a discount on his wares!<br />
If you happen to have 131 gold and some change you can buy a wicked ax from him I couldn't afford it but I wish I<br />
could. He also has some really nice armor but again, it is a bit on the pricey side, discount or no,<br />
page 50 / 145
<strong>SuperCheats</strong>.<strong>com</strong> Unoffical <strong>Dragon</strong> <strong>Age</strong>: <strong>Origins</strong> Guide<br />
http://www.supercheats.<strong>com</strong>/<strong>guide</strong>s/dragon-age:-origins<br />
Check back for updates, videos and <strong>com</strong>ments for this <strong>guide</strong>.<br />
If you talk to Sandal you learn that while he is mentally simple, he also happens to be a savant at folding and since<br />
you have some runes that can be used to enchant your weapons, why not go ahead and have him apply one?<br />
Next to Bodahn is a bloke named Levi Dreyden, and if you chat with him he tells you that he has been looking for<br />
you that he knew Duncan and that he had an arrangement with the Grey Warden. He says that they were supposed<br />
to look into something important for the Grey Wardens and for himself and suggests that Duncan would want you to<br />
help him.<br />
He tells you the story about his family, saying that Duncan wanted to reclaim Soldier's Peak this is actually the<br />
in-game link to the first DLC for the game if you have already purchased that DLC than you can trigger it here. If<br />
not, it gives you the option of buying it.<br />
You do not have to do this DLC quest now and as I do not presently have it, I will not be covering it right now.<br />
When I do cover it I will update this WT with that part.<br />
When you are finished talking to Levi, head over to the World Map zone line and assemble your party, and then<br />
select your next destination! I chose Denerim you can choose any destination you like and simply jump to that<br />
section below.<br />
page 51 / 145
<strong>SuperCheats</strong>.<strong>com</strong> Unoffical <strong>Dragon</strong> <strong>Age</strong>: <strong>Origins</strong> Guide<br />
http://www.supercheats.<strong>com</strong>/<strong>guide</strong>s/dragon-age:-origins<br />
Check back for updates, videos and <strong>com</strong>ments for this <strong>guide</strong>.<br />
Denerim<br />
Note that the city is broken up into districts, and you move between them by using the World Map gates. The quests<br />
for Denerim are presented in Appendix B if you have trouble keeping them straight but they are introduced to you<br />
in the parts for each quarter/sector of the city as well. Be aware that quests obtained in one district may have parts<br />
that require you to travel to a different district in order to <strong>com</strong>plete them.<br />
As you enter Denerim you may notice that unlike previous areas some of the people there do not highlight so you<br />
cannot talk to them. I do not know why this is, but then again if you cannot talk to them than it follows that they<br />
have nothing to do with any of the quests or interactions, right?<br />
The Market District<br />
This is the first area we visit when we enter the city. If you look to the left in the open area past the entrance you<br />
will spot the local Chanter's Board and the Chantry we may as well begin by checking that now, as there are a<br />
number of quests available on it.<br />
Chanter's Board Quests<br />
Back Alley Justice<br />
Take out the bandits that are preying on the good people in the back alleys of the town.<br />
Missing in Action<br />
A veteran of the battle at Ostagar named Rexel has gone missing see if you can find him.<br />
Fazzil's Request<br />
Master Fazzil has lost his sextant when he was set upon by bandits and would like it recovered for him.<br />
Loghain's Push<br />
Provide support to Loghain's troops at least that is what they want you to do but you may just have other ideas in<br />
that regard.<br />
Desperate Haven<br />
Rescue the group of refugees that is cornered by darkspawn.<br />
Skin Deep<br />
Obtain samples of darkspawn skin for Knight-Commander Thames.<br />
Just pick the quests you want from the list!<br />
Before you get too busy with quests, let's talk to the folks we can talk to, and explore the area for lootables, shall we?<br />
Theohild and Perpetua<br />
Standing near the gate to the Chantry is Sister Theohild and Mother Perpetua, two preistesses of the Chantry. Sister<br />
Theohild has a rather interesting take on the scripture that drives Perpetua to distraction, and the CS and dialogue<br />
sequence is both amusing and informative, so you should not miss it.<br />
Sister Justine<br />
Say hello to Sister Justine, a curator at the Chantry. In your chat with her you can learn what a curator does, perhaps<br />
more than you wanted to know in fact. There seems to be a problem with the unscrupulous selling false relics,<br />
though Justine has a theory about that as well.<br />
page 52 / 145
<strong>SuperCheats</strong>.<strong>com</strong> Unoffical <strong>Dragon</strong> <strong>Age</strong>: <strong>Origins</strong> Guide<br />
http://www.supercheats.<strong>com</strong>/<strong>guide</strong>s/dragon-age:-origins<br />
Check back for updates, videos and <strong>com</strong>ments for this <strong>guide</strong>.<br />
According to Justine her own research indicates that the ashes are real, that they were gathered and placed into an<br />
urn, and that the urn and ashes are likely hidden somewhere. If she is correct than this may be a relic we can<br />
actually find!<br />
Slim Couldry<br />
Outside a nearby building is Slim, who knows that you are a Warden and says that he is a friend. He does not seem<br />
to think much of Loghain, and he is willing to share information with you as long as you are willing to cut him in on<br />
the proceeds.<br />
If you are looking to make some money from your Rogue skills, it appears that Slim is the man to go to if you are<br />
willing to pay him 1 sovereign, he will let you know about a certain Lady who has gone to the country and left her<br />
valuable in her inn room. While there is a guard, he is not supposed to be much of a threat, and Slim thinks that you<br />
could make a good bit of profit by pilfering her valuables.<br />
Liselle<br />
A merchant in the market center, Liselle offers to sell you some bath oils or scent. You can ask her about herself,<br />
where she is from and why she left, and you can get quite a bit of detail about her past. She will direct you to the<br />
other merchants if you ask her the armorer in particular. She points the way to the Chanter's Board, and suggests the<br />
Tavern nearby if you are looking for muscle work.<br />
Wade's Emporium<br />
Nearby the open market is Wade's Emporium, an armor shop. Herren, the shop keeper, would give PT Barnum a run<br />
for his money as far as self-promotion goes, but the armorsmith Wade puts the mickey to his bragging. Judging by<br />
their back-and-forth patter, they are boyfriends.<br />
Wade's has a selection of general armor, but none of it is special.<br />
Before you leave, go try to talk to Wade he gets very pissy at you for doing that.<br />
There is a chest behind Wade that you should loot if you can there is a note inside that triggers a Codex entry, and<br />
there is a healing potion. That pretty much wraps things up at Wade's Emporium!<br />
Sergeant Kylon<br />
The local law enforcement and is he in a bad mood. It turns out that the men he has been assigned are mostly the<br />
useless and witless bastard sons of the local nobility. They are not very effective do the chat options and you will<br />
see why.<br />
Kylon reveals that a wanted poster has been passed around with your picture on it, but tells you that he does not<br />
believe the charges that are laid against you and has no problem with your being there. If you ask if he needs any<br />
help, he eagerly agrees that he could indeed! There is a whorehouse called the Pearl nearby that he needs cleared<br />
out he does not want you to kill anyone, just rough them up a bit.<br />
You may as well accept that quest it should be good for some XP.<br />
Mages Collective Liaison<br />
Around the back of this block of block of buildings is the representative of the Mages Collective, and if you have a<br />
chat with him he will tell you about what they do and how you can help them. Beside him is a bag and as he<br />
page 53 / 145
<strong>SuperCheats</strong>.<strong>com</strong> Unoffical <strong>Dragon</strong> <strong>Age</strong>: <strong>Origins</strong> Guide<br />
http://www.supercheats.<strong>com</strong>/<strong>guide</strong>s/dragon-age:-origins<br />
Check back for updates, videos and <strong>com</strong>ments for this <strong>guide</strong>.<br />
explains, in every major settlement there is a similar outpost and sack and if you are interested you can do work for<br />
them and get paid for it.<br />
The sack has three jobs in it:<br />
Blood of Warning<br />
Mark the doors of certain houses to warn them that the Templars are going to raid them.<br />
Have You Seen Me?<br />
Locate the missing mage Renold.<br />
The Scrolls of Banastor<br />
Find the five scrolls of Banastor and return them to the Collective.<br />
Gorim the Dwarf<br />
Gorim has a stall in the lane at which he is selling only the finest Dwarven steel. You can buy weapons or perhaps<br />
information and getting a little news from him would be an idea.<br />
He will tell you about the Landsmeet, and the local nobles. You might want to check out his wares to see if he has<br />
anything that you want to buy while you are here as well.<br />
Fayd the Apprentice<br />
The first time you talk to him there are no chat options.<br />
Cesar<br />
Behind him is a book you can read to gain a Codex entry. When you talk to him, he makes a <strong>com</strong>ment about<br />
refugees and offers to show you his wares. He has a general selection of weapons, armor, and crafting goods<br />
including some recipes you may want to buy.<br />
Ser Landry<br />
As you approach him he recognizes you accuses you of all of the ill that Loghain says you <strong>com</strong>mitted, and demands<br />
satisfaction from you. What he really means is that he wants to kill you. As far as I can tell he cannot be<br />
intimidated, and demands that you meet him behind the tavern for a duel.<br />
No matter what you say, this guy wants to fight, and the conversation ends with this new quest being flagged. You<br />
really have no choice here mate, you are going to have to kill him but that should not upset you too much, after all<br />
he is a rude and obnoxious git, right?<br />
When you are ready, head to the alley behind the tavern and duel him.<br />
Gnawed Noble Tavern<br />
The building near where you met Ser Landry is the Gnawed Noble Tavern and when you enter on the left there is a<br />
book you can read to add a Codex entry.<br />
The room on the left (through a door) is full of Crimson Oar Mercenaries. In this same room is the representative<br />
from Blackstone and his quest chest. When you talk to any of the mercenaries you will get abuse or bragging both<br />
are amusing.<br />
page 54 / 145
<strong>SuperCheats</strong>.<strong>com</strong> Unoffical <strong>Dragon</strong> <strong>Age</strong>: <strong>Origins</strong> Guide<br />
http://www.supercheats.<strong>com</strong>/<strong>guide</strong>s/dragon-age:-origins<br />
Check back for updates, videos and <strong>com</strong>ments for this <strong>guide</strong>.<br />
This is the inn that has Sophies room in it, but if your lockpicking skill is too low, you will have to <strong>com</strong>e back after<br />
you have raised it. You do not have to loot that chest to <strong>com</strong>plete the quest however so once you have broken in<br />
and looted the room return to Slim for another quest.<br />
Back in the main room you can chat with the Bartender, who will share the news with you, and will sell you crafting<br />
resources, and recipes including an injury kit recipe and a Greater Health Poultice Recipe that are worth the<br />
expense. He has ale (a gift) that you can buy as well.<br />
Finally he can offer you jobs of questionable legality and when you ask offers you three now:<br />
Correspondence Interruptous<br />
Bring him 12 love letters you loot from the homes of the wealthy.<br />
Solving Problems<br />
Dump some bodies for him in the Marketplace.<br />
Negotiation Aids<br />
Deliver a stack of 15 toxin extract samples to the Bartender.<br />
Blackstone Quests<br />
The chest has one quest available Restocking the Guild requesting that you bring 20 health poultices to the<br />
representative.<br />
Wonders of Thedas Shop<br />
There are books and scrolls inside that earn you Codex entries so be sure to collect all of those.<br />
Speak to the Tranquil behind the desk to view their wares this is a Mage's Circle shop, so there may well be items<br />
that you want to get for your character if it is a mage and for Morrigan if not.<br />
They sell some recipes here that you will likely want to buy, so if you do not have the money at the moment, make a<br />
mental note that they are here so you can return when you do.<br />
Genitivi's Home<br />
You can speak to Weylon, the scholar's assistant inside. It seems that the brother has gone missing while on the trial<br />
of the Urn of Sacred Ashes, and Weylon believes that the reason he has disappeared is because he has gotten too<br />
close to the location of the Urn.<br />
It takes some arm-twisting, but eventually Weylon tells you where the scholar went so that you can add this as one<br />
more quest on your list of quests to do.<br />
Unfortunately when you try to go into the scholar's study to read his papers, Weylon resists and you are forced to kill<br />
him. Too bad, I rather liked him!<br />
Inside the room you find the scholar's notes and the body of the real Weylon! Well it turns out that we did not kill<br />
the scholar's assistant after all! I know I feel better.<br />
Genitivi's research suggests that the Village of Haven in the mountains to the west may have some clues to the<br />
location of the Urn so mark that in your memory.<br />
page 55 / 145
<strong>SuperCheats</strong>.<strong>com</strong> Unoffical <strong>Dragon</strong> <strong>Age</strong>: <strong>Origins</strong> Guide<br />
http://www.supercheats.<strong>com</strong>/<strong>guide</strong>s/dragon-age:-origins<br />
Check back for updates, videos and <strong>com</strong>ments for this <strong>guide</strong>.<br />
The Pearl<br />
As you travel to the Pearl your journey will be interrupted by a <strong>com</strong>bat confrontation, but when the screen loads you<br />
find yourself on the street in the Back Alley near some vials of glowing substance.<br />
After you take one of the vials a very powerful mob called the Revenant spawns, and you have to fight it. From the<br />
strength of it, I would guess that this qualifies as a boss mob, but as there is nothing to explain what it is and is about,<br />
that is all I can tell you!<br />
When you loot it you gain a Codex entry on The Black Vials read that for some confusing hints as to the meaning of<br />
this encounter.<br />
Moving along through this area you pass through an open gate and are attacked by a band of Rogues if you get<br />
separated from your party by the portcullis dropping chances are you will fall in battle, but the gate will open again<br />
and your party can then defeat the Rogues and revive you. At the far end of this courtyard is the City Map gate that<br />
you can use to continue your journey to The Pearl.<br />
AT THE PEARL -<br />
There are books to add Codex entries here and some lootable containers so explore a bit before you get down to<br />
doing the quests.<br />
Collect the body and a letter<br />
In a room in the back of The Pearl you will find the third body that you need to collect and a container in that room<br />
with one of the letters you also need to collect. After you gather up these quest items,<br />
The Resistance Meeting<br />
The door opposite the room with the body is the meeting place of the so-called Grey Warden resistance support<br />
group knock on it and use the first selection as the pass phrase. Once you are inside however you realize that the<br />
resistance is really a trap set up by the Arl's forces!<br />
They give you one chance to surrender like you are going to do that! It is time to fight!<br />
Sanga the Proprietor<br />
Once you have finished with the back rooms, head back to the inn proper and have a chat with Sanga, the madam<br />
that runs this fine... err... establishment. She will offer to show off the talent you can pick one to frolic with if you<br />
like. Make, female, both, she does not care as long as you have the 40 silver to pay for the services.<br />
The White Falcons<br />
Remember the mercenaries that the Sgt. wants you to rough up? These are them. They do not intimidate but<br />
remember that you are not *supposed* to kill them!<br />
Once you get into the fight and do some damage, they fold like a wet paper bag, begging for mercy. Since you are<br />
not supposed to kill them, this is where you show mercy I guess, so tell them to empty their pockets and leave and<br />
you pick up a cool 2 gold pieces for your efforts!<br />
Casivir<br />
page 56 / 145
<strong>SuperCheats</strong>.<strong>com</strong> Unoffical <strong>Dragon</strong> <strong>Age</strong>: <strong>Origins</strong> Guide<br />
http://www.supercheats.<strong>com</strong>/<strong>guide</strong>s/dragon-age:-origins<br />
Check back for updates, videos and <strong>com</strong>ments for this <strong>guide</strong>.<br />
The first mate on Captain Isabela's ship, he is full of information about his captain, and you may as well get it from<br />
him, right? The ship's name is The Siren's Call, and according to Casivir, Isabela considers herself to be a duelist,<br />
and judging by his feelings she is a pretty good one.<br />
Isabela<br />
Standing in the back of the tavern room, Isabela is willing to chat and seems to be somewhat impressed with you!<br />
There are several chat options you can pursue with her, and you may as well do that so you can learn what it is she<br />
thinks is a duelist.<br />
You can ask her to teach you the duelist skills and she will teach you the basics if you ask, but you have to have a<br />
drink and a game with her before she will teach you. You do not actually have to play the game with her you can<br />
continue as she talks up the game, or you can try to catch her hand with dexterity.<br />
When you catch her hand you discover that she is cheating but evidently that was the whole point as it was a test to<br />
see how quick and resourceful you were. She announces that she will be honored to teach you her skills, and does<br />
as it unlocks your first specialization, the Duelist.<br />
Unless you want to buy a prostitute, this wraps up what you have to do at The Pearl. Now would be a good time to<br />
head back to the Market Square and dump that last body down the well and turn in that quest.<br />
On the way back to the Market you run into the Sgt, who thanks you for a job well done but a group of White<br />
Falcon mercenaries interrupt the meeting, and you are forced to fight them. After the fight, the Sgt. pays you your<br />
reward, <strong>com</strong>menting that it surprises him that people actually choose to fight you! Yes, I am surprised as well :)<br />
Back in Market Square<br />
Now continue on the the Market Square using the World Map and then dispose of the body, and then head to the<br />
tavern to talk to the Bartender.<br />
On your way out, go talk to Sgt. Kylon again, he has another mission for you this time he wants you to take out the<br />
mercenaries in the tavern nearby.<br />
The Crimson Oars Mercenaries<br />
These are the loud mercenaries we noticed before in the room with the Blackstone <strong>Age</strong>nt. You have a choice here<br />
you can either fight them or you can persuade them to leave the district and move to a tavern at the Docks.<br />
To persuade them to leave, a <strong>com</strong>pelling argument is that there are no "willing" women at this fine establishment.<br />
That logic clicks in the leaders head, and he orders his men to leave with him for a tavern at the docks. Mischief<br />
managed!<br />
Return to Sgt. Kylon and collect your reward of 3 gold sovereigns.<br />
Done? Good! Now head back to the City Map and select the Dirty Back Alley.<br />
The Dirty Back Alley<br />
As you arrive here you will see through the gates a band of thugs go ahead and engage them now.<br />
Once they are defeated, run up the far stairs and mark the door to a Blood Mage's relative, and then return to the<br />
page 57 / 145
<strong>SuperCheats</strong>.<strong>com</strong> Unoffical <strong>Dragon</strong> <strong>Age</strong>: <strong>Origins</strong> Guide<br />
http://www.supercheats.<strong>com</strong>/<strong>guide</strong>s/dragon-age:-origins<br />
Check back for updates, videos and <strong>com</strong>ments for this <strong>guide</strong>.<br />
World Map gate and select Dark Alley from the menu.<br />
On the way you will get a confrontation stop in the Back Alley where you will make quick work of a group of<br />
Bandits! Once they are defeated, return to the World Map gate and continue on.<br />
The Dark Alley<br />
Another band of bandit thugs awaits you here, angry over the killing of their friends. This can be a tough fight if you<br />
let them surround you, so try not to do that!<br />
The fourth and final door to be marked for the Blood Warning Quest is in this area so go ahead and mark it now.<br />
That is all that there is to do here for now, so head back to the City Map gate and select Rundown Back Street.<br />
Rundown Back Street<br />
As you should expect by now, another group of bandit thugs is waiting for you as you enter the area actually this is<br />
the third group and it should be the last for this quest! Taking them out may be a bit on the challenging side, but<br />
when you are done you will feel good about it I know I did :)<br />
Near by you find the body of a dead Templar named Ser Friden and on it is a document that initiates a quest called<br />
The Last Request. Friden was sent to deal with blood mages in the city, but it seems that the mages have dealt with<br />
him!<br />
There is a nearby door labeled "Dirty Hovel" that you can enter, and inside is Layson the Deserter, the subject of the<br />
quest Dereliction of Duty. You have to kill him he does not give you a choice and once he is dead you can loot the<br />
Guild Supplies from his body to return them to the Blackstone <strong>Age</strong>nt.<br />
Back to the Market Street<br />
Now that you have dealt with the final group of bandits, return to the Market District and speak with Chanter<br />
Rosamund next to the Chanter's Board near the Chantry to receive your reward of 4 gold sovereigns.<br />
Next you need to see the <strong>Age</strong>nt from the Mage's Circle, to collect the single gold sovereign for <strong>com</strong>pleting the quest<br />
Blood of Warning.<br />
Loghain's Push Quest<br />
Go to the City Map gate and change it to World Map, then select the icon marked "Civil War" and activate it to<br />
travel there. You will encounter a group of Bannorn Knights who are resisting being conscripted by Loghain's men<br />
and a battle ensues. Jump into the battle and keep fighting until the enemy is defeated!<br />
On your way back to town you will encounter an Abomination which I think is a fairly strong demon or maybe<br />
minor demon is more accurate. You have to kill it to continue, so kill it! After you kill the Abomination move ahead<br />
and to the left to discover the body of Renold loot his journal and you will recall that he is part of another quest we<br />
are doing, called Have You Seen Me? This is for the Mages Collective.<br />
After the fight return to Denerim and seek out the Chanter's Board Mistress and the Mage's Collective <strong>Age</strong>nt to<br />
receive your reward.<br />
Now it is back to the World Map and the Refugees location outside of town. On the way you are attacked by a pack<br />
of wolves and after you defeat them note the nearby sign posted to warn that wolves frequent the area very helpful to<br />
page 58 / 145
<strong>SuperCheats</strong>.<strong>com</strong> Unoffical <strong>Dragon</strong> <strong>Age</strong>: <strong>Origins</strong> Guide<br />
http://www.supercheats.<strong>com</strong>/<strong>guide</strong>s/dragon-age:-origins<br />
Check back for updates, videos and <strong>com</strong>ments for this <strong>guide</strong>.<br />
know :)<br />
Continue on at the World Map point to reach the field where the refugees are supposed to be and they are there but<br />
as you arrive a powerful group of darkspawn also arrive and attack. You need to help the refugees take out the<br />
darkspawn, which really means take them out yourself.<br />
After you finish off the darkspawn say hi to a refugee so they can properly thank you, then head back to town.<br />
Talk to Slim<br />
To get the next break-in tip you will have to pay Slim 4 gold sovereigns but according to him the haul from this one<br />
silver bars will more than make up for the up-front cost. The Arl is storing the silver he has stolen from the city in his<br />
warehouse until he can have it smuggled out of the city and you are going to steal it!<br />
Be aware that there is a very strong and large force of high-end guards you will need to defeat, so go in prepared,<br />
with plenty of potions!<br />
The Calenhad Docks<br />
On the way to the docks you have an encounter with a Drake and a bear-like demon after slaying both you will loot<br />
an item from the Drake a Drake Scale that triggers the quest Drake Scale Armor which appears in the quests list<br />
under Denerim.<br />
There is not a lot to do at the docks, though there are some lootables and there is a Mage's Collective <strong>Age</strong>nt offing<br />
the following quests:<br />
Places of Power<br />
Find and activate four mystical sites of power, located in the Brecillian Forest, the Deep Roads, Denerim, and the<br />
Circle Tower.<br />
Careless Accusations<br />
Track down and stop a small group of adventurers from giving false testimony of alleged blood magic.<br />
Notice of Termination<br />
Find the three apprentices and give each their notice of termination. Two are in Denerim and the third is in<br />
Orzammer.<br />
Thy Brother's Killer<br />
Travel to the Brecillian Forest and slay the cabal of maleficarum.<br />
Herbal Magic<br />
Bring ten bundles of Deep Mushrooms to the mage's collective.<br />
There is also a tavern here The Spoiled Princess that has a few interesting points going for it. There is a chest inside<br />
that has one of the love letters you need to collect, there is a woman named Larana inside, who you need to tell<br />
about her husband's death for the quest Notices of Death for the Blackstone Irregulars.<br />
Speak to the Bartender<br />
First ask him about Brother Genitivi he claims he has never heard of him but clearly he is lying. If you ask about the<br />
impostor named Weylon, he tells you that the person you are looking for is not there and suggests that you should be<br />
on your way as soon as possible.<br />
page 59 / 145
<strong>SuperCheats</strong>.<strong>com</strong> Unoffical <strong>Dragon</strong> <strong>Age</strong>: <strong>Origins</strong> Guide<br />
http://www.supercheats.<strong>com</strong>/<strong>guide</strong>s/dragon-age:-origins<br />
Check back for updates, videos and <strong>com</strong>ments for this <strong>guide</strong>.<br />
If you tell him that you would like a drink that gives you access to his merchandise and he has some items you may<br />
want to buy. There are some trap plans, a gift item (wine), and a selection of crafting supplies. If you are low on<br />
health potions for the Supply quest you should be able to get a few from him as well.<br />
As you exit the tavern you are attacked by a group of cultists that could not have something to do with your search<br />
for the Brother, could it? The leader has a set of Ceremonial Armor on him that has some pretty high requirements<br />
and a negative armor effect probably not worth using in other words.<br />
That is all for now so head over and say hello to the Templar guarding the docks now!<br />
He actually intimidates pretty easily and willingly takes you over to the Tower despite his rough bluffing.<br />
page 60 / 145
<strong>SuperCheats</strong>.<strong>com</strong> Unoffical <strong>Dragon</strong> <strong>Age</strong>: <strong>Origins</strong> Guide<br />
http://www.supercheats.<strong>com</strong>/<strong>guide</strong>s/dragon-age:-origins<br />
Check back for updates, videos and <strong>com</strong>ments for this <strong>guide</strong>.<br />
The Circle Tower<br />
As you arrive you get a CS of the Templar in charge issuing orders, then Alistair asks if they are barring the doors to<br />
keep people out or in? When you ask what is going on the Templar orders you to leave for your own safety of<br />
course and when you refuse, stating that as a Grey Warden you have the right to request their assistance, he finally<br />
gives you the news.<br />
The tower is no longer under their control it has been overrun by darkspawn, and the mages are indisposed but that<br />
that means is not really clear. Clearly they need help but what kind of help is the question, since the leader is only<br />
trying to obtain permission to butcher the mages.<br />
Alistair insists that the mages are probably dead but that the darkspawn must be dealt with now. The Templar does<br />
not want to hear that and even if there are any survivors it is clear he has no intentions of going to their aid or trying<br />
to clear out the darkspawn. You insist that you will look into the survivor question, and are warned that there is<br />
more than one Abomination in the tower, and there will be no help from the Templars though if you succeed, he<br />
agrees to align his Templar's with you for the <strong>com</strong>ing Blight Fight.<br />
That is progress anyway, right?<br />
The Templar warns you that once you enter, he is not going to reopen the door until he has proof that the darkspawn<br />
are no longer a threat proof in the form of the leader of the Mages himself.<br />
Before you go in have a chat with the Quartermaster and trade for anything that he has that you think you can use.<br />
One useful thing that he has is a backpack that expands your storage by 10, and he also has some elfroot and some<br />
recipes that may be useful if you can afford them.<br />
Once you have everything that you need, proceed through the door and the Templar will bar it behind you. You get<br />
a quest update at this point, and you are now inside the restricted area of the Tower. You will want to carefully<br />
search through each chamber as you progress, looting and taking out the enemy as you encounter them. This part is<br />
broken down by level of the tower...<br />
Apprentice Quarters<br />
In the rooms to the right off the hall there are some containers one of them contains a Codex entry item that also<br />
triggers a new quest Watchguard of the Reaching. This quest requires you to find all of the notes of an apprentice<br />
that may reveal a hidden secret of the tower.<br />
In the next room along the hallway to the right is the first documents from this quest be sure you loot all of the<br />
containers that you encounter. There is a second set of the documents in this room in another chest.<br />
As you enter through the door at the end of the hall you get a brief CS of Wynne taking out a monster and then she<br />
orders you to <strong>com</strong>e no closer! Clearly she is not happy with you and she tells you what happened once you start<br />
chatting, both what happened before and her fears of what is going to happen.<br />
She offers to have you join her and try to save the Circle of Mages and once you have asked all of the questions you<br />
want to ask, joining with her is the way to go, but Morrigan is not pleased with your decision at all.<br />
At this point Wynne joins your party but now you have to decide who you are going to take with you into this mess.<br />
The ideal party is a couple of tanks (Warriors), a Rogue (me in this case but maybe not you), and a Mage (Wynne).<br />
You can try it with a different <strong>com</strong>bination if you like, perhaps Morrigan, Wynne, Alistair and yourself it really<br />
depends upon what class your main character is. When you are ready and happy with your party, get going!<br />
The first Abomination is through the next door this fight seems to work best if you allow the Abomination to <strong>com</strong>e to<br />
page 61 / 145
<strong>SuperCheats</strong>.<strong>com</strong> Unoffical <strong>Dragon</strong> <strong>Age</strong>: <strong>Origins</strong> Guide<br />
http://www.supercheats.<strong>com</strong>/<strong>guide</strong>s/dragon-age:-origins<br />
Check back for updates, videos and <strong>com</strong>ments for this <strong>guide</strong>.<br />
you rather than going out to it but YMMV. There are two more Abominations in that room and after you kill them<br />
loot the books on the long table here one gives you a quest (Summoning Sciences) and both give Codex entries.<br />
In the next area are some lootables including more notes and the first summoning font.<br />
To do this first exercise, do these steps in order:<br />
1. Examine the font to initiate the flame.<br />
2. Return to the previous room and examine the Tome of Spirit Personages on the bookshelf.<br />
3. Examine the Summoning the First flame on the floor near the table.<br />
For the second exercise:<br />
1. Examine the font to initiate the flame,<br />
2. Examine the Reder<strong>com</strong>s Un<strong>com</strong>mon Calling book on the shelf in the next room near the third flame.<br />
3. Examine the statue of Magus Gorvish in the first room.<br />
4. Examine the Summoning the Second Flame in the middle room.<br />
For the third exercise:<br />
1. Examine the font to initiate the flame,<br />
2. Examine Elvorn's Grande Bestiary in the third room.<br />
3. Examine the Common Table Carving Spot in the first room.<br />
4. Examine the Spiritorum Etherialis book on the floor in the third room.<br />
5. Examine the statue of Magus Gorvish back in the first room.<br />
6. Examine the Novice Phylactery book on the shelf in the first room.<br />
7. Examine the Summoning the Third Flame in the third room to summon the beast and then kill it.<br />
Open the door to the next area and kill the beasties here first, and then:<br />
For the fourth and final exercise:<br />
1. Repeat all of the steps above minus the Summoning Flames and initiating the font only once.<br />
2. After examining the Novice Phylactery book, find the Fourth Flame and examine it.<br />
3. Pick Arl Foreshadow's pocket for a unique Codex entry.<br />
Loot the bodies and read the books here, and then head up the stairs to the entrance to the Second Floor to continue<br />
on.<br />
Senior Mage Quarters<br />
As you enter this area you get a CS with a Tranquil who asks you not to enter the stock room because it is a mess.<br />
As you chat with him you get a sense of the subplot that is unfolding here, and who you need to be looking for now.<br />
The Litany will give you a fighting chance against the Blood Mages, so you need to find Niall, right?<br />
In the next area there are some Blood Mages but you are going to need to mind your party members because for<br />
some reason some of them will not attack when you do. Taking out the mages is easy if everyone is fighting not so<br />
much if they are not. Once you have them all fighting you should make short work of the few targets here, and then<br />
you get a brief CS of a woman on the floor, who is begging you not to kill her.<br />
The Blood Mage on the floor wants you to show her mercy that is your call but there is no reason I can think of not<br />
page 62 / 145
<strong>SuperCheats</strong>.<strong>com</strong> Unoffical <strong>Dragon</strong> <strong>Age</strong>: <strong>Origins</strong> Guide<br />
http://www.supercheats.<strong>com</strong>/<strong>guide</strong>s/dragon-age:-origins<br />
Check back for updates, videos and <strong>com</strong>ments for this <strong>guide</strong>.<br />
to pump her for information so do that.<br />
Did you let her live? Yeah, neither did I. Behind her body there is a container you can loot a gift from, and there are<br />
other lootables nearby as well, so see to that, and then look in the far corner of the room for one of the Scrolls of<br />
Banaster and grab it.<br />
In the next chamber up the hall are two Abominations to kill, and behind the wall in here is a chest with one of the<br />
Love Letters in it so be sure to grab that.<br />
The next chamber after that has a group of shambling corpses in it but you make short work of them! When you loot<br />
them you discover that they each have some money who knew that corpses needed money?<br />
There is a chest here to loot, an and an Armoire, and in the rear of this chamber are two more Abominations to kill<br />
and a vanity to loot that contains a gift item. May as well give some gifts now if you like to free up some bag space.<br />
Nearby is a closet that is trembling slightly there is either a Bogart inside, in which case you should point your wand<br />
firmly and cry: "Ridikulous!" or you could go open it and see if it is something else entirely. I vote for open it. Ah<br />
well, it is not a Bogart after all.<br />
The conversation goes pretty much where I thought it would this guy is something of a coward and really would you<br />
want him in your party anyway? Really?<br />
Note on Saving...<br />
If you have not been regularly making saves you should consider doing so it would really suck to get this far into the<br />
Tower, die, and have to repeat an hour or more of work, right?<br />
The next chamber contains some Blood Mages fighting an Abomination so go ahead and kill them all<br />
mwahahahaha!<br />
There is an Apprentice Note here, some lootables, and a chest with a Lyrium Potion and Injury Kit, so grab those,<br />
and then head out into the hall to the next chamber, where you will find three Abominations to kill. I hate the way<br />
these things blow up after you kill them gotta mind that.<br />
There are a few lootables in here and a pair of metal doors that you cannot open. These doors actually lead into the<br />
storage chambers for the Circle you would know that if you did the Mage Origin Story as it factors in the questline<br />
for that story but as we do not need to go there for our current quest we can just ignore it.<br />
The next chamber has some bodies to loot one has a gift item on it and the other has one of the letters we need for<br />
that quest. If you look against the back wall you will see a toppled statue that you can target.<br />
Target the statue to initiate a brief CS that reveals the presence of another phylactery vial now take the vial to<br />
summon the Revanant and kill it! When you loot it you will get a paper and some money nice!<br />
Now back into the hall and to the next chamber, which turns out to be the Head Enchanter's Study. Go ahead and<br />
loot this place dry for some Codex entries, and some quest documents. In the far corner is a chest with a gift item a<br />
Black Grimoire that would be perfect for Morrigan don't you think?<br />
After this it is back into the hall and we finally reach the door to the Third Floor. Now would be a good time to save<br />
if you have not already thought to.<br />
The Great Hall 3rd Floor<br />
As you enter the third floor there is a chest you can loot directly ahead on the other side of that wall, and then a door<br />
page 63 / 145
<strong>SuperCheats</strong>.<strong>com</strong> Unoffical <strong>Dragon</strong> <strong>Age</strong>: <strong>Origins</strong> Guide<br />
http://www.supercheats.<strong>com</strong>/<strong>guide</strong>s/dragon-age:-origins<br />
Check back for updates, videos and <strong>com</strong>ments for this <strong>guide</strong>.<br />
on the left to open. On the floor in this large chamber is the second set of the Scrolls of Banaster so grab those and<br />
then take out the reanimated corpses first one group and then a second.<br />
Be warned that there is an Arcane Horror here a sort of boss mob and he can easily wipe your party with his<br />
area-of-effect spells so you may want to concentrate upon him first? Once you have taken him and the other corpses<br />
out, finish looting the room before continuing on to the next chamber.<br />
Note that the corpses have Corpse Gall on them and that is a quest item so be sure to loot it.<br />
The last private document is in the next chamber in a chest you can loot so do that now. Once you have that<br />
document, open the door here and kill the Abominations and then a Lesser Demon, and loot the room. Now<br />
proceed into the next hallway and open the door to the chamber on the right.<br />
In this chamber you encounter your first possessed Templars and kill them. Now loot this room and continue to the<br />
next chamber off of the hall and loot the few items here. We are concentrating on the chambers on the outside side<br />
of the hall for now, so ignore the door on the left and keep working your way along the hall doing the right-side<br />
doors.<br />
In this next chamber are more possessed or charmed Templar you know what to do to them.<br />
There is a Desire Demon here that can wipe your party if you are not careful. Keep on eye on party health and try to<br />
take it out first if you can.<br />
Loot this last room, and then head back into the hall, and open the door to the center chamber that is the one we<br />
were ignoring. Draw the enemy out and kill them. There is a Lesser Shade, an Abomination and some minor<br />
skellies here to kill but once they are dead, loot the bodies and then enter the chamber.<br />
There is a Tranquil in here that I guess you just rescued? There is also a statue that you can examine here this is<br />
actually part of the quest Watchguard of the Reaching and since we can now <strong>com</strong>plete that quest let's do that now.<br />
Watchguard of the Reaching Quest<br />
Return to the second room on this level you see the three statues against the back wall? These are the trigger points<br />
for the ques the one for which we are collecting the Apprentices Notes. Examine the one on the left, then the one on<br />
the right, and finally the one in the middle, and you will notice that you get a sort of red explosion effect each time.<br />
Now return to the room in the very center that we just left, with the statue near the Tranquil, and examine that<br />
statue, and you will get a quest update. If you examine the quest description in our active quest list, you will notice<br />
that it has now changed to indicate that the barrier has dropped. Now we need to head for the first level of the<br />
tower.<br />
When you are back on the first level, go to the metal door to the basement, save, and then try to open it this will<br />
release Shah Wyrd a fire demon. Kill it!<br />
Once the Shah is dead, examine the Pile of Rags that it leaves behind and you will find the following items:<br />
Yusario: A two-handed Greatsword with some epic properties.<br />
Three minor gems.<br />
Obviously you want that sword for later in the game, because it is really good at slaying dragons.<br />
If you look on the other side of the room you will see that there are now more Circle Mages present.<br />
page 64 / 145
<strong>SuperCheats</strong>.<strong>com</strong> Unoffical <strong>Dragon</strong> <strong>Age</strong>: <strong>Origins</strong> Guide<br />
http://www.supercheats.<strong>com</strong>/<strong>guide</strong>s/dragon-age:-origins<br />
Check back for updates, videos and <strong>com</strong>ments for this <strong>guide</strong>.<br />
Talk to Kinnon and he will relate that he is aware of Loghain's treachery, and then talk to Keili and she will have a<br />
chat with you about her feelings about what is happening. She seems to have lost a few of her marbles but that is<br />
not our problem at the moment. We need to get back up to the Third Floor!<br />
But first be sure that you saved.<br />
The Fourth Floor<br />
Right, now that we are back where we were before, head over to the door and go through to the fourth floor, and<br />
you will find yourself in darkened area. To your immediate left in the corner is some rubble with a Codex entry so<br />
loot that, then move to the other side and loot some lyrium from the chest there.<br />
Move into the hall and open the door on the left to encounter a sexy blue demon that has a Templar enthralled<br />
under her spell so that he believes that she is his wife and his children. After a brief CS and some dialogue with the<br />
demon, she sets the Templar and her minions on you kill them all!<br />
This is a significant battle in that there are items in this room that we want to loot a gift and some other useful gear<br />
including a set of Templar Armor with an armor state of 12.60 and some very nice bonuses on it! You may not have<br />
your warrior's strength to 27 yet, but hold on to that armor for when you do which should be soon. Finish looting<br />
this room to get another Codex Entry, and then head back into the hall, and turn left, and go to the end of the hall<br />
and open the door on the left.<br />
Inside this room are some possessed Templar who will immediately attack let them! While your crew is taking them<br />
out, you run to the rear of the room and kill the Blood Mage there that is making things rough on your party thanks<br />
to her ranged magical attacks.<br />
Once you have taken them all out, begin looting this room the Blood Mage you killed has a set of Archon Robes on<br />
it that give a boost of 8 Armor! They also improve health regen in <strong>com</strong>bat and add 2 to Spell Power. Wynne's robes<br />
are similar but the Archon Robes are slightly better, especially when Wynne is physically attacked so I re<strong>com</strong>mend<br />
switching her to them. There is a note near the left wall that adds another Codex Entry, and some odds and ends to<br />
loot including an injury kit.<br />
Into the Fade<br />
Once you are finished looting, return to the hall and open the final door in the opposite side for a CS with a major<br />
demon you get a chat choice and the demon tries to put you to sleep with his pacifistic charms. You have to resist<br />
you have to! And yet, well, you cannot.<br />
This now triggers a new quest Lost in Dreams and in case you have not figured it out, the demon has projected you<br />
into the Fade.<br />
The quest description reads: You are a Grey Warden in Weisshaupt, attending to your duties. The darkspawn are<br />
gone, defeated forever, and you and the other Grey Wardens are a relic of an era that is past. Now is the time for<br />
rest, and reflection.<br />
Run forward to the center of the chamber to see Duncan! Talk with him, you don't get the answers you want, and<br />
then you must fight Duncan and two Wardens. After you defeat them you get a quest update you must escape the<br />
Fade, and rescue your party!<br />
There is a Fade Pedestal in the center where Duncan was standing use that and you are presented with a puzzle of<br />
sorts. Select the first glowing destination and you are transported to Niall, who can give you some clues about what<br />
you are trapped in.<br />
page 65 / 145
<strong>SuperCheats</strong>.<strong>com</strong> Unoffical <strong>Dragon</strong> <strong>Age</strong>: <strong>Origins</strong> Guide<br />
http://www.supercheats.<strong>com</strong>/<strong>guide</strong>s/dragon-age:-origins<br />
Check back for updates, videos and <strong>com</strong>ments for this <strong>guide</strong>.<br />
The pedestal symbolizes the domains controlled by the Sloth Demon. Your task is to work your way through them<br />
and over<strong>com</strong>e the obstacles in order to reach and kill the Sloth Demon. You have to move to each island and free<br />
your party members, and then together take on the demon and win!<br />
After you finish talking to Niall, take the Fade Portal behind him and kill the demon that is on the other side. The<br />
mouse will talk to you listen to him and he will tell you what to do. Before he dies he gives you his power to<br />
shapeshift.<br />
There is a mouse hole behind you shapeshift and go through it and then kill the demon on the other side. Grab the<br />
Lyrium and the Codex entry for the statue, and then go through the Portal here and kill the Lesser Shade on the other<br />
side.<br />
Kill the demon ahead and grab the Lyrium, then kill the next demon and then take the next portal.<br />
The Raw Fade<br />
You are now back in the Raw Fade Zone near the Fade Pedestal and Niall is standing nearby. When you talk to him<br />
he will be pretty excited when he learns you were able to transform into a mouse and he has some suggestions for<br />
you as well. The Shade Zone we are presently in is the one at the top of the star when you use the Pedestal you get<br />
to choose which zone to do next.<br />
The Burning Tower (Upper Right)<br />
As you materialize you are in a chamber with a door to the right, and a mouse hole to the left turn into a mouse and<br />
go through the hole first. Inside this chamber is a broken glowing chest with an Essence of Cunning in it this will<br />
permanently increase your Cunning Stat by 1 so take that and then return through the mouse hole.<br />
Turn back into human form and head through the door, moving along the hall to the first door you <strong>com</strong>e to on the<br />
right, and open the door. Inside is a pair of Burning Templar either go in and kill them or let them <strong>com</strong>e to you and<br />
kill them, so long as they end up dead!<br />
Inside the room that the Burning Templar were from is a mouse hole go ahead and go through that, then turn back<br />
into a human and move into the room, to the door on the door straight ahead (the door on the left just leads to the<br />
hallway we were in before) and kill two more Burning Templar.<br />
There are three more doors in this chamber one on the left that you discover has flames behind it, a Massive Door<br />
straight ahead that you cannot open just yet, and a door up a short flight of steps to the right. When you approach<br />
this door you get a checkpoint save, and once you pass through it you are in a hall with lots of flames and only one<br />
way to go.<br />
Around the corner you are attacked by a pair of Burning Hounds kill them and then take the next turn, where you<br />
will fight a Burning Templar and another pair of Burning Hounds. Now head around the next corner past the Lyrium<br />
and you will fight yet another pair of Burning Hounds just before the nearby mouse hole. After you defeat them, turn<br />
yourself into a mouse and go through, for another checkpoint save.<br />
On the other side, immediately turn back into a human and engage the Templar Dreamer that is here. After you<br />
defeat him you will gain his power (The Burning Man Shapeshifting Ability) and urge to move on to victory!<br />
Walk over to the Shade Pedestal and use it, and select the next zone going clockwise The Mage Asunder.<br />
The Mage Asunder (Lower Right)<br />
page 66 / 145
<strong>SuperCheats</strong>.<strong>com</strong> Unoffical <strong>Dragon</strong> <strong>Age</strong>: <strong>Origins</strong> Guide<br />
http://www.supercheats.<strong>com</strong>/<strong>guide</strong>s/dragon-age:-origins<br />
Check back for updates, videos and <strong>com</strong>ments for this <strong>guide</strong>.<br />
Take the first mouse hole closest to the Pedestal and you will be in a dead-end room that has a glowing weapon rack<br />
in it that contains the Font of Strength. This permanently adds 1 to your Strength Stat so take that now, and then go<br />
to the bookshelf behind the rack and get a new Codex Entry, the Hierarchy of the Circle. Now return through the<br />
mouse hole.<br />
For now, ignore the other mouse hole in the room it leads to a room with a pair of mages but you can get to them<br />
through the door nearby, which leads to a hallway, and that way you are already in human form and can fight. After<br />
you kill them both, move on to the next door on the left, and another pair of mages and after you kill them, look in<br />
the bookshelf on the right side of the room to gain the Codex Entry History of the Circle!<br />
The next door on the left at the end of the hall leads to a room with four Crazy Mages in it if you have the materials<br />
to make health potions, it would be an idea to have some handy for this fight, as they can do considerable damage<br />
to you! It would also be an idea to save before you get into this fight just in case you end up dead.<br />
The door at the end of the hall reveals a pair of Servants for you to kill, and then a third as you run towards the next<br />
door. As you open that door you will see that there are flames on the other side flames that in our human form<br />
would kill us! But we gained the Burning Man Form did we not? Go ahead and transform into that, and waltz<br />
through the flames unscathed.<br />
You want to remain in this form for now, because in it you are immune to the flame damage that the magic beasties<br />
will use next so go ahead and kill the four fire demons that spawn in this room, and then head to the next door.<br />
Before you open the door, you may want to consider that there are mages behind it and they are a handful if you<br />
take them on all at the same time...<br />
In my experience the best way to handle this part is to open the door while standing to the side, so you do not<br />
immediately aggro the mages, and then lure them out and take them on one at a time by letting only one see you at<br />
a time. At most you do not want to fight more than two at a time as the offside mages will simply cream you with<br />
their spells.<br />
Once you take them out, now would be a good time to save.<br />
Inside the next room are Mage Instructors and Pupils they use mostly fire area of effect spells, so taking them out<br />
should not be much of a challenge once you get back on your feet that is. There is a Codex Entry in the bookshelf<br />
here called The Tranquil, and another from a book on the floor past the stairs called The Cardinal Rules of Magic.<br />
The door in the end of the room is a Massive Door you cannot open that just now, so head to the door up the short<br />
flight of stairs first.<br />
There are two Stone Golem and some possessed Chantry Clerics to fight, and after you defeat them, the Cursed<br />
Dreamer approaches you and grants you his power to shape change into a Golem, before begging you to "Free us all<br />
from this nightmare!"<br />
There is a Fade Pedestal here, but we are not ready to use that just yet. Instead go through the door to the left of the<br />
Pedestal, where you will face a pair of mages and a Golem. It is key to this fight that you take out both mages first<br />
and quickly. Once they are dead you can easily kill the Golem, and then check out this room.<br />
On a table at the far end is a note that gives you the Codex Entry The Harrowing, and a pile of books on the other<br />
side of the room called School of Spirit gets you the Codex Entry The Four Schools of Magic: Spirit.<br />
At the opposite end of the room from where you entered is a Massive Door remember we could not open these<br />
before, right? Well, now we have the Golem form! Go ahead and switch to that, and then smash open the door! A<br />
pair of soft and squishy Priests are on the other side of the door smash them like the Thing, and then head on down<br />
this hall to the first door on the right to face a pair of Golems and a Priest.<br />
page 67 / 145
<strong>SuperCheats</strong>.<strong>com</strong> Unoffical <strong>Dragon</strong> <strong>Age</strong>: <strong>Origins</strong> Guide<br />
http://www.supercheats.<strong>com</strong>/<strong>guide</strong>s/dragon-age:-origins<br />
Check back for updates, videos and <strong>com</strong>ments for this <strong>guide</strong>.<br />
You can do this fight however you like, but I found that the easiest and fastest way to deal with the trio was to turn<br />
into the Burning Man and use his area-of-effect power on them. It was easy to slice and dice them after that!<br />
In the corner of this room is the Essence of Willpower for an instant 1 Willpower so grab that, and then look on the<br />
floor at the opposite end of the room for a stack of books labeled School of Primal, for the Codex Entry The Four<br />
Schools of Magic: Primal.<br />
Back in the hallway, continue on and you will encounter another Stone Golem kill it and then head past the next<br />
door on the right a Massive Door with a boss mob behind it called an Arcane Horror that we will be <strong>com</strong>ing back to<br />
in a moment. First though, take out he next Golem along the hall and then enter the nearby door and fight three<br />
more Stone Golems.<br />
When you are facing a mixture of magic users and golems I can see how the Burning Man would be a good form to<br />
take but when you are facing THREE golem, the only answer to that challenge is to be a Golem yourself! You will<br />
find that this fight goes a LOT faster when you can take as well as dish it out!<br />
On the floor on the left side of the room is a pile of books labeled School of Entropy that will give you the Codex<br />
Entry The Four Schools of Magic: Entropy. The glowing Font of Strength is further into the room grab that now and<br />
then you may want to save, as this was a fight we do not want to have to repeat, right?<br />
Now back into the hall and to the right to the last room where we face some mages and a swordsman-priest. The<br />
problem with this fight is that the mages heal the priest and they try to stay as far away from you as they can.<br />
Obviously you have to take the mages out first and that is no easy task!<br />
Now I found that the easiest way to do this fight was as a Golem, luring the enemy into the hall, where they had less<br />
room to keep away from me, and quickly taking out the Mage and his Pupil, and then the Priest. YMMV but this<br />
worked well for me!<br />
Once they are defeated head into their room on the corner is a pile of books that is labeled School of Creation that<br />
gives the Codex Entry The Four Schools of Magic: Creation. Once you have that, head back to the Massive Door<br />
we ignored before, and change into the Golem form to smash it down.<br />
Inside this room is a mini-boss-mob the Arcane Horror and it may seem like a tough mob, but by staying in Golem<br />
form and luring it out into the hall, where it had less room to run away, it was almost too easy to take down! Once it<br />
is dead, head into that room, to the back, and through the door there it might be an idea to save before you do that<br />
though.<br />
The Slavren<br />
The best form to fight this in is the Burning Man I took hardly no damage from it in that form. Killing it gets you the<br />
quest update and there is a Fade Pedestal here as well, which is very convenient! Go ahead and hit the Pedestal<br />
now, and select The Darkspawn Invasion Zone.<br />
The Darkspawn Invasion (Upper Left)<br />
You arrive in an empty chamber with a door and a mouse hole leading out of it. Open the door and take out the trio<br />
of darkspawn that are in the hallway here first. Now, before we move along the rail here, we have some minor<br />
side-trips to make.<br />
First go to the door and exit the chamber, and smash open the Massive Door that is on the left as you exited the<br />
chamber into the hall. Inside is a weapon rack with a Strength upgrade grab that now.<br />
Exit back into the hall and return to the first chamber, turn into a mouse and go through the mouse hole here. Run<br />
page 68 / 145
<strong>SuperCheats</strong>.<strong>com</strong> Unoffical <strong>Dragon</strong> <strong>Age</strong>: <strong>Origins</strong> Guide<br />
http://www.supercheats.<strong>com</strong>/<strong>guide</strong>s/dragon-age:-origins<br />
Check back for updates, videos and <strong>com</strong>ments for this <strong>guide</strong>.<br />
straight ahead and take the mouse hole at the end of this hall, then run over to the broken chest in the middle of the<br />
room and grab the Essence of Cunning here.<br />
Exit through the mouse hole back into the hall, take the right turn and the mouse hole at the end of this short hall.<br />
Kill the pair of flaming darkspawn here, then take the north door and kill the trio of darkspawn in the hall outside<br />
two Hurlock and a Hurlock Emissary.<br />
With them dead, move over to the flaming door and trigger Burning Man, then move through it into a short hallway<br />
with another door at the end. Stay in Burning Man form, and pass through that door, where you will fight four<br />
burning darkspawn who really cannot do you much harm in this form!<br />
Exit this chamber through the door and then pass through the door at the end of this hall to enter a large chamber<br />
with a bunch of darkspawn spirits and the Templar Spirit. Once you have taken out all of the darkspawn spirits the<br />
Templar Spirit will approach you and you get a brief CS, after which he grants you the Spirit Form!<br />
There is a Fade Pedestal in this chamber ignore it because we are nowhere near ready to use that yet! In the<br />
Northeast corner of the room is a glowing piece of rotating art statue? Whatever! Move over to it and change into<br />
your newest form Spirit Form!<br />
The glowing sparkling not-clickable thingy is now a clickable Essence of Willpower! GO ahead and grab that, and<br />
then move over to the Northwest corner of the room, where you will see a Massive Door! Drop the Spirit Form and<br />
switch to Golem Form now, and smash open the Massive Door, revealing a very large chamber.<br />
Kill the Genlock and the pair of Hurlocks that you encounter here, and then further inside the room is another<br />
Genlock, a Hurlock, and a Darkspawn Emissary for you to kill. Taking out the Darkspawn Emissary also got me the<br />
Achievement: Master Warden which is for killing 500 darkspawn, so you should be pretty close to that as well.<br />
Uthkiel the Crusher<br />
At the far end of this room is another Massive Door so go ahead and smash that open to reveal a real boss mob<br />
Uthkiel the Crusher! Intimidating, bigger than us, and just plain scary! Before we talk about this fight, I want to talk<br />
to you about something called "Grief Code."<br />
A lot of games these days are made by people who think that the only real standard that we, the consumer, use to<br />
judge their value and goodness is the length of time that it takes to beat them. Because there is only so much you<br />
can do to create challenge, what happens is that no matter how good a game is, somewhere in it is a section that<br />
uses Grief Code because it is the only way that they know of to get the job done.<br />
That is what has happened here the mob in question hits a lot harder than you do, can take a lot more damage than<br />
you can, and so is a lot harder to beat. That is not necessarily a bad thing after all without challenging you, this<br />
would be a boring game! Still, without dying a lot, you have to <strong>com</strong>e up with a strategy to win...<br />
There are two ways you can approach the fight with Uthkiel either rely upon luck and hope for the best, and simply<br />
keep reloading until you manage to kill him OR you can use the only tactic that seems to work with him, despite<br />
how undignified it is. Once you have died a few times and are getting frustrated, try this:<br />
-Smash open the door, immediately run inside, use your special to stun him, then your other special to punch him,<br />
and then RUN AWAY. Basically you need to run around the room in circles until both of your specials have<br />
recharged. By doing this, he cannot trigger his charge attack or his haymaker. As soon as both special abilities have<br />
recharged, stun him then punch him, then rinse and repeat until he is dead and believe me, it will not take you long<br />
to kill him using this strategy.<br />
Yes, it is not very dignified. Yes, it is not from the Chuck Norris School of Fighting. Yes, your mates really will say<br />
page 69 / 145
<strong>SuperCheats</strong>.<strong>com</strong> Unoffical <strong>Dragon</strong> <strong>Age</strong>: <strong>Origins</strong> Guide<br />
http://www.supercheats.<strong>com</strong>/<strong>guide</strong>s/dragon-age:-origins<br />
Check back for updates, videos and <strong>com</strong>ments for this <strong>guide</strong>.<br />
you fight like a little girl. But hey, you beat the guy, that has to count for something, right?<br />
The Rest of the Zone<br />
Once you have finished off Uthkiel, retrace your steps south, passing through the two large chambers and the<br />
longish hallway to the central chamber (you will have to use Burning Man to pass through the door to enter it).<br />
Us the mouse hole near the middle of the West wall of this chamber to enter the Western area of the zone and then<br />
switch back to your regular form to battle the darkspawn that will attack you here. After you kill them go back<br />
through the mouse hole we entered the area from and then head South. You will pass through another burning door<br />
into a short hallway, beyond which is a burning barrier you also pass through, and we are now back in the first set of<br />
hallways that branch off of the entrance to this zone!<br />
Run straight ahead and jog North to fight some Hurlock's in that dead-end path, then work your way South and East<br />
to fight another pair in another dead-end branch of the hallway. Continue in a Southerly direction and eventually<br />
we end up back at the chamber that we originally entered the zone in, and all the enemy in the zone are now dead!<br />
Head over to the Pedestal and activate it, and select The Burning Tower (upper right) as our next destination!<br />
The Burning Tower<br />
Yes, this is a zone we have been to before but we did not finish the boss mob here because we did not have the<br />
ability to smash doors open, right? In the main room is a Massive Door in the Northwest corner go ahead and smash<br />
that puppy open! Now switch forms to the Burning Man and pass through the flames unharmed and we get a<br />
checkpoint save which should clue you in that a boss fight is <strong>com</strong>ing.<br />
At the other end of this short hall is a room just full of shambling corpses and Burning Templar and while you could<br />
stay in the Burning Man form, it might be an idea to change back into the Golem, since he can pretty much wipe the<br />
floor with the entire group with barely a scratch in damage to you!<br />
The boss mob inside is named Rhagos and he is a flame demon. You could switch to Burning Man if you like, but<br />
the Golem form will work too as long as you do not walk into any of the magical fires in here. Once he is dead,<br />
head over to the Font of Strength and grab it, then hit the Fade Pedestal. You should notice that a new area is now<br />
unlocked to the right and the zones in which we took out the boss mobs now show icons instead of the glowing star<br />
shape. Three down, five to go!<br />
The Templar's Nightmare (Lower Left)<br />
We arrive in the Pedestal room, and on the left is a Fade Portal (glowing purple door). Before we take that portal,<br />
notice the nearby mouse hole? Beside the hole is a bookshelf with a new Codex Entry in it the Rite of Annulment.<br />
Grab that and then change into a mouse and head into the hole!<br />
As you arrive on the other side you trigger a trap! Quickly switch back to your human form and kill the Arcane<br />
Horror here, and then look around there is another glowing Fade Portal, and a regular door. Take the regular door<br />
into the hall and turn right the first door on the right has a fire trap inside and some enemy do not trip that trap!<br />
Draw the trio of Sloth Abominations out, and kill them but remember that after they die these things burst into<br />
flames, and while I am not sure that can hurt you, why take the chance? Now disarm the trap for 5 XP and then grab<br />
the book in the bookshelf inside this room for a new Codex Entry.<br />
There is a mouse hole here yes I know it can get confusing if you climb down every mouse hole so just bear in mind<br />
that it is here and exit the room. The door to the right as we exit leads to the room we first entered this area in so<br />
lets backtrack a bit to see what else there is on this level before we use any portal doors, shall we?<br />
page 70 / 145
<strong>SuperCheats</strong>.<strong>com</strong> Unoffical <strong>Dragon</strong> <strong>Age</strong>: <strong>Origins</strong> Guide<br />
http://www.supercheats.<strong>com</strong>/<strong>guide</strong>s/dragon-age:-origins<br />
Check back for updates, videos and <strong>com</strong>ments for this <strong>guide</strong>.<br />
There are three Fade Portals that lead out of this area lets go back into the room where we set off the trap earlier in<br />
mouse form, and take the portal there, and we find ourselves back in the room with the Pedestal! Okay, so we are<br />
back where we started. The other portal in the hall leads back to the same room! Hmm... It is time to try some<br />
mouse holes and what better one to try than the other one in the room where we set off the trap in mouse form? You<br />
might want to save now I would if I were you because now we <strong>com</strong>e face to face with...<br />
An Ogre!<br />
Okay, it is really an Ogre and a Hunger Abomination I call these two Mutt and Jeff and if you are not skilled at<br />
dealing with them this can be a very frustrating fight in which you die a lot.<br />
The trick here is simple enough hit the Ogre with everything you have special move-wise as quickly as you can to<br />
do as much damage as you can and then when the Abomination enters from the next room, begin circling the<br />
bookshelf that is in the center of the room. Do not allow the Ogre to get you pinned to any of the outer walls<br />
because then he will pick you up and start playing whack-a-mole with your head, and the fight is over.<br />
As quick as you can, concentrate on taking out the Abomination, because it is easier to kill and, really, is more of a<br />
distraction than a threat. Once it is dead, use your specials on the Ogre, and make him dead! Good on ya mate!<br />
Mutt and Jeff are history!<br />
Now when we exit by the door that the Abomination came through we find ourselves in a hall and the nearby door<br />
is blocked by fire but there is a second Abomination inside who we can lure outside by letting him see us. Do that<br />
and kill him! Feels good! Uhm Yeah!<br />
A Sort of Maze<br />
Right at the end of the hall is another glowing purple portal this area is filled with portals and mouse holes, and<br />
when you pass through most of them, you find yourself back at the other end of the same hallway or in a chamber<br />
we already cleared I hate it when that happens! Using the portals basically loops you between the other portals,<br />
and so do the mouse holes, so the trick here is to be systematic.<br />
Go to the burning door (the second room) and change to the Burning Man form and walk in. There is another<br />
mouse hole in this room go through it and quickly change back into the Burning Man. Kill the pair of Rage Demons<br />
here if you have not already done that this is the top (third) room in this part of the pie.<br />
Now you see that glowing almost-portal in the corner? Change to the Spirit form and it be<strong>com</strong>es a Spirit Portal use it<br />
and then quickly change back into the Burning Man form and take out the demons here by using his fire<br />
area-of-effect power. There is a Lyrium Vein here if you need a quick heal.<br />
We are now in the right-hand room of the bottom piece of the pie!<br />
In the next room is another Massive Door and a mouse hole and both lead to the same place, so you are better off<br />
simply smashing down the door as you will soon be doing battle with an Arcane Horror and a Shambling Corpse.<br />
Coming through the door sets you on fire, but as the Golem that does not really do all that much damage to you, so<br />
just go ahead and kill them now.<br />
At the back of this room is a Fade Portal and passing through it puts you in a room that is quickly engulfed in flames,<br />
so trigger the Burning Man form now. Pass through the flaming door on the other end of the room and kill the pair<br />
of Abominations there, then STOP. This is one of the sections of the game where the save feature is bugged so make<br />
a new save here BEFORE you go near the Massive Door ahead, because if you smash that door down and then end<br />
up getting dead, both the mouse hole AND the door will no longer work when you reload, effectively halting the<br />
game at this point. So make a save prior to entering that room.<br />
page 71 / 145
<strong>SuperCheats</strong>.<strong>com</strong> Unoffical <strong>Dragon</strong> <strong>Age</strong>: <strong>Origins</strong> Guide<br />
http://www.supercheats.<strong>com</strong>/<strong>guide</strong>s/dragon-age:-origins<br />
Check back for updates, videos and <strong>com</strong>ments for this <strong>guide</strong>.<br />
Now that you have a backup save, move across that room to the door, inside of which is an Arcane Horror and a<br />
pair of Shambling Corpses. Kill them, make a new save, and then proceed to the next room,<br />
Vereveel<br />
As you enter the final room you encounter Vereveel who turns into a mouse and dodges into the nearby mouse<br />
hole. You need to follow her, but when you get to the other side take care her magic includes a frost spell, which<br />
means Burning Man is not a great idea.<br />
I used the Golem to defeat her, relying on his special attacks which worked well, while her elemental damage was<br />
not so effective against him. Once she is dead you get the quest update, and then you can grab the Essence of<br />
Cunning from the broken chest in the room, and hit the Fade Pedestal.<br />
That is now four of the eight zones <strong>com</strong>pleted though the middle (8th) zone is still not unlocked.<br />
Weisshaupt Fortress<br />
The very top zone now that we have the Spirit Form, head there and change to that form and ahead of you will now<br />
be revealed The Essence of Willpower (the glowing pedestal to the right of the ramp). Grab that now, then head up<br />
the ramp and take the Pedestal to the Raw Fade Zone.<br />
The Raw Fade<br />
Switch to Spirit Form and look to the right there is a Spirit Door here! Immediately after you pass through, change to<br />
Golem form and target the Yeuena she is the threat here, so ignore the other mobs and concentrate on killing her.<br />
You will be using all three of the Golem's specials, and in the process of taking her out, the other two will be killed<br />
by your AOE special anyway.<br />
Once she is dead, you get the Quest Updated, which is nice :) Now head over to the twisted statue and look at it to<br />
get a Codex Entry The Black City and then change to Spirit Form and move to the pedestal to the left of the Spirit<br />
Door to grab the Essence of Willpower. Now head back through the Spirit Door.<br />
Run past the Pedestal to the Fade Portal, and pass through it yes we have been here before, what we are doing is<br />
grabbing all of the stat boosts that we could not get before because we did not have the special powers.<br />
Take the mouse hole here, then the Fade Portal that is directly ahead, and you will see another Spirit Door ahead of<br />
you. On the other side you will be attacked by a pair of wisps you do not need to change forms, they are not that<br />
big a threat just kill them with the Spirit Form specials, and then check out that Viking Boat. Pretty cool, eh? Follow<br />
the direction of its bow and you will see the glowing charm of an Essence of Dexterity the reason we came here! Go<br />
ahead and grab that now.<br />
Now exit through the Spirit Door, but instead of heading back the way we came, turn right and go along the path to<br />
another Fade Portal that will take us back to the entrance for this zone. Excellent! Move over to the Fade Pedestal<br />
and click on it notice that this zone is now marked with a symbol because we have killed its boss mob Yeuena and<br />
that is one more down! Select the Burning Tower Zone now (Top Right).<br />
The Burning Tower<br />
Head down to the door in the right corner and change to Burning Man, pass through the flames, and then take the<br />
first right, and you will see a Spirit Door ahead of you. Change to Spirit Form and enter it, and grab the Essence of<br />
Cunning and the Essence of Constitution that are here.<br />
page 72 / 145
<strong>SuperCheats</strong>.<strong>com</strong> Unoffical <strong>Dragon</strong> <strong>Age</strong>: <strong>Origins</strong> Guide<br />
http://www.supercheats.<strong>com</strong>/<strong>guide</strong>s/dragon-age:-origins<br />
Check back for updates, videos and <strong>com</strong>ments for this <strong>guide</strong>.<br />
Exit via the Spirit Door and then change to Burning Man and turn looking right. Run along the hall through two sets<br />
of flame to a door at the end. Open the door and enter this room, then change to Golem Form and smash the<br />
Massive Door to your right here, and grab the Essence of Magic inside. That is it for this zone! Retrace your steps to<br />
the room where we entered, and then use the Fade Pedestal to go to the Mage Asunder Zone (Bottom Right).<br />
Mage Asunder<br />
Go up the stairs and through the door here, then follow this along to where the Massive Door was that we smashed<br />
earlier. Now move around into the hall and go to the third chamber (bottom right), kill the three Golem here and<br />
grab the Font of Strength from the weapon rack. Grab the Codex Entry on the floor here if you have not already, and<br />
then exit into the hall.<br />
Go north to the top right room and grab the Codex Entry here if you have not already done so, and then go all the<br />
way to the bottom of the zone and into the chamber there ()South chamber). Change to Spirit Form and enter the<br />
Spirit Door in the left back corner here, where you will find a Stone Golem to kill. Once it is dead, grab the Essence<br />
of Dexterity in the target dummy here.<br />
Change into Mouse Form and enter the mouse hole here, then immediately change to human and then Golem Form<br />
and take out the pair of Stone Golem that are here! After you have killed them, grab the Essence of Cunning in the<br />
broken chest here, and then smash open the Massive Door here. Inside this last room is an Essence of Dexterity and<br />
and Essence of Constitution. Grab them both and then retrace your steps out of here and back to the main hall.<br />
When you reach the main chamber (top left) take the door at the top of the stairs in the Northeast side, and then<br />
cross this chamber and take the other door up another set of stairs, which puts us back in the center of the tower-pie.<br />
To the East is a Massive Door smash that open and then go to the third room on this slice of the pie and turn into<br />
Spirit Form to grab the Essence of Magic here. Go back to the portal room (the first room in this pie slice) and use<br />
the mouse hole here to go to the section on the top right of the map and grab the Font of Strength here from the<br />
weapon rack if you have not already done this when we previously explored this zone. There is a Codex Entry in<br />
the bookshelf behind the weapon rack if you did not do this area before, so be sure to grab that.<br />
This wraps up the zone, so head back through the mouse hole and use the Fade Pedestal here as we have <strong>com</strong>pleted<br />
all of the main zones, it is now time to do the Nightmare Zones where the rest of our party are trapped!<br />
The Nightmares<br />
The three new zones that we unlocked by killing the boss mob for each of the other zones are actually the places in<br />
the Fade where our friends have been trapped. It really does not matter which one that you do first they are all<br />
pretty much the same you need to find your friend, and then convince them that they are in fact trapped in the<br />
Fade. Once they understand that, you get attacked by a demon, and once the demon is dead, you succeed in<br />
freeing that friend!<br />
This may be different for you but my group went like this:<br />
Alistair standing around with a goofy grin on his face, happy as a lark when I ran up to him he was happy to see me<br />
and then introduced me to his family his sister who we know this is not...<br />
Whatever the conversation that you have, eventually he tells you to get stuffed more or less, at which point you ask<br />
the demon why don't you just fight it out and you do! Generally there is a group of underlings ac<strong>com</strong>panying the<br />
demon just kill them all and Alistair's spellbound state drops.<br />
As you can see from the video this part of the quest can be rather amusing...<br />
page 73 / 145
<strong>SuperCheats</strong>.<strong>com</strong> Unoffical <strong>Dragon</strong> <strong>Age</strong>: <strong>Origins</strong> Guide<br />
http://www.supercheats.<strong>com</strong>/<strong>guide</strong>s/dragon-age:-origins<br />
Check back for updates, videos and <strong>com</strong>ments for this <strong>guide</strong>.<br />
Now you tell him he is in the Fade, he gives a bashful reply, and then disappears as you get the Quest Updated flag.<br />
Time to move to the next Nightmare!<br />
Sten my next friend, is a lot easier to convince than Alistair was, and with his help the demons were easy to kill!<br />
Poof! Sten disappeared and the Quest was updated!<br />
Wynne my final friend but I find her surrounded by bodies! Convincing her was a bit harder than Sten but not that<br />
much Alistair really is a git isn't he?<br />
With all three free there is but one task left to be <strong>com</strong>pleted the Inner Sanctum!<br />
The Inner Sanctum<br />
When I started this part of the game I did not know it was going to be such a huge quest so I felt considerable relief<br />
when I finally reached the boss fight at the end but it was an interesting set of sub-quests and zones, right?<br />
Ahead is our old friend the Sloth Demon you remember, the demon that sucked us into the Fade in the first place?<br />
After he gives his little speech, all of our friends are back! Not only are they back, but they are not precisely pleased<br />
with the situation either and they are ready to fight!<br />
The problem with the Sloth Demon is you do not have to kill him once you have to kill him five times, and doing<br />
that requires a little bit of planning and care...<br />
If you have healing potions left than you have a definite advantage here if you do not, the only healing options that<br />
you have are the two Lyrium Veins in the fight area and your healer's magic but of course the Veins take a long time<br />
to recharge, and your healer only has so much mana to cast from. You really have to micro-manage your team in<br />
this fight, there is no question about that.<br />
To begin with, the first and second forms he takes are particularly susceptible to being blocked by your tank, while<br />
the third form seems to be particularly vulnerable to Burning Man attacks. The fourth form you just want to kill as<br />
quickly as you can without it costing you too much, and the final form? That is the one that will frustrate you,<br />
because it has an AOE attack that is deadly, and can easily wipe your party.<br />
If you have potions now is the time to use them to top of your crew. If the Lyrium has recharged, use that as well<br />
you want to survive (obviously), so you need to take the final form out as fast as you can! If you find that you simply<br />
did not bring enough healing potions or the resources to make them with you and you cannot <strong>com</strong>plete the fight<br />
with what you have and the Lyrium crystals here, you do have the option of lowering the difficulty to the lowest<br />
setting. That will allow you to <strong>com</strong>plete the fight without having to heal at all.<br />
Once the Sloth Demon is dead and you will be happy that it is dead you get a CS with Niall in which he instructs<br />
you to take the Litany of Adralla from his body after you return yes, he is dead, but you sorta suspected that, right? It<br />
is rather sad that we could not save him, considering all of the help that he gave us but he seems to agree with the<br />
other spirits that we talked to, and just wants release from the Fade. We can do that! We don't even need a reason!<br />
The Mage Tower<br />
Yes! We are back in the real world at last! I don't know about you but that was a very long and arduous adventure<br />
much more than I was expecting! That we gained some amazing stat boosts in the bargain is sweet in fact the<br />
treasure trove of stat-boosting items makes this one of my favorite sections of the game.<br />
You will now reappear in the Circle Tower, and at your feet is Niall's body go ahead and remove the Litany Adralla<br />
now and then look to the right and you will see a soldier's body near the door. Go loot him for a health potion and<br />
a dagger, and then move through the door and around the corner and battle the Drake there isn't he the cutest sort of<br />
page 74 / 145
<strong>SuperCheats</strong>.<strong>com</strong> Unoffical <strong>Dragon</strong> <strong>Age</strong>: <strong>Origins</strong> Guide<br />
http://www.supercheats.<strong>com</strong>/<strong>guide</strong>s/dragon-age:-origins<br />
Check back for updates, videos and <strong>com</strong>ments for this <strong>guide</strong>.<br />
baby dragon?<br />
Check the cabinet nearby and grab the Private Documents, and then move over to the Drake's body. If you have not<br />
already looted, than take the Drake Scale from the body you will need that later so hold on to it and then loot the<br />
Charred Corpse that in on the floor nearby. You should get a Lesser Injury Kit, and The Libertarian's Cowl you may<br />
want to equip that if you are a mage or equip it on your party mage now.<br />
On a nearby desk is a book that contains another Codex Entry The Legend of Calenhad: Chapter 2 which you should<br />
grab you know you get XP for every Codex Entry, right? Umkay now, grab the Note from the pile of books on the<br />
floor nearby, and then go through the nearby door and kill the 5 <strong>Dragon</strong>lings that attack you.<br />
Okay, seriously now, this is the Tower of the Circle of Mages, right? This is where magic happens, and where the<br />
people who can do magic are vetted, checked out, and approved. You would think that this would be the last place<br />
you would encounter Drakes and their babies, yes?<br />
Nearby next to some shelves is a chest you want to open that chest and loot it, trust me on that! Inside the chest is<br />
some health and Lyrium potions, a Mabari War Harness, the Kaddis of the Lady of the Skies, a Beef Bone that I am<br />
absolutely positive your war dog would simply LOVE to get as a gift, and another Drake Scale remember you need<br />
to hold on to those, there is a quest that uses them.<br />
Through the next door a Metal Door you encounter a trio of Abominations, but you make short work of them and<br />
you notice the corpse of a Soldier nearby. Go ahead and loot that if you have the space in your bag it is a Grey Iron<br />
Greatsword.<br />
Go through the open door nearby and grab the fire crystal out of the vase, and the supplies and weapons from the<br />
nearby chest. In that chest is a Beastmen's Dagger it is Red Steel and if you are playing a Rogue (I am) you probably<br />
have the Grey Iron Enchanted Dagger equipped as your off-hand weapon. This is a better blade, so equip it or, if<br />
you are not playing Rogue, have the Rogue in your party equip it. Now would be a good time to check to see if any<br />
of the armor and weapons as well as accessories like belts, necklaces and such can offer better stats or protection to<br />
your party members.<br />
Right, now that we have done all that, head back out into the hall and to the right, for another Metal Door! Head<br />
into the room and you will spawn a trio of Shades near the loot containers. Once they are dead, check the Soldier's<br />
Corpse to loot a Health Potion whether you want the small shield is your call, but if you have the space in your bag<br />
you can always sell it later.<br />
The chest contains money and as I am sure you know, money is always wel<strong>com</strong>e!<br />
Meeting Cullen<br />
Now head through the next Metal Door for a Checkpoint Save you know that THAT means, right? We get a brief CS<br />
in which you encounter a Templar Knight named Cullen who is clearly convinced that you are some sort of<br />
darkspawn plot against him. From him you learn that the surviving mages were taken to the Harrowing Chamber but<br />
he is convinced that they are beyond salvation. Wynne on the other hand is not convinced .<br />
Now we know that the Templar policy on cross-contamination with Blood Mages is to just kill them all and let God<br />
sort out the innocent and clearly this guy wants you to help him do just that so here is one of the occasions where<br />
you have to make a moral decision. What are you going to do?<br />
Like Wynne, I am just not willing to kill an innocent on the off-chance that they might have been corrupted which<br />
really gets the Templar angry at us but what can you do? You have to play your alignment unless you are Chaotic<br />
Neutral, in which case I would love to go to a hockey game with you...<br />
This is one of those spots where you are not going to keep everyone happy someone in your party will agree with<br />
page 75 / 145
<strong>SuperCheats</strong>.<strong>com</strong> Unoffical <strong>Dragon</strong> <strong>Age</strong>: <strong>Origins</strong> Guide<br />
http://www.supercheats.<strong>com</strong>/<strong>guide</strong>s/dragon-age:-origins<br />
Check back for updates, videos and <strong>com</strong>ments for this <strong>guide</strong>.<br />
Cullen, someone will disagree, and if you are lucky, the third person will be neutral in their feelings on the matter.<br />
Obviously this is something that you have to take into consideration as you make your choice but since I am a good<br />
guy, the choice was already made for me, and so I lost 20 points of Sten's approval towards me... I hope that does<br />
not <strong>com</strong>e back to haunt me later.<br />
Note that if you choose to side with Cullen, you are going to have to kill Wynne to get past her to deal with Uldred.<br />
If that is what you want to do, okay, but she really would make a strong addition to your team. Actually she does<br />
make a strong addition if you keep her because there are going to be quests you will go on later that you will want a<br />
mage other than Morrigan for, including Morrigan's personal quest.<br />
The Harrowing Chamber<br />
At the top if the stairs nearby is the door to the Harrowing Chamber, and inside all hell is breaking loose the Blood<br />
Mages are torturing the survivors, turning them into arcane beasties as soon as their will is broken. The Blood Mage<br />
in charge notices you after we get a gristly CS, asking you if you want to join in the fun? Well, no! My answer was: I<br />
think I will just kill you if that is alright with you?<br />
As the fight ensues you have a choice to make a long fight or a short one. I chose to concentrate on Uldred, who<br />
has now transformed into his Demon Self because taking him out takes out all of his minions. Keep an eye out for<br />
when he casts the spell to change the mages and use the Litany you got earlier to <strong>com</strong>bat that.<br />
After the fight which was not as bad as I thought it was going to be there was loot to be had, including some<br />
gauntlets and plate armor off of Uldred's corpse.<br />
Now that you have looted all that you can, head over to talk to First Enchanter Irving the guy whose face and voice<br />
you need if you are going to convince the Templar who locked you into the tower to actually let you out! Before<br />
you agree to leave and tell the Templar the situation, tell Irvine that you want to take a look around first.<br />
Once you are certain you have looted all you want and are happy with your look around, either talk to Irvine again<br />
or try to take the stairs down and he'll ask you to confirm you are ready to go you are, so do that now.<br />
You get a brief CS in which Cullen encourages the head Templar Gregor to kill all the mages but we easily defuse<br />
that, and attain his thanks as a result. Thanks but no help like he promised! He tells you if you need help, talk to<br />
Irvine, because thanks to you he is back in charge of a secured tower, and the man has things to do, places to go,<br />
people to see. Great... Hard to build an army when nobody lives up to their promises!<br />
Irvine agrees to throw the support of The Circle to you and the Grey Wardens and then Wynne asks that she be<br />
released to join you. It is really a good idea that you encourage and accept this Wynne can be a powerful addition<br />
to your party. Irvine lives up to his promise, releasing Wynne to join our party, and you now pick up the<br />
Achievement: Magic Sympathizer for siding with the mages against the Templar.<br />
If you decide to side with the Templar and agree with Cullen, Gregor will honor the promise that he made, and the<br />
Templar will be<strong>com</strong>e your ally.<br />
At this point you should have leveled up so check each of your characters to add their stats and skills. If you are<br />
playing Rogue and you have not already done so, you will want to add the Stealing skill now, as we will need that<br />
when we return to the town. If you are not playing Rogue, make sure that the Rogue in your party gets that skill at<br />
skill-up time.<br />
The Quartermaster is still in the corner of this room and now would be a good time to get rid of the stuff you do not<br />
want or need, and see what he has that you can use so go ahead and do that now before you hit the World Map and<br />
head back to Denerim.<br />
page 76 / 145
<strong>SuperCheats</strong>.<strong>com</strong> Unoffical <strong>Dragon</strong> <strong>Age</strong>: <strong>Origins</strong> Guide<br />
http://www.supercheats.<strong>com</strong>/<strong>guide</strong>s/dragon-age:-origins<br />
Check back for updates, videos and <strong>com</strong>ments for this <strong>guide</strong>.<br />
Denerim Part 2<br />
On the way back to Denerim you get a <strong>com</strong>bat stop and a CS in which you see your arch nemesis learning that all is<br />
not going well for him there is a call for him to step down, and there is news that Grey Wardens that would be you<br />
and Alistair survived the battle. Assassins are to be hired to go after you!<br />
After you receive a Codex Entry, you find yourself facing a small force ahead of you on the road well what are you<br />
waiting for?? After you take out Joam, his Thugs, and his Mage, make sure you search the area for loot before you<br />
continue on to town. There is a Deathroot plant on the hill where the Mage attacked from, and Joam has some nice<br />
loot items on him as well.<br />
Once you reach town depending on the loot you have picked up you may want to go to your camp and distribute<br />
the armor and weapons to your other party members. It is an idea, because it will reduce your item count and they<br />
are items you do not want to sell anyway.<br />
Back in town, the first thing we should do is turn in any <strong>com</strong>pleted quests! That should include a trip to the Mage's<br />
Collective <strong>Age</strong>nt, the Chanter's Board, and Wade's Emporium. At the Emporium speak with Herren and choose the<br />
selection to make the Drake Scale Armor. Remember those scales we were collecting? Yes! As it will take some<br />
time, head on out to the Market Square now.<br />
Now chat with Sgt. Kylon for your reward, then back to Wade's and claim your armor! Wade doesn't think much of<br />
it, but this armor is a lot better than what we are presently wearing! Wade will make you additional sets of armor<br />
when you return with more scales bear that in mind.<br />
A Fistful of Silver<br />
Now that we have turned in our <strong>com</strong>pleted quests and obtained our rewards, let us head to the outstanding quest in<br />
the area A Fistful of Silver! Now that we have better kit and some level-ups, these guys will be cake! After you loot<br />
their corpses, head over to the three chests and loot the silver bars, and the return to Slim Couldry to turn it in. He<br />
does not have another mission for us just yet, but that's okay, we'll be back!<br />
Deserted Building<br />
Head over to the gate and select the Deserted Building as your destination, and when you arrive note the concealed<br />
door in the back of the room. Click it to reveal it, and then open the door and go carefully down the stairs, avoiding<br />
the trap below. Fight the Blood Mage and his crew, and once they are dead, disarm the trap for an easy 40 XP and<br />
then start looting corpses.<br />
The Blood Mage has the key to the Metal Door here so loot that and some potions from him next, and then hit the<br />
door! Wouldn't it have been cool to be able to retain the Fade Forms in the real world? Sigh.<br />
As you progress through the rooms you will see a barrel you can loot a piece of velum from before passing through<br />
another Metal Door and killing a trio of Merc's. Mind the tripwire that is stretched between this room and the next<br />
there should be enough time for you to disarm it for a quick 40XP before the Rogue's and Merc's descend on you.<br />
For an abandoned building this is a pretty nice layout and I would not mind having that painting in the left corner of<br />
the area up the stairs... So once you have the enemy dead here, hit the next door, and you will find yourself facing a<br />
mixed group from the room on the right of the hall you are now in a <strong>com</strong>bination of mages and warriors. I went for<br />
the mages first, since they have a more practical ability to hurt you and your party and then took out the sword<br />
jockeys.<br />
The door to the left as you entered this hall has a chest and a create to loot the crate has one of the Private Letters<br />
that we are collecting. In the room that the enemy came from is a chest with Red Steel armor in it you might want to<br />
page 77 / 145
<strong>SuperCheats</strong>.<strong>com</strong> Unoffical <strong>Dragon</strong> <strong>Age</strong>: <strong>Origins</strong> Guide<br />
http://www.supercheats.<strong>com</strong>/<strong>guide</strong>s/dragon-age:-origins<br />
Check back for updates, videos and <strong>com</strong>ments for this <strong>guide</strong>.<br />
give that to one of your warrior class party members if they can wear it.<br />
Back in the hall, beware the pressure plate trap in the center of the floor that looks like an area rug disarm that for<br />
another easy 40XP, and then go through the door ahead and take out the Rogues there. Loot the bodies and chests<br />
here, and continue through the hall to the next pressure plate trap, and disarm it. As you step past it you get attacked<br />
by some war dogs.<br />
In the next room there are archers and a Blood Mage behind a barricade and you cannot quickly reach them, so<br />
your mage and your archer are going to keep them busy while you attack the barricade, and then your team can<br />
mop-up! You head into the room beyond the barricade, or go through the last door in this hallway and clear out the<br />
group of enemy in that room, loot what you can, and then head through the next door for another small fight.<br />
After this fight, head through the next door, and then open the Metal Door on the right to clear that room before you<br />
continue on. There is a chest here that contains a Magister's Shield, some money and a Silk Carpet that you should<br />
loot. Read the Codex Entry for the Shield now if you like interesting story.<br />
The Blood Mage Leader<br />
In the next room you get a brief CS as you enter, and you find yourself facing the Blood Mage Leader and his<br />
minions. I love that word minions. Anyway, you kill him, and then loot the bodies of course. The Leader has a key<br />
on him, and there is a World Map door in this room to make leaving easier!<br />
If you were looting as we progressed through the building you picked up some half-decent mage gear and fighter kit<br />
and you should have some kit you have been saving from the earlier areas, so now would be an excellent time to<br />
visit our camp! The door in this room is an exit to the City/World Map, so head for the Camp now.<br />
While in camp remember to do the conversation options with each of the party members, especially the ones that<br />
you are not using regularly in the active party, as this is when you will be triggering the various conversations that<br />
lead to their personal quests as well. Remember that Sandal can do enchantments so you should check to see if you<br />
have better runes for your weapons ever time you hit the camp and if you do, have Sandal install them.<br />
Now that you have gained one of the four allies for your army the Mages you have a representative from the Circle<br />
in your camp behind the tents near the main fire. Next to the representative and as you gain more allies there will<br />
be a representative for each present there is a set of crates into which you can put supplies for your allies. You<br />
should be doing this because it strengthens the troops you will later use when fighting your way to the Arch Demon<br />
and in your fight WITH the Arch Demon. I am not sure precisely what the increases are for providing supplies here,<br />
but as every little bit of an advantage is good, you may as well do it too.<br />
When you click on the supply boxes it will prompt you for what you can deposit when you are depositing supplies<br />
for potions and such, be sure that you do not end up giving them all of what you have, since you may have need of<br />
some of it yourself! We are about to visit the Brecillian Forests, which is home to the Dalish Camp, and we can buy<br />
a nearly unlimited supply of Elfroot there so bear that in mind.<br />
Now that we have finished with this minor side-task, let us head to the Brecillian Outskirts!<br />
Brecillian Outskirts<br />
Travel in these lands is not without risk and on the way to the Outskirts we encounter a refugee girl asking for our<br />
help. As we approach we get a CS that suggests that all is not as it seems remember the Assassins that we learned<br />
about earlier? Yes, this is them. There are traps laid all over the place and assassins on the ledges above so take<br />
them out carefully and disarm the traps leading to the ledges before you send your party up there!<br />
page 78 / 145
<strong>SuperCheats</strong>.<strong>com</strong> Unoffical <strong>Dragon</strong> <strong>Age</strong>: <strong>Origins</strong> Guide<br />
http://www.supercheats.<strong>com</strong>/<strong>guide</strong>s/dragon-age:-origins<br />
Check back for updates, videos and <strong>com</strong>ments for this <strong>guide</strong>.<br />
When the battle has finished, you get a brief CS, and the opportunity to interrogate the Elven Assassin. As you<br />
question him, he reveals some interesting information about his organization, and he even admits that Loghain is<br />
who hired him though we already knew that. As the Elf says Loyalty is an interesting concept. Once you have<br />
pumped him for all of the information you could get, he has an offer for you he does not want you to kill him, and<br />
he does not want to be killed by the Crows what he wants is clear enough: to join your group!<br />
I suppose it is no surprise that Alistair is not real happy with this decision but hey, a new party member! Cool! Now<br />
to the business of looting one of the travelers has a letter on them that gains us the Codex Entry "Friends of Red<br />
Jenny" and as this is also a side-quest be sure that you loot it.<br />
Once you have looted all that you want, head back to the World Map and continue our journey!<br />
Dalish Camp<br />
As we arrive we get a brief CS and a challenge after a short if hostile chat in which we inform her that we are Grey<br />
Wardens, we are taken to The Keeper Zathrian. He sounds a lot like the guy who played the Vulcan on the Star Trek<br />
show with Captain Janeway... Not that this is relevant here!<br />
He gets right to the point a very direct fellow and explains that they may not be able to honor the treaty that they<br />
signed so long ago and he shows you why. Werewolves!<br />
As the story unfolds, it be<strong>com</strong>es obvious that we are going to have to help the Elves and take on the King of the<br />
Werewolves! The task is simple enough hunt him down, kill him, cut his heart out, and bring it back to the<br />
Keeper... No worries mate, we can have that done in two shakes of a Jiffy, right?<br />
Now before we get started, lets ask the Keeper a few questions to get as much of the 4-1-1 as we can, and then hit<br />
up his supply guy for whatever we can get, and have a chat with some of the other Elves.<br />
After we finish talking to the Keeper, the Dalish Camp is unlocked as an area we can access, and as Lanaya is<br />
standing next to us, she is our logical first chat and she has some questions for us...<br />
This is actually an interesting story and worth listening to, not that you have to or anything, but you might enjoy<br />
learning her story nonetheless so why not? You gain a Codex Entry for your patience as well I should add.<br />
There are some objects in the camp that will also give Codex Entries a statue of a wolf near the fire gives the entry<br />
Fen'Harel: the Dread Wolf, a headless statue near the pens gives the entry Ghilan'nain: Mother of the Halla, a small<br />
statue behind a half-wall gives the entry Elgar'nan: God of Vengeance, in the center hut is a small statue called God<br />
of the Craft, from which you obtain the Codex Entry June: God of the Craft. A statue near that called Sylaise (a<br />
woman holding a bowl) that gets you the entry Sylaise: the Hearthkeeper, and across from her is another statue<br />
called Andruil, that gives the entry Andruil: Goddess of the Hunt. There are some Colored Inks on a fur gives the<br />
entry Vallaslin: Blood Writing.<br />
There is a chest next to where Lanaya and Zathrian are standing, but you will have to be deceptive to get whatever is<br />
in it, and I chose not to do that.<br />
Sarel invites you to have a meal by the fire, and introduces himself as the Clan's Storyteller. He does not have much<br />
faith that your mission will succeed, thought he seems enthusiastic about you and your courage nonetheless. After<br />
dis'ing you and getting upbraided by a nearby Elf woman, he apologizes and offers to tell a story to the children. If<br />
you have not heard this story before you may want to listen to it, as it gives you the Elven take on the world.<br />
After you listen to the tale, Sarel tells you about the forest that you will be adventuring in the information is not really<br />
all that valuable, but he does give you some information about Witherfang, and the forest spirits, and at the end of<br />
this you receive the Codex Entry for The Dales.<br />
Cammen, a Hunter Apprentice sitting nearby, gives you an opportunity to persuade or intimidate to get his story, and<br />
page 79 / 145
<strong>SuperCheats</strong>.<strong>com</strong> Unoffical <strong>Dragon</strong> <strong>Age</strong>: <strong>Origins</strong> Guide<br />
http://www.supercheats.<strong>com</strong>/<strong>guide</strong>s/dragon-age:-origins<br />
Check back for updates, videos and <strong>com</strong>ments for this <strong>guide</strong>.<br />
in the process you learn about the girl he loves. You get another chance to persuade if you want to convince him to<br />
allow you to get the pelt for him which adds another quest to your outstanding list.<br />
Athras is near a wagon and in the conversation that you have with him, you are presented with another opportunity<br />
to persuade I took this, and if you have been following this <strong>guide</strong>, you should also have picked up the Achievement:<br />
Persuasive (10 GP) here as I did. I told him that I would look for his wife in the forest, and after the conversation<br />
ends you get a Quest Updated notice.<br />
Elora is by the pens she is the Master Herder who cares for the halla that are the Elven beasts of burden. You can<br />
have a quick chat with her to learn about her and the halla. You can try to use your Survival Skill (if you have it) to<br />
calm the halla that is ill, I was not able to help... There may be a quest attached to this I will look into that later.<br />
Either way, you also get another Codex Entry when you finish talking to her.<br />
There is a Deathroot plant behind the pen that you can harvest before you move on.<br />
Varathorn is standing nearby with his weapons arrayed on a table talk to him for a brief CS in which he yells at his<br />
apprentice, after which you can ask him for the gear he is supposed to have for you and then you can barter with<br />
him for other stuff. It would be an idea to do that, because this guy has an almost unlimited supply of some of the<br />
resources that you need like Elfroot, agents, as well as some good recipes. You need the Elfroot to make the healing<br />
potions that for one of the quests that we have, and the Toxin Extract can be bought here so that you do not have to<br />
try to collect it the hard way.<br />
When you are done with him, look around his area there is a crate with a helm in it, a pile of books behind him with<br />
two Codex Entries, a barrel with a weapon called Dar'Misu, and a chest with some supplies in it.<br />
Now go back and chat with Varathorn again and ask him what he does. He will tell you about a special wood that<br />
he needs to make his finest crafts. Here is your chance to pick up another quest, and offer to get him some<br />
Ironbark. He will tell you how to recognize it, and offer to craft something for you if you bring him some.<br />
Excellent! Yet another quest! This camp is a fertile place for adventure!<br />
Mithra is standing by the entrance to the camp, and if you talk to her she will give you her blessing on your task or<br />
you can find some things to argue with her about, your call. There are some Elfroot plants you can harvest off to her<br />
right, and that pretty much wraps up the camp! Time to go kill werewolves!<br />
page 80 / 145
<strong>SuperCheats</strong>.<strong>com</strong> Unoffical <strong>Dragon</strong> <strong>Age</strong>: <strong>Origins</strong> Guide<br />
http://www.supercheats.<strong>com</strong>/<strong>guide</strong>s/dragon-age:-origins<br />
Check back for updates, videos and <strong>com</strong>ments for this <strong>guide</strong>.<br />
Brecillian Forest<br />
The entrance to the forest is at the opposite end of the camp from where you entered so if you see Mithra you are on<br />
the wrong end. Just follow the path through camp and you will see where you need to go!<br />
Note: as you progress through the woods there are going to be plants that you can harvest I am just going to assume<br />
that you are doing that and not mention them here.<br />
Just past the log bridge you will be attacked by a group of werewolves and wolves after you kill them, if you face the<br />
bridge, you will notice that there is a path leading up to the left from here take that to fight another pair of wolves,<br />
and then take the left turn off of this path towards the waterfall. As you approach you get a checkpoint save, and a<br />
werewolf named Swiftrunner appears with two buddies and you get a CS.<br />
After the CS you can interact with Swiftrunner, who tells you to take his message to the Dalish. The conversation<br />
leads to a fight, but you do not end up killing them! After a brief exchange of blows, they retreat leaving you with a<br />
warning.<br />
The branch of the trail that heads left from here just loops back to the bridge and the other path but take it anyway,<br />
because halfway to the bridge on the left is a small opening with a Great Bear in it! After you kill it, loot the corpse<br />
here and then retrace your steps back to the waterfall where we had our encounter with Swiftrunner and continue on<br />
in the direction that he retreated in.<br />
As soon as you cross over you get attacked by a mixture of Rabid and regular Werewolves go ahead and kill them,<br />
right? If you explore in the direction that they came from you will find a body that has a Magister's Cinch for you to<br />
loot, and just past the body is a wounded Elf named Deygen one of the hunters from the missing party. I chose to<br />
take him back to the camp and was met by Kithra and her party, who took him off my hands.<br />
An easy jog back to where we were, and then cross over the next bridge to engage an Ogre and some Hurlocks.<br />
Once they are killed another Hurlock appears from the nearby path and after you kill that one, head up the path a<br />
bit and you will see some rubble on the ground. Search that to loot some gifts.<br />
There is a tombstone on the other side of the path across from the rubble but when you examine it you end up<br />
feeling uneasy... If you move a little to the right you will target a Mystical Site of Power marker behind the<br />
tombstone activate that as part of the quest we are already doing.<br />
If you return to the last bridge that we crossed you will see that there is a path ahead and one to the left of it. For<br />
now, run down the path ahead (ahead as if we were just crossing the bridge) and take the first cut to the right for a<br />
checkpoint save, and then a fight with a Wild Sylvan (tree creature). As you progress down this path there are more<br />
Wild Sylvan for you to fight and then you encounter a Grand Oak that you can talk to.<br />
The Grand Oak or Elder Tree speaks in rhyme and he wants you to do him a favor! Finding an acorn sounds like a<br />
needle in a haystack sort of quest, but hey, a quest is a quest, right? He tells us that we need to go to the East to find<br />
this man... If we read the quest description and this is actually part of the main quest we are on for the Dalish we<br />
need to find the Mad Hermit.<br />
Following the white arrow on the radar map gets us to a large fallen tree and a Wild Sylvan to kill just next to it.<br />
After you kill the Sylvan you may or may not get attacked by a group of werewolves if so kill them, and then move<br />
closer to the center of the fallen tree to target it, and gather the Ironbark that it yields for a Quest Update.<br />
At the end of this path is the entrance to the Northeast Forest.<br />
The Northeast Forest<br />
page 81 / 145
<strong>SuperCheats</strong>.<strong>com</strong> Unoffical <strong>Dragon</strong> <strong>Age</strong>: <strong>Origins</strong> Guide<br />
http://www.supercheats.<strong>com</strong>/<strong>guide</strong>s/dragon-age:-origins<br />
Check back for updates, videos and <strong>com</strong>ments for this <strong>guide</strong>.<br />
As you enter you are attacked by a group of werewolves after you kill them, continue on the path to encounter<br />
another werewolves that turns out to be Danyla, the woman we are looking for. As you talk to her you learn that she<br />
has two requests to make of you to tell her husband that she loves him and is dead and then to kill her to put her out<br />
of her misery and pain. You can get some helpful information from her, but eventually you have to decide what to<br />
do I considered it a mercy killing and did as she asked.<br />
Take the path to the left, and left again to fight a trio of bears and then a pair of Ogres. In the clearing there are some<br />
lootable spots, and you find another tombstone only this one you can disturb if you want to. Disturbing it gets you a<br />
new Codex Entry the Legend of the Juggernaut, and spawns a pretty tough Revenant for you to battle. The<br />
Juggernaut has some interesting armor on it be sure to loot that! Killing and looting it also updates one of our quests,<br />
the Mage's Treasure.<br />
Continue along the path until you encounter the Hermit's camp and talk to the Hermit who is only willing to<br />
discourse with you in a question-and-answer trade. The questions you can ask are somewhat limited, and it looks<br />
like the only thing he wants that you have is the scarf you are supposed to take back to the Elf camp...<br />
You can try killing him, but as he is an illusionist that is not as easy a task as you might think! It gets a bit tedious<br />
talking to him, and trying to kill him only to have him disappear and then reappear a few feet away so when you get<br />
tired of doing that, go over to the stump and search it then try to steal the item (the acorn) which you do, and he goes<br />
all aggro on you and summons some demons kill them, and then kill him!<br />
Hopefully you got the information out of him that you wanted before you killed him and you looted him, right? He<br />
has some good stuff!<br />
Go ahead and explore around the areas ahead you will find off to the left of the path a large mist cloud blocking that<br />
path and when you enter it, it just puts you back to where you entered it you also get a Quest Update. Read the<br />
main quests entry in the list to learn that your next task is to find a way to get past this barrier!<br />
For now let's explore the rest of the zone.. You'll find exits to the Southwest and Northwest Forests, but for now let's<br />
return to the Northwest Forest and deliver the Acorn to the Grand Oak.<br />
The reward he gives is a branch that he says will permit you to freely pass through the forest give that some thought<br />
where might that help us?<br />
Move past the Oak and you'll discover an abandoned campsite a sinister campsite that tries to get you to sleep... It's<br />
a trap! Once you resist a Greater Shade appears and the battle ensues! After you kill the Shade you discover the<br />
bones of its previous victims as the illusion of the camp is broken.<br />
There is some good loot here but if you are like me, the loot you get here puts you pretty close to having full packs,<br />
so it is time to pay a visit to the Dalish camp and sell-off some of this booty!<br />
Back to the Dalish Camp<br />
As we are selling off some booty, we may as well turn in the quests here too. Give Varathorn the wood and he will<br />
fashion an item for you a bow or a breastplate, you decide but make sure you have an inventory slot to put it in or<br />
you will lose it!<br />
Now go to Athras and talk to him be kind and let him down gently, give him the scarf and tell him that the Keeper<br />
spoke true. That really is the kindest solution.<br />
Head over to talk to Cammen give him the Wolf Pelt that you have and enjoy the CS in which he finally secures his<br />
page 82 / 145
<strong>SuperCheats</strong>.<strong>com</strong> Unoffical <strong>Dragon</strong> <strong>Age</strong>: <strong>Origins</strong> Guide<br />
http://www.supercheats.<strong>com</strong>/<strong>guide</strong>s/dragon-age:-origins<br />
Check back for updates, videos and <strong>com</strong>ments for this <strong>guide</strong>.<br />
Honey. Isn't that sweet? Of course he has built his new relationship on a lie and you helped him... Shame on you!<br />
Now might be a good time to pay a visit to your camp and distribute armor and weapons to the other party members<br />
as that will help free up more slots in your inventory. You will also get an update from Morrigan in which she<br />
reveals what she has learned from her mother's book and it is not good news. I agreed to help her of course I did!<br />
After all she is part of my party now, right? This of course adds a new quest for us but not one that is time-dependent<br />
so we can do it when it is convenient to do it.<br />
On your way back to the Forest you will get a <strong>com</strong>bat interruption it is the group of Travelers who are taking the<br />
false message about Blood Mages to the Chantry all you have to do is intimidate them to <strong>com</strong>plete the requirements<br />
for this quest so intimidate them!<br />
Back to the Forest<br />
Now that we have some breathing room in our packs and have <strong>com</strong>pleted those quests, we can head back into the<br />
Forest!<br />
Remember the first tombstone that we found that made us feel odd but that we could not interact with? It is in the<br />
hill to the right from where we encountered Swiftrunner return there now and trigger it to fight another Revenant and<br />
this one drops the second treasure for the quest, a Juggernaut Helm!<br />
Now return to where the other tombstone is, and now there are now Malifcar casting spells at an old crypt (this is the<br />
area just past the Hermit's camp). Go ahead and kill them, as that <strong>com</strong>pletes the requirements for the Mage's Circle<br />
Quest Thy Brother's Killer.<br />
Now remember the branch that the Grand Oak gave us? When he said you would be able to pass through the<br />
forest, you likely thought that he meant the Sylvan would not attack you, right? Well that is not what he meant that<br />
branch is what you need to be able to pass through the mist that kept putting us back outside! Check the map to find<br />
your bearings and now head for the Forest Barrier.<br />
As you run through it this time, instead of being kicked back out, you pass right through, and you get the Quest<br />
Updated flag and a checkpoint save! Excellent!<br />
The Ruins<br />
Swiftrunner is waiting ahead and you get a brief CS in which he once again warns you. Odd that he is warning you<br />
instead of killing you, but still... A brief chat and then the fight begins and once again you do not get to kill<br />
Swiftrunner, as just before you can deliver the final blow he is saved by a white wolf, who gets in between you.<br />
What the deuce?!<br />
As we run ahead we spot another tombstone to the left and like any good button pusher we cannot resist it, and<br />
summon the third Revenant. Killing it gets us a Juggernaut Plate Gloves and a set of Red Steel Heavy Plate Armor.<br />
Nice! Don't forget to loot the two nearby chests, and then head up the path to encounter the Gatekeepers!<br />
Now is probably a good time to make a save...<br />
So, that done, let us head into the Ruins!<br />
To the right after we enter (before we go down the stairs) is a secret brick wall door open that and kill the two<br />
skeletons that pop out, and then kill the pair that pop out of the secret door on the other side. Loot their bodies and<br />
then run over to the other side and loot the chest there it has one of the letters we have been collecting. Now head<br />
down the stairs loot the armor from the pile of bones on the left, and continue down to fight the werewolves<br />
page 83 / 145
<strong>SuperCheats</strong>.<strong>com</strong> Unoffical <strong>Dragon</strong> <strong>Age</strong>: <strong>Origins</strong> Guide<br />
http://www.supercheats.<strong>com</strong>/<strong>guide</strong>s/dragon-age:-origins<br />
Check back for updates, videos and <strong>com</strong>ments for this <strong>guide</strong>.<br />
guarding that room.<br />
On the left side of the room there is another secret door with some lootables inside, while the right side leads down<br />
to a lower level. There is a door in the center that we want to take before we go down there, that leads to a hall with<br />
branching halls off it leading down. These are all blocked by rubble, but there are lootables in some. Kill the Giant<br />
Spiders, then go to the room at the end and loot the Private Documents from the cocoon and then loot the spots in<br />
the right branch before you take the left branch down. Did you hear that growl?<br />
You get a checkpoint save here which should tell you something and then you enter a very large room at the bottom<br />
of the stairs that has traps on the floor and a <strong>Dragon</strong>! Kill the <strong>Dragon</strong>! Okay it is a small dragon but still, a dragon is<br />
a dragon! Mind the traps that this crafty dragon has laid out for you I took a moment to disarm them out of respect<br />
for my and my party's tootsies, but you can just try not stepping on them too.<br />
After it is dead, disarm the rest of the traps for some easy XP, and then head to the bottom of this area, where you<br />
can loot the <strong>Dragon</strong>'s treasure pile and some chests. Once you have everything that you want, look to the back wall<br />
for the entrance to the lower level.<br />
Ruins Lower Level<br />
As you reach the first chamber you will fight some skeletons, and then a wispy little ghost boy appears in the center<br />
of the chamber, calling for his mother. You try to talk to him, but he runs away and bunch of skeletons spawn and<br />
you kill them!<br />
In the chamber to the left is a Sarcophagus with a gift and a tablet in it loot those and note that the tablet gives you<br />
another quest called The Elven Ritual and then head back out and right, to a door that you will open and then fight<br />
more skeletons. Run down this hall to the next chamber with a round white dais similar to the one in the other room<br />
but this one has a fountain in the middle of it.<br />
The quest description describes the ritual you must perform in order to open the Metal Door in this chamber so take<br />
the following steps but be aware that if you make a mistake demons will appear and you will need to kill them:<br />
(1) Click on the Fountain and select option 3 Take the earthen jug.<br />
(2) Select option 4 Fill the earthen jug with water.<br />
(3) Now select option 4 Leave the pool alone.<br />
(4) Move to the alter and select it, then select option 2 Place the earthen jug on the alter.<br />
(5) Now select option 4 Kneel before the alter and pray.<br />
(6) Select option 2 Examine the earthen jug on the alter.<br />
(7) Next select option 1 Take a single sip from the water in the jug.<br />
(8) Select option 3 Take the earthen jug.<br />
(9) Select option 6 Leave the alter alone.<br />
(10) Now return to the fountain and select it, then select option 3 Dump the water back into the pool.<br />
Now that the jug has shattered, the Metal Door is unlocked and open, so go inside and loot. When you reach the<br />
rear section of this chamber skeletons will attack just kill them and keep looting until you have done all three<br />
sarcophagus. Now turn around and head up the stairs, where you will encounter a Shade she tries to talk to you but<br />
you cannot make any sense of what she is saying.<br />
After you tell her that, she summons some Greater Shades, and the fight is on. If you concentrate on killing her, the<br />
battle ends a bit faster, and once she is dead, look at the Burial Chamber in the center of this raised area the final<br />
piece of the Mage's Treasure for that quest is in it! Grab the Juggernaut Plate Armor from the Burial Chamber and<br />
pat yourself on the back for <strong>com</strong>pleting yet another quest!<br />
Exit this chamber and continue down the hall and turn right into a room with a broken crate and a Phylactery which<br />
page 84 / 145
<strong>SuperCheats</strong>.<strong>com</strong> Unoffical <strong>Dragon</strong> <strong>Age</strong>: <strong>Origins</strong> Guide<br />
http://www.supercheats.<strong>com</strong>/<strong>guide</strong>s/dragon-age:-origins<br />
Check back for updates, videos and <strong>com</strong>ments for this <strong>guide</strong>.<br />
you should click on, and then pick the option to touch it. Select option 3 I am sorry, and then continue twice, and<br />
then you can ask it a lot of questions.<br />
This fills in some of the details of the mystery of these Ruins I thought it was a nice touch myself, no pun intended.<br />
Once you get through the dialogue and agree to help it, select the option to place the gem on the stone alter, and<br />
then accept the memories. The gem is destroyed, you <strong>com</strong>plete the quest and you unlock another specialization<br />
Arcane Warrior!<br />
Head back down the hall until you reach the room at the bottom where you find a pile of sacks with some money,<br />
and a Glass Phylactery. Taking the vial shatters it and a Revenant appears kill it! There are some lootables in the<br />
room to the right as you exit, then head to the closed door across from that room for a checkpoint save, and then<br />
open the door.<br />
Inside this large room are some traps you should disable, and some skeletons to kill. Loot the bodies and containers<br />
for a Codex Entry, then disarm the rest of the traps before heading to the door in the back of this chamber. Open the<br />
door to find yourself in a hallway.<br />
At the end of this hall is a Metal Door and another checkpoint save and once you open that door you are fighting<br />
more skeletons. At the bottom of this chamber is an Arcane Horror who summons minions until you kill him and<br />
find some decent loot on his body!<br />
The chamber on the left side of the room has lootables in it sarcophagus and a crate. The chamber on the other side<br />
of the main chamber has more skeletons for you to kill and more lootable containers and also holds the entrance to<br />
the Lair of the Werewolves!<br />
The Lair of the Werewolves<br />
As you enter the Lair there are two corpses with Corpse Gall on them loot that as you need it for one of the quests<br />
we are doing and then head for the door ahead. Inside are some werewolves for us to kill I imagine we will be<br />
doing a lot of that! Mind the traps on the floor and take out the next group of werewolves.<br />
There are two halls with stairs leading down that are blocked by rubble but that have lootables, so loot those before<br />
you go down the third, which is not blocked. You get a checkpoint save here, and as you enter you encounter more<br />
Gatekeepers only they do not want to fight, they want to talk!<br />
Agree to talk, and the Gatekeeper will take you to see The Lady. The brief CS you get has a bit of werewolf<br />
posturing, and then we meet The Lady of the Forest who could give Pamela Anderson some stiff <strong>com</strong>petition on<br />
haute coture!<br />
As you hear her story, you <strong>com</strong>e to understand that you have been misled by the Dalish Keeper. Still, you have a<br />
choice to make here you can either agree to help her convince the Dalish, or you can persuade her to kill the<br />
Dalish. Your call I played good though, so I chose to help.<br />
You need to be aware that Achievement-wise the choice you make here has consequences. You have three options:<br />
You either kill the Lady, persuade her to kill the Elves, or you help her convince him to end the curse. If you choose<br />
to persuade her to kill the Elves, you will get an Achievement for siding with the werewolves if you kill the Lady, you<br />
will get an Achievement for siding with the Elves and if you convince him to break the curse, you get no<br />
Achievements at all for this part of the game. If Achievements are important to you, well, you know what you have<br />
to do. If being good is important, than breaking the curse is the way to go!<br />
Side with the Werewolves<br />
You have to persuade her to attack them and that is not going to happen if you do not have a high ability to<br />
page 85 / 145
<strong>SuperCheats</strong>.<strong>com</strong> Unoffical <strong>Dragon</strong> <strong>Age</strong>: <strong>Origins</strong> Guide<br />
http://www.supercheats.<strong>com</strong>/<strong>guide</strong>s/dragon-age:-origins<br />
Check back for updates, videos and <strong>com</strong>ments for this <strong>guide</strong>.<br />
persuade, which means a high Cunning stat and Expert Coercion. If you have that, than by all means this avenue is<br />
open to you!<br />
You will know it worked when Swiftrunner agrees with you rather than saying he does not trust you and after that<br />
you get a load screen and CS in which you invade the Dalish Camp with the werewolves and have a little chat with<br />
the Keeper. After the chat, the battle ensues, but with their forces weakened by the injuries and infection, it does not<br />
last all that long.<br />
Once it is over, you talk to the Lady and Swiftrunner, and they pledge their support to you in the up<strong>com</strong>ing battle<br />
with the Darkspawn. If you chose this ending to the confrontation, you will get the Achievement for siding with the<br />
werewolves, but as your transition to the Dalish Camp was a load, you are going to need to go all the way back to<br />
the Werewolf Lair to loot the last two areas, because one of the Scrolls Banister and one of the letters we are<br />
collecting for that quest are located there.<br />
Once you have obtained those, skip to the next section.<br />
Side with the Elves<br />
This is the easiest and fastest solution. Just get her mad enough to attack you and then manage to kill her and all of<br />
her werewolf minions. That probably sounds a lot easier than it actually is. Once she is dead, take her heart, and<br />
then return to where you encountered and likely killed the Gatekeepers and loot the chambers off of that area for the<br />
fourth of the Banister Scrolls and some odds and ends.<br />
Now go back to the main room of the Lair and look to the left of where she was originally standing and you will see<br />
a door there that is closed. That is a shortcut out of the Lair and when you take it, you will end up back in the large<br />
chamber with the raised white dais in it. Just before you exit be sure that you grab the letter from the pile of goo on<br />
the ground.<br />
Standing there waiting for you is The Keeper do you think he just does not trust us or what? You ask what he is<br />
doing there, and he tells you why he followed you. He admits that the heart will not break the curse but we sort of<br />
knew that and explains that what it will do is allow him to cure his own clansmen.<br />
You ask if he will honor his bargain with you and he says that he will, and suggests that you return to the camp with<br />
him now. A short CS shows you that the heart actually helped them, and The Keeper gives you a reward for helping<br />
them. You also unlock the Achievement for siding with the Elves at this point, and you overhear some of the<br />
recovering Elves talking. I suppose that this is a feel-good moment, or as feel-good as the decision is likely to give<br />
you, but now it is time to move on so skip ahead to the next section, Return to Denerim.<br />
Note: Either way you need to be sure that you loot the rest of the chambers before you leave including the ones<br />
outside where you met the Gatekeepers who took you to see the Lady, because there are quest items in here.<br />
Breaking the Curse<br />
Before you take the exit that she has opened, turn back and go to the room where you encountered the Gatekeepers<br />
a minute ago and loot the chambers to either side one of the Banister Scrolls is here, and there is some decent loot as<br />
well. Once you have looted what you want, head out the exit that she unlocked for you at the top before the door is<br />
one of the letters we are collecting be sure you grab that and then exit to the Ruins Top Level.<br />
As you enter you find Zathrian waiting for you and it takes a bit of convincing to get him to <strong>com</strong>e with you and talk<br />
to the Lady, but once you agree to protect him from them he gives in. You get a load screen and a CS in which The<br />
Keeper has his say with The Lady, and we learn a little bit more about their history and how The Keeper views the<br />
situation. Swiftrunner is not about arriving at a peaceful solution have to admire his stick-to-it attitude, right?<br />
page 86 / 145
<strong>SuperCheats</strong>.<strong>com</strong> Unoffical <strong>Dragon</strong> <strong>Age</strong>: <strong>Origins</strong> Guide<br />
http://www.supercheats.<strong>com</strong>/<strong>guide</strong>s/dragon-age:-origins<br />
Check back for updates, videos and <strong>com</strong>ments for this <strong>guide</strong>.<br />
There is still some more arguing to get him to end the curse and you may have to tune up on him a little by way of<br />
convincing but eventually he does end it! The CS for this part is pretty cool, though I have to wonder at the change<br />
that took place in him that allowed him to end his life like that... I perceived his motives to at least in part be the<br />
long life that he gained from casting the curse in the first place.<br />
Once the curse ends, The Keeper falls to the ground dead, and The Lady gets a few moments to say goodbye to her<br />
minions before she, too, dies in a glorious flash as well. The werewolves all regain their human form once the curse<br />
is broken, and thank you for your help. If you want you can ask for a reward here, and the leader will offer you<br />
Swiftrunner's Shield (presumably that was Swiftrunner doing the offering), and you might want to take that as it is not<br />
a bad shield!<br />
Now we make our return run to the Dalish Camp (when you get the World Map prompt at the exit pick the Forest<br />
Outskirts to be warped to the Camp) where we get a CS with Lanaya for the end of this mission. This is one of the<br />
places where the game goes a little off-script, and with all the care that went into making this, that is a little<br />
surprising!<br />
Lanaya opens the CS by telling you that the essence of the heart helped to cure the Elves but we never actually got<br />
her the heart, because Zathrian died removing the curse. Still, she says that she is sad that Zathrian had to die,<br />
explaining that she felt it when he did, and observing that she thought he was ready to go. I don't know, maybe she<br />
knew a different Zathrian than we did? From where I stand, getting him to die took a lot of work on our part, and<br />
that is hardly being "ready" to go, right?<br />
Yes, he died a hero's death but as Lanaya is now The Keeper, she vows that the Elven people will honor the treaty,<br />
so you have just picked up your second ally! Way to go you! Now let us return to Denerim or make a pitstop at our<br />
camp to update our other party members and distribute kit and gifts first, it is all good.<br />
Return to Denerim<br />
On the way back to town we get a <strong>com</strong>bat interrupt on our journey and find a group of mages fighting off<br />
darkspawn. After we help to kill the darkspawn the Mage in Charge tells us that the is taking these Apprentices to<br />
Redcliffe to join in the war effort. How cool is that?<br />
As we enter the town a young boy runs up to deliver a message he provides no information, and the message flags a<br />
new quest! You will just h ave to read the description The Trial of the Crows to learn what the details are. They<br />
want to meet with you in the back of the Tavern... And since we have to go there anyway to turn in a quest or two,<br />
that works out just fine!<br />
First let us head to the representative for the Mage's Collective and we get his thanks, blessing, and some hard cold<br />
gold!<br />
Now we head over to the Gnawed Noble Tavern and talk to the Bartender to get our reward. He now has two more<br />
quests for us Sign of Safe Passage and Untraceable so grab them both!<br />
Now head into the side room and chat with the Blackstone Representative to get your reward for his quests.<br />
Head to the other side of the Tavern and speak to the Representative from the Crows. Basically he wants to hire you<br />
and once you are handed the scroll you discover BONUS! The hit he wants you to contract is for someone you<br />
already killed! How sweet is that? Talk to him again to collect your reward!<br />
The chest behind him contains your next two contracts Mercenary Hunt and An Audience with the Ambassador.<br />
These quests are under The Trial of Crows Quest as parts of it so refer to that for the details. Fortunately these are in<br />
areas we will be going to anyway!<br />
If you have not done so already, pop in to the Wonders of Thedas Shop and give the Apprentice inside the note<br />
page 87 / 145
<strong>SuperCheats</strong>.<strong>com</strong> Unoffical <strong>Dragon</strong> <strong>Age</strong>: <strong>Origins</strong> Guide<br />
http://www.supercheats.<strong>com</strong>/<strong>guide</strong>s/dragon-age:-origins<br />
Check back for updates, videos and <strong>com</strong>ments for this <strong>guide</strong>.<br />
terminating his services. He is not happy, but hey, so what?<br />
Now let's take care of the Friends of Red Jenny Quest so head over to the mysterious door that is next door to the<br />
warehouse we did the silver quest in and deliver the box. The mystery remains unsolved, as the unseen person<br />
simply slips you your reward without ever revealing themselves to us!<br />
Now let us hit the World Map and select the Kaden-re Hideout!<br />
They fight well and they are strong but in the end we prevail and after we loot their corpses it is time to loot their<br />
camp! With this task done, head back to the World Map, and select Lake Calenhad.<br />
Go see Sammael the Deserter to deliver the message we have for him a message he does not want and so a battle<br />
ensues!<br />
That is all that we need to do here, so let's head for Sulcher's Pass now.<br />
Sulcher's Pass<br />
When you arrive you encounter a bloke named Felix who tells you he is a merchant and he wants to do a deal with<br />
you. Actually what he wants is for you to take the Golem Control Rod off of his hands, but the thing is, it does not<br />
<strong>com</strong>e with the Golem it controls! That you will have to go to a Darkspawn infested village to retrieve.<br />
NOTE: This is the second of the two DLC for the game released so far. I will be adding the details to this when I<br />
have the DLC.<br />
Before we head on to the next part of our adventure, let's make a quick trip to Brecillian Forest to fire off that Fire<br />
Arrow for the Tavern Quest. Everything goes according to plan as we reach the spot marked on the map, equip our<br />
bow and fire arrows, and pop off the shot but it seems that we were expected!<br />
As the battle ensues you have to wonder who it was that tipped them off that we were <strong>com</strong>ing? I might just have a<br />
few harsh words for the Bartender when we get back to town! Fortunately these guys talk a better game than the<br />
fight, and the battle is brief. Now that we have taken care of that small chore, it is time to head for the World Map,<br />
and the Village of Haven! <strong>Dragon</strong> Hunting, anybody?<br />
page 88 / 145
<strong>SuperCheats</strong>.<strong>com</strong> Unoffical <strong>Dragon</strong> <strong>Age</strong>: <strong>Origins</strong> Guide<br />
http://www.supercheats.<strong>com</strong>/<strong>guide</strong>s/dragon-age:-origins<br />
Check back for updates, videos and <strong>com</strong>ments for this <strong>guide</strong>.<br />
Village of Haven<br />
As you will no doubt recall, the quest line Urn of the Sacred Ashes is why we have <strong>com</strong>e this way as Brother<br />
Genitivi's last known destination, this is the best place for us to try to pick up his trail.<br />
As you enter the Village you are stopped by a guard who blocks your entry. No matter what you say to him, he<br />
stonewalls you, and when the conversation ends you have permission to trade for supplies at the shop but that is all<br />
he wants you to do.<br />
After you walk past him, if Sten is present you get a CS in which he pretty much questions your leadership and<br />
courage. Go into the house to the left and loot the chests for a Codex Entry and some minor items. Outside you will<br />
encounter a rhyming child a very evasive rhyming child at that and his secret (if you can persuade him to tell you<br />
about it) gives me the heebie-jeebies about this town!<br />
Head up the hill to the Shop, and head inside there is a chest with some gifts in it you can loot, and of course there is<br />
the Shopkeeper to talk with. Buy what you want, sell what you want, because when you try to look into the back<br />
room he freaks, and if you want to look I did you are going to have to kill him!<br />
In the back room you find what is left of the corpse of one of Arl Eamon's Knights! And he looks like someone has<br />
butchered him for meat! As you exit the shop you are set upon by cultists take them out and then head up the hill<br />
to fight more of them, as you work your way to the Haven Chantry.<br />
The Padre stops his service when you arrive, and tells his flock you have to die you know where this is going, right?<br />
There are some containers to loot in the room on the left that include a gift, and then you open the secret door on<br />
the right and enter what is clearly the private quarters of the Padre. Here we find the wounded form of Brother<br />
Genitivi!<br />
You learn from him that the Urn is close to you he has been listening to the villagers even as they were torturing him,<br />
and he discovered how to get into the Temple above the Village. I let the Brother know about the fate of his<br />
assistant, checked outside to make sure that the coast was clear, and then returned to get Genitivi and head for the<br />
Temple.<br />
The Ruined Temple<br />
When we arrive, Brother Genitivi takes the medallion and uses it to unlock the door and then open it. Inside is the<br />
main hall of the ruined temple and he tells you a little about the temple itself, and then decides to stay in the hall to<br />
study the statues while you go after the Urn. All things considered that is likely a good decision...<br />
As you progress through the area, loot what you can including books for Codex Entries, and as you approach the<br />
stairs you will find a group of cultists to kill. In the rooms to the side are more cultists and monsters and in the<br />
barracks room behind them is a container with the fourth Scroll of Banaster in it!<br />
The door in the back is locked and you need a key, so go ahead and clear out the side chambers up here, looting<br />
and killing, and then head back down the stairs and do the same for the side chambers down there. On the right<br />
side there is the 5th Scroll of Banister which means we now have them all!<br />
The room at the back of the chambers that are on the left side as you reach the top of the stairs has a chest in it with<br />
the door key for the Southeast Chamber grab that and head to the Southeast Chamber to open the door there that we<br />
could not open before.<br />
Inside that room in the Southeast Chambers is the Main Hall Key the one we need for the door all the way in the<br />
back so let us open that door!<br />
page 89 / 145
<strong>SuperCheats</strong>.<strong>com</strong> Unoffical <strong>Dragon</strong> <strong>Age</strong>: <strong>Origins</strong> Guide<br />
http://www.supercheats.<strong>com</strong>/<strong>guide</strong>s/dragon-age:-origins<br />
Check back for updates, videos and <strong>com</strong>ments for this <strong>guide</strong>.<br />
As we approach the door this time there is a checkpoint save, and as we enter, we encounter demons and a group of<br />
cultists and after a brisk fight we find the Holy Brazer at the top. Click it to light it, and then open the door behind it<br />
to find more cultists and traps to deal with. When we move through the next door we get another checkpoint save<br />
and some more demons to play with as well as cultists and there are several more groups to be killed as we clear the<br />
rooms ahead.<br />
Eventually we work our way up the tower to the door to the Wyrmling Lair an area with many diverging paths. You<br />
are basically going to work your way through systematically, killing the baby dragons, drakes, and cultists until you<br />
arrive at the upper chamber and the three Temple Leaders.<br />
It turns out that their entire religion is based around a dragon well that was not so hard to imagine, was it? After all<br />
the place is thick with them! The fact that they are sincere in their beliefs gives you options because like all religious<br />
zealots, they would really like it if you believed like they do...<br />
There are several approaches that you can take with them appeasement obviously, and violence. If you appease<br />
him, he will control the dragon for you which will let you get up the mountain easier. If you kill him, you are going<br />
to have to deal with the <strong>Dragon</strong>. Clearly this is one evil outfit, so I chose to kill him and deal with the <strong>Dragon</strong><br />
myself!<br />
Right killing the dragon was a monumental task I burned through a HUGE number of healing potions and still was<br />
not able to keep everyone alive because of the massive amount of damage that thing did. But eventually I did defeat<br />
it, picking up the Achievement: <strong>Dragon</strong>slayer (30 GP)!<br />
The Gauntlet<br />
The door ahead leads into this area but fortunately it is only a short distance to the Guardian. To get to the Urn you<br />
have to prove yourself worthy and to do that, you have to pass a test. Before you can do that however, the Guardian<br />
asks you questions that lay bare your souls.<br />
Before you enter to take the test, grab the book on the right for a Codex Entry, and then go inside. There are a series<br />
of ghosts inside who will ask you to answer riddles for them. Get the answer wrong, and you have to deal with a<br />
strong demon!<br />
Here are the correct answers for each, going clockwise and starting with the closest.<br />
Brona: Option 4: Dreams<br />
Thane Shartan: Option 3: Home<br />
General Maferath: Option 3: Jealousy<br />
Archon Hessarian: Option 5: Mercy<br />
Disciple Cathaire: Option 5: Hunger<br />
Disciple Havard: Option 3: The Mountains<br />
Lady Vasilia: Option 4: Vengeance<br />
Ealisay: Option 3: A Tune<br />
Once you answer all of these questions, and hear the answers, the door at the end of the hall opens and you see<br />
Shianni standing there. You are confronted with your past again and pain. When you step through the archway you<br />
get a checkpoint save and end up fighting spectral versions of yourself! That was weird.<br />
The next puzzle requires some brain sweat and trial and error to get well it did for me, but not for you!<br />
There are 6 tiles on each side, and the 4 in the middle that you need to be able to cross. By using your party<br />
individually, you can unlock the middle tiles. To make sense of this, look at the diagram below:<br />
page 90 / 145
<strong>SuperCheats</strong>.<strong>com</strong> Unoffical <strong>Dragon</strong> <strong>Age</strong>: <strong>Origins</strong> Guide<br />
http://www.supercheats.<strong>com</strong>/<strong>guide</strong>s/dragon-age:-origins<br />
Check back for updates, videos and <strong>com</strong>ments for this <strong>guide</strong>.<br />
L6 R6<br />
L5 M4 R5<br />
L4 M3 R4<br />
L3 M2 R3<br />
L2 M1 R2<br />
L1 R1<br />
L obviously is Left, R is Right, and M is Middle. The answer to the puzzle is as follows:<br />
Step 1 Move a character into L3, R1 and R2, and then on M1<br />
Step 2 Move the character on R1 to L6.<br />
Step 3 Move the character on M1 to M2.<br />
Step 4 Move the character on L3 to R4, then the character on R2 to L1.<br />
Step 5 Move the character on M2 to M3.<br />
Step 6 Move the character on L6 to R5, and the character on R4 to L5.<br />
Step 7 Move the character on M3 to M4.<br />
Now you are on the other side approach the alter in the room and click it, and read the text, then select the option to<br />
remove your kit. Doing that allows you to walk through the flames unharmed. You get a brief CS, and then when<br />
you move to the stairs, another CS, and then you have the option to take a pinch of the ashes which you do, placing<br />
them in a leather bag.<br />
There are two chests one on either side of the stairs to loot, and the body of an Unfortunate Adventurer that has a gift<br />
and a decent belt on it. After you grab what you want, take either of the doors to the Mountain Top.<br />
Making your way back is a long run but if you plan your route so that you return on the opposite side that you came<br />
up when you are going back through the ruins at least you can pick up some more XP on the enemies you did not<br />
kill yet on that side. When you get to the Brother he is thrilled with what you have to tell him and show him and<br />
after a fairly long CS, he takes off for home and so do we!<br />
First though we should head to our camp so we can distribute gifts and kit to the other members of the party and<br />
once that is out of the way, we can head back to Denerim to turn in the quests that we have now <strong>com</strong>pleted!<br />
Back in Denerim<br />
As we arrive back to town we get another CS with Loghain, in which we learn that the situation is looking rather<br />
grim for their side. Clearly he has lost the support of his daughter, and maybe he had lost touch with reality?<br />
Take the scrolls we found in the Ruins to Sister Justine at the Chantry for a nice reward and another <strong>com</strong>pleted<br />
quest! Now head over to the Tavern and turn in the hit contract to the Crow Representative for your reward. Now<br />
drop by Wade's to have him try to make another set of Drake Armor, and then visit the Mage's Collective to claim<br />
the reward for the scrolls quest!<br />
Finally drop by Genitivi's place for the reward that he promised you he gave us items but I have no idea what items<br />
:(<br />
Now hit the World Map and select Frostback Mountains!<br />
page 91 / 145
<strong>SuperCheats</strong>.<strong>com</strong> Unoffical <strong>Dragon</strong> <strong>Age</strong>: <strong>Origins</strong> Guide<br />
http://www.supercheats.<strong>com</strong>/<strong>guide</strong>s/dragon-age:-origins<br />
Check back for updates, videos and <strong>com</strong>ments for this <strong>guide</strong>.<br />
Frostback Mountains<br />
On your way to the Mountains you will get a <strong>com</strong>bat interrupt and kill a group of darkspawn, before continuing on.<br />
You may or may not get a CS interaction with Wynne if you have her in your party and if you have been talking to<br />
your group mates as you should have and have developed a relationship with them. Wynne falls down after the<br />
fight, which clues you in that something may be wrong with her, but insists that she prefers to discuss it when you<br />
are back in camp.<br />
As you move forward after arriving in the Mountains note the rather cool Dwarf statue off to the right side of the road<br />
not what you would call lifelike or to scale I guess, but cool nonetheless.<br />
Ahead is your first encounter with Bounty Hunters and then you pass over the stone bridge and into the campsite<br />
that is outside of the entrance to the Dwarven Lands. Now before we do anything else, head along the left side of<br />
the camp until you encounter the Mage Apprentice and deliver his note to him that is the third and final notice, so<br />
that is another quest that can be turned into the the Mage's Collective.<br />
Keep making your way along the camp clockwise, talking to the folks you see and eventually you will <strong>com</strong>e upon<br />
another deserter oh good! Another message delivered, and another deserter killed! That <strong>com</strong>pletes the recovery of<br />
the Guild Supplies, and another quest <strong>com</strong>pleted!<br />
Now follow the arrow on the map up the stairs in the back of this zone to overhear an argument with a guard near<br />
the door. After the argument you are given the opportunity to talk to the guard only to learn that there is no King for<br />
you to talk to! Once you show your authority as a Grey Warden, the guard has no choice but to allow you to enter.<br />
Loghain's messenger is being a major jerk you know you have to kill him, right? Once Imrek is dead and his<br />
bodyguards too head back to the guard, who thanks you for taking out the very annoying Imrek, and then he opens<br />
the doors and wel<strong>com</strong>es you!<br />
Orzammer Hall of Heroes<br />
Once you are inside, go over to the statue of Paragon Ortan and click on it for a Codex Entry actually it does not<br />
matter which one of the Paragon statues you click on, they all give the same entry to the Codex and there is only one<br />
for these statues. On the left side is a Dwarven Scholar that you can speak to and learn about the Paragons.<br />
As you head up the stairs in the back of the hall there is a book on the floor on the right called the Commission<br />
Report grab that for the Codex Entry The Key to the City, and then click on the door to the Commons.<br />
As you enter you get a nice CS that shows you entering and you get to see an argument between the Dwarves that<br />
ends in the death of one of what I think it is safe to say is a good guy. You can talk to the Captain of the Guard who<br />
evidently does not think much of the Grey Wardens but he does encourage you to visit the Shaper of Memories in<br />
the Diamond Quarter to at least learn what you can about their culture. After this conversation you pick up two<br />
more Codex Entries you have been reading these, right?<br />
After you finish talking to the Captain, walk around to the other side of the statue thing he is in front of and look at<br />
the Floor Tile to get a Codex Entry on Orzammer, and then look at your map to get an idea of the layout here. There<br />
is a gem merchant named Garin who has some nice items including three gifts that you will want to buy so that is as<br />
good a place to start as any.<br />
Near him is a Dwarf girl named Dagna interested in The Circle of Mages. After you talk to her, she asks you to pass<br />
on her request to the Circle, which flags the quest An Unlikely Scholar.<br />
Across the way from her is Nug Wrangler Boermor, who sells Nugs. Talk to him to flag the quest A Lost Nug, and<br />
then head back up the stairs and talk to Nerav, who will give you some information about the power struggle taking<br />
page 92 / 145
<strong>SuperCheats</strong>.<strong>com</strong> Unoffical <strong>Dragon</strong> <strong>Age</strong>: <strong>Origins</strong> Guide<br />
http://www.supercheats.<strong>com</strong>/<strong>guide</strong>s/dragon-age:-origins<br />
Check back for updates, videos and <strong>com</strong>ments for this <strong>guide</strong>.<br />
place now in Orzammer.<br />
Now before you run down the stairs on the other side, you see that bridge in the center? Run along it and on the<br />
right is a document on the ground pick that up for another Codex Entry with some useful information, and then grab<br />
the pink Nug that is crouching on the other side of the bridge. Now run back and down the stairs to the right and<br />
pass Dagna again you can talk to her again if you like, and learn just how fixated she is on the Circle. Just a ways<br />
down from her is Filda (marked by an exclamation point) who is a widow. From her you can learn about her<br />
missing son and offer to help her, picking up a new quest A Mother's Hope.<br />
Brother Burkel is a bit further down, a Dwarven Chanter from Redcliffe, who is seeking permission to open a Chantry<br />
here. Yes, you guessed it, another quest for us! The Chant in the Deeps is added to our quests list, and off we go!<br />
Just past the Brother in fact over his shoulder is another Nug that we may as well collect. See that wall carving<br />
leaning against the wall nearby? Click that for a Codex Entry on the Casts, and then go talk to Legnar at the nearby<br />
stand.<br />
Legnar is a fan of Bhelen, but in a pragmatic way, and admits that profit is what he is concerned with. Just as an<br />
observation, this guy would make an excellent Ferengi! He has four gifts in his shop, as well as a Tome of the Mortal<br />
Vessel (a book that instantly raises one or more stats) that you may want to buy. I would get the gifts in any case.<br />
Now let's head into Tapster's Tavern up the short stairs on the side here, and talk to Corra first. You can ask her<br />
about the city, learn what the Shapers are. To thank her for her friendly help I bought the house a round of ale, and<br />
then talked to Nevin, who can tell you about Branka and what Bhelen is up to.<br />
Talk to the Nervous Adventurer in back I swear I had this guy as a roommate in University back in the 80's. He<br />
gives us a Codex Entry, and then runs away. I wish my ex-roommate had done that.<br />
Next find Lord Helmi on the other side in the back who can tell you about the Cast System, and fills you in on how<br />
the Assembly elects a King. When you are done talking to him, head out the door to the Commons, and move back<br />
up the hall towards the stairs to the next door, Janar Armorers.<br />
There is a wall carving in the left alcove with a Codex Entry, and then there is Janar. This is Dagna's father who can<br />
give you his opinion of Branka. He has some trap plan in his shop that are priced low, so if you do not have them,<br />
now is a good time!<br />
When you exit, talk to Dagna to learn her true feelings about what her father wants that should make your decision a<br />
bit easier.<br />
As you <strong>com</strong>e down the stairs on the other side you will hear another Nug it is on the right as you descend so grab it<br />
too, and then step through the door to Figar's Imports a few steps away only to discover that it is locked up tight and<br />
requires a key. Odd that.<br />
Talk to the Nug Wrangler next, which <strong>com</strong>pletes the quest he gave us and takes the rest of the Nug's we found off<br />
our hands. You get a cash reward and a standing order for any other Nug's you find. Something to bear in mind I<br />
guess.<br />
Head down to the unimproved area below to click on another carving, and capture another Nug. You can talk to<br />
the Mine Commander nearby and you get a little info on the Darkspawn in the Roads. You can ask him about<br />
Branka, and learn a little about the monsters in the Deep Roads. We do not need to go down there just yet, so when<br />
you have learned what you want, say good bye to him for now.<br />
As there is nothing like starting at the bottom, let us take a sojourn into Dust Town, shall we?<br />
Dust Town<br />
page 93 / 145
<strong>SuperCheats</strong>.<strong>com</strong> Unoffical <strong>Dragon</strong> <strong>Age</strong>: <strong>Origins</strong> Guide<br />
http://www.supercheats.<strong>com</strong>/<strong>guide</strong>s/dragon-age:-origins<br />
Check back for updates, videos and <strong>com</strong>ments for this <strong>guide</strong>.<br />
Out first introduction and wel<strong>com</strong>e is to be attacked by thugs nice. After you defeat them, loot, and be sure to get<br />
the Codex Entry in that pile of rubble nearby. Now talk to Rogeh, who gives you a chance to use persuasion, as he<br />
has a deal to offer you. An illegal deal! I chose not to mostly because I did not have the gold at the time.<br />
Further down the street on the side is an Assembly Directive grab that and then talk to the Idle Dwarf across the<br />
street, then Nadezda in the street, a beggar who you can help. Next talk to Zerlinda, another beggar to help, who<br />
you give money to and then agree to help, picking up the quest Zerlinda's Woe.<br />
The door to a Slums House is near the only one you can enter and inside are a pair of chests you can loot. Having<br />
done that, it is time to abandon Dust Town for now, and head back up to the Commons.<br />
We can go to Tapster's now and try to talk to Zerlinda's father Ordel, since it is the first door on the right as we exit<br />
Dust Town. You can use your powers of persuasion on him, which works out well as he asks you to tell her to <strong>com</strong>e<br />
home with the cur. A quick trip back to Zerlinda to give her the good news, quest <strong>com</strong>pleted.<br />
You may notice that there is a suspicious door nearby you can take a look at it but at the moment that is all you can<br />
do we cannot open it. So let us head out of Dust Town again, and head for the door to the Diamond Quarter on the<br />
other side of the Commons.<br />
The Diamond Quarter<br />
This is our next area of exploration and flagging home to the noble houses and the hoity-toity, yeah!<br />
Adal Helmi is just inside on the left, and gives you a grim greeting, but as you cannot talk with her that is all you<br />
get. On the left ahead is the door to Harrrowmont Estate but before we visit there, click on the Weapon Rack across<br />
the street for a Diamond Maul.<br />
As I understand it who you choose to do the initial task for really does not matter since this is not where you make<br />
the decision on who you will ally with, so Harrowmont is as good as Bhelen in that respect and I do not know about<br />
you, but I already do not like Bhelen anyway, so I will not be choosing him as King, so Harrowmont is doubly useful<br />
to me :)<br />
After you enter, say hi to the Butler, then go talk to Dulin, who will not trust you until you prove you can be trusted.<br />
How? Why, to fight in the Proving in Harrowmont's name of course! Well we have our orders and Dulin has left for<br />
the Tavern, so there is nothing for it but to head out and explore the rest of the Diamond Quarters before we<br />
continue with the quest, right?<br />
There is a wall carving on the left side of the street next to Nerav, who hopes you will support Harrowmont click on<br />
that for a Codex Entry, and then head up the stairs to listen to the Crier before you continue on to the last door on the<br />
left the Shaperate. Note that we intentionally passed the Royal Palace and the Assembly without going in for now.<br />
The Shaperate<br />
Talk to Milldrate to hear about a thief who stoled a book and flag the quest Thief in the House of Learning. Next talk<br />
to Orta to flag her quest Lost to the Memories, and then pick up the book next to her for another Codex Entry.<br />
Ahead on another table is yet another book with a Codex Entry on the Deep Roads, and nearby that is the Shaper.<br />
This is who you ask about opening a Chantry in Orzammer and use your persuasive powers to convince him to say<br />
yes! What an easy quest that was! Next you can have him give you a history lesson about Orzammer. When you<br />
finish there are five more Codex Entries to gain in the back room, and a chest to pick and loot that has a gift in it and<br />
some armor. This gift is meant for Wynne by the way, so try not to give it to someone else.<br />
Let's leave here and head into the Assembly now.<br />
page 94 / 145
<strong>SuperCheats</strong>.<strong>com</strong> Unoffical <strong>Dragon</strong> <strong>Age</strong>: <strong>Origins</strong> Guide<br />
http://www.supercheats.<strong>com</strong>/<strong>guide</strong>s/dragon-age:-origins<br />
Check back for updates, videos and <strong>com</strong>ments for this <strong>guide</strong>.<br />
Vartag is standing just inside on the left, Bhelen's advisor, who attempts to recruit you to Bhelen's side. I told him<br />
that I had to think about it which did not please him but you can side with him if you like.<br />
Once you enter the Assembly Chamber you get a CS that consists of an argument, and then they go into recess, and<br />
you are locked out. Bummer, but no great loss as we have other things to do!<br />
A quick visit to the Palace just to look around finds us going up against a band of tunneling thieves, and in the<br />
storeroom in the back we find another glass vial that summons a Revenant for us to kill, who holds a scrap of paper<br />
that gives a Codex Entry. Across the hall is more loot including one of the letters we are looking for, and then we<br />
exit out into the throne room. You get a Codex Entry from clicking on the throne itself, and that wraps up our tour of<br />
the Palace and the Diamond Quarter. Time to head for the Proving.<br />
When you reach the door to the Commons, do not go through immediately instead run up one of the stairs on either<br />
side and grab the document on the ground at the top for a Codex Entry and then head through the door to the<br />
Commons.<br />
The Proving<br />
When you arrive before you talk to the Proving Master and let him know that you will be <strong>com</strong>peting as<br />
Harrowmont's Champion there are a few things we must do.<br />
Inside the main Proving Annex is a dwarf named Baizyl who was previously one of Harrowmont's Champions but<br />
why did he back out of the Proving? That is what we are here to find out! You have a chance to persuade here and<br />
when you do you learn that he was blackmailed into withdrawing and how. To solve this problem we need to get<br />
the love letters from Myaja.<br />
Now head through the North doors to the fighter's prep area on that side and talk to Gwiddon another one of<br />
Harrowmont's ex-Champions. It turns out that Gwiddon has been told that Lord Harrowmont has already given up<br />
his claim to the throne and decided that there was no point in fighting left. Another chance to persuade and<br />
Gwiddon is back in the fight!<br />
Now we head back through the tunnel to the South door and into the other fighter prep area, where we shall burgle<br />
Myaja's quarters there! The letters were in a chest we grab them and head back to Baizyl to give him the letters and<br />
the good news he can fight again!<br />
Now we talk to the Proving Master!<br />
There is an opening in the first round and what the heck, let's jump right in! There are five fights in the fourth you<br />
actually choose one of your party to fight as your second, and in the fifth fight your entire party battles.<br />
After you finish the fight you are ejected into the backstage area, and if you like you can do some unofficial match<br />
fights here if you like just talk to the Proving Armsman in the small room here to set it up.<br />
In another room is Hanashan, a member of the silent sisters, and Farinden, who give you an interesting conversation<br />
sort of.<br />
Now we head back to the Commons to the Tavern and have a chat with the man about how we proved we can be<br />
trusted, right? On the way, let us give the Chantry Brother the good news and wrap that quest up, since he is<br />
standing right outside of the Tavern. Dulin is standing in he back room, and is very pleased with what you have<br />
done. If you are ready you can meet with Lord Harrowmont now and as I am ready, to the meeting I went!<br />
Enter the Study and talk to Lord Harrowmont ask what you need to ask, and get some information from him. You<br />
want to further the quest line here, and Harrowmont has a plan, so bonus! He wants you to take out the Mob in<br />
Dust Town to help improve the lot of the poor who are their victims. That seems like a reasonable request to me so I<br />
page 95 / 145
<strong>SuperCheats</strong>.<strong>com</strong> Unoffical <strong>Dragon</strong> <strong>Age</strong>: <strong>Origins</strong> Guide<br />
http://www.supercheats.<strong>com</strong>/<strong>guide</strong>s/dragon-age:-origins<br />
Check back for updates, videos and <strong>com</strong>ments for this <strong>guide</strong>.<br />
decided to go right at it!<br />
As we exit Harrowmont's Estate the nearby Crier announces that the Grey Wardens have aligned themselves with<br />
Harrowmont which is only sort of true, right?<br />
Remember Figor's Import Shop the shop on the Diamond Quarter side of the Commons that was locked? That door<br />
is now open so head on in and whoa! It's the Mob trying to run a protection racket on the owner of the shop! After<br />
you enter, you be<strong>com</strong>e their new target for "protection" and before you react, this is one of the moments when what<br />
you decide to do effects the results.<br />
If you attack and kill them, you freak the owner out and he runs away. If you pay them off, you are out 10 Gold and<br />
you failed to strike a blow against the mob. If you intimidate them on the other hand, you solve both problems<br />
without <strong>com</strong>promising your ethics. I chose intimidation as my solution the mob retreats, and Figor is grateful.<br />
Ask Figor about Jarvia he has some useful information and confirms that you are, indeed, on a righteous mission. He<br />
confirms that the Carta is indeed a mob, but Figor you discover that Figor does not care for the casteless at all.<br />
Before you leave his shop check out what he has for sale there is a nice selection if supplies here, and if you have<br />
been working your crafting skills you might want to take on whatever you are low on. Bear in mind that the allies<br />
that you gather you will find their representative in your camp have supply needs as well, like reagents, and such.<br />
Check their needs the next time you are in camp.<br />
Back to Dust Town<br />
On your way to Dust Town your party gets attacked by a band of Bhelen Fanatics if you followed this <strong>guide</strong> and<br />
aligned with Harrowmont that is. When you arrive in Dust Town, you will notice that one of the doors that was<br />
previously blank is now marked as Alimar's Emporium this is where you need to go to advance this quest line.<br />
Inside the Emporium you will meet Alimar you can ask him questions, and check out his wares but before you do<br />
any of that there is something you need to understand: in Dust Town you have to deal honestly with people, and<br />
follow through on any promises that you make. They do not have much here, and your honor is more valuable in<br />
the slums than any gold. If you show them that you cannot be trusted, they will refuse to talk to you or do business<br />
with you in the future, so consider this in your dealings here.<br />
Among the items that Alimar sells is a Bard Manual and if you plan to specialize in that direction, you may want to<br />
purchase it. He also has a number of recipes, and if your crafting extends in those directions you may want to check<br />
out what he has that you can use.<br />
Asking him about Jarvia causes him to be a little abrupt, but continued questioning and as long as you have been<br />
improving your skill in coercion and have a reasonably high strength, you should do the intimidation option here as<br />
well.<br />
Note: When you have the opportunities to use persuade or intimidate, you may want to choose intimidate because<br />
there are a lot fewer opportunities to intimidate than there are to persuade. If you have been following this <strong>guide</strong>,<br />
you should already have the first of the two Achievements for persuasion, and if you succeed in intimidating him,<br />
you should pick up the first of the two for that here as well.<br />
BUG NOTICE: If you want to skip having to watch out for Intimidation opportunities, there is a bug in the<br />
conversation with Jarvia that you can exploit to get the Intimidation Achievements easily though it will cost you 30<br />
silver per intimidation score. If you do not want to pay him the silver, save before you do this.<br />
To use this bug do the following steps:<br />
(1) Talk to Jarvia<br />
page 96 / 145
<strong>SuperCheats</strong>.<strong>com</strong> Unoffical <strong>Dragon</strong> <strong>Age</strong>: <strong>Origins</strong> Guide<br />
http://www.supercheats.<strong>com</strong>/<strong>guide</strong>s/dragon-age:-origins<br />
Check back for updates, videos and <strong>com</strong>ments for this <strong>guide</strong>.<br />
(2) Select option 3: What do you know about Jarvia?<br />
(3) Select option 3: Why is everyone so scared of Jarvia?<br />
(4) Select option 2: Would you know more if the question came with silver?<br />
(5) Select option 2: (Intimidate) Here's twenty. If I like your information, you may get more.<br />
(6) Select option 1: Right. Here you are.<br />
(7) Select option 3: Never mind. I was just leaving.<br />
(8) Rinse and repeat until you get the Achievement.<br />
Note that you must pay him each time not paying him can cause him to refuse to talk to you, making this bug<br />
un-doable.<br />
Now that you have the information on the secret entrance, and you have finished your shopping here, here, exit the<br />
shop and look across the street and a bit further along to see a dwarf named Shady Corebit he is the dwarf that stoled<br />
the book earlier. Tell him you are looking for the thief that stoled the book and he more or less confesses it was him<br />
and then attacks you. After you kill him, loot him to get the Proving Receipt, and then talk to Nadezda the beggar<br />
we helped earlier who is also a prostitute.<br />
Ask her about Jarvia, where you can find her, and where you can find a token. She asks for a reward pay her and<br />
then the quest updates.<br />
Leliana's Pet<br />
If you are doing the romancing Achievements / Trophies you will want to obtain the Pet Nug from the Idle Dwarf<br />
here in Dust Town. Just follow the video have Leliana in your party, when you are near where the Idle Dwarf is, talk<br />
to her and she will mention that she likes those cute little pig bunnies. After the CS with her, talk to the Idle Dwarf<br />
and offer him 20 silver for a Nug. He agrees to get you one and disappears. Continue on with the quest below, and<br />
by the time we finish the next stage he will be back with the Nug!<br />
Now head to the back end of the street and talk to the beggar Nadezda, who is sitting by the fire in the center of the<br />
open area back here. You get some important information from her that you need to advance the quest this is not<br />
skipable.<br />
Now enter the nearby Slums House, where you encounter some of Jarvia's men and fight them! After you fight for a<br />
while they give up, with the Thug Leader begging that you spare them. If you already have the Intimidation<br />
Achievements do Persuade here, and he will give you directions to the entrance to Jarvia's lair and a finger token,<br />
explaining how it works. You can choose to kill them here, but that may get you negative points if Wynne is in your<br />
party, and there is no down-side to letting them go, so I guess use your best jedgement here.<br />
Either way the quest now advances. Excellent! Quest Updated!<br />
Now before we head into the mob's headquarters, let's go back and talk to the Idle Dwarf, who has returned now<br />
with a nice pink Nug! Pay him the 20 silver and the pet appears in your inventory with the gift flag but DO NOT<br />
give it to Leliana now! Chances are good that you failed to do all of the chat options with her before her approval of<br />
you got past 40, and you may even be in a relationship with her now that is bad because you will not be able to get<br />
her quest if you are.<br />
Hold onto the Nug for now, and when you are back in camp, you can break up with her which will earn you<br />
negative approval and then go through the conversations to get her quest. After you have her quest and have<br />
<strong>com</strong>pleted it, you can use the Nug to regain the approval points that you lost, and then initiate the romance with<br />
her. For more information on this read her dossier in the Appendixes.<br />
Now do you remember that Suspicious Door we found earlier? Head over to that now.<br />
page 97 / 145
<strong>SuperCheats</strong>.<strong>com</strong> Unoffical <strong>Dragon</strong> <strong>Age</strong>: <strong>Origins</strong> Guide<br />
http://www.supercheats.<strong>com</strong>/<strong>guide</strong>s/dragon-age:-origins<br />
Check back for updates, videos and <strong>com</strong>ments for this <strong>guide</strong>.<br />
Carta Hideout<br />
Now when you click on the Suspicious Door, you have the option of inserting the bone token into the hole do that<br />
and the door unlocks. Opening the door zones you into the Hideout, where you encounter some guards and kill<br />
them since you do not know the password. It certainly was not Jarvia Sucks Eggs!<br />
Further into the Hideout you <strong>com</strong>e to a crossroads of a sort, and two more thugs and a trap. Disarm the trap, kill the<br />
thugs, and go through the door here to fight more thugs. Inside this room is a chest and a journal to loot, as well as a<br />
wooden crate. The room on the other side of the hall has more thugs, and two more chests for you to loot.<br />
Go back to the hall and continue on to the next split, and fight more Carta Thugs, then clear and loot the rooms on<br />
either side. The chamber on the left has Elven Mercenaries in it, and Kanky's Common Box and a chest to loot. The<br />
chamber on the right has thugs, two chests and a crate.<br />
There is a Metal Door at the end of the hall past a left branch, and inside are more Carta Thugs for you to kill. This<br />
chamber branches into a T-shape, and there are lootable containers at either end of the T for you to loot.<br />
Double back to the left branch we ignored a minute ago and head into that chamber, taking out the thugs here.<br />
There is nothing for us to loot, so continue on through the door in the rear of this chamber, disarm the trap a little<br />
ways down the tunnel, and loot the pair of barrels on the side of the tunnel. Continue through another door to<br />
where the tunnel T's again and turn left, and go through the door ahead.<br />
There is a trap just inside this room for you to disarm, and thugs to kill. This is a cell room, and there is a dwarf<br />
named Leske locked up here who begs you to help him. Unlock and open his cell door, and release him. Now exit<br />
the cells and continue along the tunnel to the next chamber and fight. There are five barrels to loot here and more<br />
enemy further in, as well as three traps for you to disarm.<br />
In the very back of this chamber are three more barrels, Jammer's Common Box, and a crate for you to loot, before<br />
taking the door here to the next tunnel along the way. At the end of this short tunnel is another chamber and fight,<br />
four barrels and Pique's Common Box for you to loot, and another door to go through but this door does not lead<br />
into yet another tunnel, it opens on a hall! We are getting closer to our destination, mate!<br />
The door on the left leads to the Carta Bestiary, where they breed and house the rhino-like creatures that they use as<br />
pets (?) and there are thugs for you to kill here and a half-dozen containers to loot. The door on the right leads to a<br />
tunnel with some giant spiders in it, and has a chest for you to loot. At the end of the hall is a Metal Door, and as<br />
you approach it, you get a checkpoint save.<br />
Jarvia Fight<br />
Inside this chamber is Jarvia and some of her minions and as you approach, she gives you the 4-1-1 according to<br />
Jarvia! No matter what you say, there is going to be a fight, and while you are fighting do the best that you can to<br />
avoid the traps that are placed in the chamber, right?<br />
You may find that this fight goes better if you take out the archers before you take out the melee types, but YMMV on<br />
this. Once you have the minions pared down, take out Jarvia. Be sure that you loot here after you disarm the traps<br />
that you did not set off during the fight. Jarvia has some decent loot on her and the Carta Key, which you are going<br />
to need later.<br />
Now that all of the looting is done, use repair kits on any of your injuries (if you have any) and check your kit to see<br />
if any of the items you picked up are better than the ones you and your party are kitted out with if so, swap them in.<br />
When you have done all that, it is time to move on!<br />
page 98 / 145
<strong>SuperCheats</strong>.<strong>com</strong> Unoffical <strong>Dragon</strong> <strong>Age</strong>: <strong>Origins</strong> Guide<br />
http://www.supercheats.<strong>com</strong>/<strong>guide</strong>s/dragon-age:-origins<br />
Check back for updates, videos and <strong>com</strong>ments for this <strong>guide</strong>.<br />
The Metal Door on the right in the back of this chamber contains two chests to loot one of which has one of the<br />
Love Letters we are collecting. Once you have looted those, head to the other side of the chamber and unlock the<br />
other Metal Door with the key you now have, and head into this tunnel to the exit which leads into the Carta Shop.<br />
where you encounter a very freaked out Janar.<br />
Basically he says he did not know about the tunnel and has nothing to do with Jarvia I believe him! You may want<br />
to sell off a lot of the loot that you picked up in the Hideout here, to clear the slots in your bag by the time I got to<br />
this point I was full and there were items I had to leave rather than loot and that is never a good thing! With that<br />
done, we can now exit back into the Commons again!<br />
The Orzammar Commons<br />
Now would be a good time to visit the Chantry that now exists thanks to us I am not sure if you need to visit here in<br />
order to get the 100% exploration Achievement but it will not hurt and if you do, why, so you did! Talk to Brother<br />
Burkel to receive his thanks again, and then exit the Chantry and head for the entrance to the Proving Grounds.<br />
Head through the connecting tunnel inside and talk to Fixer Gredin, who will attack you! Kill him and his minions,<br />
then loot the Fixer to recover the book that was stolen from the Shaperate. Now exit back into the Commons, along<br />
the other side, and take the door to the Diamond Quarter.<br />
As you head to the Shaperate you are set upon by another group of Bhelen Fanatics kill them and then enter the<br />
Shaperate and speak with Shaper Assistant Milldrate, who is happy to see the book you are returning. This<br />
<strong>com</strong>pletes that quest.<br />
Exit the Shaperate and head towards the door to the Commons again, but on the left as you get closer there is a<br />
dwarven warrior named Loilinar, who you should stop and talk to. He will tell you about Oghren, and give you<br />
some further information about Bronka, who it turns out is his wife.<br />
Head back into Dust Town and battle the Jarvia Supporters at the other end of town, which wraps up that end of the<br />
quest. Now head back to the Diamond Quarter and speak with Harrowmont or Bhelen if that is who you aligned<br />
with and you will learn about the mission that they now have for you in the Deep Roads.<br />
When they finish speaking, you will get the quests An Anvil of the Void, and A Paragon of Her Kind which is the<br />
next phase of this quest line. Now exit the Estate/Palace and then exit back into the Commons, turn right and head<br />
to the entrance to the Mines. This is also the entrance for the Deep Roads, which is where you want to be!<br />
The Deep Roads<br />
As you approach the entrance to the Mines, you meet with the dwarf Oghern, who is looking for the Grey Warden.<br />
In the conversation that ensues, you learn what Branka was looking for the Anvil of the Void and Oghern is added to<br />
your party! Good on ya! That is one more of the party members required for the Achievement.<br />
Once you accept him, you get the party build menu I dropped Sten and added Oghern and now you are ready to<br />
enter the Deep Roads!<br />
As you move past the guards you will see a Rune Plate on the ground click that for a Codex Entry and then click on<br />
the door to enter the Underground Map. Our first destination is the Aeducan Thaig, which we will be running to<br />
pick up items and a little XP before beginning the quest proper.<br />
This is a linear path, and when you reach the first junction you will fight a group of Darkspawn. After you defeat<br />
them, loot the broken rock in the alcove and the bodies, and then continue on the path. At the next junction you<br />
fight another group, and there are two chests to loot, and another fractured stone. The West path here is actually<br />
page 99 / 145
<strong>SuperCheats</strong>.<strong>com</strong> Unoffical <strong>Dragon</strong> <strong>Age</strong>: <strong>Origins</strong> Guide<br />
http://www.supercheats.<strong>com</strong>/<strong>guide</strong>s/dragon-age:-origins<br />
Check back for updates, videos and <strong>com</strong>ments for this <strong>guide</strong>.<br />
blocked off, but you want to go into it because there is a Bloody Bag there that you will loot a Bag of Limbs from this<br />
is a Plot item and also has a Codex Entry. Once you have that, retrace your steps and continue on.<br />
In the next large chamber you will fight more Darkspawn, loot more containers, and then continue on through the<br />
tunnels, where you will get jumped by two different packs of Deep Stalkers. When you reach the very end of the<br />
tunnel a third pack of Deep Stalkers will attack, and then you can loot the items that are here. Now turn around and<br />
retrace your steps west to the last junction and take the west branch and follow that down and around to a large<br />
chamber and another pack of Deep Stalkers.<br />
Continue West and fight more Deep Stalkers, and then you will pass over a stone bridge into the ruins of an ancient<br />
Dwarven town. Loot this area and then continue into the tunnel on the other side, and fight yet another pack of<br />
Deep Stalkers! Head through the tunnel and around the bend to fight a small group of Darkspawn and you will have<br />
<strong>com</strong>e full-circle through the tunnels and be back in the first chamber that we visited.<br />
After you clean this last area out, you have exhausted this zone, so head back to the Underground Map, and select<br />
Caridin's Cross.<br />
Caridin's Cross<br />
According to your new Dwarven <strong>com</strong>panion, this used to be one of the biggest crossroads in the Deep Roads, and<br />
you used to be able to get almost anywhere from here. I don't know about that, but hey, as long as it takes us where<br />
we need to go, I say happy-happy-joy-joy!<br />
As you move forward into the Crossroads you encounter some of Bhelen's hired goons and kill them! Ahead in the<br />
roads there are two tunnels that branches off to the right and the left ignore the first one (on the right) and head to the<br />
end where the cave-in blocks the road and take the tunnel to the left.<br />
As you progress into this tunnel you will encounter a lone Deep Stalker who will lure you back into a larger chamber<br />
where there is a pack to fight. After you kill the pack you should spot a Small Bloody Sack you can loot to get a<br />
Head in a Bag (Plot Item) do that then continue along the south tunnel to fight more Deep Stalkers. There is a Rune<br />
Stone with a Codex Entry here, and a fractured rock to loot, and then we continue along the western tunnel to reach<br />
the continuation of the roads on the other side of the cave-in.<br />
You will encounter a group of darkspawn here including some of their rhino monster pets and after you defeat the<br />
group, you should loot their bodies and the lootables in this immediate area and then, for simplicity, backtrack to the<br />
original road and go down the tunnel that branched off to the left that we passed before. Both of these tunnel and<br />
chamber areas eventually lead to the same place, but for the purposes of organization it makes more sense to clear<br />
them in one direction.<br />
Once you are back to the main road, take that left tunnel and head in to find a large chamber with darkspawn in it.<br />
There are a lot of enemy here and it is a large chamber, but if you take your time and remember to heal, you will<br />
easily beat them.<br />
Once they are dead and you have looted the area, head over the large rock bridge and disarm the traps at the other<br />
end, and then take out the group of darkspawn ahead, including an Ogre! Loot the bodies and the containers in this<br />
area, then continue along the Southern tunnel, to a section of the roads a little further down but on the other side of<br />
the cave-in.<br />
To the right is a link to the Underground Map (Deep Roads) near here is a rubble pile with a Codex Entry so make<br />
sure you grab that, and on the other side of the road is a statue that has a Codex Entry. Click on that, and then turn<br />
left and head for the junction that we already cleared, take out the darkspawn and disarm the trap on the way. As<br />
you can see there is a tunnel splitting off to the right and at the junction as you continue heading east you will see<br />
that the road goes on and turns South.<br />
We will follow the road South here and at the bend you will spy a Glass Phylactery might as well pick it up and<br />
page 100 / 145
<strong>SuperCheats</strong>.<strong>com</strong> Unoffical <strong>Dragon</strong> <strong>Age</strong>: <strong>Origins</strong> Guide<br />
http://www.supercheats.<strong>com</strong>/<strong>guide</strong>s/dragon-age:-origins<br />
Check back for updates, videos and <strong>com</strong>ments for this <strong>guide</strong>.<br />
spawn the Revenant we did all the others right? Make sure you loot his scrap of paper (plot item), and then continue<br />
along the bend south, and you will see a tunnel splitting off to the left this layout is starting to make sense now, right?<br />
Ignore it for now and keep going South and you will see a tunnel split to the right as well, and at the very end of the<br />
road is the zone entrance to Ortan Thaig! Right, we know where it is now, so let us ignore it, turn around, and take<br />
the first tunnel split we <strong>com</strong>e to, which will be on our left now.<br />
After a few twists and turns we are attacked by some demons who we kill and then we see that there is a junction<br />
ahead. As we take the small right path we encounter an Ogre Alpha! Let's kill it! At the end of this short branch is a<br />
fractured stone which we loot and now backtrack to the tunnel junction again and continue to the other side to loot<br />
another fractured stone before stepping back into the tunnel and continuing along it.<br />
In the chamber ahead we encounter more darkspawn and kill them and loot the bodies. The Emissary has a Codex<br />
Entry, and there are two containers to be looted, before we continue along the tunnel and exit back onto the Roads.<br />
Head back to the main junction until we reach the other tunnel splitting off of the Roads that we have yet to explore,<br />
and enter it. As you reach the chamber mind the traps and take out the darkspawn and then circle around the center<br />
column to find another Small Bloody Sack. This one has a Torso in a Bag in it which we grab.<br />
Grabbing this last bag triggers the quest Asunder read the quest description for a clue to this one now, and then<br />
finish looting this area. Continue along the tunnel to the next chamber to fight a pack of Deep Stalkers, until you<br />
find and defeat the Deepstalker Matriarch in the nesting area. Loot the area and then backtrack to the Road.<br />
Depending upon how full your bags are, you may want to backtrack to the Deep Roads (Underground Map) zone<br />
point and head back to Orzammer to sell off your loot I did that before continuing on. You can do that using the<br />
nearby zone point for Ortan Thaig, and note that you can visit your camp from here by hitting Y for the overland<br />
map. In fact visiting your camp may be a good idea if only to distribute the gifts and other items you want your<br />
non-active party members to have. This also allows the party member quests to update.<br />
Ortan Thaig<br />
As you arrive, Oghren observes that he never thought to see this place again and mentions some of the tactics used<br />
by his wife including the fact that she would have posted sentries which means she probably is not near here. If you<br />
ask him, he will tell you about these ruins and if you are <strong>com</strong>pletely tactless (like me) you will ask what if his wife is<br />
dead? Completing this conversation gets you a Codex Entry.<br />
Head along the Road and around the bend, and you will encounter a dead Ogre where a tunnel splits off to the<br />
right. As the road ahead is blocked by a cave-in, that tunnel is our only route and who killed that Ogre I wonder?<br />
Let us head into the tunnel now!<br />
As you move through the tunnel you encounter more darkspawn corpses and then some Giant Spiders that you get<br />
to kill. When you reach the large chamber ahead, a pack of Giant and Poisonous Spiders are attacking an Ogre we<br />
may as well let them take it out for us unless you really want the XP? After you take this group out, there is a second<br />
group fighting darkspawn to the west take them all out.<br />
Loot the area and the bodies, and then head East to the alcove here, where you will find a Warrior's Grave loot it for<br />
a Codex Entry, and then head back West to the alcove there and take out the darkspawn, and loot the chest here.<br />
Now we are ready to continue North along the next tunnel!<br />
As you follow this tunnel there is a branch to the right with some Giant Spiders take it and kill them note that this<br />
tunnel split will take us to the same main chamber that the one we just left would but we got to kill the spiders here<br />
so bonus! Note the multiple arrows on the radar map now? Isn't questing fun?<br />
In this main chamber there are ruins and some Indignant Spirits, along with a Stone Golem. Kill them all, and then<br />
begin looting the area. When you approach the nearby chest Giant Spiders attack so you have to kill them before<br />
page 101 / 145
<strong>SuperCheats</strong>.<strong>com</strong> Unoffical <strong>Dragon</strong> <strong>Age</strong>: <strong>Origins</strong> Guide<br />
http://www.supercheats.<strong>com</strong>/<strong>guide</strong>s/dragon-age:-origins<br />
Check back for updates, videos and <strong>com</strong>ments for this <strong>guide</strong>.<br />
you can loot it. As you move towards the arrow to the South a dwarven warrior will run past towards the North<br />
tunnel screaming. When you approach him he tells you that there is nothing here for you because he has claimed<br />
it!<br />
According to your expert dwarf, this is a scavenger who has gone crazy because he survived by eating dead<br />
darkspawn. As the madman finishes his warning, more Spiders attack. After you take out the Spiders, turn back<br />
South and move towards the arrow marked there on your radar map to get to this you will go between the two<br />
buildings, and then fight more spirits and a Stone Golem.<br />
Alter of Sundering<br />
The arrow points to the Alter of Sundering and just in front of the alter is one of the Mystical Sites of Power. Activate<br />
the site, and then activate the alter and you are prompted to place one of the body parts on the alter! When you do<br />
this, a demon spawns and demands that you tell it whether you want vengeance or reward! I chose reward because<br />
let's face it, 25 gold is a lot better than a smidgen of XP and I don't plan on living in this hole in the ground, so what<br />
do I care of that demon is here?<br />
There is another arrow marker in this area on the map, but before we do that, grab the Journal on the stairs nearby<br />
us, and then let's go into the North tunnel and hit the arrow marker there. Inside the North tunnel we find the crazy<br />
dwarf whose name is Ruck in what is clearly his home. Before we talk to him again, loot the Topsider's Pommel<br />
from the nearby vase, which will flag a new quest An Admirable Topsider.<br />
Now we talk to Ruck again and if you are persuasive and nice, you may be able to get him to trade with you. He<br />
has a gift you may want to buy... And when you talk to him again, you can let him know that his mother misses him<br />
which really upsets him. Ruck, it seems, does not want his mother knowing what he has turned into. I agreed to tell<br />
her that her son died a brave death which made Ruck happy and, bonus, gained some approval from Wynne as<br />
well.<br />
Right, now that takes care of this area so head back to the main chamber and turn right (West) and go to the nearby<br />
arrow marker. Inside a ruined structure is an Ortan Thaig Chest loot that to obtain the Ortan Records a quest item<br />
then head across the bridge and into the Western tunnel.<br />
The Western Tunnel<br />
As you run along the tunnel the Spiders here retreat strange and as the tunnel opens up into a chamber there is a<br />
chest to loot on the left. As you approach the bridge ahead you get a checkpoint save usually not a good sign and as<br />
you reach the opposite side the Spiders spring their ambush! There is a darkspawn Emissary here as well.<br />
As you approach the spot marked by the arrow you are again set upon by Spiders including their Queen, who is<br />
hard to kill because she retreats up her web after being hurt. Eventually you kill her though, and once she is dead,<br />
loot the area and then head for the marked spot to find some chests and Branka's Journal!<br />
In it she relates that they have determined that the Anvil does not rest here and that she is ordering her men to head<br />
South into the Dead Trenches. They are not happy about that however, and she almost but does not leave a<br />
message for her husband. He on the other hand wants to head for the Dead Trenches immediately! Well, we are<br />
now done searching this area, so he will not have to wait. Head a little more Northeast and here is the zone point<br />
and our next stop, The Dead Trenches!<br />
The Dead Trenches<br />
Our arrival in the Trenches begins with a cinematic CS in which we see an army of creatures, and then a large<br />
page 102 / 145
<strong>SuperCheats</strong>.<strong>com</strong> Unoffical <strong>Dragon</strong> <strong>Age</strong>: <strong>Origins</strong> Guide<br />
http://www.supercheats.<strong>com</strong>/<strong>guide</strong>s/dragon-age:-origins<br />
Check back for updates, videos and <strong>com</strong>ments for this <strong>guide</strong>.<br />
dragon! Once the CS is over, move forward and to the right to encounter a group of dwarven Legionnaires fighting<br />
some darkspawn rush to their aid and help them to kill the darkspawn, and then we fight our way across the bridge<br />
facing waves of darkspawn.<br />
Once on the other side we take on a larger force with an Ogre, and after we defeat them, we head South to loot the<br />
two containers and then to the North, and into the tunnel there, for a checkpoint save. There are darkspawn for us<br />
to kill in the tunnel, before it opens on a large chamber and yet more darkspawn to be killed!<br />
Now head to the Metal Door on the North side of the chamber and clear out this smaller sub-chamber, and then loot<br />
it. Before you head out to the South side, and open the Metal Door there to do the same clear out the small chamber<br />
on the right as you approach the South door. Once this chamber is cleared and looted, return to the main chamber.<br />
Now head through the door to the South and clear the first few rooms than off of this chamber are some tunnels with<br />
an Ancient darkspawn in them that can be something of a challenge to kill but you have it in you, right? Make sure<br />
that you loot the Topsider's Blade from the Ancients body after you kill him.<br />
This tunnel leads to a very large chamber full of darkspawn including a Genlock Forge Master who can be a bit on<br />
the difficult side to kill. Once you have defeated them, carefully loot the area, and do not forget the smaller<br />
chamber on the East side. Once you have done all that, head through the hall to the North, and head across the<br />
bridge there killing the Shrieks that attack you. Keep heading North and go through the Metal Door at the end of this<br />
chamber.<br />
There is a Rune Stone on the right side of this small chamber, and then a checkpoint save as you move into the<br />
larger chamber beyond, where you battle undead skeletons. If you look at the map you will see that the path<br />
continues to the east but make sure you loot the bodies/room before you continue on.<br />
Eventually you reach a chamber that has a dwarven woman named Hespith, who is infected with some sort of<br />
disease. As you talk to her, you learn that she was Branka's Captain and it seems that Branka did something bad<br />
became something bad!<br />
As you leave this smaller chamber and enter the really large one, curve around to the left and take out the Ogres<br />
there, and then run along the perimeter of the chamber, looting as you go. Once you finish that, check the center<br />
door on the east side the Ominous Door but it is locked, so now head for the next one to the South on the East side.<br />
While the door looks similar to the Ominous one, it is not locked, and inside are gold glowing statues of dwarven<br />
warriors. At the center of this chamber is a Legion of the Dead Relic click on it for a Codex Entry and then continue<br />
to the Legionnaire Alter further along. Loot that to get the key and the Helm, and then retrace your steps to the<br />
Ominous Door.<br />
Once you loot the alter and try to head out, the statues <strong>com</strong>e to life and attack you! It turns out that they are<br />
Legionnaire Spirits, and they are not happy that you helped your self to their stuff!<br />
The Ominous Door<br />
The key from the alter unlocks the door and as you move along these halls, be sure to loot as you go for Codex<br />
Entries. You get a checkpoint save and shortly thereafter a CS in which you see your group moving through the<br />
tunnel until you encounter a nasty looking monster called a Broodmother and it has tentacles!<br />
During this fight you need to keep an eye on your party health, because once your mage runs out of mana you will<br />
need to use healing potions to keep them alive. Towards the end of the fight with the Broodmother, some demons<br />
spawn and if you do not notice this, you could lose a party member.<br />
The next zone point is right off of this chamber, so when you are ready, hit it to go to the Anvil of the Void!<br />
page 103 / 145
<strong>SuperCheats</strong>.<strong>com</strong> Unoffical <strong>Dragon</strong> <strong>Age</strong>: <strong>Origins</strong> Guide<br />
http://www.supercheats.<strong>com</strong>/<strong>guide</strong>s/dragon-age:-origins<br />
Check back for updates, videos and <strong>com</strong>ments for this <strong>guide</strong>.<br />
The Anvil of the Void<br />
As you enter the zone your entrance is blocked off, and Branka confronts you. The happy reunion that you might<br />
have expected is not what you find here Branka is slightly unbalanced and in no way interested in your problems.<br />
According to Branka, the only way out of here is through Caridin's Maze a maze of traps that is what has kept her<br />
from obtaining that which she desires most. As you head into the chambers you will face several waves of<br />
darkspawn, and it is best off if you allow your mage to recover their mana prior to spawning the next wave. The<br />
third wave in the tunnel includes an Ogre.<br />
When you reach the end of this tunnel you get another checkpoint save as you enter a large chamber with green<br />
wispy glowing mist. Your party is taking damage just by being in the room, so quickly close the four gas valves on<br />
either side of the room and then take out the Golems as quick as you can.<br />
As you move into the next chamber you get another checkpoint save, and you enter a chamber with Stone Golems<br />
and Blade Traps. You need to disarm those traps before passing over them! As you pass some of the Golems they<br />
<strong>com</strong>e to life and attack you keep an eye on your party health, and once you have defeated the Golems, head<br />
through the next hall to the Metal Door that leads to the next chamber.<br />
As you pass through this door you get a checkpoint save, and you see a Spirit near the anvil on the dais. You need to<br />
kill that spirit and then touch the anvil to have it shoot flaming magma at the stone thing in the center that has many<br />
faces. Every few moments the stone faces will rotate, at which point you want to shoot more magma into them to<br />
damage it. To actually kill it, you want to take out the glowing eyes on each face, and then the bleeding eyes on<br />
each face.<br />
Basically the eyes spawn a spirit, and once you kill the spirit, the anvil charges up for the side that that spirit was<br />
spawned on, then you can damage the face that spawned it. Keep doing this until you "kill" the faces on all sides<br />
twice.<br />
Note: There are two achievements associated with this part of the quest one for siding with Branka, the other for<br />
siding with Caridin. If you want them both without having to do another play-through, now is when you need to<br />
make a save. I suggest picking whoever it is you do not want to support first, getting that Achievement, then loading<br />
the save and going with the one you do want to support so you can continue on.<br />
As you head to the door out to the West there are three chests for you to loot that have supplies in them, and as you<br />
step through the door you get a checkpoint save, and then step into the chamber for a CS during which you meet<br />
Caridin the Golem?!<br />
As Caridin talks, you learn that the Anvil actually uses living souls in the process of creating the Golems and is<br />
clearly not the purely mechanical process that legend claimed! This is clearly evil it is almost as bad as the<br />
darkspawn and then Caridin admits that they did not just use volunteers! They forced unwilling dwarves onto the<br />
Anvil!<br />
When Caridin resisted the King, he was himself forced onto the Anvil and his reaction to this was to seal the Anvil<br />
away to keep it from being used again. As you learn this, Branka runs in, to claim the Anvil, while Caridin protests<br />
that it must not be used! Be aware that the "good" members of your party want that thing destroyed...<br />
Picking Sides: Caridin<br />
Supporting Caridin is the "Good" choice in this moral path, and it means that you agree with your party members<br />
page 104 / 145
<strong>SuperCheats</strong>.<strong>com</strong> Unoffical <strong>Dragon</strong> <strong>Age</strong>: <strong>Origins</strong> Guide<br />
http://www.supercheats.<strong>com</strong>/<strong>guide</strong>s/dragon-age:-origins<br />
Check back for updates, videos and <strong>com</strong>ments for this <strong>guide</strong>.<br />
while it would be nice to have an army of Golems, the moral cost is just too high!<br />
Once you pick the option: The Anvil must be destroyed, it enslaves living souls, Branka is pretty much pissed at<br />
you. Her husband wants you to give Branka the Anvil but you tell him you cannot, it is not a risk you are willing to<br />
take! That is the pivot-point, and Branka uses a Control Rod that she has found somewhere to take control of some<br />
of the Golems.<br />
Caridin appeals to you to assist him in defeating Branka and of course you do! Unfortunately defeating Branka<br />
means killing her and her husband is not going to like that very much... But you do what you have to do for the<br />
good of all, not for the good of one.<br />
After Branka is slain, talk to Caridin for a CS and he asked you if there is anything that he can do to help you and you<br />
tell him you need a Paragon's assistance and he offers to make you a Paragon's Crown that you can then use to<br />
select the new King!<br />
You get the CS of Caridin forging the crown, and then he hands it to you. Now is the time to destroy the Anvil and<br />
once it is destroyed you get a final CS with Caridin, and then he throws himself into the lava! You get the Liberator<br />
Achievement and now you should save the game here, and then skip to the Orzammer II Section!<br />
Picking Sides: Branka<br />
To support Branka which means preserving the Anvil will cost you the good faith of some of your party and this is<br />
clearly not the "Good" choice. Once you make that choice however, you will have to fight Caridin and his Golem<br />
minions!<br />
Some of the Golems fight with you, some against you, but eventually you will take Caridin down, and Branka will<br />
make her insane victory cackle. Now you need to go to Branka and talk to her you are treated to a CS of her and her<br />
husband talking and then Branka fabricates a crown for you using the Anvil. Choose the option for her to make a<br />
Paragon's Crown and then sit back for the CS of her creating the crown.<br />
After she finishes and gives you the crown, save your game and go to the Orzammer II Section.<br />
Orzammer II<br />
Before you zone to Orzammer, make sure you loot the chest nearby as it has a gift and some good items in it. To the<br />
right as you step off of the ramp is a rust-colored construct called the Golem Registry go over to it and use it to<br />
examine the list of names engraved on it. Oghren says that you should make a tracing of this memorial record to take<br />
back to the Shapers and doing so flags a new quest The Golem Registry.<br />
As you exit the chamber you get a CS and interaction with Oghren and then the Zone Map opens. Now before you<br />
choose to go directly to Orzammer remember that quest we are doing to collect the Topsider's Sword Parts? Well,<br />
we have them all, so now would be a good time to return them to his grave, right? That way we will not have to<br />
<strong>com</strong>e back.<br />
On the map, select Ortan Thaig, and then follow the arrow to the grave and click on it to <strong>com</strong>plete the quest. Now<br />
talk to Oghren to have him bring up the Underground Map and select Orzammar yeah, you do not have to run all<br />
the way to the Zone Point, is that cool or what?<br />
Okay you saved the game before zoning to Orzammer, right? I hope you did, because this is another point in the<br />
game where you make a moral decision that has two possible Achievements associated with it! As long as you<br />
saved, you have the option of picking up both Achievements so I hope you saved, as otherwise you will have to do a<br />
second long play-through!<br />
Picking Bhelen<br />
page 105 / 145
<strong>SuperCheats</strong>.<strong>com</strong> Unoffical <strong>Dragon</strong> <strong>Age</strong>: <strong>Origins</strong> Guide<br />
http://www.supercheats.<strong>com</strong>/<strong>guide</strong>s/dragon-age:-origins<br />
Check back for updates, videos and <strong>com</strong>ments for this <strong>guide</strong>.<br />
When you arrive at the Assembly you announced that Caridin has chosen the new King Bhelen gets real nasty after<br />
Oghren has his say, but his tune changes quickly when he hears you call his name! After accepting the crown and<br />
be<strong>com</strong>ing King, the first thing that the little jerk does is order the execution of Harrowmont!<br />
Well, we never liked him anyway but if you did and you chose him all that is left is for you to remind him of the<br />
treaty so that he can get his troops ready to march to fight the Blight and then you leave for the topside.<br />
Picking Harrowmont<br />
This is the path that I personally chose because it is the right thing to do!<br />
As you enter the Assembly, Bhelen calls for a vote, and Harrowmont vows that he promised Bhelen's father not to<br />
allow Bhelen to take the throne! The Assembly Leader calls for you to speak to give them the news. Our answer?<br />
"I bear a crown from Paragon Caridin for his chosen king!"<br />
Oghren tells them what happened with Caridin and where the crown <strong>com</strong>es from, and Bhelen insults you both. The<br />
Assembly Leader however, believes, and asks who Caridin chose?<br />
Why he chose Harrowmont, of course!<br />
Lord Harrowmont err excuse me King Harrowmont thanks you, and you get a nice CS of his be<strong>com</strong>ing King! Of<br />
course he has the popular support of the people, but not of Bhelen, and as you stand there in shock, Bhelen and his<br />
minions attempt a coup!<br />
I have to admit that I very much enjoyed killing Bhelen it was his just deserts after all. King Harrowmont has some<br />
final words for you, among them his vow that Orzammar will honor the Treaty. Most excellent!<br />
Harrowmont gives you his staff as your reward and of course you should be sure to do a little looting now :) Despite<br />
the fact that we told him that we needed to head to the surface and get on with our duties, there are some things we<br />
need to wrap up here in Orzammar first, so let us head for the Diamond Quarter.<br />
Take a left after we exit and visit the Shaperate, where we need to talk first to the Shaper, to deliver the Tracings, and<br />
then to Orta in the stacks nearby, to give her the evidence we recovered. A quick return to the Assembly to finish off<br />
this quest by talking to Orta again, and then back to the Diamond Quarter, and then to the Commons.<br />
The Commons<br />
Run over and talk to Filda on the other side of the Commons you can lie, but I cannot I told her the truth. You get a<br />
reward, and another quest <strong>com</strong>pleted! We now have one last monor task to <strong>com</strong>plete, so head over to the Mines<br />
District Zone Point, and select the Ferelden Map, and then the Circle Tower.<br />
Our journey is interrupted by a bad dream in camp yes this is a <strong>com</strong>bat interrupt! Alistair talks about the Arch<br />
Demon having "seen us" and then demons attack. We get a closing CS from him, and since we are in camp anyway,<br />
we may as well apply the skill-ups that our non-active party members got for leveling. Check the kit we have in loot<br />
in case any of it is better than what they are presently wearing, and also distribute gifts before hitting the World Map!<br />
As we approach the Tower we are once again forced into <strong>com</strong>bat as a Darkspawn ambush is sprung! We quickly<br />
take them out and resume our trip, arriving at the Tower!<br />
When we arrive at the Tower, go inside and talk to First Enchanter Irving and pass on the message from the little<br />
dwarven girl. He takes a little convincing, but he finally agrees to accept her if she chooses to try.<br />
page 106 / 145
<strong>SuperCheats</strong>.<strong>com</strong> Unoffical <strong>Dragon</strong> <strong>Age</strong>: <strong>Origins</strong> Guide<br />
http://www.supercheats.<strong>com</strong>/<strong>guide</strong>s/dragon-age:-origins<br />
Check back for updates, videos and <strong>com</strong>ments for this <strong>guide</strong>.<br />
Now we hit the World Map and return to Orzammer to deliver the good news! Dagna is very pleased indeed and<br />
the last quest we have for here is <strong>com</strong>pleted! Now that we have left Orzammer and returned, other items have<br />
opened up on our to-do list.<br />
Head over to the Diamond Quarter and enter the Assembly collect your reward from Orta and head over to the<br />
Royal Palace. then the the Royal Estate and find Vartag and talk to him. He will attack you kill him and his minions<br />
to clear out the Palace for Harrowmont.<br />
Enter the door nearby and then the first door on the left Bhelen's room and get the letter that is on the table in there<br />
for a Codex Entry. Go down the hall to the door on the right and go in to have another fight and kill Ambassador<br />
Gainley to <strong>com</strong>plete the Crow's Assassination Order. On a desk in this room is a book pick that up for a Codex<br />
Entry.<br />
Leave the room and turn right, and then enter the next chamber on the right to talk to the Herbalist by the bed in the<br />
back he gives you a recipe for the cure and we likely have all the items we need to make it, but this requires the<br />
Master Herbalism skill so if you do not have that, you have to <strong>com</strong>e back when you do, to make and deliver the<br />
cure. As I already had it, I <strong>com</strong>pleted the quest. Did you?<br />
We are finished in Ozammar now so it is time to leave and head back to Denerim to turn in the quests that we have<br />
for there!<br />
Denerim Again<br />
First we hit the Mage's Collecting to turn in the quest Notice of Termination, then we stop off at Wade's to pick up<br />
the second set of Drake Scale Armor the one we paid an extra 20 gold to get top quality in and switch out to that<br />
armor now :)<br />
Next we hit the Tavern, and visit the Blackstone Irregulars to turn in the quest Dereliction of Duty, then we visit with<br />
the Bartender to turn in the gems and collect our reward from him. Next we visit the very circumspect representative<br />
of The Crows to collect our reward and another Hit Contract from him!<br />
Back in the Market District, then the the City Map, and to the Dirty Back Alley. Head to the door marked "Quaint<br />
Hovel" and engage the dialogue until the door is unlocked, and then enter to find Vihl the man who has been<br />
spreading stories... Only he is not a man! He is a Demon! Time to kill!<br />
That was actually a pretty tough fight! In the back room is a chest, and in that chest is an Elementalist's Grasp, an<br />
Emerald, a piece of Quarts and almost 10 gold! A nice bit of loot to be sure! Make sure you loot the body of<br />
Gaxkang the Unbound it has the Keening Blade and 5 more gold on it and you have now <strong>com</strong>pleted the quest<br />
Unbound!<br />
Back into the Dirty Back Alley and the City Map and you will notice the new location marked on the map Ransom<br />
Drop Location. We head there now!<br />
Ransom Drop Location -<br />
As we arrive at the meeting spot, the battle <strong>com</strong>mences! It turns out that there was no hostage to rescue and the<br />
Crow thugs have nothing for you we have to see our contact back at the Tavern to resolve the matter it seems.<br />
So it is back to the Market District and the Tavern, and our contact claims that the boy has already been rescued and<br />
the kidnapper Captain Chase is dead thanks to us. Well, that is it for the Crows, no more contracts for us! As we<br />
finish the conversation our contact heads off on "vacation" and we have <strong>com</strong>pleted yet another quest! How cool is<br />
that?<br />
It is now time to take care of Morrigan's personal quest and head for her mother's house, so hit the World Map now.<br />
page 107 / 145
<strong>SuperCheats</strong>.<strong>com</strong> Unoffical <strong>Dragon</strong> <strong>Age</strong>: <strong>Origins</strong> Guide<br />
http://www.supercheats.<strong>com</strong>/<strong>guide</strong>s/dragon-age:-origins<br />
Check back for updates, videos and <strong>com</strong>ments for this <strong>guide</strong>.<br />
Flemeth's Hut<br />
page 108 / 145
<strong>SuperCheats</strong>.<strong>com</strong> Unoffical <strong>Dragon</strong> <strong>Age</strong>: <strong>Origins</strong> Guide<br />
http://www.supercheats.<strong>com</strong>/<strong>guide</strong>s/dragon-age:-origins<br />
Check back for updates, videos and <strong>com</strong>ments for this <strong>guide</strong>.<br />
Redcliffe<br />
When we arrive in Redcliffe Village we learn from Tomas that demons have been attacking the Village every night<br />
from the Castle! Many of the villagers are dead, and those that are left alive need you help. After the CS, Tomas<br />
takes us to Bann Teagan, who not only recognizes Alistair but is happy to see him! More important than that, Bann<br />
does not believe the lies that Loghain has been spreading about the Grey Wardens. That is certainly a relief.<br />
Bann explains that his brother the Arl is very ill, and there has been no contact with the Castle since the attacks<br />
began days ago. After the conversation ends you get a quest update and the approval of your party. Now before we<br />
head out, let us do a bit of looting to pick up the three Codex Entries here from two books and a bookshelf, and then<br />
speak with Jetta and deliver the news that her family is dead, which <strong>com</strong>pletes the quest Last Will.<br />
On the way out of the Chantry stop and talk to Kaitlyn (she has a "!" over her head) to hear her story and then agree<br />
to help her thus flagging the quest A Missing Child.<br />
Outside talk to Murdoch he is a male chauvinist so if your character is female expect to be insulted. This updates<br />
the quest 'A Village Under Siege.' Now head up the hill towards the Windmill and talk to Ser Perth. Go inside the<br />
Windmill and loot the crate in there it has one of the letters we are collecting and then exit. Let's head out to do<br />
what Ser Perth asked of us speak to the Revered Mother to get God's help in the fight but before we do that, look to<br />
the left on the way down the hill for a white flower Andraste's Grace that is a gift item.<br />
Once you have collected that, head down the hill and over the stone bridge, and immediately turn left as you leave<br />
the bridge you see the wooden walkway leading to that house there? Right, go into the house, where you will find<br />
Dernal Garrison the last one on our list for the Blackstone Irregulars quest 'Scraping the Barrel.' That wraps up<br />
another quest but we still have one to <strong>com</strong>plete for the Irregulars here in Redcilffe 'Notices of Death.'<br />
The bookshelf by the bed has a Codex Entry, and there is a chest in the back room that has supplies in it you can<br />
loot. Once you have done that, exit the house and head to the Southwest corner of the area where you will find a<br />
boat under construction. There is a Deathroot plant here you can loot, and if you head along the left side of the boat<br />
forms and up the path here, it loops around to the roof of this lean-to and two containers for you to loot.<br />
Blacksmith Shop<br />
Retrace your steps and head down the hill to the village center, staying to the left. First we visit the Blacksmith Shop<br />
where we find that the Smith himself is very depressed and does not feel up to having visitors, even a Grey Warden!<br />
Ask if he is Owen the Blacksmith, and then persuade him to let you in. He says he does not want trouble, and then<br />
unlocks the door for you. Say, why is it that when people say that they do not want trouble, it usually means they<br />
are willing to give you trouble?<br />
Telling Owen that the militia needs his help prompts him to tell you the story of his daughter which gives you the<br />
opportunity for some quid-pro-quo, something that we are pretty good at! Offering to rescue his daughter is the<br />
ticket, and now that you have given him hope, he is willing to reopen the Smithy once you remind him about the<br />
militia and its needs. Once you make your promise, Owen gets to work, and we can check the crate in the corner to<br />
reveal a hidden trapdoor.<br />
Owen opens the trapdoor for you and now you can loot it but he was right, it is mostly old gear. Before you leave,<br />
talk to Owen again and tell him you want to do business which puts you in his shop mode. Sell off anything you do<br />
not need, and then exit the shop.<br />
Dwyn's Home<br />
Grab the Deathroot and loot the chest that are behind the Blacksmith Shop, and then walk over to Murdoch (marked<br />
on the map) and talk to him. You get a CS of his assessment of the situation and he tells you that he will send one of<br />
page 109 / 145
<strong>SuperCheats</strong>.<strong>com</strong> Unoffical <strong>Dragon</strong> <strong>Age</strong>: <strong>Origins</strong> Guide<br />
http://www.supercheats.<strong>com</strong>/<strong>guide</strong>s/dragon-age:-origins<br />
Check back for updates, videos and <strong>com</strong>ments for this <strong>guide</strong>.<br />
his men with the news. You have a Persuasion opportunity here you may as well use it gets you closer to the<br />
Achievement and may make him feel a little better.<br />
Ask him if there is anything else that you can do, and Murdoch will tell you that they need more help, and then<br />
mentions Dwyn. Right, that is our next stop then! Take the wooden steps between the buildings just past Murdoch<br />
to get to Dwyn's Home.<br />
Knocking does not do any good he is ignoring the door it seems so picking the lock is probably the way to go, since<br />
breaking down the door would send the wrong message. Intimidation is the way to go here, and a blunt approach,<br />
but in the end you get Dwyn to join the militia, so it is all good, and now it is time to move on!<br />
Follow the walkway outside to the left and visit the General Store, and loot it. There is a book with a Codex Entry on<br />
the floor and a chest in the corner, as well as some barrels of lamp oil. When you are finished here, exit and head to<br />
the left along the next walkway to Kaitlyn's Home.<br />
Kaitlyn's Home<br />
After you enter loot the book that is on the chest ahead of you, then go into the small bedroom on this level, where<br />
you hear a noise. Someone is hiding in the clothes closet a young man with a secret! Use the persuasion option to<br />
learn about his father's sword which is in a chest in his father's room. Persuade him to give you the key to the chest,<br />
after which he heads back to the Chantry which is our next destination after we wrap things up here!<br />
Now that we have the key, head up the stairs to the Second Level, open the chest here and loot the Green Blade.<br />
This is actually not a bad blade at all, though it would help to have some runes added to it to give it more<br />
effectiveness, right? Loot the bookshelf in this room for a Codex Entry, and then head back downstairs and out to<br />
the Village.<br />
The Chantry<br />
Around the back of the Chantry is a Deathroot Plant if you want to loot that, and inside you will find Kaitlyn who<br />
you should talk to. She is happy that you found her brother, and you let her know that you have her Grandfather's<br />
sword. Being the all-around nice person that I am, I had to pay her for the sword and 500 silver is the least I could<br />
do!<br />
Irenia is standing nearby on the right, and when you talk to her you deliver the last of the letters for the Death Notice<br />
Quest, which wraps up our obligation to the Blackstone Irregulars quite nicely! Now head further into the Chantry<br />
and to the left, where you will find Mother Hannah standing by some children.<br />
She is observant and thankful, and gives you a quick summary of the situation. When you tell her what Ser Perth<br />
wants, she explains that she does not have anything that she can give him even remotely equal to what he wants,<br />
and you have another opportunity to use the persuade skill. She gives you the Holy Symbols that she has and asks<br />
that you give them to Ser Perth with her message and another leg of the quest is done!<br />
Bann Teagan is standing in the Chantry so we may as well say hello asking him about himself gets you another<br />
opportunity to persuade, and the chance to learn what he has been doing and what he plans to do. That wraps up<br />
what we have to do in the Chantry now we should pay a visit to the Tavern nearby, as there is more work for us to<br />
do there!<br />
The Tavern<br />
Head up the hill to the door to the Tavern and go in.<br />
The first thing we want to do is talk to the militiamen sitting at the table in the corner, to learn that they are very<br />
page 110 / 145
<strong>SuperCheats</strong>.<strong>com</strong> Unoffical <strong>Dragon</strong> <strong>Age</strong>: <strong>Origins</strong> Guide<br />
http://www.supercheats.<strong>com</strong>/<strong>guide</strong>s/dragon-age:-origins<br />
Check back for updates, videos and <strong>com</strong>ments for this <strong>guide</strong>.<br />
upset with the Tavern Keeper. What they want is some free ale and you can help them!<br />
Read the graffiti on the bar for a Codex Entry, and then talk to Lloyd, who is not happy with the fact that business is<br />
down. It seems to me that some of these people are just not in touch with the level of peril they are facing...<br />
You can easily intimidate him into him into joining the militia, but before you do that, talk to him about the<br />
militiamen and he replies with a garrulous refusal giving you the opportunity to use your power of persuasion to<br />
change his mind! Now that you have that quest updated, go ahead and intimidate him into helping to defend the<br />
village.<br />
Now talk to Bella, who is now in charge of the Tavern. If you ask for supplies she goes into shop mode, but the stuff<br />
she is selling is free. Grab the gift she has Wine which you can give to Oghern who does like his booze. You may<br />
as well take all that she has, since it is free, right?<br />
The elf in the corner that we asked Owen about Berwick is our next task, but when we say hello he gets all shifty on<br />
us. This is starting to feel like an episode of Cops to me. As you interrogate him, his responses clearly indicate that<br />
something is not right here... As the dialogue progresses you have the opportunity to either intimidate or persuade<br />
and speaking of that...<br />
The Achievements for intimidating and persuading are based upon the number of successes that you have at either<br />
five each for the first Achievement, and then 10 for the second intimidation one, but 25 for the second persuasion<br />
Achievement. That makes sense considering that there are a lot more persuasion opportunities than there are<br />
intimidation ones but if you read the section on Orzammer you know that there is a bugged interaction in Dust<br />
Town that will let you get the intimidate Achievements all in one go. That being the case, you should probably be<br />
concentrating on persuading successes.<br />
As the discussion progresses we learn that Berwick was hired by Loghain's advisor he is not here waiting for his<br />
brother, and other than his initial report of the Arl's illness, Berwick has been unable to file any further reports.<br />
According to the Elf, he knows nothing about the creatures, but he wonders if the people who hired him knew that<br />
the Arl would get sick. He has a letter with instructions for you to read, and then you have to make a decision kill<br />
the spy, make him leave the village, or force him to help defend it.<br />
Depending upon who is in your party, there is a good chance that one of your warrior types is going to want to kill<br />
Berwick but you will have the option of persuading them to accept your decision if you like. As I am mostly good, I<br />
want Berwick to help defend the village after all he is an Elf and an archer, he could make a contribution. Berwick<br />
says he will help and by my count that makes three warm bodies we have contributed to the defense of the Village!<br />
Now that we have done all that there is to do in the Tavern, it is time to return to Murdoch and give him the good<br />
news. Murdoch seems a little happier than he was or maybe just not as annoyed as he was earlier, I cannot tell.<br />
You can tell him you are ready to wait for the attack now but before you do that, there are a few small chores we<br />
want to take care of.<br />
First, head up the hill to the windmill and talk to Ser Perth, who is relieved that you were able to get him some<br />
additional protection. Be sure that you mention the barrels of oil that you found in the Village Store to Ser Perth, as<br />
he was unaware of that resource. Finishing the conversation with him updates the quest, and at this point we are in<br />
theory ready to take on the monsters from the castle, sort of. I say sort of because while we could jump right in, it<br />
might be a good idea to head back to the World Map and visit your camp.<br />
While you are in camp you can pass out any armor and weapons you are holding for inactive party members, give<br />
whatever gifts you have to give, and deposit the extra supplies that you have been collecting for the coalition troops<br />
in the crate by the coalition representatives. Don't forget to upgrade the stats for any who have leveled, and have<br />
your social conversations with all of them to make sure that all are up-to-date.<br />
Note: the conversations that you have with your party members in camp and in the field are what trigger the<br />
availability of some skill and ability upgrades, and both trigger and in some cases progress their personal quests, so<br />
page 111 / 145
<strong>SuperCheats</strong>.<strong>com</strong> Unoffical <strong>Dragon</strong> <strong>Age</strong>: <strong>Origins</strong> Guide<br />
http://www.supercheats.<strong>com</strong>/<strong>guide</strong>s/dragon-age:-origins<br />
Check back for updates, videos and <strong>com</strong>ments for this <strong>guide</strong>.<br />
this is something that you should be doing on a routine basis. Oh and do not forget to play with your dog! He<br />
needs love too!<br />
If you have not asked Leliana to tell you her Bard Stories you should they fill in a lot of backstory on some of what<br />
we have been doing. Sten does not have much to day ever so if you have asked the basic questions that you can<br />
ask, his menu will be empty.<br />
Finally we want to go and see Sandal to swap in new or better Runes for our weapons. With that done, it is time to<br />
return to Redcliffe Village and see Ser Perth, and tell him that we are ready to make our stand here!<br />
The Undead of Redcliffe Castle<br />
At nightfall a fog descends and the undead surge down open valley that leads to the castle. Wave after wave of the<br />
walking dead attack from the valley, and after you kill quite a few a runner from the town <strong>com</strong>es to alert you that the<br />
monsters are now attacking from the lake! Your help is needed in town so you leave the knights to hold the pass<br />
while you rush down to help defend against the attack from the lake!<br />
Once you reach the center of town you face more waves of undead, and while it seems like they will never end,<br />
eventually they do! Now talk to Murdoch and you get a CS in which dawn has <strong>com</strong>e, the town is defended, and<br />
you are honored. Bann Teagan offers you the Helm of Ser Ferris as your reward for standing to fight with them and<br />
of course you thank him and accept it, because hey, we deserve a reward!<br />
The Revered Mother offers a prayer and a blessing, and then Bann Teagan announces that it is time to attack the<br />
castle, now that the undead forces have been thinned out. He orders you to meet him at the Windmill, where you<br />
can talk further but before we head up there, drop by the Blacksmith and sell off the stuff we looted from the undead.<br />
Now before we continue on with this quest line, there are some minor tasks we can finish up! If you look to the left<br />
of the Chantry entrance you will see that the Blackstone Irregulars have sent a representative to Redcliffe. Excellent!<br />
Talk to him to turn in the quest 'Notices of Death' and collect your reward, leaving 'Scraping the Barrel' as our only<br />
quest for them at the moment, and that one we cannot finish until we gain access to the Alienage in Denerim.<br />
If you target the chest next to him, there is a new quest available called 'Grease the Wheels' that we can claim might<br />
as well! This quest is to deliver notes to the five hooded couriers in Denerim I knew that they were there for a<br />
reason! Since Alistair has asked us to help him look up the sister he did not know he had and since she lives in<br />
Denerim we will head there in a moment.<br />
Now let's talk to Tomas to hear of his plans, and after he takes off head over to the nearby Doomsayer, who we need<br />
to calm down because he is freaking out the locals. You get a chance to use persuade with him so do that. Say,<br />
wasn't he in Lothering earlier?<br />
Go to Dwyn's and say hello and learn a little more about how he ended up in Redcliffe, and then head over to the<br />
Chantry. There is a Chanter standing by the Chantry Board so let's say hello to her and then check the Board and<br />
yes! There are more quests! Grab them all they are:<br />
(1) Caravan Down<br />
Travel to the trade route marked on your map to determine the fate of the border caravan.<br />
(2) Brothers and Sons<br />
Go to the spot marked on the map to see what has happened to the conscripts of Company Easthill.<br />
(3) Unintended Consequences<br />
Be on the lookout for a strange creature that is killing merchants. We will encounter this while traveling.<br />
Enter the Chantry and say hello to the Revered Mother, and then Murdoch, who is still seriously in need of some<br />
anti-depressants! Kaitlyn is by the door say hello to her and get thanked once again. You learn that she is going to<br />
page 112 / 145
<strong>SuperCheats</strong>.<strong>com</strong> Unoffical <strong>Dragon</strong> <strong>Age</strong>: <strong>Origins</strong> Guide<br />
http://www.supercheats.<strong>com</strong>/<strong>guide</strong>s/dragon-age:-origins<br />
Check back for updates, videos and <strong>com</strong>ments for this <strong>guide</strong>.<br />
use the money you gave her for her Grandfather's sword to pay to travel to Denerim well good for her!<br />
Next stop is the Tavern on the hill, where we say hello to Lloyd, the militiamen, and overhear some gossip about us<br />
from the gossips. Last we say hello to Bella again, and then exit the Tavern and head up the hill to the World Map.<br />
Our first destination is the one marked "Battlefield."<br />
Battlefield<br />
On the way to the Battlefield we will get a <strong>com</strong>bat interruption a caravan that has been ambushed, and a group of<br />
Tricksters for us to kill! Loverly! A bit of XP, some loot, some supplies not bad for a few minutes work and now we<br />
hit the World Map to continue our journey!<br />
Ahead of us is a soldier's body that has a diary on it that gives us a quest update, and then we loot the battlefield<br />
until we are set upon by a wolf pack. Resume looting until another wolf pack attacks and kill them, and then loot<br />
some more until a Bear attacks a Bear?!<br />
Once you have finished looting, hit the World Map and select Caravan as our next destination.<br />
Caravan<br />
We arrive there with no trouble and are immediately attacked by Darkspawn! Looks like the Caravan has been<br />
knackered! Well, start looting after you kill the wave of Darkspawn, and when you have all you can get, head for<br />
the World Map. By the way, we have now <strong>com</strong>pleted all three of the quests, because we determined that the thing<br />
killing the merchants was something that got loose when we cleared the Circle of Mages Tower...<br />
At the World Map, select Denerim as our next destination.<br />
Back in Denerim<br />
You know, we have been here so much that this is starting to feel like <strong>com</strong>ing home every time we visit!<br />
First let's stop by the Chantry Board and turn in our quests then head in the direction of the Alienage and find the<br />
Hooded Courier standing on the side of the square. His client appreciates our generosity cool! If you have not<br />
already had the two suits of Drake Scale Armor made for you at Wade's Emporium, go ahead and drop in to order<br />
them. If he has already made you the second set, his counterman will tell you to get lost and stick the drake scales<br />
up your... Eh hem... Which means you have <strong>com</strong>pleted that side-quest and are not going to be getting any more<br />
armor made.<br />
Hit the World Map and visit The Pearl, where you will find the next Hooded Messenger in the lobby. Talk to him<br />
and then hit the map again and go to Dark Alley, talk to the Hooded Messenger there, and finally use the map to<br />
visit Rundown Back Street and see the Hooded Messenger there. The final Hooded Messenger is in the Alienage<br />
which we do not have access to yet so we are done with quests in Denerim for now.<br />
Hit the World Map and return to Redcliffe Village.<br />
The Windmill<br />
Knight-Commander Harrith is standing next to the door to the Windmill go up and talk to him, to deliver the 10<br />
Lyrium Potions for the Mage's Collective this updates the quest 'A Gift of Silence' which we can then turn in next<br />
time we are in Denerim. With that outstanding chore now <strong>com</strong>plete, head over and talk to Bann Teagan, who is<br />
nearby.<br />
He relates that there is a secret passage in the mill that only his family knows about, and using that you can get into<br />
page 113 / 145
<strong>SuperCheats</strong>.<strong>com</strong> Unoffical <strong>Dragon</strong> <strong>Age</strong>: <strong>Origins</strong> Guide<br />
http://www.supercheats.<strong>com</strong>/<strong>guide</strong>s/dragon-age:-origins<br />
Check back for updates, videos and <strong>com</strong>ments for this <strong>guide</strong>.<br />
the castle. Nice! Your conversation is interrupted when a woman runs out from the castle and urges Teagan to<br />
<strong>com</strong>e back into the castle with her alone with her!<br />
Lady Isolde describes what has happened that the man responsible for the raising of the undead was caught and<br />
punished, but that the attacks still take place. From what she says though, Teagan's nephew her son Connor may be<br />
part of this!<br />
Isolde explains that the Arl yet lives, and she then begs Teagan to <strong>com</strong>e back to the castle with her, giving a<br />
disjointed story with few details to convince by. After she fails to give you useful information, you are certain that it<br />
is a trap, but Teagan vows to go anyway, saying that they are still his family and that he must help them if he can.<br />
While Isolde waits for him at the bridge, he tells you to use the secret passage and enter the castle while he<br />
ac<strong>com</strong>panies his sister-in-law into the castle. The plan is for him to try to distract whatever it is in the castle while<br />
your party slips in unnoticed, and do whatever it is you can do to defeat it. Basically you are going to be winging it<br />
but hey, we have been winging it all along, right?<br />
Teagan gives you his signet ring which apparently will open doors in the castle. The last order he gives you is to<br />
concentrate on the Arl he is to be rescued at all costs, even if the rest of them must die. Yeah, doesn't sit well with<br />
me either but we are simply an arrow shot into the air, right?<br />
The quest is updated, we are given the ring, and we have already sold off our loot and checked our kit, all of our<br />
chores are done, so it is time we got on with this adventurer thing, right?<br />
The secret passage entrance is behind the main shaft, and not very well hidden by the straw scattered on the floor. I<br />
cannot believe we did not notice this last time we were here! I mean hey, we are Grey Wardens, it is not like this is<br />
the first secret passage entrance we have ever seen, right? Well, we see it now, so let's open that puppy up and claw<br />
our way through the narrow, rat-infested tunnel, open the door at the other end, and climb down into the guts of<br />
Castle Redcliffe, shall we?<br />
page 114 / 145
<strong>SuperCheats</strong>.<strong>com</strong> Unoffical <strong>Dragon</strong> <strong>Age</strong>: <strong>Origins</strong> Guide<br />
http://www.supercheats.<strong>com</strong>/<strong>guide</strong>s/dragon-age:-origins<br />
Check back for updates, videos and <strong>com</strong>ments for this <strong>guide</strong>.<br />
Castle Redcliffe<br />
We end up in a hallway with a door at the other end, behind which the sounds of beasts are clearly heard. Wynne<br />
<strong>com</strong>ments that at least the place does not seem to be much used whatever that means. There is only one direction<br />
to head in that does not involve a strategic retreat, so I guess we have to open that door, eh?<br />
I knew it! Undead! After we kill them we hear a human talking it turns out we are in the dungeons! A quick inquiry<br />
reveals that the man is the mage who poisoned the Arl and he freely admits that but claims that he has had nothing<br />
to do with what came after that, and he does not know anything useful about it either.<br />
The mage admits that Loghain hired him to poison the Arl and then he admits that he is a Blood Mage! Wynne<br />
recognizes him apparently he was a mage in the Circle before he escaped to do his Blood Mage thing. As you<br />
question him further you learn that Connor is also a mage, and that Isolde is supporting her son's illegal magic<br />
studies. The plot thickens!<br />
If Connor is responsible chances are he did not cause this on purpose, but it does not help that Isolde has been<br />
covering his magic abilities up. The mage does not think that Connor knows enough to summon Fade creatures<br />
intentionally but admits that the boy is strong enough so that he could have done it accidentally. He wants to help<br />
us but accepting his help could cause you problems remember that Alistair is an ex-mage hunter, and Wynne is a<br />
member of the Circle.<br />
I offered to let him out if he would ac<strong>com</strong>pany us into the fray, and he declined, preferring to stay in his cell and<br />
wait so much for his wanting to atone for his misdeeds. Huh. Atone as long as he does not have to risk his skin! At<br />
the end of the conversation you pick up two more Codex Entries.<br />
In the next area there are lootable items a pile of filth, and a book on the floor that gives a Codex Entry. Once you<br />
reach the end of this section you trigger an undead spawn, so fight them off and then take the stairs to the Main Floor<br />
of the castle.<br />
Main Floor<br />
You enter the area in an empty room, but when you step through the next door into the hall you face more undead.<br />
The large room across the hall has three demons and a book on a lectern that gives you another Codex Entry.<br />
Basically what you want to do here is go room-to-room, clearing the enemies and looting the lootables. Enter the<br />
armory and strip it bare,<br />
When you enter the kennel you will have to take out the three war dogs there. Loot the chest to get a gift for your<br />
dog as well as some dog-specific items, and then head back into the hall. There is a trap just inside the next area for<br />
you to disarm, and some more undead to kill in the next room. There is a quest we are doing that requires us to<br />
collect Corpse Gall which I must admit was pretty rare until now but everything here seems to be dropping it as loot!<br />
In a room at the end of the hall you will encounter Valena, the Arlessa's maid. She is also the Smith's daughter who<br />
we promised to look for. You tell her about the tunnel out through the dungeon, and she takes off. One more quest<br />
updated!<br />
We cannot head South through the door in the room across the hall because it is locked and we do not have a key,<br />
so enter that room and head east to the Basement entrance. The Basement has a lot of lootable containers in it<br />
including one with a gift and a love letter in it. There is an exit to the Courtyard here take that when you are finished<br />
looting the Basement.<br />
The Courtyard<br />
There is a barrel to loot to your right as you enter the Courtyard, and some undead will charge out from the far side<br />
page 115 / 145
<strong>SuperCheats</strong>.<strong>com</strong> Unoffical <strong>Dragon</strong> <strong>Age</strong>: <strong>Origins</strong> Guide<br />
http://www.supercheats.<strong>com</strong>/<strong>guide</strong>s/dragon-age:-origins<br />
Check back for updates, videos and <strong>com</strong>ments for this <strong>guide</strong>.<br />
meet them by the stairs and kill them. A quick check of the Gate determines that it is locked and we cannot raise it<br />
though I do recall raising the gate to be something that was discussed as part of the plan prior to our setting off on<br />
this adventure.<br />
Loot another barrel on the other side of the stairs and then head up the stairs and back into the Main Hall.<br />
The Main Hall<br />
As we enter the next chamber we get a very strange CS and it turns out that Connor really is at the root of the<br />
problems here. The question in my mind is to wonder if Connor is possessed by a demon or is he really bent?<br />
Connor sets his guards onto us after he gives his long position statement, and the fight restores Teagen to his right<br />
mind. I know that there was something fishy about Isolde's story earlier and now Teagen is ripping her a new one<br />
for the deception!<br />
In an act of desperation Islode sends Teagen for the mage so that we can interrogate him. He explains our options<br />
kill him, or deal with the demon in the Fade. Ah, back to the Fade it seems assuming that we can find a human to<br />
sacrifice to make the spell work.<br />
Isolde volunteers to be the sacrificial lamb and personally I think she deserves that fate for what she has done but the<br />
decision as to whether to do it is left up to us. So how do you decide? Someone has to die either way the mother or<br />
the son? Technically the son is an innocent victim of the mother's illegal scheme on the other hand he is rather<br />
annoying... Ah but the thing is, I am good, so nobody must die.<br />
I decide to head to the Mage Tower to see if the Circle has the Lyrium that we need, despite the fact that the trip will<br />
just give that little bugger more time to play King with his undead army. Since we are here now and there are areas<br />
of the castle we can reach, we may as well clear them and loot what there is to loot before we depart of the Tower!<br />
In the next room are some suits of armor to fight, as well as some undead in the small room off of it. This room has<br />
some lootable containers one of which has a gift in it, and there is a book with a Codex Entry as well. The room at<br />
the end of the hall has a desk you can loot with another gift that is clearly Alistair's, and a book for another Codex<br />
Entry.<br />
Back in the other room are the stairs to the Second Floor let's head up there for some more looting fun!<br />
Second Floor<br />
The first room on the right has a bookshelf with another gift and some vellum, and a vanity with a healing potion. As<br />
you near the door on the left in the hall the bodies that littered the floor <strong>com</strong>e to life more undead for us to kill! As<br />
we enter the adjacent chamber more undead attack,<br />
The door in this chamber is for the Vault and hey, we have the key we looted earlier! Go us!<br />
The vault is just full of good stuff though if you are like me, you are quickly running out of space in your bag! Make<br />
sure you grab the gift in here and since we will be back, if you run out of room, leave the stuff for grabbing after we<br />
return from the Mage Tower, where we can sell off the loot we do not want, right?<br />
Now let's clear the rooms to the South take out the undead there and loot there is another gift in here, a Stone<br />
<strong>Dragon</strong> Statue and a book with a Codex Entry in the room across the hall. Right then, we've cleared most of the<br />
Second Floor, so now we should head downstairs past Ser Perth and his knights who are in the hall with Isolde and<br />
Teagen and use the door to the Courtyard.<br />
With the castle gates now open we can head straight out to the World Map. The first choice I made was to head to<br />
page 116 / 145
<strong>SuperCheats</strong>.<strong>com</strong> Unoffical <strong>Dragon</strong> <strong>Age</strong>: <strong>Origins</strong> Guide<br />
http://www.supercheats.<strong>com</strong>/<strong>guide</strong>s/dragon-age:-origins<br />
Check back for updates, videos and <strong>com</strong>ments for this <strong>guide</strong>.<br />
my camp so I can distribute kit, gifts, upgrade my party members who have leveled, and sell off my loot to Bodahn.<br />
Once that is done, head for the World Map, and select Lake Calenhad.<br />
Lake Calenhad<br />
Head down to the Tavern and talk to the Mage's Collective Representative outside to turn in the quest 'Greasing the<br />
Wheels' for our reward. Now enter the Spoiled Princess.<br />
Oghren spots his ex-girlfriend in the Tavern and insists that you have to back him up my response was 'She's not a<br />
Genlock, you can handle her yourself!' It turns out that the last time he had seen her was when she threw him out of<br />
their house, and tossed all his clothing down a lava vent!<br />
I decided that it might be wiser if I talked to her first, and told him that.<br />
She seems nice enough a dwarf and once I got her talking I realized she has some pretty good reasons for feeling the<br />
way she does about him for instance he got drunk and wrestled a Nug naked at her father's funeral the story might<br />
have been even better but her boss yelled at her to get back to work before she could dish any more details.<br />
He is determined to give it a try so I was as supportive as I could be, and it all turned out okay. As much as she talks<br />
the game, it is clear that she actually likes that smelly drunken midget!<br />
Exit the Tavern and head over to the docks to catch the ferry over to the Tower since it is much more impressive to<br />
journey to it this way.<br />
When you get to the tower, talk to Irving and tell him about the problem. He does not even make us beg or call in a<br />
favor, he just concludes that it can be done, figures out what he needs to do it, and heads out! Irving is one<br />
righteous dude!<br />
Hit the World Map and head for Redcliffe Village now.<br />
Redcliffe Village<br />
Run down to the Chantry and turn in the quest 'Skin Deep' for 5 gold and some XP glad that one is done! With that<br />
done, head over to the Blacksmith Shop and go in.<br />
Owen is here waiting for you and he is ecstatic! He offers you a reward a dwarven-made set of armor that Oghern<br />
likes, though it is not exactly the equal to what we are already wearing... But that wraps up our business here, so<br />
head back up the hill for the gates to the castle now.<br />
As you enter the castle you find that Irving and his crew have already arrived. Talk to him to trigger the CS. You can<br />
talk with him about the procedure if you need to, and asking his advice can help prepare you as to what to expect.<br />
When you are ready, tell Irvine and the ritual will <strong>com</strong>mence.<br />
As they get ready, Alistair says he is relieved that this was the route we decided to take, and then Irvine asks who will<br />
go? Whoever it is needs to be in your active party if they are back at camp you have to go there and add them to<br />
your party so when you have them, they will appear alone in the Fade.<br />
Of the four choices that we have, I think that either Wynne or Morrigan are the way to go Jowen is too weak, and<br />
Irvine too old.<br />
In the Fade<br />
page 117 / 145
<strong>SuperCheats</strong>.<strong>com</strong> Unoffical <strong>Dragon</strong> <strong>Age</strong>: <strong>Origins</strong> Guide<br />
http://www.supercheats.<strong>com</strong>/<strong>guide</strong>s/dragon-age:-origins<br />
Check back for updates, videos and <strong>com</strong>ments for this <strong>guide</strong>.<br />
As you move along you hear the Fade images of Connor talking to his father the Arl, and the Arl talking back. You<br />
will actually encounter the Arl ahead as you move towards the first portal you can try to explain what is happening<br />
to him, letting him know that he is in the Fade. He wants you to help Connor but hey, that is why we are here, right?<br />
Head over to the portal nearby and use it, and then run ahead to find Connor. You talk to him to call out the demon<br />
and fight it. Just before you do enough damage to kill it, the demon retreats, disappearing before your eyes in a puff<br />
of flames. You are not done yet head back to the portal and use it.<br />
Find Connor again and talk to him drawing out the demon again but this time it summons a minion. Take out the<br />
demon first, then the minion and again just before you would have killed the demon it retreats. Head to the portal<br />
and use it.<br />
Find Connor again and talk to him again. You try to reason with it, but that does not work and it appears with<br />
another minion take them both out, and use the portal again.<br />
This time you find the demon in its real form waiting for you it tries to convince you to leave it alone, but I chose not<br />
to talk to it and the battle begins!<br />
It is tough but not as tough as you and slowly you weaken it and then defeat it, and you are pulled back out of the<br />
Fade. You get a CS upon your return that shows the castle guards holding Viking funerals and then you are back in<br />
the castle. Connor is better now he does not remember what happened to him and they are deciding upon what to<br />
do with him and Jowen.<br />
You are asked for your opinion on this specifically on what should happen to Jowen there really is no right answer to<br />
this, so say what you feel. It did not give me the option of saying that Jowen AND Isolde should be imprisoned<br />
together which is what I would have preferred for say...<br />
The Arl's condition is now discussed, and Isolde declares that the Urn of the Sacred Ashes is what is needed to save<br />
him! Well, here is where we get to surprise everyone and tell them we already found that!<br />
The Urn lives up to its reputation and the Arl is cured! We get the Achievement/Trophy 'Hero of Redcliffe' and the<br />
Arl wants to reward us. We mention the treaty of course, but he insists that he must make a gesture, and declares<br />
your party Champions of Redcliffe, and awards you a shield.<br />
The Arl proposes a <strong>com</strong>promise that includes putting Alistair on the throne and asks for your blessing on the entire<br />
affair. The Arl wants you to approve of his plan he says that he needs you to make it work and he is probably right.<br />
If you agree, the Arl will spread the word and call for a Landsmeet a meeting of the Nobility, in order to declare a<br />
new King.<br />
The Arl calls for Jowen and sentences him to death. After that, the Arl asks if you are ready to go to Denerim and<br />
hold the Landsmeet. As this is not the end-game yet, we will still have time to finish the quests that we have not yet<br />
<strong>com</strong>pleted, so there is no reason not to head off to Denerim now and have the Landsmeet! To Denerim!<br />
page 118 / 145
<strong>SuperCheats</strong>.<strong>com</strong> Unoffical <strong>Dragon</strong> <strong>Age</strong>: <strong>Origins</strong> Guide<br />
http://www.supercheats.<strong>com</strong>/<strong>guide</strong>s/dragon-age:-origins<br />
Check back for updates, videos and <strong>com</strong>ments for this <strong>guide</strong>.<br />
Denerim Part 3<br />
Your arrival in Denerim begins with a cinematic CS that is impressive and as the Arl assesses the situation, we see<br />
the army marching into the city. Next we see Loghain in an audience with the Arl and Loghain is not happy! Here<br />
is where we inform Loghain that there is a better hier to the throne already, but Loghain is not backing down.<br />
The Arl lays the cards on the table, and Loghain takes his leave, declaring that he will not go down without a fight!<br />
At this point you earn the Achievement / Trophy 'Standard-Bearer' for using the treaties to recruit all possible allies.<br />
The Arl gives you instructions and advice, and you are now once again free to adventure. One important difference<br />
is that now that you have <strong>com</strong>pleted the Arl quest line, the Alienage is reopened. It is time to venture forth into the<br />
city, mate but first let's explore the estate and loot what there is to loot!<br />
The Arl's Estate<br />
Your party is here instead of in camp this is now your base of operations but that only makes sense. Leliana is in the<br />
next room go have a chat with her to learn what she knows about the city and estate. Now would be the time to do<br />
the leveling stats and skills stuff for any of the party that has leveled as well.<br />
You will find an Elf named Nigella you can chat with briefly she is from the Alienage in Redcliffe!<br />
There are a bunch of Codex Entries to be had here, a Love Letter, and some odd kit to be looted, and when you get<br />
to the Arl's personal chambers you get a CS with him, and are introduced to Anora's handmaiden, who has been<br />
sent to request your help.<br />
It seems that Loghain may be considering killing his daughter to remove the impediment that she represents to his<br />
claim on the throne. Anora wants your help to keep that from happening. This flags the quest 'Rescuing the Queen'<br />
and then the handmaiden departs. Talk to the Arl again and he will give you his opinion on the nature of this quest<br />
and it is clear that he is hoping for the best here. Head to the Estate Exterior to get the party formation screen and<br />
select your party, then we have some minor chores to attend to.<br />
First we visit the Tavern, and talk to the Bartender to turn in our outstanding quest 'Correspondence Interruptus' for<br />
our reward. He now has two new quests for us False Witnes, and Dead Drops. Take them both.<br />
Step outside and look at the cages by the Square for the first Dead Drop location and click it. Next step over and<br />
chat with Slim Couldry to get the final break-in assignment, called 'The Private Collection.'<br />
Head over to the City Map and you will see that the Arl of Denerim's Estate is now selectable so go ahead and select<br />
it!<br />
Arl of Denerim's Estate<br />
On the way to the Estate we get a <strong>com</strong>bat interruption it is the Crows! And they want Zeveran back or dead it is all<br />
the same to them. I guess their appreciation and fear of us only extends so far. If Zeveran is not in your party, the<br />
game forces him into it, and you have to select the other two members who will be assisting you. It is situations like<br />
this that are why you should always be upgrading skills, stats, and kit on all of your party members!<br />
Soon enough the Assassins are dead Taliesen is dead, and Zev feels that he is now free of the Crows. He wants to<br />
leave your party now but leaves it up to you. We have another Rogue to use if you are not that class, so there is no<br />
real reason why we have to keep him. I elected to persuade him to stay just because I think he is funny, but you can<br />
safely let him go if you like.<br />
When you have looted all of the bodies and containers, head to the City Map to continue your journey. If you kept<br />
page 119 / 145
<strong>SuperCheats</strong>.<strong>com</strong> Unoffical <strong>Dragon</strong> <strong>Age</strong>: <strong>Origins</strong> Guide<br />
http://www.supercheats.<strong>com</strong>/<strong>guide</strong>s/dragon-age:-origins<br />
Check back for updates, videos and <strong>com</strong>ments for this <strong>guide</strong>.<br />
Zev but do not want to have him in your active party for the next mission you will need to visit your camp and<br />
change him out.<br />
Erlina is on the left as you approach the barricade waiting for you. After you talk to her, head to the left and sneak<br />
through the side of the Estate, and when you get to the back section Erlina will distract the guards to that you can slip<br />
inside. Put your disguises on, and tell her to distract them.<br />
Inside the Estate<br />
Once you are inside, walk forward for a CS in which Erlina gives you more instructions. You get a quest update and<br />
she tells you where the Queen is.<br />
Basically you just run North towards the icon on the map following the quest arrow. When you arrive it appears that<br />
some sort of magical seal has been placed on the door to her chamber! We have to find the mage who cast this<br />
which means seeking out Howe hey maybe we will get to kill him after all!<br />
On your way into Howe's chamber there is a chest with some Grey Warden Documents be sure to grab those!<br />
When you pass through the door you get a CS, and then the stranger recognizes Alistair he is a Grey Warden from<br />
Orlai!<br />
We talk with him and learn his story and then we give him the papers we just looted as they are his. Warden<br />
Riordan is not destined to join us now he is going to escape and heal up, and then perhaps join us later?<br />
There is a treasure room on the other side of the hall from where we entered Howe's chambers that has a lot of loot<br />
in it including a gift so we should empty it out as a favor to Howe, yes? Now back to the Dungeon door and down,<br />
and we see quest markers on the radar plus enemy markers oh joy! A fight!<br />
Take out the guards and mind the traps so you do not set them off. Basically what you are going to do is clear each<br />
room and then loot them. When you reach the torture chamber you release the son of a Noble and Clan Leader<br />
named Bann Sighard who provides you with some more intel and his rescue and release can only help our cause so<br />
good on ya mate!<br />
Deeper in the Dungeons are some cells one of them has a prisoner from the Battle at Ostagar who has gone quite<br />
mad. This tuns out to be Rexel, the missing soldier that the Chantery is seeking! You have a choice kill him to put<br />
him out of his misery, or free him.<br />
Now head into the room with Howe and it is evident that he was expecting us... So yes, we do get to kill him!<br />
Sweet!<br />
We get a nice CS of Howe bleeding out and then we loot his body for his key and some valuables. Now head to the<br />
cells in the very back and release another prisoner a Templar named Irminric who was captured during the search<br />
for Jowan. He wants you to deliver his signet ring to his sister, Bann Alfstana.<br />
Now we retrace our path back upstairs and release the Queen.<br />
Observation: When the Queen exits her chambers you may notice that one of the dialogue options you have is<br />
"Aren't you a little short for a guard?" That is a line from the all-time epic blockbuster film Star Wars! When Han<br />
and Luke release Princess Leia from the cell on the Deathstar, that is what she says to Luke...<br />
Escape!<br />
As you try to leave, you are stopped by that female warrior that was at the audience earlier and told to surrender or<br />
die! I choose Die!<br />
page 120 / 145
<strong>SuperCheats</strong>.<strong>com</strong> Unoffical <strong>Dragon</strong> <strong>Age</strong>: <strong>Origins</strong> Guide<br />
http://www.supercheats.<strong>com</strong>/<strong>guide</strong>s/dragon-age:-origins<br />
Check back for updates, videos and <strong>com</strong>ments for this <strong>guide</strong>.<br />
And I did...<br />
Yeah this is a tough fight. My party wiped and we all got captured... And I got a CS in which Wynne reports our<br />
capture to the Arl the thing is, Wynne was WITH me when I got captured so... I know that this is part of the story<br />
line, but it sorta sucks to get P0wn3d like this.<br />
Now the thing is, this is one of those spots where you have two possible out<strong>com</strong>es, and since I am carrying enough<br />
Elfroot and bottles to make 200 healing potions, there is no reason why we cannot experience both out<strong>com</strong>es! And<br />
so here they are:<br />
Confrontation: Victory!<br />
As you step out of the hall into the chamber you are cornered by Ser Cauthrien, Loghain's General Commander of<br />
the Royal Guard and a dozen of her knights, with a few mages to boot! She demands your surrender, but you try to<br />
talk to her to help her see the truth.<br />
You tell her that the Queen was being held captive here and of course she says that is a lie, because Loghain would<br />
never tolerate that. You are to be charged with Howe's murder, she declares.<br />
So you point to the Queen and say she is right here, ask her yourself!<br />
Anora steps forward and cries that you tried to kidnap her oh that double-crossing bitch!<br />
Once she says that, the fight is on! You are heavily outnumbered, they are really good at fighting, so you must stay<br />
on top of your party health. As soon as one takes damage, hit them with a healing potion in fact you should have<br />
the healing potions on your first page macro button so that you just have to hit it without having to think about it!<br />
You are about to burn through a huge number of potions but that should not be an issue for you...<br />
By now you should have healing capped at Master, and you know that you can buy an unlimited supply of Elfroot as<br />
bottles from the shop in the Dalish Camp, right? If you run low during the fight, you can use the menu to make more<br />
during the fight. I started with 95 potions made 55 more in the middle of the fight, and ended with 41, so that<br />
should give you an idea of how hard this fight was!<br />
Right so we have won the battle, but the Queen has escaped! Well, at least you had the satisfaction of killing Ser<br />
Cauthrien, right? Her body has a sword on it called The Summer Sword and it has pretty good stat's on it! It is a<br />
two-handed sword, with two available Rune slots so if one of your warriors is using two-handed style, you may want<br />
to grab this. Looting it gets you a new Codex Entry called The Summer Sword. Read the Codex Entry on it, it is<br />
pretty cool.<br />
Since we are already here, and Howe is dead, we may as well loot the rest of the Estate, right? I mean why not?<br />
Don't forget to look around the grounds on our way back to consult the Arl too...<br />
When you arrive at the Arl's Estate he greets you happily, relieved that you are not dead. Well, me too, really, but<br />
anyway, the Queen is standing here, unapologetic, and actually knocks on you for outing her to the guards. Despite<br />
the acidic feelings in the room, she asks you to hear her out while she explains what her plan is...<br />
She begins to talk about the situation in the Alienage she is not sure what exactly has been happening in the<br />
Alienage, but she believes that it is the key to this mess. The Arl points out that the Queen could have simply<br />
<strong>com</strong>municated this through a message from her handmaiden, but the Queen insists that to attain victory over her<br />
father, we need a stronger candidate for the throne her in just those words.<br />
She has a point about the matter of neutrality or lack thereof putting a Grey Warden on the Throne would not be<br />
well received by all. With that she takes her leave, and we are left with the Arl, who it seems may admire Anora<br />
more than he should. Still, the Arl warns us not to trust her too much, and that sounds like sound advice to me!<br />
page 121 / 145
<strong>SuperCheats</strong>.<strong>com</strong> Unoffical <strong>Dragon</strong> <strong>Age</strong>: <strong>Origins</strong> Guide<br />
http://www.supercheats.<strong>com</strong>/<strong>guide</strong>s/dragon-age:-origins<br />
Check back for updates, videos and <strong>com</strong>ments for this <strong>guide</strong>.<br />
During the conversation we suggest that perhaps Anora and Alistair should get married but Alistair really does not<br />
like that idea at all. The Arl tells us why we should keep pushing for Alistair to be king it is the Royal Bloodline don't<br />
cha know? The conversation ends on the Alienage just to remind us that we have some things to do there... And<br />
then the Arl tells us to go have a chat with Anora which we planned to do anyway, right?<br />
The two story divergences converge here please jump to "Deneim Part 4" now.<br />
Confrontation: Captured!<br />
As we step out of the hall to escape we are confronted by Loghain's Commanding General, Ser Cauthrien, and told<br />
to surrender or die! She orders her troops to attack, saying "Loghain wants the Warden Dead or Alive!"<br />
We get a CS in which the Queen reports that we have been captured. The Queen tells the Arl that they must rescue<br />
you err you and Alistair!<br />
Next CS is a cinematic tour of the dungeon, and we wake up wet, sticky, confused, and nearly naked in a cell.<br />
Alistair has been worrying about us, but he is happy that we are now awake and of course we ask where are we?<br />
Alistair deduces that we are not in the Royal Palace and speculates that we are in Fort Drakon. We tell him not to<br />
worry, that the others will <strong>com</strong>e for us, and Alistair wonders out loud just who is it that we think will <strong>com</strong>e? The<br />
thing is, whoever we pick and it lets us pick two will be who actually shows up to rescue us! So pick with care...<br />
I picked Leliana and Calvin (Calvin is my dog) and she ends up doing this cute little bluffing routine where she tries<br />
to convince the guards that she is delivering Calvin to the garrison. The guard ends up going for his Captain because<br />
hey, low-level non-<strong>com</strong>'s do not make that sort of decision, right?<br />
When the Captain shows up, Leliana bluffs her way past the guards and she is in!<br />
When we reach the door that leads to the rear section and presumably the dungeons, Leliana stops and observes the<br />
guards, thinking it might be a bit tricky getting past them, and then she notices a scaffolding nearby with a Ballista on<br />
it. I know what she is thinking and it is wicked!<br />
We turn the nearby Ballista towards the far wall and fire it and the guards all run in the direction of the noise made<br />
by the bolt hitting the wall, leaving the door unguarded. How cool is that? Through the door we go, and up a short<br />
hall to another door, but when we enter the next chamber the guards here immediately attack us! Well, there are<br />
only four of them, so with Calvin's help we take care of the situation.<br />
It is still a long way to go to get to where we are being held captive through the next door and then turn right, and<br />
head along the hallway here, and according to the radar map there is a group of guards on the other side of the<br />
Metal Door at the end of the hall... There is nothing for it we have to go in so fight we do! But it is not guards, it is<br />
guards AND war dogs! Well, we kill them anyway, and proceed down the stairs you have been saving after each<br />
fight, right?<br />
When Leliana reached the cells where we are being detained, she picked the lock on the door and opened it causing<br />
the game to bug so that we could not speak to our main character only to Alistair, and that did not progress the<br />
mission! I had to re-load from a save, re-fight the guards, and then loot the key to the cell and use it to open the<br />
door to the cell in order to get the mission to progress...<br />
We will need to clear each room systematically and loot to find the Colonel or the Captain we need to kill to get one<br />
of the keys to the front hall door in order to escape but hey we are here anyway, right? And it would be good to<br />
know if there are any Codex Entries or quest items here too.<br />
When we reach the front door with the key we get the City Map, and select the Arl's Estate in Denerim. We arrive<br />
there and run straight to the Arl's quarters, where he and the Queen are waiting for us.<br />
page 122 / 145
<strong>SuperCheats</strong>.<strong>com</strong> Unoffical <strong>Dragon</strong> <strong>Age</strong>: <strong>Origins</strong> Guide<br />
http://www.supercheats.<strong>com</strong>/<strong>guide</strong>s/dragon-age:-origins<br />
Check back for updates, videos and <strong>com</strong>ments for this <strong>guide</strong>.<br />
The Queen is happy to see us and we are happy to see her! Our relationship is cordial, and Anora provides a<br />
tactical assessment of the situation with her father, and tells us that we need her as she is a stronger candidate for the<br />
throne.. She has made her case, and now she retires to her quarters, and the Arl gives us his assessment of our<br />
situation.<br />
The difference between this line and not being captured appears to be the quest "Captured!" and the fact that there<br />
were Codex Entries in the other line and not in this one, so you have to decide which you want to do...<br />
The two story divergences converge here please jump to "Denerim Part 4" now.<br />
page 123 / 145
<strong>SuperCheats</strong>.<strong>com</strong> Unoffical <strong>Dragon</strong> <strong>Age</strong>: <strong>Origins</strong> Guide<br />
http://www.supercheats.<strong>com</strong>/<strong>guide</strong>s/dragon-age:-origins<br />
Check back for updates, videos and <strong>com</strong>ments for this <strong>guide</strong>.<br />
Denerim Part 4<br />
Note: I chose to go with the line that did not include me being captured because there were Codex Entires in it, and<br />
not in the Fort Drakon one. I suspect that it will not really make that much of a difference in the end because I am<br />
reasonably certain you end up killing Ser Cauthrien anyway, but just to be on the safe side I stuck with that one...<br />
Anora's Chambers<br />
The Queen tries to convince you to support her seeking the throne. Clearly she thinks that your support of her would<br />
be important and she makes some good points in her very persuasive argument but the bottom line here is that we<br />
do not need or want to create an alliance with her right now.<br />
It turns out that she is willing to marry Alistair under certain terms which was a surprise to me! On the other hand<br />
following that topic line allowed us to end the conversation without making a direct refusal or an agreement, which<br />
is what we wanted anyway. Ah diplomacy!<br />
Leave Anora's chambers and the Estate, and once you are outside head for the World Map, because we are now<br />
closing in on a pivotal point in the game, and we should try to get the side-quests out of the way that do not involve<br />
the areas of the game that we will be going to for the rest of the story line.<br />
Our first destination is Orzammer.<br />
Orzammer<br />
We are looking for Brian for the quest "False Witness" and for a Dead Drop for the quest of that name.<br />
First exit Orzammar via the Hall of Heroes to the area outside where the merchants are set up, and you will find the<br />
Dead Drop on the right side of the area, near the merchant Ahren.<br />
Brian can be found in the same general area just turn away from the Dead Drop and look at the nearby rock pillar he<br />
is standing next to it and is marked by a heart. When you confront him, he immediately attacks you and you kill him<br />
quickly as he is unarmed and not wearing armor.<br />
Now head for the nearby World Map and select Redcliffe Village.<br />
Redcliffe Village<br />
The Dead Drop here is near Dwyn's House just follow the arrow marked on the map.<br />
Stop by the Chantry and speak to Chanter Farrah to turn in a quest and collect our reward, and then head back to the<br />
World Map and select Lake Calenhad Docks.<br />
Lake Calenhad Docks<br />
Skinny Frank is down near the docks where you catch the ferry to the Circle Tower go and talk to him and he attacks<br />
with the aid of his two guards.<br />
Now return to the World Map and select Denerim.<br />
Back in Denerim<br />
Cam is found inside the Wonders of Thedas Shop go inside and up onto the balcony in the back and talk to him and<br />
page 124 / 145
<strong>SuperCheats</strong>.<strong>com</strong> Unoffical <strong>Dragon</strong> <strong>Age</strong>: <strong>Origins</strong> Guide<br />
http://www.supercheats.<strong>com</strong>/<strong>guide</strong>s/dragon-age:-origins<br />
Check back for updates, videos and <strong>com</strong>ments for this <strong>guide</strong>.<br />
he will attack.<br />
That <strong>com</strong>pletes this quest. Exit the shop and go to the City Map, and select Bann of West Hills Estate.<br />
Bann of West Hills Estate<br />
When you arrive you will notice that a large number of guards spawn, and you have to battle them in the wine<br />
cellar. This is working as intended though not what you expected. You will need to fight your way back out of the<br />
zone disarming traps as needed.<br />
If you check the map you can see where the treasure vaults are, but the path to them is blocked by barricades, and it<br />
is clear you will not be making this heist, and you were given bad information!<br />
When you exit the cellars there are yet more guards waiting for you defeat them and make your way to the City<br />
Map. Select the Market District and return to talk to Slim about what has happened.<br />
Slim refunds the finder fee that you paid him and asks you to check back with him later and he will help you get<br />
revenge for the bad information then. Later is actually after you <strong>com</strong>plete the Landsmeet Mission, just so you know.<br />
It is now time to head over to the Alienage both to investigate it and because most of the quests that we still have<br />
flagged resolve there.<br />
page 125 / 145
<strong>SuperCheats</strong>.<strong>com</strong> Unoffical <strong>Dragon</strong> <strong>Age</strong>: <strong>Origins</strong> Guide<br />
http://www.supercheats.<strong>com</strong>/<strong>guide</strong>s/dragon-age:-origins<br />
Check back for updates, videos and <strong>com</strong>ments for this <strong>guide</strong>.<br />
The Denerim Alienage<br />
When you arrive at the gate to the Alienage, the gate is now up and the guard does not try to stop you from<br />
entering. When you do try to enter, you get the City Map select the Alienage on it and you will travel there.<br />
If you are playing a City Elf, than you already know that the Alienage is the slums that the Elves are forced to live in it<br />
is really a big cage where they can be locked away, controlled, and exploited. Despite that reality, the Elven folk<br />
that live there have made it their home you have to respect that.<br />
As you cross over the stone bridge the first person you see, on the left, is the final Hooded Courier for that quest stop<br />
and talk to her, and that <strong>com</strong>pletes 'Greasing the Wheels.' Across the road is Varel go and talk to him, and give him<br />
the letter from the Irregulars, and that <strong>com</strong>pletes 'Scraping the Barrel.'<br />
There is a Starved Veteran in the street ahead stop and talk to him and he asks for a silver piece I gave him a gold<br />
piece, but he is just as happy with silver. There is a Haggered Human nearby him when you talk to him he tells you<br />
to just stay away from him, and then runs off.<br />
Continue along the street and you will encounter a group of Elves being addressed by a group of humans the crowd<br />
is upset the humans are keeping them in quarantine and something is clearly not right here! You are a Grey Warden<br />
so go ahead and stick your nose into the mix.<br />
Talk to Shianni and she will fill you in on what has been going on in the Alienage and according to her these<br />
humans are removing Elves from the Alienage under the guise of public health, claiming that those that are removed<br />
have the plague. You vow to have a look inside this "Hospice" place, and your cousin gives you her thanks and her<br />
blessing.<br />
Unrest in the Alienage<br />
Before we do this new quest, step to the other side of the large tree here and activate the final Mystical Site of Power<br />
to <strong>com</strong>plete the quest 'Places of Power' and then move back to the so-called Healers and have a chat with them.<br />
The Healer declares that you are ill when you try to talk to him clearly they plan to take you into the Hospice, but<br />
you tell them that you are a Grey Warden, and so are immune to Blight Disease, at which point the Healer<br />
announces that there is a hefty reward on your head and orders his minions to attack! Well that suits me just fine!<br />
One of the bodies has the key to the Hospice on it so loot that and then head over to the door and unlock it and<br />
enter the Hospice. When you get inside you are attacked and from the looks of the inside of this place, whatever it<br />
is, it is not a Hospice!<br />
There is a note on the table go pick it up and read the Codex Entry for it these people are Slavers!<br />
Take the side exit and head left up the alley to the Slum Apartments at the end and use the key that was wrapped in<br />
the note. Deeper inside the building is a chest marked by a quest flag when you open it you find the missing Sextant<br />
from the Chanter's Board quest Fazzil's Request! Good on ya!<br />
Unlock the next door down with the slaver key and you will be attacked kill the soldiers here and then loot the<br />
containers and bodies. Exit back into the hall and head to the Metal Door at the end which also can be unlocked<br />
with the slaver key inside is the exit to the Alienage.<br />
Once you are outside, you are confronted by one of the slavers and they immediately attack when they realize you<br />
are not supposed to be there! They have a camp set up out here, and there is a door nearby to a warehouse that is<br />
our next step.<br />
page 126 / 145
<strong>SuperCheats</strong>.<strong>com</strong> Unoffical <strong>Dragon</strong> <strong>Age</strong>: <strong>Origins</strong> Guide<br />
http://www.supercheats.<strong>com</strong>/<strong>guide</strong>s/dragon-age:-origins<br />
Check back for updates, videos and <strong>com</strong>ments for this <strong>guide</strong>.<br />
Inside you encounter Elves who are clearly a slaving group, buying and selling fellow Elves for profit. The woman in<br />
charge implies that they have the protection of the authorities if not the tacit approval, and tells you that you are in a<br />
lot of trouble! She bails to call for the Regents Guards, and we start disarming traps there are more soldiers further<br />
inside the warehouse that we kill, and another trap in the next hall to be disarmed before we take out a trio of<br />
archers.<br />
Once they are good and dead, we head through another Metal Door and get a CS in which we meet the ringleader<br />
of this little flesh market, Caladrius. You would think that the fact that you are a Grey Warden would mean<br />
something to these people but it never does.<br />
Caladrius wants to deal with you pay him 100 gold and he gives you evidence that will incriminate Loghain but he<br />
also wants to keep the slaves and their booty. If you do this deal, you will lose the respect of your party members<br />
and be sentencing Elves to slavery. If you refuse the deal, you must fight but hey, we know how to fight, right?<br />
After you beat him into submission, Caladrius makes several absolutely unacceptable offers to you that clearly show<br />
he has no idea what a Grey Warden believe in and so you kill him. Your father is in one of the cages and you have<br />
a brief reunion with him before you urge him to get out of the area and he asks that you visit him at home because<br />
he has something that he wants to give you.<br />
From Caladius' body you loot the evidence you need and some stuff you can sell, and after you loot the containers<br />
and bodies here, hit the nearby exit door to find yourself at the World Map entrance to the Alienage.<br />
Back in the Alienage<br />
Ahead of you up the road is Ser Otto a mostly blind Templar. You can learn his story by talking to him his mission<br />
to hunt down Blood Mages is a failure according to him, but there is something else that he has detected in the area,<br />
a wrongness that he cannot name, but is trying to figure out. He asks for our help and we give it! This flags the<br />
quest 'Something Wicked' so remember, watch out for something wrong, right?<br />
Ahead of us is Alarith's Store let's visit that now.<br />
Alarith is pleased to see you and gives you a hearty wel<strong>com</strong>e home though there are no options to talk to him other<br />
than to shop. Still we can get rid of some of the loot we do not want, and he has a few items that we do want, like a<br />
Tome of Skill and Sundry, some plans, and a gift. Once we have what we want it is time to head back into the<br />
Alienage.<br />
There is a pool of blood that you should examine on the ground near Cyrion's House after which the beggar we<br />
helped earlier <strong>com</strong>es back with a friend and tries to put the touch on us again. Fool me once, shame on you, fool<br />
me twice, shame on me! I told him I was out of coins...<br />
Cyrion's House<br />
Your father is waiting for you inside and like father's everywhere he <strong>com</strong>plains that you are too thin! The item he<br />
wanted to give you is your mother's dagger called "Fang" that has good stats and three Rune mounts on it! As this is<br />
better than the dagger I am presently using as my off-hand weapon, I went ahead and equipped it.<br />
That wraps up the dialogue with your father so go over and chat with Soris you get the dialogue as if you have not<br />
already solved the slavery trade, including asking where you father is when he is right there in the room with you!<br />
Poor coding I am guessing, but what the heck, it is a small flaw in an otherwise amazing game!<br />
Back to the Alienage, and now we are headed for Valendrian's House.<br />
Valendrian's House<br />
page 127 / 145
<strong>SuperCheats</strong>.<strong>com</strong> Unoffical <strong>Dragon</strong> <strong>Age</strong>: <strong>Origins</strong> Guide<br />
http://www.supercheats.<strong>com</strong>/<strong>guide</strong>s/dragon-age:-origins<br />
Check back for updates, videos and <strong>com</strong>ments for this <strong>guide</strong>.<br />
You enter the house and it is clear that nobody lives here anymore. You loot the three containers here, and then<br />
head back out to the Alienage.<br />
Outside near where the blood was is a feral dog and when you click on it, it updates the quest 'Something Wicked'<br />
so it is now time to return to Ser Otto and tell him what you have found. He listens to your clues and then decides<br />
that you should follow him to the old Orphanage. For an old and mostly blind guy he runs pretty good!<br />
The Orphanage<br />
As you enter the Orphanage you can hear the ghostly voices of children and then a child-sized ghost runs down the<br />
hall. As you pursue the sound, things pop and crackle in the rooms you pass through, and finally when you reach<br />
the hall in the back you are jumped by war dogs!<br />
After you fight off the dogs and open the next door you are attacked by the spirit of a Tormented Woman, and then<br />
in the next room an entire group of Rampaging Spirits! This place is seriously haunted!<br />
The next room over is where you find the source of the evil a demon and after a brief CS you end up fighting it! At<br />
first you are only fighting the one demon, but then a group spawns. After you put them down, you discover the the<br />
door is locked, so you cannot continue along this route. The Templar feels that the battle is not yet finished that<br />
there is evil still but in the building next door.<br />
The door that was previously locked is now unlocked, and you can enter. As you progress to the other side of the<br />
room and the next door, the tension in the ghostly voices grows, and as you open the door another wave of demaons<br />
and ghosts attack.<br />
When you open the door to the West two more demons attack. When you move to the next room another wave<br />
attacks, and then the ghostly little boy leads you into an ambush. As you approach the next door you get a<br />
checkpoint save never a good sign and as you pass through it, you encounter the real demon!<br />
The fight with the demon seems to go well, and just when you think you have won and the Templar is speaking the<br />
demon reappears and kills the Templar! As far as I can tell there is no way to save the Templar he is meant to die in<br />
this encounter.<br />
The door to the Alienage is nearby, the quest has ended with the destruction of the demon, and that is all she wrote<br />
for the Alienage! Head to the City Map and select the Market District as our destination.<br />
The Market District<br />
Head over to the Chantry Board and turn in the quests there, and then to the Mage's Collective Representative to<br />
turn in their quests and pick up your reward. Next we head over to the Tavern, and talk to teh Bartender to turn in<br />
his last quests.<br />
Head in to the next room and turn in your Blackstone Irregulars quests, then head back into the main room and talk<br />
to Sighard, who thanks you for saving his son. He asks you what reward if any you would have I chose to ask for his<br />
support and vote against Loghrain. That closes out yet another quest!<br />
In the corner next to the bar is Bann Alfstanna the sister that you are to deliver the signet ring to. She thanks you,<br />
gives you a reward, and that is one more quest in the <strong>com</strong>pleted list!<br />
To cap this off there are two quests left in Denerim Crime Wave and Unrest in the Alienage. We cannot <strong>com</strong>plete<br />
Crime Wave until after the Landsmeet, and we <strong>com</strong>plete the Unrest quest as part of the Landsmeet quest.<br />
By my figuring the only thing that we have left to finish up is the Dead Drop quest and to do that, we just have to hit<br />
page 128 / 145
<strong>SuperCheats</strong>.<strong>com</strong> Unoffical <strong>Dragon</strong> <strong>Age</strong>: <strong>Origins</strong> Guide<br />
http://www.supercheats.<strong>com</strong>/<strong>guide</strong>s/dragon-age:-origins<br />
Check back for updates, videos and <strong>com</strong>ments for this <strong>guide</strong>.<br />
the last Dead Drop, at the Spoiled Princess Inn in Lake Calenhad so let's head there now!<br />
The Drop is inside the bar on the left side of the room and once you have made it, head back to Denerim, and visit<br />
with the Bartender at the Tavern, and that is it for the side-quests! It is now time to head back to the Arl and report<br />
in.<br />
The Arl's Estate<br />
Once you arrive back at the Estate, go to the Arl's chambers and report to him of your progress. The Arl tells you<br />
that it is time he will convene the Landsmeet and you are to bring Alistair and <strong>com</strong>e to the Palace as soon as you are<br />
ready.<br />
page 129 / 145
<strong>SuperCheats</strong>.<strong>com</strong> Unoffical <strong>Dragon</strong> <strong>Age</strong>: <strong>Origins</strong> Guide<br />
http://www.supercheats.<strong>com</strong>/<strong>guide</strong>s/dragon-age:-origins<br />
Check back for updates, videos and <strong>com</strong>ments for this <strong>guide</strong>.<br />
The Landsmeet<br />
You are likely aware that there are four possible endings to this game and if you want to get all four in a single<br />
play-through, you will have to be very careful in making your saves. If you want to get all four, do the following<br />
otherwise skip to the sample ending below.<br />
To Get All Four Endings<br />
(1) Create a save outside of the Landsmeet Chamber.<br />
(2) Decide to make Loghrain a Grey Warden (Alistair will quit the party)<br />
(3) Meet with Riordan and than make another save.<br />
(4) Turn down Morrigan's offer to you and make another save prior to accessing the roof. When you turn down her<br />
offer, Morrigan quits the party.<br />
(5) Kill the Arch Demon by sacrificing yourself.<br />
(6) Load your third save.<br />
(7) Kill the Arch Demon by sacrificing Loghain.<br />
(8) Load the second save.<br />
(9) Kill the Arch Demon by accepting Morrigan's offer.<br />
(10) Load the first save.<br />
(11) Instead of accepting Loghain, kill him. Alistair will stay in the party.<br />
(12) Turn down Morrigan's offer and she will leave the party.<br />
(13) Sacrifice Alistair to kill the Arch Demon.<br />
That is all four endings you will get the Achievement / Trophy<br />
Sample Ending<br />
As you enter the Landsmeet Chamber, the Loghain protests the accusations made against him accusing you, the Arl,<br />
practically everyone present, of selling out the Kingdom. Loghain repeats the scheme that he cooked up so long ago<br />
that it was the Grey Warden's that caused the death of the King.<br />
Loghain has no intention of being convinced of anything he is on the offensive and he clearly believes that he can<br />
win. Anora makes her appearance and betrays you and Loghain changes his strategy, pushing for his daughter's<br />
position as Queen to be ratified.<br />
Loghain orders that you be taken outside to be executed and the battle begins!<br />
Just as the battle hits its peak, the Chantry's Revered Mother appears and stops the battle! The Landsmeet agrees to a<br />
duel to settle the argument and we are asked if we accept. We do for Alistair and we are his champion!<br />
The fight with Loghain is not to the death as soon as you wear his health down to a sliver, he yields.<br />
* To have Loghain be<strong>com</strong>e a Grey Warden you must choose to give his daughter the crown.<br />
* If you give the crown to Alistar, he will kill Loghain.<br />
If you chose to make Loghain a Grey Warden, Alistair will leave your party, you will view that ceremony, and then<br />
his daughter Anora <strong>com</strong>es in to address you as a group. I get the definite feeling that being rid of him was what she<br />
wanted, any way that she could get it, as long as it did not look like it was her doing it!<br />
The Last Crime Wave Quest<br />
Before you head off to Redcliffe for the beginning of the end, you may want to wrap up any outstanding quests that<br />
page 130 / 145
<strong>SuperCheats</strong>.<strong>com</strong> Unoffical <strong>Dragon</strong> <strong>Age</strong>: <strong>Origins</strong> Guide<br />
http://www.supercheats.<strong>com</strong>/<strong>guide</strong>s/dragon-age:-origins<br />
Check back for updates, videos and <strong>com</strong>ments for this <strong>guide</strong>.<br />
you have including the final quest in Slim's Crime Wave series, as once you begin the end game there is no turning<br />
back and once you slay the Arch Demon, the game is essentially over. While you can do the DLC content after the<br />
game ends, you cannot do any of the main story quests and side-quests that you failed to finish.<br />
Talk to Slim in Denerim Markets to learn that he now has more accurate information for you about the items we are<br />
supposed to steal, including the actual location of the vault. He does not want a finder's fee from you he just wants<br />
to make this right. After you agree to <strong>com</strong>plete the job, head to the City Map and select Bann of West Hill's Estate.<br />
You enter the Estate through a fireplace, and the room you arrive in is empty. Go through the door ahead and as<br />
you round the corner, beware the pressure plate trap on the floor disarm that now so you do not have any<br />
accidents. Disarm the second trap on the floor ahead, and then take out the House Soldiers that you encounter<br />
next. Continue along the hall, disarming traps and taking out soldiers you can loot side-rooms if you like, though at<br />
this stage in the game you should have more than enough gold for what is to <strong>com</strong>e.<br />
Make your way through the hall with red rugs, then the hall with blue rugs, and you will arrive at the door which<br />
you will need to unlock to get in. This takes you outside, through a series of narrow high-walled passages, and you<br />
will see one that branches to the left and goes down take that and unlock the Metal Door, then kill the soldiers<br />
inside, and head to the back of this chamber.<br />
In the next chamber is a concealed door reveal that and pass through, and then through the next door and you will<br />
find another floor trap to disarm. There are five more traps here to disarm you may as well get the XP for doing that<br />
and then you are good to unlock the door to the vault. Inside there are containers to loot, one of which contains<br />
what you came for: the Tears of Andraste.<br />
As you work your way towards the exit marked on the map, you will notice that a force has gathered to block your<br />
path you know what you have to do to them, right? Of course you do! After you take them out, exit the cellars, turn<br />
left, and take the exit (City Map) ahead.<br />
Upon your return to the Market District, have a chat with Slim he is thrilled! If you give the Tears to him, he will<br />
have them delivered to the Chantry by anonymous courier, and that pretty much wraps up the quest.<br />
Congratulations! You have <strong>com</strong>pleted the final quest in the side=quest series! All that is left after this is to <strong>com</strong>plete<br />
the story line, so on to the end!<br />
Note: Before you head to Redcliffe, check your supplies, because once the final battle is started you will not be able<br />
to re-supply! If you look under Crafting in the character menu, you should have at a minimum, two or three full<br />
stacks of Flasks (99 to a stack), and two or three full stacks of Elf Root. Depending on your class, you may want<br />
more reagents if you are a Mage or like to use certain potions / bombs, but you know what you need.<br />
Having the Elfroot and Flasks means that after each battle you will be able to replenish your supply of healing<br />
potions and believe me, you are going to use a LOT of those in the battles to <strong>com</strong>e. If you are worried about<br />
spending all of your money don't worry about that! It is not like you have anything esle you can spend it on you are<br />
headed to the end of the game, and when it ends, it really ends, so there is no point in saving money.<br />
If you need to buy more supplies here are some helpful pointers:<br />
Deathroot: The Dalish Camp Armorer has an unlimited supply.<br />
Elfroot: The Dalish Camp Armorer has an unlimited supply.<br />
Flasks: Bodahn in your Party Camp has an unlimited supply.<br />
You can also add supplies to the crates in your camp that will strengthen your allies though I am not really certain<br />
what effect this actually has on their participation in the fights. I did not use the troops until the boss fight with the<br />
Arch Demon, which is probably a good idea, because that is a fairly tough fight...<br />
Once you have <strong>com</strong>pleted your preparations, head over to Redcliffe Village.<br />
page 131 / 145
<strong>SuperCheats</strong>.<strong>com</strong> Unoffical <strong>Dragon</strong> <strong>Age</strong>: <strong>Origins</strong> Guide<br />
http://www.supercheats.<strong>com</strong>/<strong>guide</strong>s/dragon-age:-origins<br />
Check back for updates, videos and <strong>com</strong>ments for this <strong>guide</strong>.<br />
Redcliffe Village<br />
Choose your party and depart for Redcliffe.<br />
When you arrive in Redcliffe Village, before you go to the Castle you should clear out the darkspawn infestation in<br />
the Village itself. As you cross the village bridge you will encounter a villager hiding from the darkspawn who will<br />
fill you in on the most recent events. After you encourage him to head to safety, move along the path and fight your<br />
way to the Village center, where you will find a nice Ogre to kill, along with the standard darkspawn troops.<br />
Once you have cleared these out, head to the Zone Point for the Castle and go in when you enter the courtyard<br />
outside of the castle there is another three waves of darkspawn to fight, with some fairly tough not-boss mobs in each<br />
wave. Once you have succeeded in freeing the world of this particular bunch of Darkspawn, head over to the stairs<br />
and you will trigger a CS in which the guard explains that Riordan arrived earlier and set guards out to find you<br />
because he has something important to tell you.<br />
There is a long CS, and conversation, and then you are directed to go to your room and sleep. Go in to the room<br />
with your party and head upstairs to the second floor follow the marker to Riordan and talk to him. When that<br />
conversation is over, make your second save (if you are doing the multiple endings).<br />
Now exit Riordan's room and enter the first door on the right going back up the hall this is your room and Morrigan<br />
is waiting in it for you.<br />
She will make an offer to you if you are doing the multiple-endings in one play-through, turn her down and make<br />
your third save here.<br />
Morrigan wants you to convince Loghain to sleep with her, in order to get her pregnant. The baby would then<br />
absorb the stain, and would be able to absorb the Arch Demon without dying, and so no Grey Warden would have<br />
to die.<br />
If you turn her down, she leaves the party, and you get a load screen and CS, and you are now at the battle site.<br />
The Queen makes a rousing speech, and fires up the troops, and you are ready to go into battle! There is a series of<br />
CS's involved here, and then you get another load screen, and you are finally in battle with the Darkspawn. A lot of<br />
Darkspawn.<br />
Eventually you kill all of them off in this area and get the quest updated notice, now run to the marker on the screen<br />
and speak with Riordan. He tells you of his plan you should pick a few of your party and head into the city! He tells<br />
you to climb to the top of Fort Drakon.<br />
At this point Riordan asks you to pick a party member to lead one of his units into battle, and then you say goodbye<br />
to the rest of you party members. The worst part is when you have to say goodbye to your dog sniff.<br />
Head to the gate marked on the map, and then travel to the Market District. Kill all of the Darkspawn here until you<br />
find the Hurlock General then kill HIM!<br />
Once you have killed the remaining Darkspawn after the General, head back to the gates and to to the Alienage, and<br />
do the same thing here. This is a tougher fight or at least it seemed like that to me and I was not able to pull it off<br />
without one call for troops.<br />
Find your cousin and speak to her to end this mission.<br />
Run over the bridge to the zone point and as you reach it the Arch Demon will destroy the bridge behind you.<br />
Select the City Map, and choose the Palace District as your next destination.<br />
page 132 / 145
<strong>SuperCheats</strong>.<strong>com</strong> Unoffical <strong>Dragon</strong> <strong>Age</strong>: <strong>Origins</strong> Guide<br />
http://www.supercheats.<strong>com</strong>/<strong>guide</strong>s/dragon-age:-origins<br />
Check back for updates, videos and <strong>com</strong>ments for this <strong>guide</strong>.<br />
Sten's Brigade<br />
As you progress towards the Palace you will get a <strong>com</strong>bat interrupt to your trip and when you zone in you are now<br />
in control of Sten (or whoever you chose to lead the other brigade of troops that is defending the City Gates and the<br />
Darkspawn are attacking!<br />
There is an officer flagged nearby talk to him, then go kill all the Darkspawn. When they are dead, talk to the officer<br />
again to end this mission.<br />
The Palace<br />
You are not back in control of your party and there is a nice CS for you to watch. When it ends fight your way up to<br />
the top level, fighting your way up each set of stairs until you get to the top where you will find a trap to disarm and<br />
another wave of Darkspawn to kill.<br />
Ahead of you here is the gate to Fort Drakon so once you have killed them all and looted what you want, hit that<br />
gate to get to the Fort.<br />
Fort Drakon<br />
You are getting really close to the end now. You will have to fight your way up the stairs here, and this is a really<br />
tough fight, so try to think strategically and use your AOE's to good effect. You will not be sticking with one party<br />
member throughout this fight you will need to be proactive about using their special skills!<br />
Try to focus on the conjurers in here as that brings the fights to a close quicker. When you reach the room with the<br />
door to the Second Floor you will encounter Sandal, the simple-minded enchanter from your camp surrounded by a<br />
huge pile of dead Darkspawn. Man we should have recruited him into our party!<br />
He has some supplies to sell, so you may as well take advantage of that and having any better runes added to your<br />
weapons. When you are ready, use the door to go to the Second Level.<br />
Fort Drakon Final Level - Archdemon<br />
Archdemon Battle Part 1<br />
Archdemon Battle Part 2<br />
Archdemon Battle Part 3<br />
Well, here we are within a stone's throw of the final battle with the Arch Demon! Basically all that you need to do is<br />
work your way through this level, killing everything that you see. When you reach the door to the roof, you have<br />
pretty much fought your way to the almost-end-of-game!<br />
Once you reach the Roof you will get a CS of the Arch Demon snacking on soldiers, and then your party can engage<br />
it. What you are going to do here is fight it as a party to wear it down, and then once it is near death, you have to<br />
decide who gets sacrificed. If you are only going for one of the endings, it really does not matter who you sacrifice<br />
to take it out. If on the other hand you are trying to get all of the endings in one play-through, than matter it does!<br />
The Arch Demon defends in four phases the first two and the fourth you can use the usual tactics you have learned<br />
for fighting dragons but for the third phase it is in the air, and you need to use the Ballistas and ranged attacks so be<br />
prepared for that. It might be an idea to hold some archers in reserve to call up for the third defense phase, right?<br />
For all four endings you should proceed in the following order:<br />
page 133 / 145
<strong>SuperCheats</strong>.<strong>com</strong> Unoffical <strong>Dragon</strong> <strong>Age</strong>: <strong>Origins</strong> Guide<br />
http://www.supercheats.<strong>com</strong>/<strong>guide</strong>s/dragon-age:-origins<br />
Check back for updates, videos and <strong>com</strong>ments for this <strong>guide</strong>.<br />
(1) Sacrifice Yourself<br />
(2) Sacrifice Loghain<br />
(3) Go with Morrigan's Plan<br />
(4) Sacrifice Alistair<br />
Notice that Loghain tries really hard to have you let him be the one to be sacrificed? What a piece of work he turned<br />
out to be!<br />
The ending CS is pretty cool and it was nice to find out what happened to each of the people in your party... It<br />
turned out that the Queen was not as bad a person as I thought she was.<br />
And that is pretty much it! Once you reach this point, you cannot really do anything else, because the game ends<br />
hopefully you have earlier saves if you plan to work on Achievements / Trophies that you have yet to get.<br />
So hey, pat yourself on the back, mate! You have just <strong>com</strong>pleted what is likely to be the Game of the Year! Way to<br />
go!<br />
page 134 / 145
<strong>SuperCheats</strong>.<strong>com</strong> Unoffical <strong>Dragon</strong> <strong>Age</strong>: <strong>Origins</strong> Guide<br />
http://www.supercheats.<strong>com</strong>/<strong>guide</strong>s/dragon-age:-origins<br />
Check back for updates, videos and <strong>com</strong>ments for this <strong>guide</strong>.<br />
Character Dossiers<br />
Alistair<br />
* Companion Side Quest<br />
Alistair's Family<br />
When you first enter the Village of Redcliffe, if your standing with Alistair is high enough, he will mention to you that<br />
he is the bastard son of royalty, and that he has a sister. He would like to visit his sister who lives in Denerim and<br />
he would like you to go with him.<br />
His sister lives in the house next door to Wade's Emporium in the Market Square. When you get close to the house<br />
you will get a brief CS in which Alistair points out the house.<br />
When you enter Goldanna's house, she asks if you have linens to be washed and Alistair introduces himself to her.<br />
She relates her story that the folks at the castle in Redcliffe had told her that the baby Alistair was dead. It turns out<br />
that Goldanna is not pleased to see her long-lost brother.<br />
This quest can have an impact on Alistair's character the disappointment that he feels can effect his emotional state.<br />
You can use your persuasion skill on his sister to try to soften that blow, but this is one hardened chick!<br />
Dog<br />
* Companion Side Quest<br />
There is no side-quest for this <strong>com</strong>panion.<br />
Leliana<br />
* Romancing Tips<br />
Leliana is one of the party members that gives an Achievement/Trophy for "romancing." She is also the most difficult<br />
one to successfully romance, mostly due to her alignment and personality.<br />
To succeed in romancing Leliana, she must be in love with you (friend meter at 90%) and you must have triggered<br />
the romance process. It has been reported that you cannot succeed in romancing her until after you <strong>com</strong>plete her<br />
quest and you cannot do her quest if you are already in a relationship with her. When I did this I had already<br />
<strong>com</strong>pleted the quest so I do not know if it can be done without <strong>com</strong>pleting it.<br />
The following dialogue selections will give the most favorable response.<br />
Conversation 1 (M or F)<br />
I'd like to talk<br />
What was someone like you doing in the Lothering Chantry?<br />
You know, a beautiful and charming young woman like yourself.<br />
Those other initiates cannot have been more lovely than you.<br />
Conversation 2 (F only)<br />
My hair? Thank you!<br />
Dear Maker!<br />
And do you enjoy the <strong>com</strong>pany of other women?<br />
I think that I might giggle and maybe look coy?<br />
page 135 / 145
<strong>SuperCheats</strong>.<strong>com</strong> Unoffical <strong>Dragon</strong> <strong>Age</strong>: <strong>Origins</strong> Guide<br />
http://www.supercheats.<strong>com</strong>/<strong>guide</strong>s/dragon-age:-origins<br />
Check back for updates, videos and <strong>com</strong>ments for this <strong>guide</strong>.<br />
Conversation 3 (M or F)<br />
We need to talk<br />
Are you feeling better?<br />
Er, I think I see what you mean.<br />
She was special to you, wasn't she?<br />
I am sorry it ended so badly<br />
Everyone changes unfortunately<br />
I can only hope to one day be as special as she was to you.<br />
* Companion Side Quest<br />
Leliana's Past<br />
A lot of people seem to have trouble flagging the quest if you are having trouble bear the following in mind:<br />
It will help if you make sure that you ask her about being in the Chantry before her approval of you is higher than<br />
30.<br />
You cannot flag her quest if you are already in a relationship with her! If you are, you need to break it off first. Yes<br />
you will lose some approval, but you will be able to gain that back easily, and you cannot flag this quest otherwise.<br />
You cannot flag the quest unless she is in your party while traveling and you get the Assassin Attack.<br />
Giving her the Nug gift may be required in order to romance her this is not verified but a lot of people say it is. To<br />
have this happen you need to have Leliana in your party when you vist Dust Town in Orzammer. You will get a<br />
brief CS with her in which she talks about wanting a Nug as a pet. After this CS you can purchase a Nug from the<br />
Idle Beggar in Dust Town do that and give the Nug to Leliana.<br />
When you talk to Leliana and the dialogue option "Minstrels and Spies in Orlais" <strong>com</strong>es up, select it and run through<br />
the dialogue that follows so that she tells you about her past. Once she has done this, with her in your part, travel to<br />
another location Frostback or the Dalish Camp it doesn't matter which. Then head back to your camp, and you will<br />
get a CS immediately after entering camp with Leliana in which she confesses that she lied to you in her earlier<br />
explanation.<br />
Now with her in your party, travel somewhere anywhere and you will get a <strong>com</strong>bat interrupt in which you fight a<br />
pretty tough group of assassins. Once you defeat them, Leliana will interrogate their leader, and from what she<br />
learns, deduce that the person behind the attacks is her old associate and paramour, Marjolaine.<br />
Now head to Denerim and go into the street that dead-ends, and Leliana will point out the correct house to you.<br />
You will confront Marjolaine and either talk your way through the encounter or have epic battle either way that<br />
progresses Leliana's quest to its end. One result from this encounter can be that Leliana ends up "hardened" by her<br />
disappointment and grief, and be<strong>com</strong>es less good than she was before. A side-effect of this is that she no longer<br />
gives negative standing to you when you do things that are not good, but it alters her personality significantly.<br />
Loghain<br />
* Companion Side Quest<br />
There is no side-quest for this <strong>com</strong>panion.<br />
page 136 / 145
<strong>SuperCheats</strong>.<strong>com</strong> Unoffical <strong>Dragon</strong> <strong>Age</strong>: <strong>Origins</strong> Guide<br />
http://www.supercheats.<strong>com</strong>/<strong>guide</strong>s/dragon-age:-origins<br />
Check back for updates, videos and <strong>com</strong>ments for this <strong>guide</strong>.<br />
Morrigan<br />
* Companion Side Quest<br />
Flemeth's Real Grimoire<br />
In the process of <strong>com</strong>pleting the quests associated with the Mage's Circle Tower, you will loot the Grimoire that<br />
Morrigan tells you about in one of your conversations after you meet her. The book belonged to her mother<br />
Flemeth, and she very much wants to read it. After you loot it, and give it to Morrigan, she spends some time<br />
reading it. On one of your return visits to camp she <strong>com</strong>es to you to ask you for a favor and tell you about what she<br />
has learned.<br />
Her favor is to kill her mother and what she has learned is stunning! As any more information would be a major<br />
spoiler, you will just have to wait until you flag the quest to learn about it.<br />
When you go to do this quest, be sure that Morrigan is not in your party and visit her mother's shack in the swamps.<br />
Be prepared for a major fight Flemeth will shape change into a dragon! Once you have killed her, loot her hut and<br />
return to camp to talk to Morrigan. After you finish the first conversation, give her the items that you looted from her<br />
mother's house, and then talk to her again.<br />
Oghren<br />
* Companion Side Quest<br />
Oghren's Old Flame<br />
When talking to Oghren and a dialogue option about Felsi appears, select it to flag this quest.<br />
The quest destination is the Spoiled Princess Tavern at Lake Clanhad. When you arrive, you have the option of<br />
encouraging Oghren who will then engage in dialogue with Felsi. The results of this encounter will have significant<br />
effect upon Oghren's life something you may want to consider when deciding your part in it.<br />
If Oghren succeeds, he will later end up married to Felsi and will create a new family and career. If he fails and you<br />
were supportive, there is still a chance for a happy ending, but if he fails and you were not supportive, his life will<br />
end very badly.<br />
Sten<br />
* Companion Side Quest<br />
The Sword of the Beresaad<br />
Once you build a high enough relationship with Sten, he will finally be willing to truthfully answer the question as to<br />
why he was in the cage when you met him. This flags the quest, whose destination is Lake Calenhad.<br />
Talk to the scrounger here, who will reveal that he "bought" this scrounging spot from another, and you will be<br />
page 137 / 145
<strong>SuperCheats</strong>.<strong>com</strong> Unoffical <strong>Dragon</strong> <strong>Age</strong>: <strong>Origins</strong> Guide<br />
http://www.supercheats.<strong>com</strong>/<strong>guide</strong>s/dragon-age:-origins<br />
Check back for updates, videos and <strong>com</strong>ments for this <strong>guide</strong>.<br />
directed to Orzammer to speak with former "owner" of the spot. In Orzammer you will learn that the scrounger sold<br />
the sword to Dwyn, in Redcliffe. Head to Redcliffe to resolve the quest.<br />
Note that having Sten in your party can add interesting elements to this quest.<br />
Wynne<br />
* Companion Side Quest<br />
Wynne's Regret<br />
This is a <strong>com</strong>plicated quest because it does not follow the usual quest-format. Instead it is an encounter based series<br />
of events.<br />
Once Wynne has warmed up to you, you will have a <strong>com</strong>bat interrupt on one of your travels and at the end of it,<br />
Wynne will partially collapse. Back in camp, when you talk to her, you will learn the story behind why that<br />
happened, and other plot-related information.<br />
To progress this quest, dialogue with Wynne, and be sure to ask her any questions relating to her time with the<br />
Circle. She will tell you about an old apprentice named Aneirin.<br />
In another encounter, she will release the spirit, growing much weaker. After this happens, travel to the Dalish<br />
Camp near the Brecilian Forest and seek out an Elf named Sarel there. He will tell you of Aneirin as well.<br />
With Wynne in your party, travel between points that are relatively far apart to trigger a confrontation (<strong>com</strong>bat<br />
interrupts) in which Wynne casts a large fireball spell that injures you, which causes Wynne to unlock a new ability<br />
called the Vessel of Spirit.<br />
With Wynne in your party, travel to the Eastern Forest, to the area above the Mad Hermit's camp, and you will<br />
encounter Aneirin. He will give you an amulet to give to Wynne that will strengthen her and, it is implied, help her<br />
manage the spirit inside her and hopefully live a longer life!<br />
Zevran<br />
* Companion Side Quest<br />
There is no side-quest for this <strong>com</strong>panion.<br />
page 138 / 145
<strong>SuperCheats</strong>.<strong>com</strong> Unoffical <strong>Dragon</strong> <strong>Age</strong>: <strong>Origins</strong> Guide<br />
http://www.supercheats.<strong>com</strong>/<strong>guide</strong>s/dragon-age:-origins<br />
Check back for updates, videos and <strong>com</strong>ments for this <strong>guide</strong>.<br />
Quests of Denerim<br />
Back Alley Justice (Market Square Chanter's Board)<br />
Sergeant Kylon wants you to eliminate the criminals preying upon the innocent citizens of Denerim's back alleys.<br />
There is one group of bandits in each of the alley districts, and you will take them each out as you progress through<br />
the city districts. When you have finished them, see the Chantry Board agent for your reward of 4 gold sovereigns.<br />
Blood Warning (Market Square Mages Collective)<br />
As you move through the town you will notice marked doors there are two of them in the Market District, so just go<br />
up to each and spread the blood on them to update the quest.<br />
The third door is located in the Dirty Back Alley district which you will visit following your visit to The Pearl.<br />
The fourth and final door is located in the Dark Alley.<br />
When you have marked all four, return to the Collective <strong>Age</strong>nt for your reward of 1 gold sovereign.<br />
Correspondence Interruptus (Market Square Tavern)<br />
Obtain 12 Love letters and give them to the Bartender. These can be looted from inside the homes of the wealthy in<br />
town and are useful as blackmail material.<br />
Crime Wave (Market Square)<br />
Slim has some leads for you on lucrative cat burglaries you can pull.<br />
The Absent Mistress: Rob Sophie's room at the Inn.<br />
A Fistful of Silver: Rob Arl Howe's warehouse of the silver bars he has stolen from the town. Note that this is a very<br />
tough fight with a large number of opponents. Save BEFORE you try this, as if you are not strong enough or well<br />
equipped, chances are very good that you will die and have to reload your last save!<br />
Dereliction of Duty (Blackstone <strong>Age</strong>nt)<br />
Deal with the deserter Layson in Denerim. You will find him in a Dirty Hovel in the Rundown Back Street District.<br />
You will have to kill him, because he refuses to return with you and once he is dead be sure that you loot the Guild<br />
Supplies from his body.<br />
Desperate Haven (Market Square Chanter's Board)<br />
Go to the area marked on the map and see if there are any refugees left to rescue and rescue them.<br />
Fazzil's Request (Market Square Chanter's Board)<br />
Frazzil, a member of the Guild of Free Sailors, was accosted by bandits and his rare Sextant was stolen. Recover this<br />
for him.<br />
Have You Seen Me? (Market Square Mages Collective)<br />
page 139 / 145
<strong>SuperCheats</strong>.<strong>com</strong> Unoffical <strong>Dragon</strong> <strong>Age</strong>: <strong>Origins</strong> Guide<br />
http://www.supercheats.<strong>com</strong>/<strong>guide</strong>s/dragon-age:-origins<br />
Check back for updates, videos and <strong>com</strong>ments for this <strong>guide</strong>.<br />
Locate Renold and return to the Collective with the news. When you are doing the Chanter's Board quest Loghain's<br />
Push you will encounter Renold's body simply loot his journal and return it to the Collective.<br />
Honor Bound (Market Square)<br />
Duel Ser Landry in the back alley behind the tavern. This was actually a pretty fair challenge but you as long as you<br />
have some healing potions you should be able to take him out easily.<br />
Loghain's Push (Market Square Chanter's Board)<br />
Intercept Loghain's forces and assist the resistance forces until Loghain's men are defeated. To access this quest go<br />
to the City Map gate and change it to World Map, and then select the icon marked Civil War.<br />
Missing in Action (Market Square Chanter's Board)<br />
Locate the missing Ostagar veteran called Rexel.<br />
Negotiating Aids (Market Square Tavern)<br />
Deliver a stack of 15 toxin extract samples to the Bartender.<br />
Notice of Death (Blackstone Irregulars)<br />
You are to deliver notices to a list of women whose husbands have died in service to the Irregulars.<br />
Irenia in the Redclife Chantry<br />
Larana in The Spoiled Princess Tavern in Lake Calenhad Docks<br />
Sara at the Denerim Market District<br />
Tania in the Dirty Back Alley in Denerim<br />
Pearls Before Swine (Market Square)<br />
Take care of the mercenaries in the Pearl for Sgt. Kylon but do not kill them.<br />
You will find them in the tavern room of The Pearl, and they will not listen to reason so you will have to fight them.<br />
Remember you are not supposed to kill them, just rough them up and teach them a lesson. As the fight starts and<br />
you do a little damage, they surrender and beg for mercy. Make them empty their pockets and leave to pick up 2<br />
gold and, when you turn the quest in, some XP.<br />
Restocking the Guild (Blackstone <strong>Age</strong>nt)<br />
Bring 20 Health Poultices to the Blackstone Irregulars in the Tavern in Market Square.<br />
Scraping the Barrel (Blackstone <strong>Age</strong>nt)<br />
The conscription letter for Denerim goes to Varel Baern, in the Denerim Alienage. Deliver it to him there.<br />
Sign of Safe Passage<br />
Go to the location marked on the map in the Brecellian Forest and fire off a fire arrow over the trees.<br />
page 140 / 145
<strong>SuperCheats</strong>.<strong>com</strong> Unoffical <strong>Dragon</strong> <strong>Age</strong>: <strong>Origins</strong> Guide<br />
http://www.supercheats.<strong>com</strong>/<strong>guide</strong>s/dragon-age:-origins<br />
Check back for updates, videos and <strong>com</strong>ments for this <strong>guide</strong>.<br />
Skin Deep (Market Square Chanter's Board)<br />
Obtain 9 samples of corpse gall from darkspawn and return them the the Chanter's Board <strong>Age</strong>nt.<br />
Solving Problems (Market Square Tavern)<br />
You have some bodies to get rid of the first is in the warehouse near where you dueled Ser Landry. Go inside and<br />
collect the body bag.<br />
The second body bag is in the alley between two buildings on the other side of town just look for the marker near<br />
the Chantry.<br />
The third body is in a room in the back of The Pearl.<br />
You can dump the bodies down the well near the Chantry in Market Square to <strong>com</strong>plete the disposal. When you<br />
turn this quest in you earn 2 gold sovereigns and some XP.<br />
The Scrolls of Banaster (Market Square Mages Collective)<br />
Find the 5 scrolls and return them to the Collective.<br />
The first is on the Second Floor of the Tower of the Circle on the Senior Mage Quarters.<br />
The second is on the floor in the first large chamber in the Great Hall of the Tower.<br />
Untraceable<br />
Bring the Bartender ten pieces of Garnet.<br />
page 141 / 145
<strong>SuperCheats</strong>.<strong>com</strong> Unoffical <strong>Dragon</strong> <strong>Age</strong>: <strong>Origins</strong> Guide<br />
http://www.supercheats.<strong>com</strong>/<strong>guide</strong>s/dragon-age:-origins<br />
Check back for updates, videos and <strong>com</strong>ments for this <strong>guide</strong>.<br />
Gift Items<br />
As you play the game you will find by looting containers and shopping with merchants various items that are flagged<br />
with the tag "Gift." This identifies these items as special in the sense that they can be given as gifts to your party<br />
members to increase their like for you. Some gifts are specific to a particular party member, while others you can<br />
give to any party member.<br />
Gifts that are specific to a party member can reward you with 7 to 10 points on the friendship meter for a given<br />
party member, as long as you gave the item to the correct party member. Most of these items can actually be given<br />
to the wrong party member which will only give a 1 in place of the higher value, so you want to avoid that.<br />
Some gifts will be refused by certain party members and accepted by others, and some gifts not only gain you points<br />
but are also initiate small CS's for the plot line or even trigger quests. As a general rule when you see a gift on a<br />
merchant you should always buy it and when you encounter a gift in a container you should always loot it. Some<br />
gifts, like the pet Nug for Leliana, require you to do specific things in order to be able to acquire them. In cases such<br />
as that, the required steps are spelled out in the footnotes below this list.<br />
The list below specifies the gifts, and who should receive them. It is <strong>com</strong>plete to the best of my knowledge. For<br />
certain gifts there are actually more than one available in the game so it is possible to obtain duplicates but you can<br />
still gift them to the proper party member without it being a problem.<br />
Listing Key: Gift Name (Proper Recipient) Zone(s) where gift is acquired<br />
---=== Gift Items ===---<br />
Ale (Oghren)<br />
Alistair's Mother's Amulet (Alistair)<br />
Alley Kings Flagon (Oghren)<br />
Ancient Map of the Imperium (Loghain)<br />
Ancient Map of Orlais (Loghain)<br />
Andraste's Grace (Leliana)<br />
Antivan Leather Boots (Zevran)<br />
Beef Bone (Dog)<br />
Black Grimoire (Morrigan)<br />
Black Runestone (Alistair)<br />
Blue Satin Shoes (Leliana)<br />
Botanists Map of Thedas (Loghain)<br />
Bronze Symbol of Andraste (Leliana)<br />
Chantry Amulet (Leliana)<br />
Chasined Sack Mead (Oghren)<br />
Current Map of Ferelden (Loghain)<br />
Cute Nug * (Leliana) Dust Town<br />
Discovering <strong>Dragon</strong>'s Blood (Wynne)<br />
Dalish Deerhide Gloves (Zevran)<br />
Dalish Gloves (Zevran)<br />
Duncan's Shield (Alistair)<br />
Etched Silver Symbol (Leliana)<br />
Fancy Scroll (Wynne)<br />
Flemith's Gromoire (Morrigan)<br />
??Found Cake (Dog)<br />
Gemmed Bracelet (Any)<br />
Garblogs Back Country Reserve (Oghren)<br />
Gold Amulet (Morrigan)<br />
Gold Earrins (Any)<br />
page 142 / 145
<strong>SuperCheats</strong>.<strong>com</strong> Unoffical <strong>Dragon</strong> <strong>Age</strong>: <strong>Origins</strong> Guide<br />
http://www.supercheats.<strong>com</strong>/<strong>guide</strong>s/dragon-age:-origins<br />
Check back for updates, videos and <strong>com</strong>ments for this <strong>guide</strong>.<br />
Golden Demon Pendant (Morrigan)<br />
Golden Mirror (Morrigan)<br />
Golden Rope Necklace (Morrigan)<br />
Gold Scythe 4:90 Black (Oghren)<br />
Golden Symbol of Andraste (Leliana)<br />
Headband (Any)<br />
Lamb Bone (Dog)<br />
Large Bone (Dog)<br />
Legacy White Shear (Oghren)<br />
Locket (Morrigan)<br />
Map of the Anderfels (Loghain)<br />
Medium Gold Bar (Zevran)<br />
Medium Silver Bar (Zevran)<br />
Onyx Demon Statue (Alistair)<br />
Ox Bone (Dog)<br />
Painted Skyball (Any)<br />
Painting of the Rebel Queen (Sten)<br />
Portrait of a Goosegirl (Sten)<br />
Remarkable Amethyst (Shale)<br />
Remarkable Diamond (Shale)<br />
Remarkable Emerald (Shale)<br />
Remarkable Garnet (Shale)<br />
Remarkable Greenstone (Shale)<br />
Remarkable Malachite (Shale)<br />
Remarkable Ruby (Shale)<br />
Remarkable Sapphire (Shale)<br />
Remarkable Topaz (Shale)<br />
Shiny Gold Ring (Any)<br />
Silver Bracelet (Any)<br />
Silver Brooch (Morrigan)<br />
Silver Chain (Morrigan)<br />
Silver Demon Head Ring (Any)<br />
Silver-framed Still Life (Sten)<br />
Silver Medallion (Morrigan)<br />
Silver Sword of Mercy (Leliana)<br />
Small Carved Statuette (Alistair)<br />
Small Gold Bar (Zevran)<br />
Small Silver Bar (Zevran)<br />
Small Silver Ring (Any)<br />
Steel Bracers (Any)<br />
Steel Symbol of Andraste (Leliana)<br />
Sten's Lost Sword (Sten)<br />
Stone <strong>Dragon</strong> Statuette (Alistair)<br />
Stone Warrior Statuette (Alistair)<br />
Sun Blonde Vint-1 (Oghren)<br />
Tangled Ball of Yarn (Any)<br />
The Guerrins of Ferelden (Wynne)<br />
The Rose of Orlais (Wynne)<br />
The Search for the True Prophet (Wynne)<br />
Tiara (Any)<br />
Tribal Necklace (Any)<br />
Totem (Sten)<br />
Water-Stained Portrait (Sten)<br />
White Runestone (Alistair)<br />
Wilhelm's Special Brew (Oghren)<br />
page 143 / 145
<strong>SuperCheats</strong>.<strong>com</strong> Unoffical <strong>Dragon</strong> <strong>Age</strong>: <strong>Origins</strong> Guide<br />
http://www.supercheats.<strong>com</strong>/<strong>guide</strong>s/dragon-age:-origins<br />
Check back for updates, videos and <strong>com</strong>ments for this <strong>guide</strong>.<br />
Wine (Wynne)<br />
* The Cute Nug is obtained from the XXX Dwarf in Dust Town, Orzammer. In order to obtain this, you must have<br />
Leliana in your party when you enter Dust Town in order for her to give you the CS in which she says that she loves<br />
the cute little pig bunnies that are Nugs. You may or may not need to have <strong>com</strong>pleted the Nug Wrangler Quest in<br />
the Commons first...<br />
Once you get the CS, you can talk to the dwarf in Dust Town, and ask him to capture a Nug for you. You will need<br />
to pay him 20 silver once he has captured it. You can give Leliana the gift at any time she will happily accept it, and<br />
thereafter when you visit with her in Camp, the pet Nug will be nearby her on the ground.<br />
page 144 / 145
Powered by TCPDF (www.tcpdf.org)<br />
<strong>SuperCheats</strong>.<strong>com</strong> Unoffical <strong>Dragon</strong> <strong>Age</strong>: <strong>Origins</strong> Guide<br />
http://www.supercheats.<strong>com</strong>/<strong>guide</strong>s/dragon-age:-origins<br />
Check back for updates, videos and <strong>com</strong>ments for this <strong>guide</strong>.<br />
http://dragonage.bioware.<strong>com</strong>/<br />
page 145 / 145