

hyperion atlas digital servo â programming manual - Hyperion HK
hyperion atlas digital servo â programming manual - Hyperion HK
hyperion atlas digital servo â programming manual - Hyperion HK

You also want an ePaper? Increase the reach of your titles
YUMPU automatically turns print PDFs into web optimized ePapers that Google loves.
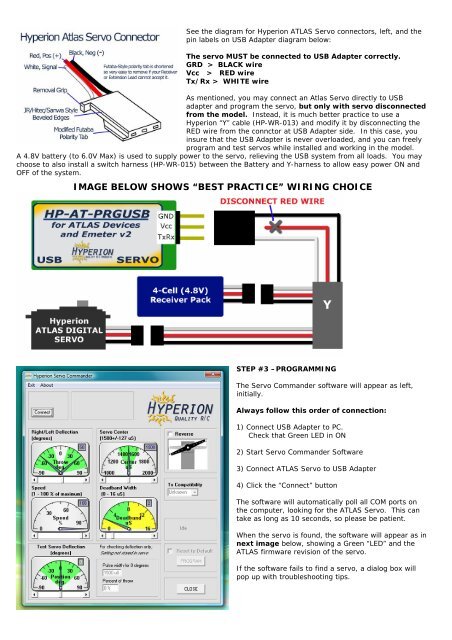
See the diagram for <strong>Hyperion</strong> ATLAS Servo connectors, left, and the<br />
pin labels on USB Adapter diagram below:<br />
The <strong>servo</strong> MUST be connected to USB Adapter correctly.<br />
GRD > BLACK wire<br />
Vcc > RED wire<br />
Tx/Rx > WHITE wire<br />
As mentioned, you may connect an Atlas Servo directly to USB<br />
adapter and program the <strong>servo</strong>, but only with <strong>servo</strong> disconnected<br />
from the model. Instead, it is much better practice to use a<br />
<strong>Hyperion</strong> “Y” cable (HP-WR-013) and modify it by disconnecting the<br />
RED wire from the connctor at USB Adapter side. In this case, you<br />
insure that the USB Adapter is never overloaded, and you can freely<br />
program and test <strong>servo</strong>s while installed and working in the model.<br />
A 4.8V battery (to 6.0V Max) is used to supply power to the <strong>servo</strong>, relieving the USB system from all loads. You may<br />
choose to also install a switch harness (HP-WR-015) between the Battery and Y-harness to allow easy power ON and<br />
OFF of the system.<br />
IMAGE BELOW SHOWS “BEST PRACTICE” WIRING CHOICE<br />
STEP #3 –PROGRAMMING<br />
The Servo Commander software will appear as left,<br />
initially.<br />
Always follow this order of connection:<br />
1) Connect USB Adapter to PC.<br />
Check that Green LED in ON<br />
2) Start Servo Commander Software<br />
3) Connect ATLAS Servo to USB Adapter<br />
4) Click the “Connect” button<br />
The software will automatically poll all COM ports on<br />
the computer, looking for the ATLAS Servo. This can<br />
take as long as 10 seconds, so please be patient.<br />
When the <strong>servo</strong> is found, the software will appear as in<br />
next image below, showing<br />
a Green “LED” and the<br />
ATLAS firmware revision of the <strong>servo</strong>.<br />
If the software fails to find a <strong>servo</strong>, a dialog box will<br />
pop up with troubleshooting tips.


![P01(Oxalys EP) [更新済み].ai - Kyosho](https://img.yumpu.com/26948574/1/184x260/p01oxalys-ep-ai-kyosho.jpg?quality=85)


