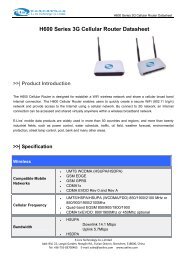
Industrial Classed H685 H820 Cellular Router User Manual ... - E-Lins
Industrial Classed H685 H820 Cellular Router User Manual ... - E-Lins
Industrial Classed H685 H820 Cellular Router User Manual ... - E-Lins

Create successful ePaper yourself
Turn your PDF publications into a flip-book with our unique Google optimized e-Paper software.
<strong>H685</strong>/<strong>H820</strong> VPN <strong>User</strong> <strong>Manual</strong><br />
<strong>Industrial</strong> <strong>Classed</strong> <strong>H685</strong> <strong>H820</strong> <strong>Cellular</strong> <strong>Router</strong><br />
<strong>User</strong> <strong>Manual</strong> for VPN setting<br />
E-<strong>Lins</strong> Technology Co., Limited<br />
PHONE: +86-755-29230581 83700465<br />
Email: sales@e-lins.com<br />
sales@szelins.com<br />
WEB: http://www.szelins.com http://www.e-lins.com<br />
ADDRESS: #301,Unit 6, Building A,Minkang Garden, Minkang Rd.,Minzhi,<br />
Longhua,Shenzhen,518109, China<br />
E-<strong>Lins</strong> Technology Co.,Limited<br />
Tel: +86-755-29230581 E-mail: sales@e-lins.com sales@szelins.com www.szelins.com
<strong>H685</strong> <strong>H820</strong> VPN <strong>User</strong> <strong>Manual</strong><br />
CONTENTS<br />
1 PROLOGUE ···································································································3<br />
1.1 VERSION ····································································································3<br />
1.2 REFERENCED DOCUMENTS ···············································································3<br />
1.3 NOTICE······································································································3<br />
2 HOW TO CONFIGURE IPSEC ···········································································4<br />
2.1 NOTES·······································································································6<br />
2.2 VPN SERVER (POINT B) ···················································································7<br />
2.2.1 Logon the WEB configuration·································································· 7<br />
2.2.2 Change local IP ··················································································· 8<br />
2.2.3 Configure WAN···················································································· 8<br />
2.2.4 Configure VPN <strong>Router</strong> as VPN Server ······················································ 9<br />
2.2.4.1 Change local IP address ········································································ 9<br />
2.2.4.2 Configure VPN Server ··········································································10<br />
2.2.5 Configure CISCO router as VPN server···················································· 11<br />
2.3 VPN CLIENT FOR VPN ROUTER (POINT C) ··························································· 12<br />
2.3.1 Configure WAN1 ·················································································12<br />
2.3.2 Change local IP address ·······································································13<br />
2.3.3 Configre VPN <strong>Router</strong> as Client ·······························································14<br />
3 HOW TO CONFIGURE PPTP ·········································································· 16<br />
3.1 NOTES ABOUT IP YOUR CONFIGURATION····························································· 18<br />
3.2 PPTP SERVER (POINT B) ················································································ 19<br />
3.2.1 Change local IP address ·······································································19<br />
3.2.2 Configuration WAN ··············································································19<br />
3.2.3 Configure PPTP Server ········································································19<br />
3.3 LAPTOP/<strong>H685</strong>(<strong>H820</strong>) AS CLIENT (POINT D)·························································· 21<br />
3.3.1 Change local IP address ·······································································21<br />
3.3.2 Configure PPTP client ··········································································21<br />
3.3.3 Configure PPTP client of <strong>H685</strong>/<strong>H820</strong> ·······················································26<br />
3.4 IPSEC CLIENT FOR SOFTWARE (POINT F) ····························································· 26<br />
3.4.1 Configure IPSec Client of Software ·························································26<br />
3.4.1.1 Set-up·······························································································26<br />
3.4.1.2 Configure IPSec Tool············································································27<br />
E-<strong>Lins</strong> Technology Co.,Limited<br />
Tel: +86-755-29230581 E-mail: sales@e-lins.com sales@szelins.com www.szelins.com
<strong>H685</strong> <strong>H820</strong> VPN <strong>User</strong> <strong>Manual</strong><br />
Chapter 1<br />
1 Prologue<br />
This document is suitable for the following products, it will show how to setup a VPN <strong>Router</strong> that<br />
has IPSec VPN capabilities for secure remote access to your cellular network from anywhere on<br />
the Internet. Detailed configuration will be shown for multiple brands of routers<br />
Type<br />
Description<br />
<strong>H685</strong>ev/<strong>H820</strong>ev<br />
EVDO <strong>Router</strong><br />
<strong>H685</strong>td/<strong>H820</strong>td<br />
TD-SCDMA <strong>Router</strong><br />
<strong>H685</strong>w/<strong>H820</strong>w<br />
WCDMA HSUPA/HSDPA <strong>Router</strong><br />
1.1 Version<br />
Version Date Description Author<br />
1.1.3 2010-11-11 Nearly complete<br />
1.4.31 2012-11-16 Modify Jason<br />
1.2 Referenced Documents<br />
<strong>H685</strong>_Datasheet_Eng.pdf<br />
<strong>H820</strong>_Datasheet_Eng.pdf<br />
<strong>H685</strong>_<strong>User</strong>manual_Eng.pdf<br />
<strong>H820</strong>_<strong>User</strong>manual_Eng.pdf<br />
1.3 Notice<br />
E-<strong>Lins</strong> is a registered trademark of E-<strong>Lins</strong> Technology Co., Limited.<br />
The copyright of the document belongs to E-<strong>Lins</strong> Technology Co., Limited. Copying of this<br />
document and modifying it and the use or communication of the contents thereof, is forbidden<br />
without express authority. Offenders are liable to the legal sanction.<br />
E-<strong>Lins</strong> Technology Co.,Limited<br />
Tel: +86-755-29230581 E-mail: sales@e-lins.com sales@szelins.com www.szelins.com
<strong>H685</strong> <strong>H820</strong> VPN <strong>User</strong> <strong>Manual</strong><br />
Chapter 2<br />
2 How to Configure IPSec<br />
IPSec provides authentication and encryption services to protect unauthorized viewing or<br />
modification of data within your network or as it is transferred over an unprotected network, such<br />
as the public Internet. IPSec is generally implemented in two types of configurations:<br />
• Site-to-site— this configuration is used between two IPSec security gateways, such as PIX<br />
Firewall. A site-to-site VPN interconnects networks in different geographic locations.<br />
• Remote access— this configuration is used to allow secure remote access for VPN clients,<br />
such as mobile users. A remote access VPN allows remote users to securely access<br />
centralized network resources.<br />
IPSec can be configured to work in two different modes:<br />
• Tunnel Mode—This is the normal way in which IPSec is implemented between two security<br />
gateways that are connected over an un-trusted network, such as the public Internet<br />
• Transport Mode—this method of implementing IPSec is typically done with PPTP to allow<br />
authentication of remote Windows 2000 VPN clients.<br />
The main task of IPSec is to allow the exchange of private information over an insecure<br />
connection. IPSec uses encryption to protect information from interception or eavesdropping.<br />
However, to use encryption efficiently, both parties should share a secret that is used for both<br />
encryption and decrypting of the information.<br />
IPSec operates in two phases to allow the confidential exchange of a shared secret:<br />
• Phase 1, which handles the negotiation of security parameters required to establish a secure<br />
channel between two IPSec peers. Phase 1 is generally implemented through the Internet<br />
Key Exchange (IKE) protocol. If the remote IPSec peer cannot do IKE, you can use manual<br />
configuration with pre-shared keys to complete Phase 1.<br />
• Phase 2, which uses the secure tunnel established in Phase 1 to exchange the security<br />
parameters required to actually transmit user data.<br />
The secure tunnels used in both phases of IPSec are based on security associations (SAs) used<br />
at each IPSec end point. SAs describe the security parameters, such as the type of authentication<br />
and encryption that both end points agree to use.<br />
In order To enable and configure IPSec, we prepare a test environment, please according to the<br />
diagram and perform the following steps<br />
Note: Point A, B, C, E is must.<br />
E-<strong>Lins</strong> Technology Co.,Limited<br />
Tel: +86-755-29230581 E-mail: sales@e-lins.com sales@szelins.com www.szelins.com
<strong>H685</strong> <strong>H820</strong> VPN <strong>User</strong> <strong>Manual</strong><br />
E-<strong>Lins</strong> Technology Co.,Limited<br />
Tel: +86-755-29230581 E-mail: sales@e-lins.com sales@szelins.com www.szelins.com
<strong>H685</strong> <strong>H820</strong> VPN <strong>User</strong> <strong>Manual</strong><br />
In this example, we will be working with a VPN server and two VPN <strong>Router</strong>. Throughout the screen<br />
shots and the rest of the article, I will refer to the following IP address. Please write them down or<br />
print them for reference, it will help you understand the rest of the article<br />
about A:<br />
local IP: 192.168.100.5<br />
gateway: 192.168.100.254<br />
about B:<br />
WAN IP:202.96.83.74(from your ISP)<br />
Local <strong>Router</strong> IP:192.168.100.254<br />
About C:<br />
WAN IP:61.80.223.24(Remote computer on the Internet)<br />
Local <strong>Router</strong> IP:192.168.2.254<br />
LAN IP Network:192.168.2.x<br />
About D:<br />
WAN IP:61.80.224.30(Remote computer on the Internet)<br />
Local <strong>Router</strong> IP: 192.168.1.254<br />
LAN IP Network:192.168.1.x<br />
2.1 Notes<br />
It is wise to change the IP Schema of your cellular network from the default your router configures.<br />
This will aid you in connecting multiple networks together - especially two VPN routers of the same<br />
brand. Often the default IP Schema is 192.168.0.254, all you need to do is change the second<br />
<strong>Router</strong>. In this example, I configure my first <strong>Router</strong> is 192.168.1.254 and another <strong>Router</strong> is<br />
192.168.2.254. This step is not totally necessary but it could save you some routing headaches<br />
later.<br />
It is also wise to convert your computers over to STATIC IP address instead of dynamic IP address.<br />
If your computers have dynamic IP address, you will not know what the IP address is of the<br />
computer you want to connect to from the road. One day it might be .2 the next day it might be .5.<br />
Again this is not necessary, but it will save you headaches later.<br />
Static IP Schema Example (about A LAN Computer 1)<br />
IP Address: 192.168.100.5<br />
Subnet: 255.255.255.0<br />
Gateway:<br />
192.168.100.254 (router address)<br />
DNS:<br />
192,168.100.254 (router address again)<br />
E-<strong>Lins</strong> Technology Co.,Limited<br />
Tel: +86-755-29230581 E-mail: sales@e-lins.com sales@szelins.com www.szelins.com
<strong>H685</strong> <strong>H820</strong> VPN <strong>User</strong> <strong>Manual</strong><br />
Note: You need change PC IP the same with VPN <strong>Router</strong> Gateway. Otherwise you didn’t connection WEB<br />
configuration<br />
2.2 VPN server (point B)<br />
You need a <strong>H685</strong>/<strong>H820</strong> or a CISCO router as a vpn server in point B.<br />
And this section describes how to configure <strong>H685</strong>/<strong>H820</strong>.<br />
2.2.1 Logon the WEB configuration<br />
Access http://192.168.8.1 to configure the VPN router from A point PC, you can see a login<br />
window<br />
Default <strong>User</strong>name: admin<br />
Default Password: admin<br />
Notice: You can change the login password after you succeed logon WEB configuration, Choose “password” menu<br />
and change the login password<br />
E-<strong>Lins</strong> Technology Co.,Limited<br />
Tel: +86-755-29230581 E-mail: sales@e-lins.com sales@szelins.com www.szelins.com
<strong>H685</strong> <strong>H820</strong> VPN <strong>User</strong> <strong>Manual</strong><br />
2.2.2 Change local IP<br />
2.2.3 Configure WAN<br />
Refer to “Chapter 3.3.3.1 WAN – <strong>Cellular</strong> Network” of the manual (<strong>H820</strong>_<strong>User</strong>manual.Eng.pdf /<br />
<strong>H685</strong>_<strong>User</strong>manual.Eng.pdf) to configure the WAN.<br />
Configure DDNS if you want to use dynamic IP.<br />
E-<strong>Lins</strong> Technology Co.,Limited<br />
Tel: +86-755-29230581 E-mail: sales@e-lins.com sales@szelins.com www.szelins.com
<strong>H685</strong> <strong>H820</strong> VPN <strong>User</strong> <strong>Manual</strong><br />
Refer to “Chapter 3.3.14.1.3 DDNS settings” of the manual (<strong>H820</strong>_<strong>User</strong>manual.Eng.pdf /<br />
<strong>H685</strong>_<strong>User</strong>manual.Eng.pdf) to configure the DDNS.<br />
NOTE: it’s not must if you choose static IP.<br />
2.2.4 Configure VPN <strong>Router</strong> as VPN Server<br />
The VPN <strong>Router</strong> also supports VPN Server function. So you can configure it as a VPN server.<br />
2.2.4.1 Change local IP address<br />
Change local IP with 192.168.100.254<br />
Notes: Do not forget to manually change the “Default Gateway” same as IP Address<br />
E-<strong>Lins</strong> Technology Co.,Limited<br />
Tel: +86-755-29230581 E-mail: sales@e-lins.com sales@szelins.com www.szelins.com
<strong>H685</strong> <strong>H820</strong> VPN <strong>User</strong> <strong>Manual</strong><br />
2.2.4.2 Configure VPN Server<br />
• Choose VPN>IPSec>Add/Edit<br />
• VPN Server. Configuration as below<br />
E-<strong>Lins</strong> Technology Co.,Limited<br />
Tel: +86-755-29230581 E-mail: sales@e-lins.com sales@szelins.com www.szelins.com
<strong>H685</strong> <strong>H820</strong> VPN <strong>User</strong> <strong>Manual</strong><br />
Notes: Do not “Enable” the configured IPSec VPN.<br />
2.2.5 Configure CISCO router as VPN server<br />
You also can use CISCO <strong>Router</strong> as VPN server.<br />
This is the sample of CISCO7200 configuration:<br />
crypto keyring shenzhen<br />
pre-shared-key hostname shenzhen key test<br />
E-<strong>Lins</strong> Technology Co.,Limited<br />
Tel: +86-755-29230581 E-mail: sales@e-lins.com sales@szelins.com www.szelins.com
<strong>H685</strong> <strong>H820</strong> VPN <strong>User</strong> <strong>Manual</strong><br />
crypto isakmp profile shenzhen<br />
description china SZ shenzhen<br />
vrf SMEP<br />
keyring shenzhen<br />
match identity host shenzhen<br />
keepalive 60 retry 10<br />
crypto ipsec transform-set vpnset esp-des esp-md5-hmac<br />
crypto ipsec profile shenzhen<br />
set transform-set vpnset<br />
set isakmp-profile shenzhen<br />
crypto dynamic-map shenzhen 1<br />
set security-association lifetime kilobytes 536870912<br />
set security-association lifetime seconds 43200<br />
set transform-set vpnset<br />
set isakmp-profile shenzhen<br />
reverse-route<br />
crypto map COREVPN 26 ipsec-isakmp dynamic shenzhen<br />
2.3 VPN Client for VPN <strong>Router</strong> (point C)<br />
Access http://192.168.8.1 to configure VPN router from point E PC, you can see the following logon<br />
window.<br />
<strong>User</strong>name:<br />
admin<br />
Password:<br />
admin<br />
2.3.1 Configure WAN1<br />
Refer to “Chapter 3.3.3.1 WAN – <strong>Cellular</strong> Network” of the manual (<strong>H820</strong>_<strong>User</strong>manual.Eng.pdf /<br />
<strong>H685</strong>_<strong>User</strong>manual.Eng.pdf) to configure the WAN.<br />
E-<strong>Lins</strong> Technology Co.,Limited<br />
Tel: +86-755-29230581 E-mail: sales@e-lins.com sales@szelins.com www.szelins.com
<strong>H685</strong> <strong>H820</strong> VPN <strong>User</strong> <strong>Manual</strong><br />
2.3.2 Change local IP address<br />
Change local IP into 192.168.2.254<br />
Notes: Do not forget to manually change the “Default Gateway” same as IP Address<br />
E-<strong>Lins</strong> Technology Co.,Limited<br />
Tel: +86-755-29230581 E-mail: sales@e-lins.com sales@szelins.com www.szelins.com
<strong>H685</strong> <strong>H820</strong> VPN <strong>User</strong> <strong>Manual</strong><br />
2.3.3 Configre VPN <strong>Router</strong> as Client<br />
E-<strong>Lins</strong> Technology Co.,Limited<br />
Tel: +86-755-29230581 E-mail: sales@e-lins.com sales@szelins.com www.szelins.com
<strong>H685</strong> <strong>H820</strong> VPN <strong>User</strong> <strong>Manual</strong><br />
Notes: Do not “Enable” the configured IPSec VPN.<br />
E-<strong>Lins</strong> Technology Co.,Limited<br />
Tel: +86-755-29230581 E-mail: sales@e-lins.com sales@szelins.com www.szelins.com
<strong>H685</strong> <strong>H820</strong> VPN <strong>User</strong> <strong>Manual</strong><br />
Chapter 3<br />
3 How to configure PPTP<br />
In order to enable and configuring PPTP for VPN, we prepare a test environment, please<br />
according to the diagram and perform the following steps<br />
Note: Point A, B, C, E is must.<br />
In this example, we will be working with a VPN server and some PC .Throughout the screen shots<br />
and the rest of the article; I will refer to the following IP address. Please write them down or print<br />
them for reference, it will help you understand the rest of the article<br />
about A:<br />
local IP:192.168.100.5<br />
Subnet mask: 255.255.255.0<br />
gateway:192.168.100.254<br />
about B:<br />
WAN IP:202.56.8.73(from your ISP)<br />
Local <strong>Router</strong> IP:192.168.100.254<br />
About D:<br />
WAN IP:61.30.89.223(Remote computer on the Internet)<br />
Local <strong>Router</strong> IP:192.168.3.8<br />
About E:<br />
WAN IP:61.80.224.30(Remote computer on the Internet)<br />
Local <strong>Router</strong> IP: 192.168.1.254<br />
LAN IP Network:192.168.1.x<br />
about F:<br />
local IP:192.168.100.4<br />
Subnet mask: 255.255.255.0<br />
gateway:192.168.100.254<br />
E-<strong>Lins</strong> Technology Co.,Limited<br />
Tel: +86-755-29230581 E-mail: sales@e-lins.com sales@szelins.com www.szelins.com
<strong>H685</strong> <strong>H820</strong> VPN <strong>User</strong> <strong>Manual</strong><br />
E-<strong>Lins</strong> Technology Co.,Limited<br />
Tel: +86-755-29230581 E-mail: sales@e-lins.com sales@szelins.com www.szelins.com
<strong>H685</strong> <strong>H820</strong> VPN <strong>User</strong> <strong>Manual</strong><br />
3.1 Notes about IP Your Configuration<br />
It is wise to change the IP Schema of your cellular network from the default your router configures.<br />
This will aid you in connecting multiple networks together - especially two VPN routers of the same<br />
brand. Often the default IP Schema is 192.168.0.254, all you need to do is change the second<br />
<strong>Router</strong>. In this example, I made my first <strong>Router</strong> is 192.168.1.254 and another <strong>Router</strong> is<br />
192.168.2.254. This step is not totally necessary but it could save you some routing headaches<br />
later.<br />
It is also wise to convert your computers over to STATIC IP address instead of dynamic IP address.<br />
If your computers have dynamic IP address, you will not know what the IP address is of the<br />
computer you want to connect to from the road. One day it might be .2 the next day it might be .5.<br />
Again this is not necessary, but it will save you headaches later.<br />
Static IP Schema Example<br />
About A LAN Computer 1<br />
IP Address: 192.168.100.5<br />
Subnet: 255.255.255.0<br />
Gateway:<br />
192.168.100.254 (router address)<br />
DNS:<br />
192,168.100.254 (router address again)<br />
Note: You need change PC IP the same with VPN <strong>Router</strong> Gateway. Otherwise you didn’t connection WEB<br />
configuration<br />
E-<strong>Lins</strong> Technology Co.,Limited<br />
Tel: +86-755-29230581 E-mail: sales@e-lins.com sales@szelins.com www.szelins.com
<strong>H685</strong> <strong>H820</strong> VPN <strong>User</strong> <strong>Manual</strong><br />
3.2 PPTP server (point B)<br />
<strong>H685</strong>/<strong>H820</strong> cannot support PPTP Server feature. We use <strong>H685</strong>m/H700/H720 series router for PPTP<br />
Server.<br />
3.2.1 Change local IP address<br />
• Click ”LAN (edit)” to change local IP into 192.168.100.254<br />
3.2.2 Configuration WAN<br />
Refer to <strong>H685</strong>m/H700/H720 usermanual to configure the WAN of <strong>H685</strong>m/H700/H720.<br />
3.2.3 Configure PPTP Server<br />
Click “VPN”, and choose ”PPTP”, select “Enable PPTP”, type the start IP and end IP as below.<br />
E-<strong>Lins</strong> Technology Co.,Limited<br />
Tel: +86-755-29230581 E-mail: sales@e-lins.com sales@szelins.com www.szelins.com
<strong>H685</strong> <strong>H820</strong> VPN <strong>User</strong> <strong>Manual</strong><br />
click Enable PPTP, and fill in Beginning IP and Ending IP, which will be assigned to PPTP client. The<br />
Beginning IP and Ending IP range must be the same range with the router. For example, the router’s IP<br />
is 192.168.100.1, then you can put Beginning IP as 192.168.100.100 and Ending IP as<br />
192.168.100.253<br />
After setting, please re-power on the router.<br />
Follow the picture below, at “VPN –PPTP <strong>User</strong>”<br />
Click “Add” button,<br />
Fill in <strong>User</strong> name, Password and Confirm password, click Apply button to save.<br />
It will show the following if the user creating is successful.<br />
E-<strong>Lins</strong> Technology Co.,Limited<br />
Tel: +86-755-29230581 E-mail: sales@e-lins.com sales@szelins.com www.szelins.com
<strong>H685</strong> <strong>H820</strong> VPN <strong>User</strong> <strong>Manual</strong><br />
3.3 Laptop/<strong>H685</strong>(<strong>H820</strong>) as Client (Point D)<br />
3.3.1 Change local IP address<br />
You need change the PC IP as below.<br />
3.3.2 Configure PPTP client<br />
Open “Network Connections”.<br />
E-<strong>Lins</strong> Technology Co.,Limited<br />
Tel: +86-755-29230581 E-mail: sales@e-lins.com sales@szelins.com www.szelins.com
<strong>H685</strong> <strong>H820</strong> VPN <strong>User</strong> <strong>Manual</strong><br />
Click “network Connection” ,click “Next” to continue<br />
The Network Connection Wizard opens. Click“Next”to continue. Put a check mark on<br />
“Connect to the Internet at my workplace” and click next<br />
E-<strong>Lins</strong> Technology Co.,Limited<br />
Tel: +86-755-29230581 E-mail: sales@e-lins.com sales@szelins.com www.szelins.com
<strong>H685</strong> <strong>H820</strong> VPN <strong>User</strong> <strong>Manual</strong><br />
Select the option “Virtual Private Network connect” and click next<br />
Type a name for this connection<br />
E-<strong>Lins</strong> Technology Co.,Limited<br />
Tel: +86-755-29230581 E-mail: sales@e-lins.com sales@szelins.com www.szelins.com
<strong>H685</strong> <strong>H820</strong> VPN <strong>User</strong> <strong>Manual</strong><br />
Type the host name it was VPN server IP address of the computer<br />
Select “my Use only “option<br />
As showing below picture, Click “Finish” to succeed your new Connection installation<br />
E-<strong>Lins</strong> Technology Co.,Limited<br />
Tel: +86-755-29230581 E-mail: sales@e-lins.com sales@szelins.com www.szelins.com
<strong>H685</strong> <strong>H820</strong> VPN <strong>User</strong> <strong>Manual</strong><br />
Input user name and password, Connection will be create when both of them is the same with that in<br />
the server<br />
E-<strong>Lins</strong> Technology Co.,Limited<br />
Tel: +86-755-29230581 E-mail: sales@e-lins.com sales@szelins.com www.szelins.com
<strong>H685</strong> <strong>H820</strong> VPN <strong>User</strong> <strong>Manual</strong><br />
3.3.3 Configure PPTP client of <strong>H685</strong>/<strong>H820</strong><br />
3.4 IPSec Client for Software (Point F)<br />
3.4.1 Configure IPSec Client of Software<br />
3.4.1.1 Set-up<br />
This software is suit for Win2000,Win2003,and Windows XP System, but Win2000 system need<br />
to add install SP3 or SP4.<br />
It is suitable for personal user and subnet user connects to the company network, after you have<br />
succeeded in dialup to create a VPN network. If you need to put this computer as Gateway .at<br />
subnet network to make VPN communication. When your install it, please choice install<br />
“VPN_NAT”, don’t used NAT from window offer (it means our common used of “internet connection<br />
sharing”)<br />
E-<strong>Lins</strong> Technology Co.,Limited<br />
Tel: +86-755-29230581 E-mail: sales@e-lins.com sales@szelins.com www.szelins.com
<strong>H685</strong> <strong>H820</strong> VPN <strong>User</strong> <strong>Manual</strong><br />
3.4.1.2 Configure IPSec Tool<br />
If you have succeed create a new Connection installation, Run the IPSec configure tools,<br />
E-<strong>Lins</strong> Technology Co.,Limited<br />
Tel: +86-755-29230581 E-mail: sales@e-lins.com sales@szelins.com www.szelins.com
<strong>H685</strong> <strong>H820</strong> VPN <strong>User</strong> <strong>Manual</strong><br />
According to configuration for your VPN <strong>Router</strong> Server, type the connection ID, password, etc.<br />
E-<strong>Lins</strong> Technology Co.,Limited<br />
Tel: +86-755-29230581 E-mail: sales@e-lins.com sales@szelins.com www.szelins.com