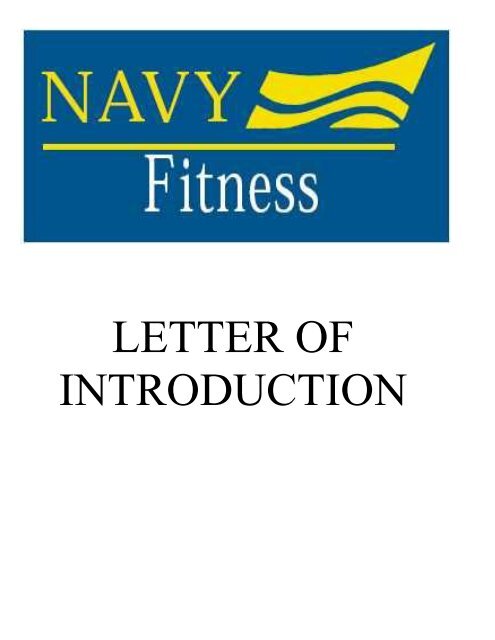
letter of introduction - Fitness, Sports and Deployed Forces Support
letter of introduction - Fitness, Sports and Deployed Forces Support
letter of introduction - Fitness, Sports and Deployed Forces Support

You also want an ePaper? Increase the reach of your titles
YUMPU automatically turns print PDFs into web optimized ePapers that Google loves.
LETTER OF<br />
INTRODUCTION
Pre-Season Basketball Manual<br />
Hello Basketball Player,<br />
Welcome to another season <strong>of</strong> Navy Basketball. As you know the sport <strong>of</strong> basketball is a<br />
very explosive <strong>and</strong> fast paced sport. Every year players are becoming bigger, stronger,<br />
<strong>and</strong> faster. With faster <strong>and</strong> stronger athletes as your competition you as an athlete must be<br />
prepared. The importance <strong>of</strong> coming into the season in the best shape possible is at the<br />
utmost priority. By coming into a season out <strong>of</strong> shape you are already behind your<br />
competition that has been training for the whole <strong>of</strong>f-season. This is what separates the<br />
good players from the mediocre ones. Championship teams <strong>and</strong> players come into the<br />
season in shape <strong>and</strong> only improve from then on. Mediocre players come into the season<br />
out <strong>of</strong> shape <strong>and</strong> are always trying to catch up with the winning teams the whole season.<br />
Remember you cannot play yourself into shape. You must prepare before you win a<br />
championship not prepare as you are trying to win a championship.<br />
The importance <strong>of</strong> employing a pre season conditioning program for basketball is critical<br />
for the prevention <strong>of</strong> injuries. Scientifically based programs will get you into the best<br />
shape possible for the upcoming season. The following program will help get into shape<br />
for the season <strong>and</strong> with a little luck will keep you injury free. Remember you do not help<br />
the team if you are on the sidelines nursing an injury that could have been prevented.<br />
Enjoy the program <strong>and</strong> enjoy your upcoming basketball season.<br />
Good Luck <strong>and</strong> Have Fun,<br />
Marc J. Meeker<br />
Programs Manager Navy <strong>Fitness</strong>
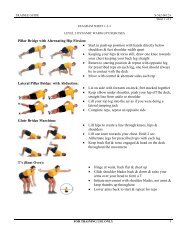
WARM UP
WARM UP<br />
The key to beginning any training program is to get the body ready for activity. This is<br />
done by doing a combination <strong>of</strong> static <strong>and</strong> dynamic movements to bring blood to the<br />
muscles that will be worked during the training period. Static Stretching is stretching,<br />
using slow, controlled stretches, held in position for a period <strong>of</strong> time. Dynamic Stretching<br />
is repeated, fluid, gentle dynamic-range movements.<br />
You should stretch at the following times:<br />
Before exercise, practice, <strong>and</strong> competition<br />
During exercise, practice, <strong>and</strong> competition<br />
Following Exercise, practice, <strong>and</strong> competition<br />
This is done to increase the following to prepare you for exercise:<br />
Heart Rate<br />
Blood Flow<br />
Deep Muscle Temperature<br />
Respiration Rate<br />
Viscosity <strong>of</strong> Joint Fluids<br />
Perspiration<br />
Flexibility<br />
Additionally for those who lack sufficient flexibility, extra stretching sessions during free<br />
time may be both relaxing <strong>and</strong> beneficial. Stretching can be done at night before going to<br />
bed, sitting watching TV or after a hot shower when you feel more relaxed<br />
*Consistency <strong>and</strong> time in a stretching program will show improvements in<br />
flexibility*<br />
Basketball requires a large amount <strong>of</strong> flexibility from the legs, core muscles, <strong>and</strong> upper<br />
body. If any one <strong>of</strong> these areas is inflexible it could hurt your game tremendously. This is<br />
why it is very important to make sure you stretch every time before <strong>and</strong> after playing,<br />
train, <strong>and</strong> when you feel tight. On the next few pages we will go through a basic<br />
stretching program that will include both static <strong>and</strong> dynamic movements to improve your<br />
flexibility while on the court.
BASKETBALL WORKOUT WARM UP<br />
1. Begin a general warm-up period, which may consist <strong>of</strong> 2-5 minutes <strong>of</strong> slow jogging or<br />
riding a stationary Bike<br />
2. At the completion <strong>of</strong> the general warm-up period, mark <strong>of</strong>f approximately a 15-yard<br />
area with cones. Perform the following dynamic stretches.<br />
Dynamic Stretches<br />
(Done in the following order) Exercises are done using 50% effort. Stay relaxed <strong>and</strong><br />
emphasize on technique rather than speed.<br />
1. Skipping – Down <strong>and</strong> Back<br />
2. Walking Lunges – Down <strong>and</strong> Back<br />
3. Side Shuffle – Down <strong>and</strong> back facing the same direction the whole time.<br />
4. Backwards – Down <strong>and</strong> Back<br />
5. High Knees- Down <strong>and</strong> Back<br />
At the completion <strong>of</strong> the dynamic movements immediately perform the following static<br />
stretches to complete the warm-up.<br />
Static Stretches<br />
(Progress from upper body stretch to lower body stretch. Stretches are to be held for<br />
approximately 30 seconds)<br />
Upper Body:<br />
Lower Body:<br />
1. Neck Stretch 1. Groin Stretch (Butterfly)<br />
2. Chest Stretch 2. V-Sit w/ Calf Stretch<br />
3. Triceps Stretch 3. Knees Side to Side<br />
4. Shoulder Stretch & Upper Back Stretch 4. Quad Stretch<br />
5. Back Extensions<br />
After performing the static stretch portion <strong>of</strong> the warm-up you will roll over onto your<br />
back <strong>and</strong> perform the following abdominal exercises.<br />
Crunches<br />
X Crunches<br />
Y Crunches<br />
R Leg Up<br />
L Leg Up<br />
x15<br />
x15<br />
x15<br />
x15<br />
x15<br />
This will complete your warm up. You are now ready to begin your workout. Depending<br />
on what day it is will determine what activity you will perform first either speed or<br />
plyometrics.
DYNAMIC MOVEMENTS EXPLANATION<br />
Skipping - Starting form a st<strong>and</strong>ing position place one foot slightly ahead <strong>of</strong> the other.<br />
Push <strong>of</strong>f with your back leg, drive the lead knee up to the chest, <strong>and</strong> try to gain as much<br />
height <strong>and</strong> distance as possible. Continue by immediately driving with the other leg on<br />
l<strong>and</strong>ing. Repeat for desired distance (2x15 yds)<br />
Walking Lunges - Starting from a st<strong>and</strong>ing position take a step forward <strong>and</strong> go into a<br />
deep lunge position. Once getting into a deep lunge position repeat the movement with<br />
the opposite leg moving forward each time. (2x15yds)<br />
Side Shuffle - Starting st<strong>and</strong>ing sideways then sit down into a deep squat position. Once<br />
in this position, take a lateral step sideways <strong>and</strong> then replace it with the other foot. Keep<br />
your chest up at all times. Do not cross your feet. (2x15)<br />
Backwards Run- St<strong>and</strong>ing with your back facing the direction you are going, place<br />
yourself in a low position. Stay low <strong>and</strong> step backwards using proper arm motion<br />
keeping low throughout the entire distance. (2x15)<br />
High Knees- Starting in a st<strong>and</strong>ing position take a step forward driving your knee up as<br />
high as you can. Staying on the balls <strong>of</strong> your feet repeat the motion with your other leg.<br />
Repeat this motion as many times as possible in the desired distance. (2x15)<br />
UPPER BODY STRETCH EXPLANATION<br />
(Some explanations taken from “Sport Stretch,” Alter, 1990)<br />
Neck Stretch-<br />
1. St<strong>and</strong> or sit upright on the floor<br />
2. Lower your chin so it is touching your upper chest<br />
3. Look from side to side while your chin remains tight to your chest<br />
4. This should create a “U” movement. Continue movement for approximately 30<br />
seconds.<br />
Chest Stretch-<br />
1. St<strong>and</strong> upright facing a corner or open doorway or use a partner.<br />
2. Raise your arms in a reverse “T” (elbows below your shoulders) to stretch the<br />
collarbone section <strong>of</strong> your pectoral muscles bilaterally.<br />
3. Exhale, <strong>and</strong> lean your entire body forward.<br />
4. Hold the stretch for approximately 30 seconds.<br />
Triceps Stretch-<br />
1. Sit or st<strong>and</strong> upright with one arm flexed <strong>and</strong> raised overhead next to your ear, <strong>and</strong><br />
your h<strong>and</strong> resting on your shoulder blade.<br />
2. Grasp your elbow with the opposite h<strong>and</strong>.<br />
3. Exhale, <strong>and</strong> pull your elbow behind your head.
4. Hold the stretch for approximately 30 seconds.<br />
Shoulders <strong>and</strong> Upper Back Stretch-<br />
1. Sit or st<strong>and</strong> upright while bringing your arm across your body while keeping it<br />
straight.<br />
2. Grasp your elbow with the opposite h<strong>and</strong>.<br />
3. Exhale <strong>and</strong> press on the elbow<br />
4. Hold stretch for approximately 30 seconds.<br />
LOWER BODY STRETCH EPLANATION<br />
Groin Stretch-<br />
1. Sit upright on the floor.<br />
2. Flex your knees <strong>and</strong> bring the heels <strong>and</strong> soles <strong>of</strong> your feet together as you pull them<br />
towards your butt.<br />
3. Place your elbows on the inside portion <strong>of</strong> both upper legs.<br />
4. Exhale, <strong>and</strong> slowly push your legs to the floor.<br />
Hold the stretch for approximately 30 seconds then repeat with other leg.<br />
V-Sit with Calf Stretch-<br />
1. Sit on floor with legs spread wide.<br />
2. Keep the legs straight <strong>and</strong> bend at the hips looking toward <strong>and</strong> reaching for the right<br />
leg.<br />
3. Grab your toes <strong>and</strong> pull them towards you to stretch both the calf <strong>and</strong> hamstrings.<br />
4. Maintain an upright chest position at all times.<br />
5. Repeat to the other leg.<br />
Knees Side to Side-<br />
1. Lay on your back with your knees bent <strong>and</strong> feet on the floor.<br />
2. Roll your knees side to side without your feet coming <strong>of</strong>f the floor.<br />
3. Repeat back <strong>and</strong> forth for approximately 30 seconds.<br />
Quad Stretch-<br />
1. Lie face down with your body extended.<br />
2. Flex one leg <strong>and</strong> bring your heel towards your butt.<br />
3. Exhale, swing your arm back to grasp your ankle, <strong>and</strong> pull your heel toward your butt<br />
without over compressing the knee.<br />
4. Hold the stretch for approximately 30 seconds then repeat with other leg.<br />
Back Extension Stretch-<br />
1. Lay on your stomach in a push-up position<br />
2. Arch up keeping your hips on the ground.<br />
3. Complete 5 repetitions lasting for 5 seconds each
PLYOMETRICS
PLYOMETRICS<br />
Plyometrics is defined as exercises that enable a muscle to reach maximum strength in as<br />
short a time as possible. In basketball you will be performing many quick <strong>and</strong> explosive<br />
movements. Plyometrics will aid in basketball by training the muscles used to be faster<br />
<strong>and</strong> stronger thus creating more force resulting in quicker movements from point a to b.<br />
Below is the plyometric workout that will be done before your strength training on days<br />
two <strong>and</strong> four. Any throwing or passing movements will be done with a 5lb – 10lb.<br />
Medicine ball.<br />
Plyometric Workout #1<br />
Rim Jumps 2x10<br />
Tuck Jumps 2x10<br />
Lateral Cone Hops 2x10<br />
Chest Pass 2x10<br />
Overhead Throw 2x10<br />
Plyometric Workout #2<br />
Approach Rim Jumps 2x10 (each side)<br />
Single Leg Lateral Cone Hops w/Stick 2x10<br />
Bounding 2x10<br />
Power Drop Chest Press 2x10<br />
Plyo-Push Ups 2x10<br />
PLYOMETRIC EXPLANATION<br />
Rim Jumps<br />
1. Position yourself under a basketball rim or backboard (This will depend on your<br />
jumping ability)<br />
2. Bend the knees <strong>and</strong> explosively jump up towards the backboard or the rim.<br />
3. You goal should be to either touch the rim or the backboard each time with one h<strong>and</strong>.<br />
4. On your decent you should be thinking about the next jump <strong>and</strong> prepare by flexing<br />
the elbows <strong>and</strong> hips so that when you l<strong>and</strong> you can immediately jump again.<br />
5. This is a rapid-fire movement with no rest in between jumps.<br />
6. Complete for desired amount <strong>of</strong> repetitions.<br />
Tuck Jumps<br />
1. St<strong>and</strong> with feet shoulder-width apart <strong>and</strong> the body in a vertical position.<br />
2. Jump up bringing up the knees towards your chest.<br />
3. You knees should come up so you would be able to grasp them with your h<strong>and</strong>s.<br />
4. L<strong>and</strong> <strong>and</strong> immediately perform another jump.<br />
5. Repeat for desired amount <strong>of</strong> repetitions.
Lateral Cone Hops<br />
1. Place a single cone on the ground <strong>and</strong> position yourself directly beside it.<br />
2. Starting from a slight knee bent position jump laterally over the cone to the other side.<br />
3. Immediately upon l<strong>and</strong>ing on the other side jump back over the cone to the other side<br />
to complete the repetition.<br />
4. Repeat for given number <strong>of</strong> repetitions.<br />
Overhead Throw<br />
1. St<strong>and</strong> with your feet shoulder width apart while holding a medicine ball overhead.<br />
2. Step forwards <strong>and</strong> throw the ball with both arms to a partner or into a wall.<br />
3. Repeat for given number <strong>of</strong> repetitions.<br />
Chest Pass<br />
1. St<strong>and</strong> with your feet shoulder width apart while holding a medicine ball at chest<br />
height.<br />
2. Step forwards <strong>and</strong> throw the ball with both arms to a partner or into a wall.<br />
3. Repeat for given number <strong>of</strong> repetitions.<br />
Approach Rim Jumps<br />
1. St<strong>and</strong> in a staggered stance, front to back.<br />
2. Take a short step forward with the preferred foot <strong>and</strong> quickly bring the back foot <strong>and</strong><br />
together with the front foot.<br />
3. Jump vertically, reaching for the rim.<br />
4. Repeat for given number <strong>of</strong> repetitions.<br />
Single Leg Lateral Cone Hops w/Stick<br />
1. Place a single cone on the ground <strong>and</strong> position yourself directly beside it.<br />
2. Starting from a slight knee bent position balance yourself on one leg.<br />
3. Jump laterally over the cone to the other side.<br />
4. Immediately upon l<strong>and</strong>ing on the other side stick the l<strong>and</strong>ing <strong>and</strong> stabilize yourself<br />
before you jump back over the cone to the other side to complete the repetition.<br />
5. Repeat for given number <strong>of</strong> repetitions sticking each l<strong>and</strong>ing.<br />
Bounding<br />
1. Start at one end <strong>of</strong> a basketball court <strong>and</strong> begin to slowly jog.<br />
2. After a few slow steps begin to over exaggerate your stride in a bounding motion.<br />
3. Each stride should be very long <strong>and</strong> drawn out.<br />
4. Repeat for desired numbers <strong>of</strong> steps.<br />
Power Drop Chest Press<br />
1. Lie on the ground with arms outstretched.<br />
2. A partner st<strong>and</strong>s on a bench or box holding a medicine ball at arms length.<br />
3. The partner drops the ball.<br />
4. Catch the ball <strong>and</strong> immediately thrust the ball back to the partner.<br />
5. Repeat for desired number <strong>of</strong> repetitions.
Plyo-Push Ups<br />
1. Face the floor as if you were going to do a push up with your feet on the floor <strong>and</strong><br />
your h<strong>and</strong>s between two 25-45 lb weight plates.<br />
2. Push up <strong>of</strong>f <strong>of</strong> the ground <strong>and</strong> jump your h<strong>and</strong>s on to the weight plates.<br />
3. Walk your h<strong>and</strong>s back to the middle <strong>and</strong> set up for another push up.<br />
4. Repeat for desired amount <strong>of</strong> repetitions.
SPEED
SPEED<br />
Speed is usually what separates the average teams from the great teams. Teams that are<br />
faster do not always have the best athletes but what they lack in athleticism they make up<br />
with speed. Speed for the most part is a genetically given gift. However, we can be more<br />
efficient in our movements to move faster. By moving more then we have to could cause<br />
a loss in speed. By streamlining our movements <strong>and</strong> training our bodies to react faster we<br />
can get our full potential out <strong>of</strong> our given speed. One key to getting faster is to lose body<br />
fat. Excess weight will just slow you down. Below are a few drills that can help you<br />
increase your present speed levels. This workout will be done in conjunction with your<br />
agility drills. All speed work should be completed before lifting.<br />
Quick Starts x5<br />
10’s x one complete cycle<br />
Get Up <strong>and</strong> Go’s x5<br />
40Yard Stride-Outs (85% Effort) x3<br />
40 Yard Sprints (100% Effort) x3<br />
SPEED EXPLANATION<br />
Quick Starts-<br />
1. Mark <strong>of</strong>f a 10 yard area with cones<br />
2. Start at one end <strong>of</strong> the 10 yard area<br />
3. On a set go comm<strong>and</strong> pump your arms <strong>and</strong> move your feet as fast as possible for the<br />
complete 10 yards.<br />
4. The movement should be over exaggerated emphasizing on the arm swing <strong>and</strong> quick<br />
foot stride.<br />
5. Complete for desired number <strong>of</strong> repetitions.<br />
10’s-<br />
1. Use the same 10-yard course that was used in the quick starts.<br />
2. You will be completing 5 different drills in this exercise.<br />
3. All drills will start at one end <strong>of</strong> the 10-yard course.<br />
4. First drill sprint 10 yards as fast as you can. Turn around <strong>and</strong> complete the sprint<br />
again to your starting point.<br />
5. Second drill sprint 10 yards as fast as you can but at the end plant your foot <strong>and</strong><br />
immediately backpedal 10 yards. Complete this drill twice.<br />
6. Third drill position yourself into a four-point stance like a sprinter would at the<br />
beginning <strong>of</strong> a race. Feet should be slightly staggered with the dominant leg towards<br />
the front. Balance yourself completely on your front foot while lifting your rear foot
<strong>of</strong>f the ground. Forcefully explode <strong>of</strong>f your front foot <strong>and</strong> sprint for 10 yards. Turn<br />
around <strong>and</strong> complete this drill again to return to the starting point.<br />
7. Fourth drill position yourself into a four-point stance like a sprinter would be at the<br />
beginning <strong>of</strong> a race. Feet should be slightly staggered with the dominant leg towards<br />
the front. Balance yourself completely on your back leg while lifting up your front<br />
leg. Forcefully explode with your rear foot <strong>and</strong> sprint for 10 yards. Turn around <strong>and</strong><br />
complete this drill again to return to the starting point.<br />
GET UP AND GO’s<br />
1. Again use the 10 yard course you have used in the previous drills.<br />
2. Start on your stomach, head behind the starting line<br />
3. On comm<strong>and</strong> or on your own<br />
4. Explode <strong>of</strong>f the ground <strong>and</strong> sprint the full 10 yards.<br />
8. Turn around <strong>and</strong> complete the same action <strong>and</strong> return to your starting point.<br />
40 YARD STRIDE-OUTS (85% EFFORT)<br />
1. Starting out <strong>of</strong> a side stance as if you were stealing a base.<br />
2. Explode out <strong>of</strong> your stance for a 100% start.<br />
3. Stay low for 3 yards then st<strong>and</strong> tall.<br />
4. Throttle back to 85% effort.<br />
5. Finish with high knee action <strong>and</strong> long stride length.<br />
6. Jog back to starting line <strong>and</strong> complete for required number <strong>of</strong> repetitions<br />
40 YARD SPRINTS (100% Effort)<br />
1. Starting out <strong>of</strong> a side stance as if you were stealing a base.<br />
2. Explode out <strong>of</strong> your stance for a 100% start.<br />
3. Sprint 40 yards with 100% effort.<br />
4. St<strong>and</strong> tall , relax, high knees, <strong>and</strong> long strides<br />
5. Jog back to starting line <strong>and</strong> complete for required number <strong>of</strong> repetitions.
AGILITY
AGILITY<br />
Having good agility on the court will just magnify your athletic ability. You will have the<br />
potential to make impossible moves look easy because your body will already know how<br />
to respond in certain situations safely. Agility drills places your body in movement<br />
situations that are not normally encountered in every day life. By preparing your body to<br />
be placed in these awkward situations you will be less prone to an injury during the<br />
season. This is why a good general agility program should be included in any year-round<br />
training program. Below are three drills that will prepare you for most <strong>of</strong> the<br />
movements you will encounter during your upcoming season.<br />
Complete The Square x3 (each way)<br />
Pro Agility Drill x5<br />
Star Runs In The Lane x5<br />
Explanation <strong>of</strong> Agility Drills<br />
COMPLETE THE SQUARE<br />
SHUFFLE<br />
S<br />
P<br />
R<br />
I<br />
N<br />
T<br />
B<br />
A<br />
C<br />
K<br />
P<br />
E<br />
D<br />
A<br />
L<br />
SHUFFLE<br />
START<br />
FINISH<br />
1. Start in a defensive position at the corner <strong>of</strong> the baseline key.<br />
2. Shuffle the baseline towards the other side <strong>of</strong> the key.<br />
3. Sprint down the key line towards the free throw line.<br />
4. Shuffle the free throw line towards the other side <strong>of</strong> the key.<br />
5. Backpedal the other side <strong>of</strong> the key to return to the starting position.<br />
6. Immediately perform the same movement scheme but start from the other side so that<br />
both directions are worked.<br />
7. Performing once in each direction will complete one repetition.
PRO AGILITY<br />
START<br />
5 yds 5 yds<br />
1. Straddle the middle line in a three-point stance with your h<strong>and</strong> on the middle line.<br />
2. Sprint to the right line touch it with your right h<strong>and</strong>.<br />
3. Sprint to the far-left line <strong>and</strong> touch it with your left h<strong>and</strong>.<br />
4. Finish by sprinting back to the right, through the middle line.<br />
Key: Face forward (towards the start) throughout the drill do not turn 180 degrees at the<br />
outside touch lines.<br />
STAR RUNS IN THE LANE<br />
1. Place a cone or mark <strong>and</strong> X in the middle <strong>of</strong> the basketball key.<br />
2. Number each corner <strong>of</strong> the key from 1 to 4.<br />
3. Have a partner yell out a 4-digit combination using 1,2,3,4.<br />
4. Have the partner say go an the participant will then sprint to each corner in the<br />
number sequence touching the floor with their h<strong>and</strong> <strong>and</strong> then coming back to the<br />
center cone before moving on to the next number <strong>of</strong> the sequence.<br />
5. Once all corners in the sequence have been touched, this will complete one repetition.<br />
6. Perform a sprint, backpedal, Shuffle, Shuffle to corner sprint back, <strong>and</strong> sprint to<br />
corner <strong>and</strong> shuffle back to complete 5 different repetition schemes.
STRENGTH
STRENGTH<br />
Strength training has not always been a focus <strong>of</strong> most participants in basketball. In the<br />
past it was thought that being stronger or more muscular could throw <strong>of</strong>f your shot <strong>and</strong><br />
make you muscle bound. This was a huge falsity. Being stronger <strong>and</strong> more explosive will<br />
make you more <strong>of</strong> an asset to your team at all times. If you can develop yourself to be a<br />
more explosive basketball player it will show huge dividends on the court. This, however,<br />
requires proper training <strong>and</strong> preparation way before the season even begins. Just going<br />
into the weight room <strong>and</strong> lifting does not always result in improvements on the court.<br />
You must emphasize on those muscle groups <strong>and</strong> movements that will benefit you the<br />
most while you are playing. Proper preparation through strength training for an upcoming<br />
season will prevent injuries <strong>and</strong> will improve your output for your team making you a<br />
valuable asset.<br />
Below is a four-day workout. Every week you will be training the entire body twice. This<br />
means that every two days you will be working every major muscle group in the body.<br />
There is one day <strong>of</strong> rest before you work the entire body again mid week <strong>and</strong> a two-day<br />
rest period is then taken on the weekends.<br />
Day One<br />
Back Squats 3x8-10<br />
Jump Squats 2x6<br />
Calf Raise W/Bar 2x15<br />
DB Shoulder Press 3x8-10<br />
DB Shrugs 2x10-12<br />
5 Way Shoulder 2x8<br />
Tricep Pushdowns 2x10<br />
Skull Crushers 2x10<br />
Day Two<br />
Incline Bench Press 3x8-10<br />
DB Bench Press 2x10<br />
Push Ups 2x25<br />
Lat Pulldowns 3x10<br />
One Arm DB Rows 2x10<br />
Hyperextensions 2x10<br />
DB Bicep Curls 2x10<br />
Wrist Curls 2x10<br />
Day Three<br />
Leg Press 2x8-10<br />
Leg Extension 2x10<br />
Leg Curls 2x10<br />
Tibia Raises 2x15<br />
Lateral Raises DB 2x10<br />
Front Raises DB 2x10<br />
45 Degree Rear Delt Raise 2x10<br />
Close Grip DB Press 2x10
Day Four<br />
Bench Press 3x8-10<br />
Incline DB Bench 2x10<br />
Flat Bench Flyes 2x10<br />
Mid Rows 3x10<br />
Bent Over Rows 2x10<br />
Revers Hypers Off <strong>of</strong> Ball 2x10<br />
Preacher Curls 2x10<br />
DB Holds 2xALAP<br />
CORE WORK<br />
At the base <strong>of</strong> every good basketball player is a solid foundation in the mid-section.<br />
Without a strong midsection the transition <strong>of</strong> power from your hips to your legs <strong>and</strong> arms<br />
may not be as effective when trying to run up the court or take a shot. Core work can be<br />
done at any time during the workout. Preferably it should be done after the warm up <strong>and</strong><br />
before plyometrics. Core work can be done every day <strong>of</strong> the week but a minimum <strong>of</strong><br />
three days is optimal for core strengthening. Below is a simple core strengthening<br />
workout that will aid in developing your mid-section.<br />
Core Workout:<br />
1. Crunches x50<br />
2. Leg Lifts x30<br />
3. Superman’s x20<br />
4. Planks x 1 min<br />
5. Bridges x 1 min<br />
6. V-Sit Twists x30<br />
Core Work Explanation<br />
Crunches – Lying flat on your back on a padded surface. Bend your knees keeping your<br />
feet flat on the floor <strong>and</strong> bring them close to your butt. Place your h<strong>and</strong>s either across<br />
your chest or behind your head. At that point contract your abdominal muscle so you are<br />
bringing your chest towards your knees. Make sure you rise up enough that your shoulder<br />
blades come up <strong>of</strong>f the ground. Once you feel them come up <strong>of</strong>f the ground return to<br />
your starting position <strong>and</strong> repeat for the desired number <strong>of</strong> repetitions. Exhale on the<br />
contraction portion <strong>of</strong> the exercise <strong>and</strong> inhale when you return to the starting position.<br />
Leg Lifts – Lying flat on your back on a padded surface. Place your h<strong>and</strong>s under your<br />
butt, elbows out so the small <strong>of</strong> your back is pressed against the floor, head up shoulder<br />
blades <strong>of</strong>f the floor. Then extend your legs straight out, heels resting on the floor. Use the<br />
muscles <strong>of</strong> your lower AB’s to raise your legs until they are perpendicular to the body.
Then lower the legs in a controlled motion <strong>and</strong> repeat for the desired number <strong>of</strong><br />
repetitions.<br />
Superman’s – Lie facedown flat on the floor, leaving your arms at your side. Slowly<br />
raise your chest <strong>and</strong> feet <strong>of</strong>f the floor as high as you comfortably can. Hold for two<br />
seconds <strong>and</strong> come back to the floor slowly <strong>and</strong> repeat for the desired number <strong>of</strong><br />
repetitions.<br />
Bridges Core Stabilization – Lie on the floor (on your back) h<strong>and</strong>s at your sides. Push<br />
with your feet <strong>and</strong> shoulder blades to lift your butt <strong>of</strong>f the ground <strong>and</strong> make a shoulder<br />
bridge. Your back should not be overly arched but in a flat neutral position. Hold this<br />
position for the desired amount <strong>of</strong> time.<br />
Planks- Lie face down on the floor. Position your elbows at your sides with arms bent.<br />
Rise up on your forearms so that the only thing touching the floor is your toes <strong>and</strong> your<br />
forearms. Keep your body in a fairly rigid position keeping the but down. You should<br />
look like a flat board from the side not an A frame. Hold for the desired amount <strong>of</strong> time.<br />
A towel or cushion under the arms will aid in the pressure from a hard floor.<br />
V-Sit Twists – Lie flat on your back, legs extended straight (knees unlocked), heels<br />
resting on floor, arms extended overhead. Use AB’s to simultaneously raise your torso<br />
<strong>and</strong> legs together so you are in a V position balancing on your butt. Rotate your torso to<br />
the right <strong>and</strong> touch the floor beside you while still balancing with your torso <strong>and</strong> feet in<br />
the air. Once you touch one side immediately repeat to the other side. Once you complete<br />
both sides that is two repetitions.<br />
STRENGH EXPLANATION<br />
Lateral Pulldown – Adjust seat to just reach h<strong>and</strong>les <strong>and</strong> secure thighs under roller pads.<br />
Pull h<strong>and</strong>les downward below chin level. Return slowly to starting position <strong>and</strong> repeat.<br />
Maintain erect posture.<br />
Mid Rows – Sit so that h<strong>and</strong>s can just reach top <strong>of</strong> h<strong>and</strong>les. Pull h<strong>and</strong>les backward as far<br />
as possible. Return slowly to starting position <strong>and</strong> repeat. Maintain erect posture. Keep<br />
chest against support pad throughout exercise.<br />
Calf Raise W/Bar - While st<strong>and</strong>ing on a flat surface <strong>and</strong> holding the bar on your back<br />
as if you were in the starting position <strong>of</strong> the squat slowly rise up onto your toes in a<br />
controlled fashion. Once you reach the full extension on your toes slowly lower yourself<br />
to the starting position. Maintain neutral head position <strong>and</strong> a straight back with your chest<br />
up.<br />
45 Degree Rear Delt Raise- Position a 0-90 degree bench in the 45 degree position.<br />
Grab two DB’s before you position yourself on the bench. Sit backward on the seat so<br />
that your chest is facing towards the back support <strong>and</strong> your chest is supported. Let your
arms hang in front <strong>of</strong> you in a relaxed position. Slowly raise the DB’s out towards your<br />
sides while squeezing your shoulder blades together. Raise your arms until you are<br />
parallel with your back <strong>and</strong> chest. Repeat for desired number <strong>of</strong> repetitions.<br />
Incline DB Bench Press – Set up a free bench so it is at 45 degrees. Pick up two<br />
dumbbells that you will be able to press for the desired amount <strong>of</strong> repetitions. Lift the<br />
dumbbells to your shoulders before you sit down on the bench. After sitting down on the<br />
bench press the dumbbells over your head in a slow <strong>and</strong> controlled manner keeping the<br />
dumbbells in alignment with your eyes until you are almost completely extended at the<br />
elbow. Lower the weight to the starting position <strong>and</strong> repeat. This exercise is done to<br />
develop the chest <strong>and</strong> deltoids.<br />
Triceps Pushdowns - St<strong>and</strong> with feet shoulder-width apart in front <strong>of</strong> a press-down<br />
cable. Grasp a V or straight bar with an overh<strong>and</strong> grip, elbows against sides, <strong>and</strong> hold at<br />
chest level. Push the bar downward until elbows are fully extended. Return slowly to<br />
starting position <strong>and</strong> repeat. Maintain neutral head position. Return the bar no higher than<br />
chest level between repetitions.<br />
Push-Ups- Starting in an up position <strong>of</strong> the push-up with h<strong>and</strong>s wider than your<br />
shoulders lower yourself to the floor <strong>and</strong> touch your chest. Upon touching your chest<br />
push yourself up to the starting position. Perform in control <strong>and</strong> not in a rapid-fire mode.<br />
Dumbbell Bench Press- Pick up a set <strong>of</strong> DB’s that match your strength level. Carry them<br />
over to a flat bench. Sit down with the DB’s <strong>and</strong> place them upright on your knees <strong>and</strong><br />
slowly pull them to your stomach <strong>and</strong> lay down at the same time. Take the DB’s out to<br />
your sides <strong>and</strong> position them like you would on a regular bench press. Press the DB’s up<br />
until the elbows are almost in a locked position. Lower slowly <strong>and</strong> repeat for desired<br />
number <strong>of</strong> repetitions.<br />
5 Way Shoulder- #1Grab a 5-10 lb. Weight plate <strong>and</strong> st<strong>and</strong> in front <strong>of</strong> a mirror. While<br />
holding a plate in each h<strong>and</strong> bend your arms to a 90 degrees keeping your elbows tight to<br />
your sides. Cross your h<strong>and</strong>s in front <strong>of</strong> you like you would be hugging yourself than take<br />
<strong>and</strong> uncross your arms <strong>and</strong> go past the starting position as far as you can without letting<br />
your elbows come away from your sides. #2 Position your arms like you are making a<br />
human goal post. Both arms should be bent at 90 degrees with your knuckles up still<br />
holding on to the plates. Rotating only at the elbow lower the weight so that you have an<br />
upside down field goal <strong>and</strong> the plates are at your sides with your arms still bent at a 90<br />
degree angle. #3 Place your h<strong>and</strong>s on the front <strong>of</strong> your thighs <strong>and</strong> rotate your thumb so<br />
you are poking the top <strong>of</strong> your thigh with it. Still holding on to the weight plate perform a<br />
front raise with the weight going no higher than eye level. #4 Take both plates back to the<br />
original starting position with 90 degrees elbows at your sides. Lift the elbows straight<br />
out to the sides like you would be pouring a pitcher <strong>of</strong> water performing a lateral raise. #5<br />
Bend over at a 45-degree angle <strong>and</strong> place your palms facing you while your arms are<br />
extended. Lift the weights directly out to your sides while squeezing the upper portion <strong>of</strong><br />
your back together. Repeat all exercises for 8 repetitions before moving on.
Back Squats- Rack the bar comfortably on your back. The feet should be slightly wider<br />
than shoulder width apart with the toes slightly pointed out. Your back must remain flat<br />
throughout the entire lift. Descend, maintaining control, to a depth where the top <strong>of</strong> the<br />
thigh is parallel. On the upward motion, the head should be straight with the eyes looking<br />
up as you accelerate the weight up. Focus on control during the lift.<br />
Bench Press- Done on a flat bench, use an overh<strong>and</strong> grip <strong>and</strong> keep palms facing away<br />
from you throughout the entire lift. The grip should be somewhere between the smooth<br />
inner part <strong>of</strong> the bar <strong>and</strong> the small ring towards the outside <strong>of</strong> the bar. Start from a locked<br />
out position with the bar directly over the chest. Lower the barbell with control <strong>and</strong> touch<br />
the mid-line <strong>of</strong> the chest. Explosively press the bar back to the starting position.<br />
Hyperextensions- Position yourself in a hyperextension/ glute-ham machine so that you<br />
fit comfortably <strong>and</strong> are supported at the hips <strong>and</strong> you can bend to a complete 90-degree<br />
angle. Starting from a bent 90-degree position raise your torso to a 180-degree position.<br />
Do not go any higher than this position because <strong>of</strong> potential injury to the spine at higher<br />
degrees. Once at the 90-degree position lower yourself to the starting position again in a<br />
controlled manner. Complete for desired number <strong>of</strong> repetitions to complete one set.<br />
Close Grip Dumbbell Press - Grab a pair <strong>of</strong> dumbbells from the rack <strong>and</strong> lay down on a<br />
flat bench. While lying down position the dumbbells so they are at your sides with a both<br />
palms facing each other. Keeping elbows tight to your sides press the dumbbells upward<br />
until arms are straight. Lower back to starting position in a controlled manner. Complete<br />
desired number <strong>of</strong> repetitions to complete one set.<br />
Dumbbell Shrugs- Pick up a pair <strong>of</strong> dumbbells <strong>and</strong> hold them at your sides. Shrug your<br />
shoulders upward towards your ears. Once your reach your top position lower back to<br />
your starting position <strong>and</strong> relax your shoulders. Complete for desired amount <strong>of</strong><br />
repetitions to complete one set.<br />
Incline Bench Press – Set up an incline bench so it is at 45 degrees. Set up a bar with<br />
your desired weight. Remove the weight from the rack <strong>and</strong> lower the bar to the upper<br />
portions <strong>of</strong> your chest but no higher than the clavicle. Raise the weight to the starting<br />
position <strong>and</strong> repeat. Complete for desired number <strong>of</strong> repetitions.<br />
Reverse Hypers <strong>of</strong>f <strong>of</strong> Physio Ball- Position yourself chest down on a physio ball.<br />
Slowly roll yourself forwards overtop <strong>of</strong> the ball so your hips are on top <strong>of</strong> the ball <strong>and</strong><br />
brace yourself with your arms in front <strong>of</strong> you. The ball should support your hips. Raise<br />
your legs <strong>of</strong>f the ground in an upright manner to a 180-degree position. Lower legs back<br />
to the ground to complete the repetition. Complete for desired number <strong>of</strong> repetitions.<br />
Jump Squats – Rack the bar comfortably on your back. The feet should be slightly wider<br />
than shoulder width apart with the toes slightly pointed out. Your back must remain flat<br />
throughout the entire lift. Descend to a ¼ squat position in a slow <strong>and</strong> controlled manner.<br />
Once you have positioned yourself in the ¼ squat position forcefully explode upward so<br />
that you come slightly <strong>of</strong>f <strong>of</strong> the ground. Because <strong>of</strong> the jumping action with the bar you
should do this exercise with lighter weight. Recommend no more than 25 lbs. per side on<br />
the bar. Complete for desired amount <strong>of</strong> repetitions.<br />
DB Shoulder Press- Position a 0-90 degree bench in the full 90 degree upright position.<br />
Select a pair <strong>of</strong> dumbbells that match your strength level <strong>and</strong> can be performed for<br />
desired amount <strong>of</strong> repetitions. After being seated position the dumbbells at shoulder level.<br />
Press the dumbbells overhead until your elbows are almost fully extended. Slowly lower<br />
to beginning position <strong>and</strong> perform for desired amount <strong>of</strong> repetitions. At no time should<br />
the dumbbell be any lower than your shoulders to prevent injury.<br />
One Arm DB Rows- Grab a dumbbell <strong>and</strong> position yourself on a bench so that your knee<br />
<strong>and</strong> arm opposite <strong>of</strong> the arm being worked are on the bench. The other leg will be in<br />
contact with the floor to provide support. The starting position <strong>of</strong> the weight should be<br />
from an extended arm position. Pull the DB up while bending your elbow. Keep your<br />
elbow close to you at all times <strong>and</strong> make sure to keep your head up. Lower the DB back<br />
to the starting position <strong>and</strong> repeat the movement. Do both the left <strong>and</strong> right arm for<br />
desired amount <strong>of</strong> repetitions.<br />
Overhead Extensions- Grab a DB <strong>and</strong> place your h<strong>and</strong>s inside the plate with your h<strong>and</strong>s<br />
forming a diamond like position. Sit down on a bench <strong>and</strong> place the DB overhead with<br />
arms extended. Bend the elbows to 90 degrees <strong>and</strong> then extend the arms up to the starting<br />
position. Keeping the elbow in at all times concentrating on the triceps doing the work.<br />
Tibia Raises- St<strong>and</strong> on the edge <strong>of</strong> a squat rack platform, with the heels raised. Then pick<br />
up your toes <strong>and</strong> hold for a second, <strong>and</strong> then lower them back to the floor. Repeat for<br />
desired number <strong>of</strong> repetitions.<br />
Bent Over Rows- Using a straight bar. Take an overh<strong>and</strong> grip that is about shoulder<br />
width apart. St<strong>and</strong> up <strong>and</strong> bend over but make sure to keep the back straight, chest out,<br />
shoulders back, <strong>and</strong> a slight bend in the knee. From there slowly pull the bar up to the<br />
chest, by pulling the elbows straight back. Then slowly lower the bar back to the starting<br />
point.<br />
DB Curls- Using a pair <strong>of</strong> DB’s position yourself in a st<strong>and</strong>ing position, with an<br />
underh<strong>and</strong> grip, curl the bar upward avoiding excessive body lean. Then lower the DB’s<br />
to full extension in a controlled manner. Complete for desired amount <strong>of</strong> repetitions.<br />
Lying Tricep Extensions (Skull Crushers)- Use an EZ curl bar for this exercise. Lying<br />
on a flat bench with feet flat on the floor have a partner h<strong>and</strong> you the EX curl bar so that<br />
you can grab the bar with your arms extended like you were bench pressing. Bend at the<br />
elbows only <strong>and</strong> slowly lower the bar towards your forehead keeping your elbows in.<br />
Your upper arm should never move. All movement should come at the elbow. Extend the<br />
elbow back to the starting position to complete the repetition. Repeat for desired amount<br />
<strong>of</strong> repetitions <strong>and</strong> then have partner take the bar away from you.
Wrist Curls- Grab either two DB’s or one lighter bar <strong>and</strong> position yoruself so that you<br />
are sitting towards the end <strong>of</strong> a flat bench. Place your elbows between your thighs so that<br />
your wrist is the only thing hanging <strong>of</strong>f the bench with palms up h<strong>and</strong> position. At this<br />
time have someone h<strong>and</strong> you the bar or DB’s <strong>and</strong> curl your wrist up towards your body in<br />
<strong>and</strong> arching motion. Only movement should be in the wrist joint. Complete for desired<br />
amount <strong>of</strong> repetitions.<br />
Lateral Raise – Squeeze seat-adjust lever to sit with shoulders in line with machine axes<br />
<strong>of</strong> rotation. Place arms against sides inside movement pads. Lift movement pads just<br />
above horizontal. Return slowly to starting position <strong>and</strong> repeat. Keep back against seat<br />
back. Lead movements with elbows.<br />
Flat Bench Flyes- Grab a pair <strong>of</strong> dumbbells <strong>and</strong> lay flat on a bench with your palms<br />
facing each other <strong>and</strong> your arms extended. Lower your arms out to your sides like you<br />
would be trying to wrap your h<strong>and</strong>s around a tree. Keep your arms slightly bent the entire<br />
time. Once you get to a parallel position with your arms bring both arms to the starting<br />
position in a hugging motion. Complete for desired number <strong>of</strong> repetitions.<br />
DB Holds- Grab two heavy DB’s (above 50 lbs.) <strong>and</strong> hold at your sides until your grip<br />
starts to weaken. Perform as long as possible. This is one repetition. Complete for desired<br />
number <strong>of</strong> repetitions.<br />
Leg Press- Position yourself in a leg press machine so that when you are in the machine<br />
you legs are bent at a 90 degree angle in the starting position. Select your weight. Press<br />
with your legs to move the weight stack in an upward position. Stop just before your<br />
knees lock out <strong>and</strong> return to the starting position without letting the weight stack rest<br />
immediately press the legs out for another repetition. Complete for desired number <strong>of</strong><br />
repetitions.<br />
Leg Extension- Position yourself in a leg extension machine so that the back <strong>of</strong> your<br />
knees are in alignment with the axis <strong>of</strong> rotation <strong>of</strong> the lift arm. Select your weight. Lift<br />
your legs up in an extension motion but stop just short <strong>of</strong> locking out your knees to return<br />
to the starting position. Repeat for desired number <strong>of</strong> repetitions.<br />
Leg Curls - Position yourself in a leg curl machine so that your knees are in alignment<br />
with the axis <strong>of</strong> rotation <strong>of</strong> the lift arm. Select your weight. Curl your legs towards your<br />
glute area stopping just short <strong>of</strong> touching the pad to your glute <strong>and</strong> return to the starting<br />
position. Repeat for desired number <strong>of</strong> repetitions.<br />
Front Raises- Grab a pair <strong>of</strong> dumbbells <strong>and</strong> st<strong>and</strong> with your feet shoulder width apart<br />
<strong>and</strong> knees slightly bent. Position your h<strong>and</strong>s so they are holding the DB’s palms down.<br />
Raise both DB’s out to the front <strong>of</strong> you in an arcing motion. Stop lifting when the DB’s<br />
reach your eye level. Return to the starting position in a controlled motion. Complete for<br />
desired amount <strong>of</strong> repetitions.
Preacher Curls- Find either a machine preacher bench or a free weight preacher bench.<br />
Set the bench so that the A-frame <strong>of</strong> the bench is directly in your armpits <strong>and</strong> your<br />
elbows are in alignment with the axis <strong>of</strong> rotation if you are using a machine. Grasp the<br />
bar with palms up grip. Curl the bar towards your body in an arcing motion. Return to the<br />
starting position. Complete for desired number <strong>of</strong> repetitions.
CARDIOVASCULAR
Cardiovascular Training<br />
As you already know basketball is a cardiovascular dem<strong>and</strong>ing sport <strong>and</strong> being in top<br />
cardiovascular condition will only magnify your skill while playing. Skill will only take<br />
you so far then conditioning takes over as the main factor in winning or losing. Playing in<br />
all day tournaments or weekend tournaments can take a lot out <strong>of</strong> an individual who is<br />
not in top shape. Being in shape will allow your game to be consistent rather than great<br />
the first few games <strong>and</strong> then suffer because <strong>of</strong> fatigue in the later games. Conditioning<br />
will allow you to be a better player by being consistent in your performance game after<br />
game.<br />
Gassers <strong>and</strong> 5 ½’s will be our preseason conditioning choice for Basketball. Gassers a<br />
short duration cardiovascular event that will simulate some <strong>of</strong> the same types <strong>of</strong><br />
cardiovascular situations you will be placed in on the field <strong>of</strong> play. General<br />
cardiovascular conditioning will include using cross-trainers, treadmill, or bikes to get the<br />
heart rate up into a training zone so you can see cardiovascular improvements. The<br />
Gassers <strong>and</strong> cardiovascular activities are explained below.<br />
Gassers<br />
Gasser runs are great way to train your cardiovascular system for basketball. This stop<br />
<strong>and</strong> go training will allow your body to get used to short term higher paced running in a<br />
controlled environment. This comes closest to actually simulating the cardiovascular<br />
stress that will be placed on your body during a basketball game.<br />
Set Up for Gassers:<br />
Measure out 159 feet on a grass field. Place a cone at the beginning <strong>of</strong> the measurement<br />
<strong>and</strong> a cone at the end <strong>of</strong> the measurement. Mark <strong>of</strong>f another 159 feet about 30 yards away<br />
from the first cone to create a box on the field. This will be the running lanes for the<br />
field runs. You can see a visual example below in the diagram.<br />
Field Run Set Up<br />
S<br />
T<br />
A<br />
R<br />
T<br />
159 Feet
Half Gasser<br />
Half gassers runs are performed by running to the end <strong>of</strong> the field marked <strong>of</strong>f by the<br />
cones <strong>and</strong> running back to the start. Once completing a one-minute rest is allowed. These<br />
runs should be performed in the following times:<br />
AGE<br />
TIME<br />
17-19 19 Seconds<br />
20-24 20 Seconds<br />
25-29 21 Seconds<br />
30-34 23 Seconds<br />
35-39 25 Seconds<br />
40-44 26 Seconds<br />
45-49 27 Seconds<br />
50-54 28 Seconds<br />
55-59 29 Seconds<br />
60-64 30 Seconds<br />
Full Gassers<br />
Full gassers are performed by running to the end <strong>of</strong> the field marked <strong>of</strong>f by the cones <strong>and</strong><br />
running back to the start then turning around <strong>and</strong> completing the same run again without<br />
rest. At the completion <strong>of</strong> this run a three-minute rest will be allowed. These runs<br />
should be performed in the following times:<br />
AGE<br />
TIME<br />
17-20 38 Seconds<br />
20-25 40 Seconds<br />
25-30 42 Seconds<br />
30-35 46 Seconds<br />
35-40 50 Seconds<br />
40-45 52 Seconds<br />
45-50 54 Seconds<br />
50-55 56 Seconds<br />
55-60 58 Seconds<br />
60-64 60 Seconds<br />
Now that you know how to set up the runs <strong>and</strong> what times you need to complete. Below<br />
is the six-week training plan you need to follow to optimize your cardiovascular training<br />
for basketball. A combination <strong>of</strong> both gassers <strong>and</strong> general cardiovascular training will be<br />
included in this workout.
5 ½’s<br />
5 ½’s are also another great way to get you ready for the upcoming basketball season.<br />
This drill is performed on a court to get you used to running up <strong>and</strong> down the court just<br />
like you would during a high intensity contest.<br />
Finish<br />
Start<br />
Start at one baseline <strong>and</strong> sprint to the other baseline. Repeat this five times <strong>and</strong> finish at<br />
half-court. Stay in a straight line. You should try to complete this drill as fast as possible.<br />
Take a 2-minute break in between each one the first two weeks. Then take a 1:30 minute<br />
break the next 2 weeks <strong>and</strong> then finish up taking only 1 minute during the last two weeks<br />
<strong>of</strong> training.<br />
Cardiovascular Training Schedule<br />
Week One<br />
Tuesday<br />
5 ½’s x4<br />
Friday<br />
4 Half Gassers<br />
2 Full Gassers<br />
Week Two<br />
Tuesday<br />
5 ½’s x5<br />
Friday<br />
5 Half Gassers<br />
2 Full Gassers
Week Three<br />
Tuesday<br />
5 ½’s x6<br />
Friday<br />
6 Half Gassers<br />
3 Full Gassers<br />
Week Four<br />
Tuesday<br />
5 ½’s x7<br />
Friday<br />
7 Half Gassers<br />
3 Full Gassers<br />
Week Five<br />
Tuesday<br />
5 ½’s x8<br />
Friday<br />
8 Half Gassers<br />
4 Full Gassers<br />
Week Six<br />
Tuesday<br />
5 ½’s x9<br />
Friday<br />
9 Half Gassers<br />
4 Full Gassers<br />
DETERMINING YOUR MAX HEART RATE AND HEART RATE ZONES<br />
To improve your current cardiovascular levels on the 6-week program you will have to<br />
do more cardiovascular training than what is listed. On the weekends it would be<br />
beneficial to you if you performed 30 minutes <strong>of</strong> light jogging or bike riding at 65% to<br />
80% <strong>of</strong> your maximum heart rate. Here is how you calculate your Maximum Heart Rate<br />
<strong>and</strong> your Training Zones.<br />
220 – Age = Maximal Heart Rate<br />
220-____________= ___________
Maximal Heart Rate – Resting Heart Rate = Heart Rate<br />
Reserve Your resting heart rate should be taken in the morning before you get out <strong>of</strong> bed.<br />
Sit on the edge <strong>of</strong> your bed <strong>and</strong> take your pulse for a one-minute time frame. The total<br />
number <strong>of</strong> beats will be your Resting Heart Rate.<br />
________________- _____________= ___________<br />
(Heart Rate Reserve X 65%) + Resting Heart Rate = Target Heart Rate for 65%<br />
(________ x .65) + _____________= _____________<br />
(Heart Rate Reserve X 70%) + Resting Heart Rate = Target Heart Rate for 70%<br />
(________ x .70) + _____________= _____________<br />
(Heart Rate Reserve X 75%) + Resting Heart Rate = Target Heart Rate 75%<br />
(________ x .75) + _____________= _____________<br />
(Heart Rate Reserve X 80%) + Resting Heart Rate = Target Heart Rate 80%<br />
(________ x .80) + _____________= _____________<br />
Target Heart Rates for Workouts<br />
65% _____ 70% _____ 75% _____<br />
80% _____<br />
Now that you know your heart rates for the given percentages what do you do with them?<br />
These numbers will allow you to determine how hard your workout will be. By slowly<br />
increasing the intensity <strong>of</strong> your heart rate you will improve your cardiovascular<br />
endurance levels.<br />
If a workout requires you to be exercising at 65% <strong>of</strong> your Max Heart Rate for 20 minutes<br />
you do not start the exercise time until you are at 65% <strong>of</strong> your Max Heart Rate. It may<br />
take 5 minutes to bring your heart rate up to this level <strong>of</strong> work. Keep adjusting the<br />
workload during your brief warm up time until your heart rate is at this level. Then start<br />
the clock for the exercise session. Starting the clock early or below your target heart rate<br />
for that workout will only hurt yourself in your cardiovascular improvement. If you can<br />
exercise at a higher heart rate then do so but never exceed 80% during a workout. If your<br />
heart rate is approaching 80% or higher then reduce the workload <strong>of</strong> the machine. This<br />
will let you stay in the training zone where you will make the most cardiovascular<br />
improvements. (You can train at higher levels but you may become mentally fatigued
knowing each time that you will be maxing out a workout. Stay within the training zones<br />
<strong>and</strong> you should stay focused with all the workouts)
NUTRITION
NUTRITION<br />
Introduction<br />
As you already know athletes use large amounts <strong>of</strong> energy to perform at a high<br />
levels. What most athletes do not realize is that the food they put in their body to produce<br />
energy is a major factor in their performance. This means that an athlete must put high<br />
quality nutrients into their body to be able to have high quality performances. Teaching<br />
an athlete how to eat a balanced diet is just as important as practicing a skill that is<br />
needed for their sport. Applying nutritional education to a training program will enhance<br />
an athlete’s performance along with their skills.<br />
First <strong>of</strong> all, an athlete must underst<strong>and</strong> some basic principals about nutrition <strong>and</strong><br />
their body. An athlete who is high in body fat is a slower athlete than one lower in body<br />
fat. This fat storage in the body comes from persons nutritional habits. Lower body fat<br />
increases mobility where higher body fat decreases mobility. Heavier is not always better<br />
when the weight comes from excess body fat. Athletes always want to know how to get<br />
faster <strong>and</strong> one simple way is their diet. By using sound nutrition in their diet it will enable<br />
them to reduce body fat <strong>and</strong> become a quicker <strong>and</strong> leaner athlete.<br />
A normal diet consists <strong>of</strong> 50-60% Complex Carbohydrates, 15-25% Fat, <strong>and</strong><br />
20-25% Protein. You should try to eat a similar combination <strong>of</strong> carbohydrates, fat, <strong>and</strong><br />
protein at each meal. By keeping the nutrients <strong>and</strong> calories the same for every meal eaten<br />
during the day an athlete should feel energized all day. There should never be bouts <strong>of</strong><br />
sluggishness or hyperactivity due to low or high blood sugar levels.<br />
Remember that an athlete uses nutrients <strong>and</strong> energy every time they workout,<br />
practice, or play a game. After a long bout <strong>of</strong> exercise you should replenish your body<br />
with nutrients within one hour <strong>of</strong> finishing. After a workout your body is looking for<br />
nutrients to replace the ones lost or rebuild what you broke down during a workout. By<br />
eating your body will absorb nutrients quickly to replenish it losses. This hour is called<br />
the “ Hour <strong>of</strong> Power” because this is where nutrition plays a large part in your strength<br />
gains after a workout. Getting nutrients to your body after a workout will aid in the<br />
recovery process to build stronger, faster, quicker athletes. On the following pages there<br />
are guidelines that will give you some insight on how to become a leaner, stronger, <strong>and</strong> a<br />
faster athlete.<br />
NUTRITIONAL GUIDELINES<br />
A. Eating Enough Quality Calories
One <strong>of</strong> the biggest problems for most athletes is just getting enough quality<br />
calories into their diet. An athlete is very active during their season <strong>and</strong> moderately<br />
active in their <strong>of</strong>f-season. This means an athlete will need sufficient calories throughout<br />
the day to meet the need <strong>of</strong> their activity level. Sufficient quality calories do not mean<br />
going to Burger King after a workout <strong>and</strong> eating a Whopper Value Meal. Sufficient<br />
quality calories mean calories that your body can use to rebuild <strong>and</strong> repair its self. These<br />
quality calories come from complex carbohydrates (ex. pasta, vegetables) <strong>and</strong> lean<br />
proteins (ex. fish, chicken).<br />
Meals should be broken up into an even percentage <strong>of</strong> calories compared to<br />
total caloric intake. Let’s say you are going to eat 3000 calories in one day. This means<br />
that you would be able to eat 1000 calories a meal. If you eat a snack you would just<br />
subtract the amount <strong>of</strong> calories <strong>of</strong> the snack from your total calories for the day <strong>and</strong> then<br />
divide it by the number <strong>of</strong> meals you are eating. An example <strong>of</strong> this is shown below:<br />
Three Meal Scenario<br />
3000 cals / 3 meals = 1000 Calories /Meal<br />
Three Meal Plus One Snack Scenario<br />
500 cal Snack<br />
3000 cals - 500 cals = 2500 Cals<br />
2500 cals / 3 meals = 833 Calories / Meal<br />
Three Meal Plus Two Snack Scenario<br />
2x500 cal snack =1000 Cals<br />
3000 cals - 1000 cals = 2000 Cals<br />
2000 cals / 3 meals = 667 Calories / Meal<br />
Four Meal Plus One Snack Scenario<br />
500 cal Snack<br />
3000 cals - 500 cals= 2500 Cals<br />
2500 cals / 4 meals = 625 Calories / Meal<br />
Also the percentage <strong>of</strong> carbohydrates, proteins, <strong>and</strong> fats should be similar for every<br />
meal. (Ex. 55% carbohydrates, 20% protein, <strong>and</strong> 25% fat) This will aid in maintaining<br />
muscle tissue, promoting fat loss, <strong>and</strong> reduces fatigue or sluggishness throughout the day.<br />
By keeping food intake consistent your body will stay in a state <strong>of</strong> energy equilibrium.<br />
An example <strong>of</strong> this is shown below:<br />
3000 Calorie A Day Diet with Three Meals<br />
Carbohydrates<br />
3000 cals x 0.55 = 1650 Cals From Carbohydrates Per Day<br />
1650 cals / 3 meals = 550 Cals From Carbohydrates Per Meal<br />
550 Cals / 4 cals per gram <strong>of</strong> carbohydrate = 138 grams <strong>of</strong> Carbohydrates Per Meal
Protein<br />
3000 cals x 0.20 = 600 Cals From Protein Per Day<br />
600 cals / 3 meals = 200 Cals From Protein Per Meal<br />
200 Cals / 4 cals per gram <strong>of</strong> protein = 50 grams <strong>of</strong> Protein Per Meal<br />
Fat<br />
3000 cals x 0.25 = 750 Cals From Fat Per Day<br />
750 cals / 3 meals = 250 Cals From Protein Per Meal<br />
250 Cals / 9 cals per gram <strong>of</strong> fat = 28 grams <strong>of</strong> Fat Per Meal<br />
Along with keeping your calories <strong>and</strong> nutrients the same percentages per meal, an<br />
athlete should eat a minimum <strong>of</strong> three meals a day with about 4-5 hours in-between<br />
meals. This will keep the athlete from getting hungry <strong>and</strong> bingeing on junk food on the<br />
side. Small snacks can be added during the day when needed, but try to make it a snack<br />
with similar percentages to your diet plan. These simple tips should allow an athlete to<br />
get enough quality calories into their diet <strong>and</strong> keep them performing at a high level at all<br />
times.<br />
B. Food Choices<br />
Now that you know how to break up your meals <strong>and</strong> snacks what foods should<br />
you be eating to meet these Quality Calorie needs. Making the right food choices does<br />
not mean eating as many wings as you can at the local free happy hour buffet.<br />
Remember most Americans get 60% <strong>of</strong> their calories from simple sugars <strong>and</strong> fat. Fat<br />
<strong>and</strong> simple sugars do not aid in your performance as an athlete. Foods should be nutrient<br />
dense with a majority <strong>of</strong> the calories from complex carbohydrates which include pastas,<br />
breads, potatoes, <strong>and</strong> rice. Avoid foods that are fried, refined, canned, or processed.<br />
These foods may be high in calories, but a majority <strong>of</strong> the calories are from fat. Below<br />
are some suggestions for increasing your quality calorie needs as an athlete.<br />
1. Use Complex Carbohydrates as your major source <strong>of</strong> Carbohydrates<br />
Examples <strong>of</strong> Complex Carbohydrates are as follows:<br />
1. Bread<br />
2. Cereals (Watch for sugar content)<br />
3. Oatmeal<br />
4. Pancakes<br />
5. Waffles<br />
6. French Toast<br />
7. Grits<br />
8. Pasta
squash)<br />
9. Rice<br />
10. Vegetables (potatoes, sweet potatoes, lima beans, peas, corn,<br />
11. Fruit <strong>and</strong> Fruit juices (watch for refined sugar in juices)<br />
Eating Complex Carbohydrates promotes better activity in athletes. By having<br />
enough stored glycogen in your muscles from carbohydrates will enable you to perform<br />
at higher levels for longer periods. Choosing simple carbohydrates (sugars, pop, <strong>and</strong><br />
c<strong>and</strong>y) only aid in fueling your body for brief periods <strong>of</strong> time. They are quickly burned<br />
<strong>and</strong> used in the body. The best choices when choosing carbohydrates are complex<br />
carbohydrates to power your high performance body for a long period <strong>of</strong> time.<br />
2. Use lean protein sources to meet your protein<br />
requirements<br />
Protein is the building blocks <strong>of</strong> all body tissues. By eating quality protein<br />
sources that are lean will enable your body to build quality muscle. It is recommended<br />
that .45 to .73 grams per day <strong>of</strong> protein are sufficient for every pound <strong>of</strong> body weight.<br />
Remember that a diet very high in protein may promote the accumulation <strong>of</strong> body fat<br />
from extra calories. Also high intakes <strong>of</strong> protein also promote the increase in urinary<br />
water loss to remove excess waste products. This extra loss <strong>of</strong> water may promote<br />
dehydration, which could lead to cramping. Below is a small list <strong>of</strong> quality protein<br />
sources).<br />
Good Protein Sources<br />
Poultry:<br />
Chicken Breast<br />
Turkey Breast<br />
Fish:<br />
Catfish<br />
Cod<br />
Flounder<br />
Haddock<br />
Halibut<br />
Lobster<br />
Orange Roughy<br />
Pollock<br />
Salmon<br />
Scallops<br />
Shrimp<br />
Sole<br />
Snapper<br />
Tuna Packed in Water<br />
Dairy:<br />
Cottage Cheese, Lowfat<br />
Egg Beaters<br />
Egg Whites, Cooked<br />
Meats:<br />
Beef, Lean<br />
Skim Milk<br />
Yogurt, Lowfat<br />
Lamb, Lean
Canadian Bacon Pork , Lean<br />
Ham , Lean<br />
Veal<br />
Remember that taking protein supplements instead <strong>of</strong> eating food to meet your protein<br />
needs is not a recommended action. If you follow a normal eating diet as discussed<br />
earlier you can meet your protein need without any extra from supplementation. In<br />
addition, the body cannot store large amounts <strong>of</strong> protein so immediate consumption after<br />
exercise is needed. An example <strong>of</strong> this would be drinking a recovery drink after a<br />
workout like Boost, Whey protein shake, or milk. This is the only time a supplement<br />
would be recommended because a liquid protein drink is digested <strong>and</strong> taken up by your<br />
muscle cells faster than solid foods.<br />
3. Fats<br />
Fat is one nutrient that most people never have any problem <strong>of</strong> getting enough <strong>of</strong>.<br />
As an athlete you should try to eat nutrient sources that are low in fat. Eating a diet that<br />
is high in fat will cause unwanted percent fat increases, chronic exhaustion, irritability,<br />
restlessness, <strong>and</strong> muscle tissue decreases. Remember that a diet high in fat <strong>and</strong> low in<br />
carbohydrate slows the process <strong>of</strong> energy storage in the muscle. If this continues, there<br />
will be less fuel for high intensity activity. This will result in poor performance.<br />
Some ways you can cut down on your fat intake are as follows. Start by limiting<br />
the amount <strong>of</strong> red meats <strong>and</strong> pork products you eat (steak, hamburger, hot dogs, luncheon<br />
meats, bacon, sausage etc.). Red meats <strong>and</strong> pork products are high in fat most <strong>of</strong> the time.<br />
If you do eat red meats try to pick leaner cuts <strong>of</strong> meat at the grocery. Also dairy products<br />
commonly have higher fat percentages for their total calories. Foods like cheese, butter,<br />
mayonnaise, ice cream, <strong>and</strong> cream sauces (Alfredo) all have high fat content. By<br />
choosing lower fat dairy products or sauces that are lower in fat for your food choices<br />
you will lower the caloric <strong>and</strong> fat content <strong>of</strong> some foods by half. Any foods that are<br />
based or cooked with oil are also very high in fat. This includes salad dressings, oils, or<br />
anything that is fried in animal or vegetable fat (ex. french fries, chips) By substituting<br />
low fat dressings, limiting oil use in cooking, <strong>and</strong> not frying food will aid in the reduction<br />
<strong>of</strong> fat content from some <strong>of</strong> your foods. Remember as an athlete you are trying to put on<br />
lean mass <strong>and</strong> fat does not aid in the increase <strong>of</strong> lean mass. This is why fat must be<br />
limited to a certain percentage <strong>of</strong> your diet <strong>and</strong> kept that way to prevent fat mass<br />
increases.<br />
C. Hydration <strong>and</strong> Fluids<br />
Along with properly planned meals athletes need plenty <strong>of</strong> fluids to<br />
perform at high levels. Your body is composed <strong>of</strong> 75% water <strong>and</strong> uses water in all<br />
metabolic functions. Once the body experiences a 3% weight loss in water, there is an<br />
affect on performance. This loss could cause muscle cramping, pulls, <strong>and</strong> heat<br />
exhaustion. By taking in water you maintain balance in your body. On the average a<br />
human being should drink about 4 to 6 glasses <strong>of</strong> water a day.<br />
To make sure athletes are getting enough water back into their system after a<br />
workout, athletes should weigh themselves before <strong>and</strong> after strenuous activity to<br />
determine the amount <strong>of</strong> water they have lost <strong>and</strong> need to replace from their body weight.
For every pound lost 2-3 cups <strong>of</strong> water will need to be replaced. Another good idea to<br />
get water during the day is to fill up <strong>and</strong> empty milk jug with water <strong>and</strong> put about 2<br />
tablespoons <strong>of</strong> either lemon juice, orange juice, apple juice <strong>and</strong> shake it up. The juice<br />
will give the water a mild citrus taste. Every time you open the refrigerator take a drink<br />
<strong>and</strong> at every meal drink out <strong>of</strong> the jug. By the end <strong>of</strong> the day you should finish the<br />
gallon jug. Believe me there will be many bathroom breaks if you follow this <strong>and</strong> your<br />
urine should be clear. This will mean you are fully hydrated <strong>and</strong> ready for maximal<br />
performance.<br />
Sport drinks <strong>and</strong> juice are also excellent ways <strong>of</strong> getting fluids into your body but<br />
watch how much you drink. Sport drinks <strong>and</strong> juices contain calories in the form <strong>of</strong><br />
simple sugars. By drinking too much juice or sport drink may give you a sugar high<br />
which we are trying to avoid with a well-planned diet. Just remember that every time<br />
you take a swig <strong>of</strong> juice from the fridge you are adding calories to your daily total. It is<br />
better to drink water if you just want to quench your thirst <strong>and</strong> save the juices for meals.<br />
D. Conclusion<br />
Probably after reading all this you will see how much nutrition can affect your<br />
performance as an athlete. By eating properly your athletic potential can increase greatly<br />
but also with athletic success you will want to enjoy life also. It is important to eat well<br />
but also enjoy food at the same time. With all the stress <strong>of</strong> eating healthy <strong>and</strong> practice you<br />
will have some times where you want to go out <strong>and</strong> eat a pizza, wings or just some good<br />
junk food <strong>and</strong> “that is OK”, but do so in moderation. Here is an example <strong>of</strong> how to do<br />
this. If you eat 21 meals in one week you should try to eat healthy for 18 <strong>of</strong> those meals.<br />
The other three meals enjoy yourself with moderation. I am not allowing you to eat a<br />
whole pizza or order 100 wings <strong>and</strong> eat them all, but eat something you enjoy like a<br />
steak, burger, fries, ect. The next meal however you are right back on the diet plan.<br />
This will allow you to enjoy some foods that you like <strong>and</strong> crave. This should prevent<br />
you from straying from your diet that will make you a better athlete.