

Clinical techniques for delivering the TAP® 3 Elite - Glidewell Dental ...
Clinical techniques for delivering the TAP® 3 Elite - Glidewell Dental ...
Clinical techniques for delivering the TAP® 3 Elite - Glidewell Dental ...

Create successful ePaper yourself
Turn your PDF publications into a flip-book with our unique Google optimized e-Paper software.
<strong>Clinical</strong> <strong>techniques</strong> <strong>for</strong><br />
<strong>delivering</strong> <strong>the</strong> TAP ®<br />
3 <strong>Elite</strong><br />
sleep apnea device<br />
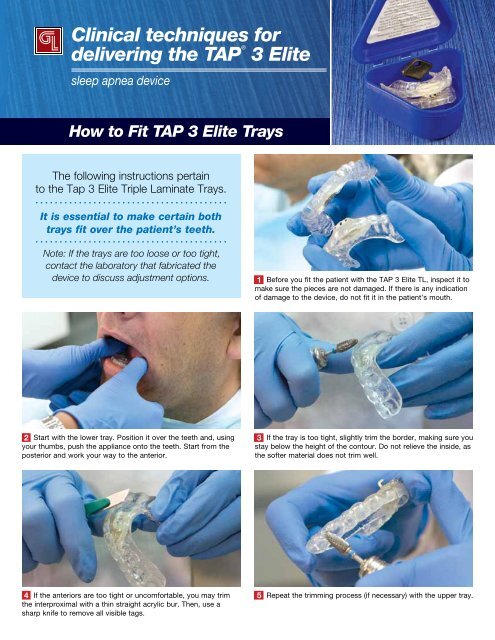
How to Fit TAP 3 <strong>Elite</strong> Trays<br />
The following instructions pertain<br />
to <strong>the</strong> Tap 3 <strong>Elite</strong> Triple Laminate Trays.<br />
It is essential to make certain both<br />
trays fit over <strong>the</strong> patient’s teeth.<br />
Note: If <strong>the</strong> trays are too loose or too tight,<br />
contact <strong>the</strong> laboratory that fabricated <strong>the</strong><br />
device to discuss adjustment options.<br />
1 Be<strong>for</strong>e you fit <strong>the</strong> patient with <strong>the</strong> TAP 3 <strong>Elite</strong> TL, inspect it to<br />
make sure <strong>the</strong> pieces are not damaged. If <strong>the</strong>re is any indication<br />
of damage to <strong>the</strong> device, do not fit it in <strong>the</strong> patient’s mouth.<br />
2 Start with <strong>the</strong> lower tray. Position it over <strong>the</strong> teeth and, using 3 If <strong>the</strong> tray is too tight, slightly trim <strong>the</strong> border, making sure you<br />
your thumbs, push <strong>the</strong> appliance onto <strong>the</strong> teeth. Start from <strong>the</strong><br />
posterior and work your way to <strong>the</strong> anterior.<br />
stay below <strong>the</strong> height of <strong>the</strong> contour. Do not relieve <strong>the</strong> inside, as<br />
<strong>the</strong> softer material does not trim well.<br />
4 If <strong>the</strong> anteriors are too tight or uncom<strong>for</strong>table, you may trim 5<br />
<strong>the</strong> interproximal with a thin straight acrylic bur. Then, use a<br />
sharp knife to remove all visible tags.<br />
Repeat <strong>the</strong> trimming process (if necessary) with <strong>the</strong> upper tray.
TAP 3 <strong>Elite</strong> Hook Setting and Adjustments<br />
The initial position should be set by <strong>the</strong> prescriber and according to <strong>the</strong> following instructions.<br />
The hook moves <strong>for</strong>ward and back by using <strong>the</strong> adjustment key to dial <strong>the</strong> adjustment screw<br />
clockwise or counterclockwise. Each 180° turn is a 0.25 mm adjustment.<br />
1 Place <strong>the</strong> device in <strong>the</strong> patient’s<br />
mouth. Instruct <strong>the</strong> patient to move<br />
his or her lower jaw <strong>for</strong>ward enough<br />
to engage <strong>the</strong> hook.<br />
6 If <strong>the</strong> patient cannot turn <strong>the</strong><br />
initial hook any fur<strong>the</strong>r, <strong>the</strong> second,<br />
shorter hook can be used. To<br />
change hooks:<br />
a. Using <strong>the</strong> hex screwdriver, loosen<br />
<strong>the</strong> two outside screws.<br />
2 Since <strong>the</strong> device was set up at<br />
a 2 mm protrusive starting point,<br />
<strong>the</strong> patient can turn <strong>the</strong> adjustment<br />
key clockwise to acquire a 7 mm<br />
protrusive position. Not all patients<br />
require a mandible protrusion of 7<br />
mm. Turn <strong>the</strong> adjustment key until<br />
<strong>the</strong> patient feels com<strong>for</strong>table.<br />
b. Remove <strong>the</strong> front plate.<br />
3 It is extremely important that<br />
<strong>the</strong>re is space bilaterally between<br />
<strong>the</strong> trays prior to adding acrylic<br />
posterior stops. The objective is<br />
to create bilateral and/or posterior<br />
stops at <strong>the</strong> patient’s treatment<br />
position. Since <strong>the</strong> relationship of<br />
<strong>the</strong> maxilla to <strong>the</strong> mandible changes<br />
during protrusion, this procedure<br />
must be repeated if <strong>the</strong> treatment<br />
position is altered.<br />
4 On <strong>the</strong> protrusive gauge, each<br />
mark and each space between<br />
<strong>the</strong> marks are 1 mm wide. The<br />
protrusion gauge is 5 mm long<br />
from <strong>the</strong> front of <strong>the</strong> plate to <strong>the</strong><br />
most posterior mark.<br />
c. Slide <strong>the</strong> initial hook toward you<br />
to remove it from <strong>the</strong> base.<br />
d. Use <strong>the</strong> key provided with <strong>the</strong><br />
device to remove <strong>the</strong> screw from<br />
<strong>the</strong> initial hook. Insert <strong>the</strong> screw<br />
into <strong>the</strong> replacement hook. Slide<br />
new hook into place.<br />
5 From <strong>the</strong> starting point, <strong>the</strong><br />
patient should turn <strong>the</strong> key a<br />
half turn (180°) per night until all<br />
of <strong>the</strong> symptoms are alleviated.<br />
The patient should count each<br />
turn so that he/she knows how<br />
far <strong>for</strong>ward to dial <strong>the</strong> hook each<br />
night.<br />
If any position becomes<br />
uncom<strong>for</strong>table, dial <strong>the</strong> hook<br />
back until <strong>the</strong> pain subsides. Do<br />
not start dialing <strong>for</strong>ward again until <strong>the</strong> jaw is com<strong>for</strong>table.<br />
Note: If <strong>the</strong> patient loses count of how far <strong>for</strong>ward <strong>the</strong> hook is dialed, have him/<br />
her dial <strong>the</strong> key clockwise until <strong>the</strong> teeth are back to <strong>the</strong> starting position. Then,<br />
have <strong>the</strong> patient dial <strong>the</strong> hook as many turns counterclockwise as <strong>the</strong> previous<br />
night’s hook position.<br />
e. Replace <strong>the</strong> front plate (flat side<br />
down and outside holes toward<br />
device) and re-tighten <strong>the</strong> two<br />
outside screws.<br />
If you have any questions related to<br />
<strong>the</strong> TAP 3 <strong>Elite</strong> device, please call<br />
800-407-3326 <strong>for</strong> assistance.<br />
GL-1726-1012


