Create successful ePaper yourself
Turn your PDF publications into a flip-book with our unique Google optimized e-Paper software.
General Information<br />
Hydraulic Hoses<br />
Hydraulic hoses are subject to extreme conditions such<br />
as pressure differentials during operation and exposure<br />
to weather, sun, chemicals, very warm storage conditions,<br />
or mishandling during operation and maintenance.<br />
These conditions can cause damage or<br />
premature deterioration. Some hoses are more susceptible<br />
to these conditions than others. Inspect the hoses<br />
frequently for signs of deterioration or damage.<br />
When replacing a hydraulic hose, be sure that the hose<br />
is straight (not twisted) before tightening the fittings.<br />
This can be done by observing the imprint on the hose.<br />
Use two wrenches; hold the hose straight with one<br />
wrench and tighten the hose swivel nut onto the fitting<br />
with the other wrench.<br />
WARNING<br />
Before disconnecting or performing any work<br />
on hydraulic system, relieve all pressure in<br />
system. Stop engine and rotate the steering<br />
wheel.<br />
Keep body and hands away from pin hole leaks<br />
or nozzles that eject hydraulic fluid under high<br />
pressure. Use paper or cardboard, not hands,<br />
to search for leaks. Hydraulic fluid escaping<br />
under pressure can have sufficient force to<br />
penetrate the skin and cause serious injury. If<br />
fluid is injected into the skin, it must be surgifamiliar<br />
with this type of injury. Gangrene may<br />
cally removed within a few hours by a doctor<br />
result from such an injury.<br />
Hydraulic Fitting Installation<br />
O–Ring Face Seal<br />
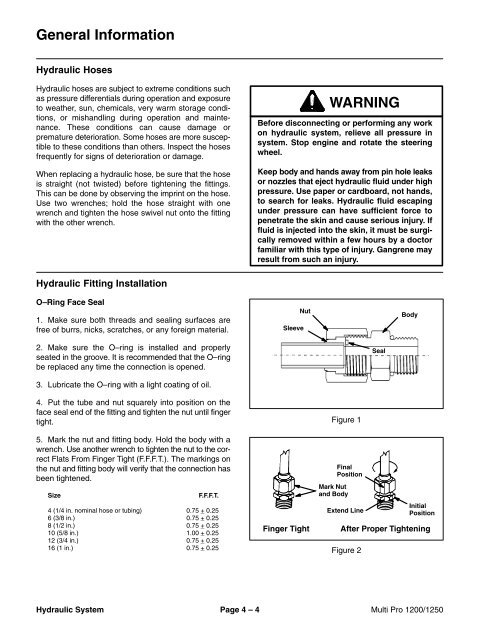
1. Make sure both threads and sealing surfaces are<br />
free of burrs, nicks, scratches, or any foreign material.<br />
Sleeve<br />
Nut<br />
Body<br />
2. Make sure the O–ring is installed and properly<br />
seated in the groove. It is recommended that the O–ring<br />
be replaced any time the connection is opened.<br />
Seal<br />
3. Lubricate the O–ring with a light coating of oil.<br />
4. Put the tube and nut squarely into position on the<br />
face seal end of the fitting and tighten the nut until finger<br />
tight. Figure 1<br />
5. Mark the nut and fitting body. Hold the body with a<br />
wrench. Use another wrench to tighten the nut to the correct<br />
Flats From Finger Tight (F.F.F.T.). The markings on<br />
the nut and fitting body will verify that the connection has<br />
been tightened.<br />
Mark Nut<br />
Size F.F.F.T. and Body<br />
Final<br />
Position<br />
Initial<br />
4 (1/4 in. nominal hose or tubing) 0.75 + 0.25 Extend Line Position<br />
6 (3/8 in.) 0.75 + 0.25<br />
8 (1/2 in.) 0.75 + 0.25<br />
10 (5/8 in.) 1.00 + 0.25 <br />
Finger Tight After Proper Tightening<br />
12 (3/4 in.) 0.75 + 0.25 <br />
16 (1 in.) 0.75 + 0.25 Figure 2 <br />
Hydraulic System Page 4 – 4 Multi Pro 1200/1250


