Metaballs in Cinema 4D - Molecular Movies
Metaballs in Cinema 4D - Molecular Movies
Metaballs in Cinema 4D - Molecular Movies

You also want an ePaper? Increase the reach of your titles
YUMPU automatically turns print PDFs into web optimized ePapers that Google loves.
<strong>Metaballs</strong> <strong>in</strong> C<strong>in</strong>ema <strong>4D</strong><br />
Custom metaballs<br />
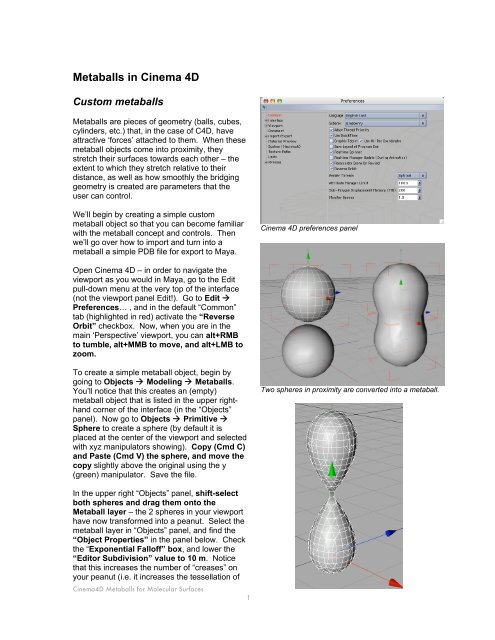
<strong>Metaballs</strong> are pieces of geometry (balls, cubes,<br />
cyl<strong>in</strong>ders, etc.) that, <strong>in</strong> the case of C<strong>4D</strong>, have<br />
attractive ‘forces’ attached to them. When these<br />
metaball objects come <strong>in</strong>to proximity, they<br />
stretch their surfaces towards each other – the<br />
extent to which they stretch relative to their<br />
distance, as well as how smoothly the bridg<strong>in</strong>g<br />
geometry is created are parameters that the<br />
user can control.<br />
We’ll beg<strong>in</strong> by creat<strong>in</strong>g a simple custom<br />
metaball object so that you can become familiar<br />
with the metaball concept and controls. Then<br />
we’ll go over how to import and turn <strong>in</strong>to a<br />
metaball a simple PDB file for export to Maya.<br />
C<strong>in</strong>ema <strong>4D</strong> preferences panel<br />
Open C<strong>in</strong>ema <strong>4D</strong> – <strong>in</strong> order to navigate the<br />
viewport as you would <strong>in</strong> Maya, go to the Edit<br />
pull-down menu at the very top of the <strong>in</strong>terface<br />
(not the viewport panel Edit!). Go to Edit <br />
Preferences… , and <strong>in</strong> the default “Common”<br />
tab (highlighted <strong>in</strong> red) activate the “Reverse<br />
Orbit” checkbox. Now, when you are <strong>in</strong> the<br />
ma<strong>in</strong> ‘Perspective’ viewport, you can alt+RMB<br />
to tumble, alt+MMB to move, and alt+LMB to<br />
zoom.<br />
To create a simple metaball object, beg<strong>in</strong> by<br />
go<strong>in</strong>g to Objects Model<strong>in</strong>g <strong>Metaballs</strong>.<br />
You’ll notice that this creates an (empty)<br />
metaball object that is listed <strong>in</strong> the upper righthand<br />
corner of the <strong>in</strong>terface (<strong>in</strong> the “Objects”<br />
panel). Now go to Objects Primitive <br />
Sphere to create a sphere (by default it is<br />
placed at the center of the viewport and selected<br />
with xyz manipulators show<strong>in</strong>g). Copy (Cmd C)<br />
and Paste (Cmd V) the sphere, and move the<br />
copy slightly above the orig<strong>in</strong>al us<strong>in</strong>g the y<br />
(green) manipulator. Save the file.<br />
Two spheres <strong>in</strong> proximity are converted <strong>in</strong>to a metaball.<br />
In the upper right “Objects” panel, shift-select<br />
both spheres and drag them onto the<br />
Metaball layer – the 2 spheres <strong>in</strong> your viewport<br />
have now transformed <strong>in</strong>to a peanut. Select the<br />
metaball layer <strong>in</strong> “Objects” panel, and f<strong>in</strong>d the<br />
“Object Properties” <strong>in</strong> the panel below. Check<br />
the “Exponential Falloff” box, and lower the<br />
“Editor Subdivision” value to 10 m. Notice<br />
that this <strong>in</strong>creases the number of “creases” on<br />
your peanut (i.e. it <strong>in</strong>creases the tessellation of<br />
C<strong>in</strong>ema<strong>4D</strong> <strong>Metaballs</strong> for <strong>Molecular</strong> Surfaces<br />
1
the geometry). Next, <strong>in</strong>crease the Hull value by<br />
<strong>in</strong>crements of 10% until the balls are no longer<br />
connected (probably <strong>in</strong> the vic<strong>in</strong>ity of 200%).<br />
Now select one of the spheres (either by click<strong>in</strong>g<br />
on its layer <strong>in</strong> the “Objects” panel, or simply by<br />
click<strong>in</strong>g on it <strong>in</strong> the viewport), and press the “E”<br />
key on your keyboard to activate the move tool<br />
(i.e. xyz manipulators). Move the sphere up and<br />
down to observe the metaball effect <strong>in</strong> action!<br />
Notice that if you move the sphere such that it<br />
JUST connects with the one below it, the<br />
geometry at the junction is poor and very<br />
faceted. You can remedy this by select<strong>in</strong>g the<br />
metaball object and now lower<strong>in</strong>g the Editor<br />
Subdivision (try a value of 5 or even 2!).<br />
<strong>Molecular</strong> metaballs<br />
Open the hhpl1.pdb file <strong>in</strong> Excel (won’t<br />
recognize the file type so switch to ‘all<br />
documents’) – this will br<strong>in</strong>g up the ‘Text Import<br />
Wizard.’ Select the “Fixed width” option and<br />
enter 16 for the “Start import at row” (if you scroll<br />
down <strong>in</strong> the “Preview of file” section, you see<br />
that l<strong>in</strong>e 16 is where our 3D coord<strong>in</strong>ates actually<br />
start – i.e. we’re not <strong>in</strong>terested <strong>in</strong> the PDB<br />
header for this). Click NEXT. Create column<br />
breaks <strong>in</strong> the “Data preview” w<strong>in</strong>dow such that<br />
the atom number column and the x, y, z<br />
coord<strong>in</strong>ate columns are separated. Click F<strong>in</strong>ish.<br />
Now clean up the file such that only the atom<br />
number and x, y, z column data rema<strong>in</strong>. Also<br />
make sure that the first l<strong>in</strong>e <strong>in</strong> your Excel file<br />
holds some sort of column labels (i.e. like “atom<br />
number” “x” “y” “z”) – C<strong>4D</strong> expects to see<br />
column labels and will otherwise chop off your<br />
first l<strong>in</strong>e of coord<strong>in</strong>ates! F<strong>in</strong>ally, save as a Text<br />
(tab-delimited) file.<br />
Excel Text Import Wizard for prepar<strong>in</strong>g PDB coord<strong>in</strong>ates<br />
In C<strong>in</strong>ema <strong>4D</strong>, open a new file and create an<br />
empty polygon object by go<strong>in</strong>g to Objects <br />
Polygon Object (notice the “Polygon” layer that<br />
appears selected <strong>in</strong> red <strong>in</strong> the upper right<br />
“Objects” panel). Next to the “Objects” tab,<br />
select the “Structure” tab, and go to File <br />
Import ASCII data… select your Excel-exported<br />
tab-delimited text file. The coord<strong>in</strong>ates are now<br />
loaded <strong>in</strong>to the “Structure” panel of C<strong>4D</strong> – notice<br />
that the Perspective viewport now shows (<strong>in</strong><br />
addition to the xyz move-tool manipulators) red<br />
corners outl<strong>in</strong><strong>in</strong>g an <strong>in</strong>visible rectangular box –<br />
this is the “bound<strong>in</strong>g box” for your coord<strong>in</strong>ate<br />
cloud.<br />
C<strong>in</strong>ema<strong>4D</strong> <strong>Metaballs</strong> for <strong>Molecular</strong> Surfaces<br />
2<br />
Specify<strong>in</strong>g column breaks
Go to Objects Model<strong>in</strong>g Metaball (the<br />
metaball layer appears <strong>in</strong> the upper right).<br />
Select and drag the Polygon layer onto your<br />
Metaball layer (the former becomes <strong>in</strong>dented<br />
under the latter). The Perspective viewport now<br />
shows a dimpled sphere: your PDB-derived<br />
po<strong>in</strong>t cloud has now been converted to<br />
metaballs! What rema<strong>in</strong>s is basically to adjust<br />
the same sett<strong>in</strong>gs we used <strong>in</strong> the preced<strong>in</strong>g 2-<br />
sphere tutorial… However, one important<br />
difference is that the SCALE of your Polygon<br />
object is crucial <strong>in</strong> this case (i.e. adjust<strong>in</strong>g the<br />
Hull Value and Editor Subdivision numbers<br />
alone will still just give you a s<strong>in</strong>gle sphere at<br />
this po<strong>in</strong>t). So select your polygon object and<br />
<strong>in</strong> the coord<strong>in</strong>ates panel (below the layers panel)<br />
enter a value of 35 <strong>in</strong> each of the S.X, S.Y,<br />
and S.Z fields (you may need to zoom out the<br />
viewport to see your object aga<strong>in</strong>)<br />
Clean<strong>in</strong>g up the coord<strong>in</strong>ate file for C<strong>in</strong>ema <strong>4D</strong> import<br />
Now you can select the metaball layer, and<br />
beg<strong>in</strong> by reduc<strong>in</strong>g the Editor Subdivision to<br />
10m and <strong>in</strong>creas<strong>in</strong>g the Hull Value to 130%.<br />
You are now look<strong>in</strong>g at a phospholipid . Feel<br />
free to experiment a little more with the metaball<br />
sett<strong>in</strong>gs and polygon scale.<br />
When you are satisfied with the look and<br />
tessellation of your object, select the metaball<br />
layer and, <strong>in</strong> the layer drop-down menu above<br />
your layer, click on Objects Make Editable<br />
(this converts your metaball <strong>in</strong>to a polygonal<br />
mesh – even though the layer is still called<br />
“metaball” after the operation). You are now<br />
ready to export your model to Maya. Go to the<br />
upper left and click on File Export <br />
Wavefront (or FBX).<br />
Adjust<strong>in</strong>g the Editor Subdivision & Hull Value<br />
C<strong>in</strong>ema<strong>4D</strong> <strong>Metaballs</strong> for <strong>Molecular</strong> Surfaces<br />
3