Wire Rigging Cartoon Ribbon Models in Maya: - Molecular Movies
Wire Rigging Cartoon Ribbon Models in Maya: - Molecular Movies
Wire Rigging Cartoon Ribbon Models in Maya: - Molecular Movies

Create successful ePaper yourself
Turn your PDF publications into a flip-book with our unique Google optimized e-Paper software.
<strong>Wire</strong> <strong>Rigg<strong>in</strong>g</strong> <strong>Cartoon</strong> <strong>Ribbon</strong> <strong>Models</strong> <strong>in</strong> <strong>Maya</strong>:<br />
by Geordie Mart<strong>in</strong>ez (www.negative13.com)<br />
The follow<strong>in</strong>g process was used to create a custom rig to study the conformational<br />
morphs of the HIV gp120 receptor as it b<strong>in</strong>ds CD4. A cartoon model can first be<br />
generated <strong>in</strong> Pymol, VMD or Chimera, exported as VRML and then converted to OBJ for<br />
import <strong>in</strong>to <strong>Maya</strong>.<br />
1. Clean the model. Use the Polygon “extract faces” tool to separate all of the ma<strong>in</strong> parts<br />
<strong>in</strong>to <strong>in</strong>dividual parts: Beta Arrows, strands, and Helices.<br />
2. Merge the vertices of each new part and delete history. Also rename the parts now if<br />
required.<br />
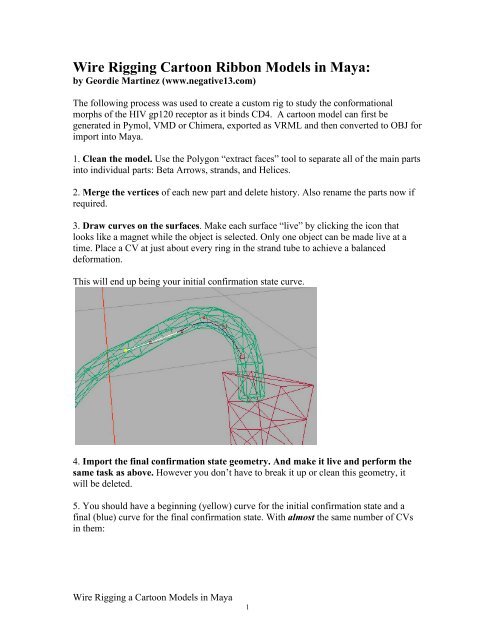
3. Draw curves on the surfaces. Make each surface “live” by click<strong>in</strong>g the icon that<br />
looks like a magnet while the object is selected. Only one object can be made live at a<br />
time. Place a CV at just about every r<strong>in</strong>g <strong>in</strong> the strand tube to achieve a balanced<br />
deformation.<br />
This will end up be<strong>in</strong>g your <strong>in</strong>itial confirmation state curve.<br />
4. Import the f<strong>in</strong>al confirmation state geometry. And make it live and perform the<br />
same task as above. However you don’t have to break it up or clean this geometry, it<br />
will be deleted.<br />
5. You should have a beg<strong>in</strong>n<strong>in</strong>g (yellow) curve for the <strong>in</strong>itial confirmation state and a<br />
f<strong>in</strong>al (blue) curve for the f<strong>in</strong>al confirmation state. With almost the same number of CVs<br />
<strong>in</strong> them:<br />
<strong>Wire</strong> <strong>Rigg<strong>in</strong>g</strong> a <strong>Cartoon</strong> <strong>Models</strong> <strong>in</strong> <strong>Maya</strong><br />
1
6. Rebuild the curves to have the same number of spans, and parameter range 0 to 1.<br />
One of your curves may have 34 and the other 42. It doesn’t matter. pick the higher<br />
number and go with it us<strong>in</strong>g the Edit Curves > Rebuild Curve command.<br />
<strong>Wire</strong> <strong>Rigg<strong>in</strong>g</strong> a <strong>Cartoon</strong> <strong>Models</strong> <strong>in</strong> <strong>Maya</strong><br />
2
7. Now Loft these two curves to create a NURBs surface. You can have a few spans <strong>in</strong><br />
the loft, but it’s best to have just one right now. Adjust the spans value BEFORE you<br />
start to sculpt the geometry <strong>in</strong> the next step:<br />
8. We’re go<strong>in</strong>g to create “<strong>in</strong>-between” curves from this surface so sculpt the geometry<br />
to create a “sweep” look. This way the curves we generate from this don’t look so<br />
l<strong>in</strong>ear when they’re used as blendshapes. Use the Sculpt Geometry tool for this. Hav<strong>in</strong>g a<br />
wacom tablet makes this part really fun and easy.<br />
<strong>Wire</strong> <strong>Rigg<strong>in</strong>g</strong> a <strong>Cartoon</strong> <strong>Models</strong> <strong>in</strong> <strong>Maya</strong><br />
3
Make sure your geometry has a nice organic look to it:<br />
9. Right-click on the surface and select Isoparams. Select the middle isoparam and drag<br />
it to the left and the right to created dotted l<strong>in</strong>es:<br />
<strong>Wire</strong> <strong>Rigg<strong>in</strong>g</strong> a <strong>Cartoon</strong> <strong>Models</strong> <strong>in</strong> <strong>Maya</strong><br />
4
10. Select the Duplicate Surface Curves tool to create curves from these dotted l<strong>in</strong>es.<br />
11. repeat this as many times as you would like to have <strong>in</strong>-between curves. I have found<br />
that 3 <strong>in</strong>-between and one f<strong>in</strong>al curve do the trick.<br />
<strong>Wire</strong> <strong>Rigg<strong>in</strong>g</strong> a <strong>Cartoon</strong> <strong>Models</strong> <strong>in</strong> <strong>Maya</strong><br />
5
12. Delete or hide the lofted surface and select the curves <strong>in</strong> the follow<strong>in</strong>g order. First is<br />
the 25% blendshape, then the 50% blendshape then 75% blendshape, f<strong>in</strong>al blendshape,<br />
and then lastly the curve which was based on your master geometry.<br />
Create a blendshape on the <strong>in</strong>itial confirmation state curve<br />
13. Use the yellow curve, your <strong>in</strong>itial<br />
position<strong>in</strong>g curve and the geometry for<br />
the wire that deforms the strands.<br />
Open the <strong>Wire</strong> Tool.<br />
Select the strand. Press enter.<br />
Select the yellow curve. Press enter.<br />
<strong>Wire</strong> <strong>Rigg<strong>in</strong>g</strong> a <strong>Cartoon</strong> <strong>Models</strong> <strong>in</strong> <strong>Maya</strong><br />
6
The strand geometry will now follow<br />
the curve as it animates. It will also<br />
reta<strong>in</strong> its volume nicely. And the <strong>in</strong>between<br />
curves can be tweaked to make<br />
sure they always meet up with the beta<br />
strands and helices as the animation<br />
occurs.<br />
<strong>Wire</strong> deformers don’t work well with<br />
the helices and the beta arrows, for<br />
these parts of the geometry to be rigged,<br />
utiliz<strong>in</strong>g traditional rigg<strong>in</strong>g techniques<br />
works best to make sure they reta<strong>in</strong><br />
their shapes and volumes.<br />
I have used. Jo<strong>in</strong>ts, lattices,<br />
blendshapes, etc. to achieve great<br />
results, but even simply us<strong>in</strong>g Set<br />
Driven Key to translate and rotate the<br />
geometry works very well.<br />
Once you are done with the wires and other rigg<strong>in</strong>g. It’s time to synchronize them under<br />
one slider and hide the direct access controls. You want to prevent animators from<br />
access<strong>in</strong>g the wire values directly, so creat<strong>in</strong>g controls, sliders that use Set Driven Key to<br />
drive the blendshapes is the best way to prevent animators from mess<strong>in</strong>g up the rig.<br />
It also allows the animator quick access to achiev<strong>in</strong>g the confirmation state they are<br />
look<strong>in</strong>g for.<br />
<strong>Wire</strong> <strong>Rigg<strong>in</strong>g</strong> a <strong>Cartoon</strong> <strong>Models</strong> <strong>in</strong> <strong>Maya</strong><br />
7
All additional rigg<strong>in</strong>g techniques can be found <strong>in</strong> rigg<strong>in</strong>g manuals and books available on<br />
the <strong>in</strong>ternet and most bookstores.<br />
RIGGING RECOMMENDED TRAINING:<br />
1. CGToolkit “Art of <strong>Rigg<strong>in</strong>g</strong>” series for <strong>in</strong>sight on MEL, deformers and general rigg<strong>in</strong>g<br />
skills.<br />
2. Fahrenheit Digital (www.fahrenheitdigital.com) DVDs are excellent sources for<br />
learn<strong>in</strong>g how to use the wire tool to deform geometry.<br />
3. Alias/Autodesk DVDs Hyper-Real series also cover many great rigg<strong>in</strong>g challenges that<br />
make come around.<br />
<strong>Wire</strong> <strong>Rigg<strong>in</strong>g</strong> a <strong>Cartoon</strong> <strong>Models</strong> <strong>in</strong> <strong>Maya</strong><br />
8