Rendering for Compositing (in Maya 2011) - Molecular Movies
Rendering for Compositing (in Maya 2011) - Molecular Movies
Rendering for Compositing (in Maya 2011) - Molecular Movies

Create successful ePaper yourself
Turn your PDF publications into a flip-book with our unique Google optimized e-Paper software.
<strong>Render<strong>in</strong>g</strong> <strong>for</strong> <strong>Composit<strong>in</strong>g</strong> (<strong>in</strong> <strong>Maya</strong> <strong>2011</strong>)<br />
Us<strong>in</strong>g After Effects to composite image sequences rendered from <strong>Maya</strong> opens up a large number<br />
of possibilities and offers flexibility that is hard to achieve us<strong>in</strong>g <strong>Maya</strong> alone. While on the one<br />
hand a little extra work, <strong>for</strong>esight, and some knowledge of After Effects is required, the payoff <strong>for</strong><br />
the additional ef<strong>for</strong>t is usually worth it. You don’t need to master every aspect of After Effects to<br />
take advantage of this workflow. A few simple tricks and techniques can add a lot of life and<br />
character to your animation. The techniques described <strong>in</strong> this tutorial are the same techniques<br />
used <strong>in</strong> design houses when creat<strong>in</strong>g animations <strong>for</strong> the enterta<strong>in</strong>ment <strong>in</strong>dustry.<br />
<strong>Maya</strong>’s render layers are designed to allow you to break up a scene <strong>in</strong>to passes <strong>for</strong> composit<strong>in</strong>g.<br />
In this tutorial you’ll see how you can create custom render passes, use <strong>Maya</strong>’s render layer<br />
presets, and f<strong>in</strong>ally how to comb<strong>in</strong>e the rendered passes together <strong>in</strong> Adobe After Effects as a<br />
composition <strong>for</strong> f<strong>in</strong>al output.<br />
Render Layer Basics<br />
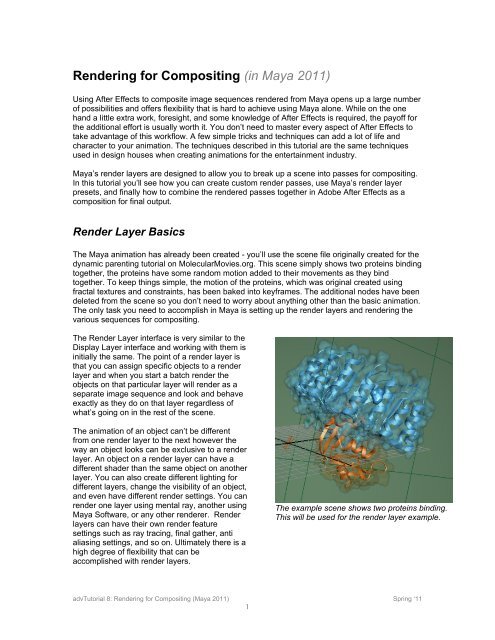
The <strong>Maya</strong> animation has already been created - you’ll use the scene file orig<strong>in</strong>ally created <strong>for</strong> the<br />
dynamic parent<strong>in</strong>g tutorial on <strong>Molecular</strong><strong>Movies</strong>.org. This scene simply shows two prote<strong>in</strong>s b<strong>in</strong>d<strong>in</strong>g<br />
together, the prote<strong>in</strong>s have some random motion added to their movements as they b<strong>in</strong>d<br />
together. To keep th<strong>in</strong>gs simple, the motion of the prote<strong>in</strong>s, which was orig<strong>in</strong>al created us<strong>in</strong>g<br />
fractal textures and constra<strong>in</strong>ts, has been baked <strong>in</strong>to keyframes. The additional nodes have been<br />
deleted from the scene so you don’t need to worry about anyth<strong>in</strong>g other than the basic animation.<br />
The only task you need to accomplish <strong>in</strong> <strong>Maya</strong> is sett<strong>in</strong>g up the render layers and render<strong>in</strong>g the<br />
various sequences <strong>for</strong> composit<strong>in</strong>g.<br />
The Render Layer <strong>in</strong>terface is very similar to the<br />
Display Layer <strong>in</strong>terface and work<strong>in</strong>g with them is<br />
<strong>in</strong>itially the same. The po<strong>in</strong>t of a render layer is<br />
that you can assign specific objects to a render<br />
layer and when you start a batch render the<br />
objects on that particular layer will render as a<br />
separate image sequence and look and behave<br />
exactly as they do on that layer regardless of<br />
what’s go<strong>in</strong>g on <strong>in</strong> the rest of the scene.<br />
The animation of an object can’t be different<br />
from one render layer to the next however the<br />
way an object looks can be exclusive to a render<br />
layer. An object on a render layer can have a<br />
different shader than the same object on another<br />
layer. You can also create different light<strong>in</strong>g <strong>for</strong><br />
different layers, change the visibility of an object,<br />
and even have different render sett<strong>in</strong>gs. You can<br />
render one layer us<strong>in</strong>g mental ray, another us<strong>in</strong>g<br />
<strong>Maya</strong> Software, or any other renderer. Render<br />
layers can have their own render feature<br />
sett<strong>in</strong>gs such as ray trac<strong>in</strong>g, f<strong>in</strong>al gather, anti<br />
alias<strong>in</strong>g sett<strong>in</strong>gs, and so on. Ultimately there is a<br />
high degree of flexibility that can be<br />
accomplished with render layers.<br />
The example scene shows two prote<strong>in</strong>s b<strong>in</strong>d<strong>in</strong>g.<br />
This will be used <strong>for</strong> the render layer example.<br />
advTutorial 8: <strong>Render<strong>in</strong>g</strong> <strong>for</strong> <strong>Composit<strong>in</strong>g</strong> (<strong>Maya</strong> <strong>2011</strong>) Spr<strong>in</strong>g ‘11<br />
1
The art of know<strong>in</strong>g how to set up a render layer<br />
strategically comes with experience and<br />
experimentation. This example will provide you<br />
with one approach but there are many variations<br />
to this approach that you will discover on your<br />
own when creat<strong>in</strong>g your own scenes. To beg<strong>in</strong><br />
with you’ll create render layers from an animated<br />
scene <strong>in</strong> <strong>Maya</strong>.<br />
1. Open the composit<strong>in</strong>g_v01.ma scene<br />
from the scene files. This scene has two<br />
prote<strong>in</strong>s that are <strong>in</strong> the process of<br />
b<strong>in</strong>d<strong>in</strong>g. The animation is complete <strong>for</strong><br />
the scene and baked <strong>in</strong>to the objects.<br />
2. An animated camera and camera aim<br />
have been set up as well as a pair of<br />
directional lights.<br />
3. The background <strong>in</strong> the animation is a<br />
polygon sphere with a Lambert texture<br />
applied. The Lambert texture has a 3D<br />
texture connected to its <strong>in</strong>candescence<br />
channel. The texture is a volume noise<br />
node, the 3D placement node of the<br />
texture has some animation <strong>in</strong> its<br />
translation and rotation channels. This<br />
will create the effects of roil<strong>in</strong>g turbulent<br />
patterns <strong>in</strong> the distant background<br />
suggest<strong>in</strong>g an organic cellular<br />
environment.<br />
4. Each prote<strong>in</strong> is made up of two objects;<br />
the outside is a mesh and the <strong>in</strong>side is a<br />
ribbon. The idea of the animation is to<br />
have the mesh as a semi-transparent<br />
object with the ribbon representation<br />
<strong>in</strong>side.<br />
5. Switch to the renderCam <strong>in</strong> the<br />
perspective w<strong>in</strong>dow and create a test<br />
render. It looks okay, it could certa<strong>in</strong>ly<br />
be improved with some more work <strong>in</strong><br />
<strong>Maya</strong>. The transparency of the mesh<br />
objects is accomplish<strong>in</strong>g the goal of the<br />
animation but its look is somewhat<br />
lack<strong>in</strong>g <strong>in</strong> terms of style. Likewise the<br />
background is very detailed and<br />
distract<strong>in</strong>g.<br />
The orig<strong>in</strong>al concept was to blur this<br />
background, which can be accomplished us<strong>in</strong>g<br />
depth of field <strong>in</strong> <strong>Maya</strong>, however this will add a<br />
great deal to the render time of the animation,<br />
particularly if the depth of field is to be rendered<br />
us<strong>in</strong>g metal ray. Furthermore, if it is decided that<br />
the blurr<strong>in</strong>g effect is too strong or needs to be<br />
changed, the entire sequence would need to be<br />
re rendered which is not terribly efficient. One of<br />
the greatest advantages of break<strong>in</strong>g the scene<br />
The prote<strong>in</strong> objects are each a group conta<strong>in</strong><strong>in</strong>g<br />
a surface mesh and a ribbon representation of<br />
the prote<strong>in</strong>.<br />
The current scene rendered straight out of <strong>Maya</strong><br />
is adequate but not terribly clear or <strong>in</strong>spir<strong>in</strong>g.<br />
advTutorial 8: <strong>Render<strong>in</strong>g</strong> <strong>for</strong> <strong>Composit<strong>in</strong>g</strong> (<strong>Maya</strong> <strong>2011</strong>) Spr<strong>in</strong>g ‘11<br />
2
<strong>in</strong>to render passes is that if an element needs to<br />
be changed, you can often, depend<strong>in</strong>g on how<br />
the scene is set up, isolate the one element that<br />
need to be changes and render it separately.<br />
Plus a simple blurr<strong>in</strong>g effect can be added <strong>in</strong><br />
After Effects and tuned much more easily and<br />
quickly than the depth of field effect <strong>in</strong> <strong>Maya</strong>.<br />
While mental ray’s depth of field is superior to<br />
what you can achieve <strong>in</strong> After Effects, it should<br />
really only be used when absolutely necessary,<br />
when real photographic quality depth of field is<br />
required. Otherwise you should see what you<br />
can get away with us<strong>in</strong>g After Effects.<br />
6. Make sure the channel box is open on<br />
the right side of the screen and that the<br />
display layers <strong>in</strong>terface is visible <strong>in</strong> the<br />
lower right (there are no display layers<br />
<strong>in</strong> this scene - to keep it simple you<br />
won’t add any).<br />
7. Click on the Render tab <strong>in</strong> the layer<br />
<strong>in</strong>terface to switch to the render layer<br />
<strong>in</strong>terface, you’ll see the default<br />
‘masterLayer (Normal)’. From the layers<br />
menu choose “Create Empty Layer”.<br />
When you do this you’ll see a new layer<br />
appear named ‘layer1 (Normal).’<br />
The render layers palette is found below the<br />
channel box on the right side of the screen. You<br />
can open this as a separate menu by choos<strong>in</strong>g<br />
Layers > Float<strong>in</strong>g W<strong>in</strong>dow…<br />
The Master Layer exists <strong>in</strong> the scene at all times<br />
even when no layers have been added to the<br />
scene. It conta<strong>in</strong>s everyth<strong>in</strong>g <strong>in</strong> the scene at its<br />
current state. All objects <strong>in</strong> the scene will always<br />
be members of the masterLayer. Generally you<br />
will not render the masterLayer when other<br />
render layers are added to the scene.<br />
8. Double click on the layer1 label/word, <strong>in</strong><br />
the dialogue box enter the name<br />
“prote<strong>in</strong>Color”. This layer will just render<br />
the color values you want to assign to<br />
the b<strong>in</strong>d<strong>in</strong>g prote<strong>in</strong>s.<br />
9. Create another layer and name it<br />
“occlusion”. This layer will conta<strong>in</strong> the<br />
shadow<strong>in</strong>g <strong>in</strong><strong>for</strong>mation <strong>for</strong> the<br />
animation. In this case you’ll use an<br />
occlusion preset to apply ambient<br />
occlusion to the prote<strong>in</strong>s.<br />
Two layers are added and named (<strong>in</strong> addition to<br />
the default masterLayer)<br />
Ambient Occlusion is a shadow<strong>in</strong>g effect created<br />
when ambient light is blocked from enter<strong>in</strong>g or<br />
leav<strong>in</strong>g small spaces <strong>in</strong> objects. It’s a very<br />
aesthetically pleas<strong>in</strong>g effect. Th<strong>in</strong>k of a detailed<br />
marble statue on an overcast day, the<br />
shadow<strong>in</strong>g <strong>in</strong> the nooks and crannies of the<br />
statue are a good example of ambient occlusion.<br />
advTutorial 8: <strong>Render<strong>in</strong>g</strong> <strong>for</strong> <strong>Composit<strong>in</strong>g</strong> (<strong>Maya</strong> <strong>2011</strong>) Spr<strong>in</strong>g ‘11<br />
3
This type of shad<strong>in</strong>g when comb<strong>in</strong>ed with the<br />
familiar X-Ray shad<strong>in</strong>g technique can create a<br />
very conv<strong>in</strong>c<strong>in</strong>g EM Scann<strong>in</strong>g look.<br />
10. Create four new render layers, name<br />
them “Xray”, “Depth”, “Ribbons”, and<br />
“BG” (BG is just shorthand fro<br />
“background”). The order of the layers<br />
does not matter, each layer is an<br />
isolated version of the scene<br />
11. As you click on each layer you’ll notice<br />
the scene elements disappear, this is<br />
because objects need to be added to<br />
each layer, click on the masterLayer and<br />
you’ll see he scene elements return.<br />
Click on the prote<strong>in</strong>Color layer. In the<br />
Outl<strong>in</strong>er expand the ribo and <strong>in</strong>hibitor<br />
groups. Select the riboMesh object from<br />
the ribo group and ctrl+select the<br />
<strong>in</strong>hibitorMesh object from the <strong>in</strong>hibitor<br />
group.<br />
12. In the render layer box, right click over<br />
the prote<strong>in</strong>Color layer and choose “Add<br />
Selected Objects”. The two prote<strong>in</strong>s will<br />
be added to the render layer.<br />
13. Select the riboMesh object while still <strong>in</strong><br />
the prote<strong>in</strong>Color layer (you’re <strong>in</strong> the<br />
layer as long as it is highlighted <strong>in</strong> the<br />
render layer <strong>in</strong>terface). Assign a new<br />
surface shader to the riboMesh object.<br />
14. Name the new shader “riboMeshColor”.<br />
Set the out color to a bright orange.<br />
15. Select the <strong>in</strong>hibitorMesh object while <strong>in</strong><br />
the prote<strong>in</strong>Color layer, assign a new<br />
surface sahder to this object. Name the<br />
shader “<strong>in</strong>hibitorMeshColor” and set the<br />
out color to blue.<br />
16. Create a test render while <strong>in</strong> this layer<br />
us<strong>in</strong>g the renderCam (note that you can<br />
assign render cameras to render layers<br />
but you don’t have to, they will render<br />
the layer just f<strong>in</strong>e even if they have not<br />
been assigned).<br />
17. Without chang<strong>in</strong>g the time on the<br />
timel<strong>in</strong>e switch to the master layer and<br />
render a frame. Notice that the shaders<br />
applied to the prote<strong>in</strong> meshes on the<br />
master layer have not changed. The<br />
same object can have two completely<br />
different shaders applied on different<br />
layers.<br />
18. Add the prote<strong>in</strong> mesh objects to the<br />
Xray, Depth, and Occlusion Layers.<br />
19. Add just the prote<strong>in</strong> ribbon models to the<br />
Ribbons layer, add the lights to this<br />
layer as well.<br />
More render layers are added and<br />
named <strong>in</strong> the render layer palette. The<br />
render layer highlighted <strong>in</strong> blue <strong>in</strong>dicates<br />
which layer is active <strong>in</strong> the perspective<br />
view. Imag<strong>in</strong>e each render layer is like a<br />
separate version of the scene.<br />
New shaders have been created an applied to the<br />
prote<strong>in</strong> mesh objects <strong>in</strong> the prote<strong>in</strong>Color render<br />
layer. These shaders will only appear <strong>in</strong> the<br />
rendered version of this particular render layer.<br />
advTutorial 8: <strong>Render<strong>in</strong>g</strong> <strong>for</strong> <strong>Composit<strong>in</strong>g</strong> (<strong>Maya</strong> <strong>2011</strong>) Spr<strong>in</strong>g ‘11<br />
4
20. Add the background sphere to the BG<br />
layer.<br />
21. Save the file.<br />
Render Layer Presets<br />
In this workflow, we will use <strong>Maya</strong>’s (old) render<br />
layer presets (as opposed to the render passes<br />
system that was <strong>in</strong>troduced <strong>in</strong> recent versions of<br />
<strong>Maya</strong> – render passes will be covered <strong>in</strong> a<br />
separate tutorial). Render presets provide you<br />
with a quick way to apply commonly used render<br />
and shader sett<strong>in</strong>gs to all the objects <strong>in</strong> a render<br />
layer.<br />
To create the ambient shad<strong>in</strong>g on the prote<strong>in</strong>s you’ll<br />
apply the occlusion preset to the occlusion layer.<br />
1. Select the Occlusion layer <strong>in</strong> the render layer<br />
panel. Right-click over the layer label and<br />
choose ‘Attributes’ from the pop up w<strong>in</strong>dow.<br />
This switches the UI to the render layer’s<br />
Attribute Editor – click on the ‘Presets’ button<br />
<strong>in</strong> the upper right and select ‘Occlusion.’<br />
2. Create a test render while <strong>in</strong> the Occlusion<br />
layer. <strong>Maya</strong> applies the occlusion shader to<br />
the prote<strong>in</strong> and sets the renderer <strong>for</strong> the layer<br />
to mental ray automatically.<br />
3. Switch to the Depth layer and apply a<br />
Lum<strong>in</strong>ance Depth from the render presets<br />
us<strong>in</strong>g the same method. Create a test render.<br />
Lum<strong>in</strong>ance Depth uses a special shader set up to<br />
shade objects based on their distance from camera.<br />
The closer the objects are to the camera, the lighter<br />
they become. As you’ll see later on <strong>in</strong> the chapter, this<br />
special pass can be used <strong>in</strong> AfterEffects to create the<br />
depth of field blurr<strong>in</strong>g effect. The shader may require a<br />
little tweak<strong>in</strong>g to establish a good range of values <strong>for</strong><br />
this particular scene.<br />
The shad<strong>in</strong>g is applied to the objects based on<br />
the clipp<strong>in</strong>g planes of the camera. By default all<br />
cameras have “auto render clip planes”<br />
activated. The clipp<strong>in</strong>g planes are set by the size<br />
of the scene detected by the camera. Currently<br />
only the prote<strong>in</strong> meshes exist <strong>in</strong> the layer<br />
mak<strong>in</strong>g the scene size appear quite small to the<br />
camera. Thus the shader doesn’t have much of<br />
a range to work with when shad<strong>in</strong>g the objects<br />
based on scene depth. There are a couple ways<br />
to fix this. You can turn “Auto Render Clip<br />
Planes” off <strong>in</strong> the camera’s Attribute Editor and<br />
then set the Far Clip plane value to a lower<br />
number. You could also take advantage of the<br />
background sphere that exists <strong>in</strong> the scene. By<br />
You can apply a preset to a layer by go<strong>in</strong>g<br />
‘Attributes’ (top image) and then select<strong>in</strong>g from<br />
the ‘Presets’ button (above) – this will create<br />
custom shaders and render sett<strong>in</strong>gs <strong>for</strong> all of the<br />
objects on the layer.<br />
The occlusion preset applies ambient<br />
occlusion shad<strong>in</strong>g/light<strong>in</strong>g to all the<br />
objects <strong>in</strong> the layer.<br />
advTutorial 8: <strong>Render<strong>in</strong>g</strong> <strong>for</strong> <strong>Composit<strong>in</strong>g</strong> (<strong>Maya</strong> <strong>2011</strong>) Spr<strong>in</strong>g ‘11<br />
5
add<strong>in</strong>g the sphere to the depth layer you<br />
establish that the scene size is based on the<br />
size of the sphere.<br />
4. Select the background object and add it<br />
to the depth layer.<br />
5. Create a test render. The background<br />
appears as a light gray <strong>in</strong> the layer.<br />
What you want is <strong>for</strong> the background to<br />
be black and the prote<strong>in</strong>s to move from<br />
dark gray to white as they approach the<br />
camera, preferably the details of the<br />
prote<strong>in</strong> shapes will also be somewhat<br />
visible <strong>in</strong> the depth pass.<br />
6. Select one of the prote<strong>in</strong> objects while <strong>in</strong><br />
the Depth layer. Open the Hypershade,<br />
right click <strong>in</strong> the work area and choose<br />
“Graph -> Graph Materials on Selected<br />
Objects”. You’ll see the special shader<br />
applied to the objects <strong>in</strong> the layer. You<br />
can tune the depth shader’s sensitivity<br />
by adjust<strong>in</strong>g the multiplier value <strong>in</strong> the<br />
multiply/divide node. Select the<br />
multiply/divide node, <strong>in</strong> the Attribute<br />
Editor, change the <strong>in</strong>put2 value from -1<br />
to -130.<br />
7. Create another test render, the prote<strong>in</strong>s<br />
are dark gray when they are far from the<br />
camera and appear lighter as they<br />
approach the camera. Notice that the<br />
renderer used <strong>in</strong> the Depth layer is<br />
<strong>Maya</strong> Software while the renderer used<br />
<strong>in</strong> the Occlusion layer is mental ray.<br />
<strong>Maya</strong> automatically sets the appropriate<br />
renderer <strong>for</strong> each layer based on the<br />
preset used.<br />
The Lum<strong>in</strong>ance Depth preset shades objects<br />
based on their distance from the render<strong>in</strong>g<br />
camera.<br />
Sett<strong>in</strong>g Up For <strong>Render<strong>in</strong>g</strong><br />
Sett<strong>in</strong>g up the f<strong>in</strong>al three layers is relatively<br />
easy. The Ribbons layer will conta<strong>in</strong> the ribbon<br />
representation of the prote<strong>in</strong>s that will be<br />
composited so that they appear <strong>in</strong>side the<br />
prote<strong>in</strong> surface meshes. The BG/background<br />
layer will conta<strong>in</strong> just the background and the<br />
Xray layer will conta<strong>in</strong> the prote<strong>in</strong> meshes with a<br />
typical Xray (fac<strong>in</strong>g ratio) shader on the objects.<br />
1. Select the ribbon layer, this should<br />
conta<strong>in</strong> the ribbons and a couple lights.<br />
You set this up <strong>in</strong> step 19 of the first<br />
section.<br />
2. Click on the clapper icon next to the<br />
ribbon label <strong>in</strong> render layer palette this<br />
By adjust<strong>in</strong>g the value of the <strong>in</strong>put 2 attribute on<br />
the Multiply/Divide node you can tune the<br />
lum<strong>in</strong>ance depth shader.<br />
advTutorial 8: <strong>Render<strong>in</strong>g</strong> <strong>for</strong> <strong>Composit<strong>in</strong>g</strong> (<strong>Maya</strong> <strong>2011</strong>) Spr<strong>in</strong>g ‘11<br />
6
will open the render sett<strong>in</strong>gs <strong>for</strong> this<br />
layer. Right click next to the “Render<br />
Us<strong>in</strong>g” menu and choose “Create Layer<br />
Override.” This creates an override that<br />
will be applied to just the ribbon layer.<br />
Set the renderer to <strong>Maya</strong> Software.<br />
3. In the <strong>Maya</strong> Software tab of the render<br />
sett<strong>in</strong>gs w<strong>in</strong>dow, set the quality preset to<br />
Production quality.<br />
4. Repeat these steps <strong>for</strong> the<br />
BG/background layer.<br />
5. Select the XRay layer. Select the<br />
ribomesh object while <strong>in</strong> the Xray layer.<br />
In the Hypershade f<strong>in</strong>d the riboXray<br />
shader and apply it to this object (simply<br />
right-click over the shader’s icon and<br />
choose “Assign Material to Selection”<br />
object). Apply the <strong>in</strong>hibitorXray shader<br />
to the <strong>in</strong>hibitorMesh object while <strong>in</strong> the<br />
XRay layer.<br />
6. These shaders are lambert shaders that<br />
use the typical X-ray shader technique<br />
to apply a ramp to the <strong>in</strong>candescence<br />
channel of the shader. Create a test<br />
render and you’ll see the edges of the<br />
objects are brightly colored.<br />
7. Save the scene.<br />
8. Select the masterLayer render layer and<br />
open the render sett<strong>in</strong>gs. You’ll see tabs<br />
<strong>for</strong> all of the available renderers <strong>in</strong> the<br />
scene. In the common attributes section<br />
make sure <strong>Maya</strong> is set up to render a<br />
sequence of 300 frames<br />
9. In the File Name Prefix slot type the<br />
“%s/%s_%l/%l”. This is a special code<br />
that will organize the output of all ender<br />
layers <strong>in</strong>to separate folders. The %s<br />
code stands <strong>for</strong> “scene name” and %l<br />
stands <strong>for</strong> layer name. All image<br />
sequences will be rendered to a folder<br />
named after the scene. That folder will<br />
conta<strong>in</strong> a subfolder <strong>for</strong> each layer<br />
named “scene name_layer name” and<br />
with<strong>in</strong> each of these folders the actual<br />
sequence will take its name from the<br />
layer name. This is important as it will<br />
help you understand the source of each<br />
layer once they are imported <strong>in</strong>to After<br />
Effects.<br />
10. Save the scene and start a Batch<br />
render.<br />
The Xray shader creates the typical EM<br />
scann<strong>in</strong>g look. This is applied to both<br />
objects <strong>in</strong> the render layer.<br />
By enter<strong>in</strong>g the code <strong>in</strong>to the filename prefix<br />
<strong>Maya</strong> knows how to name each sequence and<br />
how to set up the subdirectories.<br />
advTutorial 8: <strong>Render<strong>in</strong>g</strong> <strong>for</strong> <strong>Composit<strong>in</strong>g</strong> (<strong>Maya</strong> <strong>2011</strong>) Spr<strong>in</strong>g ‘11<br />
7
Import<strong>in</strong>g the Sequence <strong>in</strong> to After Effects<br />
As you ga<strong>in</strong> experience with creat<strong>in</strong>g animations<br />
us<strong>in</strong>g this style of workflow, you’ll develop a feel<br />
<strong>for</strong> what you need from <strong>Maya</strong> <strong>in</strong> order to create<br />
a great composition <strong>in</strong> After Effects. Essentially<br />
each of the rendered sequences becomes an<br />
<strong>in</strong>gredient rather than the entire meal and much<br />
of what you create <strong>in</strong> <strong>Maya</strong> is prep work to be<br />
seasoned and f<strong>in</strong>essed <strong>in</strong> After Effects. This<br />
tutorial goes through some fairly simple<br />
techniques and only uses a few of the many<br />
effects found <strong>in</strong> After Effects. The student is<br />
encouraged to use these techniques as a<br />
launch<strong>in</strong>g pad <strong>for</strong> their own approach to<br />
composit<strong>in</strong>g.<br />
The easiest way to br<strong>in</strong>g files <strong>in</strong>to After Effects is<br />
to simply drag them <strong>in</strong>to the application from the<br />
operat<strong>in</strong>g systems’s file browser.<br />
The image sequence folders can be dragged<br />
from the operat<strong>in</strong>g system f<strong>in</strong>der <strong>in</strong>to the project<br />
w<strong>in</strong>dow.<br />
1. Open After Effects (should create a new<br />
project by default).<br />
2. Reduce the size of the After Effects<br />
application w<strong>in</strong>dow so that you can see<br />
the desktop of your computer.<br />
3. Use your operat<strong>in</strong>g system’s file<br />
browser to locate the image sequences<br />
folder rendered from the <strong>Maya</strong> scene<br />
created <strong>in</strong> the first section of this tutorial.<br />
4. Open the folder so that the subfolders<br />
are visible.<br />
5. Drag each subfolder <strong>in</strong>to the Project<br />
palette of the After Effects <strong>in</strong>terface.<br />
This will add each sequence to the<br />
project.<br />
6. Once you have the sequences <strong>in</strong> After<br />
Effects save the project under the name<br />
“prote<strong>in</strong>B<strong>in</strong>d<strong>in</strong>gComp”. If you move this<br />
project later on, or if you relocate the<br />
folders conta<strong>in</strong><strong>in</strong>g the image sequences<br />
you’ll need to re-l<strong>in</strong>k each sequence <strong>in</strong><br />
After Effects.<br />
7. In the project palette, select the BG<br />
(background) sequence, drag it down on<br />
top of the filmstrip icon <strong>in</strong> the Project<br />
palette, this will create a new<br />
composition of the same length as the<br />
image sequence.<br />
8. Add the prote<strong>in</strong>Color layer on top of the<br />
background layer <strong>in</strong> the timel<strong>in</strong>e. It<br />
should have an alpha channel already<br />
so the background layer should be<br />
visible beh<strong>in</strong>d the prote<strong>in</strong>s.<br />
Drag the BG sequence down on top of the<br />
filmstrip icon to create a composition on the<br />
timel<strong>in</strong>e.<br />
advTutorial 8: <strong>Render<strong>in</strong>g</strong> <strong>for</strong> <strong>Composit<strong>in</strong>g</strong> (<strong>Maya</strong> <strong>2011</strong>) Spr<strong>in</strong>g ‘11<br />
8
9. To remove the dark fr<strong>in</strong>ge from around<br />
the prote<strong>in</strong>s, right click the prote<strong>in</strong>Color<br />
layer layer <strong>in</strong> the project w<strong>in</strong>dow and<br />
choose Interpret Footage>ma<strong>in</strong>. From<br />
the pop-up box select Premultiplied and<br />
make sure the matte color is set to<br />
black.<br />
10. Add the Occlusion layer on top of the<br />
prote<strong>in</strong>Color layer. The layer will appear<br />
black and white on top of the prote<strong>in</strong>s.<br />
You really only want the shadow<strong>in</strong>g to<br />
be added to the prote<strong>in</strong>s, to achieve this<br />
you can set the blend<strong>in</strong>g mode to<br />
Multiply. This multiplies the pixel values<br />
below the layer by the pixel values <strong>in</strong> the<br />
layer. So where the occlusion layer has<br />
a pixel value of 1 (white) no change is<br />
seen <strong>in</strong> the pixels below it.. If the pixel<br />
values are below 1 (such as .8) the pixel<br />
values below the occlusion layer are<br />
reduced thus mak<strong>in</strong>g the darker. What<br />
you end up with is the occlusion shad<strong>in</strong>g<br />
applied to the flat color of the<br />
prote<strong>in</strong>Color layer.<br />
11. The occlusion layer is a bit too strong,<br />
you can reduce its opacity by expand<strong>in</strong>g<br />
the layer and lower<strong>in</strong>g the opacity under<br />
the Trans<strong>for</strong>ms head<strong>in</strong>g to 80%.<br />
12. Drag the XRay layer on top of the<br />
occlusion layer <strong>in</strong> the timel<strong>in</strong>e. Set its<br />
transfer mode to Screen. This works like<br />
the opposite of multiply, now only the<br />
light values of the layer are applied to<br />
the layers below. The XRay look<br />
comb<strong>in</strong>ed with the occlusion pass<br />
creates a very stylistic EM scann<strong>in</strong>g<br />
look.<br />
13. Drag the ribbons layer on top of the<br />
XRay layer. The ribbons should look as<br />
though they are <strong>in</strong>side the prote<strong>in</strong> mesh<br />
objects. There’s a number of <strong>in</strong>terest<strong>in</strong>g<br />
ways to achieve this effect:<br />
- Simply lower the opacity of the ribbons<br />
layer.<br />
- Or set the transfer mode to screen or<br />
overlay.<br />
- Or, to create the impression that the<br />
mesh objects are translucent, try sett<strong>in</strong>g<br />
the ribbon’s transfer mode to multiply,<br />
lower the opacity to 50% and then<br />
apply a Gaussian blur to the layer. To<br />
apply a blur, select the layer <strong>in</strong> the<br />
timel<strong>in</strong>e and choose Effects>Blur &<br />
Sharpen>Gaussian Blur. In the effect<br />
palette, set the blur amount to 6.<br />
The prote<strong>in</strong>Color sequence is dragged on top of<br />
the BG sequence. Order does matter <strong>in</strong> the<br />
timel<strong>in</strong>e, the sequences are composited like<br />
layers <strong>in</strong> PhotoShop.<br />
Sett<strong>in</strong>g the Alpha of the prote<strong>in</strong>Color layer to<br />
“Premultiplied” will remove the dark fr<strong>in</strong>ge.<br />
The Opacity controls are found <strong>in</strong> the Trans<strong>for</strong>m<br />
rollout of the layer.<br />
Comb<strong>in</strong><strong>in</strong>g the prote<strong>in</strong>Color, occlusion, and XRay<br />
layers us<strong>in</strong>g different blend<strong>in</strong>g modes creates a<br />
stylized EM scann<strong>in</strong>g<br />
advTutorial 8: <strong>Render<strong>in</strong>g</strong> <strong>for</strong> <strong>Composit<strong>in</strong>g</strong> (<strong>Maya</strong> <strong>2011</strong>) Spr<strong>in</strong>g ‘11<br />
9
14. Create an Adjustment layer<br />
(Layers>Adjustment Layer). An<br />
Adjustment layer is an empty layer, any<br />
effects applied to an adjustment layer<br />
will be applied to all of the layers below<br />
it.<br />
15. Select the Adjustment layer and choose<br />
Effect>Blur and Sharpen>Lens Blur.<br />
This applies a lens blur to the all of the<br />
layers caus<strong>in</strong>g them to be blurred out.<br />
To control how the lens blur is applied<br />
you’ll use the Depth pass.<br />
16. Drag the depth pass on top of the<br />
Adjustment layer. Turn its visibility off.<br />
17. Select the Adjustment layer, <strong>in</strong> the<br />
effects palette set the Depth Map Layer<br />
to the Depth Layer, set the Depth Map<br />
Channel to Lum<strong>in</strong>ance. This uses the<br />
lum<strong>in</strong>ance of the depth layer to control<br />
the blur applied by the Adjustment layer<br />
you can change, or even key frame the<br />
blur.<br />
18. Click on Invert Depth map, lighter areas<br />
will receive less blur, darker areas will<br />
receive more blur.<br />
19. Click on Repeat Edge Pixels at the<br />
bottom (may only be available <strong>in</strong> AE<br />
CS3) to remove the dark fr<strong>in</strong>ge around<br />
the border of the composition.<br />
20. To change the amount of blurr<strong>in</strong>g, adjust<br />
the Iris Radius, to change the depth at<br />
which the image is not blurry, adjust the<br />
Blur Focus Distance.<br />
The Guassian Blur controls are found <strong>in</strong> the<br />
Effects Control palette <strong>for</strong> the selected layer.<br />
An Adjustment layer is created <strong>in</strong> the Layer<br />
menu. Effects applied to the adjustment layer<br />
affect all the layers below it.<br />
F<strong>in</strong>e Tun<strong>in</strong>g and Color<br />
Correction<br />
At this po<strong>in</strong>t you can use After Effects controls to<br />
improve the overall look of the animation.<br />
1. The color of the background is a little<br />
garish and distract<strong>in</strong>g. You can fix this<br />
by adjust<strong>in</strong>g the colors of the layer.<br />
Select the background layer and choose<br />
Effect>Color Correction>Hue,<br />
Saturation.<br />
2. In the Effect palette set the wheel to 55<br />
degrees and the Master Saturation to -<br />
38.<br />
3. The light<strong>in</strong>g of the background can also<br />
be improved by us<strong>in</strong>g a mask.<br />
4. Create a new ‘Solid’ layer, <strong>in</strong> the options<br />
palette, set the color of the layer to<br />
black.<br />
The sett<strong>in</strong>gs <strong>for</strong> the Lens Blur effect.<br />
advTutorial 8: <strong>Render<strong>in</strong>g</strong> <strong>for</strong> <strong>Composit<strong>in</strong>g</strong> (<strong>Maya</strong> <strong>2011</strong>) Spr<strong>in</strong>g ‘11<br />
10
5. Drag the layer <strong>in</strong> the timel<strong>in</strong>e so that it’s<br />
above the BG layer.<br />
6. Use the circular mask tool to create a<br />
mask object.<br />
7. Expand the mask controls <strong>in</strong> the new<br />
layer, set the mask’s mode to subtract to<br />
<strong>in</strong>vert the mask.<br />
8. Set mask feather to 170.<br />
9. Lower the opacity of the new layer to<br />
59% so that it darkens the area around<br />
the mask.<br />
10. Position the circular mask over the<br />
prote<strong>in</strong>s <strong>in</strong> the comp.<br />
11. Select the BG layer and add a fast blur<br />
(Effect>Blur and Sharpen>Fast Blur),<br />
set the blurr<strong>in</strong>ess to 8. This will add just<br />
a little bit more blur to the backdrop to<br />
help separate the <strong>for</strong>eground elements.<br />
12. Save the scene.<br />
13. To see how the scene looks create a<br />
RAM preview.<br />
14. The f<strong>in</strong>al composite can be seen <strong>in</strong> the<br />
composit<strong>in</strong>g.mov file <strong>in</strong>cluded with the<br />
project files.<br />
A circular mask is created <strong>for</strong> a new layer above<br />
the BG layer. The mask is feathered and the<br />
opacity is lowered.<br />
Additional Techniques<br />
Beyond experimentation with the many effects<br />
that come with After Effects (as well as the many<br />
others that can be purchased from various<br />
companies), the follow<strong>in</strong>g section provides a few<br />
tips and ideas not necessarily tied to the<br />
example shown <strong>in</strong> this tutorial.<br />
The masked layer creates a spotlight effect on<br />
the background, this helps to focus attention on<br />
the prote<strong>in</strong>s and m<strong>in</strong>imize the distraction of the<br />
background animation.<br />
Group<strong>in</strong>g Layers<br />
To create a group of layers you can precompose<br />
the layers. Simply shift select the layers you<br />
want to group <strong>in</strong> the timel<strong>in</strong>e and choose<br />
Layer>Precompose. The precomposed layers<br />
are a nested composition with<strong>in</strong> the ma<strong>in</strong><br />
composition. You can apply effects to the entire<br />
group just by select<strong>in</strong>g the precomposition and<br />
add<strong>in</strong>g an effect the same way you add an effect<br />
to a layer. To edit the contents of the<br />
precompostion you can locate it <strong>in</strong> the project<br />
w<strong>in</strong>dow and double click it. It’s a good idea to<br />
give your precompositions a descriptive title so<br />
that you can keep track of what they conta<strong>in</strong>.<br />
Ambient Glow<br />
You can create the look of ambient glow by<br />
duplicat<strong>in</strong>g (select and press ctrl/cmd + d) a<br />
layer or a nested precomposition and plac<strong>in</strong>g<br />
A close up of the prote<strong>in</strong>s <strong>in</strong> the f<strong>in</strong>al composite.<br />
The ribbons with<strong>in</strong> the prote<strong>in</strong> mesh are darkened<br />
and blurred giv<strong>in</strong>g the prote<strong>in</strong>s a translucent look.<br />
advTutorial 8: <strong>Render<strong>in</strong>g</strong> <strong>for</strong> <strong>Composit<strong>in</strong>g</strong> (<strong>Maya</strong> <strong>2011</strong>) Spr<strong>in</strong>g ‘11<br />
11
this duplicate above the orig<strong>in</strong>al. Set the transfer<br />
mode of the duplicate to screen and add a fast<br />
blur to it. Increase the blur amount and try<br />
lower<strong>in</strong>g the opacity of the duplicate layer.<br />
Track Mattes<br />
A track matte can be used to create an animated<br />
cut away mask to reveal parts of one layer<br />
hidden by another. For <strong>in</strong>stance if you wanted to<br />
create a w<strong>in</strong>dow that allowed a viewer to see the<br />
nucleus beh<strong>in</strong>d an otherwise opaque cell<br />
membrane, you can render the cell membrane<br />
layer and the nucleus layer separately. In After<br />
Effects place the membrane image sequence<br />
above the cell membrane sequence. Create a<br />
third layer above the membrane and add a<br />
circular mask to this layer. In the membrane<br />
layer sett<strong>in</strong>gs set the TrkMat menu to alpha<br />
<strong>in</strong>verted matte of the layer above. The Mask on<br />
the top layer will now mask out the alpha of the<br />
membrane layer creat<strong>in</strong>g a w<strong>in</strong>dow to the layer<br />
below. This can be animated by sett<strong>in</strong>g<br />
keyframes on the mask at the top layer. The<br />
track matte source layer is automatically turned<br />
off. The track matte source layer must always be<br />
one layer above the layer us<strong>in</strong>g the track matte.<br />
The ambient glow <strong>in</strong> this animation was created<br />
by duplicat<strong>in</strong>g the layers, sett<strong>in</strong>g the duplicates<br />
above the orig<strong>in</strong>als, blurr<strong>in</strong>g the duplicates and<br />
sett<strong>in</strong>g their blend<strong>in</strong>g mode to screen.<br />
The sett<strong>in</strong>gs and arrangement of the track matte layer<br />
Track mattes can be comb<strong>in</strong>ed with masks to selectively reveal parts of a<br />
layer hidden beneath another layer. The masks can be animated as well.<br />
advTutorial 8: <strong>Render<strong>in</strong>g</strong> <strong>for</strong> <strong>Composit<strong>in</strong>g</strong> (<strong>Maya</strong> <strong>2011</strong>) Spr<strong>in</strong>g ‘11<br />
12
Vector Blur<br />
Simple hardware rendered particles can benefit from the CC Vector Blur effect found <strong>in</strong> the Blur<br />
and Sharpen menu. Regular po<strong>in</strong>t type particles can be made to look as though they are a<br />
viscous fluid by apply<strong>in</strong>g one or more <strong>in</strong>stances of the CC vector blur effect.<br />
Th<br />
Hardware rendered particles created and rendered as po<strong>in</strong>ts <strong>in</strong> <strong>Maya</strong>.<br />
The look of the particles can be enhanced us<strong>in</strong>g multiple <strong>in</strong>stances of the Vector Blur effect <strong>in</strong> After<br />
Effects.<br />
advTutorial 8: <strong>Render<strong>in</strong>g</strong> <strong>for</strong> <strong>Composit<strong>in</strong>g</strong> (<strong>Maya</strong> <strong>2011</strong>) Spr<strong>in</strong>g ‘11<br />
13