Rendering for Compositing (in Maya 2011) - Molecular Movies
Rendering for Compositing (in Maya 2011) - Molecular Movies
Rendering for Compositing (in Maya 2011) - Molecular Movies

You also want an ePaper? Increase the reach of your titles
YUMPU automatically turns print PDFs into web optimized ePapers that Google loves.
add<strong>in</strong>g the sphere to the depth layer you<br />
establish that the scene size is based on the<br />
size of the sphere.<br />
4. Select the background object and add it<br />
to the depth layer.<br />
5. Create a test render. The background<br />
appears as a light gray <strong>in</strong> the layer.<br />
What you want is <strong>for</strong> the background to<br />
be black and the prote<strong>in</strong>s to move from<br />
dark gray to white as they approach the<br />
camera, preferably the details of the<br />
prote<strong>in</strong> shapes will also be somewhat<br />
visible <strong>in</strong> the depth pass.<br />
6. Select one of the prote<strong>in</strong> objects while <strong>in</strong><br />
the Depth layer. Open the Hypershade,<br />
right click <strong>in</strong> the work area and choose<br />
“Graph -> Graph Materials on Selected<br />
Objects”. You’ll see the special shader<br />
applied to the objects <strong>in</strong> the layer. You<br />
can tune the depth shader’s sensitivity<br />
by adjust<strong>in</strong>g the multiplier value <strong>in</strong> the<br />
multiply/divide node. Select the<br />
multiply/divide node, <strong>in</strong> the Attribute<br />
Editor, change the <strong>in</strong>put2 value from -1<br />
to -130.<br />
7. Create another test render, the prote<strong>in</strong>s<br />
are dark gray when they are far from the<br />
camera and appear lighter as they<br />
approach the camera. Notice that the<br />
renderer used <strong>in</strong> the Depth layer is<br />
<strong>Maya</strong> Software while the renderer used<br />
<strong>in</strong> the Occlusion layer is mental ray.<br />
<strong>Maya</strong> automatically sets the appropriate<br />
renderer <strong>for</strong> each layer based on the<br />
preset used.<br />
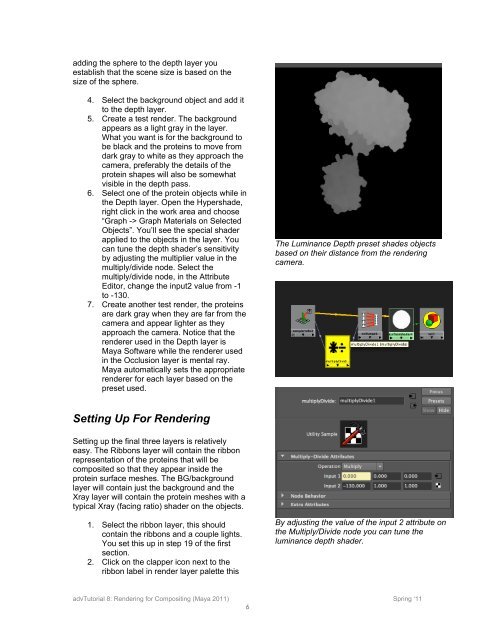
The Lum<strong>in</strong>ance Depth preset shades objects<br />
based on their distance from the render<strong>in</strong>g<br />
camera.<br />
Sett<strong>in</strong>g Up For <strong>Render<strong>in</strong>g</strong><br />
Sett<strong>in</strong>g up the f<strong>in</strong>al three layers is relatively<br />
easy. The Ribbons layer will conta<strong>in</strong> the ribbon<br />
representation of the prote<strong>in</strong>s that will be<br />
composited so that they appear <strong>in</strong>side the<br />
prote<strong>in</strong> surface meshes. The BG/background<br />
layer will conta<strong>in</strong> just the background and the<br />
Xray layer will conta<strong>in</strong> the prote<strong>in</strong> meshes with a<br />
typical Xray (fac<strong>in</strong>g ratio) shader on the objects.<br />
1. Select the ribbon layer, this should<br />
conta<strong>in</strong> the ribbons and a couple lights.<br />
You set this up <strong>in</strong> step 19 of the first<br />
section.<br />
2. Click on the clapper icon next to the<br />
ribbon label <strong>in</strong> render layer palette this<br />
By adjust<strong>in</strong>g the value of the <strong>in</strong>put 2 attribute on<br />
the Multiply/Divide node you can tune the<br />
lum<strong>in</strong>ance depth shader.<br />
advTutorial 8: <strong>Render<strong>in</strong>g</strong> <strong>for</strong> <strong>Composit<strong>in</strong>g</strong> (<strong>Maya</strong> <strong>2011</strong>) Spr<strong>in</strong>g ‘11<br />
6