Rendering for Compositing (in Maya 2011) - Molecular Movies
Rendering for Compositing (in Maya 2011) - Molecular Movies
Rendering for Compositing (in Maya 2011) - Molecular Movies

Create successful ePaper yourself
Turn your PDF publications into a flip-book with our unique Google optimized e-Paper software.
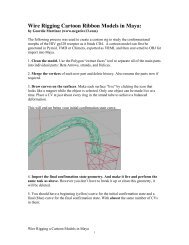
20. Add the background sphere to the BG<br />
layer.<br />
21. Save the file.<br />
Render Layer Presets<br />
In this workflow, we will use <strong>Maya</strong>’s (old) render<br />
layer presets (as opposed to the render passes<br />
system that was <strong>in</strong>troduced <strong>in</strong> recent versions of<br />
<strong>Maya</strong> – render passes will be covered <strong>in</strong> a<br />
separate tutorial). Render presets provide you<br />
with a quick way to apply commonly used render<br />
and shader sett<strong>in</strong>gs to all the objects <strong>in</strong> a render<br />
layer.<br />
To create the ambient shad<strong>in</strong>g on the prote<strong>in</strong>s you’ll<br />
apply the occlusion preset to the occlusion layer.<br />
1. Select the Occlusion layer <strong>in</strong> the render layer<br />
panel. Right-click over the layer label and<br />
choose ‘Attributes’ from the pop up w<strong>in</strong>dow.<br />
This switches the UI to the render layer’s<br />
Attribute Editor – click on the ‘Presets’ button<br />
<strong>in</strong> the upper right and select ‘Occlusion.’<br />
2. Create a test render while <strong>in</strong> the Occlusion<br />
layer. <strong>Maya</strong> applies the occlusion shader to<br />
the prote<strong>in</strong> and sets the renderer <strong>for</strong> the layer<br />
to mental ray automatically.<br />
3. Switch to the Depth layer and apply a<br />
Lum<strong>in</strong>ance Depth from the render presets<br />
us<strong>in</strong>g the same method. Create a test render.<br />
Lum<strong>in</strong>ance Depth uses a special shader set up to<br />
shade objects based on their distance from camera.<br />
The closer the objects are to the camera, the lighter<br />
they become. As you’ll see later on <strong>in</strong> the chapter, this<br />
special pass can be used <strong>in</strong> AfterEffects to create the<br />
depth of field blurr<strong>in</strong>g effect. The shader may require a<br />
little tweak<strong>in</strong>g to establish a good range of values <strong>for</strong><br />
this particular scene.<br />
The shad<strong>in</strong>g is applied to the objects based on<br />
the clipp<strong>in</strong>g planes of the camera. By default all<br />
cameras have “auto render clip planes”<br />
activated. The clipp<strong>in</strong>g planes are set by the size<br />
of the scene detected by the camera. Currently<br />
only the prote<strong>in</strong> meshes exist <strong>in</strong> the layer<br />
mak<strong>in</strong>g the scene size appear quite small to the<br />
camera. Thus the shader doesn’t have much of<br />
a range to work with when shad<strong>in</strong>g the objects<br />
based on scene depth. There are a couple ways<br />
to fix this. You can turn “Auto Render Clip<br />
Planes” off <strong>in</strong> the camera’s Attribute Editor and<br />
then set the Far Clip plane value to a lower<br />
number. You could also take advantage of the<br />
background sphere that exists <strong>in</strong> the scene. By<br />
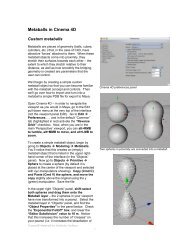
You can apply a preset to a layer by go<strong>in</strong>g<br />
‘Attributes’ (top image) and then select<strong>in</strong>g from<br />
the ‘Presets’ button (above) – this will create<br />
custom shaders and render sett<strong>in</strong>gs <strong>for</strong> all of the<br />
objects on the layer.<br />
The occlusion preset applies ambient<br />
occlusion shad<strong>in</strong>g/light<strong>in</strong>g to all the<br />
objects <strong>in</strong> the layer.<br />
advTutorial 8: <strong>Render<strong>in</strong>g</strong> <strong>for</strong> <strong>Composit<strong>in</strong>g</strong> (<strong>Maya</strong> <strong>2011</strong>) Spr<strong>in</strong>g ‘11<br />
5