Rendering for Compositing (in Maya 2011) - Molecular Movies
Rendering for Compositing (in Maya 2011) - Molecular Movies
Rendering for Compositing (in Maya 2011) - Molecular Movies

You also want an ePaper? Increase the reach of your titles
YUMPU automatically turns print PDFs into web optimized ePapers that Google loves.
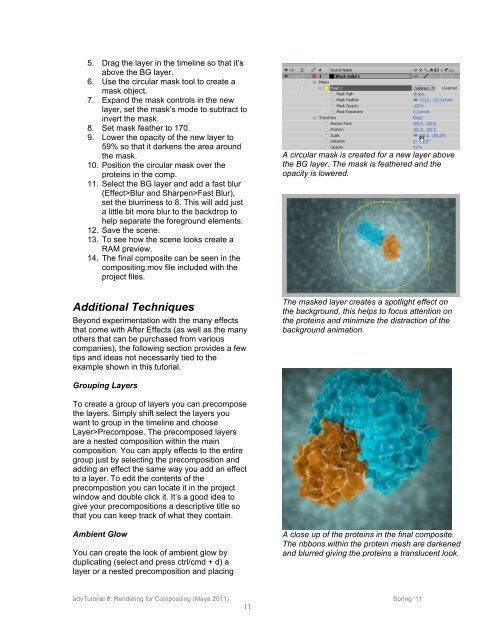
5. Drag the layer <strong>in</strong> the timel<strong>in</strong>e so that it’s<br />
above the BG layer.<br />
6. Use the circular mask tool to create a<br />
mask object.<br />
7. Expand the mask controls <strong>in</strong> the new<br />
layer, set the mask’s mode to subtract to<br />
<strong>in</strong>vert the mask.<br />
8. Set mask feather to 170.<br />
9. Lower the opacity of the new layer to<br />
59% so that it darkens the area around<br />
the mask.<br />
10. Position the circular mask over the<br />
prote<strong>in</strong>s <strong>in</strong> the comp.<br />
11. Select the BG layer and add a fast blur<br />
(Effect>Blur and Sharpen>Fast Blur),<br />
set the blurr<strong>in</strong>ess to 8. This will add just<br />
a little bit more blur to the backdrop to<br />
help separate the <strong>for</strong>eground elements.<br />
12. Save the scene.<br />
13. To see how the scene looks create a<br />
RAM preview.<br />
14. The f<strong>in</strong>al composite can be seen <strong>in</strong> the<br />
composit<strong>in</strong>g.mov file <strong>in</strong>cluded with the<br />
project files.<br />
A circular mask is created <strong>for</strong> a new layer above<br />
the BG layer. The mask is feathered and the<br />
opacity is lowered.<br />
Additional Techniques<br />
Beyond experimentation with the many effects<br />
that come with After Effects (as well as the many<br />
others that can be purchased from various<br />
companies), the follow<strong>in</strong>g section provides a few<br />
tips and ideas not necessarily tied to the<br />
example shown <strong>in</strong> this tutorial.<br />
The masked layer creates a spotlight effect on<br />
the background, this helps to focus attention on<br />
the prote<strong>in</strong>s and m<strong>in</strong>imize the distraction of the<br />
background animation.<br />
Group<strong>in</strong>g Layers<br />
To create a group of layers you can precompose<br />
the layers. Simply shift select the layers you<br />
want to group <strong>in</strong> the timel<strong>in</strong>e and choose<br />
Layer>Precompose. The precomposed layers<br />
are a nested composition with<strong>in</strong> the ma<strong>in</strong><br />
composition. You can apply effects to the entire<br />
group just by select<strong>in</strong>g the precomposition and<br />
add<strong>in</strong>g an effect the same way you add an effect<br />
to a layer. To edit the contents of the<br />
precompostion you can locate it <strong>in</strong> the project<br />
w<strong>in</strong>dow and double click it. It’s a good idea to<br />
give your precompositions a descriptive title so<br />
that you can keep track of what they conta<strong>in</strong>.<br />
Ambient Glow<br />
You can create the look of ambient glow by<br />
duplicat<strong>in</strong>g (select and press ctrl/cmd + d) a<br />
layer or a nested precomposition and plac<strong>in</strong>g<br />
A close up of the prote<strong>in</strong>s <strong>in</strong> the f<strong>in</strong>al composite.<br />
The ribbons with<strong>in</strong> the prote<strong>in</strong> mesh are darkened<br />
and blurred giv<strong>in</strong>g the prote<strong>in</strong>s a translucent look.<br />
advTutorial 8: <strong>Render<strong>in</strong>g</strong> <strong>for</strong> <strong>Composit<strong>in</strong>g</strong> (<strong>Maya</strong> <strong>2011</strong>) Spr<strong>in</strong>g ‘11<br />
11