Rendering for Compositing (in Maya 2011) - Molecular Movies
Rendering for Compositing (in Maya 2011) - Molecular Movies
Rendering for Compositing (in Maya 2011) - Molecular Movies

Create successful ePaper yourself
Turn your PDF publications into a flip-book with our unique Google optimized e-Paper software.
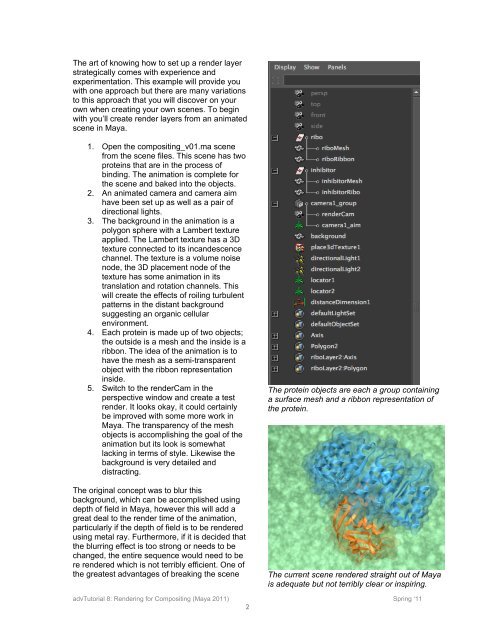
The art of know<strong>in</strong>g how to set up a render layer<br />
strategically comes with experience and<br />
experimentation. This example will provide you<br />
with one approach but there are many variations<br />
to this approach that you will discover on your<br />
own when creat<strong>in</strong>g your own scenes. To beg<strong>in</strong><br />
with you’ll create render layers from an animated<br />
scene <strong>in</strong> <strong>Maya</strong>.<br />
1. Open the composit<strong>in</strong>g_v01.ma scene<br />
from the scene files. This scene has two<br />
prote<strong>in</strong>s that are <strong>in</strong> the process of<br />
b<strong>in</strong>d<strong>in</strong>g. The animation is complete <strong>for</strong><br />
the scene and baked <strong>in</strong>to the objects.<br />
2. An animated camera and camera aim<br />
have been set up as well as a pair of<br />
directional lights.<br />
3. The background <strong>in</strong> the animation is a<br />
polygon sphere with a Lambert texture<br />
applied. The Lambert texture has a 3D<br />
texture connected to its <strong>in</strong>candescence<br />
channel. The texture is a volume noise<br />
node, the 3D placement node of the<br />
texture has some animation <strong>in</strong> its<br />
translation and rotation channels. This<br />
will create the effects of roil<strong>in</strong>g turbulent<br />
patterns <strong>in</strong> the distant background<br />
suggest<strong>in</strong>g an organic cellular<br />
environment.<br />
4. Each prote<strong>in</strong> is made up of two objects;<br />
the outside is a mesh and the <strong>in</strong>side is a<br />
ribbon. The idea of the animation is to<br />
have the mesh as a semi-transparent<br />
object with the ribbon representation<br />
<strong>in</strong>side.<br />
5. Switch to the renderCam <strong>in</strong> the<br />
perspective w<strong>in</strong>dow and create a test<br />
render. It looks okay, it could certa<strong>in</strong>ly<br />
be improved with some more work <strong>in</strong><br />
<strong>Maya</strong>. The transparency of the mesh<br />
objects is accomplish<strong>in</strong>g the goal of the<br />
animation but its look is somewhat<br />
lack<strong>in</strong>g <strong>in</strong> terms of style. Likewise the<br />
background is very detailed and<br />
distract<strong>in</strong>g.<br />
The orig<strong>in</strong>al concept was to blur this<br />
background, which can be accomplished us<strong>in</strong>g<br />
depth of field <strong>in</strong> <strong>Maya</strong>, however this will add a<br />
great deal to the render time of the animation,<br />
particularly if the depth of field is to be rendered<br />
us<strong>in</strong>g metal ray. Furthermore, if it is decided that<br />
the blurr<strong>in</strong>g effect is too strong or needs to be<br />
changed, the entire sequence would need to be<br />
re rendered which is not terribly efficient. One of<br />
the greatest advantages of break<strong>in</strong>g the scene<br />
The prote<strong>in</strong> objects are each a group conta<strong>in</strong><strong>in</strong>g<br />
a surface mesh and a ribbon representation of<br />
the prote<strong>in</strong>.<br />
The current scene rendered straight out of <strong>Maya</strong><br />
is adequate but not terribly clear or <strong>in</strong>spir<strong>in</strong>g.<br />
advTutorial 8: <strong>Render<strong>in</strong>g</strong> <strong>for</strong> <strong>Composit<strong>in</strong>g</strong> (<strong>Maya</strong> <strong>2011</strong>) Spr<strong>in</strong>g ‘11<br />
2