Rendering for Compositing (in Maya 2011) - Molecular Movies
Rendering for Compositing (in Maya 2011) - Molecular Movies
Rendering for Compositing (in Maya 2011) - Molecular Movies

Create successful ePaper yourself
Turn your PDF publications into a flip-book with our unique Google optimized e-Paper software.
Import<strong>in</strong>g the Sequence <strong>in</strong> to After Effects<br />
As you ga<strong>in</strong> experience with creat<strong>in</strong>g animations<br />
us<strong>in</strong>g this style of workflow, you’ll develop a feel<br />
<strong>for</strong> what you need from <strong>Maya</strong> <strong>in</strong> order to create<br />
a great composition <strong>in</strong> After Effects. Essentially<br />
each of the rendered sequences becomes an<br />
<strong>in</strong>gredient rather than the entire meal and much<br />
of what you create <strong>in</strong> <strong>Maya</strong> is prep work to be<br />
seasoned and f<strong>in</strong>essed <strong>in</strong> After Effects. This<br />
tutorial goes through some fairly simple<br />
techniques and only uses a few of the many<br />
effects found <strong>in</strong> After Effects. The student is<br />
encouraged to use these techniques as a<br />
launch<strong>in</strong>g pad <strong>for</strong> their own approach to<br />
composit<strong>in</strong>g.<br />
The easiest way to br<strong>in</strong>g files <strong>in</strong>to After Effects is<br />
to simply drag them <strong>in</strong>to the application from the<br />
operat<strong>in</strong>g systems’s file browser.<br />
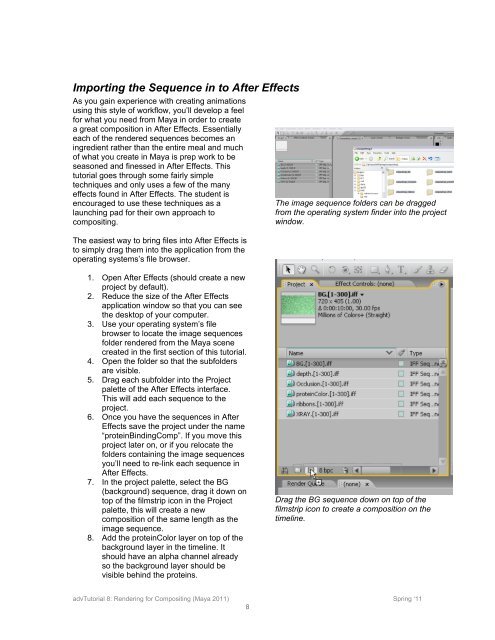
The image sequence folders can be dragged<br />
from the operat<strong>in</strong>g system f<strong>in</strong>der <strong>in</strong>to the project<br />
w<strong>in</strong>dow.<br />
1. Open After Effects (should create a new<br />
project by default).<br />
2. Reduce the size of the After Effects<br />
application w<strong>in</strong>dow so that you can see<br />
the desktop of your computer.<br />
3. Use your operat<strong>in</strong>g system’s file<br />
browser to locate the image sequences<br />
folder rendered from the <strong>Maya</strong> scene<br />
created <strong>in</strong> the first section of this tutorial.<br />
4. Open the folder so that the subfolders<br />
are visible.<br />
5. Drag each subfolder <strong>in</strong>to the Project<br />
palette of the After Effects <strong>in</strong>terface.<br />
This will add each sequence to the<br />
project.<br />
6. Once you have the sequences <strong>in</strong> After<br />
Effects save the project under the name<br />
“prote<strong>in</strong>B<strong>in</strong>d<strong>in</strong>gComp”. If you move this<br />
project later on, or if you relocate the<br />
folders conta<strong>in</strong><strong>in</strong>g the image sequences<br />
you’ll need to re-l<strong>in</strong>k each sequence <strong>in</strong><br />
After Effects.<br />
7. In the project palette, select the BG<br />
(background) sequence, drag it down on<br />
top of the filmstrip icon <strong>in</strong> the Project<br />
palette, this will create a new<br />
composition of the same length as the<br />
image sequence.<br />
8. Add the prote<strong>in</strong>Color layer on top of the<br />
background layer <strong>in</strong> the timel<strong>in</strong>e. It<br />
should have an alpha channel already<br />
so the background layer should be<br />
visible beh<strong>in</strong>d the prote<strong>in</strong>s.<br />
Drag the BG sequence down on top of the<br />
filmstrip icon to create a composition on the<br />
timel<strong>in</strong>e.<br />
advTutorial 8: <strong>Render<strong>in</strong>g</strong> <strong>for</strong> <strong>Composit<strong>in</strong>g</strong> (<strong>Maya</strong> <strong>2011</strong>) Spr<strong>in</strong>g ‘11<br />
8