and the stockings were hung... - Hobby Lobby
and the stockings were hung... - Hobby Lobby
and the stockings were hung... - Hobby Lobby

Create successful ePaper yourself
Turn your PDF publications into a flip-book with our unique Google optimized e-Paper software.
DECORATING<br />
FOR THE<br />
HOLIDAYS CAN<br />
BE MADE EVEN<br />
MORE JOYFUL<br />
WITH FESTIVE<br />
SCRAPBOOK<br />
PAPERS.<br />
From gorgeous<br />
packages to glowing<br />
c<strong>and</strong>les to a charming<br />
focal point star,<br />
<strong>the</strong>se projects let you<br />
show your true<br />
Christmas spirit<br />
with beautiful<br />
coordinating papers.<br />
<strong>and</strong> <strong>the</strong> <strong>stockings</strong> <strong>were</strong> <strong>hung</strong>...<br />
{CREATIVE INSPIRATIONS<br />
free<br />
FROM HOBBY LOBBY®}
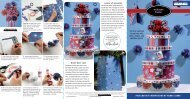
This focal point star was easy to create using foam core,<br />
double-sided adhesive, hot glue, <strong>and</strong> of course,<br />
beautifully-patterned papers. ’Tis <strong>the</strong> season to decorate & create!<br />
supplies:<br />
• 32" x 40" piece of 1/4" Thick Foam Core<br />
• Coordinating 12" x 12" Christmas<br />
Scrapbook Paper<br />
• 4" Styrofoam Ball<br />
• Wood Appliqués for Center<br />
• Craft Knife<br />
• Red Tacky Double-sided Tape<br />
• Straight Pins<br />
• Hot Glue<br />
• Acrylic Paint, in gold<br />
• Paint Brush<br />
Getting Started: The first 5<br />
steps will make all <strong>the</strong> components<br />
needed to create <strong>the</strong> paper star.<br />
1. To create <strong>the</strong> base for your star, use <strong>the</strong> provided<br />
diagram (A) <strong>and</strong> cut out a 28" x 28" piece of foam<br />
core. Using template (B), carefully cut out <strong>the</strong> star.<br />
2. To mount paper to <strong>the</strong> star base, use <strong>the</strong><br />
double-sided tape <strong>and</strong> apply strips all over <strong>the</strong> top<br />
surface of star base. Also apply tape to <strong>the</strong> bottom<br />
side of base, but only along <strong>the</strong> outer edges of <strong>the</strong><br />
star points.<br />
3. Using template (C) cut out 8 pieces of patterned<br />
paper. Working on <strong>the</strong> star base, remove liner<br />
from tape as you go (not all at once), wrap paper<br />
around each star point <strong>and</strong> press<br />
to secure. Run your finger along all edges to create<br />
a crisp fold.<br />
PHOTO 2<br />
PHOTO 1<br />
4. Note that in <strong>the</strong> photo, <strong>the</strong> paper star actually has<br />
dimension; it’s a few inches taller in <strong>the</strong> center. To<br />
achieve <strong>the</strong> height, carefully cut Styrofoam ball in<br />
half. Using low-temp hot glue, glue one half of <strong>the</strong><br />
ball to <strong>the</strong> center point of star base.<br />
5. To create <strong>the</strong> top triangles, use diagram (A) <strong>and</strong><br />
carefully cut eight 6" x 13" rectangle pieces of<br />
foam core. Cut <strong>the</strong>se pieces in half diagonally. To<br />
mount paper to <strong>the</strong> triangles, use template (D) <strong>and</strong><br />
cut out 8 pieces of patterned paper. Using<br />
double-sided tape, apply strips on <strong>the</strong> top <strong>and</strong><br />
bottom sides of each triangle. Removing tape liner<br />
as you work, wrap paper around each point <strong>and</strong><br />
press to secure. Run your finger along all edges to<br />
create a crisp fold.<br />
The next 2 steps will assemble your<br />
paper star.<br />
6. Using photo (1) as a guide <strong>and</strong> working in a<br />
clockwise pattern, lay triangles around star base<br />
alternating <strong>the</strong> patterns as desired. The edges<br />
of <strong>the</strong> triangles should be resting on top of <strong>the</strong><br />
Styrofoam ball, see photo (2). To secure placement,<br />
gently push straight pins through foam core <strong>and</strong><br />
into <strong>the</strong> ball, photo (2). Apply hot glue at tips to<br />
fur<strong>the</strong>r secure <strong>the</strong> triangles.<br />
7. To hide your h<strong>and</strong>iwork, paint both wooden<br />
appliques gold <strong>and</strong> let dry. Layer both in <strong>the</strong> center<br />
of your star <strong>and</strong> hot glue in place.<br />
2 <strong>Hobby</strong> <strong>Lobby</strong> Product Inspirations
template for focal point star<br />
(Enlarge pattern 550%)<br />
PATTERN FOR FOAM CORE BASE (B)<br />
PATTERN FOR PAPER (C)<br />
(STAR BASE)<br />
PATTERN<br />
FOR PAPER (D)<br />
(TOP TRIANGLES)<br />
<strong>Hobby</strong> <strong>Lobby</strong> Product Inspirations 3
cutting diagram for foam core (A)<br />
28"<br />
32"<br />
FOAM CORE BASE<br />
28"<br />
✂<br />
CUT<br />
40"<br />
TOP TRIANGLES<br />
✂ CUT<br />
12"<br />
6"<br />
26"<br />
13"<br />
©2013 <strong>Hobby</strong> <strong>Lobby</strong>® - Photography by Sanford Mauldin • Papercrafting - 161885<br />
www.hobbylobby.com • • www.getinspiredbyhl.com<br />
DO NOT ALLOW CHILDREN TO COMPLETE PROJECTS ALONE. ADULT SUPERVISION REQUIRED.