At-home Screen Printing - Hobby Lobby
At-home Screen Printing - Hobby Lobby
At-home Screen Printing - Hobby Lobby

Create successful ePaper yourself
Turn your PDF publications into a flip-book with our unique Google optimized e-Paper software.
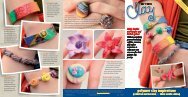
eady, set, screen print!<br />
{CREATIVE INSPIRATIONS<br />
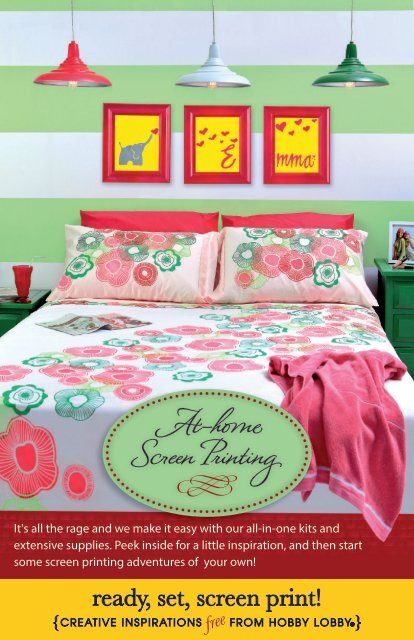
<strong>At</strong>-<strong>home</strong><br />
<strong>Screen</strong> <strong>Printing</strong><br />
M<br />
It's all the rage and we make it easy with our all-in-one kits and<br />
extensive supplies. Peek inside for a little inspiration, and then start<br />
some screen printing adventures of your own!<br />
free<br />
FROM HOBBY LOBBY®}
Sweet DREAMS<br />
Say goodbye to plain store-bought sheets! For this modern-floral look, we screen<br />
printed several different colors and images onto our sheet and pillowcases, using the<br />
advanced photo emulsion method and three screens. We first coated our screens with a light-sensitive liquid. Then we burned the<br />
images onto the screens by exposing them to light. After washing away the unexposed areas, we began printing.<br />
When using multiple<br />
colors, print one color at a time.<br />
Be sure to allow plenty of drying<br />
time between printings when working<br />
with overlapping designs, such as this<br />
one. Tip: Use a blow dryer to speed<br />
up the drying process.<br />
2 <strong>Hobby</strong> <strong>Lobby</strong> Product Inspirations
STRIKING IN Shadow<br />
Leave a legacy in a matter of minutes<br />
by mimicking a turn-of-the-century<br />
silhouette portrait. Anyone from the<br />
established to the aspiring artist can<br />
create heirloom-esque artwork that<br />
doesn’t have to wait generations to<br />
be passed down. We make it simple<br />
with an easy-to-trace silhouette<br />
on a canvas panel. Preserved in an<br />
antique-style frame, this gorgeous<br />
portrait makes the perfect keepsake to<br />
treasure and admire for years to come.<br />
<strong>Hobby</strong> <strong>Lobby</strong> Product Inspirations 3
SIMPLY Silhouetted<br />
Express yourself with sophisticated silhouettes.<br />
Because the designs are free of fine lines and<br />
intricate detail, these pieces lend themselves well<br />
to either the basic stencil method or the simple<br />
screen filler technique. We printed these dramatic<br />
designs on ready-to-use canvas panels. Try your<br />
hand at printing faces, and proudly display your<br />
screen-printed portrait.<br />
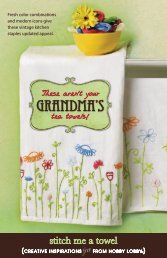
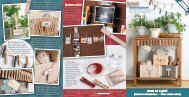
Frame IT<br />
An elephant never forgets…how simple it is to screen print at<br />
<strong>home</strong>! First we painted our canvas panels a cheery yellow. Then<br />
we screen printed the adorable designs onto the canvases. Once<br />
the designs dried, we mounted the canvases within coordinating<br />
frames and let the darling effect speak for itself. Tip: We<br />
personalized this charming trio, but the design possibilities are<br />
endless. Look to clip art and the web for copyright-free designs that<br />
suit your favorite theme and color scheme.<br />
<strong>Screen</strong>printing is the perfect<br />
fit for décor and best of all<br />
you can make it yours!<br />
Heartfelt ELEPHANT<br />
When printing designs with multiple colors,<br />
like this precious pachyderm, ink one image<br />
at a time, using painter’s tape to cover the<br />
portions of the screen that aren’t in use.<br />
4 <strong>Hobby</strong> <strong>Lobby</strong> Product Inspirations
«<br />
«<br />
SWEETLY <strong>Screen</strong>ed<br />
Let your little ones have their cupcakes<br />
and eat them too! This scrumptious<br />
design was created with the photo<br />
emulsion technique, due to the fine<br />
lines and detailed desserts. But<br />
sticking to one color allowed us to use<br />
a single screen, so this project was a<br />
piece of cake!<br />
Babywear<br />
We’ve turned up<br />
the wow factor on<br />
a plain-Jane onesie!<br />
For this personalized<br />
piece, we used the<br />
photo emulsion<br />
technique. Trees or<br />
trucks, butterflies or<br />
baseballs—you can<br />
choose any design you<br />
want. Just remember<br />
to put something in<br />
between the layers, such<br />
as a piece of cardboard,<br />
to prevent the ink from<br />
bleeding through.<br />
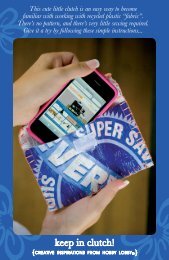
A Whale TALE<br />
An adorable screen-printed bib is the catch of<br />
the day! This eye-popping design was made<br />
using the simple screen filler method. Scroll to<br />
page six for the step-by-step instructions.<br />
<strong>Hobby</strong> <strong>Lobby</strong> Product Inspirations 5
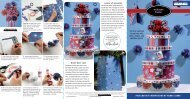
supplies<br />
• Fabric screen printing kit<br />
• Design to print<br />
• Item to be printed<br />
• Cleaning brush<br />
• Water-resistant tape<br />
• Pencil<br />
• Iron and pressing cloth<br />
1. Prepare your screen by washing<br />
it thoroughly with a soft cleaning<br />
brush before you begin.<br />
2. After taping<br />
off the inside<br />
of the frame,<br />
use a pencil<br />
to trace your<br />
desired image<br />
directly onto<br />
the screen.<br />
3. Prop up your screen to prevent<br />
the drawing fluid from getting<br />
onto your work surface—we<br />
used four same-size jars of<br />
ink, but you can use anything<br />
you have available. Now paint<br />
drawing fluid (included in the<br />
kit) over the parts of the image<br />
you want to print.<br />
4. Once the drawing fluid<br />
has dried, apply a line<br />
of screen filler across<br />
the top of the screen.<br />
Using the provided<br />
squeegee, drag the<br />
screen filler down,<br />
covering as much of<br />
the screen as possible.<br />
Note: Photo shown is<br />
completed step 4.<br />
5. After washing away the drawing<br />
fluid with cold water and<br />
letting the screen dry,<br />
place your screen<br />
over the item<br />
to be printed.<br />
Apply a line of<br />
fabric ink across the top of the screen.<br />
7. Once the ink has<br />
dried, place a<br />
piece of cloth<br />
over the printed<br />
item. Iron over<br />
it to heat set<br />
your design.<br />
6. Using the<br />
provided<br />
squeegee,<br />
drag the ink down<br />
over the image several times to fill the<br />
area with ink, then remove screen.<br />
And there you have<br />
it—the basic art of<br />
screen printing with the<br />
screen filler method.<br />
Now you can screen print<br />
on almost any surface<br />
imaginable!<br />
©2012 <strong>Hobby</strong> <strong>Lobby</strong>® - Photography by Sanford Mauldin • Art HL-WB-015<br />
www.hobbylobby.com • • www.getinspiredbyhl.com<br />
DO NOT ALLOW CHILDREN TO COMPLETE PROJECTS ALONE. ADULT SUPERVISION REQUIRED.