Create successful ePaper yourself
Turn your PDF publications into a flip-book with our unique Google optimized e-Paper software.
®<br />
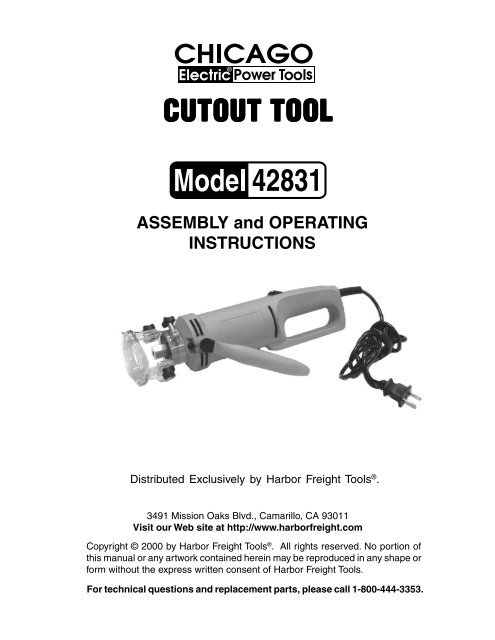
<strong>CUTOUT</strong> <strong>TOOL</strong><br />
42831<br />
ASSEMBLY and OPERATING<br />
INSTRUCTIONS<br />
Distributed Exclusively by <strong>Harbor</strong> <strong>Freight</strong> <strong>Tools</strong> ® .<br />
3491 Mission Oaks Blvd., Camarillo, CA 93011<br />
Visit our Web site at http://www.harborfreight.com<br />
Copyright © 2000 by <strong>Harbor</strong> <strong>Freight</strong> <strong>Tools</strong> ® . All rights reserved. No portion of<br />
this manual or any artwork contained herein may be reproduced in any shape or<br />
form without the express written consent of <strong>Harbor</strong> <strong>Freight</strong> <strong>Tools</strong>.<br />
For technical questions and replacement parts, please call 1-800-444-3353.
Motor<br />
ITEM<br />
Specifications<br />
DESCRIPTIO N<br />
115V, 60 Hz, 420 watts, 3.5 amps, 28,000 RPM<br />
L ine Cord<br />
6 feet; Plug: 2-prong polarized U.L.<br />
Collet<br />
Depth<br />
Depth<br />
Overall<br />
Grip<br />
Gauge Adjustments<br />
Gauge Dimensions<br />
Dimensions<br />
Dimensions<br />
Accessories<br />
Outside Nut Diameter: 5/8 inch<br />
1/2 (min.) to 1-5/16 (max.) inches depth<br />
2-3/8 inch square<br />
3-1/2 (D) x 11-1/2 (H) inches<br />
1-1/4 x 3-1/2 inches<br />
1/4 and 1/8 inch collets<br />
Save This Manual<br />
You will need the manual for the safety warnings and precautions, assembly instructions,<br />
operating and maintenance procedures, parts list and diagram. Keep your invoice with this<br />
manual. Write the invoice number on the inside of the front cover. Keep the manual and<br />
invoice in a safe and dry place for future reference.<br />
Safety Warnings and Precautions<br />
WARNING: When using tool, basic safety precautions should always be followed to<br />
reduce the risk of personal injury and damage to equipment.<br />
Read all instructions before using this tool!<br />
1. Keep work area clean. Cluttered areas invite injuries.<br />
2. Observe work area conditions. Do not use machines or power tools in damp or wet<br />
locations. Don’t expose to rain. Keep work area well lighted. Do not use electrically<br />
powered tools in the presence of flammable gases or liquids.<br />
3. Keep children away. Children must never be allowed in the work area. Do not let<br />
them handle machines, tools, or extension cords.<br />
4. Store idle equipment. When not in use, tools must be stored in a dry location to<br />
inhibit rust. Always lock up tools and keep out of reach of children.<br />
5. Do not force tool. It will do the job better and more safely at the rate for which it was<br />
intended. Do not use inappropriate attachments in an attempt to exceed the tool<br />
capacity.<br />
6. Use the right tool for the job. Do not attempt to force a small tool or attachment to<br />
do the work of a larger industrial tool. There are certain applications for which this tool<br />
was designed. Do not modify this tool and do not use this tool for a purpose for which<br />
it was not intended.<br />
SKU 42831<br />
Page 2
7. Dress properly. Do not wear loose clothing or jewelry as they can be caught in<br />
moving parts. Protective, electrically non-conductive clothes and non-skid footwear<br />
are recommended when working. Wear restrictive hair covering to contain long hair.<br />
8. Use eye and ear protection. Always wear ANSI approved impact safety goggles.<br />
Wear a full face shield if you are producing metal filings or wood chips. Wear an ANSI<br />
approved dust mask or respirator when working around metal, wood, and chemical<br />
dusts and mists.<br />
9. Do not overreach. Keep proper footing and balance at all times. Do not reach over or<br />
across running machines.<br />
10. Disconnect power. Unplug tool when not in use.<br />
11. Remove adjusting keys and wrenches. Check that keys and adjusting wrenches<br />
are removed from the tool or machine work surface before plugging it in.<br />
12. Avoid unintentional starting. Be sure the switch is in the Off position when not in use<br />
and before plugging in. Do not carry any tool with your finger on the trigger, whether it<br />
is plugged in or not.<br />
13. Stay alert. Watch what you are doing, use common sense. Do not operate any tool<br />
when you are tired.<br />
14. Take caution as some woods contain preservatives such as copper chromium<br />
arsenate (CCA) which can be toxic. When cutting these materials extra care should<br />
be taken to avoid inhalation and minimize skin contact.<br />
15. Check for damaged parts. Before using any tool, any part that appears damaged<br />
should be carefully checked to determine that it will operate properly and perform its<br />
intended function. Check for alignment and binding of moving parts; any broken parts<br />
or mounting fixtures; and any other condition that may affect proper operation. Any<br />
part that is damaged should be properly repaired or replaced by a qualified<br />
technician. Do not use the tool if any switch does not turn On and Off properly.<br />
16. Guard against electric shock. Prevent body contact with grounded surfaces such as<br />
pipes, radiators, ranges, and refrigerator enclosures.<br />
17. Do not operate tool if under the influence of alcohol or drugs. Read warning<br />
labels on prescriptions to determine if your judgment or reflexes are impaired while<br />
taking drugs. If there is any doubt, do not operate the tool.<br />
18. Use proper size and type extension cord. If an extension cord is required, it must be<br />
of the proper size and type to supply the correct current to the tool without heating up.<br />
Otherwise, the extension cord could melt and catch fire, or cause electrical damage to<br />
the tool. This tool requires use of an extension cord of 0 to 10 amps capatibility (up to<br />
50 feet), with wire size rated at 18 AWG. Longer extension cords require larger size<br />
wire. If you are using the tool outdoors, use an extension cord rated for outdoor use.<br />
(signified by “WA” on the jacket).<br />
19. WARNING: People with pacemakers should consult their physician(s) before<br />
use. Electromagnetic fields in close proximity to heart pacemaker could cause<br />
pacemaker interference or pacemaker failure.<br />
SKU 42831<br />
Page 3<br />
REV 07j
WARNING: Some dust created by power sanding, sawing, grinding, drilling, and other<br />
construction activities, contains chemicals known [to the State of California] to cause cancer,<br />
birth defects or other reproductive harm. Some examples of these chemicals are: Lead from<br />
lead-based paints Crystalline silica from bricks and cement or other masonry products<br />
Arsenic and chromium from chemically treated lumber Your risk from these exposures<br />
varies, depending on how often you do this type of work. To reduce your exposure to these<br />
chemicals: work in a well ventilated area, and work with approved safety equipment, such<br />
as those dust masks that are specially designed to filter out microscopic particles.(California<br />
Health & Safety Code § 25249.5, et seq.)<br />
Warning: The warnings, cautions, and instructions discussed in this instruction manual<br />
cannot cover all possible conditions and situations that may occur. It must be understood<br />
by the operator that common sense and caution are factors which cannot be<br />
built into this product, but must be supplied by the operator.<br />
Unpacking<br />
When unpacking, check to make sure the following parts are included: Cutout Tool, two<br />
Collets, and Collet Wrench . If any parts are missing or broken, please call <strong>Harbor</strong> <strong>Freight</strong><br />
<strong>Tools</strong> at the number on the cover of this manual as soon as possible.<br />
Operation<br />
The Cutout Tool is used to make clean (unique shape) cuts into drywall and thin woods,<br />
etc., doing minimum tearing of the material edges. Cutting Bits for this tool are not included.<br />
1. Loosen Stud Screw (23) enough to remove the Bracket (21) depth gauge from the<br />
Cutout Tool.<br />
2. Using the Collet Wrench (32), loosen the Collet Cap (20) while pressing in on the<br />
Spindle Lock Push Button.<br />
3. Insert the Cutting Bit (not supplied) into the Collet.<br />
If the Cutting Bit does not easily fit into the 1/8 inch Collet, remove the Collet Cap and<br />
pull out the existing Collet. Replace with the 1/4 inch Collet and screw in the Collet<br />
Cap again.<br />
Spindle Lock Push Button<br />
Motor (15) Spindle<br />
1/4” Collet (19)<br />
Collet Cap (20)<br />
1/8” Collet (19)<br />
REV 07j<br />
SKU 42831<br />
Page 4
4. Replace the depth gauge Bracket (21) and retighten Stud Screw (23).<br />
5. Mark the surface of the material to be cut.<br />
6. Adjust the depth gauge Bracket (21) by loosening Stud Screws (22), then adjusting the<br />
Bracket Head (33) in or out until the cutting bit protrudes out slightly over the thickness<br />
of the material being cut. Retighten Stud Screws.<br />
7. Plug the Cutout Tool Line Cord (28) into an electrical outlet.<br />
The Cutout Tool is ready to use.<br />
8. With one hand, grasp the Handle (2). Place the other hand on the Cutout Tool body.<br />
9. Using your thumb, press the sliding Switch (24) forward to turn ON.<br />
10. Drill a starter hole on the cut line.<br />
11. With the Bracket flush against the material, begin moving the Cutout Tool slowly along<br />
the cutout line.<br />
12. When the cut is complete, slide the Switch to the Off position.<br />
Caution: Do not set the Cutout Tool down until the Motor has stopped turning. Do not<br />
leave the tool plugged in when not in use. Do not leave the tool in the ON position when<br />
not in use.<br />
Direction of Feed: Feed work into a blade or cutter against the direction or rotation of<br />
the blade or cutter only.<br />
Caution: Before each use, check for damaged parts. Check for alignment of moving<br />
parts, and binding of moving parts. Always check for breakage of parts, mounting problems<br />
or any other condition that may affect a tool’s operation.<br />
.<br />
Maintenance<br />
1. Wipe the Cutout Tool with a clean cloth after every use.<br />
2. Periodically blow out the Motor vent holes with compressed air to prevent the buildup<br />
of dust and particles.<br />
3. Periodically wipe the Collets and Cutting Bits with a light oil to prevent rust.<br />
4. Over time, if the performance of the tool diminishes, or it stops working completely, it<br />
may be necessary to replace the Motor Carbon Brush Assembly (11).<br />
WARNING: For your safety, service and maintenance should be performed regularly<br />
by a qualified technician.<br />
REV 07j<br />
SKU 42831<br />
Page 5
Parts List<br />
Item #<br />
Descriptio<br />
n<br />
Qty<br />
1 Screw for Handle<br />
1<br />
2 Handle<br />
1<br />
3 Pin<br />
1<br />
4 Spring<br />
1<br />
5 Plate<br />
Washer<br />
1<br />
6 Spring<br />
Plate<br />
1<br />
7 Wire<br />
Connector<br />
2<br />
8 Inner<br />
Connection Plate<br />
2<br />
9 Torque<br />
Spring<br />
2<br />
10<br />
Carbon<br />
Brush Base<br />
1<br />
11<br />
Carbon<br />
Brush Assembl y 2<br />
12<br />
Stator<br />
1<br />
13<br />
Ball<br />
Bearing<br />
1<br />
14<br />
Stun<br />
Screw<br />
2<br />
15<br />
Motor<br />
1<br />
16<br />
Left<br />
Body<br />
1<br />
17<br />
Spring<br />
Plate<br />
1<br />
18<br />
Bearing<br />
1<br />
19<br />
Collet<br />
(1/8" and 1/4" )<br />
2<br />
20<br />
Collet<br />
Cap<br />
1<br />
21<br />
Bracke<br />
t<br />
1<br />
22<br />
Stud<br />
Screw (1)<br />
2<br />
23<br />
Stud<br />
Screw (2)<br />
1<br />
24<br />
Switch<br />
1<br />
25<br />
Wire<br />
Clamp<br />
1<br />
26<br />
Washer<br />
10<br />
27<br />
Stud<br />
Screw<br />
2<br />
28<br />
Line<br />
Cord<br />
1<br />
29<br />
Cable<br />
Holder<br />
1<br />
30<br />
Right<br />
Body<br />
1<br />
31<br />
Stud<br />
Screw<br />
8<br />
32<br />
Collet<br />
Wrench<br />
1<br />
33<br />
Bracket<br />
Head<br />
1<br />
NOTE: Some parts are listed and shown for illustration<br />
purposes only and are not available individually as replacement<br />
parts.<br />
SKU 42831<br />
Page 6
Assembly Drawing<br />
PLEASE READ THE FOLLOWING CAREFULLY<br />
THE MANUFACTURER AND/OR DISTRIBUTOR HAS PROVIDED THE PARTS DIAGRAM IN THIS<br />
MANUAL AS A REFERENCE <strong>TOOL</strong> ONLY. NEITHER THE MANUFACTURER NOR DISTRIBU-<br />
TOR MAKES ANY REPRESENTATION OR WARRANTY OF ANY KIND TO THE BUYER THAT HE<br />
OR SHE IS QUALIFIED TO MAKE ANY REPAIRS TO THE PRODUCT OR THAT HE OR SHE IS<br />
QUALIFIED TO REPLACE ANY PARTS OF THE PRODUCT. IN FACT, THE MANUFACTURER<br />
AND/OR DISTRIBUTOR EXPRESSLY STATES THAT ALL REPAIRS AND PARTS REPLACEMENTS<br />
SHOULD BE UNDERTAKEN BY CERTIFIED AND LICENSED TECHNICIANS AND NOT BY THE<br />
BUYER. THE BUYER ASSUMES ALL RISK AND LIABILITY ARISING OUT OF HIS OR HER<br />
REPAIRS TO THE ORIGINAL PRODUCT OR REPLACEMENT PARTS THERETO, OR ARISING<br />
OUT OF HIS OR HER INSTALLATION OF REPLACEMENT PARTS THERETO.<br />
SKU 42831<br />
Page 7
LIMITED 90 DAY WARRANTY<br />
<strong>Harbor</strong> <strong>Freight</strong> <strong>Tools</strong> Co. makes every effort to assure that its products meet high quality<br />
and durability standards, and warrants to the original purchaser that this product is free from<br />
defects in materials and workmanship for the period of 90 days from the date of purchase. This<br />
warranty does not apply to damage due directly or indirectly, to misuse, abuse, negligence or<br />
accidents, repairs or alterations outside our facilities, criminal activity, improper installation,<br />
normal wear and tear, or to lack of maintenance. We shall in no event be liable for death,<br />
injuries to persons or property, or for incidental, contingent, special or consequential damages<br />
arising from the use of our product. Some states do not allow the exclusion or limitation of<br />
incidental or consequential damages, so the above limitation of exclusion may not apply to<br />
you. THIS WARRANTY IS EXPRESSLY IN LIEU OF ALL OTHER WARRANTIES, EXPRESS<br />
OR IMPLIED, INCLUDING THE WARRANTIES OF MERCHANTABILITY AND FITNESS.<br />
To take advantage of this warranty, the product or part must be returned to us with<br />
transportation charges prepaid. Proof of purchase date and an explanation of the complaint<br />
must accompany the merchandise. If our inspection verifies the defect, we will either repair or<br />
replace the product at our election or we may elect to refund the purchase price if we cannot<br />
readily and quickly provide you with a replacement. We will return repaired products at our<br />
expense, but if we determine there is no defect, or that the defect resulted from causes not<br />
within the scope of our warranty, then you must bear the cost of returning the product.<br />
This warranty gives you specific legal rights and you may also have other rights which<br />
vary from state to state.<br />
3491 Mission Oaks Blvd. • PO Box 6009 • Camarillo, CA 93011 • (800) 444-3353<br />
REV 07j<br />
SKU 42831<br />
Page 8


