ElEctric trailEr jack - Harbor Freight Tools
ElEctric trailEr jack - Harbor Freight Tools
ElEctric trailEr jack - Harbor Freight Tools
Create successful ePaper yourself
Turn your PDF publications into a flip-book with our unique Google optimized e-Paper software.
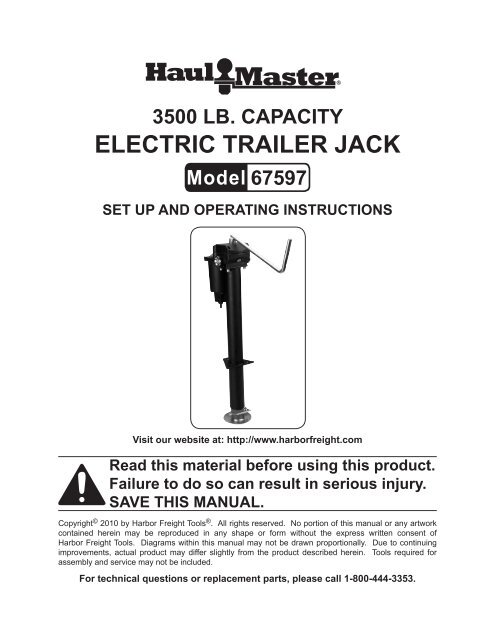
3500 lb. capacity<br />
Electric trailer <strong>jack</strong><br />
67597<br />
Set up and Operating Instructions<br />
Visit our website at: http://www.harborfreight.com<br />
Read this material before using this product.<br />
Failure to do so can result in serious injury.<br />
Save this manual.<br />
Copyright © 2010 by <strong>Harbor</strong> <strong>Freight</strong> <strong>Tools</strong> ® . All rights reserved. No portion of this manual or any artwork<br />
contained herein may be reproduced in any shape or form without the express written consent of<br />
<strong>Harbor</strong> <strong>Freight</strong> <strong>Tools</strong>. Diagrams within this manual may not be drawn proportionally. Due to continuing<br />
improvements, actual product may differ slightly from the product described herein. <strong>Tools</strong> required for<br />
assembly and service may not be included.<br />
For technical questions or replacement parts, please call 1-800-444-3353.
Save This Manual<br />
Keep this manual for the safety<br />
warnings and precautions, assembly,<br />
operating, inspection, maintenance and<br />
cleaning procedures. Write the product’s<br />
serial number in the back of the manual<br />
near the assembly diagram (or month<br />
and year of purchase if product has no<br />
number). Keep this manual and the<br />
receipt in a safe and dry place for future<br />
reference.<br />
Important SAFETY<br />
Information<br />
In this manual, on the labeling,<br />
and all other information<br />
provided with this product:<br />
This is the safety alert<br />
symbol. It is used to alert<br />
you to potential personal<br />
injury hazards. Obey all<br />
safety messages that<br />
follow this symbol to avoid<br />
possible injury or death.<br />
DANGER indicates<br />
a hazardous<br />
situation which, if not<br />
avoided, will result in death or<br />
serious injury.<br />
WARNING<br />
indicates a<br />
hazardous situation which, if<br />
not avoided, could result in<br />
death or serious injury.<br />
CAUTION, used<br />
with the safety<br />
alert symbol, indicates a<br />
hazardous situation which, if<br />
1.<br />
2.<br />
not avoided, could result in<br />
minor or moderate injury.<br />
NOTICE is used to<br />
address practices<br />
not related to personal injury.<br />
CAUTION, without<br />
the safety alert<br />
symbol, is used to address<br />
practices not related to<br />
personal injury.<br />
General Tool Safety Warnings<br />
WARNING Read all safety<br />
warnings and instructions.<br />
Failure to follow the warnings and<br />
instructions may result in serious<br />
injury.<br />
Save all warnings and<br />
instructions for future reference.<br />
The term ″tool″ in the warnings<br />
refers to your Electric Trailer Jack.<br />
Work area safety<br />
Keep work area clean and well<br />
lit. Cluttered or dark areas invite<br />
accidents.<br />
Personal safety<br />
a. Stay alert, watch what you are<br />
doing and use common sense<br />
when operating a tool. Do not use<br />
a tool while you are tired or under<br />
the influence of drugs, alcohol<br />
or medication. A moment of<br />
inattention while operating tools may<br />
result in serious personal injury.<br />
b. Use personal protective<br />
equipment. Always wear eye<br />
protection. Safety equipment such<br />
as non-skid safety shoes or a hard<br />
hat used for appropriate conditions<br />
will reduce personal injuries.<br />
SKU 67597<br />
For technical questions, please call 1-800-444-3353.<br />
Page 2
3.<br />
c. Do not overreach. Keep proper<br />
footing and balance at all times.<br />
This enables better control of the<br />
tool in unexpected situations.<br />
d. Dress properly. Do not wear<br />
loose clothing or jewelry. Keep<br />
your hair, clothing and gloves<br />
away from moving parts. Loose<br />
clothes, jewelry or long hair can be<br />
caught in moving parts.<br />
Tool use and care<br />
a. Do not force the tool. Do not<br />
attempt to lift more than the 3,500<br />
lb. maximum lifting capacity of<br />
this tool. The correct tool will do<br />
the job better and safer at the rate<br />
for which it was designed.<br />
1.<br />
2.<br />
3.<br />
4.<br />
5.<br />
identical replacement parts. This<br />
will ensure that the safety of the tool<br />
is maintained.<br />
Specific Safety Warnings<br />
Do not exceed 3500 Lb. capacity.<br />
Do not use Crank while power lift is in<br />
use.<br />
Use on flat, level, hard surface<br />
capable of supporting load.<br />
Wear ANSI-approved safety goggles<br />
during use.<br />
Prevent trailer wheels from moving by<br />
using wheel chocks while raising or<br />
lowering.<br />
4.<br />
b. Store idle tools out of reach of<br />
children and do not allow persons<br />
unfamiliar with the tool or these<br />
instructions to operate it. <strong>Tools</strong> are<br />
dangerous in the hands of untrained<br />
users.<br />
c. Maintain tools. Check for<br />
misalignment or binding of<br />
moving parts, breakage of parts<br />
and any other condition that may<br />
affect the tool’s operation. If<br />
damaged, have the tool repaired<br />
before use. Many accidents are<br />
caused by poorly maintained tools.<br />
d. Use the tool and accessories<br />
in accordance with these<br />
instructions, taking into account<br />
the working conditions and the<br />
work to be performed. Use of the<br />
tool for operations different from<br />
those intended could result in a<br />
hazardous situation.<br />
Service<br />
a. Have your tool serviced by a<br />
qualified repair person using only<br />
6.<br />
7.<br />
8.<br />
9.<br />
10.<br />
11.<br />
12.<br />
Before towing, fully raise trailer <strong>jack</strong><br />
and secure properly.<br />
Keep out from under <strong>jack</strong> and tongue<br />
when applying and releasing load,<br />
when <strong>jack</strong> is supporting load, or when<br />
moving trailer.<br />
Inspect before use. Do not use if<br />
parts are loose or damaged.<br />
Use in accordance with the<br />
Department of Transportation (DOT)<br />
regulations. Information about DOT<br />
regulations can be found at www.dot.<br />
gov/regulations.html<br />
Read manual before installation and/<br />
or use.<br />
Maintain labels and nameplates on<br />
the tool. These carry important safety<br />
information. If unreadable or missing,<br />
contact <strong>Harbor</strong> <strong>Freight</strong> <strong>Tools</strong> for a<br />
replacement.<br />
This product is not a toy. Keep it out<br />
of reach of children.<br />
SKU 67597<br />
For technical questions, please call 1-800-444-3353.<br />
Page 3
13.<br />
14.<br />
15.<br />
Not for aircraft purposes.<br />
Trailer Jack must always be retracted<br />
when towing the trailer.<br />
The warnings, precautions,<br />
and instructions discussed in<br />
this instruction manual cannot<br />
cover all possible conditions and<br />
situations that may occur. It must<br />
be understood by the operator that<br />
common sense and caution are<br />
factors which cannot be built into this<br />
product, but must be supplied by the<br />
operator.<br />
Save these<br />
instructions.<br />
Specifications<br />
Weight Capacity 3,500 lb.<br />
Motor<br />
Travel Length 17 3/4”<br />
12 VDC, 11.5 A<br />
LIft Range 8-1/2” - 26-1/4”<br />
Application<br />
Hardware (sold<br />
separately)<br />
For use with A-frame trailers<br />
3 bolts 3/8”D (grade 5 or better),<br />
3 lock nuts, 6 washers<br />
Unpacking<br />
When unpacking, make sure item<br />
is intact and undamaged. If parts are<br />
missing or broken, call <strong>Harbor</strong> <strong>Freight</strong><br />
<strong>Tools</strong> at 1-800-444-3353.<br />
Components<br />
SKU 67597<br />
For technical questions, please call 1-800-444-3353.<br />
Page 4
set up instructions<br />
Read the entire Important<br />
Safety Information<br />
section at the beginning of this<br />
manual including all text under<br />
subheadings therein before set<br />
up or use of this product.<br />
Insert Jack into trailer opening<br />
Note: For additional information regarding<br />
the parts listed in the following pages,<br />
refer to the Assembly Diagram near<br />
the end of this manual.<br />
1.<br />
2.<br />
Mounting<br />
This Electric Jack is designed to<br />
replace an existing manual-only<br />
trailer <strong>jack</strong>. Check that the Outer<br />
Tube (33) of the Electric Jack will fit<br />
into the existing <strong>jack</strong> location and<br />
that the Mounting Plate holes align<br />
with the bolt locations on your trailer.<br />
Modify the trailer as needed.<br />
Block the wheels and support the<br />
trailer A-Frame securely using <strong>jack</strong><br />
stands (sold separately).<br />
Remove the existing <strong>jack</strong>.<br />
Footpad<br />
(36)<br />
Figure 2<br />
Outer<br />
Tube (33)<br />
Lock<br />
Pin (35)<br />
Inner<br />
Tube (34)<br />
3. Remove the Lock Pin (35) and slide<br />
out the Footpad (36) from the Jack.<br />
4.<br />
5.<br />
6.<br />
Insert the bottom section of the Outer<br />
Tube (33) into the A-Frame <strong>jack</strong><br />
opening so that the Motor Housing is<br />
toward the front of the trailer and the<br />
Mounting Plate holes line up with the<br />
bolt holes in the trailer.<br />
To secure the Mounting Plate to<br />
the A-Frame, use nuts, bolts and<br />
washers (all sold separately) as listed<br />
under Hardware in the Specifications<br />
chart (previous page). The bolts<br />
need to be long enough to fit through<br />
the <strong>jack</strong> flange and the trailer, with<br />
enough room for two washers and<br />
the lock nut. Slide a washer onto<br />
each bolt then insert them from the<br />
top side and attach a flat washer and<br />
lock nut from the underside of the<br />
frame.<br />
Replace the Footpad and insert the<br />
Lock Pin.<br />
Wiring<br />
The Jack needs to be properly wired<br />
for use. Have a qualified technician<br />
SKU 67597<br />
For technical questions, please call 1-800-444-3353.<br />
Page 5
1.<br />
2.<br />
1.<br />
2.<br />
perform the wiring if you are not<br />
familiar with the following procedures.<br />
This <strong>jack</strong> is internally grounded. For<br />
added safety, connect the 10-gauge<br />
grounding wire (the shorter wire) to a<br />
good bare metal ground on the trailer.<br />
To wire the Jack to battery power:<br />
a. If wiring to the trailer battery, connect<br />
the positve wire (the longer wire) to<br />
the positive (+) battery terminal and<br />
include an ON/OFF switch in the<br />
wiring so you can turn off power to<br />
the unit.<br />
b. If wiring to the vehicle battery, route<br />
a 10-gauge wire (sold separately)<br />
from the positive (+) terminal of a<br />
12VDC battery to a location near<br />
the Jack. Attach the female side of<br />
a quick connect (sold separately)<br />
to the end of the wire and the male<br />
side to the positive Jack wire (the<br />
longer wire). Plug the quick connect<br />
sections together.<br />
Operating Instructions<br />
Read the entire Important<br />
Safety Information<br />
section at the beginning of this<br />
manual including all text under<br />
subheadings therein before set<br />
up or use of this product.<br />
Mount and dismount Trailer only on<br />
smooth, level surfaces.<br />
Block the trailer wheels to prevent the<br />
trailer from rolling.<br />
Footpad<br />
(36)<br />
Figure 4<br />
3. Remove the Lock Pin (35).<br />
4.<br />
Outer<br />
Tube (33)<br />
Lock<br />
Pin (35)<br />
Inner<br />
Tube (34)<br />
If using the Jack with electric<br />
power:<br />
a. If wired to the vehicle battery, plug<br />
the Jack wire into the quick connect.<br />
If wired to the trailer battery, turn on<br />
the ON/OFF switch.<br />
b. If needed, turn on the LED lights<br />
(26) using the Light Switch (15).<br />
Note: The LED lights will only work when<br />
the Jack wiring is powered.<br />
c. Check that the Switch Cover (6) is<br />
secured over the Power Switch (4).<br />
Figure 5<br />
Retrack<br />
Jack<br />
Release<br />
to<br />
Stop<br />
Front of<br />
Trailer<br />
Power<br />
Switch<br />
(4)<br />
Extend<br />
Jack<br />
d. To extend the Jack, which will raise<br />
the trailer, pull the Power Switch (4)<br />
away from the Jack.<br />
SKU 67597<br />
For technical questions, please call 1-800-444-3353.<br />
Page 6
e. To retract the Jack, which will lower<br />
the trailer, push the Power Switch<br />
toward the Jack.<br />
f.<br />
To stop the Jack, release the Power<br />
Switch.<br />
Insert<br />
Lock<br />
Pin<br />
here<br />
Outer<br />
Tube (33)<br />
CAUTION: Release the Power Switch<br />
when the motor slows, or switches<br />
off, to prevent damage to the motor.<br />
Wait 15 seconds for the motor to<br />
reset before operating the Jack<br />
again.<br />
5.<br />
If using the Jack manually:<br />
a. Disconnect power to the Jack.<br />
Inner<br />
Tube<br />
(34)<br />
Footpad<br />
(36)<br />
Lock<br />
Pin (35)<br />
Figure 7<br />
6. Adjust the level of the Jack so that<br />
the hole in the Inner Tube (34) lines<br />
up with one of the Footpad holes.<br />
b. Remove the Cap (22) on the top of<br />
the Jack to access the Drive Collar<br />
(12).<br />
c. Insert the Crank (30) onto the Drive<br />
Collar.<br />
d. Rotate the Crank clockwise to retract<br />
the Jack, lowering the trailer, and<br />
counterclockwise to extend the Jack,<br />
raising the trailer.<br />
7.<br />
8.<br />
Insert the Lock Pin through the holes.<br />
When finished raising or lowering the<br />
trailer:<br />
a. If using with electric power,<br />
disconnect power to the Jack.<br />
b. If using the Jack manually, remove<br />
the Crank and replace the Cap.<br />
Store the Crank in a safe place for<br />
future use.<br />
SKU 67597<br />
For technical questions, please call 1-800-444-3353.<br />
Page 7
Maintenance And<br />
Servicing<br />
Lubricating Gears<br />
Procedures not specifically<br />
explained in this manual<br />
must be performed only by a<br />
qualified technician.<br />
To prevent<br />
serious injury<br />
from tool failure:<br />
Do not use damaged<br />
equipment. If abnormal noise<br />
or vibration occurs, have the<br />
problem corrected before<br />
further use.<br />
Cleaning and Maintenance<br />
1. BEFORE EACH USE, inspect the<br />
general condition of the Jack. Check<br />
for loose hardware, misalignment or<br />
binding of moving parts, cracked or<br />
broken parts, and any other condition<br />
that may affect its safe operation.<br />
a. Unthread the four Screws (3) on the<br />
top of the Housing Cover (21) and<br />
remove the Housing Cover.<br />
b. If needed repack gears with lithium<br />
based machine grease.<br />
c. Replace the Housing Cover and<br />
secure the screws in place.<br />
Lubricating Jack Screw and Nut<br />
2. After Use, wipe external surfaces<br />
of the tool with a clean cloth.<br />
Lubrication<br />
Annually lubricate the Gears, Jack<br />
Screw and Nut.<br />
Prepare the Jack as follows:<br />
a. Support the weight of the trailer so<br />
the Jack is not providing support.<br />
b. Fully extend the Footpad so the<br />
Lock Pin is in the fourth hole from<br />
the bottom of the Footpad.<br />
c. Adjust the Jack so that the foot pad<br />
is 2” off the ground.<br />
a. Unthread the four Socket Head Bolts<br />
(43) on the Outer Tube (33) with a<br />
1/4” hex wrench (sold separately).<br />
b. Pull the motor head away from the<br />
Outer Tube.<br />
c. Clean and regrease the Jack Screw<br />
(37) and Drive Collar (12) with<br />
lithium based grease.<br />
d. Reassemble and tighten the pieces<br />
together.<br />
SKU 67597<br />
For technical questions, please call 1-800-444-3353.<br />
Page 8
Wiring Diagram<br />
SKU 67597<br />
For technical questions, please call 1-800-444-3353.<br />
Page 9
PLEASE READ THE FOLLOWING CAREFULLY<br />
The manufacturer and/or distributor has provided the parts list and assembly diagram<br />
in this manual as a reference tool only. Neither the manufacturer or distributor makes<br />
any representation or warranty of any kind to the buyer that he or she is qualified<br />
to make any repairs to the product, or that he or she is qualified to replace any parts<br />
of the product. In fact, the manufacturer and/or distributor expressly states that<br />
all repairs and parts replacements should be undertaken by certified and licensed<br />
technicians, and not by the buyer. The buyer assumes all risk and liability arising out of<br />
his or her repairs to the original product or replacement parts thereto, or arising out<br />
of his or her installation of replacement parts thereto.<br />
Parts List<br />
Part Description Qty<br />
1 Motor 1<br />
2 Motor Housing 1<br />
3 Screw #8-32 x 1/2” 8<br />
4 Power Switch 1<br />
5 Switch Housing 1<br />
6 Switch Cover 1<br />
7 Screw #5-40 x 3/8” 4<br />
8 Bolt 3/8 -16 x 1 2<br />
9 Circuit Breaker 1<br />
10 Grommet 1<br />
11 Pin 2<br />
12 Drive Collar 1<br />
13 Washer 1<br />
14 Bearing 1<br />
15 Light Switch 1<br />
16 Bushing 5/8ID x 7/8OD 1<br />
17 Washer 1<br />
18 Pin 1<br />
19 Lock Washer 1<br />
20 Socket Head Screw 1/4 x 5/8 1<br />
21 Housing Cover 1<br />
Part Description Qty<br />
22 Cap 1<br />
23 Main Gear Drive 1<br />
24 Pinion Gear 1<br />
25 Pinion Key 1<br />
26 LED Light 2<br />
27 Spur Gear 1<br />
28 Main Gear Housing 1<br />
29 Bushing 3/8ID x 1/2OD 1<br />
30 Crank 1<br />
33 Outer Tube 1<br />
34 Inner Tube 1<br />
35 Lock Pin 2-1/2” 1<br />
36 Footpad 1<br />
37 Jack Screw 1<br />
38 Nut 1<br />
39 Washer 13/16” 8<br />
40 Pin-Cotter 2<br />
41 Nut Cost 1<br />
42 Lock Washer 5/16” 4<br />
43 Socket Head Bolt 5/16” x 1” 4<br />
SKU 67597<br />
For technical questions, please call 1-800-444-3353.<br />
Page 10
ASSEMBLY DIAGRAM<br />
Record Product’s Serial Number Here:<br />
Note: If product has no serial number, record month and year of purchase instead.<br />
Note: Some parts are listed and shown for illustration purposes only, and are not<br />
available individually as replacement parts.<br />
SKU 67597<br />
For technical questions, please call 1-800-444-3353.<br />
Page 11
LIMITED 90 DAY WARRANTY<br />
<strong>Harbor</strong> <strong>Freight</strong> <strong>Tools</strong> Co. makes every effort to assure that its products meet high<br />
quality and durability standards, and warrants to the original purchaser that this product<br />
is free from defects in materials and workmanship for the period of 90 days from the<br />
date of purchase. This warranty does not apply to damage due directly or indirectly,<br />
to misuse, abuse, negligence or accidents, repairs or alterations outside our facilities,<br />
criminal activity, improper installation, normal wear and tear, or to lack of maintenance.<br />
We shall in no event be liable for death, injuries to persons or property, or for incidental,<br />
contingent, special or consequential damages arising from the use of our product.<br />
Some states do not allow the exclusion or limitation of incidental or consequential<br />
damages, so the above limitation of exclusion may not apply to you. This warranty<br />
is expressly in lieu of all other warranties, express or implied,<br />
including the warranties of merchantability and fitness.<br />
To take advantage of this warranty, the product or part must be returned to us<br />
with transportation charges prepaid. Proof of purchase date and an explanation of the<br />
complaint must accompany the merchandise. If our inspection verifies the defect, we<br />
will either repair or replace the product at our election or we may elect to refund the<br />
purchase price if we cannot readily and quickly provide you with a replacement. We will<br />
return repaired products at our expense, but if we determine there is no defect, or that<br />
the defect resulted from causes not within the scope of our warranty, then you must<br />
bear the cost of returning the product.<br />
This warranty gives you specific legal rights and you may also have other rights<br />
which vary from state to state.<br />
3491 Mission Oaks Blvd. • PO Box 6009 • Camarillo, CA 93011 • (800) 444-3353<br />
SKU 67597<br />
For technical questions, please call 1-800-444-3353.<br />
Page 12


