42" long reach air scraper - Harbor Freight Tools
42" long reach air scraper - Harbor Freight Tools
42" long reach air scraper - Harbor Freight Tools
Create successful ePaper yourself
Turn your PDF publications into a flip-book with our unique Google optimized e-Paper software.
Owner’s Manual & Safety Instructions<br />
Save This Manual Keep this manual for the safety warnings and precautions, assembly, operating,<br />
inspection, maintenance and cleaning procedures. Write the product’s serial number in the back of the manual<br />
near the assembly diagram (or month and year of purchase if product has no number). Keep this manual and<br />
the receipt in a safe and dry place for future reference.<br />
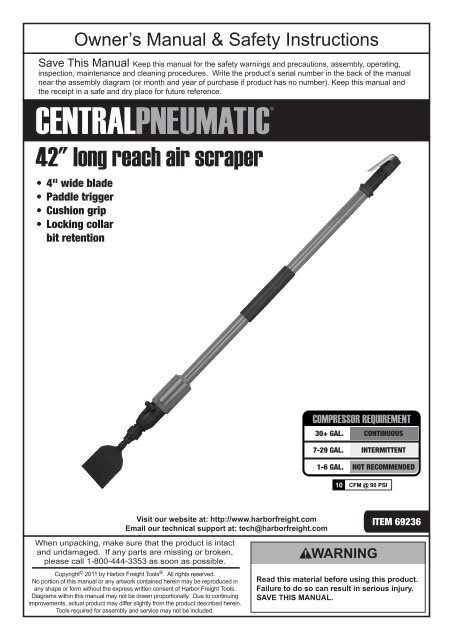
42" <strong>long</strong> <strong>reach</strong> <strong>air</strong> <strong>scraper</strong><br />
• 4" wide blade<br />
• Paddle trigger<br />
• Cushion grip<br />
• Locking collar<br />
bit retention<br />
COMPRESSOR REQUIREMENT<br />
30+ GAL.<br />
CONTINUOUS<br />
7-29 GAL.<br />
1-6 GAL.<br />
10<br />
INTERMITTENT<br />
NOT RECOMMENDED<br />
CFM @ 90 PSI<br />
Visit our website at: http://www.harborfreight.com<br />
Email our technical support at: tech@harborfreight.com<br />
ITEM 69236<br />
When unpacking, make sure that the product is intact<br />
and undamaged. If any parts are missing or broken,<br />
please call 1-800-444-3353 as soon as possible.<br />
Copyright © 2011 by <strong>Harbor</strong> <strong>Freight</strong> <strong>Tools</strong> ® . All rights reserved.<br />
No portion of this manual or any artwork contained herein may be reproduced in<br />
any shape or form without the express written consent of <strong>Harbor</strong> <strong>Freight</strong> <strong>Tools</strong>.<br />
Diagrams within this manual may not be drawn proportionally. Due to continuing<br />
improvements, actual product may differ slightly from the product described herein.<br />
<strong>Tools</strong> required for assembly and service may not be included.<br />
Read this material before using this product.<br />
Failure to do so can result in serious injury.<br />
SAVE THIS MANUAL.
Table of Contents<br />
SAFETY SETUP<br />
OPERATION MAINTENANCE<br />
Safety.......................................................... 2<br />
Setup........................................................... 6<br />
Specifications.............................................. 6<br />
Operation.................................................... 10<br />
WARNING SYMBOLS AND DEFINITIONS<br />
Maintenance............................................... 12<br />
Parts List and Diagram............................... 14<br />
Warranty..................................................... 16<br />
This is the safety alert symbol. It is used to alert you to potential personal injury hazards.<br />
Obey all safety messages that follow this symbol to avoid possible injury or death.<br />
Indicates a hazardous situation which, if not avoided,<br />
will result in death or serious injury.<br />
Indicates a hazardous situation which, if not avoided,<br />
could result in death or serious injury.<br />
Indicates a hazardous situation which, if not avoided,<br />
could result in minor or moderate injury.<br />
Addresses practices not related to personal injury.<br />
IMPORTANT SAFETY INSTRUCTIONS<br />
INSTRUCTIONS PERTAINING TO A RISK OF FIRE,<br />
ELECTRIC SHOCK, OR INJURY TO PERSONS<br />
WARNING – When using tools, basic precautions should always be followed, including the following:<br />
General<br />
To reduce the risks of electric shock,<br />
fire, and injury to persons, read all the<br />
instructions before using the tool.<br />
Work Area<br />
1. Keep the work area clean and well lighted.<br />
Cluttered benches and dark areas increase the<br />
risks of electric shock, fire, and injury to persons.<br />
2. Do not operate the tool in explosive atmospheres,<br />
such as in the presence of flammable liquids,<br />
gases, or dust. The tool is able to create sparks<br />
resulting in the ignition of the dust or fumes.<br />
3. Keep bystanders, children, and visitors away<br />
while operating the tool. Distractions are able<br />
to result in the loss of control of the tool.<br />
Page 2 For technical questions, please call 1-800-444-3353. Item 69236
Personal Safety<br />
1. Stay alert. Watch what you are doing and<br />
use common sense when operating the tool.<br />
Do not use the tool while tired or under the<br />
influence of drugs, alcohol, or medication.<br />
A moment of inattention while operating the<br />
tool increases the risk of injury to persons.<br />
2. Dress properly. Do not wear loose<br />
clothing or jewelry. Contain <strong>long</strong> h<strong>air</strong>.<br />
Keep h<strong>air</strong>, clothing, and gloves away from<br />
moving parts. Loose clothes, jewelry, or <strong>long</strong><br />
h<strong>air</strong> increases the risk of injury to persons as<br />
a result of being caught in moving parts.<br />
3. Avoid unintentional starting. Be sure the switch<br />
is off before connecting to the <strong>air</strong> supply.<br />
Do not carry the tool with your finger on the switch or<br />
connect the tool to the <strong>air</strong> supply with the switch on.<br />
Tool Use and Care<br />
1. Do not force the tool. Use the correct tool for the<br />
application. The correct tool will do the job better<br />
and safer at the rate for which the tool is designed.<br />
2. Do not use the tool if the Throttle Lever<br />
(7) does not turn the tool on or off. Any<br />
tool that cannot be controlled with the switch<br />
is dangerous and must be rep<strong>air</strong>ed.<br />
3. Disconnect the tool from the <strong>air</strong> source<br />
before making any adjustments, changing<br />
accessories, or storing the tool. Such preventive<br />
safety measures reduce the risk of starting the<br />
tool unintentionally. Turn off and detach the <strong>air</strong><br />
supply, safely discharge any residual <strong>air</strong> pressure,<br />
and release the throttle and/or turn the switch to<br />
its off position before leaving the work area.<br />
Service<br />
1. Tool service must be performed only<br />
by qualified rep<strong>air</strong> personnel.<br />
2. When servicing a tool, use only identical<br />
replacement parts. Use only authorized parts.<br />
4. Do not over<strong>reach</strong>.<br />
Keep proper footing and balance at all times.<br />
Proper footing and balance enables better<br />
control of the tool in unexpected situations.<br />
5. Use safety equipment. A dust mask,<br />
non-skid safety shoes and a hard hat<br />
must be used for the applicable<br />
conditions. Wear heavy-duty work<br />
gloves during use.<br />
6. Always wear eye protection.<br />
Wear ANSI-approved safety goggles.<br />
7. Always wear hearing protection<br />
when using the tool.<br />
Pro<strong>long</strong>ed exposure to high intensity<br />
noise is able to cause hearing loss..<br />
4. Store the tool when it is idle out of <strong>reach</strong><br />
of children and other untrained persons.<br />
A tool is dangerous in the hands of untrained users.<br />
5. Maintain the tool with care. Keep a cutting<br />
tool sharp and clean. A properly maintained<br />
tool, with sharp cutting edges reduces the<br />
risk of binding and is easier to control.<br />
6. Check for misalignment or binding of moving<br />
parts, breakage of parts, and any other condition<br />
that affects the tool's operation. If damaged,<br />
have the tool serviced before using. Many accidents<br />
are caused by poorly maintained tools.<br />
There is a risk of bursting if the tool is damaged.<br />
7. Use only accessories that are identified by the<br />
manufacturer for the specific tool model. Use of<br />
an accessory not intended for use with the specific<br />
tool model, increases the risk of injury to persons.<br />
3. Use only the lubricants supplied with the<br />
tool or specified by the manufacturer.<br />
SAFETY<br />
MAINTENANCE OPERATION<br />
SETUP<br />
Item 69236<br />
For technical questions, please call 1-800-444-3353.<br />
Page 3
SAFETY SETUP<br />
OPERATION MAINTENANCE<br />
Air Source<br />
1. Never connect to an <strong>air</strong> source that is<br />
capable of exceeding 200 psi.<br />
Over pressurizing the tool may cause<br />
bursting, abnormal operation, breakage<br />
of the tool or serious injury to persons.<br />
Use only clean, dry, regulated compressed <strong>air</strong> at the<br />
rated pressure or within the rated pressure range as<br />
marked on the tool. Always verify prior to using the<br />
tool that the <strong>air</strong> source has been adjusted to the rated<br />
<strong>air</strong> pressure or within the rated <strong>air</strong>-pressure range.<br />
2. Never use oxygen, carbon dioxide, combustible<br />
gases or any bottled gas as an <strong>air</strong> source<br />
for the tool. Such gases are capable of<br />
explosion and serious injury to persons.<br />
SAVE THESE INSTRUCTIONS.<br />
Symbols and Specific Safety Instructions<br />
Symbol Definitions<br />
Symbol<br />
n o<br />
.../min<br />
PSI<br />
ft-lb<br />
BPM<br />
CFM<br />
SCFM<br />
Property or statement<br />
No-load speed<br />
Revolutions or reciprocation per minute<br />
Pounds per square inch of pressure<br />
Foot-pounds of torque<br />
Blows per minute<br />
Cubic Feet per Minute flow<br />
Cubic Feet per Minute flow<br />
at standard conditions<br />
Symbol<br />
NPT<br />
NPS<br />
Property or statement<br />
National pipe thread, tapered<br />
National pipe thread, straight<br />
WARNING marking<br />
concerning Risk of Eye Injury.<br />
Wear ANSI‐approved eye protection.<br />
WARNING marking concerning Risk of<br />
Hearing Loss. Wear hearing protection.<br />
WARNING marking concerning<br />
Risk of Respiratory Injury. Wear<br />
NIOSH‐approved dust mask/respirator.<br />
WARNING marking concerning<br />
Risk of Explosion.<br />
Page 4 For technical questions, please call 1-800-444-3353. Item 69236
Specific Safety Instructions<br />
1. Verify flooring has concrete or another hard,<br />
smooth surface underneath. Wood will likely<br />
be damaged from Scraper operation.<br />
2. Do not operate Scraper without the Chisel (26)<br />
contacting the flooring. The Scraper will not operate<br />
unless pressed firmly against the workpiece.<br />
3. Check tightness of the Hex Head Screw (25) during<br />
regular use. The Screw may loosen during operation.<br />
4. The warnings and precautions discussed in this<br />
manual cannot cover all possible conditions and<br />
situations that may occur. It must be understood<br />
by the operator that common sense and caution<br />
are factors which cannot be built into this<br />
product, but must be supplied by the operator.<br />
5. Only use with accessories rated to handle the<br />
forces exerted by this tool during operation.<br />
Other accessories not designed for the forces<br />
generated may break and forcefully launch pieces.<br />
6. Attach all accessories properly to the tool before<br />
connecting the <strong>air</strong> supply. A loose accessory<br />
may detach or break during operation.<br />
7. Obey the manual for the <strong>air</strong> compressor<br />
used to power this tool.<br />
Vibration Precautions<br />
This tool vibrates during use. Repeated or <strong>long</strong>-term<br />
exposure to vibration may cause temporary or permanent<br />
physical injury, particularly to the hands, arms and<br />
shoulders. To reduce the risk of vibration-related injury:<br />
1. Anyone using vibrating tools regularly or for an<br />
extended period should first be examined by a<br />
doctor and then have regular medical check-ups to<br />
ensure medical problems are not being caused or<br />
worsened from use. Pregnant women or people who<br />
have imp<strong>air</strong>ed blood circulation to the hand, past<br />
hand injuries, nervous system disorders, diabetes,<br />
or Raynaud's Disease should not use this tool.<br />
If you feel any symptoms related to vibration (such<br />
as tingling, numbness, and white or blue fingers),<br />
seek medical advice as soon as possible.<br />
8. WARNING: Some dust created by power<br />
sanding, sawing, grinding, drilling, and other<br />
construction activities, contains chemicals<br />
known [to the State of California] to cause<br />
cancer, birth defects or other reproductive harm.<br />
Some examples of these chemicals are:<br />
• Lead from lead-based paints<br />
• Crystalline silica from bricks and cement or<br />
other masonry products<br />
• Arsenic and chromium from<br />
chemically treated lumber<br />
Your risk from these exposures varies, depending<br />
on how often you do this type of work. To reduce<br />
your exposure to these chemicals: work in a well<br />
ventilated area, and work with approved safety<br />
equipment, such as those dust masks that are<br />
specially designed to filter out microscopic particles.<br />
(California Health & Safety Code § 25249.5, et seq.)<br />
WARNING: The brass components of<br />
this product contain lead, a chemical<br />
known to the State of California to cause<br />
birth defects (or other reproductive harm).<br />
(California Health & Safety code § 25249.5, et seq.)<br />
9. Install an in-line shutoff valve to allow<br />
immediate control over the <strong>air</strong> supply in an<br />
emergency, even if a hose is ruptured.<br />
10. Use this tool with both hands only. Using tools<br />
with only one hand can result in loss of control.<br />
11. Do not lay the tool down until it has come to<br />
a complete stop. Moving parts can grab the<br />
surface and pull the tool out of your control.<br />
2. Do not smoke during use. Nicotine reduces<br />
the blood supply to the hands and fingers,<br />
increasing the risk of vibration-related injury.<br />
3. Wear suitable gloves to reduce the<br />
vibration effects on the user.<br />
4. Use tools with the lowest vibration<br />
when there is a choice.<br />
5. Include vibration-free periods each day of work.<br />
6. Grip tool as lightly as possible (while still keeping<br />
safe control of it). Let the tool do the work.<br />
7. To reduce vibration, maintain<br />
tool as explained in this manual.<br />
If abnormal vibration occurs, stop immediately.<br />
SAVE THESE INSTRUCTIONS.<br />
SAFETY<br />
MAINTENANCE OPERATION<br />
SETUP<br />
Item 69236<br />
For technical questions, please call 1-800-444-3353.<br />
Page 5
Functional Description<br />
Specifications<br />
SAFETY SETUP<br />
OPERATION MAINTENANCE<br />
Operating Air Pressure<br />
Air Inlet<br />
90 PSI<br />
Blows Per Minute 2100<br />
Average Air Consumption<br />
Chisel Shank<br />
1/4″ -18 NPT<br />
10 CFM @ 90 PSI<br />
(Continuous Duty)<br />
15mm<br />
Page 6 For technical questions, please call 1-800-444-3353. Item 69236
Initial Tool Set Up/Assembly<br />
Read the ENTIRE IMPORTANT SAFETY INFORMATION section at the beginning of this<br />
manual including all text under subheadings therein before set up or use of this product.<br />
Note: For additional information regarding the parts listed in the following pages,<br />
refer to the Assembly Diagram near the end of this manual.<br />
Note: This <strong>air</strong> tool may be shipped with a protective plug covering the <strong>air</strong> inlet. Remove this plug before set up.<br />
Air Supply<br />
SAFETY<br />
TO PREVENT SERIOUS INJURY FROM EXPLOSION:<br />
Use only clean, dry, regulated, compressed <strong>air</strong> to power this tool.<br />
Do not use oxygen, carbon dioxide, combustible gases,<br />
or any other bottled gas as a power source for this tool.<br />
1. Incorporate a filter, regulator with pressure gauge,<br />
oiler, in-line shutoff valve, and quick coupler for<br />
best service, as shown on Figure A on page 8<br />
and Figure B on page 9. An in-line shutoff<br />
ball valve is an important safety device because<br />
it controls the <strong>air</strong> supply even if the <strong>air</strong> hose<br />
is ruptured. The shutoff valve should be a<br />
ball valve because it can be closed quickly.<br />
Note: If an automatic oiler system is not used,<br />
add a few drops of Pneumatic Tool Oil to the<br />
<strong>air</strong>line connection before operation. Add a few<br />
more drops after each hour of continual use.<br />
2. Attach an <strong>air</strong> hose to the compressor's <strong>air</strong> outlet.<br />
Connect the <strong>air</strong> hose to the <strong>air</strong> inlet of the tool.<br />
Other components, such as a coupler plug<br />
and quick coupler, will make operation<br />
more efficient, but are not required.<br />
WARNING! TO PREVENT SERIOUS INJURY<br />
FROM ACCIDENTAL OPERATION:<br />
Do not install a female quick coupler on the tool.<br />
Such a coupler contains an <strong>air</strong> valve that will<br />
allow the <strong>air</strong> tool to retain pressure and operate<br />
accidentally after the <strong>air</strong> supply is disconnected.<br />
Note: Air flow, and therefore tool performance, can<br />
be hindered by undersized <strong>air</strong> supply components.<br />
The <strong>air</strong> hose must be <strong>long</strong> enough to <strong>reach</strong><br />
the work area with enough extra length to<br />
allow free movement while working.<br />
3. Turn the tool's throttle or switch to the off position;<br />
refer to Operation section for description of controls.<br />
4. Close the in-line shutoff valve between<br />
the compressor and the tool.<br />
5. Turn on the <strong>air</strong> compressor according to<br />
the manufacturer's directions and allow it<br />
to build up pressure until it cycles off.<br />
6. Adjust the <strong>air</strong> compressor's output regulator<br />
so that the <strong>air</strong> output is enough to properly<br />
power the tool, but the output will not exceed<br />
the tool's maximum <strong>air</strong> pressure at any time.<br />
Adjust the pressure gradually, while checking the<br />
<strong>air</strong> output gauge to set the right pressure range.<br />
7. Inspect the <strong>air</strong> connections for leaks.<br />
Rep<strong>air</strong> any leaks found.<br />
8. If the tool will not be used at this time, turn off<br />
and detach the <strong>air</strong> supply, safely discharge<br />
any residual <strong>air</strong> pressure, and release<br />
the throttle and/or turn the switch to its off<br />
position to prevent accidental operation.<br />
Note: Residual <strong>air</strong> pressure should not be present<br />
after the tool is disconnected from the <strong>air</strong> supply.<br />
However, it is a good safety measure to attempt to<br />
discharge the tool in a safe fashion after disconnecting<br />
to ensure that the tool is disconnected and not powered.<br />
MAINTENANCE OPERATION<br />
SETUP<br />
Item 69236<br />
For technical questions, please call 1-800-444-3353.<br />
Page 7
SAFETY SETUP<br />
OPERATION MAINTENANCE<br />
Lubricated<br />
<strong>Tools</strong><br />
Figure A: Portable Air Supply Setup<br />
B<br />
C<br />
D A<br />
E<br />
F<br />
A<br />
Non-lubricated<br />
<strong>Tools</strong><br />
B<br />
G<br />
C<br />
A<br />
E H<br />
Description Function<br />
A Air Hose Connects <strong>air</strong> to tool<br />
B Filter Prevents dirt and condensation from damaging tool or work piece<br />
C Regulator Adjusts <strong>air</strong> pressure to tool<br />
D Lubricator (optional) For <strong>air</strong> tool lubrication<br />
E Coupler and Plug Provides quick connection and release<br />
F Leader Hose (optional) Increases coupler life<br />
G Air Cleaner / Dryer (optional) Prevents water vapor from damaging work piece<br />
H Air Adjusting Valve (optional) For fine tuning <strong>air</strong>flow at tool<br />
Page 8 For technical questions, please call 1-800-444-3353. Item 69236
Figure B: Stationary Air Supply Setup<br />
Slope<br />
C D<br />
E<br />
G<br />
Lubricated<br />
<strong>Tools</strong><br />
C<br />
J<br />
K H<br />
L<br />
M<br />
I<br />
B B<br />
A A<br />
F<br />
F<br />
C<br />
I<br />
Non-lubricated<br />
<strong>Tools</strong><br />
N<br />
J<br />
H<br />
L O<br />
Description Function<br />
A Vibration Pads For noise and vibration reduction<br />
B Anchor Bolts Secures <strong>air</strong> compressor in place<br />
C Ball Valve Isolates sections of system for maintenance<br />
D Isolation Hose For vibration reduction<br />
E Main Air Line - 3/4″ minimum recommended Distributes <strong>air</strong> to branch lines<br />
F Ball Valve To drain moisture from system<br />
G Branch Air Line -1/2″ minimum recommended Brings <strong>air</strong> to point of use<br />
H Air Hose Connects <strong>air</strong> to tool<br />
I Filter Prevents dirt and condensation from damaging tool or work piece<br />
J Regulator Adjusts <strong>air</strong> pressure to tool<br />
K Lubricator (optional) For <strong>air</strong> tool lubrication<br />
L Coupler and Plug Provides quick connection and release<br />
M Leader Hose (optional) Increases coupler life<br />
N Air Cleaner / Dryer (optional) Prevents water vapor from damaging work piece<br />
O Air Adjusting Valve (optional) For fine tuning <strong>air</strong>flow at tool<br />
MAINTENANCE OPERATION<br />
SETUP<br />
SAFETY<br />
F<br />
Item 69236<br />
For technical questions, please call 1-800-444-3353.<br />
Page 9
Operating Instructions<br />
Read the ENTIRE IMPORTANT SAFETY INFORMATION section at the beginning of this<br />
manual including all text under subheadings therein before set up or use of this product.<br />
SAFETY SETUP<br />
OPERATION MAINTENANCE<br />
Inspect tool before use, looking for damaged, loose, and missing parts.<br />
If any problems are found, do not use tool until rep<strong>air</strong>ed.<br />
Tool Set Up: Chisel Installation<br />
TO PREVENT SERIOUS INJURY FROM ACCIDENTAL OPERATION:<br />
Turn off the tool, detach the <strong>air</strong> supply, safely discharge any residual <strong>air</strong> pressure<br />
in the tool, and release the throttle and/or turn the switch to its off position before<br />
performing any inspection, maintenance, or cleaning procedures.<br />
TO PREVENT SERIOUS INJURY:<br />
Do not adjust or tamper with any control or component in a way not specifically explained within this manual.<br />
Improper adjustment can result in tool failure or other serious hazards.<br />
TO PREVENT INJURY:<br />
Wear heavy-duty work gloves during Chisel installation.<br />
1. Place the <strong>air</strong> intake end of the tool on a<br />
clean surface on the floor. This will prevent<br />
debris from entering into the <strong>air</strong> intake.<br />
2. Pull down on Collar (24), making sure to keep the<br />
open end of Retaining Ring (25) between your thumb<br />
and index finger to prevent pinching.<br />
3. Position end of the Chisel (26) into Chisel Holder (19)<br />
and rotate Chisel until it slides in. See Figure A.<br />
Figure A<br />
Chisel (26)<br />
Chisel Holder (19)<br />
Collar (24)<br />
4. Release the Collar to lock Chisel in place.<br />
Page 10 For technical questions, please call 1-800-444-3353. Item 69236
Work Piece and Work Area Set Up<br />
1. Identify the area you intend to scrape.<br />
Clear the floor of loose objects. Use care when<br />
operating Air Scraper near baseboards.<br />
2. The work area must be well‐lit.<br />
The work area must not allow access by children<br />
or pets to prevent distraction and injury.<br />
3. Route the <strong>air</strong> hose a<strong>long</strong> a safe route to <strong>reach</strong><br />
the work area without creating a tripping hazard<br />
or exposing the <strong>air</strong> hose to possible damage.<br />
The <strong>air</strong> hose must be <strong>long</strong> enough to <strong>reach</strong><br />
the work area with enough extra length to<br />
allow free movement while working.<br />
4. There must not be hazardous objects<br />
(such as utility lines or foreign objects) nearby<br />
that will present a hazard while working.<br />
SAFETY<br />
General Operating Instructions<br />
1. If an automatic oiler is not used, add a<br />
few drops of Pneumatic Tool Oil to <strong>air</strong>line<br />
connection before use. Add a few drops<br />
more after each hour of continual use.<br />
2. Hold the Handle (11) and Housing (14).<br />
NOTE: If the flooring is made of sectioned tile or<br />
linoleum, place the Chisel’s edge at the edge of the tile.<br />
NOTE: Either side of Chisel tip can do the cutting.<br />
3. Apply forward pressure on the Air Scraper<br />
while holding it at approximately 45°- 60° angle.<br />
This will help dig into the flooring. See Figure B.<br />
Throttle Lever (9)<br />
Housing<br />
(14)<br />
Figure B<br />
Flooring<br />
Handle<br />
(11)<br />
Chisel (26)<br />
4. Press Throttle Lever (9) to begin scraping.<br />
Keep pressure on Air Scraper.<br />
5. Push the Air Scraper forward against<br />
the material being scraped off.<br />
NOTE: Push down on the Scraper’s handle.<br />
Simply guiding the Scraper will not work.<br />
NOTE: When scraping linoleum floors and the flooring<br />
comes apart in large sections, stop scraping. Clear and<br />
remove debris and use a utility knife (sold separately)<br />
to cut and remove the lifted sections together.<br />
6. If the tool requires more force to accomplish the task,<br />
verify that the tool receives sufficient, unobstructed<br />
<strong>air</strong>flow (SCFM) and increase the pressure (PSI)<br />
output of the regulator up to the maximum <strong>air</strong><br />
pressure rating of this tool.<br />
CAUTION! TO PREVENT TOOL AND ACCESSORY<br />
FAILURE, RESULTING IN INJURY: Do not exceed<br />
the tool’s maximum <strong>air</strong> pressure rating.<br />
If the tool still does not have sufficient force<br />
at maximum pressure and sufficient <strong>air</strong>flow,<br />
then a larger tool may be required.<br />
7. When leaving the work area, turn off the <strong>air</strong><br />
supply valve, disconnect Air Scraper from the <strong>air</strong><br />
supply, and press the Throttle Lever to discharge<br />
any trapped <strong>air</strong> in the tool and <strong>air</strong> supply line,<br />
then release the Throttle Lever. Lay the tool<br />
down on the floor or lean it against a wall corner<br />
with the chisel edge resting on the floor.<br />
MAINTENANCE OPERATION<br />
SETUP<br />
Item 69236<br />
For technical questions, please call 1-800-444-3353.<br />
Page 11
User‐Maintenance Instructions<br />
Procedures not specifically explained in this manual must<br />
be performed only by a qualified technician.<br />
SAFETY SETUP<br />
OPERATION MAINTENANCE<br />
TO PREVENT SERIOUS INJURY FROM ACCIDENTAL OPERATION:<br />
Turn off the tool, detach the <strong>air</strong> supply, safely discharge any residual <strong>air</strong> pressure<br />
in the tool, and release the throttle and/or turn the switch to its off position before<br />
performing any inspection, maintenance, or cleaning procedures.<br />
TO PREVENT SERIOUS INJURY FROM TOOL FAILURE:<br />
Do not use damaged equipment. If abnormal noise, vibration,<br />
or leaking <strong>air</strong> occurs, have the problem corrected before further use.<br />
TO PREVENT SEROUS INJURY FROM EXPLOSION:<br />
Lubricate the tool only with specified lubricants.<br />
Lubricate the <strong>air</strong> inlet using only pneumatic tool oil.<br />
Other lubricants may damage the mechanism and may be highly flammable, causing an explosion.<br />
Cleaning, Maintenance, and Lubrication<br />
Note: These procedures are in addition to the regular checks and maintenance<br />
explained as part of the regular operation of the <strong>air</strong>-operated tool.<br />
1. Daily - Air Supply Maintenance:<br />
Every day, maintain the <strong>air</strong> supply according<br />
to the component manufacturers’ instructions.<br />
Maintain the lubricator’s oil level.<br />
Drain the moisture filter regularly.<br />
Performing routine <strong>air</strong> supply maintenance<br />
will allow the tool to operate more safely<br />
and will also reduce wear on the tool.<br />
2. Routinely check Chisel blade and replace if cracked.<br />
DO NOT USE DAMAGED CHISEL.<br />
Small nicks can be filed off instead.<br />
3. Periodic replacing or sharpening of the Chisel<br />
is recommended for peak performance.<br />
Page 12 For technical questions, please call 1-800-444-3353. Item 69236
Troubleshooting<br />
Problem Possible Causes Likely Solutions<br />
Decreased output. 1. Not enough <strong>air</strong> pressure and/<br />
or <strong>air</strong> flow.<br />
1. Check for loose connections and make sure that<br />
<strong>air</strong> supply is providing enough <strong>air</strong> flow (CFM)<br />
at required pressure (PSI) to the tool's <strong>air</strong> inlet.<br />
Do not exceed maximum <strong>air</strong> pressure.<br />
Housing heats<br />
during use.<br />
Severe <strong>air</strong> leakage.<br />
(Slight <strong>air</strong> leakage<br />
is normal,<br />
especially on<br />
older tools.)<br />
2. Incorrect lubrication or<br />
not enough lubrication.<br />
3. Blocked <strong>air</strong> inlet screen<br />
(if equipped).<br />
4. Air leaking from loose housing.<br />
5. Mechanism contaminated.<br />
6. Damaged hose or connection.<br />
1. Incorrect lubrication or<br />
not enough lubrication.<br />
2. Worn parts.<br />
1. Cross‐threaded housing<br />
components.<br />
2. Loose housing.<br />
3. Damaged valve or housing.<br />
4. Dirty, worn or damaged valve.<br />
2. Lubricate using <strong>air</strong> tool oil and grease<br />
according to directions.<br />
3. Clean <strong>air</strong> inlet screen of buildup.<br />
4. Make sure housing is properly assembled and tight.<br />
5. Have qualified technician<br />
clean and lubricate mechanism. Install in-line filter<br />
in <strong>air</strong> supply as stated in Setup: Air Supply.<br />
6. Replace all damaged components.<br />
1. Lubricate using <strong>air</strong> tool oil and grease<br />
according to directions.<br />
2. Have qualified technician inspect internal<br />
mechanism and replace parts as needed.<br />
1. Check for incorrect alignment and uneven gaps.<br />
If cross-threaded, disassemble and<br />
replace damaged parts before use.<br />
2. Tighten housing assembly. If housing cannot tighten<br />
properly, internal parts may be misaligned.<br />
3. Replace damaged components.<br />
4. Clean or replace valve assembly.<br />
Follow all safety precautions whenever diagnosing or servicing the tool.<br />
Disconnect <strong>air</strong> supply before service.<br />
SAFETY<br />
MAINTENANCE OPERATION<br />
SETUP<br />
Item 69236<br />
For technical questions, please call 1-800-444-3353.<br />
Page 13
Parts List and Diagram<br />
PLEASE READ THE FOLLOWING CAREFULLY<br />
SAFETY SETUP<br />
OPERATION MAINTENANCE<br />
THE MANUFACTURER AND/OR DISTRIBUTOR HAS PROVIDED THE PARTS LIST AND ASSEMBLY DIAGRAM<br />
IN THIS MANUAL AS A REFERENCE TOOL ONLY. NEITHER THE MANUFACTURER OR DISTRIBUTOR<br />
MAKES ANY REPRESENTATION OR WARRANTY OF ANY KIND TO THE BUYER THAT HE OR SHE IS<br />
QUALIFIED TO MAKE ANY REPAIRS TO THE PRODUCT, OR THAT HE OR SHE IS QUALIFIED TO REPLACE<br />
ANY PARTS OF THE PRODUCT. IN FACT, THE MANUFACTURER AND/OR DISTRIBUTOR EXPRESSLY<br />
STATES THAT ALL REPAIRS AND PARTS REPLACEMENTS SHOULD BE UNDERTAKEN BY CERTIFIED AND<br />
LICENSED TECHNICIANS, AND NOT BY THE BUYER. THE BUYER ASSUMES ALL RISK AND LIABILITY<br />
ARISING OUT OF HIS OR HER REPAIRS TO THE ORIGINAL PRODUCT OR REPLACEMENT PARTS<br />
THERETO, OR ARISING OUT OF HIS OR HER INSTALLATION OF REPLACEMENT PARTS THERETO.<br />
Parts List<br />
Part Description Qty<br />
1 Connector 1<br />
2 Handle cover 1<br />
3 Valve 1<br />
4 O-ring 1<br />
5 Spring 1<br />
6 O-ring 1<br />
7 Nut 1<br />
8 Rivet 1<br />
9 Throttle Lever 1<br />
10 Connecting pipe 1<br />
11 Handle 1<br />
11-1 Sleeve 1<br />
11-2 Connection assembly 1<br />
12 Nut 1<br />
13 Ring 1<br />
14 Housing 1<br />
Record Product's Serial Number Here:<br />
Note: If product has no serial number, record month and year of purchase instead.<br />
Note: Some parts are listed and shown for illustration purposes only, and<br />
are not available individually as replacement parts.<br />
Part Description Qty<br />
14-1 Gasket 1<br />
14-2 Air Tube 1<br />
14-3 Tube valve 1<br />
15 Piston 1<br />
16 O-ring 1<br />
17 Cylinder 1<br />
18 O-ring 1<br />
19 Chisel Holder 1<br />
20 Gasket 1<br />
21 Screw 1<br />
22 Retaining Ball 2<br />
23 Spring 1<br />
24 Collar 1<br />
25 Retaining Ring 1<br />
26 4 IN. Chisel 1<br />
Page 14 For technical questions, please call 1-800-444-3353. Item 69236
Assembly Diagram<br />
MAINTENANCE OPERATION<br />
SETUP<br />
SAFETY<br />
Item 69236<br />
For technical questions, please call 1-800-444-3353.<br />
Page 15
90 Day Warranty<br />
<strong>Harbor</strong> <strong>Freight</strong> <strong>Tools</strong> Co. makes every effort to assure that its products meet high quality and durability standards,<br />
and warrants to the original purchaser that this product is free from defects in materials and workmanship for the<br />
period of 90 days from the date of purchase. This warranty does not apply to damage due directly or indirectly,<br />
to misuse, abuse, negligence or accidents, rep<strong>air</strong>s or alterations outside our facilities, criminal activity, improper<br />
installation, normal wear and tear, or to lack of maintenance. We shall in no event be liable for death, injuries<br />
to persons or property, or for incidental, contingent, special or consequential damages arising from the use of<br />
our product. Some states do not allow the exclusion or limitation of incidental or consequential damages, so the<br />
above limitation of exclusion may not apply to you. THIS WARRANTY IS EXPRESSLY IN LIEU OF ALL OTHER<br />
WARRANTIES, EXPRESS OR IMPLIED, INCLUDING THE WARRANTIES OF MERCHANTABILITY AND FITNESS.<br />
To take advantage of this warranty, the product or part must be returned to us with transportation charges<br />
prepaid. Proof of purchase date and an explanation of the complaint must accompany the merchandise.<br />
If our inspection verifies the defect, we will either rep<strong>air</strong> or replace the product at our election or we may<br />
elect to refund the purchase price if we cannot readily and quickly provide you with a replacement. We will<br />
return rep<strong>air</strong>ed products at our expense, but if we determine there is no defect, or that the defect resulted<br />
from causes not within the scope of our warranty, then you must bear the cost of returning the product.<br />
This warranty gives you specific legal rights and you may also have other rights which vary from state to state.<br />
3491 Mission Oaks Blvd. • PO Box 6009 • Camarillo, CA 93011 • (800) 444-3353


