Orbitrek Elite Instruction Manual - Thane
Orbitrek Elite Instruction Manual - Thane
Orbitrek Elite Instruction Manual - Thane

Create successful ePaper yourself
Turn your PDF publications into a flip-book with our unique Google optimized e-Paper software.
Owner’s <strong>Manual</strong><br />
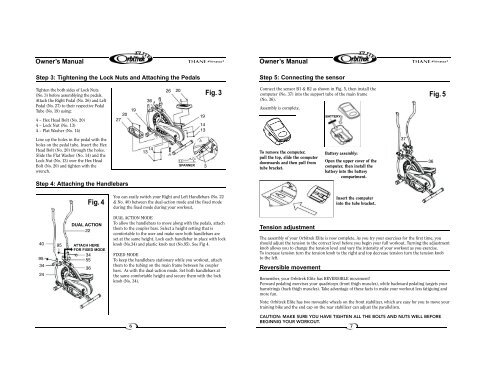
Step 3: Tightening the Lock Nuts and Attaching the Pedals<br />
Owner’s <strong>Manual</strong><br />
Step 5: Connecting the sensor<br />
Tighten the both sides of Lock Nuts<br />
(No. 3) before assemblying the pedals.<br />
Attach the Right Pedal (No. 26) and Left<br />
Pedal (No. 27) to their respective Pedal<br />
Tube (No. 19) using:<br />
4 – Hex Head Bolt (No. 20)<br />
4 – Lock Nut (No. 13)<br />
4 – Flat Washer (No. 14)<br />
20<br />
27<br />
19<br />
36<br />
26<br />
20<br />
19<br />
14<br />
13<br />
Fig. 3<br />
Connect the sensor B1 & B2 as shown in Fig. 5, then install the<br />
computer (No. 37) into the support tube of the main frame<br />
(No. 36).<br />
Assembly is complete.<br />
BATTERY<br />
Fig. 5<br />
Line up the holes in the pedal with the<br />
holes on the pedal tube. Insert the Hex<br />
Head Bolt (No. 20) through the holes.<br />
Slide the Flat Washer (No. 14) and the<br />
Lock Nut (No. 13) over the Hex Head<br />
Bolt (No. 20) and tighten with the<br />
w rench.<br />
Step 4: Attaching the Handlebars<br />
14<br />
13<br />
SPANNER<br />
3<br />
To remove the computer,<br />
pull the top, slide the computer<br />
downwards and then pull from<br />
tube bracket.<br />
Battery assembly:<br />
Open the upper cover of the<br />
computer, then install the<br />
battery into the battery<br />
compartment.<br />
37<br />
36<br />
Fig. 4<br />
DUAL ACTION<br />
22<br />
40 95 ATTACH HERE<br />
FOR FIXED MODE<br />
95<br />
34<br />
34<br />
55<br />
36<br />
24<br />
You can easily switch your Right and Left Handlebars (No. 22<br />
& No. 40) between the dual-action mode and the fixed mode<br />
during the fixed mode during your workout.<br />
DUAL ACTION MODE<br />
To allow the handlebars to move along with the pedals, attach<br />
them to the coupler bars. Select a height setting that is<br />
comfortable to the user and make sure both handlebars are<br />
set at the same height. Lock each handlebar in place with lock<br />
knob (No.34) and plastic knob nut (No.95). See Fig 4.<br />
FIXED MODE<br />
To keep the handlebars stationary while you workout, attach<br />
them to the tubing on the main frame between he coupler<br />
bars. As with the dual-action mode. Set both handlebars at<br />
the same comfortable height and secure them with the lock<br />
knob (No. 34).<br />
6<br />
Tension adjustment<br />
The assembly of your <strong>Orbitrek</strong> <strong>Elite</strong> is now complete. As you try your exercises for the first time, you<br />
should adjust the tension to the correct level before you begin your full workout. Turning the adjustment<br />
knob allows you to change the tension level and vary the intensity of your workout as you exercise.<br />
To increase tension turn the tension knob to the right and top decrease tension turn the tension knob<br />
to the left.<br />
Reversible movement<br />
Insert the computer<br />
into the tube bracket.<br />
Remember, your <strong>Orbitrek</strong> <strong>Elite</strong> has REVERSIBLE movement!<br />
Forward pedaling exercises your quadriceps (front thigh muscles), while backward pedaling targets your<br />
hamstrings (back thigh muscles). Take advantage of these facts to make your workout less fatiguing and<br />
more fun.<br />
Note: <strong>Orbitrek</strong> <strong>Elite</strong> has two moveable wheels on the front stabilizer, which are easy for you to move your<br />
training bike and the end cap on the rear stabilizer can adjust the parallelism.<br />
CAUTION: MAKE SURE YOU HAVE TIGHTEN ALL THE BOLTS AND NUTS WELL BEFORE<br />
BEGINNIG YOUR WORKOUT.<br />
7