TL-WR720N_V1_QIG_7106503893 - TP-Link
TL-WR720N_V1_QIG_7106503893 - TP-Link
TL-WR720N_V1_QIG_7106503893 - TP-Link

You also want an ePaper? Increase the reach of your titles
YUMPU automatically turns print PDFs into web optimized ePapers that Google loves.
150Mbps Wireless N Router<br />
MODEL NO. <strong>TL</strong>-WR740N/<strong>TL</strong>-WR741ND<br />
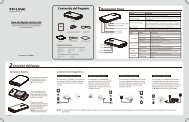
Package Contents<br />
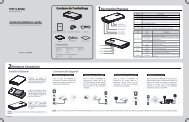
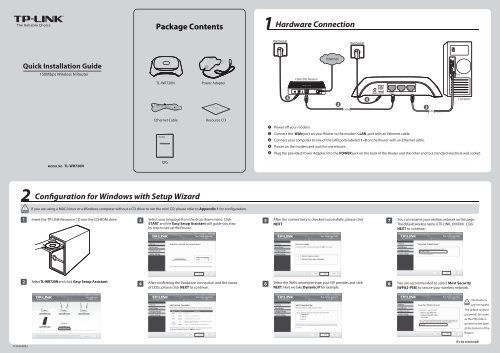
1 Hardware Connection<br />
Wall Socket<br />
Wall Socket<br />
Quick Installation Guide<br />
Internet<br />
150Mbps Wireless N Router<br />
<strong>TL</strong>-<strong>WR720N</strong><br />
Power Adapter<br />
Cable/DSL Modem<br />
4<br />
2<br />
WPS/<br />
RESET POWER WAN 1 2<br />
5<br />
Computer<br />
3<br />
Ethernet Cable<br />
Resource CD<br />
1<br />
Power off your modem.<br />
2<br />
Connect the WAN port on your Router to the modem’s LAN port with an Ethernet cable.<br />
3<br />
Connect your computer to one of the LAN ports labeled 1~2 on the Router with an Ethernet cable.<br />
4<br />
Power on the modem and wait for one minute .<br />
5<br />
Plug the provided Power Adapter into the POWER jack on the back of the Router and the other end to a standard electrical wall socket.<br />
MODEL NO. <strong>TL</strong>-<strong>WR720N</strong><br />
<strong>QIG</strong><br />
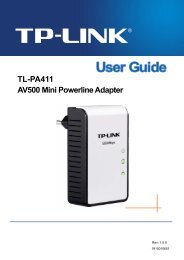
2 Configuration for Windows with Setup Wizard<br />
If you are using a MAC/Linux or a Windows computer without a CD drive to run the mini CD, please refer to Appendix 1 for configuration.<br />
1 Insert the <strong>TP</strong>-LINK Resource CD into the CD-ROM drive.<br />
3 Select your language from the drop-down menu. Click<br />
START and the Easy Setup Assistant will guide you step<br />
by step to set up the Router.<br />
5 After the connectivity is checked successfully, please click<br />
NEXT.<br />
7 You can rename your wireless network on this page.<br />
The default wireless name is <strong>TP</strong>-LINK_XXXXXX. Click<br />
NEXT to continue.<br />
2 Select <strong>TL</strong>-<strong>WR720N</strong> and click Easy Setup Assistant.<br />
4 After confirming the hardware connection and the status<br />
of LEDs, please click NEXT to continue.<br />
6 Select the WAN connection type your ISP provides and click<br />
NEXT. Here we take Dynamic IP for example.<br />
8 You are recommended to select Most Security<br />
(WPA2-PSK) to secure your wireless network.<br />
The Router is<br />
pre-encrypted.<br />
The default wireless<br />
password, the same<br />
as the PIN code, is<br />
printed on the label<br />
at the bottom of the<br />
Router.<br />
<strong>7106503893</strong><br />
(To be continued)
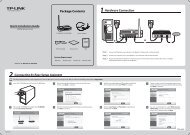
2 Configuration for Windows with Setup Wizard (continued)<br />
9<br />
After confirming the configurations, click NEXT to continue. 11 Click FINISH to close the wizard.<br />
Appendix 1: Configuring the Router via Web Management Page<br />
(for Mac OS X/Linux users or Windows users who can’t run the mini CD)<br />
1<br />
Open your browser and type http://tplinklogin.net in the address<br />
field, then use the user name admin and password admin to log in.<br />
4<br />
The Dynamic IP is the suitable connection type for most cases. Here we<br />
take it as an example. On the next page, you can rename your wireless network<br />
and create your own password on this page. The default wireless name is<br />
<strong>TP</strong>-LINK_XXXXXX, and the default wireless password, the same as the PIN code, is<br />
printed on the bottom label. Click Next to continue.<br />
You can save these settings in a text file on your<br />
desktop. If you forget the Network Security Key, you<br />
can check the Router Settings.txt.<br />
You can click WEB management interface for more<br />
advanced settings.<br />
2<br />
Click Quick Setup in the main menu and click Next.<br />
10 After the configuration is completed successfully, please<br />
click NEXT.<br />
12 The basic settings for your Router are completed. You<br />
can go to http://www.tp-link.com to verify the<br />
Internet connection.<br />
3<br />
Select the WAN connection type provided by your ISP.<br />
Or you can select Auto-Detect and click Next to continue.<br />
5<br />
Click Reboot or Finish to make your settings take effect.<br />
Appendix 2: Troubleshooting<br />
1. What can I do if I cannot access the Internet?<br />
1) Check to verify all connections are connected properly.<br />
Try with different Ethernet cables to ensure they are<br />
working properly.<br />
2) Check to see if you are able to access the Router’s web<br />
management page. If not, please refer to “What can I<br />
do if I cannot open the web management window?”.<br />
3) Please log in the web management page<br />
(http://tplinklogin.net), click the menu “Network ><br />
WAN”, and ensure that the WAN Connection Type is<br />
Dynamic IP; this is the suitable connection type for most<br />
DSL/Cable modems and other networks.<br />
4) For cable modem users, please click menu “Network ><br />
MAC Clone”. Click Clone MAC Address button and<br />
then click Save. Reboot the modem first and then the<br />
Router, try to access the Internet from your computer. If<br />
the problem persists, please go to the next step.<br />
5) Connect your computer directly to your modem and<br />
attempt to access the Internet. If you are still unable to<br />
access the Internet, please contact your internet<br />
provider for further assistance.<br />
2. What can I do if I cannot open the web management<br />
window?<br />
1) For Windows 7/Vista<br />
Go to ‘Start > Settings > Control Panel’. Click ‘View<br />
network status and tasks > View status > Properties’<br />
and double-click ‘Internet Protocol Version 4<br />
(TCP/IPv4)’. Select ‘Obtain an IP address automatically’,<br />
choose ‘Obtain DNS server address automatically’ and<br />
click ‘OK’.<br />
2) For Windows XP/2000<br />
Go to ‘Start > Control Panel’. Click ‘Network and<br />
Internet Connections > Network Connections’.<br />
Right-click ‘Local Area Connection’, select ‘Properties’<br />
and then double-click ‘Internet Protocol (TCP/IP)’. Select<br />
‘Obtain an IP address automatically’, choose ‘Obtain<br />
DNS server address automatically’ and click ‘OK’.<br />
3. What can I do if I forget my password?<br />
1) For default wireless password:<br />
Please refer to the “Wireless Password/PIN” labeled<br />
on the bottom of the Router.<br />
2) For the web management page password:<br />
Reset the Router first and then use the default user<br />
name and password: admin, admin.<br />
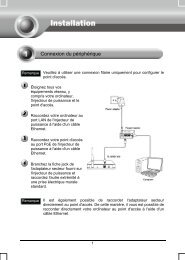
4. How do I restore my Router’s configuration<br />
to its factory default settings?<br />
If your router does not work properly, you can reset it and then<br />
configure it again. With the Router powered on, press and hold<br />
the WPS/RESET button on the rear panel for approximately 8<br />
seconds before releasing it.<br />
WPS/ WPS/<br />
RESET POWER WAN 1 2<br />
RESET POWER WAN 1 2<br />
Technical Support<br />
For more troubleshooting help, go to<br />
www.tp-link.com/support/faq.asp<br />
To download the latest Firmware, Driver, Utility and User Guide, go to<br />
www.tp-link.com/support/download.asp<br />
For all other technical support, please contact us by using the following details:<br />
Global<br />
Tel: +86 755 26504400<br />
E-mail : support@tp-link.com<br />
Service time: 24hrs, 7days a week<br />
Singapore<br />
Tel: +65 62840493<br />
E-mail: support.sg@tp-link.com<br />
Service time: 24hrs, 7days a week<br />
UK<br />
Tel: +44 (0) 845 147 0017<br />
E-mail: support.uk@tp-link.com<br />
Service time: 24hrs, 7days a week<br />
USA/Canada<br />
Toll Free: +1 866 225 8139<br />
E-mail: support.usa@tp-link.com<br />
Service time: 24hrs,7days a week<br />
Malaysia<br />
Tel: 1300 88 875465 (1300 88<strong>TP</strong>LINK)<br />
E-mail: support.my@tp-link.com<br />
Service time: 24 hrs a day,<br />
7days a week<br />
Turkey<br />
Tel: 444 19 25Turkish Service<br />
E-mail: support.tr@tp-link.com<br />
Service time: 9:00 AM to 6:00 PM,<br />
7days a week<br />
Poland<br />
Tel: +48 (0) 801 080 618 / +48 22<br />
7217563 (if calls from mobile phone)<br />
E-mail: support.pl@tp-link.com<br />
Service time: Monday to Friday 9:00 AM<br />
to 5:00 PM. GMT+1 or GMT+2<br />
(Daylight Saving Time)<br />
Germany / Austria<br />
Tel :+49 1805 875465 (German Service)<br />
+49 1805 <strong>TP</strong>LINK<br />
E-mail: support.de@tp-link.com<br />
Fee: 0.14 EUR/min from the German<br />
fixed phone network and up to 0.42<br />
EUR/min from mobile phone<br />
Service Time: Monday to Friday 9:00 AM<br />
to 6:00 PM. GMT+1 or GMT+2<br />
(Daylight Saving Time in Germany)<br />
* Except bank holidays in Hesse<br />
Australia & New Zealand<br />
Tel: AU 1300 87 5465<br />
NZ 0800 87 5465<br />
E-mail: support@tp-link.com.au<br />
Service time: 24hrs, 7 days a week<br />
Italy<br />
Tel: +39 02 66987799<br />
E-mail: support.it@tp-link.com<br />
Service time: 9:00 AM to 6:00 PM,<br />
from Monday to Friday<br />
Ukrainian<br />
Tel: +380 (44) 590-51-14<br />
E-mail: support.ua@tp-link.com<br />
Service time: Monday to Friday<br />
14:00 PM to 22:00 PM<br />
Brazilian<br />
Toll Free: 0800-770-4337<br />
(PortugueseService)<br />
E-mail: suporte.br@tp-link.com<br />
Service time: Monday to Saturday<br />
08:00 AM to 08:00 PM<br />
Indonesia<br />
Tel: (+62) 021 6259 135<br />
E-mail : support.id@tp-link.com<br />
Service time : Monday to Friday<br />
9:00 -12:00; 13:00 -18:00<br />
*Except public holidays<br />
Switzerland<br />
Tel: +41 (0) 848 800998 (German Service)<br />
E-mail: support.ch@tp-link.com<br />
Fee: 4-8 Rp/min, depending on rate of<br />
different time<br />
Service time: Monday to Friday 9:00 AM to<br />
6:00 PM. GMT+ 1 or GMT+ 2<br />
(Daylight Saving Time)<br />
Russian Federation<br />
Tel: 8 (499) 754-55-60<br />
8 (800) 250-55-60<br />
(toll-free call from any RF region)<br />
E-mail: support.ru@tp-link.com<br />
Service time: from 10:00 to 18:00<br />
(Moscow time)<br />
*Except weekends and holidays in<br />
Russian Federation<br />
<strong>TP</strong>-LINK TECHNOLOGIES CO., LTD.<br />
www.tp-link.com