RYOBI 3302HA Quick Setup Guide
RYOBI 3302HA Quick Setup Guide
RYOBI 3302HA Quick Setup Guide

Create successful ePaper yourself
Turn your PDF publications into a flip-book with our unique Google optimized e-Paper software.
C<br />
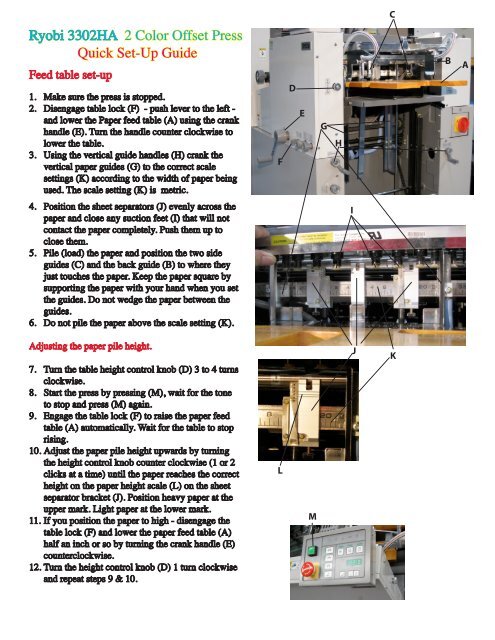
Ryobi <strong>3302HA</strong> 2 Color Offset Press<br />
<strong>Quick</strong> Set-Up <strong>Guide</strong><br />
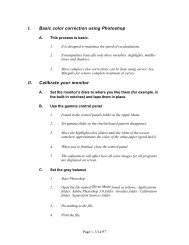
Feed table set-up<br />
1. Make sure the press is stopped.<br />
2. Disengage table lock (F) - push lever to the left -<br />
and lower the Paper feed table (A) using the crank<br />
handle (E). Turn the handle counter clockwise to<br />
lower the table.<br />
3. Using the vertical guide handles (H) crank the<br />
vertical paper guides (G) to the correct scale<br />
settings (K) according to the width of paper being<br />
used. The scale setting (K) is metric.<br />
F<br />
D<br />
E<br />
G<br />
H<br />
B<br />
A<br />
4.<br />
5.<br />
6.<br />
Position the sheet separators (J) evenly across the<br />
paper and close any suction feet (I) that will not<br />
contact the paper completely. Push them up to<br />
close them.<br />
Pile (load) the paper and position the two side<br />
guides (C) and the back guide (B) to where they<br />
just touches the paper. Keep the paper square by<br />
supporting the paper with your hand when you set<br />
the guides. Do not wedge the paper between the<br />
guides.<br />
Do not pile the paper above the scale setting (K).<br />
I<br />
Adjusting the paper pile height.<br />
7. Turn the table height control knob (D) 3 to 4 turns<br />
clockwise.<br />
8. Start the press by pressing (M), wait for the tone<br />
to stop and press (M) again.<br />
9. Engage the table lock (F) to raise the paper feed<br />
table (A) automatically. Wait for the table to stop<br />
rising.<br />
10. Adjust the paper pile height upwards by turning<br />
the height control knob counter clockwise (1 or 2<br />
clicks at a time) until the paper reaches the correct<br />
height on the paper height scale (L) on the sheet<br />
separator bracket (J). Position heavy paper at the<br />
upper mark. Light paper at the lower mark.<br />
11. If you position the paper to high - disengage the<br />
table lock (F) and lower the paper feed table (A)<br />
half an inch or so by turning the crank handle (E)<br />
counterclockwise.<br />
12. Turn the height control knob (D) 1 turn clockwise<br />
and repeat steps 9 & 10.<br />
L<br />
M<br />
J<br />
K
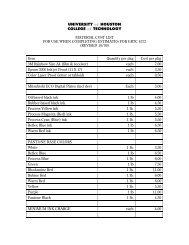
Completion of Feed table set-up<br />
and setting the <strong>Guide</strong>.<br />
A<br />
B<br />
C<br />
1.<br />
2.<br />
3.<br />
4.<br />
5.<br />
Loosen, back of and re-tighten the two fixing<br />
screws on the guide mechanism (G & H) and set<br />
the indicator on the push side guide adjustment<br />
dial (F) to zero.<br />
Start the press (A) and turn on the air (B).<br />
Adjust air control knob (D) until 5 or 6 sheets<br />
of paper are separated from the pile with the top<br />
sheet touching the copper sheet separator (I)<br />
located on the sheet separator bracket (J).<br />
Turn off the air (B).<br />
Turn the vacuum control knob (E)<br />
counterclockwise 3 or 4 turns.<br />
Press (C) - the air comes on automatically - and<br />
adjust the vacuum control knob (E) clockwise<br />
until one sheet of paper is picked up and drawn<br />
into the feeder board by the machine. The paper<br />
will stop before it enters the printing unit.<br />
D<br />
E<br />
You are now ready to set the guide.<br />
The push side guide aligns the paper laterally<br />
(registers the paper before it enters the press). The<br />
jogger guide pushes the paper against 2 springs.<br />
6.<br />
7.<br />
8.<br />
Support the paper with you hand. If the paper<br />
moves, remove it, start the press (A) and repeat<br />
step 5.<br />
Loosen the fixing screw on the guide bracket<br />
that has the two springs (H) and slide the<br />
bracket until the springs are approximately 1mm<br />
from the edge of the paper. Tighten bracket.<br />
Loosen the jogger guide fixing screw. Position<br />
the jogger guide (G) and re-tighten it 1mm<br />
from the edge of the paper. Turn the side guide<br />
adjustment dial (F) until the jogger guide (G)<br />
pushes the paper approximately 1mm into the<br />
springs.<br />
F<br />
G<br />
H<br />
I<br />
J<br />
BE AWARE THAT THE GUIDE MECHANISM<br />
CAN FUNCTION FROM THE OPERATION<br />
OR THE NON-OPERATION SIDE OF THE<br />
MACHINE.<br />
Congratulations. You have just set up the feed and<br />
the guide sections.<br />
Next.......the delivery section.
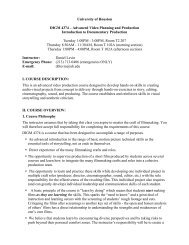
The Delivery Section.<br />
A<br />
B<br />
C<br />
D<br />
When the feed table and guide have been set:<br />
1.<br />
2.<br />
3.<br />
4.<br />
5.<br />
6.<br />
7.<br />
Start the press (A).<br />
Press (D) to deliver the paper from the feed<br />
board to the delivery section for set-up. The<br />
paper will hang from the grippers of the<br />
press in the delivery section.<br />
Loosen the knob (E) a quarter turn counterclockwise<br />
and set the delivery side guide<br />
(F) 2-3mm away from the side of the sheet of<br />
paper. Tighten knob (E).<br />
Engage the crawl on/off button (L). It will<br />
light up pink.<br />
Push the forward crawl button (M) and stop<br />
when the side jogger (J) and back guide (I)<br />
are closest to the paper.<br />
Loosen the knob (G) a quarter turn counterclockwise<br />
and move the side jogger (J) to<br />
lightly contact the paper. Tighten knob (G).<br />
Loosen and turn the back guide set knob<br />
(N) until the paper lightly contacts the front<br />
guide (H). Tighten knob (N).<br />
E<br />
F<br />
H<br />
I<br />
J<br />
G<br />
Check to make sure that the feed table, guide and<br />
delivery sections are set-up properly by feeding<br />
20/25 sheets of paper through the machine with<br />
no press stoppage. Adjust the air, vacuum and<br />
feed table height accordingly until there is an<br />
uninterrupted feed.<br />
K<br />
L<br />
M<br />
1. Start the press (A).<br />
2. Press (B) to activate the air.<br />
3. Press (C) to activate the vacuum.<br />
4. The paper will start to feed, register and<br />
deliver.<br />
To stop the paper feed:<br />
N<br />
1.<br />
2.<br />
3.<br />
Press (C) to turn off the vacuum.<br />
When all the paper has been delivered press<br />
(B) to turn off the air.<br />
Stop the press by pushing the crawl on/off<br />
button (L).<br />
USE THE EMERGENCY STOP<br />
BUTTON (C) ONLY IN AN<br />
EMERGENCY
Mounting the Plate<br />
A<br />
1. Punch the lead edge of the plate using the<br />
plate puncher (A). The image on the plate is<br />
usually closer to the lead edge of the plate.<br />
2. Bend the plate tail edge using the polyester<br />
plate bender (B).<br />
3. Press the plate load button (F). After the<br />
starting buzzer sounds press the plate load<br />
button (F) again. The press will start to crawl<br />
and stop automatically at the plate mounting<br />
position. The buzzer will sound again.<br />
4. When the buzzer STOPS open the safety<br />
cover and insert the plate into the positioning<br />
pins on the leading edge of the clamp (G).<br />
5. Support the plate.<br />
6. Press the plate load button (F). The leading<br />
edge clamp will snap closed.<br />
7. Close the safety cover and press the plate<br />
load button (F) again. The press will start to<br />
crawl and load the plate automatically. When<br />
the plate is mounted the buzzer will sound<br />
continuously.<br />
8. The set button (E) will be green if the plate<br />
mounts properly.<br />
9. Stop the buzzer by pressing the crawl on/off<br />
button (C).<br />
D E F<br />
C<br />
B<br />
Removing the Plate<br />
1.<br />
2.<br />
3.<br />
4.<br />
Press the plate remove button (D). After the<br />
buzzer sounds press the plate remove button<br />
(D) again. The press will start to crawl.<br />
When the press stops (there will be no<br />
buzzer) press the plate remove button (D)<br />
again and the press will crawl and stop<br />
automatically at the plate tail edge removing<br />
position.<br />
Open the safety cover and remove the tail<br />
edge of the plate from the clamp.<br />
Apply a very slight pulling pressure to the<br />
plate and press the plate remove button (D).<br />
The press will crawl in reverse enabling you<br />
to remove the plate. Keep applying the slight<br />
pulling pressure to make sure the plate does<br />
not get caught by the rollers in the press.<br />
G
Printing unit set-up.<br />
The dampening system:<br />
1.<br />
2.<br />
3.<br />
4.<br />
5.<br />
6.<br />
7.<br />
8.<br />
Wearing goggles and gloves, mix fountain<br />
solution to specifications 1 gallon at a time<br />
in a 1 gallon container. Pour the fountain<br />
solution into the container after you add the<br />
distilled water.<br />
Pour the mixed solution into the circulation<br />
tank until the level is about .5” from the<br />
bottom of the refrigeration coils.<br />
Check the conductivity and Ph.<br />
Turn on the circulation pump (B).<br />
When the temperature reads below 55ºF start<br />
circulating the solution through the press (A)<br />
Engage ink and dampening from rollers (D).<br />
Shift the metering roller (C) to the on<br />
position so that it contacts the water fountain<br />
roller.<br />
Set the Dampening Solution volume control<br />
dial (L) to 3.<br />
The Inking system:<br />
1. Turn on the printing unit(s) being used (J).<br />
2. Close the ink fountain(s) and add only<br />
enough ink that you think you will use.<br />
3. Open the ink keys (E) for each unit being<br />
used to 10 and set the ink fountain roller<br />
volume control (F) to 10. You will be<br />
adjusting these settings as needed (large<br />
numbers for more, smaller numbers for less)<br />
to achieve the correct ink density.<br />
4. Set the ink ductor button to manual (K).<br />
5. Start the press (G).<br />
6. Apply (duct) an even bead of ink to the<br />
rollers. Approximately 20 seconds.<br />
There is no hard and fast rule as to how much ink to<br />
apply (duct) to ensure that sufficient ink is placed on<br />
the rollers. If the ink looks matt and dull on the rollers,<br />
you probably need to add more. Printers listen<br />
for the ink to “sing” or “sizzle.” At any rate, keep in<br />
mind that it is easier to add ink than to remove it.<br />
7. When there is sufficient ink on the<br />
rollers press the automatic production<br />
button (I). Keep in mind that his action will<br />
switch the ink ductor button to automatic.<br />
8. When 5 or 6 sheets of paper have been<br />
delivered, press (H) to stop production.<br />
9. Wait for all the paper to be delivered before<br />
stopping the press (M).<br />
10. Examine the printed sheet and make any ink<br />
adjustments to obtain the proper density.<br />
C<br />
A<br />
D<br />
F E<br />
G<br />
H<br />
I<br />
J<br />
K<br />
L<br />
M<br />
B
Image Positioning<br />
If the image is positioned properly on the paper<br />
(it is centered and straight) and the ink is close<br />
to the required density you are ready to start the<br />
press run.<br />
1. Start the press (A).<br />
2. Press the automatic production button (B).<br />
3. Monitor ink density and promptly make any<br />
need adjustments. THE PRESS DOES NOT<br />
MAKE THE ADJUSTMENTS BY ITSELF.<br />
4. Keep pulling and checking sheets until (and<br />
after) the required density is achieved.<br />
B<br />
A<br />
C<br />
If the image in not properly positioned on the<br />
paper you need to position it properly (make it<br />
centered and/or straight). Make sure the press is<br />
stopped.<br />
To make a lateral image adjustment (to move the<br />
image closer to one side of the paper):<br />
1. Turn the plate cylinder micro adjustment<br />
dial (C). Use the schematic beside the dial<br />
to determine which way you need to turn<br />
it. Turning the adjustment dial by one scale<br />
moves the image .1mm (.004”).<br />
To make a vertical image adjustment (to move<br />
the image up or down on the paper):<br />
1. Push and hold the clutch (E) down.<br />
2. Push and hold the vertical image adjustment<br />
dial (D) in.<br />
3. Release the clutch (E).<br />
Use the schematic beside the dial to determine<br />
which way you need to turn it. Turning the<br />
adjustment dial one scale moves the image<br />
.25mm (.0098”).<br />
To make a diagonal image adjustment (the image<br />
is crooked on the paper):<br />
1. Press the automatic plate tension/release<br />
button (F). It’s the middle button. When<br />
the buzzer stops, press (F) again. The<br />
press will release the plate tension and<br />
stop automatically at the diagonal image<br />
adjustment knob (G) turning position.<br />
2. Open the safety cover and pull the dial (G)<br />
towards you to move the operation side of the<br />
image towards the leading edge of the paper.<br />
3. Push the dial away from you to move the<br />
non operation side of the image towards the<br />
leading edge.<br />
D<br />
E<br />
Operation<br />
side of press<br />
4.<br />
5.<br />
6.<br />
F<br />
H<br />
G<br />
Non-Operation<br />
side of press<br />
Close the safety cover.<br />
Press the plate tension/release button (F). The<br />
buzzer will sound and the press will crawl<br />
and re-tension the plate.<br />
When the press stops crawling stop the<br />
buzzer sound by pressing the crawl on/off<br />
button (H).