Operations Manual - Pioneer Electronics
Operations Manual - Pioneer Electronics
Operations Manual - Pioneer Electronics

Create successful ePaper yourself
Turn your PDF publications into a flip-book with our unique Google optimized e-Paper software.
03 Basic <strong>Operations</strong> For Television Viewing<br />
Follow the steps below to adjust options for the preferred picture quality.<br />
1 ) Access the Picture through the Setup.<br />
2 ) Select an option.<br />
3 ) Use the TOOLS button to toggle between the previous and adjusted images.<br />
4 ) Repeat Steps 2 and 3 to continue adjusting the option as needed.<br />
5 ) Repeat Steps 2 through 4 to adjust other picture options.<br />
6 ) Press HOME MENU to exit the menu.<br />
Note: if no selections are made within 60 seconds, the menu closes automatically and the current settings are<br />
saved to memory.<br />
To exit the menu without saving the changes, switch to the Before screen then press HOME MENU.<br />
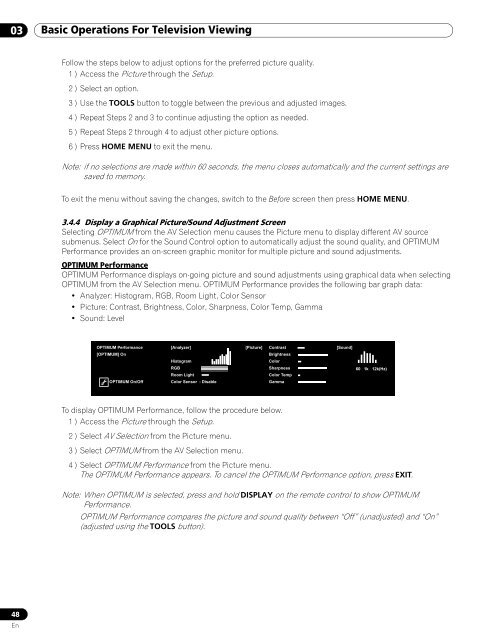
3.4.4 Display a Graphical Picture/Sound Adjustment Screen<br />
Selecting OPTIMUM from the AV Selection menu causes the Picture menu to display different AV source<br />
submenus. Select On for the Sound Control option to automatically adjust the sound quality, and OPTIMUM<br />
Performance provides an on-screen graphic monitor for multiple picture and sound adjustments.<br />
OPTIMUM Performance<br />
OPTIMUM Performance displays on-going picture and sound adjustments using graphical data when selecting<br />
OPTIMUM from the AV Selection menu. OPTIMUM Performance provides the following bar graph data:<br />
• Analyzer: Histogram, RGB, Room Light, Color Sensor<br />
• Picture: Contrast, Brightness, Color, Sharpness, Color Temp, Gamma<br />
• Sound: Level<br />
OPTIMUM Performance<br />
[OPTIMUM] On<br />
OPTIMUM On/Off<br />
[Analyzer]<br />
Histogram<br />
RGB<br />
Room Light<br />
Color Sensor : Disable<br />
[Picture]<br />
Contrast<br />
Brightness<br />
Color<br />
Sharpness<br />
Color Temp<br />
Gamma<br />
[Sound]<br />
60 1k 12k(Hz)<br />
To display OPTIMUM Performance, follow the procedure below.<br />
1 ) Access the Picture through the Setup.<br />
2 ) Select AV Selection from the Picture menu.<br />
3 ) Select OPTIMUM from the AV Selection menu.<br />
4 ) Select OPTIMUM Performance from the Picture menu.<br />
The OPTIMUM Performance appears. To cancel the OPTIMUM Performance option, press EXIT.<br />
Note: When OPTIMUM is selected, press and hold DISPLAY on the remote control to show OPTIMUM<br />
Performance.<br />
OPTIMUM Performance compares the picture and sound quality between “Off” (unadjusted) and “On”<br />
(adjusted using the TOOLS button).<br />
48<br />
En