Operations Manual - Pioneer Electronics
Operations Manual - Pioneer Electronics
Operations Manual - Pioneer Electronics

You also want an ePaper? Increase the reach of your titles
YUMPU automatically turns print PDFs into web optimized ePapers that Google loves.
IMPORTANT<br />
The lightning flash with arrowhead symbol, within an<br />
equilateral triangle, is intended to alert the user to the<br />
presence of uninsulated "dangerous voltage" within the<br />
product's enclosure that may be of sufficient magnitude<br />
to constitute a risk of electric shock to persons.<br />
CAUTION<br />
RISK OF ELECTRIC SHOCK<br />
DO NOT OPEN<br />
CAUTION:<br />
TO PREVENT THE RISK OF ELECTRIC SHOCK, DO<br />
NOT REMOVE COVER (OR BACK). NO USER-<br />
SERVICEABLE PARTS INSIDE. REFER SERVICING<br />
TO QUALIFIED SERVICE PERSONNEL.<br />
The exclamation point within an equilateral<br />
triangle is intended to alert the user to the<br />
presence of important operating and<br />
maintenance (servicing) instructions in the<br />
literature accompanying the appliance.<br />
D3-4-2-1-1_En-A<br />
1)<br />
2)<br />
3)<br />
4)<br />
5)<br />
6)<br />
7)<br />
8)<br />
9)<br />
10)<br />
Read these instructions.<br />
Keep these instructions.<br />
Heed all warnings.<br />
Follow all instructions.<br />
Do not use this apparatus near water.<br />
Clean only with dry cloth.<br />
Do not block any ventilation openings. Install in<br />
accordance with the manufacturer’s instructions.<br />
Do not install near any heat sources such as<br />
radiators, heat registers, stoves, or other apparatus<br />
(including amplifiers) that produce heat.<br />
Do not defeat the safety purpose of the polarized or<br />
grounding-type plug. A polarized plug has two<br />
blades with one wider than the other. A grounding<br />
type plug has two blades and a third grounding<br />
prong. The wide blade or the third prong are<br />
provided for your safety. If the provided plug does<br />
not fit into your outlet, consult an electrician for<br />
replacement of the obsolete outlet.<br />
Protect the power cord from being walked on or<br />
pinched particularly at plugs, convenience<br />
receptacles, and the point where they exit from the<br />
apparatus.<br />
11)<br />
12)<br />
13)<br />
14)<br />
Only use attachments/accessories specified by the<br />
manufacturer.<br />
Use only with the cart, stand, tripod, bracket, or<br />
table specified by the manufacturer, or sold with the<br />
apparatus. When a cart is used, use caution when<br />
moving the cart/apparatus combination to avoid<br />
injury from tip-over.<br />
Unplug this apparatus during lightning storms or<br />
when unused for long periods of time.<br />
Refer all servicing to qualified service personnel.<br />
Servicing is required when the apparatus has been<br />
damaged in any way, such as power-supply cord or<br />
plug is damaged, liquid has been spilled or objects<br />
have fallen into the apparatus, the apparatus has<br />
been exposed to rain or moisture, does not operate<br />
normally, or has been dropped.<br />
P1-4-2-2_En<br />
IMPORTANT NOTICE –<br />
THE SERIAL NUMBER FOR THIS EQUIPMENT IS LOCATED IN THE REAR. PLEASE<br />
WRITE THIS SERIAL NUMBER ON YOUR ENCLOSED WARRANTY CARD AND KEEP IN<br />
A SECURE AREA. THIS IS FOR YOUR SECURITY.<br />
D1-4-2-6-1_En<br />
WARNING: Handling the cord on this product or cords<br />
associated with accessories sold with the product will<br />
expose you to chemicals listed on proposition 65 known<br />
to the State of California and other governmental<br />
entities to cause cancer and birth defect or other<br />
reproductive harm.<br />
Wash hands after handling<br />
D36-P4-A_En
TABLE OF CONTENTS<br />
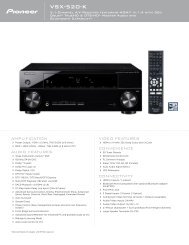
Congratulations on your purchase of a <strong>Pioneer</strong> KURO flat panel television.<br />
KURO is the future of <strong>Pioneer</strong> flat-panel displays. It’s a world without boundaries. A place where the senses evolve, colors<br />
are felt and sounds can be tasted. An experience that changes not only the way you look at television, but the way you<br />
look at the world.<br />
We are proud to incorporate this philosophy of exceptional quality, state-of-the-art design and meticulous engineering to<br />
make the KURO undeniably unique and bring you one of the best entertainment experiences possible.<br />
Please take some time to read through this owner’s guide and manual to learn about the many features and benefits that<br />
set the KURO apart. We hope you enjoy the experience of owning the KURO and invite you to enter a new world of seeing<br />
and hearing like never before.<br />
TABLE OF CONTENTS<br />
1 Introduction to the ELITE Series Flat Panel TVs .....................................................................................6<br />
1.1 Flat Panel TV Shipment Checklist ................................................................................................................................... 6<br />
1.2 Control Options: Get to Know Your Flat Panel TV .......................................................................................................... 8<br />
1.2.1 Control Buttons and More on the Flat Panel TV .................................................................................................... 8<br />
1.2.2 Operating the Remote Control .............................................................................................................................. 10<br />
1.2.3 Buttons on the Remote Control ............................................................................................................................ 12<br />
2 Install Your Flat Panel TV ......................................................................................................................14<br />
2.1 Choose a Location and the Mounting Method............................................................................................................. 14<br />
2.1.1 Check the Location for Suitability ......................................................................................................................... 15<br />
2.1.2 Lift and/or Move Your Panel (the How To’s)......................................................................................................... 15<br />
2.2 Install the Panel Using a Stand ..................................................................................................................................... 16<br />
2.2.1 Use or Remove the Included Stand ...................................................................................................................... 16<br />
2.2.2 Connect the Speaker Cables ................................................................................................................................. 22<br />
2.3 Wall/Ceiling Mounting.................................................................................................................................................... 23<br />
2.4 Mount the Flat Panel TV ................................................................................................................................................. 24<br />
2.5 Attach the Color Sensor ................................................................................................................................................. 26<br />
2.6 Connect to Broadcast TV & Other Devices (DVR, Receiver, BDR, etc.) ..................................................................... 29<br />
2.6.1 Add Analog (conventional) and Digital TV Channels .......................................................................................... 29<br />
2.6.2 Connect Your Other <strong>Pioneer</strong> Equipment.............................................................................................................. 29<br />
2.6.3 Connect the Power Cord to the Panel .................................................................................................................. 32<br />
2.7 Route then Bundle the Power Cord and Cables .......................................................................................................... 32<br />
3 Basic <strong>Operations</strong> For Television Viewing .............................................................................................34<br />
3.1 Turn the Flat Panel TV ON/OFF...................................................................................................................................... 34<br />
3.2 Program the Flat Panel TV for Television Viewing........................................................................................................ 35<br />
3.2.1 Choose Analog or Digital TV Channels ................................................................................................................ 35<br />
3.2.2 Explore the Home Menu ........................................................................................................................................ 35<br />
3.2.3 Assign a Language................................................................................................................................................. 37<br />
3.2.4 Set the Clock........................................................................................................................................................... 38<br />
3.2.5 Create the List of Channels ................................................................................................................................... 38<br />
3.2.6 Skip or Delete Unwanted Channels...................................................................................................................... 41<br />
3.2.7 Channel List ............................................................................................................................................................ 42<br />
3.3 Quick Start for Watching Television.............................................................................................................................. 44<br />
3.3.1 Change the Channel/Sub-Channel....................................................................................................................... 44<br />
3.3.2 Adjust the Volume/Sound...................................................................................................................................... 44<br />
3.3.3 Turn On the Sleep Timer........................................................................................................................................ 44<br />
3.4 Adjust the Picture and Sound Quality .......................................................................................................................... 45<br />
3.4.1 Adjust the Picture for Your Room Lighting .......................................................................................................... 45<br />
3.4.2 General Picture (Video) Adjustment for an AV Source ....................................................................................... 46<br />
3.4.3 Compare Images When Adjusting the Picture.................................................................................................... 47<br />
3.4.4 Display a Graphical Picture/Sound Adjustment Screen..................................................................................... 48<br />
3.4.5 Sound Control......................................................................................................................................................... 49<br />
3.4.6 General Sound (Audio) Adjustment...................................................................................................................... 49<br />
3.5 Block Programs, Channels, or Content ........................................................................................................................ 50<br />
3.5.1 Assign a Parental Control (Block) Password....................................................................................................... 50<br />
3<br />
En
TABLE OF CONTENTS<br />
4<br />
En<br />
3.5.2 Activate Parental Control .......................................................................................................................................51<br />
3.5.3 Assign a Rating System to Create Blocks ............................................................................................................51<br />
3.5.4 Temporarily Remove a Block .................................................................................................................................54<br />
3.6 Smart Starts for New Owners ........................................................................................................................................55<br />
3.6.1 Use the TOOLS Menu.............................................................................................................................................55<br />
3.6.2 Extend Your Panel Life............................................................................................................................................55<br />
3.6.3 Turn On the Image Orbiter.....................................................................................................................................56<br />
3.6.4 Trigger the Screen-Saving Video Pattern Periodically.........................................................................................56<br />
3.6.5 Activate Energy Save to Reduce Power Usage ....................................................................................................56<br />
4 Additional Picture and Sound Adjustment Options ........................................................................... 57<br />
4.1 Choose an AV Option (Video, Game, etc.).....................................................................................................................57<br />
4.1.1 AV Source through the Remote Control...............................................................................................................57<br />
4.1.2 Choose an AV Source through the Home Menu .................................................................................................58<br />
4.1.3 Choose a PC Source...............................................................................................................................................58<br />
4.1.4 Set the Panel to Recognize a Game Console.......................................................................................................59<br />
4.2 Adjust Specific Picture Elements ..................................................................................................................................59<br />
4.2.1 Choose a Screen Size (Automatically or <strong>Manual</strong>ly).............................................................................................59<br />
4.2.2 Correct the Picture for an AV or PC Source.........................................................................................................61<br />
4.3 Assign Advanced Picture Functions .............................................................................................................................62<br />
4.3.1 Adjust for Screen Masking (black bars on sides) ................................................................................................62<br />
4.3.2 Select a PureCinema Level for High Quality Image.............................................................................................63<br />
4.3.3 Select an Intelligent Mode Option.........................................................................................................................64<br />
4.3.4 Select the Picture Detail Options..........................................................................................................................64<br />
4.3.5 Adjust the Color Temperature ...............................................................................................................................65<br />
4.3.6 Use CTI and Color Space .......................................................................................................................................66<br />
4.3.7 Use the Color Management...................................................................................................................................66<br />
4.3.8 Reduce Noise from the Image...............................................................................................................................67<br />
4.3.9 Adjust Color Signals...............................................................................................................................................68<br />
4.4 View in Multi-Screen .......................................................................................................................................................69<br />
4.4.1 Split/Swap/Shift the Screen...................................................................................................................................69<br />
4.5 Freeze the Picture ...........................................................................................................................................................70<br />
4.6 Use the Banner Feature..................................................................................................................................................71<br />
4.7 Select Alternatives for/to Sound ....................................................................................................................................72<br />
4.7.1 Activate Closed Captioning (CC) ...........................................................................................................................72<br />
4.7.2 Switch Languages Using MTS...............................................................................................................................74<br />
4.7.3 Select SAP...............................................................................................................................................................74<br />
4.7.4 Apply Sound Effect Settings ..................................................................................................................................75<br />
4.7.5 Use Auto Volume Control (AVC)............................................................................................................................75<br />
4.8 Manage the Power ..........................................................................................................................................................76<br />
5 Use Other Equipment With Your Flat Panel TV ................................................................................... 78<br />
5.1 Program the Remote Control to Operate Other Equipment........................................................................................78<br />
5.1.1 Use the Learning Feature.......................................................................................................................................78<br />
5.1.2 Assign a Manufacturing Code to the Remote Control ........................................................................................79<br />
5.1.3 Issue a Library Search for a Manufacturer Code.................................................................................................79<br />
5.1.4 Clear Added Manufacturer Codes from the Remote Control .............................................................................80<br />
5.1.5 Control a <strong>Pioneer</strong> Receiver ....................................................................................................................................80<br />
5.1.6 Control a Cable (CBL) or Satellite (SAT) System..................................................................................................81<br />
5.1.7 Control a Video Cassette Recorder (VCR) ............................................................................................................82<br />
5.1.8 Control a DVD Player/DVR Recorder/BD Player..................................................................................................83<br />
5.2 Use HDMI Inputs.............................................................................................................................................................84<br />
5.2.1 Specify the HDMI Input Type .................................................................................................................................84<br />
5.2.2 Specify a Digital HDMI Signal Type ......................................................................................................................85<br />
5.2.3 Specify an Audio HDMI Signal Type .....................................................................................................................85<br />
5.3 Control Equipment with the Panel’s Remote Through HDMI .....................................................................................86<br />
5.3.1 Control an AV System.............................................................................................................................................88<br />
5.3.2 Control a Recorder .................................................................................................................................................89<br />
5.3.3 Control a Player.......................................................................................................................................................89<br />
5.3.4 Add an AV Amp or a BD Player.............................................................................................................................90<br />
5.4 Specific HDMI Control Commands ...............................................................................................................................91<br />
5.4.1 Play Source Sound Using an HDMI Command...................................................................................................91
TABLE OF CONTENTS<br />
5.4.2 Turn OFF the Power With an HDMI Command ................................................................................................... 91<br />
5.4.3 Turn ON the Power With an HDMI Command .................................................................................................... 91<br />
5.4.4 Test the Power Control (On/Off)............................................................................................................................ 92<br />
5.5 Connect a Game Console or Camcorder ...................................................................................................................... 92<br />
5.6 Use the IR REPEATER OUT............................................................................................................................................ 92<br />
5.7 Operate the Home Media Gallery .................................................................................................................................. 93<br />
5.7.1 Network Connections............................................................................................................................................. 94<br />
5.7.2 Connect a USB Device........................................................................................................................................... 96<br />
5.8 Run the Home Media Gallery......................................................................................................................................... 98<br />
5.8.1 Show Your Movie Files on the Flat Panel TV ...................................................................................................... 101<br />
5.8.2 Play Your Music Files on the Flat Panel TV ........................................................................................................ 103<br />
5.8.3 Show Your Photo File on the Flat Panel TV ........................................................................................................ 104<br />
5.9 Use the TOOLS Menu ................................................................................................................................................... 106<br />
5.10 HMG Setup .................................................................................................................................................................. 118<br />
5.11 Other useful functions................................................................................................................................................ 119<br />
5.12 Add Other Audio Equipment...................................................................................................................................... 121<br />
5.13 Add a Computer (PC) ................................................................................................................................................. 122<br />
5.13.1 Automatic Image Position and Clock Adjustments ........................................................................................ 122<br />
5.13.2 <strong>Manual</strong> Image Position and Clock Adjustments............................................................................................. 122<br />
6 Helpful Information .............................................................................................................................123<br />
6.1 Frequently Asked Questions (FAQs) ........................................................................................................................... 123<br />
6.2 Check Your Software/Hardware Version..................................................................................................................... 124<br />
6.3 Cleaning Methods......................................................................................................................................................... 124<br />
6.4 Troubleshooting & Service Information....................................................................................................................... 125<br />
6.4.1 Check the Signal Strength................................................................................................................................... 130<br />
7 Cautions and Warnings........................................................................................................................131<br />
7.1 Installation Details ........................................................................................................................................................ 131<br />
7.2 Physical Location & Temperature Considerations ..................................................................................................... 131<br />
7.3 Usage Guidelines.......................................................................................................................................................... 131<br />
7.4 Signal Interference or Noise ........................................................................................................................................ 132<br />
7.5 Phosphor Properties..................................................................................................................................................... 132<br />
7.6 Image Information Including Retention & After-Image Lag ...................................................................................... 132<br />
7.7 Safety Precautions........................................................................................................................................................ 134<br />
7.8 Legal Notices................................................................................................................................................................. 134<br />
7.8.1 Safety..................................................................................................................................................................... 134<br />
7.8.2 Radio Interference................................................................................................................................................ 135<br />
8 Appendix ..............................................................................................................................................136<br />
8.1 Ratings Charts (for Various Audience Classifications) ............................................................................................. 136<br />
8.1.1 TV Ratings (age-based) ........................................................................................................................................ 136<br />
8.1.2 U.S. TV Parental Guideline Ratings (age/category-based)................................................................................ 136<br />
8.1.3 MPAA Movie Ratings (age-based) ...................................................................................................................... 136<br />
8.1.4 Canadian - English Ratings (age-based) ............................................................................................................ 137<br />
8.1.5 Canadian - French Ratings (age-based)............................................................................................................. 137<br />
8.2 Manufacturer Codes to Program into the Remote Control....................................................................................... 138<br />
8.2.1 Cable...................................................................................................................................................................... 138<br />
8.2.2 Satellite.................................................................................................................................................................. 138<br />
8.2.3 VCR (Brands A - F)................................................................................................................................................ 139<br />
8.2.4 VCR (Brands G - O)............................................................................................................................................... 140<br />
8.2.5 VCR (Brands P - V) ............................................................................................................................................... 141<br />
8.2.6 VCR (Brands W - Z) .............................................................................................................................................. 141<br />
8.2.7 PVR ........................................................................................................................................................................ 142<br />
8.2.8 BD (HD-DVD)........................................................................................................................................................ 142<br />
8.2.9 DVD-R.................................................................................................................................................................... 142<br />
8.2.10 DVD (Brands A - N) ............................................................................................................................................ 143<br />
8.2.11 DVD (Brands O - Z)............................................................................................................................................. 144<br />
8.2.12 LD......................................................................................................................................................................... 144<br />
8.3 Specifications................................................................................................................................................................ 145<br />
8.4 Glossary ......................................................................................................................................................................... 162<br />
8.5 Index............................................................................................................................................................................... 164<br />
8.6 Trademarks, Licenses, & Patent Information ............................................................................................................. 165<br />
5<br />
En
01 Introduction to the ELITE Series Flat Panel TVs<br />
1 Introduction to the ELITE Series Flat Panel<br />
TVs<br />
The <strong>Pioneer</strong> ELITE Series Flat Panel TV models include the 60-inch PRO-151FD and the 50-inch PRO-111FD<br />
(screen sizes measured diagonally). Below is a list of all accessories shipped with your panel. If an item is<br />
missing, please contact your dealer or our Service organization immediately. Service contact information is listed<br />
on the back of this manual.<br />
1.1 Flat Panel TV Shipment Checklist<br />
In addition to the flat panel TV, there are several accessories included to make installation quick and easy. Please<br />
check for contents before discarding or allowing your installer to discard any packing material.<br />
The PRO-151FD and PRO-111FD shipments have slightly different pieces. Identify the accessories from the<br />
appropriate list below.<br />
You will need a Philips screwdriver when mounting the speaker and attaching the stand.<br />
Shipped with both models<br />
Remote Control Batteries for Remote (2) Cleaning Cloth<br />
Power Cord (2 m/6.6 feet) Cable Clamps (4) Operating Instructions<br />
Color Sensor Screws (x 2) (M5 x 8 mm) Warranty Card<br />
Color Sensor Bracket (when attached to the top right of the rear panel)<br />
Bracket (for 60”)<br />
Bracket (for 50”)<br />
Also shipped with the PRO-151FD (60” panel)<br />
Stand kit<br />
Base Cover Stand Pipes (2)<br />
6<br />
En
Introduction to the ELITE Series Flat Panel TVs<br />
01<br />
Also shipped with the PRO-151FD (60” panel)<br />
Silver Screws (4) (4×10 mm) Falling Prevention Metal Fittings (2)<br />
Black Screws (4) (M6×20 mm)<br />
Light-Blocking Shield Screws to Metal Fittings (4) (M4×35 mm)<br />
Speaker accessories<br />
Speaker Cables (2) Speaker Brackets<br />
for TOP-Right<br />
Speaker Mounting Screws (16) (M5×10 mm)<br />
for BOTTOM-Right<br />
for TOP-Left<br />
Speaker<br />
for BOTTOM-Left<br />
Also shipped with the PRO-111FD (50” panel)<br />
Stand kit<br />
Falling Prevention Metal Fittings (2) Screws to Metal Fittings(2) (M4×35 mm)<br />
Speaker accessories<br />
Speaker Cables (2) Speaker Brackets Speaker<br />
for TOP-Right<br />
for BOTTOM-Right<br />
Speaker Mounting Screws (16)<br />
(M5×10 mm)<br />
for TOP-Left<br />
for BOTTOM-Left<br />
7<br />
En
01 Introduction to the ELITE Series Flat Panel TVs<br />
1.2 Control Options: Get to Know Your Flat Panel TV<br />
You can operate your flat panel TV from the panel buttons or with the remote control. The following sections<br />
provide button locations/operations for the panel and the remote control.<br />
1.2.1 Control Buttons and More on the Flat Panel TV<br />
Your flat panel TV has buttons, indicators, and sensors on the lower front bezel with more buttons, toggles, and<br />
ports on the panel sides. Refer to the drawings below for specific locations and functions. Or, for the back ports<br />
and terminals only, check the terminal position sheet located near the panel’s terminal compartment to identify<br />
the various options.<br />
ELITE Series Models: Face of Panel<br />
6<br />
(PRO-111FD)<br />
(PRO-151FD)<br />
1 - Power ON indicator<br />
2 -STANDBY indicator<br />
3 - SLEEP indicator<br />
Command Side of the Panel (left side)<br />
8<br />
9<br />
1 2 3 1 2 3<br />
4 5 7<br />
4 -Room Light sensor<br />
5 -Remote Control sensor<br />
6 -Color Sensor<br />
7 -Bezel (some call it the front frame)<br />
13<br />
14<br />
15<br />
8 -USB terminal<br />
9 -INPUT 7 terminal (HDMI)<br />
10 -PHONES terminal<br />
11 -INPUT 3 terminal (Video)<br />
12 -INPUT 3 terminals (Audio)<br />
13 -STANDBY/ON button<br />
14 -INPUT button<br />
15 -VOLUME Up/Down buttons<br />
16 -CHANNEL Up/Down buttons<br />
10<br />
16<br />
11<br />
12<br />
8<br />
En
Introduction to the ELITE Series Flat Panel TVs<br />
01<br />
1 -ANT terminal<br />
2 - PC Input terminal (Analog RGB)<br />
3 - Color sensor terminal<br />
4 - AC In terminal<br />
(upper bank)<br />
Back of the Panel<br />
1 2 3<br />
4<br />
(middle bank)<br />
5 12 13 14 151617181920212223<br />
5 - Ethernet cable port<br />
6 -INPUT 4 terminal (HDMI)<br />
7 -INPUT 5 terminal (HDMI)<br />
8 -INPUT 6 terminal (HDMI)<br />
9 - RC-232C terminal (for factory use)<br />
10 - INPUT 4 terminals (Audio)<br />
11 -INPUT 5 terminals (Audio)<br />
12 -SUB WOOFER OUT terminal<br />
13 -AUDIO OUT terminals (Audio)<br />
14 -INPUT 1 terminal (S-Video)<br />
6<br />
7 8 9<br />
10 11 24<br />
15 -INPUT 1 terminal (Video)<br />
16 -INPUT 1 terminals (Audio)<br />
17 -INPUT 2 terminal (Video)<br />
18 -INPUT 2 terminals (Audio)<br />
19 -INPUT 2 terminals (Component, Y, P B , P R )<br />
20 -IR REPEATER OUT terminal<br />
21 -PC INPUT terminal (Audio)<br />
22 -CONTROL OUT terminal<br />
23 -DIGITAL OUT terminal (Optical)<br />
24 -SPEAKERS (right/left) terminal<br />
(PRO-151FD)<br />
(lower bank)<br />
25 -Speakers (R) terminal (speaker side)<br />
26 -Color Sensor<br />
25 26<br />
27 28<br />
Terminals on side and rear panels are common to both ELITE models.<br />
27 -Power On button<br />
28 -Speakers (L) terminal (speaker side)<br />
9<br />
En
01 Introduction to the ELITE Series Flat Panel TVs<br />
1.2.2 Operating the Remote Control<br />
The remote control for the ELITE Series panels is a powerful tool. This section provides a brief introduction to your<br />
remote control while later sections explore more advanced operations.<br />
Insert the Batteries into the Remote Control<br />
To open push and slide the battery cover in the direction of the arrows.<br />
Load the supplied two AA size batteries by the negative polarity (–) ends first.<br />
The batteries supplied with this product may have a shorter life expectancy due to storage conditions. If the<br />
remote control seems to be failing or is weak, replace the provided batteries with new alkaline batteries.<br />
Never mix old and new batteries. Mixing old and new batteries can shorten the life of new batteries or cause<br />
chemical leaks in old batteries. Also, mixing different types or brands of batteries can cause issues as batteries<br />
brands have slightly different characteristics.<br />
Note: If the flat panel TV’s remote control is not needed for an extended length of time, remove the batteries.<br />
When disposing of used batteries, please comply with<br />
governmental regulations or environmental public institution’s<br />
rules that apply in your country/area.<br />
Remote Control Issues<br />
There are several issues that can affect your remote control but the most common problem is weak batteries.<br />
Weak batteries in the remote control can cause communication to fail or only operate sporadically. In this<br />
situation, try moving closer to the panel and attempt to control the panel with the remote. If the panel responds<br />
then change the batteries. If moving closer has no effect on the panel, check the surroundings for objects that<br />
might be blocking the signal. Also consider other equipment with remote controls that are in the area around the<br />
panel. Objects and other IR signals can disrupt the remote. For more help with your remote control, refer to “6.1<br />
Frequently Asked Questions (FAQs).”<br />
10<br />
En
Introduction to the ELITE Series Flat Panel TVs<br />
01<br />
Operating Range for the Remote Control<br />
To control the flat panel TV, point the remote towards the sensor on the panel’s bottom right corner. For easy<br />
operation, keep the distance between the remote control and the sensor less than 7 m (23 feet) and at an angle<br />
of less than 30 degrees.<br />
30º<br />
7 m<br />
(23 feet)<br />
30º<br />
Sensor<br />
The remote control may not work properly if the sensor is in direct sunlight or very bright lighting. If your viewing<br />
room is naturally bright, change the position of the panel or physically use the remote control closer to the panel’s<br />
sensor.<br />
Note: If the remote control is left sitting in direct sunlight or under a very strong light, the case could warp or<br />
deform.<br />
11<br />
En
01 Introduction to the ELITE Series Flat Panel TVs<br />
1.2.3 Buttons on the Remote Control<br />
Except for a few options, commands available through the buttons on the flat panel TV are duplicated on the<br />
remote control. The remote control can be programmed to control other equipment such as a DVD Player,<br />
Surround Sound system, etc. A later section entitled “5 Use Other Equipment With Your Flat Panel TV” explains<br />
how to use the remote to control other equipment.<br />
This section identifies and describes the buttons on the remote control.<br />
Remote: Left side buttons (top to bottom, left to right)<br />
TV :<br />
Turn On or place panel in Standby<br />
INPUT:<br />
Select a source (INPUT 1 thru INPUT 7)<br />
PC:<br />
Select the PC terminal as an input source<br />
AV SELECTION:<br />
Select audio/video settings<br />
AV Source: OPTIMUM, PERFORMANCE, MOVIE,<br />
PURE, GAME, SPORT, Standard<br />
PC Source: STANDARD, USER<br />
SPLIT:<br />
Cycle view thru single-screen, 2-screen,<br />
picture-in-picture<br />
FREEZE:<br />
Freeze a frame from a moving image then<br />
press again to cancel the freeze function<br />
Number buttons 0 thru 9:<br />
Select a channel<br />
•(dot):<br />
Enter a dot for selecting a sub-channel<br />
VOL +/–:<br />
Set the volume<br />
EXIT:<br />
Exit the menu to return to the normal screen<br />
Arrow buttons:<br />
Navigate the menu screens<br />
HOME MENU:<br />
Display the HOME MENU<br />
Color buttons (Red, Green, Blue, Yellow):<br />
Control a BD player for HDMI Control functions only<br />
HDMI CONTROL:<br />
Select the HDMI Control functions<br />
SELECT:<br />
Select for TV/RCV, CBL/SAT, VCR, or DVD/DVR<br />
1<br />
2<br />
3<br />
4<br />
5<br />
6<br />
7<br />
8<br />
9<br />
10<br />
11<br />
12<br />
13<br />
14<br />
15<br />
TV<br />
1<br />
INPUT<br />
1 2 3 4<br />
2<br />
TV/DTV<br />
5 6 7<br />
AV<br />
SCREEN<br />
SELECTION DISPLAY SIZE<br />
PC<br />
3 4<br />
FREEZE<br />
SPLIT SWAP SHIFT<br />
1 2 3<br />
4 5 6<br />
7 8 9<br />
EXIT<br />
SAT GUIDE<br />
DVD<br />
TOP MENU<br />
5 6<br />
8<br />
VOL 9<br />
10<br />
HOME<br />
MENU<br />
12<br />
SAT / DVD MENU<br />
HDMI<br />
14<br />
CTRL<br />
7<br />
0<br />
CH<br />
ENTER<br />
CH RETURN<br />
MUTING<br />
ENTER<br />
CH<br />
TOOLS<br />
RETURN<br />
SOURCE<br />
STOP REC<br />
HMG<br />
RECEIVER VOL<br />
INPUT<br />
SELECT<br />
TV CBL<br />
EDIT/LEARN<br />
DVD<br />
RCV SAT VCR DVR<br />
15<br />
13<br />
11<br />
12<br />
En
Introduction to the ELITE Series Flat Panel TVs<br />
01<br />
Remote: Right side buttons (top to bottom, left to right)<br />
TV<br />
INPUT<br />
1 2 3 4<br />
5 6 7<br />
TV/DTV<br />
17<br />
AV<br />
SCREEN<br />
SELECTION DISPLAY SIZE<br />
PC<br />
18 19<br />
FREEZE<br />
SPLIT SWAP SHIFT<br />
1 2 3<br />
4 5 6<br />
7 8 9<br />
VOL<br />
EXIT<br />
SAT GUIDE<br />
DVD<br />
TOP MENU<br />
HOME<br />
MENU<br />
SAT / DVD MENU<br />
HDMI<br />
CTRL<br />
CH<br />
0 ENTER<br />
23<br />
CH RETURN<br />
MUTING CH<br />
24 25<br />
ENTER<br />
27<br />
16<br />
20 21<br />
22<br />
TOOLS<br />
26<br />
RETURN<br />
28<br />
29<br />
30<br />
SOURCE<br />
STOP REC<br />
HMG<br />
RECEIVER VOL<br />
INPUT<br />
SELECT<br />
TV CBL<br />
EDIT/LEARN<br />
DVD<br />
RCV SAT VCR DVR<br />
16 : Lights up all buttons<br />
Lights turn off if no operations are performed within five<br />
seconds. This is used for remote control use in dark locations.<br />
17 TV/DTV:<br />
Select analog or digital TV channels<br />
18 DISPLAY:<br />
Display the channel information<br />
19 SCREEN SIZE:<br />
Select the screen size<br />
20 SWAP:<br />
Switch between the two screens when<br />
viewing as 2-screen or picture-in-picture<br />
21 SHIFT:<br />
Move the location of the small screen when<br />
viewing as picture-in-picture<br />
22 CH ENTER:<br />
Change the channel<br />
23 CH RETURN:<br />
Return to the previous channel<br />
24 MUTING:<br />
Turn off the sound while the video continues to play<br />
25 CH +/–:<br />
Cycle through channels<br />
26 TOOLS:<br />
Display the TOOLS Menu - refer to “3.6 Smart Starts for New<br />
Owners”<br />
27 ENTER:<br />
Execute a command<br />
28 RETURN:<br />
Return to the previous menu screen<br />
29 Player/Recorder Control:<br />
Use buttons for control of connected equipment<br />
30 HMG (Home Media Gallery):<br />
Display the Home Media Gallery menu<br />
Use this button to start recording (for VCR/DVD recorder only)<br />
13<br />
En
02 Install Your Flat Panel TV<br />
2 Install Your Flat Panel TV<br />
There are several installation options for your flat panel TV. This chapter walks you through how to choose an<br />
installation site, the best mounting methods, and how to install your panel.<br />
2.1 Choose a Location and the Mounting Method<br />
Your flat panel TV is very thin. The panel needs a solid surface and some sort of support structure (a stand, table,<br />
etc.) to protect it from being tipped over or knocked down. Use installation accessories and parts included with<br />
the shipment. <strong>Pioneer</strong> recommends working with a qualified installer whenever possible.<br />
Regardless of the mounting method, anchor or secure your flat panel TV using a combination of the mounting<br />
holes and/or supplied bolts.<br />
Rear view (PRO-151FD)<br />
Side view<br />
Mounting surface<br />
Mounting hole<br />
Mounting hole<br />
Mounting<br />
bracket (or<br />
equivalent item)<br />
M8 screw<br />
12 mm to 18 mm<br />
(0.5 inches to<br />
0.7 inches)<br />
Rear view (PRO-111FD)<br />
W<br />
W<br />
Mounting hole<br />
Mounting hole<br />
W<br />
W<br />
T<br />
W<br />
T<br />
W<br />
Note: Some installation options require a different type of bolt. Check with your installer or dealer to purchase the<br />
appropriate bolt(s).<br />
14<br />
En
Install Your Flat Panel TV<br />
02<br />
2.1.1 Check the Location for Suitability<br />
When choosing the location for your panel, there are several factors you need to keep in mind. The installation<br />
site should be out of direct sunlight and have sufficient ventilation around the flat panel TV to allow cooling. The<br />
diagram below is an example of a stand-mounted panel with proper ventilation.<br />
Over 50 cm<br />
(19 11/16 inches)<br />
Over<br />
10 cm<br />
(3 15/16<br />
inches)<br />
The distance behind and above the panel<br />
changes depending on your choice of mount.<br />
Consult with your dealer or professional<br />
installer for proper ventilation.<br />
Use the checklist below to judge possible installation sites.<br />
Sufficient ventilation<br />
Safe from excessive vibrations<br />
Away from air conditioners<br />
Free of moisture or dampness<br />
No danger of splashing water<br />
Route cords and cables safely<br />
No danger of power overloads<br />
Separate from other IR equipment<br />
Protected from hits or shocks<br />
Distance from heat sources<br />
Out of direct sunlight<br />
Away from strong lighting sources<br />
For specific cautions and safety information, refer to “7.2 Physical Location & Temperature Considerations” and<br />
“7.7 Safety Precautions.”<br />
2.1.2 Lift and/or Move Your Panel (the How To’s)<br />
This flat panel TV is built for endurance but because of the technology, the panel must be handled with care. Use<br />
the handles attached to the rear of the flat panel TV to lift the unit. To avoid flexing or twisting the unit, you need<br />
at least two people to lift and move the panel. Do not move the flat panel TV by holding only a single handle or by<br />
dragging the panel by its handles.<br />
Use the handles to move the panel.<br />
Do not move the panel by holding the<br />
color sensor, speaker or speaker<br />
brackets.<br />
Note: Do not use the handles to hang the flat panel TV or as anchors to prevent the panel from slipping or tipping<br />
after it is mounted.<br />
15<br />
En
02 Install Your Flat Panel TV<br />
2.2 Install the Panel Using a Stand<br />
2.2.1 Use or Remove the Included Stand<br />
The PRO-111FD ships with the <strong>Pioneer</strong> table top stand (stand) attached. Attach the included stand to the panel for<br />
the PRO-151FD. For PRO-111FD, attach the falling prevention metal fittings after placing the panel to stand upright.<br />
(PRO-111FD)<br />
Installation screws<br />
(M4 × 35 mm: black)<br />
Falling prevention<br />
metal fitting<br />
Attach the Stand to the Panel<br />
Do not handle the flat panel TV on a wagon or pallet that is<br />
smaller than its stand. The stand will bend.<br />
1 ) Detach the speaker if it has already been added.<br />
Refer to “Attach/Detach the Speaker” on page 19 for assistance.<br />
2 ) Lay the flat panel TV down on a raised surface with the stand base hanging over the edge.<br />
3 ) Place all stand parts on a soft cloth to avoid scratching.<br />
If you are mounting the PRO-151FD continue with Steps 4 and 5. If you are mounting the PRO-111FD skip<br />
to Step 7.<br />
4 ) Turn the base cover over so that the bottom is facing up.<br />
5 ) Insert the stand supports (legs) into the base cover.<br />
Please carefully install the supports (left and right) so that they are in the correct positions. Misaligned supports<br />
can damage the base and/or the supports.<br />
6 ) Tighten the base screws to lock the supports in to place.<br />
Screws<br />
(4 x 10 mm: silver)<br />
Screws<br />
(4 x 10 mm: silver)<br />
Rear<br />
Front<br />
Completed<br />
stand<br />
Sheet<br />
Base cover<br />
16<br />
En<br />
Note: Assemble the stand with a soft sheet placed under the base cover. If a sheet is not laid before assembly,<br />
the front surface of the base cover may be scratched.
Install Your Flat Panel TV<br />
02<br />
7 ) After assembling the stand, attach the falling prevention metal fittings using the installation screws.<br />
Installation screws<br />
(M4 x 35 mm: black)<br />
(PRO-151FD)<br />
Falling prevention<br />
metal fitting<br />
8 ) With the flat panel TV still face down, insert the stand’s supports into the bottom of the panel then tighten<br />
the screws.<br />
Line up the column supports with<br />
the bottom of the flat panel TV.<br />
Installation bolts<br />
(M6 x 20 mm)<br />
Installation bolts<br />
(M6 x 20 mm)<br />
Insert the stand supports into the flat panel<br />
TV so that the arrow marked “FRONT/FACE<br />
AVANT” on the bottom of the stand<br />
points down.<br />
9 ) With the assistance of at least one other person, lift the panel upright then move it in to position.<br />
17<br />
En
02 Install Your Flat Panel TV<br />
Attach the Light-Blocking Shield<br />
Conduct after attaching the flat panel TV onto the stand.<br />
Light-blocking shield<br />
Front<br />
Base cover<br />
Rear<br />
Note: Attach the light-blocking shield after anchoring the base cover on a flat stable place.<br />
Peel off one side of the double-stick tape on the light-blocking shield and attach the shield onto the base cover.<br />
Front<br />
Rear<br />
Note: Be careful that the light-blocking shield does not catch on the pipe insertion holes. Anchor the lightblocking<br />
shield so that there are no gaps. If there is a gap, the light-blocking shield may peel off.<br />
18<br />
En
Install Your Flat Panel TV<br />
02<br />
Attach/Detach the Speaker<br />
The flat panel TV’s speaker delivers high-quality, clear sound. Although other devices can be added or removed<br />
from the mounted panel, physically attach the speaker last. Disconnect the cables from the Speaker and<br />
REMOVE THE SPEAKER before mounting or moving the panel.<br />
Before attaching the speaker to your mounted panel, review the information below.<br />
• Lay the panel face down on a stable surface when attaching speaker brackets.<br />
• Use only the supplied screws and tighten securely before stepping away.<br />
• Handle the speaker carefully to protect the cabinet and grille net from scratches and other damage.<br />
• Placing a CRT monitor near the speaker can cause a blur on the flat panel TV. Keep the distance between the<br />
speaker and the monitor.<br />
• Connecting these speakers to another panel or device can<br />
damage the unit or cause a fire.<br />
• When using tone control to increase treble, avoid overamplifying<br />
the volume.<br />
Note: Use the foam packing materials to protect the equipment from scratches or other damage during<br />
mounting.<br />
Stand-Mounted Panel<br />
1 ) Attach the appropriate speaker brackets (left and right) to the top and bottom on the back of the speakers<br />
using the supplied screws.<br />
Screw holes<br />
(PRO-151FD)<br />
Speaker bracket (For TOP-Right)<br />
Speaker bracket<br />
(For BOTTOM-Right)<br />
Screw holes<br />
Speaker bracket<br />
(For TOP-Right)<br />
Speaker bracket<br />
(For BOTTOM-Right)<br />
Place the speaker so its<br />
terminals (bottom) are<br />
facing you.<br />
19<br />
En
02 Install Your Flat Panel TV<br />
(PRO-111FD)<br />
Screw holes<br />
Speaker bracket (For TOP-Right)<br />
Speaker bracket<br />
(For BOTTOM-Right)<br />
Screw holes<br />
Speaker bracket<br />
(For TOP-Right)<br />
Speaker bracket<br />
(For BOTTOM-Right)<br />
Place the speaker so its<br />
terminals (bottom) are<br />
facing you.<br />
2 ) Screw a supplied screw into the speaker bracket hole (lower of the two) at the top, rear of the panel.<br />
Do not tighten it all the way yet. Leave it loose, with about 5 mm left to tighten.<br />
Speaker<br />
mounting<br />
hole<br />
Top, rear of<br />
flat panel TV<br />
Top of flat panel TV<br />
5 mm<br />
Leave a space of about 5 mm<br />
20<br />
En
Install Your Flat Panel TV<br />
02<br />
3 ) Hang the speaker bracket on the screw at the top by passing the wide part over it and lowering into the slot;<br />
screw in the lower screw temporarily.<br />
After passing the wide part of the hole of the speaker bracket (top) over the screw, lower the speaker onto it.<br />
(PRO-151FD)<br />
(PRO-111FD)<br />
After passing the<br />
wide part of the<br />
hole over the screw,<br />
lower the speaker.<br />
After passing the<br />
wide part of the<br />
hole over the screw,<br />
lower the speaker.<br />
Tighten with the provided<br />
screw the bottom speaker<br />
bracket to the flat panel<br />
TV temporarily (one place<br />
bottom).<br />
Tighten with the provided<br />
screw the bottom speaker<br />
bracket to the flat panel<br />
TV temporarily (one place<br />
bottom).<br />
4 ) Adjust the position of the speaker then tighten the upper and lower screws firmly.<br />
5 ) Tighten the two screws at the top and bottom for each speaker.<br />
(PRO-151FD)<br />
(PRO-111FD)<br />
6 ) Pass the supplied speaker cable between the speaker and the panel (below the speaker bracket) from below.<br />
7 ) Connect the speaker cables to the speaker.<br />
Refer to “ 2.2.2 Connect the Speaker Cables.”<br />
21<br />
En
02 Install Your Flat Panel TV<br />
8 ) Insert the cable in the groove on the speaker.<br />
(PRO-151FD)<br />
(PRO-111FD)<br />
Speaker cable<br />
Speaker<br />
terminal<br />
Speaker cable<br />
Speaker terminal<br />
Insertion<br />
in groove<br />
Insertion<br />
in groove<br />
9 ) Connect the other end of the speaker cables to the rear of the panel.<br />
Refer to “ 2.2.2 Connect the Speaker Cables.”<br />
Note: If the speaker needs to be repositioned (horizontally or vertically) after it is attached, loosen the speaker<br />
mounting screws first. Adjust the position then retighten the screws.<br />
2.2.2 Connect the Speaker Cables<br />
1 ) Press down on the tab.<br />
2 ) Insert the appropriately colored wire into the opening.<br />
3 ) Allow a small percentage of the cable’s bare wire to remain visible.<br />
4 ) Release the tab to clamp the wire.<br />
If the bare wire is hidden when the tab is released, repeat Steps 1<br />
through 4 until the proper amount of cable is showing.<br />
5 ) Repeat this process for each cable, matching the color of the wire to the<br />
appropriate terminal.<br />
6 ) Connect the speaker cables to the speaker.<br />
7 ) Bundle the speaker cables, power cord and other cables in the cable<br />
clamp then insert the clamp into an appropriate hole on the rear of the<br />
flat panel TV.<br />
Refer to “2.7 Route then Bundle the Power Cord and Cables.”<br />
Use the clamps as necessary (see page 33).<br />
Gray<br />
Black<br />
tab<br />
Gray<br />
Speaker terminal<br />
Red<br />
Black<br />
Red<br />
Speaker cable<br />
(PRO-151FD)<br />
22<br />
En
Install Your Flat Panel TV<br />
02<br />
PRO-151FD with the speaker installed<br />
Black<br />
Gray<br />
Black<br />
Red<br />
Cable clamp<br />
Speaker cable<br />
Cable clamp<br />
(PRO-111FD)<br />
• Before connecting the speakers to the flat panel TV, unplug<br />
the panel from the power outlet. Connecting the speaker<br />
cable with the power cord plugged in can cause<br />
malfunction or damage to the panel if the cable’s bare wire<br />
touches other equipment. Plug in the power cord after<br />
connecting the speakers.<br />
• Do not leave speaker cable wires bare and exposed at the<br />
terminals. Exposed wires can result in an electrical short<br />
causing malfunction or damage to the system.<br />
• Do not connect any devices to the speaker terminals other<br />
than the speakers specified.<br />
2.3 Wall/Ceiling Mounting<br />
Lay the 50” panel down on a raised surface then remove the stand.<br />
Installation bolts (1)<br />
Installation bolts (2)<br />
23<br />
En
02 Install Your Flat Panel TV<br />
A common flat panel TV mounting option is to hang the panel on a sturdy wall or from a reinforced ceiling. When<br />
mounting in this way, some preparations must be completed first. Follow the steps below to prepare the panel for<br />
mounting.<br />
1 ) Attach the speaker brackets to the speaker (see page 19).<br />
2 ) Attach the speaker to the panel (see page 21).<br />
(PRO-111FD)<br />
3 ) Connect the speaker cables to the speakers then to the panel (see page 22).<br />
4 ) Connect cables for any other devices to the panel.<br />
When deciding on a location for your flat panel TV, consider other equipment in the room. Equipment such<br />
as a DVR, Receiver, VCR, etc. requires some way to communicate with the panel, either directly or through<br />
another device. Review the instructions that came with the other equipment for available ports and<br />
terminals.<br />
After deciding which ports and terminals are needed, mark the connections on the flat panel TV for easier<br />
identification once the panel is mounted.<br />
5 ) Temporarily bundle loose cables with rubber bands (not included).<br />
6 ) Plug the flat panel TV’s power cord in to the panel but do NOT plug in to the power outlet.<br />
7 ) Follow installation directions provided with your selected wall/ceiling mount.<br />
For details, refer to the operating instructions supplied with the wall/ceiling mount unit.<br />
2.4 Mount the Flat Panel TV<br />
Because your flat panel TV is slim but heavy, have at least two people mount and/or position the panel. The<br />
following sections provide instructions for the different mounting and anchoring options.<br />
Anchor the Panel When Using a Stand<br />
When using a stand, stabilize the panel to keep it from tipping over. Please use the supplied metal fittings and<br />
screws to anchor the panel to a wall or other solid support structure.<br />
Another option is to purchase hooks, cords, and fittings through your installer or from your local hardware store.<br />
The hardware size and strength depends on the composition and thickness of the anchoring surface.<br />
Recommended hook: Nominal diameter 8 mm (3/8 inch), length 12 mm to 18 mm (0.5 inches to 0.7 inches)<br />
To anchor the panel when using the provided stand, follow the steps below.<br />
1 ) Attach the hooks to the mounting holes on the<br />
back of the panel.<br />
2 ) Sink the fittings into the wall or support structure.<br />
3 ) Run cords between the hooks and the fittings.<br />
1. Hook<br />
4 ) Tighten the cords until the panel is anchored but 2. Cord<br />
not pulled off balance.<br />
Fitting<br />
M8<br />
12 mm to 18 mm<br />
(0.5 inches to 0.7 inches)<br />
24<br />
En
Install Your Flat Panel TV<br />
02<br />
To stabilize the flat panel TV on a table or platform, use the supplied metal fittings and screws as well as<br />
commercially available wood screws. The wood screws are to anchor the metal fittings when mounting on a<br />
wooden surface. These screws should have a nominal diameter of 4 mm (5/32 inch) and are at least 20 mm (13/<br />
16 inch) long.<br />
Notes: Avoid moving the table after the panel is attached.<br />
Do not use bare wires for the cord. If any part of the wire is introduced into the ventilation port on the back<br />
of the display panel, fire or electrical shock could result.<br />
Follow the steps below to secure your flat panel TV.<br />
1 ) Mark locations for metal fittings and screws on the back edge of the table using the panel stand to determine<br />
placement.<br />
8 mm to 15 mm<br />
(3/8 inch to 5/8 inch)<br />
4 mm (5/32 inch)<br />
20 mm<br />
(13/16 inch)<br />
min.<br />
Wood screw<br />
(commercially<br />
available, 4 mm x<br />
20 mm (5/32 inch x<br />
13/16 inch) min.)<br />
(PRO-151FD)<br />
Wood screw<br />
(commercially<br />
available,<br />
4 mm x 20 mm<br />
(5/32 inch x 13/<br />
16 inch) min.)<br />
(PRO-111FD)<br />
2 ) Drill holes in the table or platform edge at the marked locations.<br />
3 ) Lift panel into place with the assistance with at least one other person.<br />
4 ) Use wood screws (not included) to secure the metal fittings to the table.<br />
25<br />
En
02 Install Your Flat Panel TV<br />
2.5 Attach the Color Sensor<br />
When attached to your panel, the color sensor analyses the brightness of the environment to automatically<br />
optimize the picture quality according to the viewing condition. To activate this function, select OPTIMUM on the<br />
AV Selection menu, Mode 1 or Mode 2 on the Room Light Sensor menu (refer to “3.4.1 Adjust the Picture for Your<br />
Room Lighting.”<br />
We strongly suggest you attach the color sensor to the bottom right of the front panel. It can be attached to the rear<br />
of the panel, but the color sensor may not operate properly depending on the conditions (refer to the Important<br />
bullets on page 28). For the actual procedure, follow the directions below.<br />
Note: Do not connect any other external device, such as a keyboard to the color sensor terminal.<br />
Do not connect the color sensor cable to a PC.<br />
To clean the sensor window, gently wipe with the supplied cleaning cloth.<br />
Do not use extension cables for the color sensor.<br />
Do not disassemble or modify the color sensor.<br />
Attach the Color Sensor to the Front Panel (recommended)<br />
This is a simple and easy-to-attach method using a magnet.<br />
1 ) Attach the color sensor at the bottom right of the front panel using a magnet.<br />
Magnet<br />
Flat panel TV<br />
(Front)<br />
Color<br />
sensor<br />
(Rear)<br />
2 ) Attach the color sensor along the bottom edge of the front panel flush with the right side.<br />
3 ) Connect the cable to the color sensor terminal on the rear upper bank but do NOT plug in to the power outlet.<br />
Color sensor terminal<br />
(upper bank)<br />
Color sensor<br />
Color sensor cable<br />
Cable clamp<br />
Note: Use the cable clamps as necessary.<br />
26<br />
En
Install Your Flat Panel TV<br />
02<br />
Attach the Color Sensor to the Rear Panel<br />
Methods of attaching the color sensor to the rear panel differ depending on the panel with or without sidemounted<br />
speakers.<br />
(when side-mounted speakers are installed)<br />
1 ) Remove the screws of the color sensor then replace the bracket.<br />
Use the removed screws again.<br />
(Bracket for PRO-151FD)<br />
2 ) Loosen the upper two (2) speaker bracket screws.<br />
3 ) Fit the color sensor bracket’s lower grooves into the screws.<br />
Adjust the color sensor/speaker bracket positions so as to stay in place.<br />
The bracket is for PRO-151FD panel but the procedure is the same for PRO-111FD.<br />
4 ) Fasten the screws.<br />
5 ) Connect the cable to the color sensor terminal on the rear upper bank but do NOT plug in to the power outlet.<br />
Color sensor<br />
Color sensor terminal<br />
(upper bank)<br />
Color sensor cable Speaker cable<br />
Cable clamp<br />
Cable clamp<br />
Notes: Do not loosen the screws at the bottom of the panel. When attached to the rear panel, the sensor window<br />
points upward.<br />
If the color sensor attached to the rear panel does not operate properly, attach it to the front panel.<br />
Do not use the supplied screws when attaching the color sensor using the speaker brackets.<br />
The color sensor may become hot due to a heat emitted from the panel. When using it in a hightemperature<br />
environment, attach the color sensor to the bottom of the front panel.<br />
27<br />
En
02 Install Your Flat Panel TV<br />
(when side-mounted speakers are not installed)<br />
1 ) Remove the screws of the color sensor then replace the bracket.<br />
Use the removed screws again.<br />
2 ) Finger tighten the supplied color sensor screws in the speaker screw holes.<br />
3 ) Fit the color sensor bracket’s lower grooves into the screws.<br />
Adjust the bracket position to stay in place.<br />
The bracket is for PRO-151FD panel but the procedure is the same for PRO-111FD.<br />
4 ) Fasten the screws.<br />
5 ) Connect the cable to the color sensor terminal on the rear upper bank but do NOT plug in to the power outlet.<br />
Important<br />
The color sensor may not operate properly:<br />
• if attached by methods other than specified above<br />
• if anything blocks light falling on the sensor window<br />
• if light falls on only part of the sensor window<br />
• if the light falling on the sensor window and the panel screen differs<br />
Notes: If the color sensor attached to the rear panel does not operate properly, attach it to the front panel.<br />
The color sensor may become hot due to a heat emitted from the panel. When using it in a hightemperature<br />
environment, attach the color sensor to the bottom of the front panel.<br />
Do not use the screws supplied for the speakers.<br />
28<br />
En
Install Your Flat Panel TV<br />
02<br />
2.6 Connect to Broadcast TV & Other Devices (DVR, Receiver, BDR, etc.)<br />
The type of equipment attached to your flat panel TV determines which panel ports are used. The following<br />
sections explain how to connect broadcast TV and playback equipment such as a DVD player, Surround Sound<br />
system, video recorder, etc. to the panel. If your equipment is not listed, please refer to the operating instructions<br />
that came with the device(s) for connection assistance.<br />
2.6.1 Add Analog (conventional) and Digital TV Channels<br />
Whether a TV station broadcasts in Analog or Digital, your flat panel TV shows the programs as long as the panel<br />
is programmed to accept the signal. To program your panel for broadcast TV, select terminal ANT.<br />
The ANT terminal accepts both analog and digital<br />
broadcasts. Connect a VHF/UHF antenna and/or cable TV<br />
to the panel’s rear ANT terminal, then press TV/DTV on<br />
the remote control to toggle between analog and digital<br />
broadcasts. When watching analog TV channels, you can<br />
also use an outdoor antenna for the clearest analog<br />
picture.<br />
If your outdoor antenna uses a 75-ohm coaxial cable with<br />
an F-type connector, plug it into the panel’s antenna<br />
terminal on the back.<br />
Rear view<br />
T<br />
W<br />
T<br />
W<br />
In order to watch both analog and<br />
digital broadcasts through your<br />
terrestrial antenna or cable<br />
connection, you must first connect<br />
the antenna cable to a splitter.<br />
2.6.2 Connect Your Other <strong>Pioneer</strong> Equipment<br />
This section provides cabling information for your other<br />
<strong>Pioneer</strong> equipment when combined with the panel. Each diagram can also be used as a reference tool for non-<strong>Pioneer</strong><br />
devices but port locations may differ or be unavailable.<br />
Connect cable or Satellite using STB (Set Top Box):<br />
T<br />
W<br />
T<br />
W<br />
Satellite antenna<br />
Rear view<br />
SAT IN<br />
Cable STB/Satellite STB<br />
Cable STB/Satellite STB<br />
AUDIO<br />
OUT<br />
COMPONENT<br />
VIDEO OUTPUT<br />
AUDIO<br />
OUT<br />
COMPONENT<br />
VIDEO OUTPUT<br />
HDMI OUT<br />
Y<br />
IN<br />
HDMI OUT<br />
Y<br />
IN<br />
PB<br />
OUT<br />
PB<br />
OUT<br />
PR<br />
PR<br />
When using a cable STB or Satellite STB, plug in to the antenna/cable TV wall outlet using the STB cable provided<br />
with your STB. If your STB has an HDMI terminal, use any of INPUT 4 through INPUT 6 (HDMI terminal) on the rear<br />
or INPUT 7 (HDMI terminal) on the side of the flat panel TV instead of making video connections. If you connect an<br />
antenna cable directly to TV, you must first connect the cable to a splitter. For details, refer to the operating manual<br />
that came with the STB.<br />
29<br />
En
02 Install Your Flat Panel TV<br />
Connect HDMI equipment (INPUT 4 through INPUT 6): Connect HDMI equipment (INPUT 7):<br />
T<br />
W<br />
T<br />
W<br />
Left side view<br />
Rear view<br />
HDMI compliant<br />
cable (HDMI cable<br />
having the HDMI<br />
mark)<br />
HDMI equipment<br />
INPUT 4 through INPUT 6 are HDMI terminals. Use<br />
INPUT 4 or INPUT 5 (HDMI) terminal when you also<br />
input analog audio signals. For details, refer to “5.2 Use<br />
HDMI Inputs.”<br />
Connect a DVD player:<br />
Audio cable<br />
(commercially<br />
available)<br />
Make this<br />
connection when<br />
inputting analog<br />
audio signals.<br />
HDMI compliant<br />
cable (HDMI cable<br />
having the HDMI<br />
mark)<br />
HDMI equipment<br />
Also use INPUT 7 (HDMI terminal) on the side of the<br />
panel when connecting HDMI equipment. For details,<br />
refer to “5.2 Use HDMI Inputs.”<br />
Connect an AV receiver:<br />
T<br />
T<br />
T<br />
T<br />
W<br />
W<br />
W<br />
W<br />
Rear view<br />
Rear view<br />
AV cable<br />
(commercially available)<br />
Component<br />
video cable<br />
(commercially<br />
available)<br />
This connection is<br />
not required when<br />
connecting an AV<br />
amp equipped with<br />
the surround<br />
function to a<br />
subwoofer.<br />
AV cable<br />
(commercially<br />
available)<br />
Optical digital<br />
cable<br />
(commercially<br />
available)<br />
DVD player<br />
Subwoofer<br />
AV receiver<br />
Use INPUT 2 terminals when connecting a DVD player<br />
or other audiovisual equipment. If your DVD player has<br />
an HDMI terminal, use this connection instead of<br />
making video connections. For details, refer to the<br />
operation manual that came with the DVD player.<br />
Use an optical digital cable to connect an AV receiver to<br />
DIGITAL OUT terminal (optical). If your AV receiver does<br />
not have a DIGITAL IN terminal (optical), you may<br />
connect the panel’s AUDIO OUT terminal (audio) to the<br />
audio input terminal on the AV receiver. For details, refer<br />
to the operation manual that came with the AV receiver.<br />
30<br />
En
Install Your Flat Panel TV<br />
02<br />
Connect a VCR:<br />
Connect a game console or camcorder:<br />
T<br />
W<br />
T<br />
W<br />
Left side view<br />
Rear view<br />
AV cable<br />
(commercially<br />
available)<br />
S-Video cable<br />
(commercially<br />
available)<br />
AV cable<br />
(commercially<br />
available)<br />
VCR<br />
Use INPUT 1 terminals when connecting a VCR or other<br />
equipment. For details, refer to the operation manual<br />
that came with the VCR.<br />
Connect control cords:<br />
Use INPUT 3 terminals when connecting a game<br />
console, camcorder or other audiovisual equipment.<br />
For details, refer to the operation manual that came<br />
with the game console or camcorder.<br />
Connect a PC:<br />
Camcorder/Game console<br />
T<br />
W<br />
T<br />
W<br />
T<br />
W<br />
T<br />
W<br />
Rear view<br />
Rear view<br />
CONTROL<br />
IN<br />
OUT<br />
RGB cable<br />
(commercially<br />
available)<br />
Stereo sound cable<br />
with a mini plug<br />
(commercially<br />
available)<br />
(When PC audio is<br />
connected)<br />
Personal computer<br />
Connect control cords between the panel’s CONTROL<br />
(OUT) terminal and other <strong>Pioneer</strong> equipment having<br />
the SR logo. Use a mono sound cable with a mini plug<br />
(not provided).<br />
Use the PC INPUT terminal (Analog RGB) when<br />
connecting a PC. If you also connect PC audio, use PC<br />
INPUT (Audio) with a stereo sound cable with a mini<br />
plug (not provided). For details, refer to the operation<br />
manual that came with the PC.<br />
31<br />
En
T<br />
W<br />
T<br />
W<br />
02 Install Your Flat Panel TV<br />
2.6.3 Connect the Power Cord to the Panel<br />
The final connection is the power cord. Always connect the panel’s power cord to a three-pronged outlet, verifying<br />
that the cord is properly grounded. The cord includes a noise filter that reduces electrical interference from the<br />
wall outlet.<br />
As long as the flat panel TV is plugged in to an outlet, some power is drawn through the panel. When the flat panel<br />
TV is not going to be used for a long period, unplug the panel from the power outlet. Unplugging the panel extends<br />
the life of the plasma as well as saves energy.<br />
Plug the cord in to the panel but do NOT plug it in to a power outlet yet.<br />
2.7 Route then Bundle the Power Cord and Cables<br />
Once the flat panel TV is mounted and the speaker is attached, place additional equipment in the final position(s).<br />
Lay out the power cord, panel cables and any other device cables in a logical pattern that works for the location.<br />
Please consider the following points when routing cables:<br />
• Access to a 3-prong (grounded) power outlet<br />
• Space for the noise filter between the panel and outlet<br />
• Placement of cables under carpets or across walking paths<br />
Usually the cord/cables have slack or are too long. Although rubber bands are a good temporary solution to<br />
bundle cables, they tend to break down too quickly. To keep cables organized and neat, use the included cable<br />
clamps to bundle cables. The diagram below shows a bundled speaker cable.<br />
(PRO-151FD)<br />
Speaker cable<br />
Cable clamp<br />
Bundle cables in small<br />
groups when possible for<br />
easier separation later,<br />
if necessary.<br />
(PRO-111FD)<br />
Speaker cable<br />
T<br />
W<br />
T<br />
W<br />
Cable clamp<br />
A reusable cable clamp is designed to lock the bundled cables in place. Your flat panel TV has a total of four holes<br />
to attach cable clamps to the back of the panel. Use the cable clamps as necessary.<br />
PRO-151FD<br />
PRO-111FD<br />
32<br />
En
Install Your Flat Panel TV<br />
02<br />
Follow the steps below to attach a cable clamp.<br />
1 ) Thread the clamp band through the holder and bundle the cable(s) in the cable clamp.<br />
2 ) Push and hold the levers then insert the hook into an appropriate hole on the rear of the flat panel TV.<br />
3 ) Pull up the clamp band to lock.<br />
1<br />
2 Cable clamp<br />
4 ) Confirm that the cable clamp is seated firmly in the panel.<br />
Note: Avoid pinching or creating pressure points when routing or bundling cables.<br />
To remove the clamp band, pull and hold the latch to release.<br />
To remove the cable clamp, push and hold the levers then pull it out from the hole.<br />
Latch<br />
Lever<br />
Lever<br />
Note: The longer a clamp is in place, the better chance of deterioration. An older clamp is more easily damaged<br />
while being removed and may not be reusable.<br />
33<br />
En
03 Basic <strong>Operations</strong> For Television Viewing<br />
3 Basic <strong>Operations</strong> For Television Viewing<br />
This chapter explores day-to-day operations such as powering on your flat panel TV, using the Home Menu, and<br />
adjusting the panel for the viewing area/room. The final section in this chapter provides hints and suggestions for<br />
those new to flat panel TV features.<br />
3.1 Turn the Flat Panel TV ON/OFF<br />
Your flat panel TV has three activity levels: Power On, Standby, and Power Off. Standby saves energy but allows<br />
the remote control to turn on the panel. The following instructions use the remote control. To operate the flat panel<br />
TV through the side panel buttons, refer to “1.2.1 Control Buttons and More on the Flat Panel TV” for button<br />
locations.<br />
Turn ON the Flat Panel TV<br />
To turn on the panel, follow the steps below.<br />
1 ) Plug the flat panel TV’s power cord in to a properly grounded outlet.<br />
2 ) Press any of the following buttons to turn the flat panel TV On.<br />
• Power On button (a) on the panel’s back in lower-left section (see page 9)<br />
• STANDBY/ON button on the side of the panel (see page 8)<br />
• Remote control’s TV (a) button located in the upper left corner (see page 12).<br />
Images appear on the panel screen.<br />
Note: Use the remote control’s MUTING button to reduce any excessive static noise.<br />
3 ) Confirm that the Power ON indicator lights blue.<br />
Sleep indicator<br />
(PRO-111FD)<br />
Standby indicator<br />
Power On indicator<br />
Note: While in Standby, pressing the remote control’s TV (a) button causes the flat panel TV to turn On.<br />
Turn OFF the Flat Panel TV<br />
Turning off the flat panel TV can mean entering Standby so features such as Sleep are still functional or it can<br />
mean cutting power to the panel. Unless the flat panel TV is to sit idle for long periods, leave the panel in Standby.<br />
Note: While in Standby or when powered off, the flat panel TV continues to draw some power as long as the panel<br />
is plugged in to an outlet.<br />
Follow the steps below to place the panel in Standby.<br />
1 ) Press the remote control’s TV (a) button or<br />
panel’s STANDBY/ON button.<br />
2 ) Confirm that the Standby indicator lights red.<br />
The table to the right provides samples of how the<br />
indicators light. Monitor the indicators On the front of<br />
the panel to check the power status.<br />
Note: Select from Auto, High, Mid and Low. Selecting<br />
Auto toggles the brightness of the Power On<br />
indicator between High, Mid and Low to match<br />
the brightness level of the viewing area. Refer<br />
to “Blue LED Dimmer” (page 46).<br />
Power On<br />
Indicator<br />
Standby<br />
Flat Panel TV Status<br />
Indicator<br />
Panel’s power cord is disconnected or<br />
the power cord is connected but the<br />
flat panel TV’s Power On button (a) is<br />
off<br />
Power is on but waiting for activation<br />
Panel is in Standby<br />
34<br />
En
Basic <strong>Operations</strong> For Television Viewing 03<br />
3.2 Program the Flat Panel TV for Television Viewing<br />
To watch TV and take advantage of some built-in features, choose the channel type or types (Analog, Digital),<br />
select a language, set your time zone, and program the channels. The sections below include how to set your<br />
channel type and how to use the Home Menu for each programming option.<br />
3.2.1 Choose Analog or Digital TV Channels<br />
To choose a channel setting, note the antenna input terminal connected to the back of the panel. Follow the<br />
directions below to select analog or digital TV channels.<br />
1) Confirm that the remote control is set to TV.<br />
Located at the bottom of the remote control.<br />
2) Press TV/DTV on the remote control.<br />
Located at the top of the remote control.<br />
3) Select a channel option, analog or digital.<br />
During operation, press TV/DTV to toggle between<br />
TV signals.<br />
Note: See “2.6.1 Add Analog (conventional) and Digital<br />
TV Channels” for more information about channel<br />
setting options.<br />
TV<br />
1<br />
5<br />
PC<br />
SELECT<br />
INPUT<br />
TV<br />
2<br />
INPUT<br />
6 7<br />
AV<br />
SELECTION<br />
CBL<br />
3 4<br />
DISPLAY<br />
RCV SAT VCR DVR<br />
TV/DTV<br />
SCREEN<br />
SIZE<br />
EDIT/LEARN<br />
DVD<br />
Note: When watching TV and separate video image (multi-screen), pressing the remote control’s TV/DTV button<br />
changes only the TV signal appearing on the left side of the panel.<br />
3.2.2 Explore the Home Menu<br />
The Home Menu is the main menu for the flat panel TV. Most commands and settings are programmed through<br />
this menu. The following section describes a typical method for working with the panel’s menus. For actual<br />
procedures, see the appropriate page(s) that describe a function.<br />
1) Press HOME MENU on the remote<br />
to access the main menu.<br />
2) Use the Up/Down arrows (/ ) to<br />
highlight a menu item.<br />
3) Use the Left/Right arrows (/ )<br />
to scroll through options for that<br />
menu item.<br />
4) Highlight the selected menu option.<br />
Remote control<br />
DVD<br />
TOP MENU<br />
HOME<br />
MENU<br />
SAT / DVD MENU<br />
SAT GUIDE<br />
ENTER<br />
RETURN<br />
Home Menu screen<br />
Channel<br />
Favorites<br />
Input<br />
Home Media Gallery<br />
HDMI Control<br />
Setup<br />
5) Press ENTER to lock in the change.<br />
6) Press RETURN to move back to a previous menu/submenu page when changing more than a single option.<br />
7) Press HOME MENU again to exit the menu screen.<br />
35<br />
En
03 Basic <strong>Operations</strong> For Television Viewing<br />
This chart provides a breakdown of the Home Menu for both AV and PC sources.<br />
36<br />
En<br />
AV Source Pg Option<br />
Channel 42 —<br />
Favorites 42 —<br />
Input 42 —<br />
Home Media Gallery 93 —<br />
HDMI Control 86 —<br />
Setup Picture 57 AV Selection<br />
61 Contrast*<br />
61 Brightness*<br />
61 Color*<br />
61 Tint*<br />
61 Sharpness*<br />
64 Pro Adjust*<br />
63 PureCinema**<br />
49 Sound Control***<br />
48 OPTIMUM<br />
Performance***<br />
61 Reset<br />
Sound 49 Treble<br />
49 Bass<br />
49 Balance<br />
75 Sound Effect<br />
49 Reset<br />
75 AVC<br />
Power Control 56 Energy Save<br />
76 No Signal off<br />
76 No Operation off<br />
Sleep Timer 44 —<br />
Option 47 Position<br />
59 Auto Size<br />
62 Side Mask<br />
84 HDMI Input<br />
91 HDMI Control Setting<br />
46 Blue LED Dimmer<br />
56 Orbiter<br />
56 Video Pattern<br />
59 Game Control Pref<br />
45 Room Light Sensor<br />
55 Screen Protection<br />
43 Label Input<br />
System Setup 38 Auto Installation<br />
39 Analog TV Setup<br />
41 Digital Tuner Setup<br />
50 Parental Control<br />
72 Closed Captions<br />
121 Digital Audio Output<br />
50 Change Password<br />
37 Language<br />
124 Technical Info<br />
Favorites Setup 42 Channel Mode<br />
43 Sort Favorites<br />
* Available when any option other than OPTIMUM is selected from the<br />
AV Selection menu.<br />
** Access this option through the Pro Adjust menu when any option<br />
other than OPTIMUM is selected from the AV Selection menu.<br />
*** Available only when OPTIMUM is selected from the AV Selection<br />
menu<br />
PC Source Pg Option<br />
Channel 42 —<br />
Favorites 42 —<br />
Input 42 —<br />
Home Media Gallery 93 —<br />
HDMI Control 86 —<br />
Setup Picture 57 AV Selection<br />
61 Contrast<br />
61 Brightness<br />
61 Red<br />
61 Green<br />
61 Blue<br />
61 Reset<br />
Sound 49 Treble<br />
49 Bass<br />
49 Balance<br />
75 Sound Effect<br />
49 Reset<br />
75 AVC<br />
Power Control 56 Energy Save<br />
77 Power Management<br />
Sleep Timer 44 —<br />
Option 122 Auto Setup<br />
122 <strong>Manual</strong> Setup<br />
84 HDMI Input<br />
91 HDMI Control Setting<br />
56 Orbiter<br />
43 Label Input<br />
Favorites Setup 42 Channel Mode<br />
43 Sort Favorites
Basic <strong>Operations</strong> For Television Viewing 03<br />
TV Screen Components<br />
Your flat panel TV has easy-to-read menus and graphic symbols that provide quick access to the desired options.<br />
Menus appearing in this manual may differ slightly from the actual menus but the functionality remains the<br />
same.<br />
1<br />
2 3<br />
Exit<br />
Sound<br />
TELEVISION<br />
Treble : 0<br />
Bass : 0<br />
4<br />
Reset<br />
Balance : 0<br />
Sound Effect :<br />
8<br />
AVC : Off<br />
xxxxxxxxxxxxxxxxxxxx<br />
xxxxxxxxxxxxxxxxxxxxxx<br />
HOME MENU<br />
Return<br />
1 - Exit button: Close the menu to return to TV<br />
viewing<br />
2 - Menu title: Display the selected menu title<br />
3 - TOOLS button: Display the TOOLS Menu<br />
4 - Menu: Select an option<br />
5 - HOME MENU button: Close the menu to return<br />
to TV viewing<br />
3.2.3 Assign a Language<br />
The default menu language is English. To assign a different language for menus and on-screen information,<br />
follow the steps below.<br />
1 ) Press HOME MENU.<br />
2 ) Select Setup from the main menu.<br />
Use the arrow buttons to highlight an option then press ENTER.<br />
3 ) Select System Setup from the Setup menu.<br />
4 ) Select Language from the System Setup menu.<br />
5 ) Select a language from the submenu.<br />
5 6 7<br />
Menu : English<br />
6 - Operation Guide area: Display the operational<br />
guidelines for the selected option(s)<br />
7 - Return button: Return to the previous menu<br />
screen<br />
8 - Picture preview (in reduced size)<br />
6 ) Press HOME MENU again to exit the menu.<br />
37<br />
En
03 Basic <strong>Operations</strong> For Television Viewing<br />
3.2.4 Set the Clock<br />
Set the flat panel TV’s clock to take advantage of many built-in features such as Time Zone and D.S.T. (Daylight<br />
Saving Time) activation for digital TV broadcast.<br />
Note: If the panel’s power cord is unplugged or there is a power outage, the time must be reset.<br />
Follow the steps below to set the clock.<br />
1 ) Access the System Setup through the Setup.<br />
2 ) Select Digital Tuner Setup from the System Setup menu.<br />
3 ) Select Clock from the Digital Tuner Setup menu.<br />
4 ) Select Time Zone from the options.<br />
5 ) Select the time zone for your area.<br />
Time Zone : Atlantic<br />
D.S.T. : On<br />
6 ) Select the menu option D.S.T. to activate/deactivate Daylight Saving Time.<br />
7 ) Select the proper option for your location.<br />
8 ) Press HOME MENU to close the menu and exit.<br />
3.2.5 Create the List of Channels<br />
This section describes how to search for and set up TV channels. There are two ways to add channels to your flat<br />
panel TV, Auto Installation for automatic channel selection or manual channel assignments. The Auto Installation<br />
adds all available channels from your selected TV provider. Once all channels are added to the list, simply delete<br />
any unwanted channels. This section provides steps to add/remove channels.<br />
Auto Installation<br />
Auto Installation searches for and adds TV channels to your list of viewable channels. Using the remote control,<br />
follow the steps below to automatically select all available channels.<br />
1 ) Access the System Setup through the Setup.<br />
2 ) Select Auto Installation from the System Setup menu.<br />
3 ) Select Air/Cable, Language, or Time Zone from the Auto Installation menu.<br />
4 ) Select an option.<br />
• Signal type: Air or Cable<br />
• Language: English, Français or Español<br />
• Time Zone: Atlantic, Eastern, Central, Mountain, Pacific, Alaska, or Hawaii<br />
38<br />
En
Basic <strong>Operations</strong> For Television Viewing 03<br />
5 ) Select Start.<br />
The panel automatically begins creating your list of channels.<br />
Language : English<br />
Air/Cable : Cable<br />
Time Zone : Atlantic<br />
Start<br />
Note: To quit Auto Installation before it is complete, press RETURN to recall the Auto Installation screen then<br />
EXIT.<br />
<strong>Manual</strong> Channel Selection<br />
To add channels without using the Auto Installation option, follow the directions below. Also, if a channel is<br />
skipped in error, use this method to add the channel to your list.<br />
1 ) Access the System Setup through the Setup.<br />
2 ) Select Analog TV Setup from the System Setup menu.<br />
3 ) Select <strong>Manual</strong> Adjust from the Analog TV Setup menu.<br />
4 ) Select Program Entry.<br />
5 ) Select a channel number to be added.<br />
Use the arrow buttons (/) to enter a channel number.<br />
6 ) Select Store from the <strong>Manual</strong> Adjust menu.<br />
7 ) Select Yes from the submenu.<br />
Program Entry : 1<br />
Store : Yes<br />
Tuner NR : On<br />
8 ) Press HOME MENU to exit the menu after all wanted channels have been added.<br />
Note: Analog channels can be added manually but digital channels can only be added using the Add New<br />
Channels button on the Digital Tuner Setup menu.<br />
Add New Channels<br />
To add new channels, follow the steps below.<br />
1 ) Access the System Setup through the Setup.<br />
2 ) Select Digital Tuner Setup from the System Setup menu.<br />
39<br />
En
03 Basic <strong>Operations</strong> For Television Viewing<br />
3 ) Select Installation from the Digital Tuner Setup menu.<br />
Installation<br />
Channel management<br />
Clock<br />
4 ) Select Add New Channels.<br />
Channel search starts automatically. If a new channel is found, it is stored automatically in the flat panel<br />
TV.<br />
To cancel channel search before it finishes, press RETURN.<br />
Software Keyboard<br />
This on-screen keyboard allows labeling manually added TV channels. Channel labels can be up to eight<br />
characters long to help channel identification. To use the Software Keyboard for labeling TV channels, follow the<br />
steps below.<br />
1 ) Access the System Setup through the Setup.<br />
2 ) Select Analog TV Setup from the System Setup menu.<br />
3 ) Select Label from the Analog TV Setup menu.<br />
4 ) Select Program Entry from the submenu.<br />
5 ) Select a program number.<br />
• Cable: 1 through 135<br />
• Air: 2 through 69<br />
6 ) Select Label.<br />
The Software Keyboard screen appears.<br />
Label<br />
I N P U<br />
1 2 3 4 5 6 7 8 9 0<br />
A B C D E F G H I J Delete<br />
K L M N O P Q R S T Space<br />
U V W X Y Z , . : ; Caps<br />
& ' ( ) + - * / _ @ OK Cancel<br />
7 ) Select the first character.<br />
The cursor moves to the next character space.<br />
8 ) Repeat the previous step to enter up to eight characters.<br />
• To change a character, use or to highlight the character then press ENTER. The cursor moves to the<br />
previous or next character.<br />
• To delete the entered character, highlight the character, select Delete then press ENTER.<br />
• To put a space after the entered character, highlight the space, select Space then press ENTER.<br />
• To toggle between upper case and lower case, highlight the character, select Caps then press ENTER.<br />
40<br />
En
Basic <strong>Operations</strong> For Television Viewing 03<br />
9 ) Select OK then press ENTER.<br />
The entry is complete.<br />
10 ) Press HOME MENU to exit the menu.<br />
3.2.6 Skip or Delete Unwanted Channels<br />
The Auto Installation process adds all channels available from your TV service provider. However, there may be<br />
some channels that are unwanted or are not age-appropriate for your home. This section explains how to bypass<br />
or delete unwanted channels when moving up/down one channel at a time and what programs are available for<br />
viewing.<br />
To skip or delete unwanted channels, use the remote’s CH+/CH– buttons to reset the status for those channels.<br />
Follow the steps below to change a channel’s status.<br />
1 ) Access the System Setup through the Setup.<br />
2 ) Select Digital Tuner Setup or Analog TV Setup from the System Setup menu.<br />
• Digital TV channels: Channel management > Channel Options > (Channel Delete) > (On)<br />
XXXX 00001.000<br />
XXXX 00002.000<br />
XXXX 00003.000<br />
XXXX 00004.000<br />
XXXX 00005.000<br />
XXXX 00006.000<br />
XXXX 00007.000<br />
XXXX 00008.000<br />
XXXX 00009.000<br />
3 ) Scroll to or highlight an unwanted channel number.<br />
4 ) Press ENTER to reverse the status for that channel.<br />
When there is a check mark next to the channel, it disappears.<br />
5 ) Press RETURN.<br />
A confirmation screen appears.<br />
6 ) Select Yes then press ENTER.<br />
The Channel Delete setting is complete.<br />
7 ) Press HOME MENU to exit the menu.<br />
If you select the (Channel Skip) option in Step 3, the setting is complete when exiting the Channel<br />
Options menu (no confirmation screen appears). Skip Steps 5 and 6.<br />
The instructions for restoring a skipped channel are the same as above. In Step 4 a check mark appears next to<br />
the added/restored channel.<br />
To skip an analog channel, follow the steps below.<br />
• Analog TV channels: <strong>Manual</strong> Adjust > Store > No<br />
Radio Skip<br />
This function allows skipping of radio channels at a time. To set this option, follow the steps below.<br />
1 ) Access the System Setup through the Setup.<br />
2 ) Select Digital Tuner Setup from the System Setup menu.<br />
3 ) Select Channel management from the Digital Tuner Setup menu.<br />
4 ) Select Radio Skip from the Channel management menu.<br />
5 ) Select On.<br />
6 ) Press HOME MENU to exit the menu.<br />
41<br />
En
03 Basic <strong>Operations</strong> For Television Viewing<br />
3.2.7 Channel List<br />
Your flat panel TV offers three channel lists for quick access to a desired channel: Favorites List, Channel List and<br />
Input List.<br />
Favorites List: Display your favorite channel numbers/names up to 20 channels (analog channels, Input 1 through<br />
7, PC), 20 digital channels, and 1 Home Media Gallery (top screen, see page 98)<br />
Store your most frequently viewed channels in the Favorites List. To display the Favorites List, press ENTER while<br />
showing a TV channel. For another method to access the Favorites List, follow the directions below.<br />
1 ) Press HOME MENU.<br />
2 ) Select Favorites from the main menu.<br />
Pressing the / button while showing the Channel List or Input List also causes the Favorites List to<br />
appear.<br />
Channel List: Display all analog/digital TV channels in each broadcast network group<br />
To display the Channel List, follow the directions below.<br />
1 ) Press HOME MENU.<br />
2 ) Select Channel from the main menu.<br />
Pressing the / button while showing the Favorites List or Input List also causes the Channel List to<br />
appear.<br />
Input List: Display external input source names from INPUT 1 through INPUT 7 and PC<br />
To display the Input List, follow the directions below.<br />
1 ) Press HOME MENU.<br />
2 ) Select Input from the main menu.<br />
Pressing the / button while showing the Favorites List or Channel List also causes the Input List to<br />
appear.<br />
Note: After selecting the desired channel, pressing ENTER causes the Channel List to close and the selected<br />
screen appears. Pressing RETURN or EXIT causes the Channel List to close and the screen before<br />
selection returns. Press an arrow button to cycle through the lists when viewing any of the lists.<br />
Favorites<br />
INPUT 6<br />
XXXXXX 00001.000<br />
XXXXXX 00004.000<br />
XXXXXX 00007.000<br />
XXXXXX 00009.000<br />
PC<br />
XXXXXX<br />
XXXXXX 00013.002<br />
XXXXXX 00015.000<br />
XXXXXX 00024.000<br />
1/2<br />
Set Favorite Channels<br />
Select up to ten (10) channels per list page, up to five pages for a total of 41 favorite channels. To assign channels<br />
to your Favorites or All, follow the steps below.<br />
1 ) Access the Favorites Setup through the Setup.<br />
2 ) Select Channel Mode from the Favorites Setup menu.<br />
42<br />
En<br />
3 ) Select All or Favorites from the Channel Mode menu.<br />
• To assign all channels, select All. To assign the registered channels, select Favorites.
Basic <strong>Operations</strong> For Television Viewing 03<br />
4 ) Select a TV channel to store.<br />
If the screen fails to fit in the window, a scroll bar appears.<br />
Pressing ENTER while watching a TV program also causes the favorite channel list to appear. If the<br />
Favorites list is empty, “No Favorites List.” appears.<br />
5 ) Press HOME MENU to exit the menu.<br />
Alternate Method to Store your Favorite Channels<br />
Use the TOOLS Menu to store TV channels, external input sources including PC, and Home Media Gallery<br />
contents. To store channels, follow the steps below.<br />
1 ) Press TOOLS.<br />
The TOOLS Menu appears on screen.<br />
2 ) Select Favorites Entry.<br />
Use the arrow buttons to highlight an option.<br />
3 ) Select On (/ ).<br />
The channel you are watching is stored in the favorite list.<br />
To cancel, use the arrow button to select Off.<br />
Notes:<br />
• Pressing EXIT, RETURN, or TOOLS again causes the TOOLS Menu to disappear.<br />
• Once the maximum number of channels are stored, a warning screen appears.<br />
• To quit the procedure before it finishes, press EXIT or RETURN on the remote control.<br />
Sort Favorite Channels<br />
To sort theough the store channels, follow the steps below.<br />
1 ) Access the Favorites Setup through the Setup.<br />
2 ) Select Sort Favorites from the Favorites Setup menu.<br />
3 ) Select a channel to move.<br />
4 ) Select a new location then press ENTER.<br />
The selected channel is moved to the new location. To sort another channel(s), repeat Steps 3 and 4.<br />
5 ) Press HOME MENU to exit the menu.<br />
Edit the Input List<br />
To change name of an Input, follow the steps below.<br />
1 ) Access the Option through the Setup.<br />
2 ) Select Label Input from the Option menu.<br />
3 ) Select an input or PC.<br />
The software keyboard appears.<br />
4 ) Enter the new name.<br />
Label<br />
K I D S<br />
1 2 3 4 5 6 7 8 9 0<br />
A B C D E F G H I J Delete<br />
K L M N O P Q R S T Space<br />
U V W X Y Z , . : ; Caps<br />
& ' ( ) + - * / _ @ OK Cancel<br />
5 ) Select OK to save the name and exit the menu.<br />
To cancel, press HOME MENU.<br />
43<br />
En
03 Basic <strong>Operations</strong> For Television Viewing<br />
3.3 Quick Start for Watching Television<br />
Your flat panel TV has many functions and features, some of which you may simply lack the time to set when first<br />
installing the panel. To begin watching TV quickly, refer to the basic information within this section. However, when<br />
it is convenient, we strongly suggest going through the rest of this manual and learning all that your flat panel TV<br />
can do.<br />
3.3.1 Change the Channel/Sub-Channel<br />
With the remote control pointed at the panel’s remote<br />
sensor, press the CH + button to sequentially change to the<br />
next highest available channel. The CH – button<br />
sequentially changes down to the next lowest available<br />
channel. Each press of CH + or CH – causes the channel to<br />
change sequentially from station to station. To return to the<br />
previous channel, press CH RETURN. To toggle between<br />
the two channels, press CH RETURN again. Each press of<br />
this button switches the channel between these two<br />
stations.<br />
Another option for changing the channel is to use the number buttons (0 through 9). Simply press the number<br />
buttons in the order needed for that channel. For example, enter Channel 231 as 2 - 3 - 1 or Channel 4 as the single<br />
number, 4.<br />
A recent addition to TV viewing is the Sub-channel. A digital channel can be split in to multiple signals. Each<br />
signal, called a sub-channel, can carry a different program. To watch a sub-channel, use a combination of number<br />
buttons and the dot (.) button. For example, if Channel 5 is digital and has three active sub-channels, enter 5 . 2<br />
to reach the second sub-channel.<br />
Note: To tune in a program more quickly, enter the channel or sub-channel then press CH ENTER.<br />
3.3.2 Adjust the Volume/Sound<br />
With the remote control pointed at the panel’s remote sensor, press and hold VOL+ to increase the sound volume<br />
gradually. Holding down VOL– decreases the volume at the same rate. A single press of VOL+ or VOL– causes<br />
the volume to adjust by minor increments.<br />
To silence all sound, press MUTING. The muting symbol ( e ) appears on screen. To return the volume to the<br />
previous level, press MUTING again. Pressing VOL+ once also increases the volume one step higher than the<br />
current level and cancels the muting mode.<br />
If the panel’s default sound level is too loud or too soft, refer to “3.4.6 General Sound (Audio) Adjustment.”<br />
3.3.3 Turn On the Sleep Timer<br />
To save energy and to maximize the life of your flat panel TV, try using the Sleep Timer for occasions when the<br />
panel may be left on by accident. The Sleep Timer places the panel in Standby when the selected time elapses.<br />
The Sleep Timer provides time periods of 30, 60, 90, or 120 minutes. When the Timer is down to five minutes, a<br />
reminder appears on screen each minute until the time has elapsed.<br />
To set the Sleep Timer, follow the steps below.<br />
1 ) Access the Sleep Timer through the Setup.<br />
2 ) Select the desired time period.<br />
Select between 30 minutes and 2 hours (120 minutes).<br />
44<br />
En<br />
3 ) Press HOME MENU to exit the menu.
Basic <strong>Operations</strong> For Television Viewing 03<br />
The SLEEP indicator on the front of the flat panel TV lights orange when the Sleep Timer is set. To check the<br />
remaining time, press TOOLS then select Sleep. “Remain ---min” appears at the top of the menu screen. After<br />
checking the time, press EXIT to return to your program without losing the Sleep Timer setting.<br />
Note: When the sleep timer has been set, “Remain ---min” appears at the top of the menu. However, the Video<br />
Pattern timer has priority over the sleep timer. When the Video Pattern timer is on, the sleep timer is<br />
deactivated. Video Pattern is explained fully later in this manual.<br />
3.4 Adjust the Picture and Sound Quality<br />
Your flat panel TV has many adjustment options for the picture and the sound to make it just right for you. This<br />
section provides basic adjustments but for detailed video/audio modifications, refer to “4 Additional Picture and<br />
Sound Adjustment Options” and “4.7 Select Alternatives for/to Sound.”<br />
3.4.1 Adjust the Picture for Your Room Lighting<br />
The flat panel TV senses the amount of light in your room and automatically adjusts the screen brightness for the<br />
best picture. Bright rooms require stronger coloring so images appear crisp while dimly lit rooms allow the<br />
picture to use more subtle coloring. Set the Color Sensor function to On for best coloring possible for the selected<br />
image and viewing environment (refer to “2.5 Attach the Color Sensor” on page 26 for details on how to attach<br />
the sensor).<br />
The panel ships with the Room Light Sensor turned Off. The sections below provide directions to turn the room<br />
lighting sensor and color sensor On/Off.<br />
Room Lighting Sensor<br />
To deactivate/reactivate the room lighting sensor, follow the steps below.<br />
1 ) Access the Option through the Setup.<br />
2 ) Select Room Light Sensor from the Option menu.<br />
3 ) Select Mode 1 or Mode 2 (or Off ) from the submenu.<br />
Off<br />
Mode 1<br />
Mode 2<br />
Option<br />
Description<br />
No effect<br />
automatically adjusts the picture brightness for the<br />
best possible image quality based on the<br />
information collected at the Room Light Sensor<br />
and Color Sensor<br />
automatically adjusts the picture brightness and<br />
coloring for best image quality possible for the<br />
viewing environment based on the information<br />
collected at the Room Light Sensor and Color<br />
Sensor<br />
Note: If the color sensor is not in use, adjustments are made for Mode 1 and Mode 2 based on the information<br />
collected at the Room Light Sensor.<br />
Game Control Pref : Off<br />
Room Light Sensor : Off<br />
Screen Protection<br />
Label Input<br />
4 ) Press HOME MENU to exit the menu.<br />
45<br />
En
03 Basic <strong>Operations</strong> For Television Viewing<br />
Blue LED Dimmer<br />
Adjust the brightness of the POWER ON indicator depending on the brightness level of the viewing area. Setting<br />
to Auto toggles the brightness of the indicator between High, Mid and Low to match the brightness level of the<br />
viewing area. To set the indicator, follow the directions below.<br />
1 ) Access the Option through the Setup.<br />
2 ) Select Blue LED Dimmer from the Option menu.<br />
3 ) Select Auto, High, Mid or Low from the submenu.<br />
4 ) Press HOME MENU to exit the menu.<br />
3.4.2 General Picture (Video) Adjustment for an AV Source<br />
The directions below apply to all AV sources except OPTIMUM. If the viewing option is OPTIMUM, your flat panel<br />
TV automatically adjusts the picture to the best possible level.<br />
1 ) Access the Picture through the Setup.<br />
2 ) Select an item to be adjusted.<br />
Contrast is used in the example below.<br />
Picture<br />
AV Selection : PERFORMANCE<br />
Contrast : 40<br />
Brightness : 0<br />
Color : 0<br />
Tint : 0<br />
Sharpness : 0<br />
Pro Adjust<br />
Reset<br />
3 ) Use the arrow buttons (/) to adjust to the desired level.<br />
Contrast 32<br />
4 ) Press HOME MENU to exit the menu.<br />
46<br />
En<br />
Reduce Noise from Analog TV<br />
Sometimes electronic signal static can cause imperfections in the picture. This static is called Video Noise. Your<br />
flat panel TV can reduce video noise from an analog TV channel, depending on the broadcast signal level.<br />
Sometimes the broadcast signal has higher interference levels so that some video noise is noticeable.<br />
This function is only selectable for signals from an antenna. Follow the steps below to reduce noise on an analog<br />
TV channel.<br />
1 ) Access the System Setup through the Setup.<br />
2 ) Select Analog TV Setup from the System Setup menu.<br />
3 ) Select <strong>Manual</strong> Adjust from the submenu.<br />
Only analog channels set using Auto Installation are manually adjustable.<br />
4 ) Select Program Entry.<br />
5 ) Select a channel number to be added.<br />
Use the arrow buttons (/) to enter a channel number.<br />
6 ) Select Tuner NR.<br />
7 ) Select On.<br />
The default setting is On.<br />
8 ) Press HOME MENU to exit the menu.
Basic <strong>Operations</strong> For Television Viewing 03<br />
Picture Image Position<br />
Each input source stores the picture adjustment settings for that view. Although repositioning is available in most<br />
screen views, when the screen is set to Dot-by-Dot, the Position menu is unavailable. Also, depending on the<br />
displayed video, the image position may not change after an adjustment.<br />
To adjust the picture’s horizontal and vertical position, follow the steps below.<br />
1 ) Access the Option through the Setup.<br />
2 ) Select Position from the Option menu.<br />
Position<br />
Auto Size : Off<br />
Side Mask<br />
HDMI Input<br />
HDMI Control Setting<br />
Blue LED Dimmer : Auto<br />
Orbiter : Off<br />
Video Pattern<br />
3 ) Select H/V Position Adjust from the submenu.<br />
4 ) Adjust the vertical and/or horizontal positioning using the arrow buttons.<br />
5 ) Press HOME MENU to exit the menu.<br />
Restore Default Picture<br />
After making multiple adjustments, it may be difficult to reverse improper settings. To restore the factory default<br />
video settings, follow the directions below.<br />
1 ) Highlight Reset from the Picture menu.<br />
2 ) Press ENTER to continue with the picture reset.<br />
A confirmation screen appears asking if settings should be returned to the factory defaults.<br />
3 ) Use the arrow buttons to highlight Yes.<br />
4 ) Press ENTER.<br />
All video settings return to the original default values when selecting options other than OPTIMUM or PC.<br />
When OPTIMUM is selected, video settings for OPTIMUM. AV Selection menus, and Sound Control<br />
settings return to the original default values.<br />
3.4.3 Compare Images When Adjusting the Picture<br />
When adjusting the picture, look for an overall improvement by adjusting each parameter or option one at a time.<br />
Many small adjustments lead to the best picture for your viewing area. As each option changes, refer back to the<br />
previously set image for comparison. This section includes adjustment notes and steps to adjust the flat panel<br />
TV’s picture.<br />
Each parameter/option must be adjusted separately. For example, if two options under AV Selection,<br />
PERFORMANCE and MOVIE need adjustment, change/compare one option then save the preferred setting<br />
before moving on to the other option. Below are other guidelines to follow when adjusting the picture.<br />
• Adjustments are available while on the After screen. Trying to make adjustments while on the Before causes<br />
a warning message to appear.<br />
• Switch to another parameter/option only from the After screen. If viewing the Before screen when selecting<br />
another option, the Before data is lost.<br />
• Exiting an option from the Before screen stores that previous entry in memory and deactivates the button.<br />
• Exiting an option from the After screen stores the new entry in memory and deactivates the TOOLS button.<br />
• Moving/changing the AV Selection parameter/option stores the option setting in memory (button continues<br />
to work).<br />
47<br />
En
03 Basic <strong>Operations</strong> For Television Viewing<br />
Follow the steps below to adjust options for the preferred picture quality.<br />
1 ) Access the Picture through the Setup.<br />
2 ) Select an option.<br />
3 ) Use the TOOLS button to toggle between the previous and adjusted images.<br />
4 ) Repeat Steps 2 and 3 to continue adjusting the option as needed.<br />
5 ) Repeat Steps 2 through 4 to adjust other picture options.<br />
6 ) Press HOME MENU to exit the menu.<br />
Note: if no selections are made within 60 seconds, the menu closes automatically and the current settings are<br />
saved to memory.<br />
To exit the menu without saving the changes, switch to the Before screen then press HOME MENU.<br />
3.4.4 Display a Graphical Picture/Sound Adjustment Screen<br />
Selecting OPTIMUM from the AV Selection menu causes the Picture menu to display different AV source<br />
submenus. Select On for the Sound Control option to automatically adjust the sound quality, and OPTIMUM<br />
Performance provides an on-screen graphic monitor for multiple picture and sound adjustments.<br />
OPTIMUM Performance<br />
OPTIMUM Performance displays on-going picture and sound adjustments using graphical data when selecting<br />
OPTIMUM from the AV Selection menu. OPTIMUM Performance provides the following bar graph data:<br />
• Analyzer: Histogram, RGB, Room Light, Color Sensor<br />
• Picture: Contrast, Brightness, Color, Sharpness, Color Temp, Gamma<br />
• Sound: Level<br />
OPTIMUM Performance<br />
[OPTIMUM] On<br />
OPTIMUM On/Off<br />
[Analyzer]<br />
Histogram<br />
RGB<br />
Room Light<br />
Color Sensor : Disable<br />
[Picture]<br />
Contrast<br />
Brightness<br />
Color<br />
Sharpness<br />
Color Temp<br />
Gamma<br />
[Sound]<br />
60 1k 12k(Hz)<br />
To display OPTIMUM Performance, follow the procedure below.<br />
1 ) Access the Picture through the Setup.<br />
2 ) Select AV Selection from the Picture menu.<br />
3 ) Select OPTIMUM from the AV Selection menu.<br />
4 ) Select OPTIMUM Performance from the Picture menu.<br />
The OPTIMUM Performance appears. To cancel the OPTIMUM Performance option, press EXIT.<br />
Note: When OPTIMUM is selected, press and hold DISPLAY on the remote control to show OPTIMUM<br />
Performance.<br />
OPTIMUM Performance compares the picture and sound quality between “Off” (unadjusted) and “On”<br />
(adjusted using the TOOLS button).<br />
48<br />
En
Basic <strong>Operations</strong> For Television Viewing 03<br />
3.4.5 Sound Control<br />
Setting the Sound Control option to On automatically adjusts to the highest sound quality possible for the<br />
selected image and viewing environment. This option is also available when OPTIMUM is selected in the AV<br />
Selection menu. To activate Sound Control, follow the procedure below.<br />
1 ) Access the Picture through the Setup.<br />
2 ) Select AV Selection from the Picture menu.<br />
3 ) Select OPTIMUM from the AV Selection menu.<br />
4 ) Select Sound Control from the Picture menu.<br />
5 ) Select On.<br />
6 ) Press HOME MENU to exit the menu.<br />
Note: When Sound Control from the Picture menu is selected, the only Sound menu option available is AVC (Auto<br />
Volume Control).<br />
3.4.6 General Sound (Audio) Adjustment<br />
Many prefer a heavier base when watching movies or music videos from an AV source or on TV. Others like a more<br />
balanced sound. To adjust the sound to your preference, follow the directions below.<br />
1 ) Access the Sound through the Setup.<br />
2 ) Select an option for adjustment.<br />
Treble : 0<br />
Bass : 0<br />
Balance : 0<br />
Sound Effect<br />
Reset<br />
AVC : Off<br />
3 ) Use the left/right arrow buttons (/) to adjust the option.<br />
Option Left Button Right Button<br />
Treble weakens tone strengthens tone<br />
Base weakens tone strengthens tone<br />
Balance shifts audio balance to the left shifts audio balance to the right<br />
4 ) Press HOME MENU to exit the menu.<br />
Restore Default Sound Setting<br />
To restore the factory default sound settings, follow the directions below.<br />
1 ) Highlight Reset from the Sound menu.<br />
2 ) Press ENTER to continue with the sound reset.<br />
A confirmation screen appears asking if settings should be returned to the factory defaults.<br />
3 ) Use the arrow buttons to highlight Yes.<br />
4 ) Press ENTER to restore all sound settings to the original default values.<br />
Note: The Auto Volume Control (AVC) setting cannot be restored to the factory default.<br />
49<br />
En
03 Basic <strong>Operations</strong> For Television Viewing<br />
3.5 Block Programs, Channels, or Content<br />
Although blocking programs, channels, or content is optional, some images may be inappropriate for all family<br />
members. Your flat panel TV supports a blocking function known as Parental Control. With Parental Control<br />
activated, certain material fails to appear on screen if it is beyond your select viewing level. Parental Control uses<br />
recognized rating systems but also allows blocks placed at your discretion. This section explains the different<br />
blocking functions and how to assign each type.<br />
Note: When watching a TV program, you may see an emergency alert message scrolling at the top of the screen.<br />
The television station is broadcasting the emergency message as a test or an alert in a real emergency. The<br />
flat panel TV ships with this function active. For information about emergency messages, refer to “3.5.3<br />
Assign a Rating System to Create Blocks”.<br />
3.5.1 Assign a Parental Control (Block) Password<br />
With Parental Control, inappropriate TV programs, VCR recordings, and DVD content can be blocked. When<br />
someone attempts to watch a blocked program or content, the flat panel TV displays the password window.<br />
Parental Control applies to both analog and digital material.<br />
To ensure that your blocks are not removed in error, the flat panel TV requires a password to change access to<br />
blocked programs, channels, or content. The default password for your panel is 1234. We strongly recommend<br />
changing the password to a four-digit code that is meaningful to you.<br />
Follow the steps below to change the password.<br />
1 ) Access the System Setup through the Setup.<br />
2 ) Select Change Password from the System Setup menu.<br />
Please Input Your Password.<br />
3 ) Enter the current four-digit code using the 0 through 9 buttons.<br />
A confirmation message appears on screen.<br />
4 ) Enter your new password.<br />
5 ) Enter your new password a second time when prompted.<br />
6 ) Press HOME MENU to exit the menu.<br />
Write your new password:<br />
If you forget your password:<br />
When “Please Input Your<br />
Password” appears at Step 4,<br />
press and hold the ENTER button<br />
for three or more seconds.<br />
The password reverts to the<br />
default password, 1234.<br />
50<br />
En
Basic <strong>Operations</strong> For Television Viewing 03<br />
3.5.2 Activate Parental Control<br />
The Parental Control function must be active for the panel to block content. If this option is turned Off, blocked<br />
programs appear on screen. To activate Parental Control blocking, follow the steps below.<br />
1 ) Access the System Setup through the Setup.<br />
2 ) Select Parental Control.<br />
The password entry screen appears.<br />
3 ) Enter your four-digit code using the 0 through 9 buttons.<br />
4 ) Select Status.<br />
5 ) Select On to activate Parental Control.<br />
6 ) Press HOME MENU to exit the menu.<br />
Status : Off<br />
MPAA Ratings<br />
TV Parental Guidelines<br />
Canadian English Ratings<br />
Canadian French Ratings<br />
Unavailable Ratings : View<br />
Digital Regional Ratings<br />
When a program is blocked, a (B) appears in appropriate rating boxes. If a channel is blocked but the Parental<br />
Control system is turned off, the symbol is a (V) and the channel/program is viewable.<br />
The lock symbol here marks<br />
blocked TV ratings.<br />
B<br />
B<br />
B<br />
V<br />
FV<br />
B<br />
D<br />
3.5.3 Assign a Rating System to Create Blocks<br />
Besides choosing to block certain channels, you may use one of the recognized rating systems to block programs<br />
and/or content. Your panel recognizes the following rating systems:<br />
• TV ratings<br />
• TV Parental Guidelines including unrated programming<br />
• Motion Picture Association of America (MPAA for movies)<br />
• Canadian English/French rating systems<br />
Note: Your flat panel TV ships with all ratings unblocked.<br />
To block TV or other content using a rating system, follow the steps below.<br />
1 ) Access the System Setup through the Setup.<br />
2 ) Select Parental Control from the System Setup menu.<br />
3 ) Select one of the rating systems from the submenu.<br />
51<br />
En
03 Basic <strong>Operations</strong> For Television Viewing<br />
MPAA Ratings menu<br />
TV Parental Guidelines menu<br />
N/A : View<br />
G : View<br />
PG : View<br />
PG-13 : View<br />
R : View<br />
NC-17 : View<br />
TV-None<br />
TV-Y<br />
TV-Y7<br />
TV-G<br />
TV-PG<br />
TV-14<br />
TV-MA<br />
B<br />
B<br />
B<br />
V<br />
V<br />
V<br />
V<br />
FV D L S V<br />
B<br />
V<br />
V<br />
V<br />
V<br />
V<br />
V<br />
V<br />
V<br />
V<br />
V<br />
V<br />
NR : View<br />
Canadian English Ratings menu<br />
Canadian French Ratings menu<br />
E : View<br />
C : View<br />
C8+ : View<br />
G : Block<br />
PG : Block<br />
14+ : Block<br />
18+ : Block<br />
Unavailable Ratings menu<br />
E : View<br />
G : View<br />
8 ans+ : View<br />
13 ans+ : View<br />
16 ans+ : View<br />
18 ans+ : View<br />
Digital Regional Ratings menu<br />
Status : Off<br />
MPAA Ratings<br />
TV Parental Guidelines<br />
Canadian English Ratings<br />
Canadian French Ratings<br />
Unavailable Ratings : View<br />
Digital Regional Ratings<br />
Status : Off<br />
MPAA Ratings<br />
TV Parental Guidelines<br />
Canadian English Ratings<br />
Canadian French Ratings<br />
Unavailable Ratings : View<br />
Digital Regional Ratings<br />
4 ) Use the arrow buttons to highlight a block level for that rating system.<br />
5 ) Press ENTER to reverse the blocked status for the highlighted TV Parental Guideline option.<br />
A block (B) or view (V) symbol appears in appropriate rating boxes. For other rating options, press / to<br />
toggle between block and view.<br />
6 ) Press HOME MENU to exit the menu.<br />
When a rating is blocked, all more severe ratings are blocked as well. For example, blocking TV rating TV-PG<br />
(Parental guidance suggested) automatically blocks TV-14 (Parents strongly cautioned) and TV-MA (Mature<br />
audiences only). In turn, unblocking a rating causes less severe ratings to become automatically available.<br />
Program Rating of “None”<br />
The flat panel TV also provides a rating setting that blocks programs with a rating of None. The US TV Parental<br />
Guidelines Rating system identifies programs with a None rating level. Examples of programs with a rating of<br />
None are as follows:<br />
52<br />
En<br />
• Emergency Bulletins (such as EAS messages, weather warning and others)<br />
• Locally originated programming<br />
• Public Service Announcements<br />
• News<br />
• Politics<br />
• Religion<br />
• Sports
Basic <strong>Operations</strong> For Television Viewing 03<br />
To block a program with a rating of None, follow the steps below.<br />
1 ) Access the System Setup through the Setup.<br />
2 ) Select Parental Control from the System Setup menu.<br />
3 ) Select TV Parental Guidelines from the Parental Control menu.<br />
4 ) Select TV-None from the submenu.<br />
5 ) Select an option (View or Block ).<br />
6 ) Press HOME MENU to exit the menu.<br />
Refer to “8.1 Ratings Charts (for Various Audience Classifications)” for detailed information about the different<br />
rating systems.<br />
Block Not Rated Programs<br />
With some TV programs, the rating information is unavailable. To block these programs, follow the steps below.<br />
1 ) Access the System Setup through the Setup.<br />
2 ) Select Parental Control from the System Setup menu.<br />
3 ) Select Unavailable Ratings from the Parental Control menu.<br />
4 ) Select an option (View or Block ).<br />
5 ) Press HOME MENU to exit the menu.<br />
Note: Your flat panel TV ships with this option set to View.<br />
New Ratings System for Digital Broadcasts<br />
Some Digital broadcasts carry new ratings that are not compatible with the panel’s original Parental Control<br />
settings. When first tuning to one of these broadcasts, the Digital Regional Ratings menu appears on screen.<br />
Change the Parental Control settings to handle the new ratings. Otherwise, previous blocked ratings may become<br />
unblocked.<br />
Note: Adding the new rating does not cause programs with this rating system to be blocked automatically.<br />
To add the new rating system to your panel, follow the directions below.<br />
1 ) Access the System Setup through the Setup.<br />
2 ) Select Parental Control from the System Setup menu.<br />
3 ) Select Digital Regional Ratings from the submenu.<br />
A list of available ratings appears.<br />
4 ) Select from the available ratings.<br />
5 ) Select a level from the available ratings.<br />
6 ) Select View or Block.<br />
7 ) Press HOME MENU to exit the menu.<br />
53<br />
En
03 Basic <strong>Operations</strong> For Television Viewing<br />
Delete a New Ratings System<br />
If an added ratings system is no longer needed, delete the ratings system from your flat panel TV. It is unnecessary<br />
to remove blocks from individual channels or programs. Deleting the ratings line removes any/all blocks initiated<br />
with that system.<br />
1 ) Access the System Setup through the Setup.<br />
2 ) Select Parental Control from the System Setup menu.<br />
3 ) Select Digital Regional Ratings from the submenu.<br />
4 ) Select RRT Rese to delete the new ratings system from the flat panel TV.<br />
The message “Reset digital regional ratings?” appears.<br />
5 ) Select OK.<br />
6 ) Press HOME MENU to exit the menu.<br />
While the Parental Control menu is open, the status display remains unchanged even if the system receives<br />
broadcasts carrying new ratings.<br />
3.5.4 Temporarily Remove a Block<br />
The password entry screen appears when detecting the blocked rating signals (with the picture and sound turned<br />
off). Entering your four-digit password allows you to view the program until your flat panel TV is placed into<br />
Standby or turned Off. To temporarily remove a block, follow the steps below.<br />
1 ) Tune the flat panel TV to the blocked channel.<br />
2 ) Wait for the Block message to appear on screen.<br />
3 ) Enter the four-digit password.<br />
The password window appears. When a four-digit password is entered, or no operation is performed within<br />
60 seconds, the window disappears. To recall the window after it disappears, change the channel or input<br />
source then return before repeating the above steps.<br />
Please Input Your Password.<br />
For INPUT 2 (except 480i signals) and INPUT 4 through INPUT 7, the password entry screen appears when Block<br />
is selected from the Unavailable Ratings menu.<br />
54<br />
En
Basic <strong>Operations</strong> For Television Viewing 03<br />
3.6 Smart Starts for New Owners<br />
Many of the flat panel TV features make it easy to use but also environmentally friendlier. This section explains<br />
how to extend the life of your panel while being energy efficient. We suggest applying all of the following functions<br />
below for the simplest usage, best quality, and longest life span.<br />
3.6.1 Use the TOOLS Menu<br />
To change the current menu to another option, the on-screen TOOLS Menu provides short-cuts to the available<br />
selections even while watching a program. To display the menu, press TOOLS on the remote control. The menus<br />
shown in this section differ, depending upon the menu.<br />
EXIT<br />
SAT GUIDE<br />
DVD<br />
TOP MENU<br />
ENTER<br />
TOOLS<br />
TELEVISION<br />
TOOLS<br />
Sound<br />
Random<br />
All Play Mode : Single<br />
A-B Repeat<br />
Time Search<br />
Repeat<br />
HOME<br />
MENU<br />
SAT / DVD MENU<br />
RETURN<br />
The TOOLS Menu provides short-cuts to the selectable menu options<br />
while watching a program.<br />
Use the arrow buttons to toggle between options. The setting is complete as soon as the selected option appears<br />
in the center of the screeen. When showing two screens, the TOOLS Menu appears on the main screen.<br />
3.6.2 Extend Your Panel Life<br />
This function provides short-cuts to your panel’s longer service life. Your flat panel TV includes the Screen<br />
Protection option. Activating this option causes the panel to automatically select the several different features<br />
that can prolong the life of your panel and help alleviate after-image ghosts or burn-in. To set this option, follow<br />
the steps below.<br />
1 ) Access the Option through the Setup.<br />
2 ) Select Screen Protection from the Option menu.<br />
A confirmation screen appears.<br />
3 ) Select Yes from the submenu.<br />
The following settings are automatically entered:<br />
•Auto Size: Wide-Zoom<br />
•Side Mask - Detection: Mode 1<br />
•Orbiter (AV source): Mode 1<br />
•Orbiter (PC source): Mode 1<br />
•Energy Save: Mode 1<br />
4 ) Press HOME MENU to exit the menu.<br />
55<br />
En
03 Basic <strong>Operations</strong> For Television Viewing<br />
3.6.3 Turn On the Image Orbiter<br />
A built-in feature to protect against burn-in is the Orbiter function. Orbiter automatically changes the position of<br />
the picture imperceptibly while the image is on screen. To activate the Orbiter, follow the steps below. To cancel<br />
this function, select Off in Step 3.<br />
1 ) Access the Option through the Setup.<br />
2 ) Select Orbiter from the Option menu.<br />
3 ) Select Mode 1 or Mode 2.<br />
• AV source Mode 1: for any screen mode except Dot by Dot<br />
• AV source Mode 2: for all available screen modes<br />
• PC source Mode 1: to enable the Orbiter<br />
• PC source Mode 2: to smooth the text/character appearance<br />
4 ) Press HOME MENU to exit the menu.<br />
Note: The farthest edges of an image may be hidden at times as the picture position shifts. Also, when the Orbiter<br />
function is set to Mode 1 or Mode 2, the image may appear to drop slightly on the screen.<br />
3.6.4 Trigger the Screen-Saving Video Pattern Periodically<br />
The Video Pattern function causes the screen to appear white, which helps to alleviate after-image ghosts or burnin.<br />
While the Video Pattern screen is on, only the remote’s TV (a) button and the panel’s STANDBY/ON button<br />
is available. The panel automatically switches to Standby one hour after running the Video Pattern screen. To<br />
cancel the Video Pattern screen, press the remote’s TV (a) or the panel’s STANDBY/ON.<br />
To activate the Video Pattern screen, follow the steps below.<br />
1 ) Access the Option through the Setup.<br />
2 ) Select Video Pattern from the Option menu.<br />
A confirmation screen appears.<br />
3 ) Select Start from the submenu.<br />
The Video Pattern screen appears.<br />
4 ) Leave the panel alone for a minimum of one hour.<br />
Note: The Video Pattern timer has priority over Sleep Timer, No Signal off, and No Power off (Power Management)<br />
settings.<br />
3.6.5 Activate Energy Save to Reduce Power Usage<br />
The Energy Save option decreases picture brightness and lowers power consumption. The recommended setting,<br />
Energy Save Mode 1, extends the life of your panel while keeping power usage at a minimum.<br />
Follow the steps below to activate an Energy Save option.<br />
1 ) Access the Power Control through the Setup.<br />
2 ) Select Energy Save from the menu.<br />
3 ) Select an option from the Energy Save submenu.<br />
Option<br />
Description<br />
Off<br />
No effect<br />
Mode 1<br />
consumes less power than Off<br />
Mode 2 consumes less power than Mode 1<br />
4 ) Press HOME MENU to exit the menu.<br />
56<br />
En
Additional Picture and Sound Adjustment Options<br />
04<br />
4 Additional Picture and Sound Adjustment<br />
Options<br />
To take advantage of all that your flat panel TV offers, browse this chapter for features and functions that enhance<br />
your viewing experience. Most sections deal with adjusting the picture and arranging screen/menu items while<br />
the remaining sections provide sound and power management options. Apply as many or as few of these changes<br />
as desired.<br />
4.1 Choose an AV Option (Video, Game, etc.)<br />
Similar to the purpose for the room light sensor, the AV Option or Selection depends upon the brightness of the<br />
environment and the program or movie on screen. Images can be from either an AV Source or from a PC. Both<br />
sources are discussed below.<br />
Choose from among the seven AV Selections for the best image from an external AV Source. Use either the<br />
remote control or the Home Menu to select the AV source. For a PC, skip down to “4.1.3 Choose a PC Source.”<br />
If the AV source is a Game Control, select GAME and refer to “4.1.4 Set the Panel to Recognize a Game Console”<br />
for more information.<br />
4.1.1 AV Source through the Remote Control<br />
Follow the directions below to set an AV Selection for an external AV Source using the remote control.<br />
1 ) Press AV SELECTION on the remote control.<br />
The current AV selection appears.<br />
2 ) Press AV SELECTION again before the displayed mode disappears.<br />
Each press cycles the options in the order shown below.<br />
AV Selection<br />
OPTIMUM<br />
PERFORMANCE<br />
PURE<br />
MOVIE<br />
SPORT<br />
GAME<br />
Standard<br />
Description<br />
automatically adjusts the image quality for the<br />
brightness level of the viewing area (shared by<br />
external input and TV input sources)<br />
for a highly defined image in a normally bright<br />
room (shared by external input and TV input<br />
sources)<br />
reflects input signals as faithfully as possible for<br />
checking image materials, for example (shared by<br />
external input and TV input sources)<br />
for movies (shared by external input and TV input<br />
sources)<br />
for sports programs (shared by external input and<br />
TV input sources)<br />
lowers image brightness for easier viewing (shared<br />
by external input and TV input sources)<br />
allows customizing settings as desired (set the<br />
mode for each input source)<br />
3 ) Allow the AV Selection screen to disappear.<br />
When the screen disappears, the panel locks in last viewed option and the menu closes.<br />
57<br />
En
04 Additional Picture and Sound Adjustment Options<br />
4.1.2 Choose an AV Source through the Home Menu<br />
The other method for choosing an AV Selection uses the Home Menu. Follow the directions below to set an AV<br />
Selection for an external AV Source.<br />
The AV Selection, OPTIMUM, automatically adjusts to the highest image quality possible for the selected source<br />
and viewing environment. Your flat panel TV employs advanced sound reproduction technologies, such as SRS<br />
WOW HD TM , OPTIMUM also automatically adjusts to the optimum sound for the selected scene. This process is<br />
gradual so changes to the tint and brightness may be visible. This is normal and is not a malfunction.<br />
To choose an AV source through the Home Menu, follow the steps below.<br />
1 ) Access the Picture through the Setup.<br />
2 ) Select AV Selection from the Picture menu.<br />
3 ) Select an option from the submenu.<br />
AV Selection<br />
OPTIMUM<br />
PERFORMANCE<br />
PURE<br />
MOVIE<br />
SPORT<br />
GAME<br />
Standard<br />
When OPTIMUM is selected,<br />
images are adjusted automatically<br />
based on the information collected<br />
at the Room Light Sensor, as well<br />
as the Color Sensor (when in use).<br />
Picture<br />
AV Selection : OPTIMUM<br />
PureCinema<br />
Sound Control : Off<br />
OPTIMUM Performance<br />
Reset<br />
(Submenu when OPTIMUM is selected for AV Selection)<br />
4 ) Press HOME MENU to close and exit the menu.<br />
4.1.3 Choose a PC Source<br />
From a PC, choose between the two AV Selections for the best image. The options are as follows:<br />
• STANDARD: for a highly defined image in a normally bright room<br />
• USER: allows customizing settings as desired for each input source<br />
58<br />
En
Additional Picture and Sound Adjustment Options<br />
04<br />
4.1.4 Set the Panel to Recognize a Game Console<br />
When adding a game console to your flat panel TV, use the Game function to establish a preference for image<br />
quality or for operability.<br />
To have the panel store your Game preference, follow the steps below.<br />
1 ) Access the Option through the Setup.<br />
2 ) Select Game Control Pref from the menu.<br />
3 ) Select On (operability preferred) or Off (image quality preferred).<br />
4 ) Press HOME MENU to exit the menu.<br />
To activate the Game Control Pref option, set the AV Selection to GAME and use an external input (unless the<br />
source is coming from a PC). When a PC source menu is on screen, the Game Control Pref option is ignored.<br />
Also, the Game Control Pref option for operability (on) is ignored during multi-screen viewing (refer to “4.4 View<br />
in Multi-Screen”) or image freezing (refer to “4.5 Freeze the Picture”).<br />
4.2 Adjust Specific Picture Elements<br />
Plasma technology delivers one of the best images available today. However, the viewing area/environment and<br />
personal preferences affect how the picture appears. This section provides methods to adjust the picture and sound<br />
for your best viewing experience.<br />
4.2.1 Choose a Screen Size (Automatically or <strong>Manual</strong>ly)<br />
Automatic Screen Sizing<br />
The flat panel TV can automatically select an appropriate screen size for the incoming video signal from a<br />
connected HDMI device. To allow automatic screen sizing, follow the steps below.<br />
1 ) Access the Option through the Setup.<br />
2 ) Select Auto Size from the Option menu.<br />
3 ) Select Natural or Wide-Zoom from the submenu.<br />
Option<br />
Off<br />
Natural<br />
Wide-Zoom<br />
Description<br />
deactivates the Auto Size function<br />
adjusts the image to the screen size<br />
enlarges and displays only the 4:3 aspect ratio<br />
portion in full and wide screen<br />
4 ) Press HOME MENU to exit the menu.<br />
Note: When a video signal contains no aspect ratio information, the Automatic Screen Size function is unavailable.<br />
59<br />
En
04 Additional Picture and Sound Adjustment Options<br />
<strong>Manual</strong> Screen Sizing<br />
<strong>Manual</strong>ly select an appropriate screen size if an image fails to appear in the correct format. Browse the menu for<br />
the correct screen size for a specific program.<br />
The selectable screen sizes differ depending on the types of input signals. While watching a TV broadcast, press<br />
SCREEN SIZE on the remote control to cycle the picture through Auto, FULL, Dot by Dot, ZOOM, CINEMA, 4:3,<br />
WIDE, WIDE 1 and WIDE 2. Freely change the screen size during broadcasts or video from other input sources.<br />
Auto is available when receiving HD broadcasts.<br />
The following chart provides information about how the screen appears for each option.<br />
Auto<br />
FULL<br />
Dot by Dot<br />
ZOOM<br />
CINEMA<br />
AV Option<br />
Description<br />
adds side masks or displays the image in full<br />
screen when detecting HD pictures containing side<br />
masks. See Detect Masks on page 62.<br />
squeezes 16:9 images<br />
matches input signal to the same number of screen<br />
pixels (available for 1080i or 1080p signals only)<br />
bars may appear on the top and bottom on some<br />
programs that are 16:9 letterbox<br />
bars may appear on the top and bottom on some<br />
programs that are 14:9 letterbox (available for SD<br />
signals only)<br />
4:3 side bars appear on each side<br />
WIDE<br />
WIDE 1<br />
WIDE 2<br />
PC Option<br />
pictures progressively stretch toward each side<br />
(available for SD signals only)<br />
pictures progressively stretch toward each side<br />
(available for HD signals only)<br />
pictures evenly stretch toward each side (available<br />
for HD signals only)<br />
Description<br />
4:3 fills without altering the input signal aspect ratio<br />
FULL<br />
shows 16:9 screen display<br />
With WIDE 1 or WIDE 2 selected, a High Definition (HD) TV broadcast may crop part of an image or menu. If an<br />
image or menu appears cut or runs off the screen, change the option to FULL.<br />
Avoid showing signals that fill only part of the screen. Images that fail to fill the screen may cause temporary or<br />
permanent image retention depending on the frequency and duration. For example, an HD broadcast with side<br />
masks (4:3 content) causes uneven wear of the plasma cells. If side masks appear around a broadcast, after that<br />
program or movie is over, switch to a full screen motion video. This action helps the panel balance wear for the<br />
plasma cells and guard against after-image issues. For more information about Masks, refer to “4.3.1 Adjust for<br />
Screen Masking (black bars on sides).”<br />
Note: Not all broadcast programs carry alternative screen sizes.<br />
60<br />
En
Additional Picture and Sound Adjustment Options<br />
04<br />
4.2.2 Correct the Picture for an AV or PC Source<br />
Although picture adjustments are to your personal preferences, often the source causes unanticipated image<br />
changes. Your flat panel TV offers several adjustment options.<br />
AV Source<br />
PC Source<br />
Option Left Arrow Right Arrow<br />
Contrast less contrast more contrast<br />
Brightness dimmer brighter<br />
Color decreased intensity increased intensity<br />
Tint purplish skin tones greenish skin tones<br />
Sharpness softer definition crisper definition<br />
Option Left Arrow Right Arrow<br />
Contrast less contrast more contrast<br />
Brightness dimmer brighter<br />
Red weaker color stronger color<br />
Green weaker color stronger color<br />
Blue weaker color stronger color<br />
To correct the picture for an AV or a PC source, follow the steps below.<br />
1 ) Access the Picture through the Setup.<br />
2 ) Select an option to adjust.<br />
AV Source<br />
PC Source<br />
Picture<br />
AV Selection : PERFORMANCE<br />
Contrast : 40<br />
Brightness : 0<br />
Color : 0<br />
Tint : 0<br />
Sharpness : 0<br />
Pro Adjust<br />
Reset<br />
Picture<br />
AV Selection : STANDARD<br />
Contrast : 40<br />
Brightness : 0<br />
Red : 0<br />
Green : 0<br />
Blue : 0<br />
Reset<br />
3 ) Select the desired level for that option using the left/right arrows (/).<br />
Contrast 32<br />
4 ) Repeat the process for any additional adjustments.<br />
5 ) Press HOME MENU to exit the menu after all adjustments are complete.<br />
Note: Reset returns all settings to the factory defaults.<br />
61<br />
En
04 Additional Picture and Sound Adjustment Options<br />
4.3 Assign Advanced Picture Functions<br />
Your flat panel TV provides various advanced functions for optimizing the picture quality that go beyond the basic<br />
adjustments explained earlier in this manual. This section explores the value offered through <strong>Pioneer</strong>’s Pro Adjust<br />
High Definition (HD) support, top quality blacks, better balanced whites, and overall color improvements.<br />
4.3.1 Adjust for Screen Masking (black bars on sides)<br />
Screen Masks fill areas on both sides of a picture. Some content fails to fill the screen so bars appear on each<br />
side of the picture. This section explains how to adjust screen masking.<br />
Detect Masks<br />
Some HD broadcasts transmit in 4:3 content with side masks. Side masks are black bars that appear on the<br />
picture’s left and right sides. If the flat panel TV’s Screen Size is set to Natural during the Auto Size process, gray<br />
bars replace the black bars. When the panel is set to Wide-Zoom, the bars are hidden. These responses reduce<br />
after-image concerns.<br />
To allow the panel to detect side masks, follow the steps below.<br />
1 ) Access the Option through the Setup.<br />
2 ) Select Side Mask from the Option menu.<br />
3 ) Select Detection from the submenu.<br />
4 ) Select Mode 1 or Mode 2 to activate Side Mask Detection.<br />
Mode 1 detects only black side masks and Mode 2 detects both black and illustrated side masks. Select Off<br />
to deactivate this function.<br />
5 ) Press HOME MENU to exit the menu.<br />
6 ) Confirm that the word “AUTO” appears in the InfoBanner.<br />
Video signals can affect the Side Mask Detection function differently. For High Definition broadcasts, if Side Mask<br />
Detection is on, the panel automatically detects images containing side masks and shows the picture in full<br />
screen. Cycle the screen size to select Auto for video signals without aspect ratio information.<br />
Video content also can affect the Side Mask Detection function. If a detection error occurs when trying to watch<br />
HD content, manually change the screen size to the proper setting for the content.<br />
HD Wide Mode<br />
The HD Wide Mode allows selecting the display mode (WIDE 1 or WIDE 2) when detecting side masks that appear<br />
in a 4:3 image. This option is available when the Auto Size menu is set to Wide-Zoom and Side Mask Detection to<br />
Mode 1 or Mode 2. To allow the HD Wide Mode, follow the steps below.<br />
1 ) Access the Option through the Setup.<br />
2 ) Select Side Mask from the Option menu.<br />
3 ) Select HD Wide Mode from the submenu.<br />
4 ) Select Mode 1 or Mode 2 to activate HD Wide Mode.<br />
• Mode 1: screen mode sets to WIDE 1 when detecting side masks.<br />
• Mode 2: screen mode sets to WIDE 2 when detecting side masks.<br />
5 ) Press HOME MENU to exit the menu.<br />
62<br />
En
Additional Picture and Sound Adjustment Options<br />
04<br />
Lighten Side Masks<br />
If content appears with bars (side masks) on each side of a picture when the screen size is 4:3 and Side Mask<br />
Detection is set to Mode 1 or Mode 2, the bars automatically change from black to gray. However, the gray is fairly<br />
dark. To change the bars to a lighter shade of gray, follow the steps below.<br />
1 ) Access the Option through the Setup.<br />
2 ) Select Side Mask from the Option menu.<br />
3 ) Select Brightness Sync. from the submenu.<br />
4 ) Select the desired parameter.<br />
Fixed<br />
Auto<br />
Parameter<br />
Description<br />
sets the same brightness for gray side masks<br />
adjusts the side mask brightness according to the<br />
brightness of screen images<br />
5 ) Press HOME MENU to exit the menu.<br />
4.3.2 Select a PureCinema Level for High Quality Image<br />
<strong>Pioneer</strong>’s PureCinema automatically detects and analyses a film-based source (originally encoded at 24 frames/<br />
second) then recreates each still film frame for HD picture quality. The function supports both film and text<br />
material.<br />
To set the PureCinema level for your HD material, follow the steps below.<br />
1 ) Access the Picture through the Setup.<br />
With AV Selection set to OPTIMUM, go to Step 2.<br />
With AV Selection set to any options other than OPTIMUM, select Pro Adjust then go to Step 2.<br />
2 ) Select PureCinema from the submenu.<br />
3 ) Select Film Mode or Text Optimization depending on the material.<br />
4 ) Select the desired parameter.<br />
Mode Parameter Description<br />
Film Mode Off deactivates PureCinema<br />
Standard (not available for<br />
input signals 480p, 720p @60<br />
Hz, or 1080p @60 Hz)<br />
Smooth (not available for input<br />
signals 1080p @60 Hz)<br />
Advance (not available for input<br />
signals 1080p @60 Hz)<br />
automatically detects recorded<br />
image data when displaying<br />
DVD or high-definition images<br />
(e.g., movies) having 24 frames<br />
per second for smooth and vivid<br />
playback<br />
produces smoother and more<br />
vivid moving images<br />
converts theatre-quality images<br />
to 72 Hz when displaying DVD<br />
images (e.g., movies) having 24<br />
frames per second for smooth<br />
and vivid playback<br />
Text Off deactivates text optimization<br />
Optimization On<br />
improves subtitle display<br />
quality<br />
63<br />
En
04 Additional Picture and Sound Adjustment Options<br />
5 ) Press HOME MENU to exit the menu.<br />
Note: Activating the Game Control Pref setting under the Option menu disables the PureCinema setting.<br />
4.3.3 Select an Intelligent Mode Option<br />
Use this function to optimize color tones and brightness for images.<br />
To select the Intelligent Mode, follow the steps below.<br />
1 ) Access the Picture through the Setup.<br />
2 ) Select Pro Adjust from the Picture menu.<br />
3 ) Select Intelligent Mode from the submenu.<br />
4 ) Select Mode 1 or Mode 2 (or Off).<br />
5 ) Select the desired parameter.<br />
Parameter<br />
Off<br />
Mode 1<br />
Mode 2<br />
Description<br />
No effect<br />
compensates for more effective picture adjustment<br />
compensates for appropriate picture adjustment<br />
6 ) Press HOME MENU to exit the menu.<br />
Note: As this function automatically optimizes image quality, this process is gradual so changes to the tint and<br />
brightness may be visible. This is normal and is not a malfunction.<br />
4.3.4 Select the Picture Detail Options<br />
The Picture Detail function provides five adjustment options: DRE Picture, Black Level, ACL, Enhancer Mode and<br />
Gamma for enhanced image contrast, sharpness and image gradation characteristics.<br />
To select the Picture Detail options, follow the steps below.<br />
1 ) Access the Picture through the Setup.<br />
2 ) Select Pro Adjust from the Picture menu.<br />
3 ) Select Picture Detail from the submenu.<br />
4 ) Select DRE Picture, Black Level, ACL, Enhancer Mode or Gamma.<br />
5 ) Select the desired parameter.<br />
64<br />
En<br />
Option Parameter Description<br />
DRE Picture (emphasizes Off No effect<br />
image contrast between<br />
brightness and darkness)<br />
High enhances DRE picture<br />
Mid standard DRE picture<br />
Low moderate DRE picture<br />
Black Level (emphasizes dark Off No effect<br />
portion of images for enhanced<br />
On<br />
contrast)<br />
activates Black Level<br />
ACL (compensates images for Off No effect<br />
optimum contrast<br />
characteristics)<br />
On activates ACL
Additional Picture and Sound Adjustment Options<br />
04<br />
Option Parameter Description<br />
Enhancer Mode (selects<br />
processing of the image’s high<br />
frequency (detailed) area)<br />
Gamma (adjusts the gamma<br />
characteristics)<br />
1 selects Hard (SHARPNESS)<br />
image<br />
2 selects Natural (SHARPNESS)<br />
image<br />
3 selects Soft (SHARPNESS)<br />
image<br />
1 selects gamma<br />
characteristics 1<br />
2 selects gamma<br />
characteristics 2<br />
3 selects gamma<br />
characteristics 3<br />
6 ) Press HOME MENU to exit the menu.<br />
4.3.5 Adjust the Color Temperature<br />
Adjust the Color Temperature for better white balance.<br />
To set the color temperature level, follow the steps below.<br />
1 ) Access the Picture through the Setup.<br />
2 ) Select Pro Adjust from the Picture menu.<br />
3 ) Select Color Detail from the Pro Adjust menu.<br />
4 ) Select Color Temp from the submenu.<br />
5 ) Select the desired parameter.<br />
Parameter<br />
High<br />
Mid-High<br />
Mid<br />
Mid-Low<br />
Low<br />
<strong>Manual</strong><br />
Description<br />
white with bluish tone<br />
intermediate tone between High and Mid<br />
natural tone<br />
intermediate tone between Mid and Low<br />
white with reddish tone<br />
adjusts to your preference<br />
To make fine adjustments, select <strong>Manual</strong>, press and hold ENTER for more than three seconds. The “<strong>Manual</strong><br />
adjustment” screen appears. Go to Step 6.<br />
65<br />
En
04 Additional Picture and Sound Adjustment Options<br />
6 ) Select the desired item.<br />
Item Left Arrow Right Arrow<br />
R High (fine adjustment for weaker red stronger red<br />
G High<br />
bright portions)<br />
weaker green stronger green<br />
B High weaker blue stronger blue<br />
R Low (fine adjustment for dark weaker red stronger red<br />
G Low<br />
portions)<br />
weaker green stronger green<br />
B Low weaker blue stronger blue<br />
To adjust another item, press RETURN then repeat Steps 5 and 6.<br />
7 ) Press HOME MENU to exit the menu.<br />
4.3.6 Use CTI and Color Space<br />
Use the Color Transient Improvement (CTI) and Color Space options to further enhance the picture to your<br />
preference.<br />
To set the CTI and Color Space options, follow the steps below.<br />
1 ) Access the Picture through the Setup.<br />
2 ) Select Pro Adjust from the Picture menu.<br />
3 ) Select Color Detail from the Pro Adjust menu.<br />
4 ) Select CTI or Color Space from the submenu.<br />
5 ) Select the desired parameter.<br />
Option Parameter Description<br />
CTI Off No effect<br />
On activates CTI<br />
Color Space 1 optimized for vivid, vibrant color reproduction<br />
2 standard color reproduction<br />
6 ) Press HOME MENU to exit the menu.<br />
4.3.7 Use the Color Management<br />
Use the Color Management option to fine adjust the coloring of images.<br />
To set the Color Management option, follow the steps below.<br />
1 ) Access the Picture through the Setup.<br />
2 ) Select Pro Adjust from the Picture menu.<br />
3 ) Select Color Detail from the Pro Adjust menu.<br />
4 ) Select Color Management from the submenu.<br />
66<br />
En
Additional Picture and Sound Adjustment Options<br />
04<br />
5 ) Select the desired parameter.<br />
Color Management<br />
R 0<br />
Y 0<br />
G 0<br />
C 0<br />
B 0<br />
M 0<br />
6 ) Select the desired level.<br />
Item Left Arrow Right Arrow<br />
R closer to magenta closer to yellow<br />
Y closer to red closer to green<br />
G closer to yellow closer to cyan<br />
C closer to green closer to blue<br />
B closer to cyan closer to magenta<br />
M closer to blue closer to red<br />
To adjust another item, press RETURN then repeat Steps 5 and 6.<br />
7 ) Press HOME MENU to exit the menu.<br />
4.3.8 Reduce Noise from the Image<br />
Use the video noise reduction features for clear and crisp images. Refer to the following table for available noise<br />
reduction functions.<br />
To select the Noise Reduction options, follow the steps below.<br />
1 ) Access the Picture through the Setup.<br />
2 ) Select Pro Adjust from the Picture menu.<br />
3 ) Select Noise Reduction from the Pro Adjust menu.<br />
4 ) Select 3DNR, Field NR, Block NR or Mosquito NR.<br />
67<br />
En
04 Additional Picture and Sound Adjustment Options<br />
5 ) Select the desired parameter.<br />
Option Parameter Description<br />
3DNR (3-dimensional Noise<br />
Reduction)<br />
Field NR (removes glimmer for<br />
more natural image)<br />
Block NR (reduces noise in HD<br />
images)<br />
Mosquito NR (reduces<br />
mosquito noise in DVD and HD<br />
images)<br />
Off<br />
High<br />
Mid<br />
Low<br />
Off<br />
High<br />
Mid<br />
Low<br />
Off<br />
On<br />
Off<br />
On<br />
No effect<br />
enhances DNR<br />
standard DNR<br />
moderate DNR<br />
No effect<br />
enhances Field NR<br />
standard Field NR<br />
moderate Field NR<br />
No effect<br />
activates Block NR<br />
No effect<br />
activates Mosquito NR<br />
6 ) Press HOME MENU to exit the menu.<br />
4.3.9 Adjust Color Signals<br />
The 3DYC function optimizes characteristics for separating brightness signals and color signals while the I-P<br />
Mode provides optimum conversion from interlace signals to progressive signals. Use these options to adjust<br />
color signals for both video and still images.<br />
To select the 3DYC and I-P Mode options, follow the steps below.<br />
1 ) Access the Picture through the Setup.<br />
2 ) Select Pro Adjust from the Picture menu.<br />
3 ) Select Others from the Pro Adjust menu.<br />
4 ) Select 3DYC or I-P Mode.<br />
5 ) Select the desired parameter.<br />
Option Parameter Description<br />
3DYC Off No effect<br />
High enhances 3DYC<br />
Mid standard 3DYC<br />
Low moderate 3DYC<br />
I-P Mode 1 optimizes video images<br />
2 standard setting<br />
3 optimizes still images<br />
6 ) Press HOME MENU to exit the menu.<br />
68<br />
En<br />
Notes: 3DYC is available when connected to only the video terminal at INPUT 1, INPUT 2 or INPUT 3 or when<br />
analog tuner is selected.<br />
I-P Mode is unavailable when the selected mode is On for Game Control Pref or when input signal is 480p,<br />
720p or 1080p.
Additional Picture and Sound Adjustment Options<br />
04<br />
4.4 View in Multi-Screen<br />
The flat panel TV can show multiple screens at the same time; two-screen or picture-in-picture. The pictures may<br />
be reversed (in 2-screen and P-in-P) or moved to various locations on the screen (P-in-P).<br />
2-Screen<br />
Picture-in-Picture (P-in-P)<br />
4.4.1 Split/Swap/Shift the Screen<br />
To split the screen so that two channels appear, press the SPLIT button on the remote control. Each press of the<br />
button cycles the screen through two-screen, picture-in-picture, and single-screen views.<br />
To switch the images between screen sides/locations, press the SWAP button.<br />
To move the Picture-In-Picture (P-in-P) small image counter-clockwise, press the SHIFT button.<br />
69<br />
En
04 Additional Picture and Sound Adjustment Options<br />
.<br />
TV<br />
Press SPLIT to cycle through the<br />
different multi-screen views.<br />
Press SWAP to switch the position<br />
of the two screens.<br />
Press SHIFT to move the position of<br />
the small screen counter-clockwise.<br />
1<br />
5<br />
PC<br />
2<br />
INPUT<br />
6 7<br />
AV<br />
SELECTION DISPLAY<br />
3 4<br />
TV/DTV<br />
SCREEN<br />
SIZE<br />
FREEZE<br />
SPLIT SWAP SHIFT<br />
The multi-screen function is unavailable when viewing source from a single input or from two external input<br />
sources.<br />
Warning: Displaying pictures in multi-screen mode<br />
for an extended period may cause an after-image.<br />
To return to a single picture, press EXIT.<br />
Another option is to select a multi-screen mode from the TOOLS Menu. To select a multi-screen mode, follow the<br />
steps below.<br />
1 ) Press TOOLS.<br />
The TOOLS Menu appears on screen.<br />
2 ) Select Split, Swap or Shift from the menu.<br />
Use the arrow buttons to highlight an option (then press ENTER if you select Swap).<br />
3 ) Select a mode.<br />
Select Off, 2-screen or P-in-P for the Split mode. The selected mode is displayed in the center of the TOOLS<br />
Menu.<br />
4.5 Freeze the Picture<br />
During fast-action sequences or detailed pictures, try capturing the image with the FREEZE option. FREEZE<br />
allows you to better understand the action or picture details if desired. To freeze a picture from a TV broadcast or<br />
movie, follow the steps below.<br />
1 ) Press FREEZE to create a still image picture<br />
(copy) of the currently showing image.<br />
The copy appears to the right of the still-moving<br />
video sequence thus splitting the screen.<br />
2 ) Press FREEZE again to release the image.<br />
The frozen image disappears, returning the<br />
picture to a single screen with the video<br />
sequence still in progress.<br />
• With the screen split, an image cannot be frozen.<br />
FREEZE<br />
A warning message appears if you attempt to<br />
use this function when there is already a frozen<br />
SPLIT SWAP SHIFT<br />
image on screen. If an image is left frozen on the screen, the panel automatically releases the image after<br />
five minutes.<br />
Note: Using FREEZE for an extended period may cause an after-image.<br />
TV<br />
1<br />
5<br />
PC<br />
2<br />
INPUT<br />
6 7<br />
AV<br />
SELECTION DISPLAY<br />
3 4<br />
TV/DTV<br />
SCREEN<br />
SIZE<br />
70<br />
En
Additional Picture and Sound Adjustment Options<br />
04<br />
4.6 Use the Banner Feature<br />
When tuning in a TV channel or an input signal<br />
changes, any available information appears on<br />
the screen if the signal carries information<br />
about the program (see InfoBanner below).<br />
Pressing DISPLAY causes the InfoBanner<br />
(additional) to appear. Press EXIT or DISPLAY<br />
again to hide the banner.<br />
InfoBanner<br />
D00001.000 ABCDEFGH XXXXXXXXXXXXXXXXXXXXXXXXXXXXXX STEREO 9:30AM<br />
1 2 3<br />
4 5 6<br />
InfoBanner (additional)<br />
D00001.000 ABCDE XXXXXXXXXXXXXXXXXXXXXXXXXXXXX STEREO<br />
7:07PM-8:08PM<br />
PRT_10<br />
TV<br />
PG<br />
9:30AM<br />
V HD<br />
7 8 9 1011<br />
12<br />
1 -Broadcast signal (Digital/Analog)<br />
2 -Channel number<br />
3 -Station name<br />
4 -Program title<br />
5 -Sound multiplex information<br />
6 -Current time<br />
7 -Program time schedule<br />
8 -Parental Control information<br />
9 -Parental icon<br />
10 -Parental name<br />
11 -Signal information (HD/SD)<br />
12 -Favorite icon<br />
A separate banner also appears at the bottom of the screen showing the AV Selection mode (bottom left) and<br />
screen size (bottom right).<br />
The above information is only appears if it is included in the broadcast signal. During multi-screen mode, the<br />
banner appears in both main and sub screens.<br />
71<br />
En
04 Additional Picture and Sound Adjustment Options<br />
4.7 Select Alternatives for/to Sound<br />
There are four sound alternatives for your flat panel TV; CC, MTS, SAP, and Sound Effect. This section defines each<br />
of these alternatives then explains how/when to use.<br />
4.7.1 Activate Closed Captioning (CC)<br />
Your flat panel TV is equipped with an internal closed caption (CC) decoder. CC allows conversations, narration,<br />
and sound effects in TV programs and home videos to appear as subtitles on the screen. For digital channels,<br />
some parameters can be changed such as the text font and color. However, not all programs/videos offer closed<br />
caption. Please look for the “ “ symbol to confirm that the channel or program provides closed captioning.<br />
To activate closed captioning when available, follow the steps below.<br />
1 ) Access the System Setup through the Setup.<br />
2 ) Select Closed Captions from the System Setup menu.<br />
3 ) Select Status from the submenu.<br />
4 ) Select an option.<br />
Parameter<br />
Off<br />
On<br />
On If Mute<br />
Description<br />
does not show closed captioning (default)<br />
shows closed captioning when available<br />
shows closed captions only while sound is muted<br />
5 ) Press HOME MENU to exit the menu.<br />
Types of Closed Caption<br />
Broadcast TV offers different types of closed captioning. Your flat panel TV provides support for the recognized<br />
types on Analog programming as well as Digital signals that carry analog closed captions.<br />
• CC 1, CC 2, CC 3, or CC 4: provides subtitles with a full view of the picture<br />
• Text 1, Text 2, Text 3, or Text 4: superimposes other information (e.g. weather) that is independent of the TV<br />
program in progress<br />
To change the closed caption type from the default CC 1, follow the steps below.<br />
1 ) Access the System Setup through the Setup.<br />
2 ) Select Closed Captions from the System Setup menu.<br />
3 ) Select Analog Settings from the submenu.<br />
4 ) Select the desired closed caption.<br />
Status : Off<br />
Analog Settings : CC 1<br />
Digital Settings<br />
5 ) Press HOME MENU to exit the menu.<br />
72<br />
En
Additional Picture and Sound Adjustment Options<br />
04<br />
Closed Caption for Digital Programs<br />
There are six different closed caption options for digital programming, called Service levels. The Primary Caption<br />
Service is on Service 1 and the Secondary Language Service is on Service 2. More information about these<br />
offerings is found later in this chapter.<br />
To change the digital closed caption from the default Service 1, follow the steps below.<br />
1 ) Access the System Setup through the Setup.<br />
2 ) Select Closed Captions from the System Setup menu.<br />
3 ) Select Digital Settings from the submenu.<br />
4 ) Select Digital Service.<br />
5 ) Select the desired closed caption service level (/).<br />
Digital Settings<br />
Digital Service : Service 1<br />
Font Size : Auto<br />
Font : Auto<br />
Font Color : Auto<br />
Font Opacity : Auto<br />
Background Color : Auto<br />
Background Opacity : Auto<br />
6 ) Press HOME MENU to exit the menu.<br />
To change the appearance of closed captioning on a digital program, follow the steps below.<br />
1 ) Access the System Setup through the Setup.<br />
2 ) Select Closed Captions from the System Setup menu.<br />
3 ) Select Digital Settings from the submenu.<br />
4 ) Select an option to change.<br />
5 ) Select the desired parameter for that option.<br />
The default parameter for each option is Auto.<br />
Option<br />
Description<br />
Font Size<br />
Auto, Large, Standard, Small<br />
Font 1 Auto, Font 1, Font 2, Font 3, Font 4, Font 5, Font 6,<br />
Font 7<br />
Font Color<br />
Font Opacity<br />
Background Color<br />
Background Opacity<br />
6 ) Press HOME MENU to exit the menu.<br />
Auto, Black, White, Red, Green, Blue, Yellow,<br />
Magenta, Cyan<br />
Auto, Solid, Transparent, Translucent, Flashing<br />
Auto, Black, White, Red, Green, Blue, Yellow,<br />
Magenta, Cyan<br />
Auto, Solid, Transparent, Translucent<br />
1<br />
Font 1 (monospaced with serifs)/ Font 2 (proportionally spaced with serifs)/ Font 3 (monospaced<br />
without serifs)/ Font 4 (proportionally spaced without serifs)/ Font 5 (casual font)/ Font 6 (cursive font)/<br />
Font 7 (small capitals font)<br />
73<br />
En
04 Additional Picture and Sound Adjustment Options<br />
4.7.2 Switch Languages Using MTS<br />
Multi-channel Television Sound (MTS) allows switching the audible<br />
language if it is available for that program. Available languages differ<br />
depending on the current broadcast.<br />
When watching a digital TV program that provides multi language<br />
services, follow the steps below.<br />
1 ) Press TOOLS on the remote control.<br />
The TOOLS Menu appears on screen.<br />
2 ) Select MTS from the TOOLS Menu.<br />
3 ) Select English, Français or Español.<br />
A digital TV program without sound or language information causes “N/<br />
A” to appear on the screen. For languages other than English, French, or<br />
Spanish, the word “Others” appears instead. If the selected language is<br />
available when the channel or program is changed, that language is<br />
heard.<br />
EXIT<br />
SAT GUIDE<br />
DVD<br />
TOP MENU<br />
HOME<br />
MENU<br />
SAT / DVD MENU<br />
ENTER<br />
TOOLS<br />
RETURN<br />
4.7.3 Select SAP<br />
When watching TV programs on the VHF/UHF frequencies or from analog cable TV channels, the TOOLS button<br />
can activate Stereo Sound and/or Secondary Audio Programs (SAP) if available.<br />
To select Stereo/SAP options, follow the steps below.<br />
1 ) Press TOOLS.<br />
The TOOLS Menu appears on screen.<br />
2 ) Select MTS from the TOOLS Menu.<br />
3 ) Select STEREO, SAP or MONO.<br />
The chart below breaks down the Stereo/SAP options.<br />
STEREO mode SAP mode MONO mode<br />
STEREO SAP MONO<br />
STEREO mode SAP mode MONO mode<br />
STEREO SAP MONO<br />
STEREO 9:30AM STEREO (SAP) 9:30AM MONO (SAP) 9:30AM MONO 9:30AM<br />
In STEREO mode In STEREO mode In STEREO mode In STEREO mode<br />
STEREO 9:30AM SAP (STEREO) 9:30AM SAP (MAIN) 9:30AM MAIN 9:30AM<br />
In SAP mode In SAP mode In SAP mode In SAP mode<br />
MONO 9:30AM MONO (SAP) 9:30AM MONO (SAP) 9:30AM MONO 9:30AM<br />
74<br />
En<br />
In MONO mode In MONO mode In MONO mode In MONO mode<br />
STEREO signals STEREO + SAP MONO + SAP MONO signals
Additional Picture and Sound Adjustment Options<br />
04<br />
When stereo sound is difficult to hear, manually switch to MONO for clearer sound. The panel’s sound remains<br />
in mono even if the system receives a stereo broadcast. Reselect STEREO to hear broadcasts in stereo where<br />
available.<br />
Selecting MTS while the input source is INPUT 1 to INPUT 7 or a PC does not change the type of sound. In this<br />
case, the video source determines the sound.<br />
4.7.4 Apply Sound Effect Settings<br />
Your flat panel TV offers four sound effects: SRS FOCUS, SRS, SRS TruBass and SRS Definition.<br />
• SRS FOCUS TM moves sound source direction vertically and makes sound and voice clearly audible<br />
• SRS ® effortlessly produces a three-dimensional sound field<br />
• SRS TruBass ® produces a clear, rich bass tone<br />
• SRS Definition ® improves midrange quality and clarifies voice and instrument sound<br />
To activate one or more of the sound effects, follow the directions below.<br />
1 ) Access the Sound through the Setup.<br />
2 ) Select Sound Effect from the Sound menu.<br />
3 ) Select a sound effect option.<br />
(SRS FOCUS, SRS, SRS TruBass, SRS Definition)<br />
4 ) Select Low (moderate), Mid (standard), High (enhanced) or Off for that option.<br />
5 ) Press HOME MENU to exit the menu.<br />
Note: How a Sound Effect changes the Audio depends on the signal.<br />
(SRS WOW HD TM ) indicates that SRS FOCUS, SRS, SRS TruBass and SRS Definition are on.<br />
4.7.5 Use Auto Volume Control (AVC)<br />
Auto Volume Control, or AVC, reduces sudden volume change and compensates source sound level.<br />
To select this option, follow the procedure below.<br />
1 ) Access the Sound through the Setup.<br />
2 ) Select AVC from the Sound menu.<br />
3 ) Select On (or Off ).<br />
4 ) Press HOME MENU to exit the menu.<br />
75<br />
En
04 Additional Picture and Sound Adjustment Options<br />
4.8 Manage the Power<br />
Your flat panel TV is energy efficient but includes functions to save additional power. In an earlier section entitled<br />
“3.6 Smart Starts for New Owners”, you were told how to activate the Energy Save feature. This section provides<br />
more advanced functions to save power and to extend the panel life.<br />
AV/PC Source - Picture Off<br />
To save energy and extend the life of your flat panel TV, have the screen turn Off. To deactivate the screen, follow<br />
the steps below.<br />
1 ) Press TOOLS on the remote control.<br />
The TOOLS Menu appears on screen.<br />
2 ) Select Picture Off from the TOOLS Menu.<br />
3 ) Press ENTER.<br />
The screen display turns Off.<br />
To restore the screen display, press any buttons other than VOL +/– and MUTING.<br />
Note: The Picture Off setting is not memorized by the system.<br />
AV Source - No Signal<br />
To save energy and extend the life of your flat panel TV, the panel can enter Standby automatically if the AV source<br />
signal fails for 15 consecutive minutes. At five minutes before and at every minute after that, a warning message<br />
appears on the screen. When the final minute elapses, the panel switches to Standby.<br />
To have the panel switch to Standby when an AV source signal fails, follow the steps below.<br />
1 ) Access the Power Control through the Setup.<br />
2 ) Select No Signal off from the Power Control menu.<br />
3 ) Select Enable to activate the AV Signal off power function.<br />
4 ) Press HOME MENU to exit the menu.<br />
Note: The flat panel TV may switch to Standby when there is noise (signal interference) at the end of a broadcast<br />
schedule (channel goes off-air).<br />
AV Source - Non-Operational<br />
To save energy and extend the life of your flat panel TV, the panel can enter Standby automatically if there are no<br />
commands from the AV source for three consecutive hours. At five minutes before and at every minute after that,<br />
a warning message appears on the screen. When the final minute elapses, the panel switches to Standby.<br />
To have the panel enter Standby automatically when there are no commands from the AV source, follow the steps<br />
below.<br />
1 ) Access the Power Control through the Setup.<br />
2 ) Select No Operation off from the Power Control menu.<br />
3 ) Select Enable from the No Operation off menu.<br />
4 ) Press HOME MENU to exit the menu.<br />
76<br />
En
Additional Picture and Sound Adjustment Options<br />
04<br />
PC Source -Power Management<br />
When receiving signals from a PC, the panel can automatically enter Standby if the signal fails. Follow the steps<br />
below to activate this function.<br />
1 ) Access the Power Control through the Setup.<br />
2 ) Select Power Management from the Power Control menu.<br />
3 ) Select an option from the submenu.<br />
Off<br />
On<br />
Option<br />
Description<br />
no power management (default)<br />
panel enters Standby when no signal is received<br />
from the PC for eight minutes; using the PC has no<br />
effect on the panel<br />
Note: Pressing the remote’s TV () or the panel’s STANDBY/ON reactivates the flat panel TV.<br />
4 ) Press HOME MENU to exit the menu.<br />
These power management options are unavailable when a PC is connected to the panel through the HDMI port/<br />
terminal.<br />
77<br />
En
TV<br />
1<br />
5<br />
PC<br />
TV<br />
CBL<br />
DVD<br />
DVR<br />
VOL<br />
05 Use Other Equipment With Your Flat Panel TV<br />
5 Use Other Equipment With Your Flat Panel<br />
TV<br />
Although earlier sections have mentioned other equipment for playing back video, this section provides control<br />
and operation information for specific types of equipment.<br />
5.1 Program the Remote Control to Operate Other Equipment<br />
To operate other equipment or devices through your flat panel TV, program the panel’s remote control with the<br />
equipment’s Learning function or manufacturing code. A manufacturing code is a series of numbers that identify<br />
the type of device and the brand. These codes are available in the section entitled “8.2 Manufacturer Codes to<br />
Program into the Remote Control” in Appendix 8.2 of this manual.<br />
5.1.1 Use the Learning Feature<br />
The Learning function allows the panel’s remote control to memorize other remote controls’ codes.<br />
2 cm to 5 cm (0.8 inches to 2.0 inches)<br />
2<br />
INPUT<br />
3 4<br />
6 7<br />
AV<br />
SELECTION DISPLAY<br />
TV/DTV<br />
SCREEN<br />
SIZE<br />
FREEZE<br />
SPLIT SWAP SHIFT<br />
1 2 3<br />
4 5 6<br />
7 8 9<br />
0 CH<br />
ENTER<br />
CH RETURN<br />
VOL MUTING CH<br />
EXIT TOOLS<br />
SAT GUIDE<br />
DVD<br />
TOP MENU<br />
ENTER<br />
HOME<br />
MENU RETURN<br />
SAT / DVD MENU<br />
HDMI<br />
CTRL<br />
SOURCE<br />
RECEIVER<br />
STOP<br />
REC<br />
HMG<br />
INPUT<br />
SELECT EDIT/LEARN<br />
RCV SAT VCR<br />
Remote control<br />
(Supplied accessory)<br />
Remote control of<br />
AV product<br />
To activate the Learning function follow the directions below.<br />
1 ) Press SELECT to choose the device to learn.<br />
2 ) Press EDIT/LEARN and 2 at the same time.<br />
The selected mode indicator flashes when the remote control is<br />
ready to be learned.<br />
3 ) Use the number buttons to learn a manufacturing code.<br />
The mode indicator lights up.<br />
The Learn session is canceled in 30 seconds and the indicator<br />
restarts blinking again. When the indicator flashes, the selected<br />
device’s remote is memorized. To exit the Learn mode before it<br />
finishes, press EDIT/LEARN.<br />
4 ) Press EDIT/LEARN again to exit the Lean mode.–<br />
1 2 3<br />
4 5 6<br />
7 8 9<br />
RECEIVER VOL<br />
INPUT<br />
SELECT<br />
EDIT/LEARN<br />
TV CBL DVD<br />
RCV SAT VCR DVR<br />
Note: The Learn session is canceled:<br />
– if no operation is performed for more than one minute after<br />
having pressed EDIT/LEARN and 2 (the mode indicator is<br />
flashing)<br />
– if you press SELECT<br />
– Code transmission finishes in approximately two seconds. Do not interrupt it until the transmission is<br />
complete. Wait until the mode indicator flashes again. When using any of the receiver buttons (, INPUT,<br />
or VOL+/–), the learned manufacturer code remains the same.<br />
78<br />
En
Use Other Equipment With Your Flat Panel TV 05<br />
To delete a learned code, overwrite it with a new code on the same button or follow the directions below.<br />
1 ) Concurrently press EDIT/LEARN and 2.<br />
The selected mode indicator flashes when the remote control is ready to be learned.<br />
2 ) Press and hold TV for more than two seconds.<br />
The remote control starts deleting all learned codes for selected modes. When completed, the mode<br />
indicator blinks Off and the remote control returns to normal operation.<br />
5.1.2 Assign a Manufacturing Code to the Remote Control<br />
To assign a preset Manufacturing code to the panel’s remote control,<br />
follow the directions below. (For Manufacturing codes, refer to “8.2<br />
Manufacturer Codes to Program into the Remote Control.”)<br />
1 ) Press SELECT to choose the device to program.<br />
2 ) Press EDIT and 1 at the same time.<br />
The selected mode indicator flashes when the remote control is<br />
ready to be programmed.<br />
1 2 3<br />
4 5 6<br />
7 8 9<br />
RECEIVER VOL<br />
INPUT<br />
SELECT<br />
EDIT/LEARN<br />
TV CBL DVD<br />
RCV SAT VCR DVR<br />
3 ) Use the number buttons to enter a manufacturer code.<br />
When the indicator turns off, the code has been programmed into<br />
the remote control.<br />
5.1.3 Issue a Library Search for a Manufacturer Code<br />
If the code for a particular device is unknown, cycle through the<br />
available codes for a similar unit then sample some functions for that<br />
code.<br />
To find the code that properly operates the unit, follow the steps below<br />
using differemt codes to find the best match.<br />
FREEZE<br />
SPLIT SWAP SHIFT<br />
TOP MENU<br />
1 2 3<br />
ENTER<br />
1 ) Press SELECT to choose the device to program.<br />
HOME<br />
MENU<br />
RETURN<br />
2 ) Press EDIT and 3 at the same time.<br />
The selected mode indicator flashes when the remote control is<br />
ready to search the code library.<br />
3 ) Sample the code using a SOURCE POWER, PLAY, 1 or CH+<br />
command.<br />
4 ) Use the up/down arrow (/) buttons to advance to the next code<br />
if the code fails to control the device.<br />
Another option is to return to the previous code and repeat Step 3.<br />
5 ) Press ENTER to lock in the code that properly operates the device.<br />
All the available buttons for the selected mode are added when<br />
the mode indicator flashes on for one second. The remote control<br />
then returns to normal operation.<br />
SAT / DVD MENU<br />
HDMI<br />
CTRL<br />
SOURCE<br />
STOP REC<br />
HMG<br />
RECEIVER VOL<br />
INPUT<br />
SELECT<br />
TV CBL<br />
EDIT/LEARN<br />
DVD<br />
RCV SAT VCR DVR<br />
79<br />
En
05 Use Other Equipment With Your Flat Panel TV<br />
5.1.4 Clear Added Manufacturer Codes from the Remote Control<br />
To return all learned and preset codes to the defaults (PIONEER), follow the steps below.<br />
1 ) Press EDIT and TV at the same time.<br />
Selection can be in any mode.<br />
2 ) Press the Yellow button.<br />
Confirm that the selected mode indicator flashes.<br />
The remote control enters the Manufacturing Reset mode. The<br />
reset is complete when the mode indicator flashes on for one<br />
second. The remote control then returns to normal operation.<br />
Note: The panel’s remote control may not control or have complete<br />
control of some equipment listed in the tables.<br />
TV<br />
1<br />
5<br />
HOME PC<br />
MENU<br />
SAT / DVD MENU<br />
2<br />
AV<br />
SELECTION<br />
INPUT<br />
6 7<br />
3 4<br />
DISPLAY<br />
TV/DTV<br />
SCREEN<br />
SIZE<br />
RETURN<br />
HDMI<br />
CTRL<br />
SOURCE<br />
STOP REC<br />
HMG<br />
RECEIVER VOL<br />
INPUT<br />
SELECT<br />
TV<br />
CBL<br />
EDIT/LEARN<br />
DVD<br />
RCV SAT VCR DVR<br />
To exit before the reset is complete, press the EDIT button again. The reset is cancelled if no action is taken within<br />
60 seconds. Also, switching the Mode during this procedure cancels the reset.<br />
5.1.5 Control a <strong>Pioneer</strong> Receiver<br />
The flat panel TV’s remote control has a bank of buttons specifically for controlling a <strong>Pioneer</strong> receiver. The active<br />
buttons, left to right, are as follows:<br />
• RECEIVER STANDBY/ON<br />
(turns the <strong>Pioneer</strong> Receiver On/Off)<br />
• RECEIVER INPUT<br />
(cycles through/selects an input)<br />
• RECEIVER VOL –<br />
(adjusts the volume lower)<br />
• RECEIVER VOL +<br />
(adjusts the volume higher)<br />
HDMI<br />
CTRL<br />
SOURCE<br />
SELECT<br />
STOP REC<br />
HMG<br />
RECEIVER VOL<br />
INPUT<br />
EDIT/LEARN<br />
TV CBL DVD<br />
RCV SAT VCR DVR<br />
80<br />
En
Use Other Equipment With Your Flat Panel TV 05<br />
5.1.6 Control a Cable (CBL) or Satellite (SAT) System<br />
When Mode is set to CBL/SAT, a cable converter uses the buttons 1, 6, 7, 8, and 9 while satellite tuners use the<br />
buttons 1 to 8. However, the panel only recognizes a single system (cable or satellite) at a time.<br />
• 1 Number buttons<br />
(press to enter a channel number)<br />
• 2 SAT GUIDE<br />
(displays the satellite broadcasting guide screen)<br />
• 3 ENTER<br />
(Enter activates the selected function)<br />
(arrows to select from SAT GUIDE or MENU<br />
screens)<br />
• 4 SAT MENU<br />
(displays the satellite broadcasting menu screen)<br />
• 5 SOURCE<br />
(turns the equipment power on and off)<br />
• 6 CH ENTER*<br />
(enters the selected channel with the direct<br />
channel selection buttons)<br />
• 7 CH RETURN*<br />
(press buttons that correspond to a channel)<br />
• 8 CH +/–<br />
(selects a higher or lower channel)<br />
• 9 RETURN<br />
(restores the immediately previous screen)<br />
1<br />
TV<br />
INPUT<br />
1 2 3 4<br />
TV/DTV<br />
5 6 7<br />
AV<br />
SELECTION DISPLAY<br />
SCREEN<br />
SIZE<br />
PC<br />
FREEZE<br />
SPLIT SWAP SHIFT<br />
1 2 3<br />
4 5 6<br />
7 8 9<br />
VOL<br />
0<br />
CH<br />
ENTER<br />
CH RETURN<br />
MUTING<br />
CH<br />
6<br />
7<br />
8<br />
* Some cable converter manufacturers do not preset<br />
CH ENTER and CH RETURN.<br />
2<br />
EXIT<br />
SAT GUIDE<br />
DVD<br />
TOP MENU<br />
TOOLS<br />
3<br />
ENTER<br />
4<br />
HOME<br />
MENU<br />
SAT / DVD MENU<br />
RETURN<br />
9<br />
HDMI<br />
CTRL<br />
5<br />
SOURCE<br />
STOP REC<br />
HMG<br />
RECEIVER VOL<br />
INPUT<br />
SELECT<br />
TV<br />
CBL<br />
EDIT/LEARN<br />
DVD<br />
RCV SAT VCR DVR<br />
81<br />
En
05 Use Other Equipment With Your Flat Panel TV<br />
5.1.7 Control a Video Cassette Recorder (VCR)<br />
When Mode is set to VCR, verify that the proper Input is selected (INPUT 1 to INPUT 7) then use 1 to 8 to control<br />
the device.<br />
• 1 REWind<br />
(rewinds the VCR tape and allows searches)<br />
• 2 PAUSE/STILL<br />
(pauses playback and displays still images)<br />
• 3 SOURCE<br />
(turns the VCR’s power on and off)<br />
• 4 CH +/–<br />
(selects a higher or lower channel)<br />
• 5 PLAY<br />
(selects playback)<br />
• 6 FF<br />
(advances the VCR tape and allows searches)<br />
• 7 STOP<br />
(halts VCR tape transport)<br />
• 8 RECord<br />
(begins recording)<br />
1<br />
2<br />
3<br />
7 8 9<br />
VOL<br />
EXIT<br />
SAT GUIDE<br />
DVD<br />
TOP MENU<br />
HOME<br />
MENU<br />
SAT / DVD MENU<br />
HDMI<br />
CTRL<br />
SOURCE<br />
INPUT<br />
0<br />
CH<br />
ENTER<br />
CH RETURN<br />
MUTING<br />
ENTER<br />
RECEIVER<br />
STOP<br />
VOL<br />
CH<br />
TOOLS<br />
RETURN<br />
REC<br />
HMG<br />
4<br />
5<br />
6<br />
7<br />
8<br />
SELECT<br />
TV<br />
CBL<br />
EDIT/LEARN<br />
DVD<br />
RCV SAT VCR DVR<br />
82<br />
En
Use Other Equipment With Your Flat Panel TV 05<br />
5.1.8 Control a DVD Player/DVR Recorder/BD Player<br />
When Mode is set to DVD/DVR, the remote control can operate DVD players, DVD recorders or BD players<br />
connected to the flat panel TV. Verify that the proper Input is selected for the device then use 1 to 14 to control it.<br />
Note: Equipment from other manufacturers (DVD players, DVD recorders, BD players, and HD-DVD players) can<br />
also be operated using the remote control if the remote is preset for the device(s).<br />
• 1 DVD TOP MENU<br />
(displays the top menu on the DVD)<br />
• 2 ENTER<br />
(ENTER activates the selected function)<br />
(arrows to select from SAT GUIDE or MENU<br />
screens)<br />
• 3 DVD MENU<br />
(displays the DVD menu)<br />
• 4 Red/Green/Blue/Yellow (BD only)<br />
(controls a BD-J application)<br />
• 5 REVERSE SCAN/CHAPTER SEARCH<br />
(press once quickly to go to beginning of current<br />
chapter; press again to go back to the beginning of<br />
the previous chapter; continue pressing to go<br />
backward)<br />
• 6 PAUSE/STILL<br />
(pauses playback and displays still image)<br />
• 7 SOURCE<br />
(turns the equipment power on or off)<br />
• 8 CH +/– (DVD Recorder only)<br />
(selects a higher or lower channel)<br />
• 9 TOOLS<br />
(assigns the code for a <strong>Pioneer</strong> BD player)<br />
• 10 RETURN<br />
(restores the immediately previous screen)<br />
• 11 PLAY<br />
(selects playback)<br />
• 12 FORWARD SCAN/CHAPTER SEARCH<br />
(press once quickly to go to beginning of next<br />
chapter; press again to advance to beginning of<br />
next chapter; continue pressing for fast forward)<br />
• 13 STOP<br />
(halts DVD playback, some DVD players/recorders<br />
open the disc tray if this button is pressed twice)<br />
• 14 RECord (DVD Recorder only)<br />
(begins recording)<br />
1<br />
2<br />
3<br />
4<br />
5<br />
6<br />
7<br />
7 8 9<br />
VOL<br />
EXIT<br />
SAT GUIDE<br />
DVD<br />
TOP MENU<br />
HOME<br />
MENU<br />
SAT / DVD MENU<br />
HDMI<br />
CTRL<br />
SOURCE<br />
SELECT<br />
0<br />
CH<br />
ENTER<br />
CH RETURN<br />
RECEIVER<br />
INPUT<br />
TV<br />
MUTING<br />
ENTER<br />
CBL<br />
STOP<br />
VOL<br />
RCV SAT VCR DVR<br />
CH<br />
TOOLS<br />
RETURN<br />
REC<br />
HMG<br />
EDIT/LEARN<br />
DVD<br />
8<br />
9<br />
10<br />
11<br />
12<br />
13<br />
14<br />
13 & 14 STOP RECord (DVD Recorder only)<br />
(press and hold then press to stop recording -<br />
applies to <strong>Pioneer</strong> DVD recorders only)<br />
83<br />
En
05 Use Other Equipment With Your Flat Panel TV<br />
5.2 Use HDMI Inputs<br />
High Definition Multimedia Interface (HDMI) is a communication method commonly used by digital and/or<br />
high definition equipment. Your flat panel TV’s INPUT 4, INPUT 5, INPUT 6, INPUT 7 are HDMI terminals for<br />
incoming digital video and audio signals. The flat panel TV supports HDMI Control functions so that when a piece<br />
of equipment is connected to the panel, it can control the equipment. To use an HDMI terminal, specify the types<br />
of video and audio signals being sent from the connected equipment. For the signal types, see the operating<br />
manual(s) that came with the equipment.<br />
One of the benefits of using your flat panel TV to control other equipment is the support of Deep Color. Deep Color is<br />
the color depth that describes the number of bits used to represent the color of a single pixel in a bitmapped image.<br />
Besides the conventional RGB/YCbCr16bit/20bit/24bit signals, the flat panel TV also supports RGB/YCbCr30bit/36bit<br />
signals. This enables finer color reproduction when a device that supports Deep Color signals (HDMI1.3 Deep Color)<br />
is connected to the panel. The color depth appears on the InfoBanner if a program supports Deep Color.<br />
The flat panel TV supports the following Video signals:<br />
Supported Video Signals<br />
• 1920 x 1080p@60 Hz<br />
• 1920 x 1080p@24 Hz<br />
• 1920 x 1080i@59.94 Hz/60 Hz<br />
• 1280 x 720p@59.94 Hz/60 Hz<br />
• 720 x 480p@59.94 Hz/60 Hz<br />
• 720 (1440) x 480i@59.94 Hz/60 Hz<br />
Supported PC Signals<br />
• 1280 x 1024 (SXGA) 60 Hz<br />
• 1360 x 768 (Wide - XGA) 60 Hz<br />
• 1024 x 768 (XGA) 60 Hz<br />
• 800 x 600 (SVGA) 60 Hz<br />
• 640 x 480 (VGA) 60 Hz<br />
Note: It may take a short period for the image to appear on the other equipment, depending on the type of device.<br />
The flat panel TV supports the following Audio signals:<br />
• Linear PCM (STEREO 2ch)<br />
• Sampling frequency: 32 kHz, 44.1 kHz, 48 kHz<br />
When connecting a PC to one of the panel’s HDMI inputs, use an HDMI-compliant PC or video card. Using DVI<br />
output from the PC to the flat panel TV may cause the sound or picture to fail or seem distorted. If a DVI output is<br />
your only option then contact the PC manufacturer for assistance.<br />
5.2.1 Specify the HDMI Input Type<br />
To select a signal type, follow the steps below.<br />
1 ) Select the Input for the connected equipment.<br />
Press the INPUT button (remote control or panel) until the correct input is showing (INPUT 4, INPUT 5,<br />
INPUT 6, or INPUT 7).<br />
Note: For INPUT 4 and INPUT 5, add Audio cables to support analog signals.<br />
2 ) Access the Option through the Setup.<br />
3 ) Select HDMI Input from the Option menu.<br />
4 ) Select Signal Type from the submenu.<br />
5 ) Select the appropriate option.<br />
Video<br />
PC<br />
Option<br />
Description<br />
use except when a PC is connected (default)<br />
when a PC is connected to HDMI input terminal<br />
6 ) Press HOME MENU to exit the menu.<br />
84<br />
En
Use Other Equipment With Your Flat Panel TV 05<br />
In Video mode, the image is over-scanned (enlarged) but the panel automatically switches to PC when receiving<br />
computer signals. In PC mode, the image displays in full size for optimum image quality.<br />
Video (over-scan)<br />
PC (under-scan)<br />
5.2.2 Specify a Digital HDMI Signal Type<br />
For the necessary digital video signal type, check the operating manual that came with the other equipment.<br />
To assign the type of digital signal, follow the steps below.<br />
1 ) Access the Option through the Setup.<br />
2 ) Select HDMI Input from the Option menu.<br />
3 ) Select Video from the submenu.<br />
4 ) Select the type of digital video signal recommended for the attached device.<br />
Auto<br />
Color-1<br />
Color-2<br />
Color-3<br />
Color-4<br />
Type<br />
Description<br />
automatically identifies input digital signals<br />
(default)<br />
Digital Component Video signals (4:2:2) locked<br />
Digital Component Video signals (4:4:4) locked<br />
Digital RGB signals (16 to 235) locked<br />
Digital RGB signals (0 to 255) locked<br />
5 ) Press HOME MENU to exit the menu.<br />
If an image fails to appear, specify another digital video signal type. Type parameters other than Auto need to be<br />
checked for natural colorings.<br />
5.2.3 Specify an Audio HDMI Signal Type<br />
For the necessary audio signal type, check the operating manual that came with the other equipment. When<br />
using INPUT 4 or INPUT 5 for HDMI, select the terminal for the desired input source.<br />
To specify the audio type, follow the steps below.<br />
1 ) Access the Option through the Setup.<br />
2 ) Select HDMI Input from the Option menu.<br />
3 ) Select Audio from the submenu.<br />
4 ) Select the type of audio signal recommended for the attached device.<br />
Auto<br />
Digital<br />
Analog<br />
Type<br />
Description<br />
automatically identifies input audio signals (default)<br />
accepts digital audio signals<br />
accepts analog audio signals<br />
5 ) Press HOME MENU to exit the menu.<br />
85<br />
En
05 Use Other Equipment With Your Flat Panel TV<br />
If there is no sound, specify another audio signal type. Depending on the type of equipment, sound output may<br />
require analog audio cables in addition to the HDMI connection(s).<br />
Note: When signals come through the HDMI terminals, no signals are output from the DIGITAL OUT terminal if they<br />
are copy guarded.<br />
5.3 Control Equipment with the Panel’s Remote Through HDMI<br />
Your flat panel TV’s remote can control other equipment such as a recorder, player, or AV system through the HDMI<br />
Control functions. The HDMI Control functions include playback of content using an on-screen control panel.<br />
However, not all device operations may be available through HDMI control. For details, see the charts below.<br />
Control Function<br />
Playback of<br />
content<br />
Controlled<br />
Equipment<br />
Recorder<br />
Player<br />
On-screen control Recorder<br />
Player<br />
Display Language<br />
Setup<br />
Recorder<br />
Player<br />
AV system control AV system<br />
Power ON<br />
Power OFF<br />
Recorder<br />
Player<br />
Recorder<br />
Player<br />
AV system<br />
Function Description<br />
Pressing PLAY on a connected device<br />
automatically selects the source and<br />
begins playback<br />
Recorder/player operation can be<br />
controlled on-screen or with the<br />
panel’s remote (play, stop, fast<br />
forward/reverse, etc.)<br />
Information on the display menu<br />
language transfers to the recorder or<br />
player connected to the flat panel TV.<br />
For details, see the operation manual<br />
that came with the recorder or player.<br />
Receiver/amplifier operation can also<br />
be controlled with the panel’s remote,<br />
(volume, surround mode and input<br />
selection of the HDMI terminal)<br />
The flat panel TV can be turned On<br />
when a connected recorder(s) or<br />
player(s) is turned On and images are<br />
input to the flat panel TV<br />
The connected device(s) can be<br />
turned Off when the flat panel TV is<br />
turned Off<br />
Notes: The KURO LINK function name used on the web and in catalogs is referred to as HDMI Control in the<br />
operating instructions and on the product.<br />
Except for Power Off and Display Language Setup functions, only a single HDMI terminal may be active<br />
at a time.<br />
The flat panel TV’s remote can control a maximum of two (2) recorders, two (2) playback devices, and one (1) AV<br />
system at a time.<br />
To select and use the various HDMI Control functions for a connected <strong>Pioneer</strong> AV system, recorder, or player, use<br />
the panel’s HDMI Control menu.<br />
86<br />
En
Use Other Equipment With Your Flat Panel TV 05<br />
To access the menu, follow the steps below.<br />
1 ) Press HOME MENU.<br />
2 ) Select HDMI Control from the main menu.<br />
Use the arrow buttons to highlight an option then press ENTER.<br />
Disc Navigator<br />
CTRL Panel(AV-SYS)<br />
Playback CTRL Panel<br />
Switch to AV Sound<br />
Note: Pressing HDMI CTRL on the remote also causes the HDMI Control menu to open.<br />
Option<br />
Disc Navigator<br />
CTRL Panel (AV-SYS)<br />
Playback CTRL Panel<br />
Switch to AV Sound/<br />
Switch to TV Sound<br />
Description<br />
displays a title list of connected recorder or player<br />
displays the control panel for connected AV system<br />
displays the control panel for connected recorder<br />
or player<br />
switches between the flat panel TV screen and the<br />
connected AV system for sound output<br />
1<br />
2<br />
3<br />
4<br />
5<br />
6<br />
7<br />
Use the following buttons to control functions such as the disc<br />
navigator on a recorder or player.<br />
• 1 VOL +/–<br />
(adjusts the volume for an AV system)<br />
• 2 MUTING<br />
(turns off the sound while the video continues to play)<br />
• 3 Arrow buttons<br />
(navigates the menu screen)<br />
• 4 Color buttons (Red, Green, Blue, Yellow)<br />
(controls a BD player)<br />
• 5 TOOLS<br />
(assigns the code for a <strong>Pioneer</strong> BD player)<br />
• 6 ENTER<br />
(activates the selected function)<br />
• 7 RETURN<br />
(returns to the previous menu screen)<br />
To connect a device for HDMI Control, follow the steps below.<br />
1 ) Turn on the flat panel TV and all other equipment.<br />
2 ) Confirm that the panel’s Input Setting for HDMI Control Setting options comply with directions in the<br />
operating instructions for the connected device(s).<br />
87<br />
En
05 Use Other Equipment With Your Flat Panel TV<br />
3 ) Confirm that the other equipment is set for HDMI Control.<br />
4 ) Check that the audio and video are playing back properly from the equipment connected to the HDMI<br />
terminal(s).<br />
5 ) Turn Off the flat panel TV.<br />
6 ) Pause for a few seconds before turning the power back on.<br />
7 ) Verify that all equipment is functioning properly.<br />
To select the device to control via HDMI Control, follow the steps below.<br />
1 ) Access the Option through the Setup.<br />
2 ) Select HDMI Control Setting from the Option menu.<br />
3 ) Select Input Setting from the submenu.<br />
Input Setting : INPUT 4<br />
Power Off Control : On<br />
Power-On Ready : On<br />
Hold Sound Status : Off<br />
Power On Test<br />
Power Off Test<br />
4 ) Select the desired Input (INPUT 4, INPUT 5, INPUT 6, or INPUT 7).<br />
5 ) Press HOME MENU to exit the menu.<br />
If operating an HDMI supported device using an HDMI port other than the terminal selected in Input Setting, the<br />
system malfunctions. When connecting to an HDMI terminal other than that selected in Input Setting, the<br />
equipment settings should block HDMI Control functions. The HDMI Control menu is not selectable when the<br />
option Input Setting under the HDMI Control Setting menu is set to Off.<br />
The control menu changes to suit the type of HDMI-compatible equipment. When adding, changing, or removing<br />
equipment from HDMI Control, refer to the sections below for installation notes and the supported commands.<br />
5.3.1 Control an AV System<br />
When adding an AV System, connect the unit between the panel and any recorders and/or players. To function<br />
properly, an Audio/Video system should support the HDMI Control functions between the panel and any other<br />
connected equipment.<br />
If the AV system does not support HDMI Control but the other equipment (player/recorder) accepts this type of<br />
control than connect the AV System through the panel’s DIGITAL OUT using an optical digital cable and AUDIO<br />
OUT using an AV cable (commercially available). The other equipment connects to the HDMI port using an HDMI<br />
compliant cable. Signals input from the HDMI are not output from DIGITAL OUT.<br />
88<br />
En
Use Other Equipment With Your Flat Panel TV 05<br />
During playback, use the remote control’s up/down arrows (/ ) to cycle through the surround sound options.<br />
Use the left/right arrows (/ ) to change the input. To resume playback, return to the HDMI Control menu then<br />
select the function again.<br />
AV Systems<br />
1 Cycles the surround mode in sequence<br />
2 Switches the input source in reverse order<br />
3 Switches the surround mode in reverse order<br />
4 Closes the screen to return to HDMI Control<br />
menu<br />
5 Lists the connected equipment<br />
(model number)<br />
6 Switches the input source in sequence<br />
7 Reserved/Void<br />
1<br />
2<br />
3<br />
HDMI Control<br />
****<br />
SURROUND+<br />
INPUT- INPUT+<br />
SURROUND-<br />
Exit<br />
4<br />
5<br />
6<br />
7<br />
5.3.2 Control a Recorder<br />
Press ENTER to start playback or press HDMI CONTROL to return to the menu. This process also applies to<br />
Players. Refer to the chart below for available commands.<br />
Recorders<br />
1 Skips commercials<br />
2 Fast reverse<br />
3 Stops playback<br />
4 Closes the screen to return to HDMI Control<br />
menu<br />
5 Lists the connected equipment<br />
(model number)<br />
6 Fast forward<br />
7 Starts playback<br />
1<br />
2<br />
3<br />
4<br />
HDMI Control<br />
Exit<br />
****<br />
5<br />
6<br />
7<br />
Note: You can also use (Play), (Stop), (Pause), (Fast Forward) and (Fast Reverse) on the remote<br />
control to conduct the same operations as the control menu buttons.<br />
5.3.3 Control a Player<br />
Press ENTER to start playback or press HDMI CONTROL to return to the menu. This process also applies to<br />
Recorders. Refer to the chart below for available commands.<br />
Players<br />
1 Displays the DVD/Blu-ray disc menu on the<br />
player<br />
2 Fast reverse<br />
3 Stops playback<br />
4 Closes the screen to return to HDMI Control<br />
menu<br />
5 Lists the connected equipment<br />
(model number)<br />
6 Fast forward<br />
7 Starts playback<br />
1<br />
2<br />
3<br />
4<br />
HDMI Control<br />
****<br />
MENU<br />
Exit<br />
5<br />
6<br />
7<br />
Note: You can also use (Play), (Stop), (Pause), (Fast Forward) and (Fast Reverse) on the remote<br />
control to conduct the same operations as the control menu buttons.<br />
89<br />
En
05 Use Other Equipment With Your Flat Panel TV<br />
5.3.4 Add an AV Amp or a BD Player<br />
To add an AV amp and/or a BD Player, refer to the appropriate cabling diagram below.<br />
AV Amp & BD Player<br />
T<br />
T<br />
T<br />
T<br />
W<br />
W<br />
W<br />
W<br />
Rear view<br />
Rear view<br />
HDMI compliant<br />
cable (HDMI cable<br />
having the HDMI<br />
mark)<br />
AV cable<br />
(commercially<br />
available)<br />
Optical digital cable<br />
(commercially<br />
available)<br />
HDMI compliant<br />
cable (HDMI cable<br />
having the HDMI<br />
mark)<br />
AV cable<br />
(commercially<br />
available)<br />
Optical digital<br />
cable<br />
(commercially<br />
available)<br />
AV amp<br />
BD player<br />
AV amp<br />
BD player<br />
BD Player only<br />
T<br />
W<br />
T<br />
W<br />
Rear view<br />
HDMI compliant cable<br />
(HDMI cable having the<br />
HDMI mark)<br />
BD player<br />
90<br />
En
Use Other Equipment With Your Flat Panel TV 05<br />
5.4 Specific HDMI Control Commands<br />
When using HDMI equipment with your flat panel TV, some options include when to power the panel and ways to<br />
turn other devices or features On and Off. This section provides steps for commonly desirable setting changes.<br />
5.4.1 Play Source Sound Using an HDMI Command<br />
When sound is coming from a <strong>Pioneer</strong> AV System through the flat panel TV, placing the panel in Standby causes<br />
the sound to stop. To have the sound continue when the flat panel TV turns On, follow the steps below.<br />
1 ) Access the Option through the Setup.<br />
2 ) Select HDMI Control Setting from the Option menu.<br />
3 ) Select Hold Sound Status from the submenu.<br />
4 ) Select On to allow sound from an AV System to play when the panel turns On.<br />
5 ) Press HOME MENU to exit the menu.<br />
Note: To have the sound continue when the flat panel TV turns On, confirm that the Switch to TV Sound option<br />
appears on the HDMI Control menu before turning the panel Off (see page 87).<br />
5.4.2 Turn OFF the Power With an HDMI Command<br />
The “Power Off Control” function is valid for the devices connected to any of the panel’s HDMI ports. To power off<br />
a connected device when the flat panel TV is turned Off, follow the steps below.<br />
1 ) Access the Option through the Setup.<br />
2 ) Select HDMI Control Setting from the Option menu.<br />
3 ) Select Power Off Control from the submenu.<br />
4 ) Select On to allow the panel to power off the connected equipment.<br />
5 ) Press HOME MENU to exit the menu.<br />
5.4.3 Turn ON the Power With an HDMI Command<br />
The panel ships from the factory with the Power On command activated. If this feature is turned off in error, it can<br />
be reactivated. To power on the flat panel TV automatically when a connected <strong>Pioneer</strong> recorder or player is turned<br />
On and images are sent to the panel, follow the steps below.<br />
1 ) Access the Option through the Setup.<br />
2 ) Select HDMI Control Setting from the Option menu.<br />
3 ) Select Power-On Ready from the submenu.<br />
4 ) Select On to have another device power-on the panel.<br />
5 ) Press HOME MENU to exit the menu.<br />
91<br />
En
05 Use Other Equipment With Your Flat Panel TV<br />
5.4.4 Test the Power Control (On/Off)<br />
Your flat panel TV provides an HDMI control option to test equipment power when it is connected to the panel’s<br />
HDMI ports and it has been properly assigned to an Input.<br />
To confirm that the Power On/Off control function is working, follow the steps below.<br />
1 ) Access the Option through the Setup.<br />
2 ) Select HDMI Control Setting from the Option menu.<br />
3 ) Select a test option (Power On Test or Power Off Test ) from the submenu.<br />
A list containing all HDMI connected equipment appears.<br />
4 ) Select a piece of equipment from the list.<br />
5 ) Repeat this process to test other equipment from the list.<br />
6 ) Press HOME MENU to exit the menu when all testing is complete.<br />
If the Power On/Off Test fails, check the connection points and the settings.<br />
5.5 Connect a Game Console or Camcorder<br />
Your flat panel TV supplies direct connections for a game console, camcorder, or other Audio/Visual (AV)<br />
equipment through INPUT 3. To watch an image coming from a game console or camcorder, press INPUT 3 on<br />
the remote control or repeatedly press INPUT on the panel to select INPUT 3. For details on game console<br />
settings, refer to “2.6.2 Connect Your Other <strong>Pioneer</strong> Equipment” and “4.1.4 Set the Panel to Recognize a Game<br />
Console.”<br />
Use the connection type specified by the equipment. Connect equipment only to terminals that are actually to be<br />
used.<br />
5.6 Use the IR REPEATER OUT<br />
Connecting control cables between the flat panel TV and other <strong>Pioneer</strong> equipment allows to operate the<br />
connected equipment by sending commands from its remote control to the remote control sensor on your flat<br />
panel TV.<br />
This function is helpful when controlling <strong>Pioneer</strong> equipment from other <strong>Pioneer</strong> equipment.<br />
92<br />
En
Use Other Equipment With Your Flat Panel TV 05<br />
5.7 Operate the Home Media Gallery<br />
With Home Media Gallery, you can enjoy digital content such as movies, music, and photo files on your high-end<br />
flat panel TV. Play content from files stored on one or more media servers connected by a home or local area<br />
network (LAN) or those stored on a USB flash drive. After connecting via a broadband router or an Ethernet hub<br />
to a media server with network software, navigate through the digital content visible on the Home Media Gallery.<br />
The flat panel TV supports Mass Storage Class and PTP devices through USB interface and DLNA-compatible<br />
devices through a network.<br />
DLNA CERTIFIED Audio/Video/Image Player<br />
This unit complies with the DLNA Networked Device Interoperability Guidelines - expanded: October 2006 (v1.5).<br />
When a PC running DLNA server software or other DLNA-compatible device is connected to this player, some<br />
setting changes of software or other devices may be required. Please refer to the operating instructions for the<br />
software or device for more information.<br />
PlaysForSure<br />
PlaysForSure is a marketing certification given by Microsoft. The PlaysForSure logo makes it easy to find digital<br />
media stores and devices that work together. Digital media purchased from online stores carrying the<br />
PlaysForSure logo is available for use on this unit. This unit complies with PlaysForSure Version 2.20<br />
Requirements Specification for Network Devices.<br />
Supported File Formats<br />
The following sections show supported file formats that can be played back or displayed on the flat panel TV. These<br />
formats are applicable to network sources. Most are also applicable to USB sources. However, media server<br />
content protected by digital rights management such as WMDRM10 (Windows Media Digital Rights<br />
Management 10), may not play on the panel.<br />
Supported Video Formats<br />
• Windows Media Video 9 (WMV9): MP@ML<br />
• Windows Media Video 9 (WMV9) Advanced Profile (VC-1): AP@L1, MP@ML<br />
• MPEG-2 PS: MP@ML<br />
• MPEG-2 TS: MP@ML<br />
• MPEG-1<br />
• MPEG-4 Part2 (SP/ASP): SP@L3, ASP@L5<br />
• MPEG-4 Part10 (H.264/AVC): Main Profile 3.0<br />
Supported Audio Formats<br />
• Windows Media Audio 9 (WMA9): Sampling rates; 44.1 kHz or 48 kHz<br />
• MPEG-1 Audio Layer 3 (MP3): Sampling rates; 32 kHz, 44.1 kHz or 48 kHz<br />
• Linear PCM (WAV): Sampling rates; 44.1 kHz or 48 kHz<br />
• MPEG-4 AAC: Sampling rates; 16 kHz, 32 kHz, 44.1 kHz or 48 kHz<br />
• HE-AAC: Sampling rates; 16 kHz, 32 kHz, 44.1 kHz or 48 kHz<br />
Supported Image Formats<br />
• JPEG: Resolution; up to 3680 x 2760 pixels<br />
• PNG: Resolution; up to 3680 x 2760 pixels<br />
• GIF: Resolution; up to 3680 x 2760 pixels<br />
• TIFF: Resolution; up to 1600 x 1200 pixels<br />
• BMP: Resolution; up to 3072 x 2304 pixels<br />
Supported File Extensions<br />
This product supports the playback of files with the following extensions.<br />
• Video: .wmv, .asf, .mpg, .mpeg, .mpe, .m2p, .m4v, .mp4v, .mp4, .mov<br />
• Audio: .wma, .mp3, .wav, .m4a, .aac<br />
• Image: .jpg, .jpeg, .png, .gif, .bmp, .tif, .tiff<br />
Note: Even the supported format files that are listed above may or may not play properly or completely, depending<br />
on the media server, USB device, bit rate stream and other content characteristics, as well as other factors.<br />
93<br />
En
05 Use Other Equipment With Your Flat Panel TV<br />
Even when files have a supported file extension, some files may not play or display properly, depending on the<br />
content or media server type.<br />
Some formats may not be supported nor displayed on Home Media Gallery as formats that individual media<br />
servers support vary. Refer to the media server manufacturer’s or other relevant websites for supported formats.<br />
Although a particular format is supported, not all content functions may operate properly. If the content fails to<br />
appear properly, contact the content producer for assistance. In addition, some supported file formats may fail to<br />
play properly when imported from an unknown USB device.<br />
Note: You cannot use the Home Media Gallery until dimmed elements on the menu screen turn white.<br />
Some Home Media Gallery functions, such as trick play during Fast Forward and Rewind, Time Search and<br />
Search, may not work depending on the media server’s capability and functionality.<br />
Home Media Gallery complies with the DLNA Networked Device Interoperability Guidelines - expanded:<br />
October 2006 (v1.5) and PlaysForSure Version 2.20 Requirements Specification for Network Devices. If your<br />
media server supports different DLNA and/or PlaysForSure version(s), some Home Media Gallery<br />
function(s) and content format(s) may not be supported.<br />
<strong>Pioneer</strong> is not responsible for any malfunction of the Home Media Gallery features due to communication<br />
error/malfunctions associated with your network connection and/or your PC, or other connected<br />
equipment. Contact your PC manufacturer or Internet service provider.<br />
Content may not play or display properly, depending on the conditions of use or media server in use.<br />
The Home Media Gallery functions as a WMDRM10-ND (Microsoft Windows Media DRM for networked<br />
devices). Content can only be navigated from the media servers that support WMDRM10-ND. Content may<br />
not play, depending on the DRM protection level.<br />
This system may not display content from incompatible memory cards.<br />
5.7.1 Network Connections<br />
To connect to a network, set up the Home Media Gallery through the Home Media Gallery menu. Press the HMG<br />
button on the remote control to cause the menu to appear. To use the Home Media Gallery, connect to a home<br />
network (LAN) via an Ethernet hub or cable directly to a media server.<br />
Usable Media Servers<br />
A media server contains digital content such as movies, music, and photo files. PCs that have pre-installed media<br />
server software and recorders with a media server function are considered the media server. There are some<br />
media servers that you can choose from; for example, Windows Media Connect, Windows Media Player that has<br />
a media sharing function, and DLNA compliant servers.<br />
• Windows Media Connect 2.0<br />
Windows Media Connect runs on a 32-bit PC with Windows XP Service Pack 2 (SP2) installed.<br />
When it is already installed, you can enjoy Home Media Gallery using your PC.<br />
• Windows Media Player 11 for Windows XP<br />
Windows Media Player 11 features Media Sharing that runs on a 32-bit PC with Windows XP Service Pack 2<br />
(SP2) installed.<br />
If Windows Media Connect 2.0 is not installed in your PC, you can download Windows Media Player 11 from<br />
Microsoft’s website.<br />
• Windows Media Player 11 for Windows Vista<br />
Windows Media Player 11 is featured in 32-bit Windows Vista PCs.<br />
When selecting the most suitable media server, please visit Microsoft’s website for system requirements, known<br />
issues, installation procedures, and other updated information.<br />
94<br />
En<br />
• DLNA CERTIFIED TM digital media servers<br />
The server is a DLNA-certified digital media server such as PC software, PCs and other devices installed with<br />
DLNA-certified software. When a PC running DLNA server software or other DLNA-compatible device is<br />
connected to this player, some setting changes of the software or device may be required. Refer to the<br />
device(s) operating instructions for more information.
Use Other Equipment With Your Flat Panel TV 05<br />
Connect via an Ethernet Hub<br />
If already operating one or more media servers on a home or local area network (LAN), connect the flat panel TV<br />
to the Ethernet (LAN) hub using a standard (“straight-through”) Ethernet (LAN) cable. See the diagram below.<br />
Note: Although the Home Media Gallery supports 10BASE-T, it is better to use 100BASE-TX for improved display<br />
quality and speed.<br />
T<br />
W<br />
T<br />
W<br />
Rear view<br />
Media server 2<br />
Ethernet hub<br />
(Router with hub function)<br />
Straight-through<br />
cable<br />
Media server 1<br />
Connect directly to a Media Server<br />
To run a PC as a media server, connect the flat panel TV directly to the PC using a twisted (“cross-over”) Ethernet<br />
(LAN) cable. See the diagram below.<br />
T<br />
W<br />
T<br />
W<br />
Rear view<br />
Cross-over cable<br />
Media server 1<br />
95<br />
En
05 Use Other Equipment With Your Flat Panel TV<br />
Confirm the IP Address<br />
After making the network connection, follow the instructions below to confirm the IP Address before accessing<br />
the network. (The setup is effective for Auto only. To perform the procedure, DHCP on your server or router must<br />
be valid. See “5.10 HMG Setup”)<br />
1 ) Press HMG on the remote control.<br />
The Home Media Gallery menu appears on screen.<br />
2 ) Select HMG Setup.<br />
Use the arrow buttons to highlight an option.<br />
3 ) Press ENTER.<br />
4 ) Select Network Setup.<br />
5 ) Select Auto DHCP.<br />
The screen turns from “Select” mode to “Input” mode.<br />
6 ) Select Yes.<br />
7 ) Press RETURN.<br />
The HMG Setup screen returns.<br />
The IP Address is assigned.<br />
The Home Media Gallery supports Auto IP and DHCP (Dynamic Host Configuration Protocol). If the system<br />
failed to assign the IP Address or if you want to obtain different addresses, select No then enter IP Address<br />
and Subnet mask. See Network Setup or HMG Setup to enter an address manually.<br />
For information on DHCP, refer to network device’s operating instructions.<br />
You may need to contact your service provider or network administrator when manually entering an IP Address.<br />
Some media servers block or are programmed to block access to client servers. When connecting the flat panel<br />
TV, check the media server for client server access rights.<br />
5.7.2 Connect a USB Device<br />
You can also enjoy content stored on memory cards by connecting a USB device to the flat panel TV. The root<br />
directory or Device List screen appears as soon as a USB flash drive or a multi-card reader is connected to the<br />
USB port. Another option is to connect your digital camera directly to the flat panel TV using a commercially<br />
available USB connector cable.<br />
If for any reason, the Folder/Content List or Device List fails to appear, follow the steps below.<br />
1 ) Press HMG.<br />
The Home Media Gallery menu appears on screen.<br />
2 ) Select USB.<br />
Use the arrow buttons to highlight an option.<br />
3 ) Press ENTER to confirm the selection.<br />
4 ) Select the desired device.<br />
The USB Device screen must be displayed.<br />
5 ) Press ENTER to navigate to a folder or play a file/content.<br />
To return to the previous screen, press RETURN.<br />
6 ) Press EXIT or HMG to exit Home Media Gallery.<br />
Note: The flat panel TV displays the USB Device screen or root directory immediately after inserting a USB device.<br />
In this case, start from Step 5. When a multi-card reader is inserted, the USB Device screen is displayed. In<br />
this case, start from Step 4.<br />
96<br />
En
Use Other Equipment With Your Flat Panel TV 05<br />
Flat Panel TV<br />
USB flash drive<br />
Digital Camera with USB<br />
Mass Storage Class<br />
(PTP also supported)<br />
Flash media via USB adapter (Multi-card Reader)<br />
Note: Do not use any USB devices other than those specified. Using other devices can cause a malfunction.<br />
Readable Data Format<br />
This system reads FAT16, FAT32 or NTFS.<br />
Readable Data Files<br />
Movie, music, and photo files play with the exception of Digital Rights Management (WMDRM10) protected files.<br />
Your flat panel TV supports a single USB device at a time. Also, the panel does not support USB hubs.<br />
This system may not be able to display modified or edited content from a PC or other equipment.<br />
Your flat panel TV supports the USB Mass Storage Class and PTP devices.<br />
Some digital cameras may require a setup procedure for Mass Storage Class data transfer. The setup is done on<br />
the camera. See the operating instructions supplied with the digital camera. Depending on the type of your<br />
memory card or camera, some images may fail to display.<br />
Remove a USB Device<br />
To remove a USB device, exit the Home Media Gallery first then disconnect the device.<br />
Be sure to exit the Home Media Gallery screen before removing the USB device. If you remove the USB device<br />
while the Home Media Gallery screen is displayed, data inside the memory may be damaged.<br />
Do not insert or remove the USB device immediately after the system is switched On or Off. This action may cause<br />
data inside the memory to be damaged.<br />
<strong>Pioneer</strong> is not liable for any loss or damage to the data inside the USB flash drive.<br />
97<br />
En
05 Use Other Equipment With Your Flat Panel TV<br />
5.8 Run the Home Media Gallery<br />
1 ) Press HMG.<br />
The Home Media Gallery menu appears on screen.<br />
2 ) Select Media Navigator, USB, HMG Playlist or HMG Setup.<br />
Use the arrow buttons to highlight an option then press ENTER.<br />
To return to the previous screen, press RETURN.<br />
3 ) Press EXIT or HMG to exit Home Media Gallery.<br />
Media Navigator<br />
USB<br />
HMG Playlist<br />
HMG Setup<br />
Use the Media Navigator<br />
By selecting Media Navigator, the previously selected server menu automatically appears on the screen. When<br />
only one server is found, the system automatically connects the server. You can also use the TOOLS Menu to<br />
switch to another server or manually select a server from the Server List. The screen automatically changes to<br />
the Server List if there are no previous servers.<br />
1 ) Press HMG.<br />
The Home Media Gallery menu appears on screen.<br />
2 ) Select Media Navigator.<br />
Use the arrow buttons to highlight an option then press ENTER.<br />
A server menu appears. The file/folder configuration may vary depending on the server selected.<br />
3 ) Select a desired server from the Server List.<br />
4 ) Select the desired folder to navigate or file/content to play.<br />
Movie<br />
Music<br />
Photo<br />
User Files<br />
4<br />
(Sample screen)<br />
5 ) Press ENTER.<br />
The appropriate Player launches and begins playing the selected file.<br />
To return to the previous screen, press RETURN.<br />
6 ) Press EXIT or HMG to exit Home Media Gallery.<br />
Note: The Media Navigator launch depends on the option selected in Auto Connection under “5.10 HMG Setup.”<br />
Select a server from the Server list to open Media Navigator.<br />
98<br />
En
Use Other Equipment With Your Flat Panel TV 05<br />
Navigate through a USB Device’s Files and Folders<br />
Like navigating through media servers, select the specific file from a device on the USB Device screen to start an<br />
appropriate player. For details, follow the steps below.<br />
1 ) Press HMG.<br />
The Home Media Gallery menu appears on screen.<br />
2 ) Select USB.<br />
Use the arrow buttons to highlight an option then press ENTER.<br />
The USB Device screen appears. Select the device. When using a single directory device (USB flash drive),<br />
the USB Device screen does not appear.<br />
USB A<br />
USB B<br />
USB C<br />
USB D<br />
USB E<br />
USB F<br />
USB G<br />
3 ) Select the desired folder to navigate or file/content to play.<br />
4 ) Press ENTER.<br />
The appropriate Player launches and begins playing the selected file.<br />
To return to the previous screen, press RETURN.<br />
5 ) Press EXIT or HMG to exit Home Media Gallery.<br />
15 (Sample screen)<br />
Note: The USB Device screen appears when using a multi-card reader or multiple flash drive devices. In this case,<br />
select the device containing the desired content.<br />
99<br />
En
05 Use Other Equipment With Your Flat Panel TV<br />
Screen Components<br />
Screen display options are:<br />
• List<br />
• Thumbnail<br />
• Thumbnail List<br />
Press TOOLS then select Change View from the TOOLS Menu to choose from the screen display options. The<br />
options are available for Movie, Music and Photo menus.<br />
List screen<br />
(Sample screens)<br />
Folder 1<br />
3<br />
Folder 2<br />
1<br />
Folder 3<br />
Content 2<br />
4<br />
Content 3<br />
Content 4<br />
2<br />
Content 5<br />
40<br />
1<br />
Thumbnail screen<br />
Thumbnail List screen<br />
Folder 2<br />
Folder 3 Content 1<br />
Content 2 Content 3<br />
40<br />
40<br />
2<br />
1<br />
3<br />
2 3<br />
1. Item being selected<br />
2. Number of total items<br />
3. Scroll bar (displayed when one or more pages follow)<br />
4. Icon or thumbnail of the selected item (if obtained)<br />
100<br />
En
Use Other Equipment With Your Flat Panel TV 05<br />
HMG Playlist<br />
Each category (Movie, Music, and Photo) has five different Playlists with up to 100 files each. The HMG Playlist can<br />
contain sound and image files selected in “Media Navigator”. To edit a Playlist, use the TOOLS Menu.<br />
1 ) Press HMG.<br />
The Home Media Gallery menu appears on screen.<br />
2 ) Select HMG Playlist.<br />
Use the arrow buttons to highlight an option then press ENTER.<br />
3 ) Select Movie, Music or Photo from the HMG Playlist screen.<br />
Movie<br />
Music<br />
Photo<br />
3<br />
4 ) Select a desired list from Playlist 1 through Playlist 5.<br />
5 ) Select the desired content.<br />
This menu can appear as a List, Thumbnail or Thumbnail List screen. Press TOOLS then select Change<br />
view from the TOOLS Menu to cycle through the views.<br />
6 ) Press ENTER to play the content.<br />
The appropriate Player launches and begins playing the selected file.<br />
To return to the previous screen, press RETURN.<br />
7 ) Press EXIT or HMG to exit Home Media Gallery.<br />
5.8.1 Show Your Movie Files on the Flat Panel TV<br />
When selecting movie content from the server menu on the Media Navigator screen or USB Device screen, the<br />
Movie Player automatically launches. Select a category, folder, or device to access the submenu containing the<br />
file or content.<br />
Selecting a movie file from the HMG Playlist causes the Movie Player screen to appear, just like selecting a file<br />
from a server.<br />
Screen Components<br />
The following information automatically appears on screen for a few seconds when Movie Player launches or<br />
playback status changes (controlled by the remote, for example). Pressing DISPLAY or selecting Information on<br />
the TOOLS Menu also causes the information to appear.<br />
1 2<br />
3 (Content information)<br />
1. Album name<br />
Album Name MovieTITLE_0123456<br />
2. Content title<br />
Playback 00:02:01/00:05:24<br />
1<br />
YYYY/MM/DD<br />
3. Date<br />
(Player status)<br />
4<br />
5 6 7 8<br />
4. Playback status (status icon, status information,<br />
current time/total time)<br />
5. Progress bar<br />
1<br />
6. Sound mode<br />
7. Play mode<br />
9<br />
8. Random mode<br />
During A-B Repeat mode<br />
9. A-B Repeat mode<br />
101<br />
En
05 Use Other Equipment With Your Flat Panel TV<br />
Movie Player key guide<br />
Playback<br />
Stop<br />
PAUSE<br />
Mode Key(s) used Function<br />
ENTER, (PLAY) Plays back the content<br />
(STOP),<br />
RETURN<br />
ENTER,<br />
(PAUSE)<br />
Stops the Movie Player and returns to the previous screen<br />
(List/Thumbnail/Thumbnail List)<br />
Pauses the playback<br />
Fast Forward (FF), Fast forward while playback.<br />
Each press toggles the Fast Forward speed. To discontinue<br />
Fast Forward, press ENTER or PLAY. Normal playback mode<br />
returns.<br />
Fast Reverse (RWD), Fast reverse while playback.<br />
Each press toggles the Fast Reverse speed. To discontinue<br />
Fast Reverse, press ENTER or PLAY. Normal playback mode<br />
returns.<br />
Slow Forward + ,<br />
+ <br />
Slow forward when in PAUSE.<br />
Each press toggles the Slow Forward speed. To discontinue<br />
Slow Forward, press ENTER or PLAY. Normal playback<br />
mode returns.<br />
Note: This function may not be supported, depending on the<br />
content.<br />
Forward (15 sec.) Skips 15 seconds forward then plays back the video or pauses<br />
while in PAUSE<br />
Reverse (15 sec.) Skips 15 seconds backward then plays back the video or<br />
pauses while in PAUSE<br />
Time Search TOOLS See Use the TOOLS Menu<br />
Add to HMG Playlist TOOLS See Use the TOOLS Menu<br />
A-B Repeat TOOLS See Use the TOOLS Menu<br />
Random TOOLS See Use the TOOLS Menu<br />
Play Mode TOOLS See Use the TOOLS Menu<br />
Audio TOOLS See Use the TOOLS Menu<br />
Picture TOOLS See Use the TOOLS Menu<br />
Sound TOOLS See Use the TOOLS Menu<br />
Information TOOLS See Use the TOOLS Menu<br />
Note: Some functions may not be supported depending on the server type or software version.<br />
During playback, an error may arise in time-related information, depending on the content or server software.<br />
Also, some functions may not be supported, depending on the content.<br />
102<br />
En
Use Other Equipment With Your Flat Panel TV 05<br />
Content obtained from a digital video camera that supports H.264/AVC format can be played through the USB<br />
port.<br />
To play content from this type of camera, follow the steps below.<br />
1 ) Insert the USB flash drive containing the content into a card reader connected to the flat panel TV.<br />
The USB device’s Folder/Contents List appears on screen.<br />
Refer to the operation manual that came with the individual device for connection and setting help.<br />
2 ) Select a Folder/Contents List.<br />
Use the arrow buttons to highlight an option then press ENTER.<br />
3 ) Select the desired content.<br />
Note: Some content may not be played back or may be a short delay between audio and video, depending on the file.<br />
Not all files (including edited files) may be supported with the Movie Player. Stored content may not appear in<br />
the “Shortcut” folder, depending on the saved position in the memory device.<br />
Also, content may not play properly, depending on the USB card reader used.<br />
5.8.2 Play Your Music Files on the Flat Panel TV<br />
When selecting music content from the server menu (on the Media Navigator screen or from the USB Device<br />
screen), the Music Player automatically launches. Select a category, folder, or device to access the submenu<br />
containing your file or content. Selecting a music file from HMG Playlist causes the Music Player screen to<br />
appear, just like selecting a file from a server.<br />
After playing music content through once, the music content loops as background music (BGM). To stop looping,<br />
stop the playback, exit the Home Media Gallery or start playing content other than photo content.<br />
Screen Components<br />
1<br />
Artist : XXXXX<br />
Album : XXXXX<br />
1. Artist/album information<br />
2. Music Player thumbnail icon/jacket image<br />
3. Player list<br />
XXXXXX.mp3<br />
Previous Song<br />
XXXXXX.mp3<br />
Next Song<br />
2<br />
3<br />
The following information and playback status appear on the Music Player screen.<br />
Playback 00:02:01/00:05:24<br />
4 5<br />
8<br />
During A-B Repeat mode<br />
YYYY/MM/DD<br />
6 7<br />
9<br />
4. Play mode<br />
5. Random mode<br />
6. Playback status (status icon, status information,<br />
current time/total time)<br />
7. Progress bar<br />
8. A-B Repeat mode<br />
9. Date<br />
103<br />
En
05 Use Other Equipment With Your Flat Panel TV<br />
Music Player key guide<br />
Mode Key(s) used Function<br />
Playback<br />
ENTER, (PLAY) Plays back the selected content<br />
Stop (STOP), Stops the playback<br />
PAUSE<br />
ENTER,<br />
Pauses the playback<br />
(PAUSE)<br />
Fast Forward (FF) See the Movie Player key guide<br />
<br />
Press and hold to start Fast Forward. When in Fast<br />
Forward, press to change the playback speed. To<br />
discontinue Fast Forward, press ENTER or PLAY. Normal<br />
playback mode returns.<br />
Fast Reverse (RWD) See the Movie Player key guide<br />
<br />
Press and hold to start Fast Reverse. When in Fast<br />
Reverse, press to change the playback speed. To<br />
discontinue Fast Reverse, press ENTER or PLAY. Normal<br />
playback mode returns.<br />
Next Selects the next content<br />
Previous Selects the previous content<br />
Time Search TOOLS See Use the TOOLS Menu<br />
Add to HMG Playlist TOOLS See Use the TOOLS Menu<br />
Random TOOLS See Use the TOOLS Menu<br />
A-B Repeat TOOLS See Use the TOOLS Menu<br />
Play Mode TOOLS See Use the TOOLS Menu<br />
Sound TOOLS See Use the TOOLS Menu<br />
Note: Files may not play properly, depending on the content.<br />
Some functions may not be supported, depending on the server type or software version.<br />
Playback continues. Pressing RETURN to move from the Player screen to the previously selected screen has<br />
no effect.<br />
5.8.3 Show Your Photo File on the Flat Panel TV<br />
When selecting photo content from the Media Navigator’s server menu or from the USB Device screen, the Photo<br />
Player automatically launches. Press ENTER to show content in full screen. Select a category, folder or device to<br />
access the submenu containing your file or content.<br />
Selecting a photo file from the HMG Playlist causes the Photo Player screen to appear, just like selecting a file<br />
from the server.<br />
Screen Components<br />
The following information automatically appears on screen for a few seconds when Photo Player launches or<br />
playback status changes (controlled by the remote, for example). Pressing DISPLAY or selecting Information on<br />
the TOOLS Menu also causes the information to appear.<br />
104<br />
En<br />
1 2<br />
Album Name Photo TITLE_0123456<br />
Playback 45678/99999<br />
4<br />
5 6 7<br />
3<br />
YYYY/MM/DD<br />
(Content information)<br />
1. Album name<br />
2. Content title<br />
3. Date<br />
(Player status)<br />
4. Playback status<br />
(status icon, status information,<br />
current number/total number)<br />
5. Progress bar<br />
6. Play mode<br />
7. Random mode
Use Other Equipment With Your Flat Panel TV 05<br />
Photo Player key guide<br />
Playback<br />
Stop<br />
PAUSE<br />
Mode Key(s) used Function<br />
ENTER, (PLAY) Starts displaying a photo or playing a slideshow when in<br />
playback<br />
(STOP),<br />
RETURN<br />
ENTER while<br />
playback, <br />
(PAUSE)<br />
Stops the Player and returns to the previous screen (List/<br />
Thumbnail/Thumbnail List)<br />
Pauses the slideshow<br />
Move File Forward Displays the next image content<br />
Move File Backward Displays the previous image content<br />
Rotate (clockwise) (FF), TOOLS Rotates the image 90 o clockwise.<br />
Each press toggles the rotation angle by 90 o between 90 o ,<br />
180 o , 270 o and 0 o .<br />
(See Use the TOOLS Menu)<br />
Rotate (counterclockwise)<br />
(RWD)<br />
Rotates the image 90 o counter-clockwise.<br />
Each press toggles the rotation angle by 90 o between 270 o ,<br />
180 o , 90 o and 0 o .<br />
Change BGM , Switches BGM content while playing BGM<br />
Zoom TOOLS See Use the TOOLS Menu<br />
Add to HMG Playlist TOOLS See Use the TOOLS Menu<br />
Random TOOLS See Use the TOOLS Menu<br />
Play Mode TOOLS See Use the TOOLS Menu<br />
Slide Show TOOLS See Use the TOOLS Menu<br />
Music Player TOOLS See Use the TOOLS Menu<br />
Picture TOOLS See Use the TOOLS Menu<br />
Sound TOOLS See Use the TOOLS Menu<br />
Information TOOLS See Use the TOOLS Menu<br />
Note: Some functions may not be supported, depending on the server type or software version.<br />
Even files in the supported format may fail to play properly, depending on the content.<br />
105<br />
En
05 Use Other Equipment With Your Flat Panel TV<br />
5.9 Use the TOOLS Menu<br />
Pressing TOOLS on the remote control causes the TOOLS Menu to appear. Select various play and display modes<br />
from this menu. The selectable menu items differ, depending on the current menu (refer to “3.6.1 Use the TOOLS<br />
Menu”).<br />
Update Server List<br />
Use this function to update the currently selected Server List. This option is available on the Server List screen<br />
regardless if the server is connected to your flat panel TV.<br />
1 ) Press TOOLS while showing the Server List.<br />
The TOOLS Menu appears on screen.<br />
TELEVISION<br />
TOOLS<br />
Update Server List<br />
Music Player<br />
2 ) Select Update Server List from the TOOLS Menu.<br />
Use the arrow buttons to highlight an option then press ENTER.<br />
Information on the connected server is updated.<br />
Delete Server<br />
Your flat panel TV allows disconnected servers to be removed from the Server List.<br />
To delete a server, follow the steps below. This option is available on the Server List screen (server not connected).<br />
1 ) Press TOOLS while the cursor is on the unconnected server on the Server List screen.<br />
The TOOLS Menu appears on screen.<br />
TELEVISION<br />
TOOLS<br />
Delete Server<br />
Update Server List<br />
2 ) Select Delete Server from the TOOLS Menu.<br />
A Delete Server screen appears.<br />
3 ) Select Yes then press ENTER.<br />
The server disappears from the list.<br />
To cancel the server deletion, select No.<br />
USB Device<br />
The TOOLS menu provides a screen to see what USB device(s) are connected or supported. Follow the directions<br />
below to open the USB Device screen. This option is available on the Folder/Contents List (USB) screen.<br />
1 ) Press TOOLS.<br />
The TOOLS Menu appears on screen.<br />
TELEVISION<br />
TOOLS<br />
USB Device<br />
Picture<br />
106<br />
En<br />
2 ) Select USB Device from the TOOLS Menu.<br />
A USB Device screen appears, showing currently connected USB devices.
Use Other Equipment With Your Flat Panel TV 05<br />
Favorites Entry<br />
Registering the Home Media Gallery in Favorites (TOOLS Menu) provides quick access to the Home Media Gallery<br />
top screen while watching TV or other programs. This option is available on the Home Media Gallery screen.<br />
1 ) Press TOOLS.<br />
The TOOLS Menu appears on screen.<br />
TELEVISION<br />
TOOLS<br />
Favorite Entry : Off<br />
Delete from HMG Playlist<br />
On<br />
2 ) Select Favorites Entry.<br />
3 ) Set the option to On then press ENTER.<br />
Registration completes.<br />
To remove the Home Media Gallery from Favorites, select Off.<br />
Detailed Display<br />
Select this option to display the detailed information on the current content. This option is available on the Media<br />
Navigator, Playlist List (Movie/Music/Photo), and Folder/Contents List screens.<br />
1 ) Press TOOLS.<br />
The TOOLS Menu appears on screen.<br />
TELEVISION<br />
TOOLS<br />
Detailed Display<br />
Delete Server<br />
2 ) Select Detailed Display from the TOOLS Menu.<br />
Detailed information appears.<br />
Pressing RETURN causes the information to disappear and the previous screen to return.<br />
Sort<br />
A sort option is available under Media Navigator and Folder/Contents List screens. This function is unavailable<br />
for folders or content on a USB device. To sort the items contained in the Folder/Contents List, follow the steps<br />
below.<br />
1 ) Press HMG.<br />
The Home Media Gallery menu appears on screen.<br />
2 ) Select the desired folder and/or content in the Media Navigator.<br />
Use the arrow buttons to highlight an option then press ENTER.<br />
3 ) Press TOOLS then select Sort from the TOOLS Menu.<br />
A Sort dialog screen appears.<br />
Sort<br />
Condition : Title<br />
Order : Bottom-Up<br />
Start<br />
4 ) Select the appropriate option on the Sort dialog screen.<br />
• Condition: Title, Track Number, Genre, Artist or Date.<br />
107<br />
En
05 Use Other Equipment With Your Flat Panel TV<br />
• Order: Bottom-Up or Top-Down<br />
5 ) Select Start on the Sort dialog screen.<br />
The sorting starts based on your selection and sort results are displayed.<br />
While sorting continues, content playback is available. To return to the sort screen, press RETURN any time<br />
during playback.<br />
To cancel the sort mode, press RETURN.<br />
Notes: The “Select a sorting order.” screen is available and may be left on the screen while navigating through<br />
the music categories.<br />
Sort may not be available, depending on the server used.<br />
Available submenus for Condition vary, depending on the server used.<br />
Search<br />
The flat panel TV’s built-in Search function provides a convenient way to find items held in a Folder/Contents List.<br />
However, the searching function is unavailable for folders or content on a USB device.<br />
Simply enter a word and the results appear on screen. To begin a Search, follow the directions below. This option<br />
is available on the Media Navigator and Folder/Contents List screens.<br />
1 ) Press HMG.<br />
The Home Media Gallery menu appears on screen.<br />
2 ) Select the desired folder and/or content in the Media Navigator.<br />
Use the arrow buttons to highlight an option then press ENTER.<br />
3 ) Press TOOLS.<br />
The TOOLS Menu appears on screen.<br />
4 ) Select Search from the TOOLS Menu.<br />
A Search dialog screen appears.<br />
Search<br />
Condition : Title<br />
Keyword : ----<br />
Start<br />
5 ) Select Title, Genre or Artist for Condition, or enter a Keyword.<br />
Pressing ENTER on the Keyword menu causes the software keyboard to appear on the screen.<br />
6 ) Enter the word on the software keyboard.<br />
Refer to “Software Keyboard” under “3.2.5 Create the List of Channels” for operation details.<br />
7 ) Select OK on the software keyboard to bring up the Search dialog screen and hide the keyboard.<br />
To cancel the key word entry, select Cancel.<br />
8 ) Select Start on the Search dialog screen.<br />
The searching starts based on the word entered with results are appearing on screen.<br />
While searching continues, content is playable. To return to the search screen, press RETURN any time<br />
during playback.<br />
To cancel the search mode, press RETURN.<br />
Notes: The Search function may not be available, depending on the server.<br />
Available submenus for Condition vary, depending on the server used.<br />
108<br />
En
Use Other Equipment With Your Flat Panel TV 05<br />
Slide Show<br />
A slideshow is simply a series of still pictures, appearing one after the other, usually in a timed procession. Select<br />
the desired photo file to display a still picture then press ENTER to start a slideshow. After a slideshow launches,<br />
pressing ENTER toggles between PLAY and PAUSE. Or press PLAY to start the slideshow immediately. This option<br />
is available on the Media Navigator, Folder/Contents List, and Photo Player. You can set the Photo Player to play<br />
a slideshow with background music (BGM) and various visual effects. To begin a slideshow, follow the directions<br />
below.<br />
1 ) Press HMG.<br />
The Home Media Gallery menu appears on screen.<br />
2 ) Select Media Navigator or USB from the menu.<br />
Use the arrow buttons to highlight an option then press ENTER.<br />
3 ) Select a folder containing photo content.<br />
Use the arrow buttons to highlight a folder then press ENTER.<br />
The Thumbnail screen appears (Thumbnail List or List screen appears, depending on the setting).<br />
4 ) Select the desired photo file.<br />
The selected photo content appears in full screen.<br />
5 ) Press TOOLS.<br />
The TOOLS Menu appears on screen.<br />
6 ) Select a slideshow option.<br />
7 ) Select Random, Off, Black Out, Cross Sweep, Horizontal Blinds, Boxed In/Out, Panoramic or Scenic for<br />
Effect.<br />
8 ) Select Off or On for Monochrome.<br />
9 ) Select a time interval: 3Seconds, 5Seconds, 10Seconds, 15Seconds, 30Seconds or 60Seconds.<br />
Slide Show<br />
Effect : Black Out<br />
Monochrome : Off<br />
Interval : 5Seconds<br />
Random : Off<br />
Play Mode : Repeat All<br />
BGM : Off<br />
Start<br />
10 ) Turn the Random option Off or On.<br />
For details, refer to Random.<br />
11 ) Select the desired option for Play Mode.<br />
Select Single, Repeat, Repeat All or All. For details, refer to “Play Mode” (page 111).<br />
12 ) Select any desired BGM.<br />
Select music content from Playlist 1 through 5 or the USB device.<br />
13 ) Select Start.<br />
The slideshow starts and photo images in the folder automatically appear one by one.<br />
To force the next image to appear, press .<br />
To force the previous image to return, press .<br />
14 ) Press ENTER or (Pause) to stop the slideshow.<br />
The Photo Player pauses.<br />
15 ) Press ENTER again to resume the slideshow.<br />
To cancel the slideshow and stop the Photo Player, press RETURN or (Stop) during playback. The<br />
previous screen returns.<br />
Note: After setting the Interval time, it may take longer than the preset time. As the Interval time refers to the time<br />
length up until the Home Media Gallery starts to obtain the next image. Key operations may not work while<br />
obtaining the next image.<br />
109<br />
En
05 Use Other Equipment With Your Flat Panel TV<br />
Add to HMG Playlist<br />
The Home Media Gallery function provides “HMG Playlist” – a self-contained play list that allows bookmarking<br />
favorite movie, music, and photo files from the network. You can store, edit, and sort up to 100 files in each Playlist<br />
List. This option is available on the Media Navigator, Folder/Contents List, Movie Player, Music Player, and Photo<br />
Player screens.<br />
1 ) While navigating or playing, select the file to be added to a HMG Playlist.<br />
2 ) Press TOOLS.<br />
The TOOLS Menu appears on screen.<br />
3 ) Select Add to HMG Playlist from the TOOLS Menu.<br />
An Add to HMG Playlist dialog screen appears.<br />
4 ) Select a Playlist.<br />
Press / to select from Playlist 1 to Playlist 5.<br />
Add to HMG Playlist<br />
Add to : Playlist 1<br />
[Total] : 050/100<br />
OK<br />
5 ) Select OK.<br />
To select other Playlist(s), repeat Steps 2 to 5.<br />
The file is added to the selected Playlist. The Total field changes as content is added to the playlist.<br />
To cancel the operation, press RETURN.<br />
Select Server<br />
When one or more servers are connected within the network, you can switch between servers. This option is<br />
available on the Media Navigator and Folder/Contents List screens.<br />
1 ) Press TOOLS.<br />
The TOOLS Menu appears on screen.<br />
2 ) Select Select Server from the TOOLS Menu.<br />
The Server List appears.<br />
Server 01<br />
Server 02<br />
Server 03<br />
Server 04<br />
4 (Sample screen)<br />
3 ) Select the desired server.<br />
The screen changes to Media Navigator on the selected server.<br />
110<br />
En<br />
Notes: The Home Media Gallery can memorize previously connected servers. When the Media Navigator is<br />
launched, available servers are automatically located and connected.<br />
If a previously connected server cannot be found or if the server is in sleep mode, the server name is<br />
dimmed.<br />
In some cases, media servers that support “Wake On LAN” can be booted up. Select the server then press<br />
ENTER to transmit a “Wake On LAN” command to the highlighted server.<br />
When having “Wake On LAN” turns the server’s power on, the server must be ready with the necessary<br />
settings already completed.
Use Other Equipment With Your Flat Panel TV 05<br />
Play Mode<br />
Your flat panel TV provides four repeat modes when using the Movie Player, Music Player, or Photo Player. Choose<br />
a playback mode (Repeat, Single, etc.) when playing multiple content files. To activate Play Mode, follow the steps<br />
below.<br />
1 ) While playing content, press TOOLS.<br />
The TOOLS Menu appears on screen.<br />
2 ) Select Play Mode from the TOOLS Menu.<br />
Select Single, Repeat, Repeat All or All.<br />
Single : Plays the selected content only once<br />
Repeat : Plays the selected content in a loop<br />
Repeat All : Loop-plays all contents in a folder in order (when the last content file ends, the first file begins<br />
to play with all subsequent files playing in order continually)<br />
All : Plays all selected folder content in order only once<br />
TELEVISION<br />
TOOLS<br />
Sound<br />
Random<br />
All Play Mode : Single<br />
A-B Repeat<br />
Time Search<br />
Repeat<br />
Change Name<br />
Playlist (1 through 5) can be renamed in HMG Playlist. To name a Playlist, follow the directions below. This option<br />
is available on the Playlist List (Movie/Music/Photo) screen.<br />
1 ) Press TOOLS while five Playlists in the HMG Playlist are on screen.<br />
The TOOLS Menu appears on screen.<br />
2 ) Select Change Name from the TOOLS Menu.<br />
The software keyboard appears.<br />
Playlist Name<br />
P L A Y L I S T 1<br />
1 2 3 4 5 6 7 8 9 0<br />
A B C D E F G H I J Delete<br />
K L M N O P Q R S T Space<br />
U V W X Y Z , . : ; Caps<br />
& ' ( ) + - * / _ @<br />
/<br />
$ % ! ? # = | ~ "<br />
^ ` < > [ ] { } OK Cancel<br />
3 ) Enter the new name.<br />
Refer to “Software Keyboard” under “3.2.5 Create the List of Channels” for operation details.<br />
4 ) Select OK after the new name is entered on the software keyboard.<br />
The software keyboard disappears and the newly named Playlist appears.<br />
Selecting Cancel causes the entry to stop and cancels the name entry process.<br />
111<br />
En
05 Use Other Equipment With Your Flat Panel TV<br />
Change View<br />
Select this option to cycle between the different views: List, Thumbnail, and Thumbnail List. This option is<br />
available on the Playlist List (Movie/Music/Photo), and Folder/Contents List screens.<br />
1 ) Press TOOLS.<br />
The TOOLS Menu appears on screen.<br />
2 ) Select Change View from the TOOLS Menu.<br />
Select the screen option from List, Thumbnail or Thumbnail List.<br />
TOOLS Menu<br />
TELEVISION<br />
TOOLS<br />
Thumbnail List<br />
Music Player<br />
Add to HMG Playlist<br />
Change View : List<br />
Sort<br />
Search<br />
Thumbnail<br />
List screen<br />
Folder 1<br />
Folder 2<br />
Folder 3<br />
Content 2<br />
Content 3<br />
Content 4<br />
Content 5<br />
40<br />
Thumbnail List screen<br />
Thumbnail screen<br />
40<br />
Folder 2<br />
Folder 3 Content 1<br />
Content 2 Content 3<br />
40<br />
(Sample screens)<br />
Time Search<br />
The Time Search function allows the content to start playing at the preset time. This option is available on the<br />
Movie Player and Music Player screens.<br />
To allow Time Search, follow the steps below.<br />
1 ) While playing content, press TOOLS.<br />
The TOOLS Menu appears on screen.<br />
2 ) Select Time Search from the TOOLS Menu.<br />
A Time Search dialog screen appears.<br />
[Total] : 01:00:00<br />
Time Search<br />
Jump :<br />
00 : 00 : 00<br />
Start<br />
3 ) Enter the time (Hour, Minute and/or Second) to jump to.<br />
Enter Hour and Minute for movie content or Minute and Second for music content.<br />
Use /or buttons 0 to 9 (if a numeric key icon appears).<br />
Press / to select Hour and Minute (movie content) or Minute and Second (music content).<br />
4 ) Select Star then press ENTER to begin the time search.<br />
The movie (music) begins playing from the set time. To cancel the Time Search, press RETURN.<br />
112<br />
En<br />
Note: The Time Search function may not be supported, depending on the content, server software or software<br />
version.<br />
An error may arise in time-related information, depending on the content or server software.
Use Other Equipment With Your Flat Panel TV 05<br />
Picture<br />
The Picture option is another way to adjust the image quality. This option is available on the Movie Player and<br />
Photo Player screens. To adjust the picture, follow the steps below.<br />
1 ) Press TOOLS.<br />
The TOOLS Menu appears on screen.<br />
TELEVISION<br />
TOOLS<br />
Information<br />
Picture<br />
Sound<br />
Random<br />
2 ) Select Picture from the TOOLS Menu.<br />
A picture adjustment screen appears. For adjustment items, see “3.4 Adjust the Picture and Sound<br />
Quality.”<br />
3 ) Press RETURN to close the adjustment screen.<br />
Normal playback screen returns.<br />
Sound<br />
This Sound option is another way to adjust audio quality. This option is available on the Movie Player, Music Player<br />
and Photo Player screens. To adjust the sound, follow the steps below.<br />
1 ) Press TOOLS.<br />
The TOOLS Menu appears on screen.<br />
TELEVISION<br />
TOOLS<br />
Sound<br />
Random<br />
Play Mode<br />
2 ) Select Sound from the TOOLS Menu.<br />
A sound adjustment screen appears. For adjustment items, see “3.4 Adjust the Picture and Sound Quality.”<br />
3 ) Press RETURN to close the adjustment screen.<br />
Normal playback screen returns.<br />
Information<br />
The Information option displays the status information on the playing content. This option is available on the<br />
Movie Player and Photo Player screens. To show information during playback, follow the steps below.<br />
1 ) Press TOOLS.<br />
The TOOLS Menu appears on screen.<br />
TELEVISION<br />
TOOLS<br />
Information<br />
Zoom<br />
2 ) Select Information from the TOOLS Menu.<br />
An information (such as playback status) screen appears. Pressing DISPLAY also causes the information<br />
screen to appear.<br />
The screen automatically disappears after a short period of time.<br />
113<br />
En
05 Use Other Equipment With Your Flat Panel TV<br />
Audio<br />
Use this option to switch to another audio source if the currently played content has multiple audio sources<br />
(multi-language content, for example). This option is available on the Movie Player screen. To reveal multiple audio<br />
tracks, follow the steps below.<br />
1 ) Press TOOLS.<br />
The TOOLS Menu appears on screen.<br />
TELEVISION<br />
TOOLS<br />
A-B Repeat<br />
Time Search<br />
Audio : 1 L+R<br />
Information<br />
Add to HMG Playlist<br />
1 L<br />
2 ) Select Audio from the TOOLS Menu.<br />
Pressing / causes L, R or L+R to be selected. If the content has multiple audio sources, select L, R or<br />
L+R for each source.<br />
3 ) After entering the setting, press RETURN.<br />
Music Player<br />
The Music Player option allows changing BGM on any screen rather than using the music from the content. This<br />
option is only available when music is played on any screen other than Movie Player and Music Player. Music<br />
Player is available on the Media Navigator, Folder/Contents List, USB, HMG Playlist, Playlist List, and Photo Player<br />
screens. To activate Music Player, follow the steps below.<br />
1 ) Press TOOLS.<br />
The TOOLS Menu appears on screen.<br />
TELEVISION<br />
TOOLS<br />
Music Player<br />
Slide Show<br />
2 ) Select Music Player from the TOOLS Menu.<br />
The Music Player screen appears.<br />
After entering the setting, press RETURN. The previous screen returns.<br />
Move<br />
To show files in your preferred order, use the Move option to change the listing order in the HMG Playlist. This<br />
option is available on the Contents List (Playlist) screen.<br />
1 ) Move the cursor to the content to be moved within the HMG Playlist.<br />
2 ) Press TOOLS.<br />
The TOOLS Menu appears on screen.<br />
TELEVISION<br />
TOOLS<br />
Move<br />
USB Device<br />
114<br />
En<br />
3 ) Select Move from the TOOLS Menu.<br />
4 ) Press / to move the content up or down.
Use Other Equipment With Your Flat Panel TV 05<br />
5 ) Press ENTER.<br />
Editing completes and Move finishes.<br />
Delete from HMG Playlist<br />
Sometimes a file is no longer wanted. Your flat panel TV provides a method to delete content from a HMG Playlist.<br />
This option is available on the Contents List (Playlist) screen. To delete content from a Playlist, follow the steps<br />
below.<br />
1 ) Move the cursor to the content to be deleted from the HMG Playlist.<br />
2 ) Press TOOLS.<br />
The TOOLS Menu appears on screen.<br />
TELEVISION<br />
TOOLS<br />
Delete from HMG Playlist<br />
Move<br />
3 ) Select Delete from HMG Playlist on the TOOLS Menu.<br />
A Delete from HMG Playlist dialog screen appears.<br />
4 ) Select Yes to remove the content item.<br />
The dialog screen disappears and the selected content is deleted from the HMG Playlist.<br />
To cancel, select No.<br />
A-B Repeat Mode<br />
Use this option to play the selected movie scenes or music programs repeatedly. This option is available only<br />
during normal playback on the Movie Player or Music Player.<br />
To set Repeat, follow the steps below.<br />
1 ) While playing content, press TOOLS.<br />
The TOOLS Menu appears on screen.<br />
TELEVISION<br />
TOOLS<br />
A-B Repeat : A(Loop Start)<br />
Rotate<br />
2 ) Select A-B Repeat from the TOOLS Menu.<br />
3 ) Press ENTER to mark a starting point.<br />
4 ) Press ENTER again where the playback needs to stop.<br />
The Player status appears on the screen and the A-B Repeat mode icon changes.<br />
The selected part of the content begins looping.<br />
To end the looping and return to normal playback, press TOOLS then select Off while in the A-B Repeat mode.<br />
Note: If the screen display fails to match the player status, a malfunction may have occurred. Stop playback then<br />
try the operation again.<br />
115<br />
En
05 Use Other Equipment With Your Flat Panel TV<br />
Random<br />
Use this option to shuffle the order in the content list, playing the content at random. This option is available on<br />
the Movie Player, Music Player and Photo Player screens. To shuffle the playlist, follow the steps below.<br />
1 ) While playing content, press TOOLS.<br />
The TOOLS Menu appears on screen.<br />
TELEVISION<br />
TOOLS<br />
Change Name<br />
Random : Off<br />
On<br />
2 ) Select Random from the TOOLS Menu.<br />
3 ) Select On.<br />
Random Repeat playback starts.<br />
To cancel the random mode, press TOOLS and select Off.<br />
Note: Random Repeat is only available for content playing in Repeat Mode (except when Single is selected).<br />
Rotate<br />
Use the Rotate option to turn an image 90º clockwise. This option is available on the Photo Player screen. To rotate<br />
an image, follow the steps below.<br />
1 ) While photo content appears, press TOOLS.<br />
The TOOLS Menu appears on screen.<br />
TELEVISION<br />
TOOLS<br />
Rotate : 90<br />
Time Search<br />
2 ) Select Rotate from the TOOLS Menu.<br />
Each press of the ENTER button causes the displayed image to rotate by one quarter clockwise. It toggles<br />
between 90º, 180º, 270º and 0º.<br />
Note: The selected rotation angle is only effective for the visible image.<br />
Moving or changing the content causes the image to reset to the default view.<br />
116<br />
En
Use Other Equipment With Your Flat Panel TV 05<br />
Zoom<br />
Use the Zoom option to enlarge the photo content displayed. This option is available on the Photo Player screen.<br />
To enlarge content, follow the steps below.<br />
1 ) While photo content appears, press TOOLS.<br />
The TOOLS Menu appears on screen.<br />
TELEVISION<br />
TOOLS<br />
Music Player<br />
Add to HMG Playlist<br />
Zoom : Off<br />
On<br />
2 ) Select Zoom from the TOOLS Menu.<br />
3 ) Press / to select On or Off.<br />
4 ) Press ENTER to confirm the selection.<br />
Selecting On causes the enlarged photo content to always appear.<br />
Displayed image differs depending on the content. If the content’s aspect ratio is longer than 16:9, it<br />
appears fully stretched horizontally to both sides with images cropped at the top and bottom. If the<br />
content’s aspect ratio is wider than 16:9, it appears fully stretched vertically to top and bottom with images<br />
cropped on the right and left sides.<br />
A “zoom” icon appears on screen.<br />
5 ) While in Zoom mode, use the arrow buttons to scroll the content.<br />
Press or if the content’s aspect ratio is longer than 16:9, or if the content’s aspect ratio is wider<br />
than 16:9.<br />
6 ) Press RETURN or ENTER to cancel the Zoom and return to the normal screen.<br />
Note: The Zoom function is disabled when the content is a 16:9 picture.<br />
117<br />
En
05 Use Other Equipment With Your Flat Panel TV<br />
5.10 HMG Setup<br />
Use the HMG Setup option for Network Setup, Auto Connection Setup and Default Settings. For more information<br />
about each option, refer to the following sections.<br />
Network Setup<br />
Auto Connection<br />
Default Settings<br />
On<br />
Network Setup<br />
Select whether to acquire the IP Address automatically or manually or, when acquiring manually, set the IP<br />
Address and Subnet mask. To access the Network Setup menu, follow the steps below.<br />
Automatic:<br />
To perform the procedure, DHCP on your server or router must be valid.<br />
1 ) Press HMG.<br />
The Home Media Gallery menu appears on screen.<br />
2 ) Select HMG Setup from the menu.<br />
Use the arrow buttons to highlight an option then press ENTER.<br />
3 ) Select Network Setup.<br />
4 ) Select Auto DHCP.<br />
5 ) Select Yes.<br />
The flat panel TV seeks and acquires an IP Address if available.<br />
6 ) Press EXIT or HMG to exit Home Media Gallery.<br />
<strong>Manual</strong>:<br />
Before activating, check your media server for IP Address and Subnet mask information.<br />
1 ) Access the Network Setup through the HMG Setup.<br />
2 ) Select Auto DHCP.<br />
3 ) Select No.<br />
4 ) Select the appropriate box.<br />
Use or to highlight an entry item (IP Address or Subnet mask) then press ENTER.<br />
No need to enter Default Gateway and DNS Server data.<br />
5 ) Enter the figures using buttons 0 to 9.<br />
Subnet mask (such as 255.255.255.0): Enter the same figures.<br />
IP Address (such as 192.168.201.***): Enter the same figures as used in the media server (PC, etc.). For<br />
***, enter 3-digit figures (0 – 254) that have not been used for other network connections.<br />
Use or to highlight other entry areas.<br />
6 ) Press ENTER on the appropriate box after the entry is complete.<br />
Repeat Steps 4 to 5 to complete Network setup.<br />
7 ) Press EXIT or HMG to exit Home Media Gallery.<br />
118<br />
En
Use Other Equipment With Your Flat Panel TV 05<br />
Auto Connection<br />
Set Auto Connection to automatically connect to the last accessed server.<br />
For selection, follow the steps below.<br />
1 ) Access the Auto Connection through the HMG Setup.<br />
2 ) Use or to change the setting.<br />
Selecting ON causes the display to access the last server. If the server is in Standby, a WOL (“Wake On<br />
LAN”) is sent to turn the last accessed server On.<br />
Selecting OFF causes a server list to appear on screen.<br />
“Wake on LAN (WOL)” turns the last accessed server’s power on if the server is WOL-compliant and is in<br />
Standby or sleep mode, once the server is awake, the Media Navigator screen appears. While your flat<br />
panel TV attempts to wake the server, a dialog screen appears. If the server is not WOL-compliant or the<br />
WOL function fails, a notice appears on the Server List screen.<br />
3 ) Press EXIT or HMG to exit Home Media Gallery.<br />
Reset to Default<br />
Occasionally it may be easier to return your flat panel TV to the HMG default values rather than try to correct a<br />
large number of accidental entries. To restore default settings within the Home Media Gallery, follow the steps<br />
below.<br />
1 ) Access Default Settings through the HMG Setup.<br />
2 ) Select Yes.<br />
The default values return and the Home Media Gallery screen appears.<br />
3 ) Press EXIT or HMG to exit Home Media Gallery.<br />
5.11 Other useful functions<br />
Screen Saver<br />
During navigation, the screen saver launches automatically if no activity is sensed within five minutes. However,<br />
when a movie or slideshow is playing, the panel stops the screen saver from activating.<br />
Press any button to cancel the screen saver. Dismissing the screen saver does not interfere when connecting a<br />
USB device.<br />
Note: Pressing DISPLAY to show the Player status or key guide before the screen saver activates may cause image<br />
retention.<br />
Important<br />
• Do not display the Player status and key guide for an extended period of time while playing a movie<br />
or slideshow to avoid possible image retention.<br />
119<br />
En
05 Use Other Equipment With Your Flat Panel TV<br />
Dialog Screen Message<br />
No. Message Problem<br />
001 Content cannot be played. (001) No details are available for the<br />
error, please check content<br />
100 A communication error<br />
occurred. (100)<br />
No further details are available<br />
for the error<br />
101 No response from server. (101) Flat Panel TV timed out due to<br />
delayed server response<br />
102 Disconnected from the<br />
network. (102)<br />
103 Response from server<br />
indicating that it is impossible<br />
to reply. (103)<br />
Cables are disconnected<br />
Server response is not<br />
understandable<br />
300 Content cannot be played. (300) No further details are availabe<br />
for the error<br />
301 This format is not supported.<br />
(301)<br />
An unsupported file is selected<br />
500 Failed to authenticate. (500) Failed to obtain DRM<br />
authorization<br />
501 Failed to authenticate. (501) Failed to obtain DRM<br />
authorization<br />
502 Failed to authenticate.<br />
Check for failure of router, hub,<br />
other network devices. (502)<br />
503 Failed to authenticate content.<br />
The copyright notice of this file<br />
might be invalid. (503)<br />
Failed to obtain DRM<br />
authorization<br />
Failed to obtain DRM<br />
authorization<br />
504 Failed to authenticate. (504) Failed to obtain WMDRM<br />
authorization<br />
505 Failed to authenticate.<br />
Check for failure of router, hub,<br />
other network devices. (505)<br />
506 Failed to authenticate. The max<br />
count of access devices<br />
depends on server. (506)<br />
507 Failed to authenticate. The<br />
license of this file might be<br />
invalid. Receive the license from<br />
a server. (507)<br />
Failed to obtain WMDRM<br />
authorization<br />
Failed to obtain WMDRM<br />
authorization<br />
Failed to obtain WMDRM<br />
authorization<br />
508 Failed to authenticate. (508) Authorization error other than<br />
above<br />
Important<br />
• Displaying pictures in the Home Media Gallery for an extended period may cause an after-image.<br />
120<br />
En
Use Other Equipment With Your Flat Panel TV 05<br />
5.12 Add Other Audio Equipment<br />
The flat panel TV’s digital audio output terminal (optical) can output Dolby Digital signals. Using an optical digital<br />
cable, connect an AV receiver to the digital audio output terminal (optical) on the rear of the flat panel TV. This<br />
connection allows audio such as from digital TV broadcasts to play back in high quality.<br />
If your AV receiver does not have a digital audio input terminal (optical), connect the AUDIO OUT terminals (AUDIO)<br />
on the rear of the flat panel TV to the audio input terminals on the AV receiver. However, this method may result in<br />
audio delay between the speakers and the sound from the AV receiver. To reduce the delay, mute the speakers on<br />
the flat panel TV. Nonetheless, you may still experience some delay between the sound and the picture.<br />
T<br />
W<br />
T<br />
W<br />
Rear view<br />
This connection is<br />
not required<br />
when connecting<br />
an AV amp<br />
equipped with<br />
the surround<br />
function to a<br />
subwoofer.<br />
AV cable<br />
(commercially<br />
available)<br />
Optical digital<br />
cable<br />
(commercially<br />
available)<br />
Subwoofer<br />
AV receiver<br />
Audio signals synchronized with currently displayed images are output to the AUDIO OUT terminals. However,<br />
audio accompanying the images are output to the SUB WOOFER OUT terminal.<br />
When using the digital audio output terminal (optical), select settings according to your AV Receiver. For more<br />
information, see the operating instructions that came with the AV receiver.<br />
Note: When signals are input from the HDMI terminals, no signals are output from the DIGITAL OUT terminal if they<br />
are copy guarded.<br />
To set the DIGITAL OUT terminal (OPTICAL) for your AV Receiver, follow the steps below.<br />
1 ) Access the System Setup through the Setup.<br />
2 ) Select Digital Audio Output from the System Setup menu.<br />
3 ) Select an option from the submenu.<br />
Option<br />
Dolby Digital<br />
PCM<br />
Description<br />
outputs in Dolby Digital for the Dolby format and<br />
outputs in PCM for the PCM format (default)<br />
outputs in the PCM format regardless of signal type<br />
4 ) Press HOME MENU to exit the menu.<br />
121<br />
En
05 Use Other Equipment With Your Flat Panel TV<br />
5.13 Add a Computer (PC)<br />
Use the panel’s PC terminals to connect a personal computer. The PC input terminals are DDC2B-compatible;<br />
however, the Plug & Play function may not operate properly. When connected to a PC, the panel automatically<br />
identifies the input signal type. If the panel fails to see the PC or the picture is unclear, activate the Auto Setup<br />
function.<br />
5.13.1 Automatic Image Position and Clock Adjustments<br />
When connected to a PC, the image position and clock frequency can be adjusted. The Auto Setup option<br />
automatically adjusts these options but the image position and clock can be adjusted manually too. This section<br />
covers the automatic setup function and the following section covers how to manually adjust the image position<br />
and clock.<br />
The AV source device must be connected to the flat panel TV and turned on for these options to work. To use Auto<br />
Setup to automatically adjust the image position and clock, follow the steps below.<br />
1 ) Access the Option through the Setup.<br />
2 ) Select Auto Setup from the Option menu.<br />
The function begins as soon as the selection is made. However, depending on the image, the position may<br />
not change after an adjustment.<br />
3 ) Press HOME MENU to exit the menu.<br />
Note: This function is unavailable when the PC is connected to the HDMI terminal.<br />
When Auto Setup finishes, the message, “Auto Setup Completed” appears on screen. However, if the setup fails<br />
to adjust the image, the message still appears if other factors affect the change. Auto Setup may fail with a PC<br />
image composed of similar patterns or a monochrome picture. If Auto Setup fails to correct the image position<br />
and clock, change the PC image and try again.<br />
5.13.2 <strong>Manual</strong> Image Position and Clock Adjustments<br />
Usually Auto Setup for a PC is the best practice for adjusting the image position and clock. However, to personally<br />
optimize position and clock, follow the steps below.<br />
1 ) Access the Option through the Setup.<br />
2 ) Select <strong>Manual</strong> Setup from the Option menu.<br />
3 ) Select an option to adjust.<br />
H/V Position Adjust<br />
Clock : +120<br />
Phase : +15<br />
Reset<br />
4 ) Use the up/down arrow buttons (/) to adjust the option.<br />
Clock and Phase also accept the left/right arrows (/) for changes.<br />
5 ) Press HOME MENU to exit the menu.<br />
122<br />
En
Helpful Information 06<br />
6 Helpful Information<br />
This chapter includes answers to some common questions and provides information about software/hardware<br />
used in your flat panel TV, cleaning methods, and troubleshooting/service information. If you need further<br />
assistance, please contact us and give us the chance to correct any issues you are experiencing. Thank you again<br />
for buying <strong>Pioneer</strong>!<br />
6.1 Frequently Asked Questions (FAQs)<br />
This section answers some of the questions received by our Support staff members. If your question is not here<br />
or you would like more information please see the <strong>Pioneer</strong> website for more FAQs (www.pioneerelectronics.com)<br />
about your specific model or our flat panel TVs in general.<br />
Why won’t the remote control buttons control my flat panel TV?<br />
If you select a mode other than TV on the remote control, your flat panel TV cannot receive the commands. Press<br />
the SELECT button to toggle the modes until the TV indicator lights.<br />
Why do I have to move closer to the panel to use the remote control?<br />
Weak batteries in the remote control can cause communication to fail. Try moving closer to the panel and attempt<br />
to control the panel with the remote. If the panel responds then change the batteries. If moving closer has no<br />
effect on the panel, check the surroundings for objects that might be blocking the signal. Also consider if other<br />
equipment that use remote controls have been added to the area around the panel. Objects and other IR signals<br />
can disrupt the remote.<br />
How can I protect the remote so it holds up longer?<br />
There are several ways to protect your remote control. Do not leave the remote sitting in direct sunlight as this<br />
can warp or deform the case. Avoid spilling liquids on the remote but if this happens, dry it immediately. If<br />
necessary, remove the batteries and allow the unit to dry completely before attempting to use it again. Areas with<br />
high humidity can also cause damage.<br />
Another issue that can affect the remote control is a leaking battery. The chemicals from a leaky battery can<br />
discolor or damage the remote. If there is visible leakage in a battery, remove both batteries immediately and<br />
carefully wipe the battery compartment clean. Replace both batteries with fresh ones.<br />
Can the signal from my panel’s remote mess up other audio/video equipment?<br />
The flat panel TV emits very weak infrared rays from its screen. If there is other equipment close by that also uses<br />
a remote control such as a DVR or stereo system, it may not receive commands from its remote control properly.<br />
Try moving the equipment farther away from the flat panel TV.<br />
Note: The strength of infrared rays emitted from the panel differs as the picture changes on the screen.<br />
Why does the picture seem to dim when I leave a picture on the screen?<br />
When still images (such as photos and computer images) stay on the screen for an extended period of time, the<br />
screen slightly dims. This function protects the panel from damage by automatically adjusting the screen<br />
brightness. The screen dims when a still image is detected for approximately three minutes.<br />
How do I find (or change) the Parental Control password if I forgot it?<br />
To clear a forgotten password, from an “Enter Password” window, press and hold the ENTER button on the remote<br />
control for three or more seconds. This action resets the password to the default value of 1234. To set a new<br />
password, refer to “3.5.1 Assign a Parental Control (Block) Password.”<br />
The picture and/or sound on a channel coming through the antenna doesn’t seem as clear as it should be,<br />
what can I do?<br />
Channels received through an antenna may have a weaker signal. To check signal strength, refer to “Check the<br />
Signal Strength” in Section 6.4.1 for more information.<br />
123<br />
En
06 Helpful Information<br />
Why is the picture cropped when I feed a PC signal through the PRO-151FD/111FD’s HDMI input?<br />
If you select Video for Signal Type in the HDMI Input menu, the image is over-scanned (enlarged) but the panel<br />
automatically switches to PC when receiving computer signals. Refer to “5.2.1 Specify the HDMI Input Type.”<br />
Why won’t my <strong>Pioneer</strong> flat panel TV turn on?<br />
It may be that your remote has failing batteries or has been damaged. Check the power cord connection at the<br />
wall and on the back of the panel. Also try pressing a on you panel.<br />
Why does the blue or red power light on my flat panel TV blink?<br />
The panel’s internal protection circuit may have been activated for some reason. First turn the panel’s a off, wait<br />
one (1) or more minutes, then turn it back on. If the light still blinks, unplug the power cord from the outlet. Plug<br />
in the panel again after one to two minutes. If this fails to solve the problem, contact your dealer or <strong>Pioneer</strong><br />
Customer Support (see inside back cover).<br />
What can I do to prevent image retention or burn-in?<br />
Burn-in or Image Retention is a side effect of plasma technology. After an image remains on the display for an<br />
extended time period, when the image changes or the unit is turned off, a faint afterimage or ghost of the original<br />
picture may remain. Continuing to play video or leaving the unit turned off for a length of time can clear the<br />
afterimage. We recommend the following steps and settings to prevent image retention or burn-in.<br />
• Set Screen Protection to On.<br />
• Select PC for a signal type when using a PC through an HDMI input.<br />
How do I clean my flat panel TV?<br />
To clean the screen surface, gently wipe it with the supplied dry cloth. Rubbing hard on the screen can scratch<br />
the special film coating. Use a clean soft cloth (cotton or flannel, for example) for the TV cabinet. For details on<br />
cleaning, refer to “6.3 Cleaning Methods.”<br />
6.2 Check Your Software/Hardware Version<br />
You can check the version of all software and hardware used in your flat panel TV. To access the version<br />
information, follow the directions below.<br />
1 ) Access the System Setup through the Setup.<br />
2 ) Select Technical Info. from the System Setup menu.<br />
Software and hardware versions appear.<br />
3 ) Press HOME MENU to exit the menu after checking the versions.<br />
6.3 Cleaning Methods<br />
Before cleaning your flat panel TV, unplug the power cord from the outlet.<br />
When cleaning the screen or the glossy front bezel, gently wipe with a clean, dry cloth such as the supplied<br />
cleaning cloth or a similar type of soft cloth (e.g., cotton, flannel, etc.). Avoid a wet or damp cloth as that can let<br />
moisture seep into the panel. A dusty or rough-textured cloth (or if you rub too hard) can scratch surfaces.<br />
Note: Do not use liquid cleaners or aerosol cleaners on the screen.<br />
The chassis or cabinet of the panel is mostly composed of plastic. Do not use chemicals such as benzene or paint<br />
thinner to clean the cabinet. These chemicals can mar the finish or cause other deterioration. When cleaning the<br />
cabinet, use the same type of cloth and method as described for the front bezel.<br />
Note: Do not affix labels, tapes, etc. to any visible location on the flat panel TV. Adhesives can discolor or mar the<br />
panel surfaces.<br />
124<br />
En
Helpful Information 06<br />
6.4 Troubleshooting & Service Information<br />
General<br />
No power<br />
Issue<br />
Power suddenly turns<br />
off<br />
Panel does not operate<br />
Remote control does<br />
not operate<br />
Possible Solutions<br />
• Check the connection seating at the wall and panel.<br />
• See if the panel’s Power On button is turned ON.<br />
• Confirm that the remote is set to TV.<br />
If the panel indicator lights red, press TV (a) on the remote control or STANDBY/ON<br />
on the flat panel TV.<br />
• Confirm that the Sleep Timer did not turn off your flat panel TV.<br />
• Check the power control setting.<br />
• See if the panel’s internal temperature has increased.<br />
Clean the vents or remove any blocking objects.<br />
• External influences such as voltage malfunction, static electricity, etc., may cause<br />
improper operation.<br />
Unplug the panel from the wall and leave it for two or more minutes. Reconnect and<br />
attempt to operate the panel once again.<br />
• Check if TV power is off. Press the button when the POWER ON and STANDBY<br />
indicators are off.<br />
• Confirm that the mode is set to TV.<br />
• Examine the remote control sensor on the panel for obstructions that could block the<br />
signal.<br />
• Check that the remote’s batteries are installed properly and hold a change.<br />
Replace with new batteries to verify.<br />
• Consider changes in lighting such as stronger or new light sources that may affect the<br />
signal.<br />
Picture/Sound<br />
Issue<br />
No picture and sound<br />
No picture<br />
Possible Solutions<br />
• Check the antenna connections.<br />
• Reseat the cable connections for other equipment.<br />
• Confirm that Parental Control is inactive.<br />
• Enter the password to temporarily remove Parental Control (block).<br />
• Confirm that the panel is set to watch a TV channel instead of an input source.<br />
• Check the picture adjustment settings.<br />
Reset to default values if necessary.<br />
• Confirm that the connected equipment is installed and programmed properly.<br />
• If viewing an image from a PC, confirm that the signal is compatible.<br />
Screen appears dark • Check for any obstacles in front of the Room Light Sensor.<br />
Odd coloring and shades • Review the room lighting for recent changes or different natural lighting sources from<br />
or misaligned images windows or doorways.<br />
• Check the picture tone and adjust as necessary.<br />
Picture is cut off or runs<br />
off screen<br />
• Check the screen size for the current channel/input source.<br />
• Confirm that the position of the picture is centered.<br />
125<br />
En
06 Helpful Information<br />
Picture/Sound<br />
Issue<br />
Picture but no sound<br />
Sound but no picture<br />
Sound is wrong (one side<br />
only or reversed between<br />
left and right)<br />
Brightness and color<br />
tone on the sides differ<br />
from the center<br />
After-image lag<br />
Possible Solutions<br />
• Confirm that the sound is not muted or that the volume is turned down.<br />
• When using a video or PC input source, check that the audio terminals are connected.<br />
• Check if Picture Off is selected from the TOOLS Menu.<br />
With this option selected, the screen is deactivated; only audio is output. To restore the<br />
screen display, press any button other than VOL +/– or MUTING.<br />
• Check if the speaker cable connections have been reversed between the left and right.<br />
• Confirm that speaker cables are connected and seated properly.<br />
• Check the sound balance and adjust if necessary.<br />
• If images in 4:3 mode or letterbox images are displayed for long periods or for shorter<br />
periods over several days, an after-image may remain due to burning.<br />
Watch images in Full screen as much as possible to avoid this issue.<br />
• Change the Brightness Sync. setting to Auto.<br />
This function adjusts the brightness of the gray side masks for the brightness of the main<br />
image.<br />
• Use the Screen Protection function (see “3.6.2 Extend Your Panel Life”).<br />
• If a bright or still image was on screen for a long period before switching to a darker<br />
image the original image may appear as an after-image or ghost. Try playing another<br />
bright image, switching the picture quickly many times, or show a very active scene.<br />
• Use the Screen Protection function (see “3.6.2 Extend Your Panel Life”).<br />
• Display the Video Pattern screen to help reduce after-image lag.<br />
HDMI Control<br />
Issue<br />
HDMI Controls do not<br />
function<br />
Error message: “The<br />
device cannot be<br />
operated. Please check<br />
connection”<br />
No picture and sound<br />
No picture<br />
No sound<br />
Possible Solutions<br />
• Check the connections between the panel and the HDMI equipment.<br />
• Confirm that the settings for the panel are correct.<br />
• Confirm that the equipment is HDMI compliant.<br />
• Confirm that settings for the equipment are correct.<br />
For details, refer to the operating instructions that came with the equipment.<br />
• Check the connections between the panel and the HDMI equipment.<br />
• Confirm that settings for the equipment are correct.<br />
For details, refer to the operating instructions that came with the equipment.<br />
• Check the connections between the panel and the HDMI equipment.<br />
• Confirm that settings for the equipment are correct.<br />
For details, refer to the operating instructions that came with the equipment.<br />
• Check the connections between the panel and the HDMI equipment.<br />
• Confirm that settings for the equipment are correct.<br />
For details, refer to the operating instructions that came with the equipment.<br />
• Check the connections between the panel and the HDMI equipment.<br />
• Confirm that settings for the equipment are correct.<br />
For details, refer to the operating instructions that came with the equipment.<br />
• Check that the AV system is connected to an HDMI terminal and any recorder/player is<br />
connected to another HDMI terminal.<br />
126<br />
En
Helpful Information 06<br />
Home Media Gallery/NETWORK<br />
Issue<br />
No servers are found<br />
No previously<br />
connected server(s)<br />
found (items in Select<br />
Servers are dimmed)<br />
“Failed to acquire a<br />
list.” appears on the<br />
Server List screen<br />
An available server is<br />
selected but cannot be<br />
navigated<br />
A server is arbitrarily<br />
selected<br />
File/folder<br />
configuration differs<br />
from one server to<br />
another (strange<br />
configuration)<br />
A communication error<br />
message appears<br />
Possible Solutions<br />
• Confirm that the PC is On and not in Standby or Sleep (nothing is chosen in Select<br />
Servers). When the PC started from “Wake On LAN” (WOL), check if the PC complies<br />
with WOL or if the WOL setup is programmed properly in device manager for BIOS or<br />
Windows.<br />
• Check the physical connections (hub, router, and cable quality). Please use 100BASE-<br />
TX for best quality playback and display speed.<br />
• Check the logical connections (IP Address setup, DHCP, etc.). Confirm the IP Address<br />
is correct if acquired by Auto IP and Firewall setup. Also check if the IP Address is<br />
properly acquired with DHCP on the Network Setup screen that follows the HMG Setup<br />
menu.<br />
• Using two or more application servers on a single PC may cause unstable operation.<br />
For proper operation, it is strongly recommended that one application server is used on a<br />
single PC.<br />
• Check the PC if its media server is running. Restart if necessary. Check if one or more<br />
servers are On (this may cause a malfunction).<br />
• Check if the PC is operating properly. Reboot the PC after confirming its specifications<br />
and setup values.<br />
• Check the media server setup. If a client is registered manually, the setup procedure<br />
may have to be run again. An option “Not Allowed” may be selected for connections.<br />
• Check if UPnP (Universal Plug and Play) is enabled on your router. Refer to your<br />
router’s instruction manual for procedures.<br />
• Wait for a short period then select “Update Server List” from the TOOLS Menu.<br />
• Check for radio interference when connected using a wireless LAN. Radio interference<br />
may cause the connection to fail.<br />
• If the above does not solve the problem, try turning TV a off on the remote control unit<br />
then turn a on on the flat panel TV.<br />
• Check if the server is correctly set up for file sharing, if the target folder has been<br />
deleted, or if one or more folders have been corrupted on the server.<br />
• Check if there are too many files in each folder.<br />
• This arbitrary selection happens when the server you used before had been set to<br />
display the Media Navigator menu screen (if you reset it, other servers connected are<br />
also reset).<br />
•When ON is selected for Auto Connection on the HMG Setup menu, the server is<br />
automatically accessed if only one server is connected. Use the TOOLS Menu to select<br />
the proper server.<br />
• The Media Navigator displays the server contents as classified by the server.<br />
• If no information (such as ID3 tag) is contained in the file, files cannot be classified on<br />
the server.<br />
• Refer to the possible solutions provided previously for “No servers are found.”<br />
• If the above does not solve the problem, try turning TV a off on the remote control then<br />
turn a on on the flat panel TV.<br />
127<br />
En
06 Helpful Information<br />
Home Media Gallery/PLAYBACK<br />
Issue<br />
Image or sound is<br />
interrupted or distorted<br />
(Block noise appears)<br />
Cannot play or display<br />
Possible Solutions<br />
• Check the physical connections (hub, router, cable quality). Please use 100BASE-TX<br />
for best quality playback and display speed.<br />
• Check if the PC is operating properly. Reboot the PC after confirming specifications<br />
and setup values.<br />
• Confirm that the file complies to the supported format, bit rate, and/or profile. Also<br />
check the file for damage.<br />
• When connected by a wireless LAN, verify that the bit rate is sufficient.<br />
• Some files that comply with the supported format may not play back or display.<br />
• Check if the DRM content was purchased for use with another PC. Your flat panel TV<br />
cannot play DRM content if it has been transferred from the PC on which it was<br />
purchased to another PC. You can only play DRM content purchased for the PC in use<br />
at the time of purchase. Please obtain a new license or use the PC for which the<br />
content was purchased.<br />
• Check if content on the same server allows multiple client devices (players).<br />
• Check the physical connections (hub, router and cable quality). Please use 100BASE-<br />
TX for best quality playback and display speed.<br />
• Check if the PC is operating properly. Reboot the PC after confirming its specifications<br />
and setup.<br />
• Check if the file complies to the supported format, bit rate and/or profile. Also check<br />
the file for damage.<br />
• Check if the leasing contract for the server has expired.<br />
• When connected by a wireless LAN, check if the bit rate is sufficient.<br />
• Some files that comply with the supported format may not be played back or displayed.<br />
• It takes time to capture and display a large-sized image. If this is the case, no operation<br />
may be performed.<br />
• Check if the DRM content was purchased for use with another PC. With the flat panel<br />
TV you cannot play DRM content if it has been transferred from the PC on which it was<br />
purchased to another PC. You can only play DRM content purchased for the PC in use<br />
at the time of purchase. Please obtain a new license or use the PC for which the<br />
content was purchased.<br />
• Check if content on the same server is played with multiple client devices (players).<br />
Home Media Gallery/USB<br />
128<br />
En<br />
Issue<br />
USB devices are not<br />
properly recognized<br />
Possible Solutions<br />
• Check if the device is Mass Storage Class compliant.<br />
• Check if it is connected properly, nothing is damaged (power unit, mode such as Mass<br />
Storage mode and media format, etc.).<br />
• Check if it contains the supported files.<br />
• Check if the speed of the device is sufficient (poor device speed may result in<br />
interrupted or delayed display of images due to a bit-rate problem). When using a<br />
digital camera that is not Mass Storage Class compliant, insert the Flash Memory card<br />
into the multi-card reader.<br />
• Confirm that the device is correctly inserted or removed.<br />
• No USB hub is supported. When using a home network, connect directly to the<br />
device’s USB port.
Helpful Information 06<br />
Home Media Gallery/USB<br />
Issue<br />
Image or sound is<br />
interrupted or distorted<br />
(Block noise appears)<br />
An external device<br />
connected to the USB<br />
port does not operate<br />
Photo data stored in a<br />
digital still camera<br />
cannot be read<br />
through USB interface<br />
Possible Solutions<br />
• Verify that the file complies with the supported format, bit rate and/or profile. Also<br />
check the file for damage.<br />
• Some files that comply with the supported format may not play back or display<br />
properly.<br />
• Check if the device is Mass Storage Class compliant.<br />
• Check if it is connected properly, nothing is damaged (power unit, mode such as Mass<br />
Storage mode and media format, etc.).<br />
• Check if it contains the supported files.<br />
• Check if the speed of the device is sufficient (poor device speed may result in<br />
interrupted or delayed display of images due to a bit-rate problem). When using a<br />
digital camera that is not Mass Storage Class compliant, insert the Flash Memory card<br />
into the multi-card reader.<br />
• Check if the device is connectable to the flat panel TV.<br />
• Re-insert the USB cable.<br />
• For connection, use a USB cable shorter than 5 m.<br />
• Check if the USB cable is properly connected.<br />
• First turn the power off and then on again to check if the external device works<br />
correctly.<br />
• Check if the external device works correctly after the USB device is relaunched.<br />
• Check if the digital still camera is in viewing mode.<br />
• Refer to the instruction manual for the digital still camera.<br />
• Check if the device is connectable to the flat panel TV.<br />
• Check if the digital still camera is turned on.<br />
• Check if the digital still camera is in viewing mode.<br />
Home Media Gallery/Slide Show<br />
Issue<br />
Slideshow (photo<br />
content) doesn’t start<br />
Next picture does not<br />
appear in the<br />
slideshow<br />
Possible Solutions<br />
• Check if the player is in pause, rotation or zoom mode. If it is, press PLAY or ENTER to<br />
start the slideshow.<br />
• The time needed to display a picture may be longer than the time set to display in Slide<br />
Show settings. Reduce the picture size using a PC and try again.<br />
• Slide Show only displays supported files. If there is only one supported file, that file<br />
remains on the screen. No other files appear.<br />
Other<br />
Issue<br />
Panel sounds/noises<br />
Brightness on sides of<br />
screen are uneven<br />
Possible Solutions<br />
• Some sounds are appropriate for plasma technology.<br />
Examples: fan motor noise, electrical circuit humming, glass panel buzzing, etc.<br />
• Display content that completely fills the screen until unevenness is minimized.<br />
• Change the AV mode setting.<br />
129<br />
En
06 Helpful Information<br />
If the information above fails to solve the issue, please contact a <strong>Pioneer</strong>-authorized service representative. Do<br />
not attempt to service the panel yourself. Opening or removing covers exposes you to possible electrical shock<br />
and other dangers as well as possibly voiding your warranty. Request a qualified service professional to check you<br />
flat panel TV.<br />
Some situations that require a service professional are as follows:<br />
• panel dropped or damaged<br />
• power cord or plug damaged<br />
• liquid spilled or an object dropped into the panel<br />
• exposed to rain or water<br />
• noticeable abnormality in panel operation<br />
Occasionally a part within the flat panel TV may fail. Verify that your service professional uses only replacement<br />
parts specified by <strong>Pioneer</strong> or by those with the same characteristics and performance as the original parts. Use<br />
of unauthorized parts can result in fire, electric shock, or other danger. Upon completion of any service or repair<br />
work, request that the service professional perform safety checks to ensure that the product is operating properly.<br />
If you need more assistance or have a Service/Parts-related question, please contact the <strong>Pioneer</strong> Service<br />
organization at (800) 421-1625.<br />
6.4.1 Check the Signal Strength<br />
When the flat panel TV has a UHF/VHF antenna connected, the signal may be weak. If the image or sound is<br />
unclear, check the strength of the signal. Follow the steps below to check a channel’s signal strength.<br />
1 ) Tune to the channel that is fuzzy or with unclear sound.<br />
2 ) Access the System Setup through the Setup.<br />
3 ) Select Digital Tuner Setup from the System Setup menu.<br />
4 ) Select Installation from the Digital Tuner Setup menu.<br />
5 ) Select Signal Check from the submenu.<br />
6 ) Select RF Channel.<br />
To add the channel(s), select Add.<br />
7 ) Select the channel to be checked.<br />
8 ) Adjust the direction of the antenna until the current signal strength reaches as close to the maximum signal<br />
strength as possible.<br />
RF Channel : 21<br />
Add<br />
Level : 60%<br />
Quality : 80%<br />
9 ) Press HOME MENU to exit the menu.<br />
130<br />
En
Cautions and Warnings 07<br />
7 Cautions and Warnings<br />
Your flat panel TV is designed for a long and productive life. To keep your panel at peak performance, there are a<br />
few things that can help. This section provides general information and specific warnings to help you maintain<br />
the flat panel TV at top quality throughout its lifetime.<br />
Note: If you do not intend to use your flat panel TV for an extended period, occasionally power on and run the<br />
panel to maintain functionality.<br />
7.1 Installation Details<br />
It is best to use parts and accessories designed by <strong>Pioneer</strong>. Use of accessories other than the <strong>Pioneer</strong> stand or<br />
installation bracket may result in instability and could cause injury. For custom installations, please speak with<br />
your dealer or expert installer before attempting to install your high-end flat panel TV. These professionals are<br />
familiar with proper installation techniques including ventilation.<br />
Using the unit without proper ventilation may cause the internal temperature to rise and could result in a possible<br />
malfunction. When the surrounding environmental or internal temperature exceeds a certain degree, the display<br />
automatically powers off in order to cool the internal electronics and prevent a hazardous situation.<br />
A malfunction can be caused by a single issue such as ventilation or by a combination of factors. <strong>Pioneer</strong> is not<br />
responsible for accidents or damage caused by using parts and/or accessories manufactured by other<br />
companies, inadequate installation sites, poor stabilization practices, erroneous installation methods,<br />
operational mistakes, site remodeling, or natural disasters.<br />
For more installation information, refer to the following bullet points:<br />
• Confirm that panel vents are not partially obstructed or completely blocked.<br />
• Use a vacuum cleaner set to its lowest suction setting to clean dusty vents.<br />
• Distance the panel from the wall, other equipment, etc. (for minimum space requirements, refer to “2.1.1<br />
Check the Location for Suitability” ).<br />
• Do not fit the unit inside of narrow spaces where ventilation is poor.<br />
• Do not drape, seat, or enclose the panel in any material including blankets, loose cloth, or carpeting as this<br />
could block the panel vents.<br />
• Use a proper mount or stand rather than leaning the panel against a wall or other support.<br />
7.2 Physical Location & Temperature Considerations<br />
Condensation may form on the surface or inside of the flat panel TV when the panel is moved from a cold place<br />
to a warm place or just after a heater or air conditioner is switched on. If condensation forms, do not turn on the<br />
flat panel TV until all moisture evaporates. Powering on the display when there is condensation may cause the<br />
panel to malfunction.<br />
7.3 Usage Guidelines<br />
For maximum enjoyment of your <strong>Pioneer</strong> flat panel TV, read the following information carefully.<br />
Over the course of the flat panel TV’s lifetime, as with all phosphor-based screens including standard tube-type<br />
TVs, the luminosity of the screen diminishes very slowly. Also, static pictures shown over an extended period can<br />
adversely affect the screen image. To enjoy bright and beautiful pictures for many years to come, please apply the<br />
following guidelines.<br />
• Set the flat panel TV to Standby when it is not being used.<br />
• Avoid leaving a still image or frequently showing the same picture on the screen (e.g. closed-captioned<br />
images, games with static portions, etc.).<br />
• Hide the On Screen Display (OSD) from a DVD player, VCR, or other device when not in use.<br />
• Do not leave a picture freeze-framed or paused for long periods.<br />
• Avoid showing a picture with very bright and very dark areas on the screen for extended lengths to time.<br />
• Activate the GAME mode on the AV Selection submenu to play a game but try to limit using this mode for<br />
more than two hours at a time.<br />
131<br />
En
07 Cautions and Warnings<br />
• View full-motion, high-action video in WIDE or FULL screen after playing a game or showing a still/PC image.<br />
The recommended duration for showing the action video is three times as long as the game or PC image<br />
was on the screen.<br />
• View full-motion video in WIDE or FULL screen after playing content with side, top, or bottom masking (black<br />
bars). Extensive viewing of masked content without this recovery process can cause uneven wear on the<br />
plasma cells.<br />
7.4 Signal Interference or Noise<br />
Signal interference, also referred to as video noise or white noise, can be caused by many different situations.<br />
The most common are addressed in the following sections.<br />
Infrared rays<br />
The flat panel TV releases infrared rays because of its characteristics. Depending on how the flat panel TV is used,<br />
remote controls for nearby equipment may be adversely affected. Wireless headphones using infrared rays can<br />
experience noise interference. If this is the case, move equipment to a location where its remote control sensor<br />
is not affected.<br />
Radio Signals<br />
While this flat panel TV meets the required specifications, it can affect the signals for surrounding equipment. If<br />
your radio, PC, VCR, or other electrical equipment is disrupted by the panel, move the equipment away from the<br />
panel.<br />
Flat Panel TV Motor<br />
The screen of the flat panel TV is composed of extremely fine pixels that emit light according to received video<br />
signals. This principle may cause you to hear a slight buzz or electrical hum coming from the panel. This is a<br />
normal sound for the flat panel TV and does not indicate a failing unit.<br />
Flat Panel TV Fans<br />
You may hear the sound of a fan motor at times. The slight noise is caused by a cooling fan motor speeding up<br />
when the ambient temperature of the flat panel TV rises. This is a normal function of the panel and is not a<br />
malfunction.<br />
7.5 Phosphor Properties<br />
The following are typical effects and characteristics of a phosphor-based matrix display and as such are not<br />
covered by the Warranty:<br />
• Permanent residual images upon the phosphors of the panel<br />
• Existence of one or more inactive light cells in small quantity<br />
• Noises generated by fan motors, electrical circuits (hum), panel plates, etc.<br />
7.6 Image Information Including Retention & After-Image Lag<br />
Menu Window Size (after a Video Switch)<br />
Programs may be high definition (HD) or standard definition (SD). This flat panel TV automatically scales to the<br />
appropriate definition type. If the video program’s definition type changes while a menu window is on screen (for<br />
example: HD to SD or SD to HD) the menu size may temporarily shrink or enlarge until the panel finishes<br />
adjusting the picture. Adjusting may happen, for example, when switching between a TV program and playback<br />
from a DVR, or when a recorded program switches between different definition types while the menu is showing.<br />
The menu returns to its normal size after a couple of seconds. This action is normal and does not indicate a<br />
problem with your flat panel TV.<br />
Pixel Information<br />
Plasma screens show picture using pixels. <strong>Pioneer</strong> flat panel TVs contain a very large number of pixels. The size<br />
of the panel determines the number of pixels. With the ELITE Series models, there are over 6.2 million pixels in<br />
the 50”/60” panel. All <strong>Pioneer</strong> display panels are manufactured using a very high level of ultra-precision<br />
technology and undergo individual quality control.<br />
132<br />
En
Cautions and Warnings 07<br />
In rare cases, some pixels can be permanently switched off, or on, resulting in either a black or colored pixel<br />
permanently fixed on the screen. This effect is common to all plasma displays because it is a consequence of the<br />
technology.<br />
If the defective pixels are visible at the standard viewing distance of between 2.5 and 3.5 meters (8.2 feet and 11.5<br />
feet) while viewing a normal broadcast (i.e. not a test card, still image, or single color display) please immediately<br />
contact <strong>Pioneer</strong> Customer Support (USA) or Customer Satisfaction (CANADA). See inside back cover for contact<br />
information. If, however, the faulty pixels can only be seen close up or during single color displays then this is<br />
considered normal for this technology.<br />
Image Retention (a.k.a. Burn-In)<br />
Leaving a static picture on screen for several hours can cause a faint imprint of the image. This imprint is known as<br />
image retention or burn-in. The image may be temporary or permanent. Although caused by different things, image<br />
retention can occur on all display technologies including LDC, plasma, direct view CRT TVs, and projection TVs.<br />
On today’s plasma displays, permanent image retention is less of a worry. Most image retention can be improved<br />
simply by watching something with a lot of action or rapid screen changes. To avoid image retention as much as<br />
possible, refer to the guidelines below.<br />
• Change the picture periodically when showing static images, such as a fixed image from a PC or a TV game<br />
unit, for longer periods.<br />
• Avoid leaving fixed images such as time of day indicator or channel logos on screen whenever possible.<br />
• Display content in a wide aspect ratio (no black or gray bars on any side of the content). This flat panel TV is<br />
equipped with multiple wide-screen viewing modes; use one of these modes to fill the entire screen with<br />
content. View in a wide aspect ratio unless doing so would be a copyright infringement.<br />
• Set the Side Mask detection function to Mode 1 or Mode 2. High Definition 16:9 aspect ratio images<br />
containing side masks are detected automatically and side masks are added or the image appears in fullscreen.<br />
• Avoid showing dark images after still images for a period of time. In most cases, any image retention caused<br />
by this sequence can be corrected by displaying bright images for a similar period of time.<br />
After-Image Lag<br />
Displaying the same images such as still images for a long time may cause after-image lagging. After-Image Lag<br />
refers to a ghost of the still image remaining visible after the picture is no longer being shown. This may occur in<br />
the following cases.<br />
• After-image lagging due to remaining electric load<br />
If an image with very high peak luminance is displayed for more than a minute, after-image lagging may<br />
occur due to the remaining electric load. The ghost-image remaining on the screen disappears when<br />
moving images are shown. The luminance of the still image and the length of time it was displayed<br />
determine how long it takes for the ghost image to fade away.<br />
• After-image (lag image) due to burning<br />
Avoid displaying the same image on the flat panel TV continuously over a long period. If the same image is<br />
displayed continuously for several hours, or for shorter periods over several days, a permanent after-image<br />
may remain on the screen. This after-image is permanent because the fluorescent materials burned.<br />
Burned images may fade eventually after playing other video sequences but do not disappear completely.<br />
When a program menu, or frozen image is displayed for up to 10 minutes, the flat panel TV automatically turns<br />
the image off to prevent the screen from being burned.<br />
Screen Protection<br />
Screen Protection simultaneously optimizes the related settings to alleviate image retention. For details, see<br />
“3.6.2 Extend Your Panel Life.”<br />
Image Orbiter<br />
Another built-in feature to protect against burn-in is the Orbiter function. Orbiter automatically changes the<br />
position of the picture imperceptibly while the image is on screen. For more information about the feature, refer<br />
to “3.6.3 Turn On the Image Orbiter.”<br />
133<br />
En
07 Cautions and Warnings<br />
7.7 Safety Precautions<br />
Your flat panel TV is engineered and manufactured with one of the highest priorities being safety. However,<br />
improper use can result in electric shock and/or fire. To avoid danger please follow the instructions below when<br />
installing, operating, and cleaning your flat panel TV.<br />
• Read & Retain Instructions – Read all operating and user information provided with your flat panel TV.<br />
• Environment – Avoid installing the panel in a location with exposure to large quantities of dust, temperature<br />
extremes, high humidity, direct sunlight, or subject to excessive vibrations or impact shock. Also, never pour<br />
a liquid or insert an object in to the flat panel TV.<br />
• Cleaning – See the section above regarding the proper way to clean your flat panel TV.<br />
• Water & Moisture – Avoid operating or positioning your panel close to water or other sources of liquid. Such<br />
locations include a bathroom, a kitchen or laundry sink, in a damp basement, by a swimming pool, etc.<br />
• Power – Turn OFF the panel before connecting any other equipment. Operate the panel only from a grounded<br />
outlet.<br />
7.8 Legal Notices<br />
7.8.1 Safety<br />
WARNING<br />
This equipment is not waterproof. To prevent a fire or shock hazard, do not place any container filled<br />
with liquid near this equipment (such as a vase or flower pot) or expose it to dripping, splashing, rain<br />
or moisture.<br />
D3-4-2-1-3_B_En<br />
WARNING: This product equipped with a three-wire grounding (earthed) plug - a plug that has a<br />
third (grounding) pin. This plug only fits a grounding-type power outlet. If you are unable to insert<br />
the plug into an outlet, contact a licensed electrician to replace the outlet with a properly grounded<br />
one. Do not defeat the safety purpose of the grounding plug.<br />
D3-4-2-1-6_A_En<br />
WARNING: To prevent a fire hazard, do not place any naked flame sources (such as a lighted<br />
candle) on the equipment.<br />
D3-4-2-1-7a_A_En<br />
VENTILATION CAUTION:<br />
When installing this unit, make sure to leave space around the unit for ventilation to improve heat<br />
radiation. For the minimum space required, see page 15.<br />
WARNING: Slots and openings in the cabinet are provided for ventilation to ensure reliable<br />
operation of the product, and to protect it from overheating. To prevent fire hazard, the openings<br />
should never be blocked or covered with items (such as newspapers, table-cloths, curtains) or by<br />
operating the equipment on thick carpet or a bed.<br />
134<br />
En
Cautions and Warnings 07<br />
CAUTION: The switch on this unit will not completely shut off all power from the AC outlet. Since the power<br />
cord serves as the main disconnect device for the unit, you will need to unplug it from the AC outlet to shut<br />
down all power. Therefore, make sure the unit has been installed so that the power cord can be easily<br />
unplugged from the AC outlet in case of an accident. To avoid fire hazard, the power cord should also be<br />
unplugged from the AC outlet when left unused for a long period of time (for example, when on vacation).<br />
D3-4-2-2-2a_A_En<br />
Operating Environment<br />
Operating environment temperature and humidity:<br />
+0 ºC to +40 ºC (+32 ºF to +104 ºF); less than 85 %RH (cooling vents not blocked)<br />
Do not install this unit in a poorly ventilated area, or in locations exposed to high humidity or direct sunlight<br />
(or strong artificial light)<br />
D3-4-2-1-7c_A_En<br />
7.8.2 Radio Interference<br />
This digital television is capable of receiving analog basic, digital basic and digital premium cable television<br />
programming by direct connection to a cable system providing such programming. A security card provided<br />
by your cable operator is required to view encrypted digital programming. Certain advanced and interactive<br />
digital cable services such as video-on-demand, a cable operator’s enhanced program guide and dataenhanced<br />
television services may require the use of a set-top box. For more information call your local cable<br />
operator.<br />
Information to User<br />
Alteration or modifications carried out without appropriate authorization may invalidate the user’s right to<br />
operate the equipment.<br />
D8-10-2_En<br />
[For Canadian model]<br />
This Class B digital apparatus complies with Canadian ICES-003.<br />
D8-10-1-3_En<br />
FEDERAL COMMUNICATIONS COMMISSION DECLARATION OF CONFORMITY<br />
This device complies with part 15 of the FCC Rules. Operation is subject to the following two conditions:<br />
(1) This device may not cause harmful interference, and (2) this device must accept any interference received,<br />
including interference that may cause undesired operation.<br />
Product Name: Flat Panel TV<br />
Model Number: PRO-151FD/PRO-111FD<br />
Product Category: Class B Personal Computers & Peripherals<br />
Responsible Party Name: PIONEER ELECTRONICS SERVICE, INC.<br />
Address: 1925 E. DOMINGUEZ ST., LONG BEACH, CA 90801-1760, U.S.A.<br />
Phone: 800-421-1625<br />
URL: http://www.pioneerelectronics.com<br />
NOTE: This equipment has been tested and found to comply with the limits for a Class B digital device,<br />
pursuant to Part 15 of the FCC Rules. These limits are designed to provide reasonable protection against<br />
harmful interference in a residential installation. This equipment generates, uses, and can radiate radio<br />
frequency energy and, if not installed and used in accordance with the instructions, may cause harmful<br />
interference to radio communications. However, there is no guarantee that interference will not occur in a<br />
particular installation. If this equipment does cause harmful interference to radio or television reception,<br />
which can be determined by turning the equipment off and on, the user is encouraged to try to correct the<br />
interference by one or more of the following measures:<br />
– Reorient or relocate the receiving antenna.<br />
– Increase the separation between the equipment and receiver.<br />
– Connect the equipment into an outlet on a circuit different from that to which the receiver is connected.<br />
– Consult the dealer or an experienced radio/TV technician for help. D8-10-1-2_En<br />
CAUTION: This product satisfies FCC regulations when shielded cables and connectors are used to connect<br />
the unit to other equipment. To prevent electromagnetic interference with electric appliances such as radios<br />
and televisions, use shielded cables and connectors for connections.<br />
D8-10-3a_En<br />
135<br />
En
08 Appendix<br />
8 Appendix<br />
8.1 Ratings Charts (for Various Audience Classifications)<br />
The charts below list the various rating systems recognized by your flat panel TV.<br />
8.1.1 TV Ratings (age-based)<br />
Rating<br />
Description<br />
TV-Y<br />
TV-Y7<br />
TV-G<br />
TV-PG<br />
TV-14<br />
TV-MA<br />
All children<br />
Children seven and above<br />
General audiences<br />
Parental guidance suggested<br />
Parents strongly cautioned<br />
Mature audiences only<br />
8.1.2 U.S. TV Parental Guideline Ratings (age/category-based)<br />
Rating<br />
Description<br />
FV<br />
V<br />
S<br />
L<br />
D<br />
Fantasy Violence<br />
Violence<br />
Sexual Situations<br />
Adult Language<br />
Sexual Dialog<br />
8.1.3 MPAA Movie Ratings (age-based)<br />
Rating<br />
Description<br />
N/A<br />
G<br />
PG<br />
PG-13<br />
R<br />
NC-17<br />
NR<br />
Not applicable for MPAA ratings<br />
General audiences. All ages admitted.<br />
Parental guidance suggested. Some material<br />
may not be suitable for children.<br />
Parents strongly cautioned. Some material may<br />
be inappropriate for children under 13.<br />
Restricted. Under 17 requires accompanying<br />
parent or adult guardian (age varies in some<br />
jurisdictions).<br />
No one 17 and under admitted.<br />
Not rated<br />
136<br />
En
Appendix<br />
08<br />
8.1.4 Canadian - English Ratings (age-based)<br />
E<br />
(exempt)<br />
C<br />
(children)<br />
Rating<br />
C8+<br />
(children over 8)<br />
G<br />
(general)<br />
PG<br />
(parental guidance)<br />
14+<br />
(children over 14)<br />
18+<br />
(adults)<br />
Description<br />
News, sports, documentaries, other information<br />
programming, talk shows, music videos, variety<br />
programming<br />
For younger children under the age of eight years;<br />
pays close attention to themes that could<br />
threaten their sense of security and well-being<br />
Contains no portrayal of violence as the preferred,<br />
acceptable, or only way to resolve conflict; nor<br />
encourages children to imitate dangerous acts<br />
they may see on the screen<br />
Acceptable for all age groups; contains very little<br />
violence, physical, verbal or emotional<br />
For general audience but may not be suitable for<br />
younger children (under the age of eight); could<br />
contain controversial themes or issues<br />
Contains themes where violence is one of the<br />
dominant elements of the storyline but it must be<br />
integral to the development of plot or character;<br />
language usage could be profane; limited nudity<br />
present within the context of the theme<br />
Contains depictions of violence related to the<br />
development of plot, character or themes<br />
intended for adult viewing; could contain graphic<br />
language and portrayals of sex and nudity<br />
8.1.5 Canadian - French Ratings (age-based)<br />
Rating<br />
E<br />
G<br />
8ans+<br />
13ans+<br />
16ans+<br />
18ans+<br />
Description<br />
News, sports, documentaries, other information<br />
programming, talk shows, music videos, variety<br />
programming<br />
All ages and children, contains minimal direct<br />
violence, but may be integrated into the plot in a<br />
humorous or unrealistic manner<br />
General but inadvisable for young children; may<br />
be viewed by a wide public audience but could<br />
contain scenes disturbing to children under eight<br />
who cannot distinguish between imaginary and<br />
real situations; view with parent<br />
Contains scenes of frequent violent scenes and<br />
therefore recommended for viewing with parent<br />
Contains frequent violent scenes and intense<br />
violence<br />
Only for adult viewing; contains frequent violent<br />
scenes and extreme violence<br />
137<br />
En
08 Appendix<br />
8.2 Manufacturer Codes to Program into the Remote Control<br />
8.2.1 Cable<br />
Brand/Code Brand/Code Brand/Code Brand/Code Brand/Code Brand/Code<br />
A-Mark<br />
0008,0144<br />
ABC<br />
0237, 0003,<br />
0008<br />
Accuphase<br />
0003<br />
Acorn<br />
0237<br />
Action<br />
0237<br />
Active<br />
0237<br />
Americast<br />
0899<br />
Archer<br />
0237, 0260<br />
BCC<br />
0276<br />
Bell South<br />
0899<br />
British Telecom<br />
0003<br />
Century<br />
0008<br />
Clearmaster<br />
0883<br />
ClearMax<br />
0883<br />
Cool Box<br />
0883<br />
Coolmax<br />
0883<br />
Digeo<br />
1187<br />
Director<br />
0476<br />
Fosgate<br />
0276<br />
GE<br />
0144<br />
General<br />
Instrument<br />
0476, 0810,<br />
0276, 0003<br />
Gibralter<br />
0003<br />
GMI<br />
0883<br />
GoldStar<br />
0144<br />
Hitachi<br />
0003, 0008<br />
Insight<br />
0476, 0810<br />
Jerrold<br />
0476, 0810,<br />
0276, 0003<br />
Memorex<br />
0000<br />
Mitsubishi<br />
0003<br />
Motorola<br />
1376, 0476,<br />
0810, 0276,<br />
1187, 1106<br />
Multitech<br />
0883<br />
Nova Vision<br />
0008<br />
Novaplex<br />
0008<br />
Pace<br />
1877, 0877,<br />
0237, 0008<br />
Panasonic<br />
0000, 0008,<br />
0144, 0107<br />
Paragon<br />
0000, 0008, 0525<br />
Penney<br />
0000<br />
Philips<br />
1305, 0317<br />
<strong>Pioneer</strong><br />
1877, 0877,<br />
0144, 0533,<br />
0023, 0260,<br />
1021<br />
Pulsar<br />
0000<br />
Quasar<br />
0000<br />
RadioShack<br />
0883<br />
RCA<br />
1256<br />
Regal<br />
0276<br />
Runco<br />
0000<br />
Samsung<br />
0003, 0144,<br />
0023<br />
Scientific<br />
Atlanta<br />
1877, 0877,<br />
0477, 0237,<br />
0003, 0000,<br />
0008<br />
Sony<br />
1006<br />
Sprucer<br />
0144<br />
Starcom<br />
0003<br />
Supercable<br />
0276<br />
Supermax<br />
0883<br />
Thomson<br />
1256<br />
Torx<br />
0003<br />
Toshiba<br />
0000<br />
Tristar<br />
0883<br />
United Cable<br />
0276, 0003<br />
US <strong>Electronics</strong><br />
0276, 0003,<br />
0008<br />
V2<br />
0883<br />
Videoway<br />
0000<br />
Viewmaster<br />
0883<br />
Vision<br />
0883<br />
Vortex View<br />
0883<br />
Zenith<br />
0000, 0525,<br />
0899<br />
8.2.2 Satellite<br />
Brand/Code Brand/Code Brand/Code Brand/Code Brand/Code Brand/Code<br />
138<br />
En<br />
Bell ExpressVu<br />
0775, 1170<br />
Chaparral<br />
0216<br />
Coolsat<br />
1806, 2147<br />
Crossdigital<br />
1109<br />
DirecTV<br />
1377, 0392,0566,<br />
0639, 1639,<br />
1142, 0247,<br />
0749, 1749,<br />
0819, 1856,<br />
1076, 1108,<br />
0099, 1109,<br />
1392, 1414,<br />
1442, 1443,<br />
1444, 1538, 1609<br />
Dish Network<br />
System<br />
1505, 0775,<br />
1170, 1775<br />
Dishpro<br />
1505, 0775,<br />
1775<br />
Echostar<br />
1505, 0775,<br />
1170, 1775<br />
Expressvu<br />
0775, 1775<br />
Fortec Star<br />
1550, 1821,<br />
1948<br />
Funai<br />
1377<br />
GE<br />
0392, 0566<br />
General<br />
Instrument<br />
0869<br />
GOI<br />
0775, 1775<br />
Hitachi<br />
0749, 0819,<br />
1250<br />
Houston<br />
0775<br />
HTS<br />
0775, 1775<br />
Hughes<br />
Network<br />
Systems<br />
1142, 0749,<br />
1749, 1442,<br />
1443, 1444,<br />
1538<br />
Humax<br />
1790, 1781<br />
Innova<br />
0099<br />
Jerrold<br />
0869<br />
JVC<br />
0775, 1170,<br />
1775<br />
LG<br />
1226, 1414<br />
Magnavox<br />
0722<br />
McIntosh<br />
0869<br />
Mitsubishi<br />
0749<br />
Motorola<br />
0869, 0856<br />
Netsat<br />
0099<br />
Next Level<br />
0869<br />
Panasonic<br />
0247, 0701<br />
Pansat<br />
0647, 1807<br />
Philips<br />
1142, 0749,<br />
1749, 0775,<br />
0819, 1076,<br />
0722, 0099,<br />
1442<br />
<strong>Pioneer</strong><br />
1142, 0329,<br />
1442<br />
Primestar<br />
0869<br />
Proscan<br />
0392, 0566<br />
RadioShack<br />
0566, 0775,<br />
0869<br />
RCA<br />
0392, 0566,<br />
1142, 0775,<br />
0855, 0143,<br />
1392, 1442<br />
Samsung<br />
1377, 1142,<br />
1276, 1108,<br />
1109, 1442,<br />
1609<br />
Sanyo<br />
1219<br />
SKY<br />
0856, 0099<br />
Sony<br />
0639, 1639<br />
Star Choice<br />
0869<br />
Star Trak<br />
0869<br />
Thomson<br />
0392, 0566<br />
TiVo<br />
1142, 1442,<br />
1443, 1444,<br />
1538<br />
Toshiba<br />
0749, 1749,<br />
0790, 0819,<br />
1285<br />
UltimateTV<br />
1392<br />
Ultrasat<br />
1806<br />
Uniden<br />
0722<br />
Voom<br />
0869<br />
Zenith<br />
0856, 1856,<br />
1810
Appendix<br />
08<br />
8.2.3 VCR (Brands A - F)<br />
Brand/Code Brand/Code Brand/Code Brand/Code Brand/Code Brand/Code<br />
A-Mark<br />
0037, 0240,<br />
0000, 0278, 0046<br />
ABS<br />
1972<br />
Accurian<br />
0000<br />
Admiral<br />
0060, 0048,<br />
0039, 0047,<br />
0104, 0209,<br />
0479<br />
Adventura<br />
0037, 0240,<br />
0000<br />
Adyson<br />
0072<br />
Aiko<br />
0278<br />
Aiwa<br />
0037, 0000,<br />
0124, 0307,<br />
1137, 0468<br />
Akai<br />
0041, 0175<br />
Alba<br />
0209, 0072,<br />
0278<br />
Alienware<br />
1972<br />
Allegro<br />
0039, 1137<br />
America Action<br />
0278<br />
American High<br />
0035, 0081<br />
Amstrad<br />
0000<br />
Anam National<br />
0226<br />
Asha<br />
0240<br />
Astra<br />
0035, 0240<br />
Audio Dynamics<br />
0040<br />
Audio-Technica<br />
0058<br />
Audiovox<br />
0037, 0278,<br />
0038<br />
Avis<br />
0000, 0072<br />
Beaumark<br />
0240<br />
Bell & Howell<br />
0035, 0048,<br />
0039, 0000,<br />
0104, 0046,<br />
0479<br />
Bell ExpressVu<br />
1944<br />
Broksonic<br />
0184, 0121,<br />
0209, 0002,<br />
0479, 1815<br />
Calix<br />
0037<br />
Candle<br />
0037, 0038<br />
Canon<br />
0035<br />
Capehart<br />
0002<br />
Captive Works<br />
2167<br />
Carrera<br />
0240<br />
Carver<br />
0035, 0081<br />
CCE<br />
0072, 0278<br />
Cineral<br />
0278<br />
CineVision<br />
1137<br />
Citizen<br />
0035, 0037,<br />
0240, 0000,<br />
0209, 0278,<br />
0479<br />
Classic<br />
0037<br />
Colortyme<br />
0060, 0035,<br />
0045, 0278<br />
Colt<br />
0000, 0072<br />
Craig<br />
0037, 0047,<br />
0240, 0072<br />
Criterion<br />
0000, 0072<br />
Crosley<br />
0035, 0081,<br />
0000<br />
Crown<br />
0072, 0278<br />
Curtis Mathes<br />
0060, 0035,<br />
0162, 0240,<br />
0000, 0041,<br />
0278, 0432<br />
Cybernex<br />
0240<br />
CyberPower<br />
1972<br />
Daewoo<br />
0037, 0045,<br />
0278, 0046,<br />
1137<br />
Daytron<br />
0037, 0278<br />
DBX<br />
0040, 0050<br />
Dell<br />
1972<br />
Denon<br />
0081, 0042<br />
Derwent<br />
0041<br />
DirecTV<br />
0739, 0740<br />
Dish Network<br />
System<br />
1944<br />
Dishpro<br />
1944<br />
Dual<br />
0000<br />
Dumont<br />
0040<br />
Durabrand<br />
0039, 0038<br />
Dynatech<br />
0240, 0000<br />
Echostar<br />
1944<br />
Electrohome<br />
0060, 0037,<br />
0240, 0000,<br />
0043, 0209<br />
Electrophonic<br />
0037<br />
Emerald<br />
0184, 0121<br />
Emerex<br />
0032<br />
Emerson<br />
0037, 0184,<br />
0240, 0000,<br />
0121, 0043,<br />
0209, 0002,<br />
0278, 0479,<br />
0593, 1593<br />
ESA<br />
1137<br />
Expressvu<br />
1944<br />
Fisher<br />
0039, 0047,<br />
0000, 0104,<br />
0046<br />
Fuji<br />
0035, 0033<br />
Fujitsu<br />
0000<br />
Funai<br />
0037, 0000,<br />
0072, 0278,<br />
0593, 1593<br />
139<br />
En
08 Appendix<br />
8.2.4 VCR (Brands G - O)<br />
Brand/Code Brand/Code Brand/Code Brand/Code Brand/Code Brand/Code<br />
Garrard<br />
0000<br />
Gateway<br />
1972<br />
GE<br />
0060, 0035,<br />
0048, 0240,<br />
0000<br />
Gemini<br />
0060<br />
Genexxa<br />
0037, 0000,<br />
0278<br />
Go Video<br />
0240, 0432,<br />
0526, 0614,<br />
1137, 1873<br />
GOI<br />
1944<br />
GoldStar<br />
0035, 0037,<br />
0039, 0000,<br />
0278, 0038,<br />
1137<br />
Goodmans<br />
0037, 0081,<br />
0000, 0072,<br />
0278<br />
Gradiente<br />
0000<br />
Granada<br />
0081, 0042<br />
Grundig<br />
0081, 0226<br />
Harley Davidson<br />
0000<br />
Harman/Kardon<br />
0081, 0038<br />
Harvard<br />
0072<br />
Harwood<br />
0072<br />
Headquarter<br />
0046<br />
Hewlett<br />
Packard<br />
1972<br />
HI-Q<br />
0035, 0047,<br />
0000<br />
Hitachi<br />
0035, 0037,<br />
0045, 0000,<br />
0042, 0041,<br />
0089<br />
Howard<br />
Computers<br />
1972<br />
HP<br />
1972<br />
HTS<br />
1944<br />
Hughes<br />
Network<br />
Systems<br />
0042, 0739,<br />
0740<br />
Humax<br />
0739, 1797,<br />
1988<br />
Hush<br />
1972<br />
Hytek<br />
0047, 0000,<br />
0072<br />
iBUYPOWER<br />
1972<br />
Instant Replay<br />
0035, 0226<br />
ITT Nokia<br />
0240, 0041<br />
Janeil<br />
0240<br />
Jensen<br />
0067, 0041<br />
JVC<br />
0067, 0041,<br />
0058, 1162<br />
1944<br />
KEC<br />
0037, 0278<br />
Kenwood<br />
0067, 0041,<br />
0038, 0046<br />
KLH<br />
0072<br />
Kodak<br />
0035, 0037<br />
KTV<br />
0000<br />
LG<br />
0037, 0240,<br />
0038, 1037,<br />
1137, 2010<br />
Linksys<br />
1972<br />
Lloyd’s<br />
0240, 0000,<br />
0072, 0038,<br />
0040<br />
Loewe<br />
0081<br />
Logik<br />
0240, 0000,<br />
0072<br />
Lumatron<br />
0278<br />
Luxor<br />
0046<br />
LXI<br />
0037, 0000,<br />
0042, 0067<br />
M Electronic<br />
0240<br />
Magnasonic<br />
0037, 0240,<br />
0000, 0072,<br />
0278, 0593<br />
Magnavox<br />
0035, 0037,<br />
0048, 0039,<br />
0081, 0240,<br />
0000, 0226,<br />
0563, 0593,<br />
0618, 1593<br />
Magnin<br />
0240<br />
Marantz<br />
0035, 0081,<br />
0038<br />
Marta<br />
0037<br />
Matsui<br />
0037, 0209<br />
Matsushita<br />
0035, 0162,<br />
0081, 1162<br />
Media Center<br />
PC<br />
1972<br />
MEI<br />
0035<br />
Memorex<br />
0035, 0162,<br />
0037, 0048,<br />
0039, 0047,<br />
0240, 0000,<br />
0104, 0209,<br />
0072, 0278,<br />
0046, 0307,<br />
0479, 1037,<br />
1162<br />
Metz<br />
0037<br />
MGA<br />
0060, 0240,<br />
0043<br />
MGN<br />
Technology<br />
0240<br />
Microsoft<br />
1972<br />
Midland<br />
0240<br />
Mind<br />
1972<br />
Minolta<br />
0042<br />
Mitsubishi<br />
0060, 0048,<br />
0047, 0000,<br />
0042, 0067,<br />
0043, 0041,<br />
0173<br />
Motorola<br />
0035, 0048,<br />
1843<br />
Movie Walker<br />
0072<br />
MTC<br />
0240, 0000,<br />
0072<br />
MTX<br />
0000<br />
Multitech<br />
0039, 0000,<br />
0072<br />
NAD<br />
0240, 0104,<br />
0058<br />
NEC<br />
0104, 0067,<br />
0041, 0038,<br />
0040, 0050<br />
New Tech<br />
0072<br />
Nikko<br />
0037, 0278<br />
Nikkodo<br />
0037, 0278<br />
Nishi<br />
0240<br />
Niveus Media<br />
1972<br />
Noblex<br />
0240<br />
Northgate<br />
1972<br />
Olympus<br />
0035, 0162,<br />
0104, 0226<br />
Onkyo<br />
0222<br />
Optimus<br />
1062, 0035,<br />
0162, 0037,<br />
0048, 0047,<br />
0240, 0000,<br />
0104, 0058,<br />
0432, 0593,<br />
1162<br />
Orion<br />
0184, 0240,<br />
0000, 0104,<br />
0121, 0209,<br />
0002, 0278,<br />
0479<br />
140<br />
En
Appendix<br />
08<br />
8.2.5 VCR (Brands P - V)<br />
Brand/Code Brand/Code Brand/Code Brand/Code Brand/Code Brand/Code<br />
Panama<br />
0035<br />
Panasonic<br />
1062, 0035,<br />
0162, 0000,<br />
0225, 0226,<br />
0614, 0616,<br />
1162<br />
Penney<br />
0035, 0162,<br />
0037, 0047,<br />
0081, 0240,<br />
0000, 0042,<br />
0067, 0038,<br />
0040<br />
Pentax<br />
0042<br />
Philco<br />
0035, 0081,<br />
0000, 0209,<br />
0479<br />
Philips<br />
0035, 0162,<br />
0048, 0081,<br />
0045, 0000,<br />
0209, 0616,<br />
0618, 0739,<br />
1081, 1181,<br />
1818<br />
Pilot<br />
0037<br />
<strong>Pioneer</strong><br />
0162, 0081,<br />
0042, 0067,<br />
0058, 0168,<br />
1337, 1803<br />
Polk Audio<br />
0081<br />
Portland<br />
0278<br />
Presidian<br />
1593<br />
Profitronic<br />
0240<br />
Proscan<br />
0060<br />
Protec<br />
0000, 0072<br />
Protech<br />
0072<br />
Pulsar<br />
0039, 0240,<br />
0278<br />
Pulser<br />
0240<br />
Quarter<br />
0046<br />
Quartz<br />
0035, 0047,<br />
0046<br />
Quasar<br />
0035, 0162,<br />
0002, 0226,<br />
1162<br />
RadioShack<br />
0035, 0162,<br />
0037, 0048,<br />
0047, 0240,<br />
0000, 0104,<br />
0046, 1037,<br />
1162<br />
Radix<br />
0037<br />
Randex<br />
0037<br />
RCA<br />
0060, 0035,<br />
0048, 0240,<br />
0045, 0000,<br />
0042, 0880,<br />
0058<br />
Realistic<br />
0035, 0162,<br />
0037, 0048,<br />
0047, 0240,<br />
0000, 0104,<br />
0121, 0278,<br />
0046, 1162<br />
ReplayTV<br />
0614, 0616<br />
Ricavision<br />
1972<br />
Rio<br />
1137<br />
Runco<br />
0039<br />
Samsung<br />
0060, 0240,<br />
0045, 0000,<br />
0038, 0432,<br />
0739<br />
Samtron<br />
0240<br />
Sanky<br />
0048, 0039<br />
Sansui<br />
0240, 0000,<br />
0067, 0209,<br />
0041, 0072,<br />
0002, 0479<br />
Sanyo<br />
0047, 0240,<br />
0000, 0104,<br />
0046, 0159,<br />
0479<br />
Scott<br />
0184, 0045,<br />
0121, 0043<br />
Sears<br />
0060, 0035,<br />
0162, 0037,<br />
0048, 0039,<br />
0047, 0033,<br />
0045, 0000,<br />
0042, 0104,<br />
0067, 0043,<br />
0209, 0041,<br />
0072, 0046,<br />
0058<br />
Sharp<br />
0048, 0047,<br />
0032, 0000,<br />
1875<br />
Shintom<br />
0039, 0240,<br />
0000, 0072<br />
Shogun<br />
0240<br />
Siemens<br />
0037, 0104<br />
Signature<br />
0060, 0035,<br />
0037, 0048,<br />
0000, 0046,<br />
0479<br />
Singer<br />
0037, 0240,<br />
0072<br />
Sonic Blue<br />
0614, 0616,<br />
1137<br />
Sonographe<br />
0046<br />
Sony<br />
0035, 0047,<br />
0032, 0033,<br />
0000, 0067,<br />
0046, 0226,<br />
0275, 0636,<br />
1032, 1702,<br />
1703, 1896,<br />
1972<br />
Soundmaster<br />
0000<br />
Stack 9<br />
1972<br />
Star Choice<br />
1843<br />
STS<br />
0042<br />
SV2000<br />
0000, 0072<br />
SVA<br />
0000<br />
Sylvania<br />
0035, 0081,<br />
0000, 0043,<br />
0593, 1593<br />
Symphonic<br />
0240, 0000,<br />
0002, 0593,<br />
1593<br />
Systemax<br />
1972<br />
Tagar Systems<br />
1972<br />
Tandy<br />
0000, 0104<br />
Tashiko<br />
0037<br />
Tatung<br />
0048, 0081,<br />
0000, 0067,<br />
0041<br />
Teac<br />
0000, 0067,<br />
0041<br />
Technics<br />
0035, 0162,<br />
0037, 0000<br />
Teknika<br />
0035, 0037,<br />
0000<br />
Telecorder<br />
0240<br />
Telefunken<br />
0041<br />
Tevion<br />
0479<br />
Thomas<br />
0000, 0002<br />
Thomson<br />
0060, 0041<br />
Tisonic<br />
0278<br />
TiVo<br />
0618, 0636,<br />
0739, 0740,<br />
1337, 1944,<br />
1996<br />
TMK<br />
0240, 0000<br />
TNIX<br />
0037<br />
Tocom<br />
0240<br />
Toshiba<br />
0240, 0045,<br />
0000, 0043,<br />
0209, 0041,<br />
1008, 1972,<br />
1996, 1988<br />
Tosonic<br />
0278<br />
Totevision<br />
0037, 0240<br />
Touch<br />
1972<br />
Trix<br />
0037<br />
Ultra<br />
0045, 0278<br />
Unitech<br />
0240<br />
Vector<br />
0045<br />
Vector Research<br />
0184, 0038,<br />
0040<br />
Vextra<br />
0072<br />
Victor<br />
0067, 0041<br />
Video Concepts<br />
0045, 0040<br />
Videomagic<br />
0037<br />
Videosonic<br />
0240, 0000,<br />
0072<br />
Viewsonic<br />
1972<br />
Villain<br />
0000<br />
Voodoo<br />
1972<br />
8.2.6 VCR (Brands W - Z)<br />
Brand/Code Brand/Code Brand/Code Brand/Code Brand/Code Brand/Code<br />
Wards<br />
0060, 0035,<br />
0037, 0048,<br />
0047, 0081,<br />
0033, 0240,<br />
0045, 0000,<br />
0042, 0043,<br />
0041, 0072,<br />
0038, 0046,<br />
0058, 0479<br />
Wharfedale<br />
0593<br />
White<br />
Westinghouse<br />
0000, 0209,<br />
0072, 0278,<br />
0479<br />
World<br />
0209, 0002,<br />
0479<br />
XR-1000<br />
0035, 0240,<br />
0000, 0072<br />
Yamaha<br />
0041, 0038<br />
Zenith<br />
0037, 0039,<br />
0033, 0000,<br />
0209, 0041,<br />
0278, 0479,<br />
1137, 1709<br />
ZT Group<br />
1972<br />
141<br />
En
08 Appendix<br />
8.2.7 PVR<br />
Brand/Code Brand/Code Brand/Code Brand/Code Brand/Code Brand/Code<br />
ABS<br />
1972<br />
Alienware<br />
1972<br />
Bell ExpressVu<br />
1944<br />
Captive Works<br />
2167<br />
CyberPower<br />
1972<br />
Dell<br />
1972<br />
DirecTV<br />
0739, 0740<br />
Dish Network<br />
System<br />
1944<br />
Dish Pro<br />
1944<br />
Echostar<br />
1944<br />
Expressvu<br />
1944<br />
Gateway<br />
1972<br />
Go Video<br />
0614, 1873<br />
GOI<br />
1944<br />
Hewlett Packard<br />
1972<br />
Howard<br />
Computers<br />
1972<br />
HP<br />
1972<br />
HTS<br />
1944<br />
Hughes<br />
Network<br />
Systems<br />
0739, 0740<br />
Humax<br />
0739, 1797<br />
1988<br />
Hush<br />
1972<br />
iBUYPOWER<br />
1972<br />
JVC<br />
1944<br />
LG<br />
2010<br />
Linksys<br />
1972<br />
Media Center<br />
PC<br />
1972<br />
Microsoft<br />
1972<br />
Mind<br />
1972<br />
Motorola<br />
1843<br />
Niveus Media<br />
1972<br />
Northgate<br />
1972<br />
Panasonic<br />
0614, 0616<br />
Philips<br />
0618, 0739<br />
1818<br />
<strong>Pioneer</strong><br />
1337, 1803<br />
RCA<br />
0880<br />
ReplayTV<br />
0614, 0616<br />
Samsung<br />
0739<br />
Sharp<br />
1875<br />
Sonic Blue<br />
0614, 0616<br />
Sony<br />
0636, 1972<br />
Stack 9<br />
1972<br />
Star Choice<br />
1843<br />
Systemax<br />
1972<br />
Tagar Systems<br />
1972<br />
TiVo<br />
0618, 0636,<br />
0739, 1337<br />
0740<br />
Toshiba<br />
1008, 1972,<br />
1996, 1988<br />
Touch<br />
1972<br />
Viewsonic<br />
1972<br />
Voodoo<br />
1972<br />
Zenith<br />
1709<br />
ZT Group<br />
1972<br />
8.2.8 BD (HD-DVD)<br />
Brand/Code Brand/Code Brand/Code Brand/Code Brand/Code<br />
LG<br />
0741<br />
Onkyo<br />
1769<br />
Panasonic<br />
1641<br />
Philips<br />
2084<br />
<strong>Pioneer</strong><br />
2052, 0142<br />
RCA<br />
1769<br />
Samsung<br />
0199<br />
Sony<br />
1516<br />
Toshiba<br />
1769<br />
8.2.9 DVD-R<br />
Brand/Code Brand/Code Brand/Code Brand/Code Brand/Code Brand/Code<br />
Accurian<br />
0675, 1416<br />
Apex Digital<br />
1056<br />
Aspire Digital<br />
1168<br />
Astar<br />
1489<br />
Broksonic<br />
1419<br />
Citizen<br />
2116<br />
Coby<br />
1086<br />
CyberHome<br />
1129, 1502<br />
Digital Max<br />
1738<br />
Electrohome<br />
2116<br />
Funai<br />
0675, 1334<br />
Gateway<br />
1073, 1158<br />
Go Video<br />
0741, 1158,<br />
1304, 1730<br />
iLo<br />
1348<br />
JVC<br />
1275<br />
LG<br />
0741<br />
LiteOn<br />
1158, 1416,<br />
1440, 1738<br />
Magnavox<br />
0646, 0675,<br />
1506<br />
Panasonic<br />
0490<br />
Philips<br />
0646, 1340<br />
<strong>Pioneer</strong><br />
0631, 1460,<br />
1475,<br />
1476, 1512<br />
Polaroid<br />
1086, 2130<br />
Presidian<br />
1738<br />
RCA<br />
0522<br />
Samsung<br />
0490, 1470<br />
Sensory<br />
Science<br />
1158<br />
Sharp<br />
0675<br />
Sony<br />
1033, 1070,<br />
1431<br />
Sylvania<br />
0675<br />
Toshiba<br />
1510, 1588<br />
Zenith<br />
0741<br />
142<br />
En
Appendix<br />
08<br />
8.2.10 DVD (Brands A - N)<br />
Brand/Code Brand/Code Brand/Code Brand/Code Brand/Code Brand/Code<br />
3D LAB<br />
0503, 0539<br />
Accurian<br />
0675, 1072,<br />
1416, 1737<br />
Acoustic<br />
Solutions<br />
0730<br />
Adcom<br />
1094<br />
Afreey<br />
0698<br />
Aiwa<br />
0641<br />
Akai<br />
0695, 0705,<br />
0770, 1089<br />
Alba<br />
0672, 0717<br />
Alco<br />
0790<br />
Allegro<br />
0869<br />
Amphion Media<br />
Works<br />
0872, 1245<br />
AMW<br />
0872, 1245<br />
Apex Digital<br />
0533, 0672,<br />
0717, 0755,<br />
0794, 0795,<br />
0796, 0797,<br />
1004, 1020,<br />
1056, 1061<br />
Arrgo<br />
1023<br />
Aspire Digital<br />
1168, 1407<br />
Astar<br />
1489, 1678,<br />
1679<br />
Audiovox<br />
0717, 0790,<br />
1041, 1072,<br />
1121, 1122<br />
Awa<br />
0730<br />
Axion<br />
1072<br />
B & K<br />
0655, 0662<br />
BBK<br />
1224<br />
Bel Canto<br />
Design<br />
1571<br />
Blaupunkt<br />
0717<br />
Blue Parade<br />
0571<br />
Blue Sky<br />
0695, 0699<br />
Bose<br />
2023<br />
Brandt<br />
0651<br />
Broksonic<br />
0695, 1419<br />
California Audio<br />
Labs<br />
0490<br />
CAVS<br />
1057<br />
Celestial<br />
1020<br />
Centrex<br />
0672, 1004<br />
Cinea<br />
0831<br />
Cinego<br />
1399<br />
CineVision<br />
0876, 0833,<br />
0869<br />
Citizen<br />
1003, 0695,<br />
1277, 1587,<br />
2116<br />
Clairtone<br />
0571<br />
Coby<br />
0778, 0852,<br />
1077, 1086,<br />
1107, 1165,<br />
1177, 1351,<br />
1628<br />
Craig<br />
0831<br />
Creative<br />
0503, 0539<br />
Curtis Mathes<br />
1087<br />
CyberHome<br />
0816, 0874,<br />
1023, 1024,<br />
1117, 1129,<br />
1502, 1537<br />
Cytron<br />
0705<br />
D-Link<br />
1881<br />
Daewoo<br />
0784, 0705,<br />
0770, 0833,<br />
0869, 1169,<br />
1172, 1234,<br />
1242, 1441<br />
Dansai<br />
0770<br />
Daytek<br />
0872<br />
Decca<br />
0770<br />
Denon<br />
0490, 0634<br />
Denver<br />
0778<br />
Desay<br />
1407<br />
Diamond Vision<br />
1316<br />
DigitalMax<br />
1738<br />
Digitrex<br />
0672<br />
Disney<br />
0675, 1270<br />
DiViDo<br />
0705<br />
Dual<br />
0675, 1068,<br />
1085<br />
Durabrand<br />
1127, 2164<br />
DVD2000<br />
0521<br />
Electrohome<br />
1003, 2116<br />
Emerson<br />
0591, 0675,<br />
1268<br />
Enterprise<br />
0591<br />
Entivo<br />
0503, 0539<br />
Enzer<br />
0770<br />
ESA<br />
1268<br />
Firstline<br />
0651<br />
Fisher<br />
0670<br />
Funai<br />
0675, 1268,<br />
1334<br />
Gateway<br />
1073, 1077,<br />
1158<br />
GE<br />
0522, 0815,<br />
0717<br />
Go Video<br />
0573, 0744,<br />
0717, 1730,<br />
1304, 1158,<br />
1144, 1099,<br />
1075, 1044,<br />
0869, 0833,<br />
0783, 0741,<br />
0715<br />
Go Vision<br />
1072<br />
GoldStar<br />
0741, 0869<br />
Goodmans<br />
0790<br />
GPX<br />
0699, 0769<br />
Gradiente<br />
0490, 0651<br />
Greenhill<br />
0717<br />
Grundig<br />
0539, 0705<br />
Harman/Kardon<br />
0582, 0702<br />
Helios<br />
2080<br />
Hello Kitty<br />
0831<br />
Hitachi<br />
0573, 0664,<br />
1247, 1664<br />
Hiteker<br />
0672<br />
Humax<br />
1588, 1500<br />
iLo<br />
1348, 1472<br />
Initial<br />
0717, 1472<br />
Insignia<br />
1268, 2095,<br />
2150<br />
Integra<br />
0571, 0627<br />
IRT<br />
0783<br />
Jaton<br />
1078<br />
JBL<br />
0702<br />
JMB<br />
0695<br />
JSI<br />
1423<br />
JVC<br />
0558, 0623,<br />
0867, 1275,<br />
1550, 1602<br />
jWin<br />
1049, 1051<br />
Kawasaki<br />
0790<br />
Kenwood<br />
0490, 0534,<br />
0682, 0737<br />
KLH<br />
0717, 0790,<br />
1020, 1149<br />
Kloss<br />
0533<br />
Konka<br />
0711, 0721<br />
Koss<br />
0651, 0769,<br />
0896, 1061,<br />
1423<br />
Landel<br />
0826<br />
Lasonic<br />
0627, 0798,<br />
1173<br />
Lecson<br />
1533<br />
Lenoxx<br />
1127<br />
LG<br />
0591, 0741,<br />
0869<br />
LiteOn<br />
1058, 1158,<br />
1416, 1440,<br />
1656, 1738<br />
Loewe<br />
0511, 0741<br />
Logix<br />
0783<br />
Magnasonic<br />
0651, 0675<br />
Magnavox<br />
0503, 0539,<br />
0646, 0675,<br />
1268, 1354,<br />
1472, 1506<br />
Malata<br />
0782, 1159<br />
Marantz<br />
0503, 0539,<br />
0675<br />
Mclntosh<br />
1533, 1273<br />
Medion<br />
0651<br />
McIntosh<br />
Memorex<br />
0695, 0831,<br />
1270<br />
Microsoft<br />
0522, 1708,<br />
2083<br />
Minato<br />
0752<br />
Mintek<br />
0839, 0717,<br />
1472<br />
Mitsubishi<br />
1521, 0521<br />
Momitsu<br />
1082<br />
Mustek<br />
0730<br />
Myryad<br />
0894<br />
NAD<br />
0692, 0741<br />
Naiko<br />
0770<br />
Nakamichi<br />
1222<br />
NEC<br />
0785, 0869<br />
Nesa<br />
0717<br />
Next Base<br />
0826<br />
NexxTech<br />
1402<br />
Nintaus<br />
1051<br />
Norcent<br />
1003, 0872,<br />
1107, 1265<br />
Nova<br />
1517<br />
143<br />
En
08 Appendix<br />
8.2.11 DVD (Brands O - Z)<br />
Brand/Code Brand/Code Brand/Code Brand/Code Brand/Code Brand/Code<br />
Onkyo<br />
0503, 0627,<br />
1769<br />
Oppo<br />
0575, 1224,<br />
2185<br />
Optimus<br />
0571<br />
OptoMedia<br />
<strong>Electronics</strong><br />
0896<br />
Oritron<br />
0651<br />
Palsonic<br />
0672, 0852<br />
Panasonic<br />
0503, 0490,<br />
0571, 0703,<br />
1641, 1762<br />
Philco<br />
0675<br />
Philips<br />
0503, 0539,<br />
0646, 0675,<br />
1267, 1340,<br />
1354, 1846,<br />
2056, 2084<br />
Phonotrend<br />
0699<br />
PianoDisc<br />
1024<br />
<strong>Pioneer</strong><br />
0525, 0571,<br />
0142, 0631,<br />
1475, 1476,<br />
1571, 1460,<br />
1512, 1902,<br />
2052<br />
Polaroid<br />
1020, 1061,<br />
1086, 1245,<br />
1316, 1478,<br />
2130<br />
Polk Audio<br />
0539<br />
Portland<br />
0770<br />
Presidian<br />
0675, 1072,<br />
1738<br />
Primare<br />
1618<br />
Proceed<br />
0672<br />
Proscan<br />
0522<br />
Prosonic<br />
0699<br />
ProVision<br />
0778<br />
Qwestar<br />
0651<br />
Radionette<br />
0741<br />
RadioShack<br />
0571<br />
RCA<br />
0522, 0571,<br />
0717, 0790,<br />
0822, 1022,<br />
1769<br />
Realistic<br />
0571<br />
Reoc<br />
0752<br />
Revoy<br />
0699<br />
Rio<br />
0869, 2002<br />
RJTech<br />
0118, 1360<br />
Rotel<br />
0623, 1178<br />
Rowa<br />
0823, 1004<br />
Saba<br />
0651<br />
Sampo<br />
0698, 0752,<br />
1501<br />
Samsung<br />
0298, 0490,<br />
0573, 0744,<br />
0199, 0820,<br />
1044, 1075,<br />
1470, 2069<br />
Sansui<br />
0695<br />
Sanyo<br />
0670, 0675,<br />
0695, 0873,<br />
1334<br />
Schneider<br />
0783<br />
Schwaiger<br />
0752<br />
Sensory<br />
Science<br />
1158<br />
Sharp<br />
0630, 0675,<br />
0752, 1256<br />
Sharper Image<br />
1117<br />
Sherwood<br />
0633, 0770,<br />
1043, 1077,<br />
1889<br />
Shinsonic<br />
0533, 0839<br />
Slim Art<br />
0784<br />
SM Electronic<br />
0730<br />
Sonic Blue<br />
0573, 0715,<br />
0783, 0869,<br />
1099, 2002<br />
Sony<br />
0533, 0772,<br />
0864, 1033,<br />
1070, 1431,<br />
1516, 1533,<br />
1548, 1633,<br />
1791, 1824,<br />
1892, 1903,<br />
1904, 1934,<br />
2020, 2043<br />
Sova<br />
1122<br />
Sungale<br />
1074<br />
SVA<br />
0717, 0860,<br />
1105<br />
Sylvania<br />
0675, 1268<br />
Symphonic<br />
0675, 0894,<br />
1268, 1334<br />
TAG McLaren<br />
0894<br />
Tatung<br />
0770<br />
Teac<br />
0571, 0717,<br />
0692, 0790<br />
Technics<br />
0490, 0703<br />
Technika<br />
0770<br />
Technosonic<br />
0730<br />
Techwood<br />
0692<br />
Terapin<br />
1031<br />
Tevion<br />
0651<br />
Theta Digital<br />
0571<br />
Thomson<br />
0522, 0511<br />
TiVo<br />
1503, 1512,<br />
1588<br />
Toshiba<br />
0503, 0573,<br />
0539, 0695,<br />
1154, 1503,<br />
1510, 1588,<br />
1608, 1769<br />
Tredex<br />
0800, 0803,<br />
0804<br />
Unimax<br />
0770<br />
United<br />
0730<br />
Universum<br />
0591<br />
Urban Concepts<br />
0503, 0539<br />
US Logic<br />
0839<br />
V<br />
1064, 1226<br />
Venturer<br />
0790<br />
Vizio<br />
1064, 1226<br />
Vocopro<br />
1027, 1360<br />
Wesder<br />
0699<br />
Xbox<br />
0522, 1708,<br />
2083<br />
Yamaha<br />
0490, 0539,<br />
0545, 0497,<br />
0817<br />
Yamakawa<br />
0872<br />
Zenith<br />
0503, 0591,<br />
0741, 0869<br />
Zeus<br />
0784<br />
Zoece<br />
1265<br />
8.2.12 LD<br />
Brand/Code Brand/Code Brand/Code Brand/Code Brand/Code Brand/Code<br />
Carver<br />
0064, 0194,<br />
0323<br />
Denon<br />
0059, 0172,<br />
0241<br />
Disco Vision<br />
0023<br />
Harman/Kardon<br />
0194<br />
Hitachi<br />
0023, 0395<br />
Magnavox<br />
0064, 0194,<br />
0217, 0241<br />
Marantz<br />
0064, 0194<br />
Mitsubishi<br />
0059, 0241<br />
NAD<br />
0059<br />
NEC<br />
0286<br />
Optimus<br />
0059<br />
Panasonic<br />
0204<br />
Philips<br />
0064, 0194<br />
<strong>Pioneer</strong><br />
0059, 0023,<br />
0241, 0463,<br />
0572, 1274<br />
Polk Audio<br />
0194<br />
Quasar<br />
0204<br />
Renaissance<br />
0323<br />
Samsung<br />
0323<br />
Sega<br />
0023<br />
Sharp<br />
0001<br />
Sony<br />
0193, 0201,<br />
0270<br />
Technics<br />
0204<br />
Theta Digital<br />
0194<br />
Toshiba<br />
0059<br />
Victor<br />
0245<br />
Wards<br />
0059<br />
Yamaha<br />
0217<br />
144<br />
En
Appendix<br />
08<br />
8.3 Specifications<br />
Flat Panel TV PRO-151FD (60”) PRO-111FD (50”)<br />
Number of pixels 1920 × 1080 pixels 1920 × 1080 pixels<br />
Audio Amplifier 18 W + 18 W (1 kHz, 10 %, 6 Ω) 18 W + 18 W (1 kHz, 10 %, 6 Ω)<br />
Speaker<br />
Sound Effect<br />
Woofer: 4.8 cm x 13 cm cone type<br />
Tweeter: 2.5 cm semidome type<br />
SRS FOCUS/SRS/SRS TruBass/<br />
SRS Definition<br />
Woofer: 4.8 cm x 13 cm cone type<br />
Tweeter: 2.5 cm semidome type<br />
SRS FOCUS/SRS/SRS TruBass/<br />
SRS Definition<br />
On-Screen Languages English, French, Spanish English, French, Spanish<br />
Power Requirement<br />
Weight<br />
120 V AC, 60 Hz, 524 W (0.3 W<br />
Standby)<br />
Main unit: 51.0 kg (112.4 lbs)<br />
Stand: 6.1 kg (13.4 lbs) (including<br />
bolts)<br />
Speaker: 4.1 kg (9.0 lbs)<br />
(including cables, speaker<br />
brackets and screws)<br />
Color Sensor: 0.1 kg (0.2 lbs)<br />
Total: 61.3 kg (135.1 lbs)<br />
120 V AC, 60 Hz, 436 W (0.2 W<br />
Standby)<br />
Main unit: 33.8 kg (74.5 lbs)<br />
Stand: 2.5 kg (5.6 lbs)(including<br />
bolts)<br />
Speaker: 3.6 kg (7.9 lbs)<br />
(including cables, speaker<br />
brackets and screws)<br />
Color Sensor: 0.1 kg (0.2 lbs)<br />
Total: 39.9 kg (88.0 lbs)<br />
Digital<br />
Reception System<br />
Circuit Type<br />
ATSC Digital TV system<br />
8VSB/64QAM/256QAM<br />
Tuner VHF/UHF VHF Ch. 2 to 13 UHF Ch. 14 to 69<br />
Tuner CATV Ch. 2 to 135<br />
Audio format<br />
Dolby Digital<br />
Analog<br />
American TV standard NTSC system<br />
Circuit Type<br />
Video signal detection PLL full synchronous detection, PLL digital<br />
Synthesizer system<br />
Tuner VHF/UHF VHF Ch. 2 to 13 UHF Ch. 14 to 69<br />
Tuner CATV Cable Ch. 1 to 135 Air Ch. 1 to 125<br />
Audio<br />
multiplex<br />
BTSC system<br />
Terminals - Side<br />
INPUT 3<br />
INPUT 7<br />
PHONES<br />
USB<br />
VIDEO in, AUDIO in<br />
HDMI in*<br />
16 Ω to 32 Ω recommended<br />
USB in**<br />
145<br />
En
08 Appendix<br />
Terminals - Rear<br />
ANT<br />
INPUT 1<br />
INPUT 2<br />
INPUT 4<br />
PC INPUT<br />
COLOR SENSOR 1<br />
INPUT 5<br />
INPUT 6<br />
AUDIO OUT<br />
IR REPEATER OUT 1<br />
DIGITAL OUT<br />
ETHERNET 1<br />
CONTROL OUT 1<br />
SPEAKERS<br />
SUB WOOFER OUT<br />
75 Ω UNBAL, F Type for DTV/VHF/UHF/CATV in<br />
S-VIDEO in, VIDEO in, AUDIO in<br />
COMPONENT VIDEO in, VIDEO in, AUDIO in<br />
HDMI in*, AUDIO in<br />
Analog RGB in, AUDIO in<br />
HDMI in*, AUDIO in<br />
HDMI in*<br />
AUDIO out (Fixed)<br />
Optical<br />
6 Ω to 16 Ω<br />
Variable<br />
* conforms to HDMI1.3 (Deep Color) and HDCP1.1<br />
** conforms to USB 1.1 and 2.0<br />
HDMI (High-Definition Multimedia Interface) is a digital interface that handles both video and audio using a<br />
single cable.<br />
HDCP (High-bandwidth Digital Content Protection) is a technology used to protect copyrighted digital contents<br />
that use the Digital Visual Interface (DVI).<br />
Note: Design and specifications are subject to change without notice.<br />
Dimensions<br />
PRO-151FD (60” panel)<br />
PRO-111FD (50” panel)<br />
93 (3-21/32)<br />
1677 (66-1/32)<br />
93 (3-21/32)<br />
1445 (56-7/8)<br />
953 (37-17/32)<br />
430 (16-15/16)<br />
922 (36-5/16)<br />
75<br />
(2-31/32)<br />
876 (34-1/2)<br />
14 (9/16)<br />
788 (31-1/32) 788<br />
350 (13-25/32)<br />
552 (21-23/32)<br />
75<br />
(2-31/32)<br />
14 (9/16) 723 (28-15/32)<br />
146<br />
En
Appendix<br />
08<br />
License<br />
[MPEG4IP]<br />
This software is based in part on Mozilla Public License 1.1 see http://www.mozilla.org/MPL/ for information.<br />
[OpenSSL]<br />
OpenSSL License<br />
Copyright © 1998-2007 The OpenSSL Project. All rights reserved.<br />
Redistribution and use in source and binary forms, with or without modification, are permitted provided that the<br />
following conditions are met:<br />
1. Redistributions of source code must retain the above copyright notice, this list of conditions and the following<br />
disclaimer.<br />
2. Redistributions in binary form must reproduce the above copyright notice, this list of conditions and the<br />
following disclaimer in the documentation and/or other materials provided with the distribution.<br />
3. All advertising materials mentioning features or use of this software must display the following<br />
acknowledgment: “This product includes software developed by the OpenSSL Project for use in the OpenSSL<br />
Toolkit. (http://www.openssl.org/)”.<br />
4. The names “OpenSSL Toolkit” and “OpenSSL Project” must not be used to endorse or promote products<br />
derived from this software without prior written permission. For written permission, please contact opensslcore@openssl.org.<br />
5. Products derived from this software may not be called “OpenSSL” nor may “OpenSSL” appear in their names<br />
without prior written permission of the OpenSSL Project.<br />
6. Redistributions of any form whatsoever must retain the following acknowledgment: “This product includes<br />
software developed by the OpenSSL Project for use in the OpenSSL Toolkit (http://www.openssl.org/)”.<br />
THIS SOFTWARE IS PROVIDED BY THE OpenSSL PROJECT “AS IS” AND ANY EXPRESSED OR IMPLIED<br />
WARRANTIES, INCLUDING, BUT NOT LIMITED TO, THE IMPLIED WARRANTIES OF MERCHANTABILITY AND<br />
FITNESS FOR A PARTICULAR PURPOSE ARE DISCLAIMED. IN NO EVENT SHALL THE OpenSSL PROJECT OR<br />
ITS CONTRIBUTORS BE LIABLE FOR ANY DIRECT, INDIRECT, INCIDENTAL, SPECIAL, EXEMPLARY, OR<br />
CONSEQUENTIAL DAMAGES (INCLUDING, BUT NOT LIMITED TO, PROCUREMENT OF SUBSTITUTE GOODS OR<br />
SERVICES; LOSS OF USE, DATA, OR PROFITS; OR BUSINESS INTERRUPTION) HOWEVER CAUSED AND ON<br />
ANY THEORY OF LIABILITY, WHETHER IN CONTRACT, STRICT LIABILITY, OR TORT (INCLUDING NEGLIGENCE OR<br />
OTHERWISE) ARISING IN ANY WAY OUT OF THE USE OF THIS SOFTWARE, EVEN IF ADVISED OF THE<br />
POSSIBILITY OF SUCH DAMAGE.<br />
This product includes cryptographic software written by Eric Young (eay@cryptsoft.com). This product includes<br />
software written by Tim Hudson (tjh@cryptsoft.com).<br />
Original SSLeay License<br />
Copyright © 1995-1998 Eric Young (eay@cryptsoft.com)<br />
All rights reserved.<br />
This package is an SSL implementation written by Eric Young (eay@cryptsoft.com). The implementation was<br />
written so as to conform with Netscapes SSL. This library is free for commercial and non-commercial use as long<br />
as the following conditions are aheared to. The following conditions apply to all code found<br />
in this distribution, be it the RC4, RSA, lhash, DES, etc., code; not just the SSL code. The SSL documentation<br />
included with this distribution is covered by the same copyright terms except that the holder is Tim Hudson<br />
(tjh@cryptsoft.com).<br />
Copyright remains Eric Young’s, and as such any Copyright notices in the code are not to be removed. If this<br />
package is used in a product, Eric Young should be given attribution as the author of the parts of the library used.<br />
This can be in the form of a textual message at program startup or in documentation (online or textual) provided<br />
with the package.<br />
Redistribution and use in source and binary forms, with or without modification, are permitted provided that the<br />
following conditions are met:<br />
147<br />
En
08 Appendix<br />
1. Redistributions of source code must retain the copyright notice, this list of conditions and the following<br />
disclaimer.<br />
2. Redistributions in binary form must reproduce the above copyright notice, this list of conditions and the<br />
following disclaimer in the documentation and/or other materials provided with the distribution.<br />
3. All advertising materials mentioning features or use of this software must display the following<br />
acknowledgement: “This product includes cryptographic software written by Eric Young (eay@cryptsoft.com)”<br />
The word ‘cryptographic’ can be left out if the routines from the library being used are not cryptographic<br />
related:-).<br />
4. If you include any Windows specific code (or a derivative thereof) from the apps directory (application code)<br />
you must include an acknowledgement: “This product includes software written by Tim Hudson<br />
(tjh@cryptsoft.com)”<br />
THIS SOFTWARE IS PROVIDED BY ERIC YOUNG “AS IS” AND ANY EXPRESS OR IMPLIED WARRANTIES,<br />
INCLUDING, BUT NOT LIMITED TO, THE IMPLIED WARRANTIES OF MERCHANTABILITY AND FITNESS FOR A<br />
PARTICULAR PURPOSE ARE DISCLAIMED. IN NO EVENT SHALL THE AUTHOR OR CONTRIBUTORS BE LIABLE<br />
FOR ANY DIRECT, INDIRECT, INCIDENTAL, SPECIAL, EXEMPLARY, OR CONSEQUENTIAL DAMAGES<br />
(INCLUDING, BUT NOT LIMITED TO, PROCUREMENT OF SUBSTITUTE GOODS OR SERVICES; LOSS OF USE,<br />
DATA, OR PROFITS; OR BUSINESS INTERRUPTION) HOWEVER CAUSED AND ON ANY THEORY OF LIABILITY,<br />
WHETHER IN CONTRACT, STRICT LIABILITY, OR TORT (INCLUDING NEGLIGENCE OR OTHERWISE) ARISING IN<br />
ANY WAY OUT OF THE USE OF THIS SOFTWARE, EVEN IF ADVISED OF THE POSSIBILITY OF SUCH DAMAGE.<br />
The licence and distribution terms for any publically available version or derivative of this code cannot be<br />
changed. i.e. this code cannot simply be copied and put under another distribution licence [including the GNU<br />
Public Licence.]<br />
[tiff]<br />
Copyright © 1988-1997 Sam Leffler<br />
Copyright © 1991-1997 Silicon Graphics, Inc.<br />
THE SOFTWARE IS PROVIDED “AS-IS” AND WITHOUT WARRANTY OF ANY KIND, EXPRESS, IMPLIED OR<br />
OTHERWISE, INCLUDING WITHOUT LIMITATION, ANY WARRANTY OF MERCHANTABILITY OR FITNESS FOR A<br />
PARTICULAR PURPOSE. IN NO EVENT SHALL SAM LEFFLER OR SILICON GRAPHICS BE LIABLE FOR ANY<br />
SPECIAL, INCIDENTAL, INDIRECT OR CONSEQUENTIAL DAMAGES OF ANY KIND, OR ANY DAMAGES<br />
WHATSOEVER RESULTING FROM LOSS OF USE, DATA OR PROFITS, WHETHER OR NOT ADVISED OF THE<br />
POSSIBILITY OF DAMAGE, AND ON ANY THEORY OF LIABILITY, ARISING OUT OF OR IN CONNECTION WITH THE<br />
USE OR PERFORMANCE OF THIS SOFTWARE.<br />
[Howl]<br />
Copyright © 2003, 2004 Porchdog Software All rights reserved.<br />
THIS SOFTWARE IS PROVIDED BY THE COPYRIGHT HOLDERS AND CONTRIBUTORS “AS IS” AND ANY<br />
EXPRESS OR IMPLIED WARRANTIES, INCLUDING, BUT NOT LIMITED TO, THE IMPLIED WARRANTIES OF<br />
MERCHANTABILITY AND FITNESS FOR A PARTICULAR PURPOSE ARE DISCLAIMED. IN NO EVENT SHALL THE<br />
COPYRIGHT OWNER OR CONTRIBUTORS BE LIABLE FOR ANY DIRECT, INDIRECT, INCIDENTAL, SPECIAL,<br />
EXEMPLARY, OR CONSEQUENTIAL DAMAGES (INCLUDING, BUT NOT LIMITED TO, PROCUREMENT OF<br />
SUBSTITUTE GOODS OR SERVICES; LOSS OF USE, DATA, OR PROFITS; OR BUSINESS INTERRUPTION)<br />
HOWEVER CAUSED AND ON ANY THEORY OF LIABILITY, WHETHER IN CONTRACT, STRICT LIABILITY, OR TORT<br />
(INCLUDING NEGLIGENCE OR OTHERWISE) ARISING IN ANY WAY OUT OF THE USE OF THIS SOFTWARE, EVEN<br />
IF ADVISED OF THE POSSIBILITY OF SUCH DAMAGE.<br />
This software is based in part on Apple Public Source License or the recent’s rights thereunder see http://<br />
developer.apple.com/ for information.<br />
148<br />
En<br />
[libupnp]<br />
Copyright © 2000-2003 Intel Corporation<br />
All rights reserved.<br />
Redistribution and use in source and binary forms, with or without modification, are permitted provided that the<br />
following conditions are met:
Appendix<br />
08<br />
* Redistributions of source code must retain the above copyright notice, this list of conditions and the following<br />
disclaimer.<br />
* Redistributions in binary form must reproduce the above copyright notice, this list of conditions and the<br />
following disclaimer in the documentation and/or other materials provided with the distribution.<br />
* Neither name of Intel Corporation nor the names of its contributors may be used to endorse or promote<br />
products derived from this software without specific prior written permission.<br />
THIS SOFTWARE IS PROVIDED BY THE COPYRIGHT HOLDERS AND CONTRIBUTORS “AS IS” AND ANY<br />
EXPRESS OR IMPLIED WARRANTIES, INCLUDING, BUT NOT LIMITED TO, THE IMPLIED WARRANTIES OF<br />
MERCHANTABILITY AND FITNESS FOR A PARTICULAR PURPOSE ARE DISCLAIMED. IN NO EVENT SHALL<br />
INTEL OR CONTRIBUTORS BE LIABLE FOR ANY DIRECT, INDIRECT, INCIDENTAL, SPECIAL, EXEMPLARY, OR<br />
CONSEQUENTIAL DAMAGES (INCLUDING, BUT NOT LIMITED TO, PROCUREMENT OF SUBSTITUTE GOODS OR<br />
SERVICES; LOSS OF USE, DATA, OR PROFITS; OR BUSINESS INTERRUPTION) HOWEVER CAUSED AND ON<br />
ANY THEORY OF LIABILITY, WHETHER IN CONTRACT, STRICT LIABILITY, OR TORT (INCLUDING NEGLIGENCE OR<br />
OTHERWISE) ARISING IN ANY WAY OUT OF THE USE OF THIS SOFTWARE, EVEN IF ADVISED OF THE<br />
POSSIBILITY OF SUCH DAMAGE.<br />
[JPEG image compression]<br />
If only executable code is distributed, then the accompanying documentation must state that “this software is<br />
based in part on the work of the Independent JPEG Group”.<br />
[libpng]<br />
COPYRIGHT NOTICE, DISCLAIMER, and LICENSE:<br />
If you modify libpng you may insert additional notices immediately following this sentence. libpng versions 1.2.6,<br />
August 15, 2004, through 1.2.25, February 18, 2008, are Copyright © 2004, 2006-2008 Glenn Randers-Pehrson, and<br />
are distributed according to the same disclaimer and license as libpng-1.2.5 with the following individual added<br />
to the list of Contributing Authors<br />
Cosmin Truta<br />
libpng versions 1.0.7, July 1, 2000, through 1.2.5 - October 3, 2002, are Copyright © 2000-2002 Glenn Randers-<br />
Pehrson, and are distributed according to the same disclaimer and license as libpng-1.0.6 with the following<br />
individuals added to the list of Contributing Authors<br />
Simon-Pierre Cadieux<br />
Eric S. Raymond<br />
Gilles Vollant<br />
and with the following additions to the disclaimer:<br />
There is no warranty against interference with your enjoyment of the library or against infringement. There is no<br />
warranty that our efforts or the library will fulfill any of your particular purposes or needs. This library is provided<br />
with all faults, and the entire risk of satisfactory quality, performance, accuracy, and effort is with the user.<br />
libpng versions 0.97, January 1998, through 1.0.6, March 20, 2000, are Copyright © 1998, 1999 Glenn Randers-<br />
Pehrson, and are distributed according to the same disclaimer and license as libpng-0.96, with the following<br />
individuals added to the list of Contributing Authors:<br />
Tom Lane<br />
Glenn Randers-Pehrson<br />
Willem van Schaik<br />
libpng versions 0.89, June 1996, through 0.96, May 1997, are Copyright © 1996, 1997 Andreas Dilger Distributed<br />
according to the same disclaimer and license as libpng-0.88, with the following individuals added to the list of<br />
Contributing Authors:<br />
John Bowler<br />
Kevin Bracey<br />
Sam Bushell<br />
Magnus Holmgren<br />
Greg Roelofs<br />
Tom Tanner<br />
149<br />
En
08 Appendix<br />
libpng versions 0.5, May 1995, through 0.88, January 1996, are Copyright © 1995, 1996 Guy Eric Schalnat, Group<br />
42, Inc.<br />
For the purposes of this copyright and license, “Contributing Authors” is defined as the following set of<br />
individuals:<br />
Andreas Dilger<br />
Dave Martindale<br />
Guy Eric Schalnat<br />
Paul Schmidt<br />
Tim Wegner<br />
The PNG Reference Library is supplied “AS IS”. The Contributing Authors and Group 42, Inc. disclaim all<br />
warranties, expressed or implied, including, without limitation, the warranties of merchantability and of fitness<br />
for any purpose. The Contributing Authors and Group 42, Inc. assume no liability for direct, indirect, incidental,<br />
special, exemplary, or consequential damages, which may result from the use of the PNG Reference Library, even<br />
if advised of the possibility of such damage.<br />
Permission is hereby granted to use, copy, modify, and distribute this source code, or portions hereof, for any<br />
purpose, without fee, subject to the following restrictions:<br />
1. The origin of this source code must not be misrepresented.<br />
2. Altered versions must be plainly marked as such and must not be misrepresented as being the original source.<br />
3. This Copyright notice may not be removed or altered from any source or altered source distribution.<br />
The Contributing Authors and Group 42, Inc. specifically permit, without fee, and encourage the use of this source<br />
code as a component to supporting the PNG file format in commercial products. If you use this source code in a<br />
product, acknowledgment is not required but would be appreciated.<br />
A “png_get_copyright” function is available, for convenient use in “about” boxes and the like:<br />
printf(“%s”,png_get_copyright(NULL)); Also, the PNG logo (in PNG format, of course) is supplied in the files<br />
“pngbar.png” and “pngbar.jpg”(88x31) and “pngnow.png” (98x31).<br />
Libpng is OSI Certified Open Source Software. OSI Certified Open Source is a certification mark of the Open<br />
Source Initiative.<br />
Glenn Randers-Pehrson<br />
glennrp at users.sourceforge.net<br />
February 18, 2008<br />
[zlib]<br />
This software is based in part on zlib see http://www.zlib.net for information.<br />
[FreeType]<br />
The FreeType Project is Copyright © 1996-2000 by David Turner, Robert Wilhelm, and Werner Lemberg. All rights<br />
reserved except as specified below. THE FREETYPE PROJECT IS PROVIDED “AS IS” WITHOUT WARRANTY OF<br />
ANY KIND, EITHER EXPRESS OR IMPLIED, INCLUDING, BUT NOT LIMITED TO, WARRANTIES OF<br />
MERCHANTABILITY AND FITNESS FOR A PARTICULAR PURPOSE. IN NO EVENT WILL ANY OF THE AUTHORS<br />
OR COPYRIGHT HOLDERS BE LIABLE FOR ANY DAMAGES CAUSED BY THE USE OR THE INABILITY TO USE,<br />
OF THE FREETYPE PROJECT.<br />
[GIFLIB]<br />
The GIFLIB distribution is Copyright © 1997 Eric S. Raymond<br />
THE SOFTWARE IS PROVIDED “AS IS”, WITHOUT WARRANTY OF ANY KIND, EXPRESS OR IMPLIED,<br />
INCLUDING BUT NOT LIMITED TO THE WARRANTIES OF MERCHANTABILITY, FITNESS FOR A PARTICULAR<br />
PURPOSE AND NONINFRINGEMENT. IN NO EVENT SHALL THE AUTHORS OR COPYRIGHT HOLDERS BE<br />
LIABLE FOR ANY CLAIM, DAMAGES OR OTHER LIABILITY, WHETHER IN AN ACTION OF CONTRACT, TORT OR<br />
OTHERWISE, ARISING FROM, OUT OF OR IN CONNECTION WITH THE SOFTWARE OR THE USE OR OTHER<br />
DEALINGS IN THE SOFTWARE.<br />
150<br />
En
Appendix<br />
08<br />
[TinyLogin]<br />
This software is Copyright 1988 - 1994, Julianne Frances Haugh. All rights reserved.<br />
[portmap]<br />
Copyright © Sun Microsystems, Inc.<br />
Sun RPC is a product of Sun Microsystems, Inc. and is provided for unrestricted use provided that this legend is<br />
included on all tape media and as a part of the software program in whole or part. Users may copy or modify Sun<br />
RPC without charge, but are not authorized to license or distribute it to anyone else except as part of a product<br />
or program developed by the user or with the express written consent of Sun Microsystems, Inc.<br />
SUN RPC IS PROVIDED AS IS WITH NO WARRANTIES OF ANY KIND INCLUDING THE WARRANTIES OF<br />
DESIGN, MERCHANTIBILITY AND FITNESS FOR A PARTICULAR PURPOSE, OR ARISING FROM A COURSE OF<br />
DEALING, USAGE OR TRADE PRACTICE.<br />
Sun RPC is provided with no support and without any obligation on the part of Sun Microsystems, Inc. to assist<br />
in its use, correction, modification or enhancement.<br />
SUN MICROSYSTEMS, INC. SHALL HAVE NO LIABILITY WITH RESPECT TO THE INFRINGEMENT OF<br />
COPYRIGHTS, TRADE SECRETS OR ANY PATENTS BY SUN RPC OR ANY PART THEREOF.<br />
In no event will Sun Microsystems, Inc. be liable for any lost revenue or profits or other special, indirect and<br />
consequential damages, even if Sun has been advised of the possibility of such damages.<br />
Sun Microsystems, Inc.<br />
2550 Garcia Avenue<br />
Mountain View, California 94043<br />
[libpcap]<br />
Copyright © 2000 Torsten Landschoff <br />
Sebastian Krahmer <br />
License: BSD<br />
Redistribution and use in source and binary forms, with or without modification, are permitted provided that the<br />
following conditions are met:<br />
1. Redistributions of source code must retain the above copyright notice, this list of conditions and the following<br />
disclaimer.<br />
2. Redistributions in binary form must reproduce the above copyright notice, this list of conditions and the<br />
following disclaimer in the documentation and/or other materials provided with the distribution.<br />
3. The names of the authors may not be used to endorse or promote products derived from this software without<br />
specific prior written permission.<br />
THIS SOFTWARE IS PROVIDED “AS IS” AND WITHOUT ANY EXPRESS OR IMPLIED WARRANTIES, INCLUDING,<br />
WITHOUT LIMITATION, THE IMPLIED WARRANTIES OF MERCHANTABILITY AND FITNESS FOR A PARTICULAR<br />
PURPOSE.<br />
[libmpeg1]<br />
Copyright © 1992 The Regents of the University of California<br />
Copyright © 1994-1999 Gregory P. Ward <br />
All rights reserved.<br />
This software is supplied without even the faintest shred of assurance that it works in its entirety.<br />
Permission to use, copy, modify, and distribute this software and its documentation for any purpose, without fee,<br />
and without written agreement is hereby granted, provided that the above copyright notice and the following two<br />
paragraphs appear in all copies of this software.<br />
IN NO EVENT SHALL THE AUTHOR BE LIABLE TO ANY PARTY FOR DIRECT, INDIRECT, SPECIAL, INCIDENTAL,<br />
OR CONSEQUENTIAL DAMAGES ARISING OUT OF THE USE OF THIS SOFTWARE AND ITS DOCUMENTATION,<br />
EVEN IF THE UNIVERSITY OF CALIFORNIA HAS BEEN ADVISED OF THE POSSIBILITY OF SUCH DAMAGE.<br />
THE AUTHOR SPECIFICALLY DISCLAIMS ANY WARRANTIES, INCLUDING, BUT NOT LIMITED TO, THE IMPLIED<br />
WARRANTIES OF ERCHANTABILITY AND FITNESS FOR A PARTICULAR PURPOSE. THE SOFTWARE PROVIDED<br />
151<br />
En
08 Appendix<br />
HEREUNDER IS ON AN “AS IS” BASIS, AND THE AUTHOR HAS NO BLIGATION TO PROVIDE MAINTENANCE,<br />
SUPPORT, UPDATES, ENHANCEMENTS, OR MODIFICATIONS.<br />
[GNU GENERAL PUBLIC LICENSE]<br />
Version 2, June 1991<br />
Copyright © 1989, 1991 Free Software Foundation, Inc., 51 Franklin Street, Fifth Floor, Boston, MA 02110-1301 USA<br />
Everyone is permitted to copy and distribute verbatim copies of this license document, but changing it is not<br />
allowed.<br />
Preamble<br />
The licenses for most software are designed to take away your freedom to share and change it. By contrast, the<br />
GNU General Public License is intended to guarantee your freedom to share and change free software - to make<br />
sure the software is free for all its users. This General Public License applies to most of the Free Software<br />
Foundation’s software and to any other program whose authors commit to using it. (Some other Free Software<br />
Foundation software is covered by the GNU Lesser General Public License instead.) You can apply it to your<br />
programs, too.<br />
When we speak of free software, we are referring to freedom, not price. Our General Public Licenses are designed<br />
to make sure that you have the freedom to distribute copies of free software (and charge for this service if you<br />
wish), that you receive source code or can get it if you want it, that you can change the software or use pieces of<br />
it in new free programs; and that you know you can do these things.<br />
To protect your rights, we need to make restrictions that forbid anyone to deny you these rights or to ask you to<br />
surrender the rights. These restrictions translate to certain responsibilities for you if you distribute copies of the<br />
software, or if you modify it.<br />
For example, if you distribute copies of such a program, whether gratis or for a fee, you must give the recipients<br />
all the rights that you have. You must make sure that they, too, receive or can get the source code. And you must<br />
show them these terms so they know their rights.<br />
We protect your rights with two steps: (1) copyright the software, and (2) offer you this license which gives you<br />
legal permission to copy, distribute and/or modify the software.<br />
Also, for each author’s protection and ours, we want to make certain that everyone understands that there is no<br />
warranty for this free software. If the software is modified by someone else and passed on, we want its recipients<br />
to know that what they have is not the original, so that any problems introduced by others will not reflect on the<br />
original authors’ reputations.<br />
Finally, any free program is threatened constantly by software patents. We wish to avoid the danger that<br />
redistributors of a free program will individually obtain patent licenses, in effect making the program proprietary.<br />
To prevent this, we have made it clear that any patent must be licensed for everyone’s free use or not licensed at<br />
all.<br />
The precise terms and conditions for copying, distribution and modification follow.<br />
152<br />
En<br />
GNU GENERAL PUBLIC LICENSE<br />
TERMS AND CONDITIONS FOR COPYING, DISTRIBUTION AND MODIFICATION<br />
0. This License applies to any program or other work which contains a notice placed by the copyright holder<br />
saying it may be distributed under the terms of this General Public License. The “Program”, below, refers to any<br />
such program or work, and a “work based on the Program” means either the Program or any derivative work<br />
under copyright law: that is to say, a work containing the Program or a portion of it, either verbatim or with<br />
modifications and/or translated into another language. (Hereinafter, translation is included without limitation<br />
in the term “modification”.) Each licensee is addressed as “you”. Activities other than copying, distribution and<br />
modification are not covered by this License; they are outside its scope. The act of running the Program is not<br />
restricted, and the output from the Program is covered only if its contents constitute a work based on the<br />
Program (independent of having been made by running the Program). Whether that is true depends on what<br />
the Program does.<br />
1. You may copy and distribute verbatim copies of the Program’s source code as you receive it, in any medium,<br />
provided that you conspicuously and appropriately publish on each copy an appropriate copyright notice and<br />
disclaimer of warranty; keep intact all the notices that refer to this License and to the absence of any warranty;<br />
and give any other recipients of the Program a copy of this License along with the Program. You may charge a
Appendix<br />
08<br />
fee for the physical act of transferring a copy, and you may at your option offer warranty protection in exchange<br />
for a fee.<br />
2. You may modify your copy or copies of the Program or any portion of it, thus forming a work based on the<br />
Program, and copy and distribute such modifications or work under the terms of Section 1 above, provided that<br />
you also meet all of these conditions:<br />
a) You must cause the modified files to carry prominent notices stating that you changed the files and the<br />
date of any change.<br />
b) You must cause any work that you distribute or publish, that in whole or in part contains or is derived from<br />
the Program or any part thereof, to be licensed as a whole at no charge to all third parties under the terms<br />
of this License.<br />
c) If the modified program normally reads commands interactively when run, you must cause it, when started<br />
running for such interactive use in the most ordinary way, to print or display an announcement including<br />
an appropriate copyright notice and a notice that there is no warranty (or else, saying that you provide a<br />
warranty) and that users may redistribute the program under these conditions, and telling the user how to<br />
view a copy of this License. (Exception: if the Program itself is interactive but does not normally print such<br />
an announcement, your work based on the Program is not required to print an announcement.) These<br />
requirements apply to the modified work as a whole. If identifiable sections of that work are not derived<br />
from the Program, and can be reasonably considered independent and separate works in themselves, then<br />
this License, and its terms, do not apply to those sections when you distribute them as separate works. But<br />
when you distribute the same sections as part of a whole which is a work based on the Program, the<br />
distribution of the whole must be on the terms of this License, whose permissions for other licensees<br />
extend to the entire whole, and thus to each and every part regardless of who wrote it. Thus, it is not the<br />
intent of this section to claim rights or contest your rights to work written entirely by you; rather, the intent<br />
is to exercise the right to control the distribution of derivative or collective works based on the Program. In<br />
addition, mere aggregation of another work not based on the Program with the Program (or with a work<br />
based on the Program) on a volume of a storage or distribution medium does not bring the other work<br />
under the scope of this License.<br />
3. You may copy and distribute the Program (or a work based on it, under Section 2) in object code or executable<br />
form under the terms of Sections 1 and 2 above provided that you also do one of the following:<br />
a) Accompany it with the complete corresponding machine-readable source code, which must be distributed<br />
under the terms of Sections 1 and 2 above on a medium customarily used for software interchange; or,<br />
b) Accompany it with a written offer, valid for at least three years, to give any third party, for a charge no more<br />
than your cost of physically performing source distribution, a complete machine-readable copy of the<br />
corresponding source code, to be distributed under the terms of Sections 1 and 2 above on a medium<br />
customarily used for software interchange; or, it linking proprietary applications with the library. If this is<br />
what you want to do, use the GNU Lesser General Public License instead of this License.<br />
c) Accompany it with the information you received as to the offer to distribute corresponding source code.<br />
(This alternative is allowed only for noncommercial distribution and only if you received the program in<br />
object code or executable form with such an offer, in accord with Subsection b above.) The source code for<br />
a work means the preferred form of the work for making modifications to it. For an executable work,<br />
complete source code means all the source code for all modules it contains, plus any associated interface<br />
definition files, plus the scripts used to control compilation and installation of the executable. However, as<br />
a special exception, the source code distributed need not include anything that is normally distributed (in<br />
either source or binary form) with the major components (compiler, kernel, and so on) of the operating<br />
system on which the executable runs, unless that component itself accompanies the executable. If<br />
distribution of executable or object code is made by offering access to copy from a designated place, then<br />
offering equivalent access to copy the source code from the same place counts as distribution of the<br />
source code, even though third parties are not compelled to copy the source along with the object code.<br />
4. You may not copy, modify, sublicense, or distribute the Program except as expressly provided under this<br />
License. Any attempt otherwise to copy, modify, sublicense or distribute the Program is void, and will<br />
automatically terminate your rights under this License. However, parties who have received copies, or rights,<br />
from you under this License will not have their licenses terminated so long as such parties remain in full<br />
compliance.<br />
5. You are not required to accept this License, since you have not signed it. However, nothing else grants you<br />
permission to modify or distribute the Program or its derivative works. These actions are prohibited by law if<br />
you do not accept this License. Therefore, by modifying or distributing the Program (or any work based on the<br />
153<br />
En
08 Appendix<br />
Program), you indicate your acceptance of this License to do so, and all its terms and conditions for copying,<br />
distributing or modifying the Program or works based on it.<br />
6. Each time you redistribute the Program (or any work based on the Program), the recipient automatically<br />
receives a license from the original licensor to copy, distribute or modify the Program subject to these terms<br />
and conditions. You may not impose any further restrictions on the recipients’ exercise of the rights granted<br />
herein.<br />
You are not responsible for enforcing compliance by third parties to this License.<br />
7. If, as a consequence of a court judgment or allegation of patent infringement or for any other reason (not<br />
limited to patent issues), conditions are imposed on you (whether by court order, agreement or otherwise) that<br />
contradict the conditions of this License, they do not excuse you from the conditions of this License. If you<br />
cannot distribute so as to satisfy simultaneously your obligations under this License and any other pertinent<br />
obligations, then as a consequence you may not distribute the Program at all. For example, if a patent license<br />
would not permit royalty-free redistribution of the Program by all those who receive copies directly or indirectly<br />
through you, then the only way you could satisfy both it and this License would be to refrain entirely from<br />
distribution of the Program.<br />
If any portion of this section is held invalid or unenforceable under any particular circumstance, the balance<br />
of the section is intended to apply and the section as a whole is intended to apply in other circumstances.<br />
It is not the purpose of this section to induce you to infringe any patents or other property right claims or to<br />
contest validity of any such claims; this section has the sole purpose of protecting the integrity of the free<br />
software distribution system, which is implemented by public license practices. Many people have made<br />
generous contributions to the wide range of software distributed through that system in reliance on consistent<br />
application of that system; it is up to the author/donor to decide if he or she is willing to distribute software<br />
through any other system and a licensee cannot impose that choice. This section is intended to make<br />
thoroughly clear what is believed to be a consequence of the rest of this License.<br />
8. If the distribution and/or use of the Program is restricted in certain countries either by patents or by<br />
copyrighted interfaces, the original copyright holder who places the Program under this License may add an<br />
explicit geographical distribution limitation excluding those countries, so that distribution is permitted only in<br />
or among countries not thus excluded. In such case, this License incorporates the limitation as if written in the<br />
body of this License.<br />
9. The Free Software Foundation may publish revised and/or new versions of the General Public License from time<br />
to time. Such new versions will be similar in spirit to the present version, but may differ in detail to address new<br />
problems or concerns.<br />
Each version is given a distinguishing version number. If the Program specifies a version number of this<br />
License which applies to it and “any later version”, you have the option of following the terms and conditions<br />
either of that version or of any later version published by the Free Software Foundation. If the Program does not<br />
specify a version number of this License, you may choose any version ever published by the Free Software<br />
Foundation.<br />
10.If you wish to incorporate parts of the Program into other free programs whose distribution conditions are<br />
different, write to the author to ask for permission. For software which is copyrighted by the Free Software<br />
Foundation, write to the Free Software Foundation; we sometimes make exceptions for this. Our decision will<br />
be guided by the two goals of preserving the free status of all derivatives of our free software and of promoting<br />
the sharing and reuse of software generally.<br />
154<br />
En<br />
NO WARRANTY<br />
11.BECAUSE THE PROGRAM IS LICENSED FREE OF CHARGE, THERE IS NO WARRANTY FOR THE PROGRAM,<br />
TO THE EXTENT PERMITTED BY APPLICABLE LAW. EXCEPT WHEN OTHERWISE STATED IN WRITING THE<br />
COPYRIGHT HOLDERS AND/OR OTHER PARTIES PROVIDE THE PROGRAM “AS IS” WITHOUT WARRANTY OF<br />
ANY KIND, EITHER EXPRESSED OR IMPLIED, INCLUDING, BUT NOT LIMITED TO, THE IMPLIED<br />
WARRANTIES OF MERCHANTABILITY AND FITNESS FOR A PARTICULAR PURPOSE. THE ENTIRE RISK AS<br />
TO THE QUALITY AND PERFORMANCE OF THE PROGRAM IS WITH YOU. SHOULD THE PROGRAM PROVE<br />
DEFECTIVE, YOU ASSUME THE COST OF ALL NECESSARY SERVICING, REPAIR OR CORRECTION.<br />
12.IN NO EVENT UNLESS REQUIRED BY APPLICABLE LAW OR AGREED TO IN WRITING WILL ANY COPYRIGHT<br />
HOLDER, OR ANY OTHER PARTY WHO MAY MODIFY AND/OR REDISTRIBUTE THE PROGRAM AS<br />
PERMITTED ABOVE, BE LIABLE TO YOU FOR DAMAGES, INCLUDING ANY GENERAL, SPECIAL, INCIDENTAL<br />
OR CONSEQUENTIAL DAMAGES ARISING OUT OF THE USE OR INABILITY TO USE THE PROGRAM<br />
(INCLUDING BUT NOT LIMITED TO LOSS OF DATA OR DATA BEING RENDERED INACCURATE OR LOSSES
Appendix<br />
08<br />
SUSTAINED BY YOU OR THIRD PARTIES OR A FAILURE OF THE PROGRAM TO OPERATE WITH ANY OTHER<br />
PROGRAMS), EVEN IF SUCH HOLDER OR OTHER PARTY HAS BEEN ADVISED OF THE POSSIBILITY OF SUCH<br />
DAMAGES.<br />
END OF TERMS AND CONDITIONS<br />
How to Apply These Terms to Your New Programs<br />
If you develop a new program, and you want it to be of the greatest possible use to the public, the best way to<br />
achieve this is to make it free software which everyone can redistribute and change under these terms.<br />
To do so, attach the following notices to the program. It is safest to attach them to the start of each source file to<br />
most effectively convey the exclusion of warranty; and each file should have at least the “copyright” line and a<br />
pointer to where the full notice is found.<br />
<br />
Copyright © <br />
This program is free software; you can redistribute it and/or modify it under the terms of the GNU General Public<br />
License as published by the Free Software Foundation; either version 2 of the License, or (at your option) any later<br />
version.<br />
This program is distributed in the hope that it will be useful, but WITHOUT ANY WARRANTY; without even the<br />
implied warranty of MERCHANTABILITY or FITNESS FOR A PARTICULAR PURPOSE. See the GNU General Public<br />
License for more details.<br />
You should have received a copy of the GNU General Public License along with this program; if not, write to the<br />
Free Software Foundation, Inc., 51 Franklin Street, Fifth Floor, Boston, MA 02110-1301 USA.<br />
Also add information on how to contact you by electronic and paper mail.<br />
If the program is interactive, make it output a short notice like this when it starts in an interactive mode:<br />
Gnomovision version 69, Copyright © year name of author<br />
Gnomovision comes with ABSOLUTELY NO WARRANTY; for details type ‘show w’. This is free software, and<br />
you are welcome to redistribute it under certain conditions; type ‘show c’ for details.<br />
The hypothetical commands ‘show w’ and ‘show c’ should show the appropriate parts of the General Public<br />
License. Of course, the commands you use may be called something other than ‘show w’ and ‘show c’; they could<br />
even be mouse-clicks or menu items - whatever suits your program.<br />
You should also get your employer (if you work as a programmer) or your school, if any, to sign a “copyright<br />
disclaimer” for the program, if necessary. Here is a sample; alter the names:<br />
Yoyodyne, Inc., hereby disclaims all copyright interest in the program ‘Gnomovision’ (which makes passes at<br />
compilers) written by James Hacker.<br />
, 1 April 1989<br />
Ty Coon, President of Vice<br />
This General Public License does not permit incorporating your program into proprietary programs. If your<br />
program is a subroutine library, you may consider it more useful to permit linking proprietary applications with<br />
the library. If this is what you want to do, use the GNU Lesser General Public License instead of this License.<br />
[GNU LESSER GENERAL PUBLIC LICENSE]<br />
Version 2.1, February 1999<br />
Copyright © 1991, 1999 Free Software Foundation, Inc.<br />
51 Franklin Street, Fifth Floor, Boston, MA 02110-1301 USA<br />
Everyone is permitted to copy and distribute verbatim copies of this license document, but changing it is not<br />
allowed.<br />
[This is the first released version of the Lesser GPL. It also counts as the successor of the GNU Library Public<br />
License, version 2, hence the version number 2.1.]<br />
155<br />
En
08 Appendix<br />
156<br />
En<br />
Preamble<br />
The licenses for most software are designed to take away your freedom to share and change it. By contrast, the<br />
GNU General Public Licenses are intended to guarantee your freedom to share and change free software - to<br />
make sure the software is free for all its users. This license, the Lesser General Public License, applies to some<br />
specially designated software packages - typically libraries - of the Free Software Foundation and other authors<br />
who decide to use it. You can use it too, but we suggest you first think carefully about whether this license or the<br />
ordinary General Public License is the better strategy to use in any particular case, based on the explanations<br />
below.<br />
When we speak of free software, we are referring to freedom of use, not price. Our General Public Licenses are<br />
designed to make sure that you have the freedom to distribute copies of free software (and charge for this service<br />
if you wish); that you receive source code or can get it if you want it; that you can change the software and use<br />
pieces of it in new free programs; and that you are informed that you can do these things.<br />
To protect your rights, we need to make restrictions that forbid distributors to deny you these rights or to ask you<br />
to surrender these rights. These restrictions translate to certain responsibilities for you if you distribute copies of<br />
the library or if you modify it.<br />
For example, if you distribute copies of the library, whether gratis or for a fee, you must give the recipients all the<br />
rights that we gave you. You must make sure that they, too, receive or can get the source code. If you link other<br />
code with the library, you must provide complete object files to the recipients, so that they can relink them with<br />
the library after making changes to the library and recompiling it. And you must show them these terms so they<br />
know their rights. We protect your rights with a two-step method: (1) we copyright the library, and (2) we offer you<br />
this license, which gives you legal permission to copy, distribute and/or modify the library.<br />
To protect each distributor, we want to make it very clear that there is no warranty for the free library. Also, if the<br />
library is modified by someone else and passed on, the recipients should know that what they have is not the<br />
original version, so that the original author’s reputation will not be affected by problems that might be introduced<br />
by others.<br />
Finally, software patents pose a constant threat to the existence of any free program. We wish to make sure that<br />
a company cannot effectively restrict the users of a free program by obtaining a restrictive license from a patent<br />
holder. Therefore, we insist that any patent license obtained for a version of the library must be consistent with<br />
the full freedom of use specified in this license.<br />
Most GNU software, including some libraries, is covered by the ordinary GNU General Public License. This<br />
license, the GNU Lesser General Public License, applies to certain designated libraries, and is quite different from<br />
the ordinary General Public License. We use this license for certain libraries in order to permit linking those<br />
libraries into non-free programs.<br />
When a program is linked with a library, whether statically or using a shared library, the combination of the two<br />
is legally speaking a combined work, a derivative of the original library. The ordinary General Public License<br />
therefore permits such linking only if the entire combination fits its criteria of freedom. The Lesser General Public<br />
License permits more lax criteria for linking other code with the library.<br />
We call this license the “Lesser” General Public License because it does Less to protect the user’s freedom than<br />
the ordinary General Public License. It also provides other free software developers Less of an advantage over<br />
competing non-free programs. These disadvantages are the reason we use the ordinary General Public License<br />
for many libraries. However, the Lesser license provides advantages in certain special circumstances.<br />
For example, on rare occasions, there may be a special need to encourage the widest possible use of a certain<br />
library, so that it becomes a de-facto standard. To achieve this, non-free programs must be allowed to use the<br />
library. A more frequent case is that a free library does the same job as widely used non-free libraries. In this case,<br />
there is little to gain by limiting the free library to free software only, so we use the Lesser General Public License.<br />
In other cases, permission to use a particular library in non-free programs enables a greater number of people to<br />
use a large body of free software. For example, permission to use the GNU C Library in non-free programs enables<br />
many more people to use the whole GNU operating system, as well as its variant, the GNU Linux operating system.<br />
Although the Lesser General Public License is Less protective of the users’ freedom, it does ensure that the user<br />
of a program that is linked with the Library has the freedom and the wherewithal to run that program using a<br />
modified version of the Library.<br />
The precise terms and conditions for copying, distribution and modification follow. Pay close attention to the<br />
difference between a “work based on the library” and a “work that uses the library”. The former contains code<br />
derived from the library, whereas the latter must be combined with the library in order to run.
Appendix<br />
08<br />
GNU LESSER GENERAL PUBLIC LICENSE<br />
TERMS AND CONDITIONS FOR COPYING, DISTRIBUTION AND MODIFICATION<br />
0. This License Agreement applies to any software library or other program which contains a notice placed by the<br />
copyright holder or other authorized party saying it may be distributed under the terms of this Lesser General<br />
Public License (also called “this License”). Each licensee is addressed as “you”.<br />
A “library” means a collection of software functions and/or data prepared so as to be conveniently linked with<br />
application programs (which use some of those functions and data) to form executables.<br />
The “Library”, below, refers to any such software library or work which has been distributed under these terms.<br />
A “work based on the Library” means either the Library or any derivative work under copyright law: that is to<br />
say, a work containing the Library or a portion of it, either verbatim or with modifications and/or translated<br />
straightforwardly into another language. (Hereinafter, translation is included without limitation in the term<br />
“modification”.)<br />
“Source code” for a work means the preferred form of the work for making modifications to it. For a library,<br />
complete source code means all the source code for all modules it contains, plus any associated interface<br />
definition files, plus the scripts used to control compilation and installation of the library.<br />
Activities other than copying, distribution and modification are not covered by this License; they are outside its<br />
scope. The act of running a program using the Library is not restricted, and output from such a program is<br />
covered only if its contents constitute a work based on the Library (independent of the use of the Library in a<br />
tool for writing it). Whether that is true depends on what the Library does and what the program that uses the<br />
Library does.<br />
1. You may copy and distribute verbatim copies of the Library’s complete source code as you receive it, in any<br />
medium, provided that you conspicuously and appropriately publish on each copy an appropriate copyright<br />
notice and disclaimer of warranty; keep intact all the notices that refer to this License and to the absence of<br />
any warranty; and distribute a copy of this License along with the Library.<br />
You may charge a fee for the physical act of transferring a copy, and you may at your option offer warranty<br />
protection in exchange for a fee.<br />
2. You may modify your copy or copies of the Library or any portion of it, thus forming a work based on the Library,<br />
and copy and distribute such modifications or work under the terms of Section 1 above, provided that you also<br />
meet all of these conditions:<br />
a) The modified work must itself be a software library.<br />
b) You must cause the files modified to carry prominent notices stating that you changed the files and the<br />
date of any change.<br />
c) You must cause the whole of the work to be licensed at no charge to all third parties under the terms of this<br />
License.<br />
d) If a facility in the modified Library refers to a function or a table of data to be supplied by an application<br />
program that uses the facility, other than as an argument passed when the facility is invoked, then you<br />
must make a good faith effort to ensure that, in the event an application does not supply such function or<br />
table, the facility still operates, and performs whatever part of its purpose remains meaningful. (For<br />
example, a function in a library to compute square roots has a purpose that is entirely well-defined<br />
independent of the application. Therefore, Subsection 2d requires that any application-supplied function<br />
or table used by this function must be optional: if the application does not supply it, the square root<br />
function must still compute square roots.)<br />
These requirements apply to the modified work as a whole. If identifiable sections of that work are not<br />
derived from the Library, and can be reasonably considered independent and separate works in<br />
themselves, then this License, and its terms, do not apply to those sections when you distribute them as<br />
separate works. But when you distribute the same sections as part of a whole which is a work based on the<br />
Library, the distribution of the whole must be on the terms of this License, whose permissions for other<br />
licensees extend to the entire whole, and thus to each and every part regardless of who wrote it.<br />
Thus, it is not the intent of this section to claim rights or contest your rights to work written entirely by you;<br />
rather, the intent is to exercise the right to control the distribution of derivative or collective works based on<br />
the Library.<br />
In addition, mere aggregation of another work not based on the Library with the Library (or with a work<br />
based on the Library) on a volume of a storage or distribution medium does not bring the other work under<br />
the scope of this License.<br />
3. You may opt to apply the terms of the ordinary GNU General Public License instead of this License to a given<br />
copy of the Library. To do this, you must alter all the notices that refer to this License, so that they refer to the<br />
157<br />
En
08 Appendix<br />
158<br />
En<br />
ordinary GNU General Public License, version 2, instead of to this License. (If a newer version than version 2 of<br />
the ordinary GNU General Public License has appeared, then you can specify that version instead if you wish.)<br />
Do not make any other change in these notices.<br />
Once this change is made in a given copy, it is irreversible for that copy, so the ordinary GNU General Public<br />
License applies to all subsequent copies and derivative works made from that copy. This option is useful when<br />
you wish to copy part of the code of the Library into a program that is not a library.<br />
4. You may copy and distribute the Library (or a portion or derivative of it, under Section 2) in object code or<br />
executable form under the terms of Sections 1 and 2 above provided that you accompany it with the complete<br />
corresponding machine-readable source code, which must be distributed under the terms of Sections 1 and<br />
2 above on a medium customarily used for software interchange.<br />
If distribution of object code is made by offering access to copy from a designated place, then offering<br />
equivalent access to copy the source code from the same place satisfies the requirement to distribute the<br />
source code, even though third parties are not compelled to copy the source along with the object code.<br />
5. A program that contains no derivative of any portion of the Library, but is designed to work with the Library by<br />
being compiled or linked with it, is called a “work that uses the Library”. Such a work, in isolation, is not a<br />
derivative work of the Library, and therefore falls outside the scope of this License.<br />
However, linking a “work that uses the Library” with the Library creates an executable that is a derivative of the<br />
Library (because it contains portions of the Library), rather than a “work that uses the library”. The executable<br />
is therefore covered by this License. Section 6 states terms for distribution of such executables.<br />
When a “work that uses the Library” uses material from a header file that is part of the Library, the object code<br />
for the work may be a derivative work of the Library even though the source code is not. Whether this is true is<br />
especially significant if the work can be linked without the Library, or if the work is itself a library. The threshold<br />
for this to be true is not precisely defined by law.<br />
If such an object file uses only numerical parameters, data structure layouts and accessors, and small macros<br />
and small inline functions (ten lines or less in length), then the use of the object file is unrestricted, regardless<br />
of whether it is legally a derivative work. (Executables containing this object code plus portions of the Library<br />
will still fall under Section 6.)<br />
Otherwise, if the work is a derivative of the Library, you may distribute the object code for the work under the<br />
terms of Section 6. Any executables containing that work also fall under Section 6, whether or not they are<br />
linked directly with the Library itself.<br />
6. As an exception to the Sections above, you may also combine or link a “work that uses the Library” with the<br />
Library to produce a work containing portions of the Library, and distribute that work under terms of your<br />
choice, provided that the terms permit modification of the work for the customer’s own use and reverse<br />
engineering for debugging such modifications.<br />
You must give prominent notice with each copy of the work that the Library is used in it and that the Library<br />
and its use are covered by this License. You must supply a copy of this License. If the work during execution<br />
displays copyright notices, you must include the copyright notice for the Library among them, as well as a<br />
reference directing the user to the copy of this License. Also, you must do one of these things:<br />
a) Accompany the work with the complete corresponding machine-readable source code for the Library<br />
including whatever changes were used in the work<br />
(which must be distributed under Sections 1 and 2 above); and, if the work is an executable linked with the<br />
Library, with the complete machine-readable “work that uses the Library”, as object code and/or source<br />
code, so that the user can modify the Library and then relink to produce a modified executable containing<br />
the modified Library. (It is understood that the user who changes the contents of definitions files in the<br />
Library will not necessarily be able to recompile the application to use the modified definitions.)<br />
b) Use a suitable shared library mechanism for linking with the Library. A suitable mechanism is one that (1)<br />
uses at run time a copy of the library already present on the user’s computer system, rather than copying<br />
library functions into the executable, and (2) will operate properly with a modified version of the library, if<br />
the user installs one, as long as the modified version is interface-compatible with the version that the work<br />
was made with.<br />
c) Accompany the work with a written offer, valid for at least three years, to give the same user the materials<br />
specified in Subsection 6a, above, for a charge no more than the cost of performing this distribution.<br />
d) If distribution of the work is made by offering access to copy from a designated place, offer equivalent<br />
access to copy the above specified materials from the same place.<br />
e) Verify that the user has already received a copy of these materials or that you have already sent this user a<br />
copy.
Appendix<br />
08<br />
For an executable, the required form of the “work that uses the Library” must include any data and utility<br />
programs needed for reproducing the executable from it. However, as a special exception, the materials to<br />
be distributed need not include anything that is normally distributed (in either source or binary form) with<br />
the major components (compiler, kernel, and so on) of the operating system on which the executable runs,<br />
unless that component itself accompanies the executable.<br />
It may happen that this requirement contradicts the license restrictions of other proprietary libraries that<br />
do not normally accompany the operating system. Such a contradiction means you cannot use both them<br />
and the Library together in an executable that you distribute.<br />
7. You may place library facilities that are a work based on the Library side-by-side in a single library together with<br />
other library facilities not covered by this License, and distribute such a combined library, provided that the<br />
separate distribution of the work based on the Library and of the other library facilities is otherwise permitted,<br />
and provided that you do these two things:<br />
a) Accompany the combined library with a copy of the same work based on the Library, uncombined with any<br />
other library facilities. This must be distributed under the terms of the Sections above.<br />
b) Give prominent notice with the combined library of the fact that part of it is a work based on the Library,<br />
and explaining where to find the accompanying uncombined form of the same work.<br />
8. You may not copy, modify, sublicense, link with, or distribute the Library except as expressly provided under<br />
this License. Any attempt otherwise to copy, modify, sublicense, link with, or distribute the Library is void, and<br />
will automatically terminate your rights under this License. However, parties who have received copies, or<br />
rights, from you under this License will not have their licenses terminated so long as such parties remain in<br />
full compliance.<br />
9. You are not required to accept this License, since you have not signed it. However, nothing else grants you<br />
permission to modify or distribute the Library or its derivative works. These actions are prohibited by law if you<br />
do not accept this License. Therefore, by modifying or distributing the Library (or any work based on the<br />
Library), you indicate your acceptance of this License to do so, and all its terms and conditions for copying,<br />
distributing or modifying the Library or works based on it.<br />
10.Each time you redistribute the Library (or any work based on the Library), the recipient automatically receives<br />
a license from the original licensor to copy, distribute, link with or modify the Library subject to these terms<br />
and conditions. You may not impose any further restrictions on the recipients’ exercise of the rights granted<br />
herein. You are not responsible for enforcing compliance by third parties with this License.<br />
11.If, as a consequence of a court judgment or allegation of patent infringement or for any other reason (not<br />
limited to patent issues), conditions are imposed on you (whether by court order, agreement or otherwise) that<br />
contradict the conditions of this License, they do not excuse you from the conditions of this License. If you<br />
cannot distribute so as to satisfy simultaneously your obligations under this License and any other pertinent<br />
obligations, then as a consequence you may not distribute the Library at all. For example, if a patent license<br />
would not permit royalty-free redistribution of the Library by all those who receive copies directly or indirectly<br />
through you, then the only way you could satisfy both it and this License would be to refrain entirely from<br />
distribution of the Library. If any portion of this section is held invalid or unenforceable under any particular<br />
circumstance, the balance of the section is intended to apply, and the section as a whole is intended to apply<br />
in other circumstances.<br />
It is not the purpose of this section to induce you to infringe any patents or other property right claims or to<br />
contest validity of any such claims; this section has the sole purpose of protecting the integrity of the free<br />
software distribution system which is implemented by public license practices. Many people have made<br />
generous contributions to the wide range of software distributed through that system in reliance on consistent<br />
application of that system; it is up to the author donor to decide if he or she is willing to distribute software<br />
through any other system and a licensee cannot impose that choice.<br />
This section is intended to make thoroughly clear what is believed to be a consequence of the rest of this<br />
License.<br />
12.If the distribution and/or use of the Library is restricted in certain countries either by patents or by copyrighted<br />
interfaces, the original copyright holder who places the Library under this License may add an explicit<br />
geographical distribution limitation excluding those countries, so that distribution is permitted only in or<br />
among countries not thus excluded. In such case, this License incorporates the limitation as if written in the<br />
body of this License.<br />
13.The Free Software Foundation may publish revised and/or new versions of the Lesser General Public License<br />
from time to time. Such new versions will be similar in spirit to the present version, but may differ in detail to<br />
address new problems or concerns.<br />
159<br />
En
08 Appendix<br />
Each version is given a distinguishing version number. If the Library specifies a version number of this License<br />
which applies to it and “any later version”, you have the option of following the terms and conditions either of<br />
that version or of any later version published by the Free Software Foundation. If the Library does not specify a<br />
license version number, you may choose any version ever published by the Free Software Foundation.<br />
14.If you wish to incorporate parts of the Library into other free programs whose distribution conditions are<br />
incompatible with these, write to the author to ask for permission. For software which is copyrighted by the Free<br />
Software Foundation, write to the Free Software Foundation; we sometimes make exceptions for this. Our<br />
decision will be guided by the two goals of preserving the free status of all derivatives of our free software and<br />
of promoting the sharing and reuse of software generally.<br />
NO WARRANTY<br />
15.BECAUSE THE LIBRARY IS LICENSED FREE OF CHARGE, THERE IS NO WARRANTY FOR THE LIBRARY, TO<br />
THE EXTENT PERMITTED BY APPLICABLE LAW. EXCEPT WHEN OTHERWISE STATED IN WRITING THE<br />
COPYRIGHT HOLDERS AND/OR OTHER PARTIES PROVIDE THE LIBRARY “AS IS” WITHOUT WARRANTY OF<br />
ANY KIND, EITHER EXPRESSED OR IMPLIED, INCLUDING, BUT NOT LIMITED TO, THE IMPLIED<br />
WARRANTIES OF MERCHANTABILITY AND FITNESS FOR A PARTICULAR PURPOSE. THE ENTIRE RISK AS<br />
TO THE QUALITY AND PERFORMANCE OF THE LIBRARY IS WITH YOU. SHOULD THE LIBRARY PROVE<br />
DEFECTIVE, YOU ASSUME THE COST OF ALL NECESSARY SERVICING, REPAIR OR CORRECTION.<br />
16.IN NO EVENT UNLESS REQUIRED BY APPLICABLE LAW OR AGREED TO IN WRITING WILL ANY COPYRIGHT<br />
HOLDER, OR ANY OTHER PARTY WHO MAY MODIFY AND/OR REDISTRIBUTE THE LIBRARY AS PERMITTED<br />
ABOVE, BE LIABLE TO YOU FOR DAMAGES, INCLUDING ANY GENERAL, SPECIAL, INCIDENTAL OR<br />
CONSEQUENTIAL DAMAGES ARISING OUT OF THE USE OR INABILITY TO USE THE LIBRARY (INCLUDING<br />
BUT NOT LIMITED TO LOSS OF DATA OR DATA BEING RENDERED INACCURATE OR LOSSES SUSTAINED BY<br />
YOU OR THIRD PARTIES OR A FAILURE OF THE LIBRARY TO OPERATE WITH ANY OTHER SOFTWARE), EVEN<br />
IF SUCH HOLDER OR OTHER PARTY HAS BEEN ADVISED OF THE POSSIBILITY OF SUCH DAMAGES.<br />
END OF TERMS AND CONDITIONS<br />
How to Apply These Terms to Your New Libraries<br />
If you develop a new library, and you want it to be of the greatest possible use to the public, we recommend<br />
making it free software that everyone can redistribute and change. You can do so by permitting redistribution<br />
under these terms (or, alternatively, under the terms of the ordinary General Public License).<br />
To apply these terms, attach the following notices to the library. It is safest to attach them to the start of each<br />
source file to most effectively convey the exclusion of warranty; and each file should have at least the “copyright”<br />
line and a pointer to where the full notice is found.<br />
<br />
Copyright © <br />
This library is free software; you can redistribute it and/or modify it under the terms of the GNU Lesser General<br />
Public License as published by the Free Software Foundation; either version 2.1 of the License, or (at your option)<br />
any later version.<br />
This library is distributed in the hope that it will be useful, but WITHOUT ANY WARRANTY; without even the<br />
implied warranty of MERCHANTABILITY or FITNESS FOR A PARTICULAR PURPOSE. See the GNU Lesser General<br />
Public License for more details.<br />
You should have received a copy of the GNU Lesser General Public License along with this library; if not, write to<br />
the Free Software Foundation, Inc., 51 Franklin Street, Fifth Floor, Boston, MA 02110-1301 USA<br />
Also add information on how to contact you by electronic and paper mail.<br />
You should also get your employer (if you work as a programmer) or your school, if any, to sign a “copyright<br />
disclaimer” for the library, if necessary. Here is a sample; alter the names:<br />
Yoyodyne, Inc., hereby disclaims all copyright interest in the library ‘Frob’ (a library for tweaking knobs) written by<br />
James Random Hacker.<br />
, 1 April 1990<br />
Ty Coon, President of Vice<br />
That’s all there is to it!<br />
160<br />
En
Appendix<br />
08<br />
[Linux Source Notice]<br />
The software programs used on this product include the Linux operating system. The Linux contains software<br />
licensed for use based on the terms of a GNU General Public License. The machine readable copy of the<br />
corresponding source code is available for the cost of distribution.<br />
For more information or to obtain a copy, contact your local <strong>Pioneer</strong> Customer Service center.<br />
Details of the GNU General Public License can be found at the GNU website (http://www.gnu.org).<br />
161<br />
En
08 Appendix<br />
8.4 Glossary<br />
HDMI<br />
The High-Definition Multimedia Interface (HDMI) is a digital data transmission standard for consumer<br />
electronics/home appliances. HDMI connects digital audio/video sources to a compatible digital audio and/or<br />
video device, such as a flat panel TV. HDMI also allows digitally transmitted audio and control signals on a single<br />
cable for multi-channel digital audio sources.<br />
PCM<br />
The Pulse Code Modulation (PCM) is a method for converting analog audio signals to digital. PCM is used in<br />
music CDs.<br />
Dolby Digital<br />
Dolby Digital is an encoding technology for audio signal compressions. Dolby Digital supports high-quality, highcompression,<br />
multi-channel audio formats. The 5.1-channel surround format is utilized in digital broadcasts.<br />
High-Definition Broadcast<br />
A digital television broadcasting system with greater resolution than traditional television systems. As compared<br />
with the existing terrestrial analog broadcasting system capable of producing an image composed of 525 lines of<br />
resolution, the digital high-definition broadcasting system features 750 or 1125 lines, thus providing higher<br />
definition and quality image.<br />
Interlaced Scanning<br />
In NTSC television or video image display, interlaced scanning first redraws every second line of the image field<br />
(262.5 lines) per each image refresh in 1/60 of a second, then the remaining lines with a second refresh in 1/60<br />
of a second for a complete frame of an image (525 lines). Effective scanning lines are expressed as “480i” and<br />
“1080i” (“i” stands for “interlaced”).<br />
Progressive Scanning<br />
The progressive scanning redraws an image frame (all of its lines) in order per each image refresh. Compared to<br />
interlaced scanning, progressive scanning produces less flicker, making it suitable for displaying text and still<br />
images. Effective scanning lines are expressed as “480p” and “720p” (“p” stands for “progressive”).<br />
162<br />
En<br />
(Home Media Gallery)<br />
Default Gateway<br />
Default gateway is a node on a computer network that serves as an access point to another network. A default<br />
gateway (such as a computer and router) is used to forward all traffic that is not addressed to a station within the<br />
local subnet.<br />
DHCP (Dynamic Host Configuration Protocol) Server<br />
Provides a mechanism to allocate IP addresses to client hosts. In most cases, a broadband router serves as a<br />
DHCP server in a home network.<br />
DLNA (Digital Living Network Alliance)<br />
The DLNA authorized logo makes it easy for consumers to recognize products that meet the new standard for<br />
home network PCs and other digital devices, as set down in the DLNA Guidelines for interoperability. This allows<br />
music, video, etc. to be enjoyed from various devices over a home network. This unit is compatible with music,<br />
photo and video content, and is based on the DLNA Home Networked Device Interoperability Guidelines -<br />
expanded: October 2006 (v1.5). This unit can be used to playback music, photos and video stored on a DLNAcompatible<br />
server connected through a LAN cable.<br />
Digital Living Network Alliance (DLNA) is dedicated to the simplified sharing of digital content, such as digital<br />
music, photos and video among networked consumer electronics (CE) and PCs. By establishing a platform of<br />
interoperability based on open industry standards, DLNA delivers technical design guidelines that companies<br />
can use to develop digital home products that share content through wired or wireless networks in the home.<br />
DNS (Domain Name Service) Server<br />
DNS Server is a server that determines the name of network-computer within the Internet. The server functions<br />
to exchange IP address to the hostname, hostname to the IP address.<br />
Ethernet<br />
A frame-based computer networking technology for local area networks (LANs). The flat panel TV supports<br />
100BASE-TX.
Appendix<br />
08<br />
IP (Internet Protocol) Address<br />
A unique number that devices use in order to identify and communicate with each other on a network utilizing<br />
the Internet Protocol standard, such as “192.168.1.xxx”. No duplicate numbers are allowed within the network.<br />
LAN Cable<br />
A cable that has an eight-pin modular plug on each end and is different from a telephone plug which has four<br />
pins. A straight cable is used when connecting the flat panel TV to a home network via a hub. A cross-over cable<br />
is used when connecting directly to a PC. Use category 5 (CAT-5) LAN cables.<br />
MAC (Media Access Control) Address<br />
An address attached to the port of any network device with an IP address. The MAC address is expressed as<br />
“00:e0:36:01:23:xx” and cannot be changed.<br />
Mass Storage Class Devices<br />
The standard provides an interface to a variety of storage devices, such as USB flash drive and digital cameras.<br />
PlaysForSure<br />
PlaysForSure is a marketing certification given by Microsoft. This unit complies with PlaysForSure Version 2.20<br />
Requirements Specification for Network Devices.<br />
PTP (Picture Transfer Protocol)<br />
A protocol that allows the transfer of images and manipulation of digital cameras through USB connection. Most<br />
recent digital cameras and other devices support PTP allowing the transfer of images through direct connections.<br />
Subnet Mask<br />
Used to determine the etwork when IP addresses are broken into several parts. It is expressed as “255.255.255.0”.<br />
In most cases, the Subnet mask is automatically assigned by the DHCP server.<br />
UPnP (Universal Plug and Play)<br />
Architecture for pervasive peer-to-peer network connectivity of devices of all form factors. It is designed to bring<br />
easy-to-use, flexible, standard based connectivity to ad-hoc or unmanaged networks whether in the home, in a<br />
small business, public spaces, or attached to the Internet.<br />
USB (Universal Serial Bus)<br />
USB provides a serial bus standard for connecting devices, usually to computers such as PCs. The flat panel TV<br />
supports the Mass Storage Class and PTP (Picture Transfer Protocol) devices.<br />
Windows Media Connect<br />
Microsoft Windows Media Connect is a new technology to distribute music, photos and video stored on a PC with<br />
Windows XP installed to a stereo system of TV. Using this technology you can playback files stored on the PC from<br />
various devices wherever you like in your home.<br />
Windows Media DRM<br />
Windows Media DRM is copyright protection technology developed by Microsoft Corporation. It enables content<br />
providers to distribute over the Internet music, video and other digital media content in a protected, encrypted file<br />
format.<br />
Windows Media Player<br />
A free digital media player application provided by Microsoft that is used for playing audio, video and images on<br />
PCs.<br />
Windows Media Player 11<br />
The functionality of Windows Media Connect has been integrated into this version of Windows Media Player. After<br />
installing Windows Media Player 11 Windows Media Connect will not function. See Microsoft’s website for<br />
details.<br />
163<br />
En
08 Appendix<br />
164<br />
En<br />
8.5 Index<br />
Numerics<br />
100BASE-TX ..........................................................................95, 162<br />
10BASE-T ......................................................................................95<br />
2-screen ......................................................................12, 13, 69, 70<br />
A<br />
Air/Cable .......................................................................................38<br />
Analog ...................................................................46, 72, 74, 84, 85<br />
Analog TV Setup ...............................................................39, 41, 46<br />
Auto Installation .....................................................................38, 41<br />
Auto Size ...........................................................................55, 59, 62<br />
AV Selection ...........................................................................57, 58<br />
AVC ..........................................................................................49, 75<br />
B<br />
Balance .............................................................................36, 49, 60<br />
Bass ..............................................................................................36<br />
Block ...............................................................................52, 54, 123<br />
Blue ...................................................................................36, 61, 73<br />
Blue LED Dimmer ..................................................................34, 46<br />
Brightness ........................................................................48, 58, 61<br />
Brightness Sync ...................................................................63, 126<br />
C<br />
Canadian English Ratings ...........................................................52<br />
Canadian French Ratings ............................................................52<br />
CBL ..........................................................................................12, 81<br />
Change Password ..................................................................36, 50<br />
Channel .............................................................................38, 41, 44<br />
Channel Mode ........................................................................36, 42<br />
Clock .....................................................................................38, 122<br />
Closed Captions .....................................................................72, 73<br />
Color ..................................................................................45, 48, 61<br />
Color Sensor ...........................................................................27, 45<br />
Contrast ..................................................................................46, 61<br />
D<br />
Digital ................................................................................29, 35, 53<br />
Digital Tuner Setup ........................................................38, 41, 130<br />
Dolby Digital ...............................................................121, 145, 165<br />
E<br />
Energy Save ......................................................................55, 56, 76<br />
F<br />
Favorites ..................................................................................36, 43<br />
Favorites Sort ..........................................................................36, 43<br />
Film Mode .....................................................................................63<br />
Freeze ....................................................................................70, 131<br />
G<br />
GAME ....................................................................31, 57, 59, 64, 92<br />
Game Control Pref .................................................................59, 64<br />
Green .................................................................................61, 73, 83<br />
H<br />
H/V Position Adjust ......................................................................47<br />
HD Wide Mode .............................................................................62<br />
HDMI Control ...................................................................84, 86, 88<br />
HDMI Control Setting ............................................................87, 91<br />
HDMI Input .....................................................................84, 85, 124<br />
HDMI terminal ..........................................................30, 84, 86, 126<br />
Home Media Gallery ....................................................................93<br />
HOME MENU .........................................................................12, 37<br />
I<br />
InfoBanner ....................................................................................71<br />
Input ........................................................................................12, 43<br />
Installation ......................................................................14, 38, 131<br />
IR REPEATER OUT .......................................................................92<br />
L<br />
Label ..............................................................................................43<br />
Label Input ....................................................................................43<br />
Language ..............................................................37, 38, 73, 74, 86<br />
M<br />
<strong>Manual</strong> Adjust ........................................................................39, 46<br />
MOVIE ...............................................................................12, 47, 57<br />
MPAA ....................................................................................51, 136<br />
MTS .........................................................................................72, 74<br />
Multi-screen ......................................................................59, 69, 70<br />
MUTING ...................................................................................13, 44<br />
N<br />
No Operation off ...........................................................................76<br />
No Signal Off ................................................................................76<br />
O<br />
OPTIMUM .........................................................................12, 48, 57<br />
Orbiter ...................................................................................56, 133<br />
P<br />
Parental Control .......................................................50, 51, 53, 123<br />
PCM .......................................................................................84, 121<br />
PERFORMANCE .....................................................................12, 57<br />
Picture-in-picture .............................................................12, 13, 69<br />
Position .................................................................................47, 122<br />
Power ................................................................................34, 56, 76<br />
Power Control ...............................................................................92<br />
Power Management .....................................................................77<br />
Pro Adjust .....................................................................................62<br />
R<br />
RCV ................................................................................................12<br />
Red ..........................................................................................61, 73<br />
Remote Control ................................................................10, 12, 78<br />
Room Light Sensor ......................................................................45<br />
S<br />
SAP ..........................................................................................72, 74<br />
SAT ..........................................................................................12, 81<br />
Screen Protection ..................................................36, 55, 124, 133<br />
SCREEN SIZE .........................................................................13, 59<br />
Sharpness .....................................................................................61<br />
SHIFT .................................................................................13, 69, 70<br />
Side Mask .........................................................................55, 62, 63<br />
Side Mask Detection ............................................................62, 133<br />
Sleep Timer ...........................................................................44, 125<br />
Sound ..........................................................................45, 49, 57, 72<br />
Sound Effect .........................................................................75, 145<br />
SPORT .....................................................................................12, 57<br />
SRS ................................................................................75, 145, 165<br />
SRS Definition ............................................................................145<br />
SRS FOCUS ................................................................................145<br />
SRS TruBASS .............................................................................145<br />
STANDARD .............................................................................12, 58<br />
Standard .................................................................................12, 57<br />
SWAP ................................................................................13, 69, 70<br />
System Setup ................................................................................37<br />
T<br />
Text Optimization .........................................................................63<br />
Time Zone .....................................................................................38<br />
Tint ...........................................................................................58, 61<br />
Treble .............................................................................................49<br />
TV Parental Guidelines ....................................................51, 52, 53<br />
TV/DTV ...............................................................................13, 29, 35<br />
U<br />
Unavailable Ratings .....................................................................52<br />
USER .......................................................................................12, 58<br />
V<br />
VOLUME ..................................................................................44, 75
Appendix 08<br />
8.6 Trademarks, Licenses, & Patent Information<br />
Trademarks<br />
is a trademark of SRS Labs, Inc.<br />
WOW HD technology is incorporated under license from SRS Labs, Inc.<br />
Manufactured under license from Dolby Laboratories. Dolby and the double-D symbol are trademarks of Dolby Laboratories.<br />
HDMI, the HDMI logo and High-Definition Multimedia Interface are trademarks or registered trademarks of HDMI Licensing<br />
LLC.<br />
This product includes FontAvenue ® fonts licensed by NEC Corporation. FontAvenue is a registered trademark of NEC<br />
Corporation.<br />
DDC is a registered trademark of Video <strong>Electronics</strong> Standards Association.<br />
This software is based in part on the work of the independent JPEG Group.<br />
The names of the companies or institutions are trademarks or registered trademarks of the respective companies or<br />
institutions.<br />
Windows Media and the Windows logo are trademarks or registered trademarks of Microsoft Corporation in the United States<br />
and/or other countries.<br />
DLNA and DLNA CERTIFIED are trademarks and/or service marks of Digital Living Network Alliance.<br />
License<br />
Content owners use Windows Media digital rights management technology (WMDRM) to protect their intellectual property,<br />
including copyrights. This device uses WMDRM software to access WMDRM-protected content. If the WMDRM software fails<br />
to protect the content, content owners may ask Microsoft to revoke the software’s ability to use WMDRM to play or copy<br />
protected content. Revocation does not affect unprotected content. When you download licenses for protected content, you<br />
agree that Microsoft may include a revocation list with the licenses. Content owners may require you to upgrade WMDRM to<br />
access their content. If you decline an upgrade, you will not be able to access content that requires the upgrade.<br />
This product is protected by certain intellectual property rights of Microsoft. Use or distribution of such technology outside of<br />
this product is prohibited without a license from Microsoft.<br />
The DLNA logo is permitted to the product that has obtained a DLNA (Digital Living Network Alliance) certificate.<br />
Disclaimer Notice<br />
<strong>Pioneer</strong> provides information to help in setting up a network and connecting the flat panel TV to the network, but you are solely<br />
responsible for proper network setup and the connection. <strong>Pioneer</strong> bears no responsibility whatsoever for any damage arising<br />
from the network setup and the connection you made.<br />
When downloading software updates from the <strong>Pioneer</strong> website and performing updating procedures, make sure that your<br />
connections from the network to your USB flash drive, and from your USB flash drive to the flat panel TV are uninterrupted.<br />
<strong>Pioneer</strong> bears no responsibility for any failures or damage resulting from connection problems.<br />
Content may not work properly depending on the USB device used. <strong>Pioneer</strong> assumes no responsibility whatsoever for any<br />
failures or damage resulting from the USB device used by the user.<br />
165<br />
En
Should this product require service in the U.S.A. and you wish to locate the nearest <strong>Pioneer</strong> Authorized Independent Service Company, or if you wish to<br />
purchase replacement parts, operating instructions, service manuals, or accessories, please call the number shown below.<br />
8 0 0 – 4 2 1 – 1 6 2 5<br />
Please do not ship your product to <strong>Pioneer</strong> without first calling the Customer Support Division at the above listed number for assistance.<br />
<strong>Pioneer</strong> <strong>Electronics</strong> (USA) Inc.<br />
Customer Support Division<br />
P.O. BOX 1760, Long Beach,<br />
CA 90801-1760, U.S.A.<br />
For warranty information please see the Limited Warranty sheet included with your product.<br />
Should this product require service in Canada, please contact a <strong>Pioneer</strong> Canadian Authorized Dealer to locate the nearest <strong>Pioneer</strong> Authorized Service<br />
Company in Canada.<br />
Alternatively, please contact the Customer Satisfaction Department at the following address:<br />
<strong>Pioneer</strong> <strong>Electronics</strong> of Canada, Inc.<br />
Customer Satisfaction Department<br />
300 Allstate Parkway, Markham, Ontario L3R 0P2<br />
1-877-283-5901<br />
905-479-4411<br />
For warranty information please see the Limited Warranty sheet included with your product.<br />
Si ce produit doit être réparé au Canada, veuillez vous adresser à un distributeur autorisé <strong>Pioneer</strong> du Canada pour obtenir le nom du Centre de Service<br />
Autorisé <strong>Pioneer</strong> le plus près de chez-vous. Vous pouvez aussi contacter le Service à la clientèle de <strong>Pioneer</strong>:<br />
<strong>Pioneer</strong> Électroniques du Canada, Inc.<br />
Service Clientèle<br />
300, Allstate Parkway, Markham, Ontario L3R 0P2<br />
1-877-283-5901<br />
905-479-4411<br />
Pour obtenir des renseignements sur la garantie, veuillez vous reporter au feuillet sur la garantie restreinte qui accompagne le produit.<br />
S018_B_EF
Register Your Product on<br />
http://www.pioneerelectronics.com (US)<br />
http://www.pioneerelectronics.ca (Canada)<br />
PIONEER CORPORATION<br />
4-1, Meguro 1-Chome, Meguro-ku, Tokyo 153-8654, Japan<br />
PIONEER ELECTRONICS (USA) INC.<br />
P.O. BOX 1540, Long Beach, California 90801-1540, U.S.A. TEL: (800) 421-1404<br />
PIONEER ELECTRONICS OF CANADA, INC.<br />
300 Allstate Parkway, Markham, Ontario L3R 0P2, Canada TEL: 1-877-283-5901, 905-479-4411<br />
PIONEER EUROPE NV<br />
Haven 1087, Keetberglaan 1, B-9120 Melsele, Belgium TEL: 03/570.05.11<br />
PIONEER ELECTRONICS ASIACENTRE PTE. LTD.<br />
253 Alexandra Road, #04-01, Singapore 159936 TEL: 65-6472-7555<br />
PIONEER ELECTRONICS AUSTRALIA PTY. LTD.<br />
178-184 Boundary Road, Braeside, Victoria 3195, Australia, TEL: (03) 9586-6300<br />
PIONEER ELECTRONICS DE MEXICO S.A. DE C.V.<br />
Blvd.Manuel Avila Camacho 138 10 piso Col.Lomas de Chapultepec, Mexico, D.F. 11000 TEL: 55-9178-4270<br />
K002_B_En<br />
Published by <strong>Pioneer</strong> Corporation.<br />
Copyright © 2008 <strong>Pioneer</strong> Corporation.<br />
All rights reserved.<br />
<br />
Printed in China