Prism Kite 4-D Flight Manual - Shopatron
Prism Kite 4-D Flight Manual - Shopatron
Prism Kite 4-D Flight Manual - Shopatron

Create successful ePaper yourself
Turn your PDF publications into a flip-book with our unique Google optimized e-Paper software.
<strong>Prism</strong> Designs Inc.<br />
4214 24th Ave. West<br />
Seattle, WA 98199<br />
phone: 206.547.1100<br />
fax: 206.547.1200<br />
e-mail: info@prismkites.com<br />
www.prismkites.com<br />
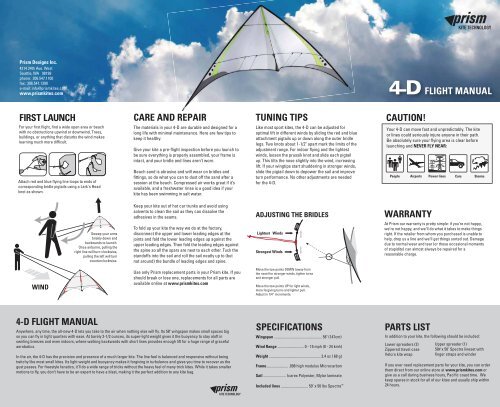
FIRST LAUNCH<br />
For your first flight, find a wide open area or beach<br />
with no obstructions upwind or downwind. Trees,<br />
buildings, or anything that disturbs the wind makes<br />
learning much more difficult.<br />
Attach red and blue flying line loops to ends of<br />
corresponding bridle pigtails using a Lark's Head<br />
knot as shown.<br />
CARE AND REPAIR<br />
The materials in your 4-D are durable and designed for a<br />
long life with minimal maintenance. Here are few tips to<br />
keep it healthy:<br />
Give your kite a pre-flight inspection before you launch to<br />
be sure everything is properly assembled, your frame is<br />
intact, and your bridle and lines aren’t worn.<br />
Beach sand is abrasive and will wear on bridles and<br />
fittings, so do what you can to dust off the sand after a<br />
session at the beach. Compressed air works great if it’s<br />
available, and a freshwater rinse is a good idea if your<br />
kite has been swimming in salt water.<br />
TUNING TIPS<br />
Like most sport kites, the 4-D can be adjusted for<br />
optimal lift in different winds by sliding the red and blue<br />
attachment pigtails up or down along the outer bridle<br />
legs. Two knots about 1-1/2" apart mark the limits of the<br />
adjustment range. For indoor flying and the lightest<br />
winds, loosen the prussik knot and slide each pigtail<br />
up. This tilts the nose slightly into the wind, increasing<br />
lift. If your wingtips start shuddering in stronger winds,<br />
slide the pigtail down to depower the sail and improve<br />
turn performance. No other adjustments are needed<br />
for the 4-D.<br />
CAUTION!<br />
Your 4-D can move fast and unpredictably. The kite<br />
or lines could seriously injure anyone in their path.<br />
Be absolutely sure your flying area is clear before<br />
launching and NEVER FLY NEAR:<br />
Keep your kite out of hot car trunks and avoid using<br />
solvents to clean the sail as they can dissolve the<br />
adhesives in the seams.<br />
ADJUSTING THE BRIDLES<br />
WARRANTY<br />
Sweep your arms<br />
briskly down and<br />
backwards to launch.<br />
Once airborne, pulling the<br />
right line will turn clockwise,<br />
pulling the left will turn<br />
counterclockwise.<br />
To fold up your kite the way we do at the factory,<br />
disconnect the upper and lower leading edges at the<br />
joints and fold the lower leading edges up against the<br />
upper leading edges. Then fold the leading edges against<br />
the spine so all the spars are next to each other. Tuck the<br />
standoffs into the sail and roll the sail neatly up to (but<br />
not around) the bundle of leading edges and spine.<br />
Lightest Winds<br />
Strongest Winds<br />
Strong<br />
Winds<br />
Light<br />
Winds<br />
At <strong>Prism</strong> our warranty is pretty simple: if you’re not happy,<br />
we’re not happy, and we’ll do what it takes to make things<br />
right. If the retailer from whom you purchased is unable to<br />
help, drop us a line and we’ll get things sorted out. Damage<br />
due to normal wear and tear (or those occasional moments<br />
of stupidity) can almost always be repaired for a<br />
reasonable charge.<br />
WIND<br />
Use only <strong>Prism</strong> replacement parts in your <strong>Prism</strong> kite. If you<br />
should break or lose one, replacements for all parts are<br />
available online at www.prismkites.com<br />
Move the tow points DOWN (away from<br />
the nose) for stronger winds, tighter turns<br />
and stronger pull.<br />
Move the tow points UP for light winds,<br />
more forgiving turns and lighter pull.<br />
Adjust in 1/4” increments.<br />
4-D FLIGHT MANUAL<br />
Anywhere, any time, the all-new 4-D lets you take to the air when nothing else will fly. Its 58" wingspan makes small spaces big<br />
so you can fly in tight quarters with ease. At barely 2-1/2 ounces, its super-light weight gives it the buoyancy to stay aloft in<br />
swirling breezes and even indoors, where walking backwards with short lines provides enough lift for a huge range of graceful<br />
aerobatics.<br />
In the air, the 4-D has the precision and presence of a much larger kite. The line feel is balanced and responsive without being<br />
twitchy like most small kites. Its light weight and buoyancy makes it forgiving in turbulence and gives you time to recover as the<br />
gust passes. For freestyle fanatics, it’ll do a wide range of tricks without the heavy feel of many trick kites. While it takes smaller<br />
motions to fly, you don’t have to be an expert to have a blast, making it the perfect addition to any kite bag.<br />
SPECIFICATIONS<br />
Wingspan ................................................... 58" (147cm)<br />
Wind Range ............................ 0 - 15 mph (0 - 24 kmh)<br />
Weight ....................................................... 2.4 oz ( 68 g)<br />
Frame....................... .098 high modulus Microcarbon<br />
Sail ........................ Icarex Polyester, Mylar laminate<br />
Included lines ............................. 50’ x 50 lbs Spectra <br />
PARTS LIST<br />
In addition to your kite, the following should be included:<br />
Lower spreaders (2)<br />
Zippered travel case<br />
Velcro kite wrap<br />
Upper spreader (1)<br />
50# x 50’ Spectra lineset with<br />
finger straps and winder<br />
If you ever need replacement parts for your kite, you can order<br />
them direct from our online store at www.prismkites.com or<br />
give us a call during business hours, Pacific coast time. We<br />
keep spares in stock for all of our kites and usually ship within<br />
24 hours.
Lower Spreader<br />
Standoffs<br />
Upper Spreader<br />
Leading Edge<br />
Wingtip Spar<br />
ASSEMBLY INSTRUCTIONS<br />
1. Unroll your kite and lay it out flat as shown.<br />
2. Unfold the left and right wings and connect the leading edge rods at the joint hidden inside the leading edge sleeve.<br />
3. Tension the sail at each wingtip using the special fitting as shown.<br />
4. Insert the marked end of each lower spreader into the aluminum center "T" fitting, and the other end into the lower leading edge<br />
fittings. Insert the upper spreader into the two upper leading edge fittings. IMPORTANT: Hold the spreaders close to the end to avoid<br />
slipping and puncturing the sail.<br />
5. Taking care to keep all bridle lines clear, insert the four thin standoff rods into the fittings on the lower spreaders to tension the sail.<br />
Orienting silver marks on lower spreaders into the center T positions standoff fittings properly so that standoffs are perpendicular to<br />
the spreaders.<br />
6. Hang the kite from its bridles as shown, checking that the kite is symmetrical<br />
and the bridle lines run clear without tangles around frame or fittings.<br />
1 2 3 4<br />
5<br />
6<br />
FLYING LINES<br />
Your 4-D comes with a set of 50# x 50' Spectra lines,<br />
which will provide a nice-sized wind window to play in<br />
as long as you have a little wind. To fly indoors, or in<br />
the very lightest winds outdoors, shorter lines will<br />
let you fly with less movement and less effort.<br />
50# x 18' works well, and you can make your<br />
own or purchase one from our online store<br />
at www.prismkites.com. Your 4-D case<br />
includes an extra velcro strap to hold a<br />
second lineset.<br />
FIRST FLIGHT<br />
For your first flight, pick a spot with smooth, light winds blowing<br />
around 5mph and a kite-friendly surface such as sand or grass.<br />
At first you will likely overcontrol the kite by pulling too much<br />
with your arms to steer. Practice steering in smooth, straight<br />
lines with just your fingertips to get a feel for the light pull and<br />
quick response of the 4-D.<br />
If you've never flown a dual-line sport kite before, we suggest<br />
learning the basics with a larger kite until you can comfortably<br />
launch, steer around and land in moderate winds<br />
without crashing.<br />
It takes a practice to develop the finesse you'll need to fly in<br />
light winds. Here are a few tips:<br />
1) Maneuver the kite as you fly to always keep tension on your<br />
lines. Fly with a fingertip touching each line so you can feel the<br />
smallest changes in line tension. Turn the kite back towards the<br />
middle of the wind window before it comes to a stop at the edge.<br />
2) Don't stand in one place. Be ready to move backwards any<br />
time the wind drops in order to keep tension on your lines and<br />
keep the kite moving. Whenever you feel a gust, use it to work<br />
your way back downwind without losing too much altitude.<br />
3) On those no-wind days, practice flying slow. Keep the kite<br />
moving, but see how slowly you can fly without losing tension on<br />
the lines. This is a key skill for flying indoors and in zero wind.<br />
With practice, you'll be able to hover the kite in a stall and let it<br />
float backwards, knowing that a quick downwards sweep of the<br />
arms is all it takes to get flying again.
How to tie off the 4-D wingtip tensioner with a clove hitch<br />
1<br />
2<br />
3<br />
Orient the nock with the long slot<br />
facing away from the spine and lead<br />
the tensioning string through the hole.<br />
Hold tension on the leading edge by<br />
squeezing the sleeve against the rod with<br />
one hand. Tie a half hitch around the nock<br />
with the tensioner and pull tight.<br />
Pull the first hitch tight into the narrow<br />
neck at the nock end.<br />
4<br />
5<br />
NOTE: Once your wingtips are securely<br />
tied off, it is not necessary to untie them<br />
after use. Just swing the specially<br />
designed nock sideways to release<br />
tension for disassembly.<br />
Loop a second half hitch around the<br />
nock in the same direction as the first.<br />
Pull the second hitch tight into the<br />
narrow neck and you’re good to go!