Compound Bow
Compound Bow
Compound Bow

You also want an ePaper? Increase the reach of your titles
YUMPU automatically turns print PDFs into web optimized ePapers that Google loves.
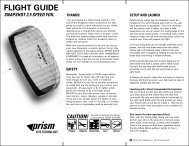
<strong>Compound</strong> <strong>Bow</strong><br />
USER’S GUIDE<br />
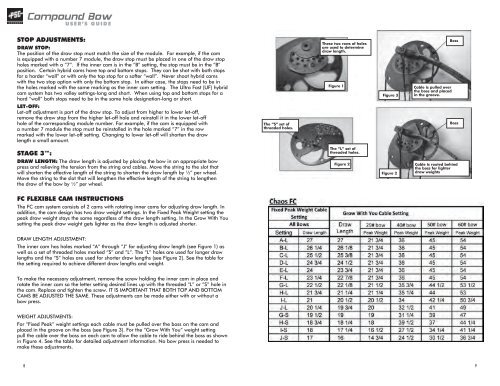
stop adjustments:<br />
Draw Stop:<br />
The position of the draw stop must match the size of the module. For example, if the cam<br />
is equipped with a number 7 module, the draw stop must be placed in one of the draw stop<br />
holes marked with a “7”. If the inner cam is in the “B” setting, the stop must be in the “B”<br />
position. Certain hybrid cams have top and bottom stops. They can be shot with both stops<br />
for a harder “wall” or with only the top stop for a softer “wall”. Never shoot hybrid cams<br />
with the two stop option with only the bottom stop. In either case, the stops need to be in<br />
the holes marked with the same marking as the inner cam setting. The Ultra Fast (UF) hybrid<br />
cam system has two valley settings-long and short. When using top and bottom stops for a<br />
hard “wall” both stops need to be in the same hole designation-long or short.<br />
These two rows of holes<br />
are used to determine<br />
draw length.<br />
Figure 1<br />
Figure 3<br />
Cable is pulled over<br />
the boss and placed<br />
in the groove.<br />
Boss<br />
Let-Off:<br />
Let-off adjustment is part of the draw stop. To adjust from higher to lower let-off,<br />
remove the draw stop from the higher let-off hole and reinstall it in the lower let-off<br />
hole of the corresponding module number. For example, if the cam is equipped with<br />
a number 7 module the stop must be reinstalled in the hole marked “7” in the row<br />
marked with the lower let-off setting. Changing to lower let-off will shorten the draw<br />
length a small amount.<br />
The “S” set of<br />
threaded holes.<br />
Boss<br />
STAGE 3:<br />
DRAW LENGTH: The draw length is adjusted by placing the bow in an appropriate bow<br />
press and relieving the tension from the string and cables. Move the string to the slot that<br />
will shorten the effective length of the string to shorten the draw length by ½” per wheel.<br />
Move the string to the slot that will lengthen the effective length of the string to lengthen<br />
the draw of the bow by ½” per wheel.<br />
The “L” set of<br />
threaded holes.<br />
Figure 2<br />
Figure 2<br />
Cable is routed behind<br />
the boss for lighter<br />
draw weights<br />
FC FLEXIBLE Cam Instructions<br />
The FC cam system consists of 2 cams with rotating inner cams for adjusting draw length. In<br />
addition, the cam design has two draw weight settings. In the Fixed Peak Weight setting the<br />
peak draw weight stays the same regardless of the draw length setting. In the Grow With You<br />
setting the peak draw weight gets lighter as the draw length is adjusted shorter.<br />
DRAW LENGTH ADJUSTMENT:<br />
The inner cam has holes marked “A” through “J” for adjusting draw length (see Figure 1) as<br />
well as a set of threaded holes marked “S” and “L”. The “L” holes are used for longer draw<br />
lengths and the “S” holes are used for shorter draw lengths (see Figure 2). See the table for<br />
the setting required to achieve different draw lengths and weight.<br />
To make the necessary adjustment, remove the screw holding the inner cam in place and<br />
rotate the inner cam so the letter setting desired lines up with the threaded “L” or “S” hole in<br />
the cam. Replace and tighten the screw. IT IS IMPORTANT THAT BOTH TOP AND BOTTOM<br />
CAMS BE ADJUSTED THE SAME. These adjustments can be made either with or without a<br />
bow press.<br />
WEIGHT ADJUSTMENTS:<br />
For “Fixed Peak” weight settings each cable must be pulled over the boss on the cam and<br />
placed in the groove on the boss (see Figure 3). For the “Grow With You” weight setting<br />
pull the cable over the boss on each cam to allow the cable to ride behind the boss as shown<br />
in Figure 4. See the table for detailed adjustment information. No bow press is needed to<br />
make these adjustments.<br />
8<br />
9