SUSPENSION SETUP GUIDE
SUSPENSION SETUP GUIDE
SUSPENSION SETUP GUIDE

Create successful ePaper yourself
Turn your PDF publications into a flip-book with our unique Google optimized e-Paper software.
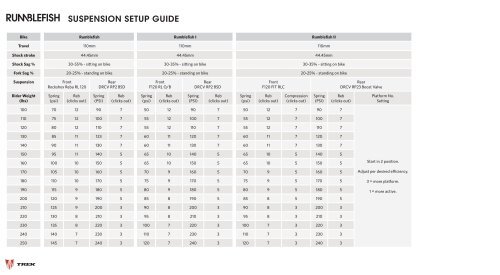
Suspension Setup Guide<br />
Bike Rumblefish Rumblefish I Rumblefish II<br />
Travel 110mm 110mm 110mm<br />
Shock stroke 44.45mm 44.45mm 44.45mm<br />
Shock Sag % 30-55% - sitting on bike 30-35% - sitting on bike 30-35% - sitting on bike<br />
Fork Sag % 20-25% - standing on bike 20-25% - standing on bike 20-25% - standing on bike<br />
Suspension<br />
Front<br />
Rockshox Reba RL 120<br />
Rear<br />
DRCV RP2 BSD<br />
Front<br />
F120 RL O/B<br />
Rear<br />
DRCV RP2 BSD<br />
Front<br />
F120 FIT RLC<br />
Rear<br />
DRCV RP23 Boost Valve<br />
Rider Weight<br />
(lbs)<br />
Spring<br />
(psi)<br />
Reb<br />
(clicks out)<br />
Spring<br />
(PSI)<br />
Reb<br />
(clicks out)<br />
Spring<br />
(psi)<br />
Reb<br />
(clicks out)<br />
Spring<br />
(PSI)<br />
Reb<br />
(clicks out)<br />
Spring<br />
(psi)<br />
Reb<br />
(clicks out)<br />
Compression<br />
(clicks out)<br />
Spring<br />
(PSI)<br />
Reb<br />
(clicks out)<br />
Platform No.<br />
Setting<br />
100 70 12 90 7 50 12 90 7 50 12 7 90 7<br />
110 75 12 100 7 55 12 100 7 55 12 7 100 7<br />
120 80 12 110 7 55 12 110 7 55 12 7 110 7<br />
130 85 11 123 7 60 11 120 7 60 11 7 120 7<br />
140 90 11 130 7 60 11 130 7 60 11 7 130 7<br />
150 95 11 140 5 65 10 140 5 65 10 5 140 5<br />
160 100 10 150 5 65 10 150 5 65 10 5 150 5<br />
170 105 10 160 5 70 9 160 5 70 9 5 160 5<br />
180 110 10 170 5 75 9 170 5 75 9 5 170 5<br />
190 115 9 180 5 80 9 180 5 80 9 5 180 5<br />
200 120 9 190 5 85 8 190 5 85 8 5 190 5<br />
Start in 2 position.<br />
Adjust per desired efficiency.<br />
3 = more platform.<br />
1 = more active.<br />
210 125 9 200 3 90 8 200 3 90 8 3 200 3<br />
220 130 8 210 3 95 8 210 3 95 8 3 210 3<br />
230 135 8 220 3 100 7 220 3 100 7 3 220 3<br />
240 140 7 230 3 110 7 230 3 110 7 3 230 3<br />
250 145 7 240 3 120 7 240 3 120 7 3 240 3
Suspension Setup Guide<br />
Follow these steps to optimize the performance of your Trek Full Suspension. Mountain Bike. Steps 3 & 5 are specific to DRCV-equipped bikes:<br />
1.<br />
2.<br />
3.<br />
4.<br />
5.<br />
6.<br />
7.<br />
8.<br />
9.<br />
10.<br />
Determine rider weight (individual weight plus riding gear).<br />
Adjust rebound and low speed compression settings if applicable as indicated in chart. Turn Pro Pedal off.<br />
Be sure to thread the pump head completely on to the valve. Apply pressure as indicated in the chart. Remove pump.<br />
Install Trek Sag Meter.<br />
Compress shock at least 50%.<br />
Note: this step is vital for proper DRCV setup.<br />
If adjusting fork, stand on the pedals. If adjusting shock, remain seated.<br />
Slide O-ring so that it rests against dust seal.<br />
Dismount bike.<br />
If o-ring falls within sag meter’s window, or if o-ring is within recommended sag measurement, you’re ready to ride.<br />
If the o-ring falls outside of that window, or is greater or less than recommended measurement, add or subtract pressure as needed.<br />
Note: be sure to cycle shock 2-3 times after any pressure adjustment