
Create successful ePaper yourself
Turn your PDF publications into a flip-book with our unique Google optimized e-Paper software.
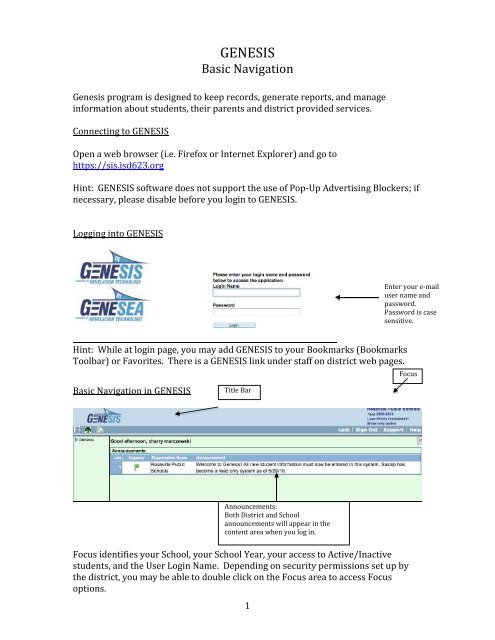
<strong>GENESIS</strong><br />
Basic Navigation<br />
Genesis program is designed to keep records, generate reports, and manage<br />
information about students, their parents and district provided services.<br />
Connecting to <strong>GENESIS</strong><br />
Open a web browser (i.e. Firefox or Internet Explorer) and go to<br />
https://sis.isd623.org<br />
Hint: <strong>GENESIS</strong> software does not support the use of Pop-Up Advertising Blockers; if<br />
necessary, please disable before you login to <strong>GENESIS</strong>.<br />
Logging into <strong>GENESIS</strong><br />
Enter your e-mail<br />
user name and<br />
password.<br />
Password is case<br />
sensitive.<br />
Hint: While at login page, you may add <strong>GENESIS</strong> to your Bookmarks (Bookmarks<br />
Toolbar) or Favorites. There is a <strong>GENESIS</strong> link under staff on district web pages.<br />
Focus<br />
Basic Navigation in <strong>GENESIS</strong><br />
Title Bar<br />
Announcements:<br />
Both District and School<br />
announcements will appear in the<br />
content area when you log in.<br />
Focus identifies your School, your School Year, your access to Active/Inactive<br />
students, and the User Login Name. Depending on security permissions set up by<br />
the district, you may be able to double click on the Focus area to access Focus<br />
options.<br />
1
Lock and protect your screens from unauthorized use. Type in<br />
your password to return to the program.<br />
Support and Help access information and on-line help.<br />
Home Page Icon<br />
Menu<br />
Bar Icons<br />
and<br />
Groups<br />
Tree Icon<br />
Click on the triangle next to “Genesis”<br />
to view menu area; click on triangles<br />
to open submenus and reports.<br />
Adding Groups to Menu<br />
To add a group to the Menu Bar, right (control) click on a current group and select<br />
Add New Group; a window will open, name the group and click Save.<br />
Adding Items to Menu Bar Groups<br />
To add an item to a Menu Bar group, right (control) click on an item in the Tree list;<br />
a menu opens, select Add to Group.<br />
Note: If you add a lot of icons to one group, you will have to scroll down to see all of them.<br />
Quick Navigation<br />
Quick Navigation is located in the upper right<br />
part of the screen. The tab containing the<br />
symbol “>>” is used to expand or collapse the Quick Navigation area.<br />
2
• To add item to Quick Nav, right (control) click on an icon in the Menu Bar;<br />
select Add to Quick Nav.<br />
• To remove an item from Quick Nav, right (control) click on item in Quick Nav;<br />
select Remove Icon.<br />
Note: One of the advantages of using Quick Nav is that the activated screens are<br />
detached which allows for having several screens open at the same time.<br />
Opening Multiple Windows<br />
From the Tree or Menu Bar, right (control) click on an item<br />
and select Open New Window.<br />
Navigating Within a View<br />
Use the Action Bar arrows to<br />
navigate from student to<br />
student<br />
alphabetically.<br />
Action Bar<br />
Print the info showing in<br />
content area<br />
Use the magnifying<br />
glass to<br />
Activate the Find/Search<br />
mode.<br />
• Click on the magnifying glass to clear the screen.<br />
• Searching for an individual student: Enter student name and Return or click<br />
Find.<br />
• Searching by parameters (several different search fields): Enter the criteria<br />
you are searching for by using dropdowns, asterisk (*) to select fields, and or<br />
conditions in a field.<br />
3
Click Find or Return. When the data is returned, Open in Query, Print and Save<br />
as Filter are available.<br />
• Open in Query is used to start a Query.<br />
• Print has the following options: PDF, TIFF Image, CSV, Excel, HTML, PDF,<br />
Rich Text, Text File and XML<br />
• Save as Filter: Create a filter by entering a Filter Name, then click on Save<br />
as Filter. Leave the Make Active box checked and the filter is applied<br />
immediately.<br />
A funnel icon appears in the upper left corner of the view,<br />
indicating a funnel is active (this will show saved filters).<br />
Click on the funnel to open the menu to apply<br />
additional filters or to remove filters. Click on the “X” to<br />
delete a filter.<br />
With a filter selected, a user can change their Focus to a<br />
different school or year and the filter is honored when running reports.<br />
4