

Germicidal Lights Manual - Lennox
Germicidal Lights Manual - Lennox
Germicidal Lights Manual - Lennox

You also want an ePaper? Increase the reach of your titles
YUMPU automatically turns print PDFs into web optimized ePapers that Google loves.
Installation<br />
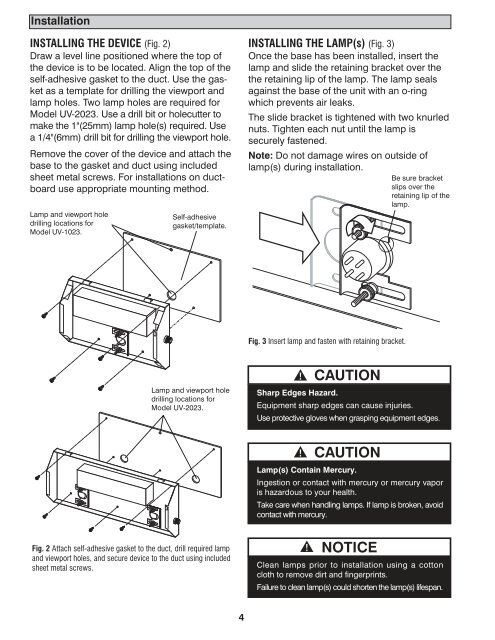
INSTALLING THE DEVICE (Fig. 2)<br />
Draw a level line positioned where the top of<br />
the device is to be located. Align the top of the<br />
self-adhesive gasket to the duct. Use the gasket<br />
as a template for drilling the viewport and<br />
lamp holes. Two lamp holes are required for<br />
Model UV-2023. Use a drill bit or holecutter to<br />
make the 1"(25mm) lamp hole(s) required. Use<br />
a 1/4"(6mm) drill bit for drilling the viewport hole.<br />
Remove the cover of the device and attach the<br />
base to the gasket and duct using included<br />
sheet metal screws. For installations on ductboard<br />
use appropriate mounting method.<br />
Lamp and viewport hole<br />
drilling locations for<br />
Model UV-1023.<br />
Self-adhesive<br />
gasket/template.<br />
INSTALLING THE LAMP(s) (Fig. 3)<br />
Once the base has been installed, insert the<br />
lamp and slide the retaining bracket over the<br />
the retaining lip of the lamp. The lamp seals<br />
against the base of the unit with an o-ring<br />
which prevents air leaks.<br />
The slide bracket is tightened with two knurled<br />
nuts. Tighten each nut until the lamp is<br />
securely fastened.<br />
Note: Do not damage wires on outside of<br />
lamp(s) during installation.<br />
Be sure bracket<br />
slips over the<br />
retaining lip of the<br />
lamp.<br />
Fig. 3 Insert lamp and fasten with retaining bracket.<br />
Lamp and viewport hole<br />
drilling locations for<br />
Model UV-2023.<br />
CAUTION<br />
Sharp Edges Hazard.<br />
Equipment sharp edges can cause injuries.<br />
Use protective gloves when grasping equipment edges.<br />
CAUTION<br />
Lamp(s) Contain Mercury.<br />
Ingestion or contact with mercury or mercury vapor<br />
is hazardous to your health.<br />
Take care when handling lamps. If lamp is broken, avoid<br />
contact with mercury.<br />
Fig. 2 Attach self-adhesive gasket to the duct, drill required lamp<br />
and viewport holes, and secure device to the duct using included<br />
sheet metal screws.<br />
NOTICE<br />
Clean lamps prior to installation using a cotton<br />
cloth to remove dirt and fingerprints.<br />
Failure to clean lamp(s) could shorten the lamp(s) lifespan.<br />
4


