

ML193DF Gas Furnace Installation Manual - Lennox
ML193DF Gas Furnace Installation Manual - Lennox
ML193DF Gas Furnace Installation Manual - Lennox

You also want an ePaper? Increase the reach of your titles
YUMPU automatically turns print PDFs into web optimized ePapers that Google loves.
2010 <strong>Lennox</strong> Industries Inc.<br />
Dallas, Texas, USA<br />
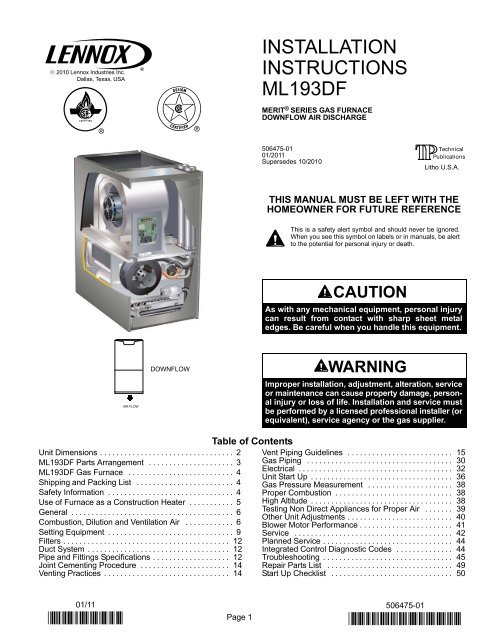
INSTALLATION<br />
INSTRUCTIONS<br />
<strong>ML193DF</strong><br />
MERIT ® SERIES GAS FURNACE<br />
DOWNFLOW AIR DISCHARGE<br />
506475−01<br />
01/2011<br />
Supersedes 10/2010<br />
Litho U.S.A.<br />
THIS MANUAL MUST BE LEFT WITH THE<br />
HOMEOWNER FOR FUTURE REFERENCE<br />
This is a safety alert symbol and should never be ignored.<br />
When you see this symbol on labels or in manuals, be alert<br />
to the potential for personal injury or death.<br />
CAUTION<br />
As with any mechanical equipment, personal injury<br />
can result from contact with sharp sheet metal<br />
edges. Be careful when you handle this equipment.<br />
AIR FLOW<br />
DOWNFLOW<br />
WARNING<br />
Improper installation, adjustment, alteration, service<br />
or maintenance can cause property damage, personal<br />
injury or loss of life. <strong>Installation</strong> and service must<br />
be performed by a licensed professional installer (or<br />
equivalent), service agency or the gas supplier.<br />
Table of Contents<br />
Unit Dimensions . . . . . . . . . . . . . . . . . . . . . . . . . . . . . . . . . 2 Vent Piping Guidelines . . . . . . . . . . . . . . . . . . . . . . . . . . 15<br />
<strong>ML193DF</strong> Parts Arrangement . . . . . . . . . . . . . . . . . . . . . 3 <strong>Gas</strong> Piping . . . . . . . . . . . . . . . . . . . . . . . . . . . . . . . . . . . . 30<br />
<strong>ML193DF</strong> <strong>Gas</strong> <strong>Furnace</strong> . . . . . . . . . . . . . . . . . . . . . . . . . . 4<br />
Electrical . . . . . . . . . . . . . . . . . . . . . . . . . . . . . . . . . . . . . . 32<br />
Unit Start Up . . . . . . . . . . . . . . . . . . . . . . . . . . . . . . . . . . . 36<br />
Shipping and Packing List . . . . . . . . . . . . . . . . . . . . . . . . 4 <strong>Gas</strong> Pressure Measurement . . . . . . . . . . . . . . . . . . . . . 38<br />
Safety Information . . . . . . . . . . . . . . . . . . . . . . . . . . . . . . . 4 Proper Combustion . . . . . . . . . . . . . . . . . . . . . . . . . . . . . 38<br />
Use of <strong>Furnace</strong> as a Construction Heater . . . . . . . . . . . 5 High Altitude . . . . . . . . . . . . . . . . . . . . . . . . . . . . . . . . . . . 38<br />
General . . . . . . . . . . . . . . . . . . . . . . . . . . . . . . . . . . . . . . . . 6<br />
Testing Non Direct Appliances for Proper Air . . . . . . . 39<br />
Other Unit Adjustments . . . . . . . . . . . . . . . . . . . . . . . . . . 40<br />
Combustion, Dilution and Ventilation Air . . . . . . . . . . . . 6 Blower Motor Performance . . . . . . . . . . . . . . . . . . . . . . . 41<br />
Setting Equipment . . . . . . . . . . . . . . . . . . . . . . . . . . . . . . . 9 Service . . . . . . . . . . . . . . . . . . . . . . . . . . . . . . . . . . . . . . . 42<br />
Filters . . . . . . . . . . . . . . . . . . . . . . . . . . . . . . . . . . . . . . . . . 12 Planned Service . . . . . . . . . . . . . . . . . . . . . . . . . . . . . . . . 44<br />
Duct System . . . . . . . . . . . . . . . . . . . . . . . . . . . . . . . . . . . 12 Integrated Control Diagnostic Codes . . . . . . . . . . . . . . 44<br />
Pipe and Fittings Specifications . . . . . . . . . . . . . . . . . . . 12 Troubleshooting . . . . . . . . . . . . . . . . . . . . . . . . . . . . . . . . 45<br />
Joint Cementing Procedure . . . . . . . . . . . . . . . . . . . . . . 14 Repair Parts List . . . . . . . . . . . . . . . . . . . . . . . . . . . . . . . 49<br />
Venting Practices . . . . . . . . . . . . . . . . . . . . . . . . . . . . . . . 14 Start Up Checklist . . . . . . . . . . . . . . . . . . . . . . . . . . . . . . 50<br />
01/11<br />
<br />
Page 1<br />
506475−01
<strong>ML193DF</strong> Unit Dimensions − inches (mm)<br />
9/16<br />
(14)<br />
COMBUSTION<br />
AIR INTAKE<br />
EXHAUST AIR<br />
OUTLET<br />
B<br />
RETURN AIR<br />
OPENING<br />
2−1/16 (52)<br />
5<br />
(127)<br />
2−1/4<br />
(57)<br />
9/16<br />
(14)<br />
TOP VIEW<br />
AIR<br />
A<br />
B<br />
FLOW<br />
9/16<br />
(14)<br />
1 (25)<br />
27−3/4<br />
Front Panel (705)<br />
19−7/16<br />
(494)<br />
9/16<br />
(14)<br />
33<br />
(838)<br />
2 (51)<br />
Either Side<br />
GAS PIPING INLET<br />
(Either Side)<br />
ELECTRICAL INLET<br />
(Either Side)<br />
CONDENSATE<br />
TRAP CONNECTION<br />
(Either Side)<br />
9−1/8 (232) Right<br />
6−9/16 (167) Left<br />
6−1/2 (165)<br />
Either Side<br />
3/4<br />
(19)<br />
C<br />
Supply<br />
Air<br />
3/4<br />
(19)<br />
19−1/4<br />
(489)<br />
Supply<br />
Air<br />
3/4<br />
(19)<br />
FRONT VIEW<br />
SIDE VIEW<br />
<strong>ML193DF</strong><br />
Model No.<br />
04536B<br />
07036B<br />
09048C<br />
11060C<br />
A B C<br />
in. mm in. mm in. mm<br />
17−1/2 446 16−3/8 416 16 406<br />
21 533 19−7/8 504 19−1/2 495<br />
Page 2
<strong>ML193DF</strong> Parts Arrangement<br />
CONTROL BOX<br />
(Includes integrated control,<br />
transformer and door switch)<br />
BAG ASSEMBLY<br />
BLOWER MOTOR<br />
(hidden)<br />
BLOWER<br />
ACCESS<br />
PANEL<br />
COMBUSTION<br />
AIR INDUCER<br />
BLOWER DECK<br />
BURNER<br />
ACCESS<br />
PANEL<br />
GAS VALVE<br />
PRIMARY LIMIT<br />
COLD END HEADER BOX<br />
HEAT EXCHANGER<br />
BURNER BOX ASSEMBLY<br />
(includes sensor, rollout switches and ignitor)<br />
FIGURE 1<br />
Page 3
<strong>ML193DF</strong> <strong>Gas</strong> <strong>Furnace</strong><br />
The <strong>ML193DF</strong> Category IV gas furnace is shipped ready<br />
for installation in the downflow position.<br />
The furnace is equipped for installation in natural gas applications.<br />
A conversion kit (ordered separately) is required<br />
for use in propane/LP gas applications.<br />
The <strong>ML193DF</strong> can be installed as a Direct Vent or Non−<br />
Direct Vent gas central furnace.<br />
NOTE − In Direct Vent installations, combustion air is taken<br />
from outdoors and flue gases are discharged outdoors. In<br />
Non−Direct Vent installations, combustion air is taken from<br />
indoors and flue gases are discharged outdoors. See figure<br />
2 for applications involving roof termination.<br />
DIRECT VENT INSTALLATION<br />
COMBUSTION<br />
AIR INTAKE<br />
OUTSIDE OF<br />
HOUSE<br />
<strong>ML193DF</strong><br />
EXHAUST<br />
OUTLET<br />
FIGURE 2<br />
Shipping and Packing List<br />
NON−DIRECT VENT<br />
INSTALLATION<br />
EXHAUST<br />
OUTLET<br />
<strong>ML193DF</strong><br />
Package 1 of 1 contains<br />
1 − Assembled <strong>ML193DF</strong> unit<br />
1 − Bag assembly containing the following:<br />
3 − Wire nuts<br />
1 − Snap bushing<br />
1 − Snap plug<br />
1 − Wire tie<br />
1 − Condensate trap<br />
1 − Condensate trap cap<br />
1 − Condensate trap clamp<br />
1 − 2" diameter Air intake screen<br />
DANGER<br />
COMBUSTION<br />
AIR INTAKE INSIDE<br />
OF HOUSE<br />
Danger of explosion.<br />
There are circumstances in which odorant used with<br />
LP/propane gas can lose its scent. In case of a leak,<br />
LP/propane gas will settle close to the floor and may<br />
be difficult to smell. An LP/propane leak detector<br />
should be installed in all LP applications.<br />
Check equipment for shipping damage. If you find any<br />
damage, immediately contact the last carrier.<br />
The following items may also be ordered separately:<br />
1 − Thermostat<br />
1 − Propane/LP changeover kit<br />
Safety Information<br />
WARNING<br />
Improper installation, adjustment, alteration, service<br />
or maintenance can cause property damage, personal<br />
injury or loss of life. <strong>Installation</strong> and service must<br />
be performed by a licensed professional installer (or<br />
equivalent), service agency or the gas supplier.<br />
CAUTION<br />
As with any mechanical equipment, personal injury<br />
can result from contact with sharp sheet metal<br />
edges. Be careful when you handle this equipment.<br />
Use only the type of gas approved for use with this furnace.<br />
Refer to unit nameplate.<br />
<strong>ML193DF</strong> units are CSA International certified to ANSI<br />
Z21.47 and CSA 2.3 standards.<br />
Building Codes<br />
In the USA, installation of gas furnaces must conform with local<br />
building codes. In the absence of local codes, units must<br />
be installed according to the current National Fuel <strong>Gas</strong> Code<br />
(ANSI-Z223.1/NFPA 54). The National Fuel <strong>Gas</strong> Code is<br />
available from the following address:<br />
American National Standards Institute, Inc.<br />
11 West 42nd Street<br />
New York, NY 10036<br />
In Canada, installation must conform with current National<br />
Standard of Canada CSA-B149 Natural <strong>Gas</strong> and Propane<br />
<strong>Installation</strong> Codes, local plumbing or waste water codes<br />
and other applicable local codes.<br />
In order to ensure proper unit operation in non−direct vent<br />
applications, combustion and ventilation air supply must be<br />
provided according to the current National Fuel <strong>Gas</strong> Code<br />
or CSA-B149 standard.<br />
Locations and Clearances<br />
This furnace is CSA International certified for installation<br />
clearances to combustible material as listed on the unit<br />
nameplate and in the table in figure 11. Accessibility and service<br />
clearances must take precedence over fire protection<br />
clearances.<br />
For installation in a residential garage, the furnace must<br />
be installed so that the burner(s) and the ignition source<br />
are located no less than 18 inches (457 mm) above the<br />
floor. The furnace must be located or protected to avoid<br />
physical damage by vehicles. When a furnace is installed<br />
in a public garage, hangar, or other building that has a hazardous<br />
atmosphere, the furnace must be installed according<br />
to recommended good practice requirements and current<br />
National Fuel <strong>Gas</strong> Code or CSA B149 standards.<br />
Page 4
NOTE − <strong>Furnace</strong> must be adjusted to obtain a temperature<br />
rise within the range specified on the unit nameplate. Failure<br />
to do so may cause erratic limit operation and premature heat<br />
exchanger failure.<br />
This <strong>ML193DF</strong> furnace must be installed so that its electrical<br />
components are protected from water.<br />
<strong>Installation</strong> in Combination with a Cooling Coil<br />
When this furnace is used with cooling units (figure 3), it<br />
shall be installed in parallel with, or on the upstream side of,<br />
cooling units to avoid condensation in the heating compartment.<br />
With a parallel flow arrangement, a damper (or other<br />
means to control the flow of air) must adequately prevent<br />
chilled air from entering the furnace. If the damper is manually<br />
operated, it must be equipped to prevent operation of either<br />
the heating or the cooling unit, unless it is in the full<br />
HEAT or COOL setting.<br />
When installed, this furnace must be electrically grounded<br />
according to local codes. In addition, in the United States,<br />
installation must conform with the current National Electric<br />
Code, ANSI/NFPA No. 70. The National Electric Code<br />
(ANSI/NFPA No. 70) is available from the following address:<br />
National Fire Protection Association<br />
1 Battery March Park<br />
Quincy, MA 02269<br />
In Canada, all electrical wiring and grounding for the unit<br />
must be installed according to the current regulations of the<br />
Canadian Electrical Code Part I (CSA Standard C22.1)<br />
and/or local codes.<br />
Heating Unit Installed Parallell to Air Handler Unit<br />
GAS UNIT<br />
Dampers<br />
(open during heating<br />
operation only)<br />
AIR HANDLER<br />
Dampers<br />
(open during cooling<br />
operation only)<br />
FIGURE 3<br />
NOTE − This furnace is designed for a minimum continuous<br />
return air temperature of 60°F (16°C) or an intermittent<br />
operation down to 55°F (13°C) dry bulb for cases<br />
where a night setback thermostat is used. Return air temperature<br />
must not exceed 85°F (29°C) dry bulb.<br />
The <strong>ML193DF</strong> furnace may be installed in alcoves, closets,<br />
attics, basements, garages, utility rooms and crawl<br />
spaces.<br />
This furnace design has not been CSA certified for installation<br />
in mobile homes, recreational vehicles, or outdoors.<br />
Never use an open flame to test for gas leaks. Check all<br />
connections using a commercially available soap solution<br />
made specifically for leak detection.<br />
Use of <strong>Furnace</strong> as Construction Heater<br />
<strong>Lennox</strong> does not recommend the use of <strong>ML193DF</strong> units as<br />
a construction heater during any phase of construction.<br />
Very low return air temperatures, harmful vapors and operation<br />
of the unit with clogged or misplaced filters will damage<br />
the unit.<br />
<strong>ML193DF</strong> units may be used for heating of buildings or<br />
structures under construction, if the following conditions<br />
are met:<br />
• The vent system must be permanently installed per<br />
these installation instructions.<br />
• A room thermostat must control the furnace. The use of<br />
fixed jumpers that will provide continuous heating is not<br />
allowed.<br />
• The return air duct must be provided and sealed to the<br />
furnace.<br />
• Return air temperature range between 60°F (16°C) and<br />
80°F (27°C) must be maintained.<br />
• Air filters must be installed in the system and must be<br />
maintained during construction.<br />
• Air filters must be replaced upon construction completion.<br />
• The input rate and temperature rise must be set per the<br />
furnace rating plate.<br />
• One hundred percent (100%) outdoor air must be provided<br />
for combustion air requirements during construction.<br />
Temporary ducting may supply outdoor air to the<br />
furnace. Do not connect duct directly to the furnace.<br />
Size the temporary duct following these instructions in<br />
section for Combustion, Dilution and Ventilation Air in a<br />
confined space with air from outside.<br />
• The furnace heat exchanger, components, duct system,<br />
air filters and evaporator coils must be thoroughly<br />
cleaned following final construction clean−up.<br />
• All furnace operating conditions (including ignition, input<br />
rate, temperature rise and venting) must be verified<br />
according to these installation instructions.<br />
Page 5
General<br />
These instructions are intended as a general guide and do<br />
not supersede local codes in any way. Consult authorities<br />
having jurisdiction before installation.<br />
In addition to the requirements outlined previously, the following<br />
general recommendations must be considered<br />
when installing a <strong>ML193DF</strong> furnace:<br />
• Place the furnace as close to the center of the air distribution<br />
system as possible. The furnace should also be<br />
located close to the chimney or vent termination point.<br />
• When the furnace is installed in non−direct vent applications,<br />
do not install the furnace where drafts might blow<br />
directly into it. This could cause improper combustion<br />
and unsafe operation.<br />
• When the furnace is installed in non−direct vent applications,<br />
do not block the furnace combustion air opening<br />
with clothing, boxes, doors, etc. Air is needed for proper<br />
combustion and safe unit operation.<br />
• When the furnace is installed in an attic or other insulated<br />
space, keep insulation away from the furnace.<br />
• When the furnace is installed in an unconditioned<br />
space, consider provisions required to prevent freezing<br />
of condensate drain system.<br />
CAUTION<br />
<strong>ML193DF</strong> unit should not be installed in areas normally<br />
subject to freezing temperatures.<br />
WARNING<br />
Product contains fiberglass wool.<br />
Disturbing the insulation in this product during<br />
installation, maintenance, or repair will expose you<br />
to fiberglass wool. Breathing this may cause lung<br />
cancer. (Fiberglass wool is known to the State of California<br />
to cause cancer.)<br />
Fiberglass wool may also cause respiratory, skin,<br />
and eye irritation.<br />
To reduce exposure to this substance or for further<br />
information, consult material safety data sheets<br />
available from address shown below, or contact your<br />
supervisor.<br />
<strong>Lennox</strong> Industries Inc.<br />
P.O. Box 799900<br />
Dallas, TX 75379−9900<br />
Combustion, Dilution & Ventilation Air<br />
If the <strong>ML193DF</strong> is installed as a Non−Direct Vent <strong>Furnace</strong>,<br />
follow the guidelines in this section.<br />
NOTE − In Non−Direct Vent installations, combustion air<br />
is taken from indoors and flue gases are discharged out−<br />
doors.<br />
WARNING<br />
Insufficient combustion air can cause headaches,<br />
nausea, dizziness or asphyxiation. It will also cause<br />
excess water in the heat exchanger resulting in rusting<br />
and premature heat exchanger failure. Excessive<br />
exposure to contaminated combustion air will result<br />
in safety and performance related problems. Avoid<br />
exposure to the following substances in the combustion<br />
air supply:<br />
Permanent wave solutions<br />
Chlorinated waxes and cleaners<br />
Chlorine base swimming pool chemicals<br />
Water softening chemicals<br />
De−icing salts or chemicals<br />
Carbon tetrachloride<br />
Halogen type refrigerants<br />
Cleaning solvents (such as perchloroethylene)<br />
Printing inks, paint removers, varnishes, etc.<br />
Hydrochloric acid<br />
Cements and glues<br />
Antistatic fabric softeners for clothes dryers<br />
Masonry acid washing materials<br />
In the past, there was no problem in bringing in sufficient<br />
outdoor air for combustion. Infiltration provided all the air<br />
that was needed. In today’s homes, tight construction<br />
practices make it necessary to bring in air from outside<br />
for combustion. Take into account that exhaust fans, appliance<br />
vents, chimneys, and fireplaces force additional<br />
air that could be used for combustion out of the house.<br />
Unless outside air is brought into the house for combustion,<br />
negative pressure (outside pressure is greater than<br />
inside pressure) will build to the point that a downdraft<br />
can occur in the furnace vent pipe or chimney. As a result,<br />
combustion gases enter the living space creating a potentially<br />
dangerous situation.<br />
In the absence of local codes concerning air for combus−<br />
tion and ventilation, use the guidelines and procedures in<br />
this section to install <strong>ML193DF</strong> furnaces to ensure efficient<br />
and safe operation. You must consider combustion<br />
air needs and requirements for exhaust vents and gas<br />
pip−ing. A portion of this information has been reprinted<br />
with permission from the National Fuel <strong>Gas</strong> Code (ANSI−<br />
Z223.1/NFPA 54). This reprinted material is not the complete<br />
and official position of the ANSI on the referenced<br />
subject, which is represented only by the standard in its<br />
entirety.<br />
In Canada, refer to the CSA B149 installation codes.<br />
CAUTION<br />
Do not install the furnace in a corrosive or contaminated<br />
atmosphere. Meet all combustion and ventilation<br />
air requirements, as well as all local codes.<br />
Page 6
All gas-fired appliances require air for the combustion process.<br />
If sufficient combustion air is not available, the furnace<br />
or other appliance will operate inefficiently and unsafely.<br />
Enough air must be provided to meet the needs of all<br />
fuel−burning appliances and appliances such as exhaust<br />
fans which force air out of the house. When fireplaces, exhaust<br />
fans, or clothes dryers are used at the same time as<br />
the furnace, much more air is required to ensure proper<br />
combustion and to prevent a downdraft. Insufficient air<br />
causes incomplete combustion which can result in carbon<br />
monoxide.<br />
In addition to providing combustion air, fresh outdoor air dilutes<br />
contaminants in the indoor air. These contaminants<br />
may include bleaches, adhesives, detergents, solvents<br />
and other contaminants which can corrode furnace components.<br />
The requirements for providing air for combustion and ventilation<br />
depend largely on whether the furnace is installed in<br />
an unconfined or a confined space.<br />
Unconfined Space<br />
An unconfined space is an area such as a basement or<br />
large equipment room with a volume greater than 50 cubic<br />
feet (1.42 m 3 ) per 1,000 Btu (.29 kW) per hour of the combined<br />
input rating of all appliances installed in that space.<br />
This space also includes adjacent rooms which are not<br />
separated by a door. Though an area may appear to be unconfined,<br />
it might be necessary to bring in outdoor air for<br />
combustion if the structure does not provide enough air by<br />
infiltration. If the furnace is located in a building of tight<br />
construction with weather stripping and caulking around<br />
the windows and doors, follow the procedures in the air<br />
from outside section.<br />
Confined Space<br />
A confined space is an area with a volume less than 50 cubic<br />
feet (1.42 m 3 ) per 1,000 Btu (.29 kW) per hour of the com−<br />
bined input rating of all appliances installed in that space. This<br />
definition includes furnace closets or small equipment rooms.<br />
When the furnace is installed so that supply ducts carry air<br />
circulated by the furnace to areas outside the space containing<br />
the furnace, the return air must be handled by ducts<br />
which are sealed to the furnace casing and which terminate<br />
outside the space containing the furnace. This is especially<br />
important when the furnace is mounted on a platform in a<br />
confined space such as a closet or small equipment room.<br />
Even a small leak around the base of the unit at the platform<br />
or at the return air duct connection can cause a potentially<br />
dangerous negative pressure condition. Air for combustion<br />
and ventilation can be brought into the confined space either<br />
from inside the building or from outside.<br />
Air from Inside<br />
If the confined space that houses the furnace adjoins a<br />
space categorized as unconfined, air can be brought in by<br />
providing two permanent openings between the two<br />
spaces. Each opening must have a minimum free area of 1<br />
square inch (645 mm 2 ) per 1,000 Btu (.29 kW) per hour of<br />
total input rating of all gas−fired equipment in the confined<br />
space. Each opening must be at least 100 square inches<br />
(64516 mm 2 ). One opening shall be within 12 inches (305<br />
mm) of the top of the enclosure and one opening within 12<br />
inches (305 mm) of the bottom. See figure 4.<br />
EQUIPMENT IN CONFINED SPACE − ALL AIR FROM INSIDE<br />
ROOF TERMINATED<br />
EXHAUST PIPE<br />
SIDE WALL<br />
TERMINATED<br />
EXHAUST PIPE<br />
(ALTERNATE<br />
LOCATION)<br />
OPENINGS<br />
(To Adjacent<br />
Unconfined<br />
Space)<br />
NOTE − Each opening shall have a free area of at least one square<br />
inch per 1,000 Btu (645mm 2 per .29kW) per hour of the total input<br />
rating of all equipment in the enclosure, but not less than 100 square<br />
inches (64516mm. 2).<br />
FIGURE 4<br />
Air from Outside<br />
If air from outside is brought in for combustion and ventilation,<br />
the confined space shall be provided with two permanent<br />
openings. One opening shall be within 12" (305mm)<br />
of the top of the enclosure and one within 12" (305mm) of<br />
the bottom. These openings must communicate directly<br />
or by ducts with the outdoors or spaces (crawl or attic) that<br />
freely communicate with the outdoors or indirectly<br />
through vertical ducts. Each opening shall have a minimum<br />
free area of 1 square inch per 4,000 Btu (645mm 2<br />
per 1.17kW) per hour of total input rating of all equipment<br />
in the enclosure. When communicating with the outdoors<br />
through horizontal ducts, each opening shall have a minimum<br />
free area of 1 square inch per 2,000 Btu (645mm 2<br />
per .59kW) per total input rating of all equipment in the enclosure<br />
(See figure 5).<br />
Page 7
EQUIPMENT IN CONFINED SPACE − ALL AIR FROM OUTSIDE<br />
(Inlet Air from Crawl Space and Outlet Air to Ventilated Attic)<br />
EQUIPMENT IN CONFINED SPACE − ALL AIR FROM OUTSIDE<br />
(All Air Through Ventilated Attic)<br />
ROOF TERMINATED<br />
EXHAUST PIPE<br />
VENTILATION LOUVERS<br />
(Each end of attic)<br />
ROOF TERMINATED<br />
EXHAUST PIPE<br />
VENTILATION LOUVERS<br />
(Each end of attic)<br />
OUTLET<br />
AIR<br />
OUTLET<br />
AIR<br />
SIDE WALL<br />
TERMINATED<br />
EXHAUST PIPE<br />
(ALTERNATE<br />
LOCATION)<br />
INLET<br />
AIR<br />
VENTILATION<br />
LOUVERS<br />
(For unheated<br />
crawl space)<br />
SIDE WALL<br />
TERMINATED<br />
EXHAUST PIPE<br />
(ALTERNATE<br />
LOCATION)<br />
INLET AIR<br />
(Ends 12" above<br />
bottom)<br />
NOTE−The inlet and outlet air openings shall each have a free area<br />
of at least one square inch per 4,000 Btu (645mm 2 per 1.17kW) per<br />
hour of the total input rating of all equipment in the enclosure.<br />
FIGURE 5<br />
NOTE−The inlet and outlet air openings shall each have a free area of<br />
at least one square inch per 4,000 Btu (645mm 2 per 1.17kW) per<br />
hour of the total input rating of all equipment in the enclosure.<br />
FIGURE 6<br />
EQUIPMENT IN CONFINED SPACE −<br />
ALL AIR FROM OUTSIDE<br />
ROOF TERMINATED<br />
EXHAUST PIPE<br />
If air from outside is brought in for combustion and ventilation,<br />
the confined space must have two permanent openings.<br />
One opening shall be within 12 inches (305 mm) of<br />
the top of the enclosure and one opening within 12 inches<br />
(305 mm) of the bottom. These openings must communicate<br />
directly or by ducts with the outdoors or spaces (crawl<br />
or attic) that freely communicate with the outdoors or indirectly<br />
through vertical ducts. Each opening shall have a<br />
minimum free area of 1 square inch (645 mm 2 ) per 4,000<br />
Btu (1.17 kW) per hour of total input rating of all equipment<br />
in the enclosure. See figures 5 and 6. When communicating<br />
with the outdoors through horizontal ducts, each opening<br />
shall have a minimum free area of 1 square inch (645<br />
mm 2 ) per 2,000 Btu (.56 kW) per total input rating of all<br />
equipment in the enclosure. See figure 7.<br />
When ducts are used, they shall be of the same cross−sectional<br />
area as the free area of the openings to which they<br />
connect. The minimum dimension of rectangular air ducts<br />
shall be no less than 3 inches (75 mm). In calculating free<br />
area, the blocking effect of louvers, grilles, or screens<br />
must be considered. If the design and free area of protective<br />
covering is not known for calculating the size opening<br />
required, it may be assumed that wood louvers will have<br />
20 to 25 percent free area and metal louvers and grilles<br />
will have 60 to 75 percent free area. Louvers and grilles<br />
must be fixed in the open position or interlocked with the<br />
equipment so that they are opened automatically during<br />
equipment operation.<br />
SIDE WALL<br />
TERMINATED<br />
EXHAUST PIPE<br />
(ALTERNATE<br />
LOCATION)<br />
FIGURE 7<br />
OUTLET AIR<br />
INLET AIR<br />
NOTE−Each air duct opening shall have a free area of at least one<br />
square inch per 2,000 Btu (645mm 2 per .59kW) per hour of the total<br />
input rating of all equipment in the enclosure. If the equipment room<br />
is located against an outside wall and the air openings communicate<br />
directly with the outdoors, each opening shall have a free area<br />
of at least 1 square inch per 4,000 Btu (645mm 2 per 1.17kW) per<br />
hour of the total input rating of all other equipment in the enclosure.<br />
Shipping Bolt Removal<br />
NOTE − The <strong>ML193DF</strong>09048C is equipped with a 1/2 hp<br />
blower motor which has three flexible legs and one rigid<br />
leg. The rigid leg is equipped with a shipping bolt and a flat<br />
white plastic washer (rather than the rubber mounting<br />
grommet used with a flexible mounting leg). See figure 8.<br />
The bolt and washer must be removed before the furnace<br />
is placed into operation. After the bolt and washer<br />
have been removed, the rigid leg will not touch the blower<br />
housing.<br />
Page 8
<strong>ML193DF</strong>09048C BLOWER MOTOR<br />
RIGID LEG<br />
remove shipping bolt and washer<br />
FIGURE 8<br />
<strong>Installation</strong> − Setting Equipment<br />
Allow for clearances to combustible materials as indicated<br />
on the unit nameplate. Minimum clearances for closet or alcove<br />
installations are shown in figure 11.<br />
WARNING<br />
Blower access panel must be securely in place when<br />
blower and burners are operating. <strong>Gas</strong> fumes, which<br />
could contain carbon monoxide, can be drawn into<br />
living space resulting in personal injury or death.<br />
WARNING<br />
SETTING EQUIPMENT<br />
Do not install the furnace on its front, back or in the<br />
horizontal position. See figure 10. Do not connect the<br />
return air ducts to the back of the furnace. Doing so<br />
will adversely affect the operation of the safety control<br />
devices, which could result in personal injury or<br />
death.<br />
AIR FLOW<br />
AIR FLOW<br />
AIR FLOW<br />
Select a location that allows for the required clearances<br />
that are listed on the unit nameplate. Also consider gas<br />
supply connections, electrical supply, vent connection,<br />
condensate trap and drain connections, and installation<br />
and service clearances [24 inches (610 mm) at unit<br />
front]. The unit must be level from side to side. Unit may<br />
be positioned from level to 1/2" toward the front to aid in<br />
draining. See figure 9.<br />
FRONT VIEW SIDE VIEW<br />
SIDE VIEW<br />
Unit must be level side−to−side. Unit may be positioned<br />
from level to 1/2" toward the front to aid in draining.<br />
FIGURE 9<br />
1/2"<br />
max.<br />
Front<br />
Back<br />
Horizontal<br />
NOTE − Do not install the furnace on its front, back or in the horizontal position<br />
FIGURE 10<br />
Page 9
WARNING<br />
Improper installation of the furnace can result in personal<br />
injury or death. Combustion and flue products<br />
must never be allowed to enter the return air system<br />
or air in the living space. Use sheet metal screws and<br />
joint tape to seal return air system to furnace.<br />
In platform installations with furnace return, the furnace<br />
should be sealed airtight to the return air plenum.<br />
A door must never be used as a portion of the<br />
return air duct system. The base must provide a<br />
stable support and an airtight seal to the furnace. Allow<br />
absolutely no sagging, cracks, gaps, etc.<br />
For no reason should return and supply air duct systems<br />
ever be connected to or from other heating devices<br />
such as a fireplace or stove, etc. Fire, explosion,<br />
carbon monoxide poisoning, personal injury<br />
and/or property damage could result.<br />
The unit may be installed three ways in downflow applications:<br />
on non−combustible flooring, on combustible flooring<br />
using an additive base, or on a reverse−flow cooling coil<br />
cabinet. Do not drag the unit across the floor in the<br />
downflow position. Floor and furnace flange damage<br />
will result.<br />
Refer to figure 11 for clearances in downflow applications.<br />
Downflow Application <strong>Installation</strong> Clearances<br />
Top<br />
<strong>Installation</strong> on Non−Combustible Flooring Figure 12<br />
1 − Cut floor opening keeping in mind clearances listed on<br />
unit rating plate. Also keep in mind gas supply connections,<br />
electrical supply, flue and air intake connections<br />
and sufficient installation and servicing clearances.<br />
See table 1 for correct floor opening size.<br />
2 − Flange warm air plenum and lower the plenum into the<br />
opening.<br />
3 − Set the unit over the plenum and seal the plenum to<br />
the unit.<br />
4 − Ensure that the seal is adequate.<br />
TABLE 1<br />
NON−COMBUSTIBLE FLOOR OPENING SIZE<br />
Front to Rear Side to Side<br />
Cabinet Width<br />
in. mm in. mm<br />
B Cabinet (17.5") 19 − 3/4 502 16 − 5/8 422<br />
C Cabinet (21") 19 − 3/4 502 20−1/8 511<br />
NOTE − Floor opening dimensions listed are 1/4 inch (6 mm) larger than<br />
the unit opening. See dimension drawing on page 2.<br />
FURNACE<br />
Left Side<br />
Right Side<br />
PROPERLY<br />
SIZED FLOOR<br />
OPENING<br />
SUPPLY AIR<br />
PLENUM<br />
Bottom<br />
Top 0<br />
*Front 0<br />
Back 0<br />
Sides 0†<br />
Vent 0<br />
Floor<br />
NC‡<br />
*Front clearance in alcove installation must be 24 in. (610 mm).<br />
Maintain a minimum of 24 in. (610 mm) for front service access.<br />
†Allow proper clearances to accommodate condensate trap and<br />
vent pipe installation.<br />
‡The furnace may be installed on a combustible wood floor if an optional<br />
additive base is installed between the furnace and the combustible<br />
floor.<br />
FIGURE 11<br />
FIGURE 12<br />
<strong>Installation</strong> on Combustible Flooring Figure 13<br />
1 − When unit is installed on a combustible floor, a downflow<br />
combustible flooring base must be installed between<br />
the furnace and the floor. The base must be ordered<br />
separately. See table 2 for opening size to cut in<br />
floor.<br />
CAUTION<br />
The furnace and combustible flooring base shall not<br />
be installed directly on carpeting, tile, or other combustible<br />
material other than wood flooring.<br />
Page 10
TABLE 2<br />
COMBUSTIBLE FLOORING BASE OPENING SIZE<br />
Cabinet<br />
Width<br />
Catalog<br />
Number<br />
Front to Rear<br />
Side to Side<br />
in. mm in. mm<br />
FURNACE<br />
B Cabinet<br />
(17.5")<br />
11M60 22 559 18 − 3/4 476<br />
C Cabinet<br />
(21")<br />
11M61 22 559 22 − 3/4 578<br />
PROPERLY<br />
SIZED FLOOR<br />
OPENING<br />
COOLING COIL<br />
PLENUM<br />
FURNACE<br />
SUPPLY AIR<br />
PLENUM<br />
PROPERLY<br />
SIZED FLOOR<br />
OPENING<br />
FIGURE 13<br />
COMBUSTIBLE<br />
FLOORING BASE<br />
2 − After opening is cut, set the combustible flooring base<br />
into opening.<br />
3 − Check fiberglass strips on the combustible flooring<br />
base to make sure they are properly glued and positioned.<br />
4 − Lower supply air plenum into the combustible flooring<br />
base until plenum flanges seal against fiberglass<br />
strips.<br />
NOTE − Be careful not to damage fiberglass strips.<br />
Check for a tight seal.<br />
5 − Set the furnace over the plenum.<br />
6 − Ensure that the seal between the furnace and plenum<br />
is adequate.<br />
<strong>Installation</strong> on Cooling Coil Cabinet Figure 14<br />
NOTE − Downflow combustible flooring kit is not used..<br />
1 − Refer to reverse−flow coil installation instructions for<br />
correctly sized opening in floor and installation of cabinet.<br />
2 − When cooling cabinet is in place, set and secure the<br />
furnace according to the instructions that are provided<br />
with the cooling coil. Secure the furnace to the cabinet.<br />
3 − Seal the cabinet and check for air leaks.<br />
FIGURE 14<br />
Return Air Opening −− Downflow Units<br />
Return air may be brought in only through the top opening<br />
of a furnace installed in the downflow position. The following<br />
steps should be taken when installing plenum:<br />
1 − Bottom edge of plenum should be flanged with a<br />
hemmed edge (See figure 15 or 16).<br />
2 − Sealing strips should be used to ensure an airtight seal<br />
between the cabinet and the plenum.<br />
3 − In all cases, plenum should be secured to top of furnace<br />
using sheet metal screws.<br />
4 − Make certain that an adequate seal is made.<br />
PLENUM<br />
(Field Provided)<br />
SEALING STRIP<br />
(Field Provided)<br />
PLENUM<br />
(Field Provided)<br />
SECURE FROM<br />
INSIDE CABINET<br />
ÉÉÉÉ<br />
Side View<br />
FIGURE 15<br />
Side View<br />
ÉÉÉÉ<br />
FIGURE 16<br />
SECURE FROM<br />
OUTSIDE CABINET<br />
CABINET<br />
SIDE PANEL<br />
SEALING STRIP<br />
(Field Provided)<br />
CABINET<br />
SIDE PANEL<br />
Page 11
Filters<br />
This unit is not equipped with a filter or rack. A field−provided<br />
filter is required for the unit to operate properly. Table<br />
3 lists recommended filter size.<br />
A filter must be in place whenever the unit is operating.<br />
TABLE 3<br />
<strong>Furnace</strong><br />
Filter Size<br />
Cabinet Width<br />
17−1/2"<br />
21"<br />
Duct System<br />
16 x 25 x 1 (1)<br />
Use industry-approved standards to size and install the<br />
supply and return air duct system. Refer to ACCA <strong>Manual</strong><br />
D. This will result in a quiet and low-static system that has<br />
uniform air distribution.<br />
NOTE − This furnace is not certified for operation in heating<br />
mode (indoor blower operating at selected heating speed)<br />
with an external static pressure which exceeds 0.5 inches<br />
w.c. Operation at these conditions may result in improper<br />
limit operation.<br />
Supply Air Plenum<br />
If the furnace is installed without a cooling coil, a removable<br />
access panel should be installed in the supply air duct. The<br />
access panel should be large enough to permit inspection<br />
of the heat exchanger. The furnace access panel must always<br />
be in place when the furnace is operating and it must<br />
not allow leaks into the supply air duct system.<br />
Return Air Plenum<br />
NOTE − Return air must not be drawn from a room<br />
where this furnace, or any other gas−fueled appliance<br />
(i.e., water heater), or carbon monoxide−producing device<br />
(i.e., wood fireplace) is installed.<br />
When return air is drawn from a room, a negative pressure<br />
is created in the room. If a gas appliance is operating<br />
in a room with negative pressure, the flue products can<br />
be pulled back down the vent pipe and into the room. This<br />
reverse flow of the flue gas may result in incomplete combustion<br />
and the formation of carbon monoxide gas. This<br />
raw gas or toxic fumes might then be distributed throughout<br />
the house by the furnace duct system.<br />
Use fiberglass sealing strips, caulking, or equivalent sealing<br />
method between the plenum and the furnace cabinet to<br />
ensure a tight seal. If a filter is installed, size the return air<br />
duct to fit the filter frame.<br />
Pipe & Fittings Specifications<br />
All pipe, fittings, primer and solvent cement must conform<br />
with American National Standard Institute and the American<br />
Society for Testing and Materials (ANSI/ASTM) standards.<br />
The solvent shall be free flowing and contain no<br />
lumps, undissolved particles or any foreign matter that adversely<br />
affects the joint strength or chemical resistance of<br />
the cement. The cement shall show no gelation, stratification,<br />
or separation that cannot be removed by stirring. Refer<br />
to the table 4 below for approved piping and fitting materials.<br />
CAUTION<br />
Solvent cements for plastic pipe are flammable liquids<br />
and should be kept away from all sources of<br />
ignition. Do not use excessive amounts of solvent<br />
cement when making joints. Good ventilation should<br />
be maintained to reduce fire hazard and to minimize<br />
breathing of solvent vapors. Avoid contact of cement<br />
with skin and eyes.<br />
TABLE 4<br />
PIPING AND FITTINGS SPECIFICATIONS<br />
Schedule 40 PVC (Pipe)<br />
Schedule 40 PVC (Cellular Core Pipe)<br />
Schedule 40 PVC (Fittings)<br />
Schedule 40 CPVC (Pipe)<br />
Schedule 40 CPVC (Fittings)<br />
SDR−21 PVC or SDR−26 PVC (Pipe)<br />
SDR−21 CPVC or SDR−26 CPVC (Pipe)<br />
Schedule 40 ABS Cellular Core DWV (Pipe)<br />
Schedule 40 ABS (Pipe)<br />
Schedule 40 ABS (Fittings)<br />
ABS−DWV (Drain Waste & Vent)<br />
(Pipe & Fittings)<br />
PVC−DWV (Drain Waste & Vent)<br />
Pipe & Fittings)<br />
PRIMER & SOLVENT CEMENT<br />
PVC & CPVC Primer<br />
PVC Solvent Cement<br />
CPVC Solvent Cement<br />
ABS Solvent Cement<br />
PVC/CPVC/ABS All Purpose Cement For<br />
Fittings & Pipe of the same material<br />
ABS to PVC or CPVC Transition Solvent<br />
Cement<br />
CANADA PIPE & FITTING & SOLVENT<br />
CEMENT<br />
PVC & CPVC Pipe and Fittings<br />
PVC & CPVC Solvent Cement<br />
ABS to PVC or CPVC Transition Cement<br />
D1785<br />
F891<br />
D2466<br />
F441<br />
F438<br />
D2241<br />
F442<br />
F628<br />
D1527<br />
D2468<br />
D2661<br />
D2665<br />
ASTM<br />
SPECIFICATION<br />
F656<br />
D2564<br />
F493<br />
D2235<br />
D2564, D2235, F493<br />
D3138<br />
MARKING<br />
ULCS636<br />
Page 12
IMPORTANT<br />
<strong>ML193DF</strong> exhaust and intake connections are made<br />
of PVC. Use PVC primer and solvent cement when<br />
using PVC vent pipe. When using ABS vent pipe, use<br />
transitional solvent cement to make connections to<br />
the PVC fittings in the unit.<br />
Use PVC primer and solvent cement or ABS solvent cement<br />
meeting ASTM specifications, refer to Table 4. As an alternate,<br />
use all purpose cement, to bond ABS, PVC, or CPVC<br />
pipe when using fittings and pipe made of the same materials.<br />
Use transition solvent cement when bonding ABS to either<br />
PVC or CPVC.<br />
ML193<br />
UNIT<br />
VENT<br />
PIPE<br />
DIA.<br />
(in.)<br />
Outdoor<br />
Exhaust<br />
Accelerator<br />
(Dia. X<br />
Length)<br />
Outdoor<br />
Exhaust<br />
Accelerator<br />
(Dia. X<br />
Length)<br />
1−1/2" X 12" 2" X 12"<br />
Low temperature solvent cement is recommended during<br />
cooler weather. Metal or plastic strapping may be used for<br />
vent pipe hangers. Uniformly apply a liberal coat of PVC<br />
primer for PVC or use a clean dry cloth for ABS to clean inside<br />
socket surface of fitting and male end of pipe to depth<br />
of fitting socket.<br />
Canadian Applications Only − Pipe, fittings, primer<br />
and solvent cement used to vent (exhaust) this appliance<br />
must be certified to ULC S636 and supplied by a<br />
single manufacturer as part of an approved vent (exhaust)<br />
system. In addition, the first three feet of vent<br />
pipe from the furnace flue collar must be accessible for<br />
inspection.<br />
TABLE 5<br />
OUTDOOR TERMINATION KITS USAGE<br />
STANDARD<br />
2" Wall Plate<br />
Kit<br />
22G44<br />
or 30G28<br />
3" Wall Plate<br />
Kit<br />
44J40<br />
or 81J20<br />
2" Wall<br />
Ring Kit<br />
15F74<br />
Flush-<br />
Mount<br />
Kit<br />
51W11**<br />
1−1/2"<br />
Concentric<br />
Kit<br />
71M80<br />
or<br />
44W92<br />
2 YES YES YES* YES YES YES<br />
CONCENTRIC<br />
2"<br />
Concentric<br />
Kit<br />
69M29<br />
or<br />
44W92<br />
3"<br />
Concentric<br />
Kit<br />
60L46<br />
or 44W93<br />
045<br />
2−1/2 YES YES YES* YES YES YES<br />
3 YES YES YES* YES YES YES<br />
2 YES YES YES* YES YES YES<br />
070<br />
2−1/2 YES YES YES* YES YES YES<br />
3 YES YES YES* YES YES YES<br />
2 YES YES YES YES YES YES<br />
090<br />
2−1/2 YES YES YES YES YES YES<br />
3 YES YES YES YES YES YES<br />
110 3 YES YES YES YES YES YES<br />
*Requires field−provided and installed 1−1/2" exhaust accelerator.<br />
** Kit 51W11 is provided with a 1−1/2" accelerator which must be used for all <strong>ML193DF</strong>−045, −070 and −090 installations.<br />
Termination kits 44W92, 44W93, 30G28 and 81J20 approved for use in Canadian installations to meet CSAB149.<br />
The 44W92 Concentric kit is provided with a 1−1/2" accelerator which must be installed on the exhaust outlet when this kit is used with the <strong>ML193DF</strong>045P36B and<br />
<strong>ML193DF</strong>070P36B furnaces.<br />
Page 13
Joint Cementing Procedure<br />
All cementing of joints should be done according to the<br />
specifications outlined in ASTM D 2855.<br />
NOTE − A sheet metal screw may be used to secure<br />
the intake pipe to the connector, if desired. Use a drill<br />
or self tapping screw to make a pilot hole.<br />
Venting Practices<br />
Piping Suspension Guidelines<br />
SCHEDULE 40<br />
PVC − 5’<br />
all other pipe* − 3’<br />
DANGER<br />
DANGER OF EXPLOSION!<br />
Fumes from PVC glue may ignite during system<br />
check. Allow fumes to dissipate for at least 5 minutes<br />
before placing unit into operation.<br />
1 − Measure and cut vent pipe to desired length.<br />
2 − Debur and chamfer end of pipe, removing any ridges<br />
or rough edges. If end is not chamfered, edge of pipe<br />
may remove cement from fitting socket and result in a<br />
leaking joint.<br />
* See table 4 for allowable pipe.<br />
NOTE − Isolate piping at the point where it exits the outside wall or<br />
roof in order to prevent transmission of vibration to the structure.<br />
inside<br />
Wall Thickness Guidelines<br />
24" maximum<br />
3/4" minimum<br />
Wall<br />
outside<br />
3 − Clean and dry surfaces to be joined.<br />
4 − Test fit joint and mark depth of fitting on outside of pipe.<br />
5 − Uniformly apply a liberal coat of PVC primer for PVC or<br />
use a clean dry cloth for ABS to clean inside socket<br />
surface of fitting and male end of pipe to depth of fitting<br />
socket.<br />
6 − Promptly apply solvent cement to end of pipe and inside<br />
socket surface of fitting. Cement should be applied<br />
lightly but uniformly to inside of socket. Take<br />
care to keep excess cement out of socket. Apply second<br />
coat to end of pipe.<br />
NOTE − Time is critical at this stage. Do not allow primer<br />
to dry before applying cement.<br />
7 − Immediately after applying last coat of cement to pipe,<br />
and while both inside socket surface and end of pipe<br />
are wet with cement, forcefully insert end of pipe into<br />
socket until it bottoms out. Turn PVC pipe 1/4 turn during<br />
assembly (but not after pipe is fully inserted) to distribute<br />
cement evenly. DO NOT turn ABS or cellular<br />
core pipe.<br />
NOTE − Assembly should be completed within 20 seconds<br />
after last application of cement. Hammer blows<br />
should not be used when inserting pipe.<br />
8 − After assembly, wipe excess cement from pipe at end<br />
of fitting socket. A properly made joint will show a<br />
bead around its entire perimeter. Any gaps may indicate<br />
an improper assembly due to insufficient solvent.<br />
9 − Handle joints carefully until completely set.<br />
CHIMNEY<br />
OR GAS<br />
VENT<br />
(Check sizing<br />
for water<br />
heater only)<br />
FURNACE<br />
(Replaced<br />
by ML193)<br />
FIGURE 17<br />
REPLACING FURNACE THAT<br />
WAS PART OF A COMMON<br />
VENT SYSTEM<br />
WATER<br />
HEATER<br />
OPENINGS<br />
(To Adjacent<br />
Room)<br />
If an <strong>ML193DF</strong> furnace replaces a furnace which was commonly<br />
vented with another gas appliance, the size of the existing<br />
vent pipe for that gas appliance must be checked.<br />
Without the heat of the original furnace flue products, the<br />
existing vent pipe is probably oversized for the single water<br />
heater or other appliance. The vent should be checked for<br />
proper draw with the remaining appliance.<br />
FIGURE 18<br />
1 − In areas where piping penetrates joists or interior<br />
walls, hole must be large enough to allow clearance on<br />
all sides of pipe through center of hole using a hanger.<br />
Page 14
2 − When furnace is installed in a residence where unit is<br />
shut down for an extended period of time, such as a<br />
vacation home, make provisions for draining condensate<br />
collection trap and lines.<br />
Exhaust Piping (Figures 20 and 21)<br />
Route piping to outside of structure. Continue with installation<br />
following instructions given in piping termination section.<br />
Use the following steps to correctly size vent pipe diameter.<br />
1<br />
<strong>Furnace</strong> capacity?<br />
045, 070,<br />
090, 110<br />
or 135 btuh<br />
CAUTION<br />
Do not discharge exhaust into an existing stack or<br />
stack that also serves another gas appliance. If vertical<br />
discharge through an existing unused stack is required,<br />
insert PVC pipe inside the stack until the end<br />
is even with the top or outlet end of the metal stack.<br />
2<br />
Which termination?<br />
Standard or<br />
Concentric?<br />
See table 5<br />
CAUTION<br />
The exhaust vent pipe operates under positive pressure<br />
and must be completely sealed to prevent leakage<br />
of combustion products into the living space.<br />
3<br />
Which needs<br />
most elbows?<br />
Intake or<br />
exhaust<br />
Vent Piping Guidelines<br />
The <strong>ML193DF</strong> can be installed as either a Non−Direct<br />
Vent or a Direct Vent gas central furnace.<br />
NOTE − In Non-Direct Vent installations, combustion air is<br />
taken from indoors and flue gases are discharged outdoors.<br />
In Direct Vent installations, combustion air is taken from outdoors<br />
and flue gases are discharged outdoors.<br />
Intake and exhaust pipe sizing −− Size pipe according to<br />
tables 6 and 7. Table 6 lists the minimum vent pipe lengths<br />
permitted. Table 7 lists the maximum pipe lengths permitted.<br />
TABLE 6<br />
MINIMUM VENT PIPE LENGTHS<br />
<strong>ML193DF</strong><br />
MIN. VENT LENGTH*<br />
MODEL<br />
15 ft. or<br />
045, 070, 090, 110<br />
5 ft plus 2 elbows or<br />
10 ft plus 1 elbow<br />
*Any approved termination may be added to the minimum length listed.<br />
Regardless of the diameter of pipe used, the standard roof<br />
and wall terminations described in section Exhaust Piping<br />
Terminations should be used. Exhaust vent termination<br />
pipe is sized to optimize the velocity of the exhaust gas as<br />
it exits the termination. Refer to table 8.<br />
In some applications which permit the use of several different<br />
sizes of vent pipe, a combination vent pipe may be<br />
used. Contact <strong>Lennox</strong>’ Application Department for assistance<br />
in sizing vent pipe in these applications.<br />
IMPORTANT<br />
Do not use screens or perforated metal in exhaust or<br />
intake terminations. Doing so will cause freeze−ups<br />
and may block the terminations.<br />
4<br />
5<br />
6<br />
7<br />
How many?<br />
Desired pipe size?<br />
What is the altitude?<br />
Use table 7 to find<br />
max intake or exhaust<br />
pipe length.<br />
FIGURE 19<br />
2", 2−1/2"<br />
or 3"<br />
NOTE − It is acceptable to use any pipe size which fits within<br />
the guidelines allowed in table 7.<br />
NOTE − All horizontal runs of exhaust pipe must slope back<br />
toward unit. A minimum of 1/4" (6mm) drop for each 12"<br />
(305mm) of horizontal run is mandatory for drainage.<br />
NOTE − Exhaust pipe MUST be glued to furnace exhaust<br />
fittings.<br />
NOTE − Exhaust piping should be checked carefully to<br />
make sure there are no sags or low spots.<br />
Page 15
TABLE 7<br />
Maximum Allowable Intake or Exhaust Vent Length in Feet<br />
*Size intake and exhaust pipe length separately. Values in table are for Intake OR Exhaust, not combined total. Both Intake and Exhaust must be same pipe size.<br />
Number<br />
Of 90°<br />
Elbows<br />
Used<br />
Standard Termination at Elevation 0 − 10,000 ft.<br />
2" Pipe 2−1/2" Pipe 3" Pipe<br />
Model Model Model<br />
045 070 090 110 045 070 090 110 045 070 090 110<br />
1 61 46 24<br />
100 80 43<br />
127 127 108 108<br />
2 56 41 19 95 75 38 122 122 103 103<br />
3 51 36 14 90 70 33 117 117 98 98<br />
4 46 31<br />
85 65 28 112 112 93 93<br />
5 41 26 80 60 23 107 107 88 88<br />
6 36 21<br />
n/a<br />
75 55 18<br />
n/a<br />
102 102 83 83<br />
7 31 16 n/a<br />
70 50 13 97 97 78 78<br />
8 26 11 65 45<br />
92 92 73 73<br />
9 21<br />
60 40 n/a<br />
87 87 68 68<br />
n/a<br />
10 16 55 35 82 82 63 63<br />
Number<br />
Of 90°<br />
Elbows<br />
Used<br />
Concentric Termination Elevation 0 − 10,000 ft.<br />
2" Pipe 2−1/2" Pipe 3" Pipe<br />
Model Model Model<br />
045 070 090 110 045 070 090 110 045 070 090 110<br />
1 53 38 22<br />
90 70 39<br />
111 111 104 104<br />
2 48 33 17 85 65 34 106 106 99 99<br />
3 43 28 12 80 60 29 101 101 94 94<br />
4 38 23<br />
5 33 18 70 50 19 91 91 84 84<br />
6 28 13<br />
n/a<br />
65 45 14<br />
n/a<br />
86 86 79 79<br />
7 23<br />
n/a<br />
75 55 24 96 96 89 89<br />
60 40<br />
81 81 74 74<br />
8 18 55 35 76 76 69 69<br />
9 13<br />
n/a<br />
50 30<br />
n/a<br />
71 71 64 64<br />
10 n/a 45 25 66 66 59 59<br />
Page 16
TYPICAL EXHAUST PIPE CONNECTIONS<br />
Pipe size determined in table 7.<br />
2”<br />
2”<br />
2”<br />
or<br />
2”<br />
2”<br />
3”<br />
TRANSITION<br />
*2”<br />
DO NOT transition from smaller<br />
to larger pipe size in horizontal<br />
runs of exhaust pipe.<br />
INTAKE<br />
EXHAUST<br />
TOP VIEW<br />
* When transitioning up in pipe size, use the shortest length of 2” PVC pipe possible.<br />
NOTE − Exhaust pipe and intake pipe must be the same diameter.<br />
FIGURE 20<br />
TYPICAL INTAKE PIPE CONNECTIONS<br />
Pipe size determined in table 7.<br />
2”<br />
2”<br />
2”<br />
or<br />
2”<br />
2”<br />
TRANSITION<br />
3”<br />
TRANSITION<br />
*2”<br />
*2”<br />
3”<br />
*2”<br />
INTAKE<br />
EXHAUST<br />
TOP VIEW<br />
* When transitioning up in pipe size, use the shortest length of 2” PVC pipe possible.<br />
NOTE − Intake pipe and exhaust pipe must be the same diameter.<br />
FIGURE 21<br />
Page 17
Intake Piping<br />
The <strong>ML193DF</strong> furnace may be installed in either direct<br />
vent or non−direct vent applications. In non−direct vent<br />
applications, when intake air will be drawn into the furnace<br />
from the surrounding space, the indoor air quality must be<br />
considered. Guidelines listed in Combustion, Dilution and<br />
Ventilation Air section must be followed.<br />
Follow the next two steps when installing the unit in Direct<br />
Vent applications, where combustion air is taken from<br />
outdoors and flue gases are discharged outdoors. The<br />
provided air intake screen must not be used in direct<br />
vent applications (outdoors).<br />
1 − Use cement to secure the intake pipe to the inlet air<br />
connector.<br />
2 − Route piping to outside of structure. Continue with<br />
installation following instructions given in general<br />
guide lines for piping terminations and intake and exhaust<br />
piping terminations for direct vent sections. Refer<br />
to table 7 for pipe sizes.<br />
TYPICAL AIR INTAKE PIPE CONNECTIONS<br />
NON−DIRECT VENT APPLICATIONS<br />
FIGURE 22<br />
AIR<br />
INTAKE<br />
SCREEN<br />
(Provided)<br />
NOTE − Air intake screen and elbow may be rotated, so that<br />
screen may be positioned to face forward or to either side.<br />
Follow the next two steps when installing the unit in Non-<br />
Direct Vent applications where combustion air is taken<br />
from indoors and flue gases are discharged outdoors.<br />
1 − Use field−provided materials and the factory−provided<br />
air intake screen to route the intake piping as shown in<br />
figure 22. Maintain a minimum clearance of 3" (76mm)<br />
around the air intake opening. The air intake opening<br />
(with the protective screen) should always be directed<br />
forward, or sideways.<br />
2 − Use cement to secure the intake pipe to the connector,<br />
if desired.<br />
General Guidelines for Vent Terminations<br />
In Non-Direct Vent applications, combustion air is taken<br />
from indoors and the flue gases are discharged to the outdoors.<br />
The <strong>ML193DF</strong> is then classified as a non-direct<br />
vent, Category IV gas furnace.<br />
In Direct Vent applications, combustion air is taken from<br />
outdoors and the flue gases are discharged to the outdoors.<br />
The <strong>ML193DF</strong> is then classified as a direct vent,<br />
Category IV gas furnace.<br />
In both Non-Direct Vent and Direct Vent applications, the<br />
vent termination is limited by local building codes. In the<br />
absence of local codes, refer to the current National Fuel<br />
<strong>Gas</strong> Code ANSI Z223−1/NFPA 54 in U.S.A., and current<br />
CSA−B149 Natural <strong>Gas</strong> and Propane <strong>Installation</strong> Codes in<br />
Canada for details.<br />
Position termination according to location given in figure 23<br />
or 24. In addition, position termination so it is free from any<br />
obstructions and 12" above the average snow accumulation.<br />
At vent termination, care must be taken to maintain<br />
protective coatings over building materials (prolonged<br />
exposure to exhaust condensate can destroy protective<br />
coatings). It is recommended that the exhaust outlet not be<br />
located within 6 feet (1.8m) of a condensing unit because<br />
the condensate can damage the painted coating.<br />
NOTE − If winter design temperature is below 32°F (0°C),<br />
exhaust piping should be insulated with 1/2" (13mm), Armaflex<br />
or equivalent when run through unheated space.<br />
Do not leave any surface area of exhaust pipe open to outside<br />
air; exterior exhaust pipe should be insulated with<br />
1/2" (13mm) Armaflex or equivalent. In extreme cold climate<br />
areas, 3/4" (19mm) Armaflex or equivalent may be<br />
necessary. Insulation on outside runs of exhaust pipe<br />
must be painted or wrapped to protect insulation from deterioration.<br />
Exhaust pipe insulation may not be necessary<br />
in some specific applications.<br />
NOTE − During extremely cold temperatures, below<br />
approximately 20°F (6.7°C), units with long runs of vent<br />
pipe through unconditioned space, even when insulated,<br />
may form ice in the exhaust termination that prevents the<br />
unit from operating properly. Longer run times of at least 5<br />
minutes will alleviate most icing problems. Also, a heating<br />
cable may be installed on exhaust piping and termination<br />
to prevent freeze−ups. Heating cable installation kit is<br />
available from <strong>Lennox</strong>. See Condensate Piping section<br />
for part numbers.<br />
IMPORTANT<br />
Do not use screens or perforated metal in exhaust<br />
terminations. Doing so will cause freeze−ups and<br />
may block the terminations.<br />
IMPORTANT<br />
For Canadian <strong>Installation</strong>s Only:<br />
In accordance to CSA International B149 installation<br />
codes, the minimum allowed distance between the<br />
combustion air intake inlet and the exhaust outlet of<br />
other appliances shall not be less than 12 inches<br />
(305mm).<br />
Page 18
VENT TERMINATION CLEARANCES<br />
FOR NON−DIRECT VENT INSTALLATIONS IN THE USA AND CANADA<br />
INSIDE CORNER<br />
DETAIL<br />
G<br />
D<br />
A<br />
H<br />
E<br />
B<br />
L<br />
F<br />
C<br />
B<br />
Fixed<br />
Closed<br />
Operable<br />
B<br />
B<br />
Operable<br />
A<br />
B<br />
Fixed<br />
Closed<br />
J<br />
I<br />
M<br />
K<br />
A =<br />
VENT TERMINAL<br />
Clearance above grade, veranda,<br />
porch, deck or balcony<br />
AIR SUPPLY INLET<br />
AREA WHERE TERMINAL<br />
IS NOT PERMITTED<br />
US <strong>Installation</strong>s 1 Canadian <strong>Installation</strong>s 2<br />
12 inches (305mm) or 12 in. 305mm)<br />
above average snow accumulation.<br />
12 inches (305mm) or 12 in. 305mm)<br />
above average snow accumulation.<br />
B =<br />
C =<br />
D =<br />
E =<br />
F =<br />
G =<br />
H =<br />
I =<br />
J =<br />
K =<br />
L =<br />
M =<br />
Clearance to window or<br />
door that may be opened<br />
Clearance to permanently<br />
closed window<br />
Vertical clearance to ventilated soffit<br />
located above the terminal within a<br />
horizontal distance of 2 feet (mm)<br />
from the center line of the terminal<br />
Clearance to unventilated soffit<br />
Clearance to outside corner<br />
Clearance to inside corner<br />
Clearance to each side of center line extended<br />
above meter / regulator assembly<br />
Clearance to service regulator<br />
vent outlet<br />
Clearance to non−mechanical air<br />
supply inlet to building or the combustion<br />
air inlet to any other appliance<br />
Clearance to mechanical air supply<br />
inlet<br />
Clearance above paved sidewalk or<br />
paved driveway located on public property<br />
Clearance under veranda, porch,<br />
deck or balcony<br />
4 feet (1.2 m) below or to side of opening;<br />
1 foot (30 cm) above opening<br />
1 In accordance with the current ANSI Z223.1/NFPA 54 Natural Fuel <strong>Gas</strong> Code<br />
2 In accordance with the current CSA B149.1, Natural <strong>Gas</strong> and Propane <strong>Installation</strong> Code<br />
A vent shall not terminate directly above a sidewalk or paved driveway that is located<br />
between two single family dwellings and serves both dwellings.<br />
Permitted only if veranda, porch, deck or balcony is fully open on a minimum of two<br />
sides beneath the floor. <strong>Lennox</strong> recommends avoiding this location if possible.<br />
FIGURE 23<br />
Page 19<br />
* 12"<br />
* Equal to or greater than soffit depth.<br />
6 inches (152mm) for appliances 10,000 Btuh (3kw) and<br />
100,000 Btuh (30kw)<br />
* 12"<br />
* Equal to or greater than soffit depth. * Equal to or greater than soffit depth.<br />
* No minimum to outside corner * No minimum to outside corner<br />
* *<br />
* 3 feet (.9m) within a height 15 feet (4.5m)<br />
above the meter / regulator assembly<br />
3 feet (.9m) within a height 15 feet (4.5m)<br />
above the meter / regulator assembly<br />
* 3 feet (.9m)<br />
3 feet (.9m)<br />
4 feet (1.2 m) below or to side of opening;<br />
1 foot (30 cm) above opening<br />
3 feet (.9m) above if within 10 feet<br />
(3m) horizontally<br />
7 feet (2.1m)<br />
*12 inches (305mm)<br />
* Equal to or greater than soffit depth.<br />
6 inches (152mm) for appliances 10,000 Btuh (3kw) and<br />
100,000 Btuh (30kw)<br />
6 feet (1.8m)<br />
7 feet (2.1m)<br />
12 inches (305mm)<br />
*For clearances not specified in ANSI Z223.1/NFPA 54 or CSA B149.1,<br />
clearance will be in accordance with local installation codes and the requirements<br />
of the gas supplier and these installation instructions."
VENT TERMINATION CLEARANCES<br />
FOR DIRECT VENT INSTALLATIONS IN THE USA AND CANADA<br />
INSIDE CORNER<br />
DETAIL<br />
G<br />
D<br />
A<br />
H<br />
E<br />
B<br />
L<br />
F<br />
C<br />
B<br />
Fixed<br />
Closed<br />
Operable<br />
B<br />
B<br />
Operable<br />
A<br />
B<br />
Fixed<br />
Closed<br />
J<br />
I<br />
M<br />
K<br />
A =<br />
VENT TERMINAL<br />
Clearance above grade, veranda,<br />
porch, deck or balcony<br />
AIR SUPPLY INLET<br />
AREA WHERE TERMINAL<br />
IS NOT PERMITTED<br />
US <strong>Installation</strong>s 1 Canadian <strong>Installation</strong>s 2<br />
12 inches (305mm) or 12 in. 305mm)<br />
above average snow accumulation.<br />
12 inches (305mm) or 12 in. 305mm)<br />
above average snow accumulation.<br />
B =<br />
C =<br />
D =<br />
E =<br />
F =<br />
G =<br />
H =<br />
I =<br />
J =<br />
K =<br />
L =<br />
M =<br />
Clearance to window or<br />
door that may be opened<br />
Clearance to permanently<br />
closed window<br />
Vertical clearance to ventilated soffit<br />
located above the terminal within a<br />
horizontal distance of 2 feet (mm)<br />
from the center line of the terminal<br />
Clearance to unventilated soffit<br />
Clearance to outside corner<br />
Clearance to inside corner<br />
Clearance to each side of center line extended<br />
above meter / regulator assembly<br />
Clearance to service regulator<br />
vent outlet<br />
Clearance to non−mechanical air<br />
supply inlet to building or the combustion<br />
air inlet to any other appliance<br />
Clearance to mechanical air supply<br />
inlet<br />
Clearance above paved sidewalk or<br />
paved driveway located on public property<br />
Clearance under veranda, porch,<br />
deck or balcony<br />
6 inches (152mm) for appliances 10,000 Btuh (3kw) and 50,000 Btuh (15kw)<br />
* 12"<br />
*<br />
* 3 feet (.9m)<br />
6 inches (152mm) for appliances 10,000 Btuh (3kw) and 50,000 Btuh (15kw)<br />
3 feet (.9m) above if within 10 feet<br />
(3m) horizontally<br />
* 7 feet (2.1m)<br />
1 In accordance with the current ANSI Z223.1/NFPA 54 Natural Fuel <strong>Gas</strong> Code<br />
2 In accordance with the current CSA B149.1, Natural <strong>Gas</strong> and Propane <strong>Installation</strong> Code<br />
A vent shall not terminate directly above a sidewalk or paved driveway that is located<br />
between two single family dwellings and serves both dwellings.<br />
Permitted only if veranda, porch, deck or balcony is fully open on a minimum of two<br />
sides beneath the floor. <strong>Lennox</strong> recommends avoiding this location if possible.<br />
FIGURE 24<br />
Page 20<br />
6 inches (152mm) for appliances 10,000 Btuh (3kw) and<br />
100,000 Btuh (30kw)<br />
* 12"<br />
* Equal to or greater than soffit depth * Equal to or greater than soffit depth<br />
* Equal to or greater than soffit depth * Equal to or greater than soffit depth<br />
* No minimum to outside corner * No minimum to outside corner<br />
3 feet (.9m) within a height 15 feet (4.5m)<br />
above the meter / regulator assembly<br />
*12 inches (305mm)<br />
*<br />
3 feet (.9m) within a height 15 feet (4.5m)<br />
above the meter / regulator assembly<br />
3 feet (.9m)<br />
6 inches (152mm) for appliances 10,000 Btuh (3kw) and<br />
100,000 Btuh (30kw)<br />
6 feet (1.8m)<br />
7 feet (2.1m)<br />
12 inches (305mm)<br />
*For clearances not specified in ANSI Z223.1/NFPA 54 or CSA B149.1, clearance<br />
will be in accordance with local installation codes and the requirements<br />
of the gas supplier and these installation instructions."
Details of Intake and Exhaust Piping Terminations for<br />
Direct Vent <strong>Installation</strong>s<br />
NOTE − In Direct Vent installations, combustion air is taken<br />
from outdoors and flue gases are discharged to outdoors.<br />
NOTE − Flue gas may be slightly acidic and may adversely<br />
affect some building materials. If any vent termination is<br />
used and the flue gasses may impinge on the building material,<br />
a corrosion−resistant shield (minimum 24 inches<br />
square) should be used to protect the wall surface. If the<br />
optional tee is used, the protective shield is recommended.<br />
The shield should be constructed using wood, plastic,<br />
sheet metal or other suitable material. All seams, joints,<br />
cracks, etc. in the affected area should be sealed using an<br />
appropriate sealant. See figure 27.<br />
Intake and exhaust pipes may be routed either horizontally<br />
through an outside wall or vertically through the roof. In attic<br />
or closet installations, vertical termination through the roof<br />
is preferred. Figures 25 through 37 show typical terminations.<br />
1 − Exhaust and intake exits must be in same pressure<br />
zone. Do not exit one through the roof and one on the<br />
side. Also, do not exit the intake on one side and the<br />
exhaust on another side of the house or structure.<br />
2 − Intake and exhaust pipes should be placed as close<br />
together as possible at termination end (refer to illustrations).<br />
Maximum separation is 3" (76mm) on roof<br />
terminations and 6" (152mm) on side wall terminations.<br />
3 − On roof terminations, the intake piping should terminate<br />
straight down using two 90° elbows (See figure<br />
25).<br />
4 − Exhaust piping must terminate straight out or up as<br />
shown. A reducer may be required on the exhaust piping<br />
at the point where it exits the structure to improve<br />
the velocity of exhaust away from the intake piping.<br />
See table 8.<br />
TABLE 8<br />
EXHAUST PIPE TERMINATION SIZE REDUCTION<br />
ML193<br />
MODEL<br />
Exhaust Pipe Size<br />
*045 and *070 2" (51mm), 2−1/2" (64mm),<br />
Termination<br />
Pipe Size<br />
1−1/2" (38mm)<br />
*090 3" (76mm)<br />
2" (51mm)<br />
110 3" (76mm) 2" (51mm)<br />
*<strong>ML193DF</strong>−045, −070 and −090 units with the flush−mount termination<br />
must use the 1−1/2"accelerator supplied with the kit.<br />
5 − On field−supplied terminations for side wall exit, exhaust<br />
piping may extend a maximum of 12 inches<br />
(305mm) for 2" PVC and 20 inches (508mm) for 3"<br />
(76mm) PVC beyond the outside wall. Intake piping<br />
should be as short as possible. See figures 28 and 29.<br />
NOTE − Care must be taken to avoid recirculation of<br />
exhaust back into intake pipe.<br />
6 − On field supplied terminations, a minimum distance<br />
between the end of the exhaust pipe and the end of<br />
the intake pipe without a termination elbow is 8" and a<br />
minimum distance of 6" with a termination elbow. See<br />
figures 28 and 29.<br />
Inches(mm)<br />
12" (305mm) ABOVE<br />
AVERAGE SNOW<br />
ACCUMULATION<br />
3" (76mm) OR<br />
2" (51mm) PVC<br />
FURNACE<br />
INTAKE<br />
PIPE<br />
8" (203mm) MIN<br />
3"(76mm) MAX.<br />
FIGURE 25<br />
SIZE TERMINATION<br />
PIPE PER TABLE 8.<br />
UNCONDITIONED<br />
ATTIC SPACE<br />
1/2" (13mm) FOAM<br />
INSULATION IN<br />
UNCONDITIONED<br />
SPACE<br />
PROVIDE SUPPORT<br />
FOR INTAKE AND<br />
EXHAUST LINES<br />
DIRECT VENT ROOF TERMINATION KIT<br />
(15F75 or 44J41)<br />
2" EXTENSION FOR<br />
2" PVC PIPE<br />
1" EXTENSION FOR<br />
3" PVC PIPE<br />
4’’<br />
FURNACE<br />
EXHAUST<br />
PIPE<br />
GLUE EXHAUST<br />
END FLUSH INTO<br />
TERMINATION<br />
1−1/2" ACCELERATOR<br />
(all −070 and −090 units)<br />
FLUSH−MOUNT SIDE WALL TERMINATION KIT 51W11<br />
FIGURE 26<br />
7 − If intake and exhaust piping must be run up a side wall<br />
to position above snow accumulation or other obstructions,<br />
piping must be supported every 24"<br />
(610mm) as shown in figures 28 and 29. In addition,<br />
close coupled wall termination kits must be extended<br />
for use in this application. See figures 35 and 36.<br />
When exhaust and intake piping must be run up an<br />
outside wall, the exhaust piping must be terminated<br />
with pipe sized per table 8.The intake piping may be<br />
equipped with a 90° elbow turndown. Using turndown<br />
will add 5 feet (1.5m) to the equivalent length of the<br />
pipe.<br />
8 − A multiple furnace installation may use a group of up to<br />
four terminations assembled together horizontally, as<br />
shown in figure 32.<br />
Page 21
B<br />
D<br />
B<br />
D<br />
2<br />
A<br />
C<br />
1<br />
Intake<br />
A<br />
C<br />
Exhaust<br />
3<br />
Front View of<br />
Intake and Exhaust<br />
Intake<br />
Exhaust<br />
2<br />
B<br />
A<br />
E<br />
C<br />
D<br />
1<br />
12"<br />
A− Clearance above<br />
grade or average snow<br />
accumulation<br />
B−Horizontal<br />
separation between<br />
intake and exhaust<br />
C−Minimum from<br />
end of exhaust to<br />
inlet of intake<br />
TABLE 9<br />
2" (51mm)<br />
Vent Pipe<br />
3" (76mm)<br />
Vent Pipe<br />
12" (508MM) Min. 12" (508MM) Min.<br />
6" (152MM) Min.<br />
24" (610 MM) Max<br />
9" (227MM) Min.<br />
6" (152MM) Min.<br />
24" (610 MM) Max<br />
9" (227MM) Min.<br />
D−Exhaust pipe length<br />
E−Wall support distance<br />
from top of each pipe<br />
(intake/exhaust)<br />
12" (305MM) Min.<br />
16" (405 MM) Max.<br />
6" (152MM) Max.<br />
12" (305MM) Min.<br />
20" (508MM) Max.<br />
6" (152MM) Max.<br />
1 The exhaust termination tee should be connected to the 2" or 3" PVC flue pipe as shown in the illustration. Do<br />
not use an accelerator in applications that include an exhaust termination tee. The accelerator is not required.<br />
2 As required. Flue gas may be acidic and may adversely affect some building materials. If a side wall vent<br />
termination is used and flue gases will impinge on the building materials, a corrosion−resistant shield (24 inches<br />
square) should be used to protect the wall surface. If optional tee is used, the protective shield is recommended.<br />
The shield should be constructed using wood, sheet metal or other suitable material. All seams, joints,<br />
cracks, etc. in affected area, should be sealed using an appropriate sealant.<br />
3 Exhaust pipe 45° elbow can be rotated to the side away from the combustion air inlet to direct exhaust away<br />
from adjacent property. The exhaust must never be directed toward the combustion air inlet.<br />
FIGURE 27<br />
Page 22
FIELD SUPPLIED WALL TERMINATION OR<br />
(15F74) WALL RING TERMINATION KIT<br />
FIELD SUPPLIED WALL TERMINATION OR<br />
(15F74) WALL RING TERMINATION KIT<br />
With INTAKE ELBOW<br />
NOTE − FIELD PROVIDED<br />
REDUCER MAY BE<br />
REQUIRED TO ADAPT<br />
LARGER VENT PIPE SIZE<br />
TO TERMINATION<br />
1/2" (13mm) ARMAFLEX<br />
INSULATION IN UN-<br />
CONDITIONED SPACE<br />
NOTE − FIELD PROVIDED<br />
REDUCER MAY BE<br />
REQUIRED TO ADAPT<br />
LARGER VENT PIPE SIZE<br />
TO TERMINATION<br />
1/2" (13mm) ARMAFLEX<br />
INSULATION IN UN-<br />
CONDITIONED SPACE<br />
SIZE TERMINATION<br />
PER TABLE 8<br />
SIZE TERMINATION<br />
PER TABLE 8<br />
D<br />
D<br />
C<br />
A<br />
B<br />
STRAIGHT<br />
APPPLICATION<br />
C<br />
A<br />
B<br />
STRAIGHT<br />
APPPLICATION<br />
1/2" (13mm) ARMAFLEX INSULATION<br />
IN UNCONDITIONED SPACE<br />
1/2" (13mm) ARMAFLEX INSULATION<br />
IN UNCONDITIONED SPACE<br />
* WALL<br />
SUPPORT<br />
E<br />
D<br />
B<br />
* WALL<br />
SUPPORT<br />
E<br />
B<br />
D<br />
C<br />
A<br />
EXTENDED<br />
APPLICATION<br />
C<br />
A<br />
EXTENDED<br />
APPLICATION<br />
See venting table 7 for maximum venting lengths with this<br />
arrangement.<br />
* Use wall support every 24" (610 mm). Use two wall supports if<br />
extension is greater than 24" (610 mm) but less than 48" (1219 mm).<br />
NOTE − One wall support must be 6" (152 mm) from top of each pipe<br />
(intake and exhaust)<br />
A−Minimum clearance<br />
above grade or average<br />
snow accumulation<br />
B−Maximum horizontal<br />
separation between<br />
intake and exhaust<br />
C−Minimum from<br />
end of exhaust to<br />
inlet of intake<br />
D−Maximum exhaust<br />
pipe length<br />
E−Maximum wall support<br />
distance from top of each<br />
pipe (intake/exhaust)<br />
2" (51mm)<br />
Vent Pipe<br />
FIGURE 28<br />
3" (76mm)<br />
Vent Pipe<br />
12" (508MM) 12" (508MM)<br />
6" (152MM) 6" (152MM)<br />
8" (203MM) 8" (203MM)<br />
12" (305MM) 20" (508MM)<br />
6" (152MM) 6" (152MM)<br />
See venting table 7 for maximum venting lengths with this<br />
arrangement.<br />
* Use wall support every 24" (610 mm). Use two wall supports if<br />
extension is greater than 24" (610 mm) but less than 48" (1219 mm).<br />
NOTE − One wall support must be 6" (152 mm) from top of each pipe<br />
(intake and exhaust)<br />
A−Minimum clearance<br />
above grade or average<br />
snow accumulation<br />
B−Maximum horizontal<br />
separation between<br />
intake and exhaust<br />
C−Minimum from<br />
end of exhaust to<br />
inlet of intake<br />
D−Maximum exhaust<br />
pipe length<br />
E−Maximum wall support<br />
distance from top of each<br />
pipe (intake/exhaust)<br />
2" (51mm)<br />
Vent Pipe<br />
FIGURE 29<br />
3" (76mm)<br />
Vent Pipe<br />
12" (508MM) 12" (508MM)<br />
6" (152MM) 6" (152MM)<br />
6" (152MM)<br />
6" (152MM)<br />
12" (305MM) 20" (508MM)<br />
6" (152MM) 6" (152MM)<br />
Page 23
12” (305mm)<br />
Minimum<br />
Above Average<br />
Snow<br />
Accumulation<br />
INTAKE<br />
1−1/2" (38mm) accelerator<br />
provided on 71M80 & 44W92<br />
kits for <strong>ML193DF</strong>045P36B− &<br />
070P36B<br />
FLASHING<br />
(Not Furnished)<br />
Front View<br />
INTAKE<br />
AIR<br />
Top View<br />
EXHAUST VENT<br />
SIZE<br />
TERMINATION<br />
PIPE PER<br />
TABLE 8.<br />
CLAMP<br />
SHEET METAL STRAP<br />
(Clamp and sheet metal strap<br />
must be field installed to support<br />
the weight of the termination kit.)<br />
FIELD−PROVIDED<br />
REDUCER MAY BE REQUIRED<br />
TO ADAPT LARGER VENT<br />
PIPE SIZE TO TERMINATION<br />
1/2" (13mm) Foam Insulation<br />
in Unconditioned Space<br />
FIELD−PROVIDED<br />
REDUCER MAY<br />
BE REQUIRED TO<br />
ADAPT LARGER<br />
VENT PIPE SIZE<br />
TO TERMINATION<br />
EXHAUST VENT<br />
INTAKE AIR<br />
6 (152mm) MIN.<br />
DIRECT VENT CONCENTRIC ROOFTOP TERMINATION<br />
71M80, 69M29 or 60L46 (US)<br />
41W92 or 41W93 (Canada)<br />
FIGURE 30<br />
FIELD−PROVIDED<br />
REDUCER MAY BE<br />
REQUIRED TO ADAPT<br />
LARGER VENT PIPE<br />
SIZE TO TERMINATION<br />
EXHAUST<br />
AIR<br />
INTAKE<br />
AIR<br />
OUTSIDE<br />
WALL<br />
CLAMP<br />
(Not Furnished)<br />
1−1/2" (38mm) accelerator<br />
provided on 71M80 &<br />
44W92 kits for<br />
<strong>ML193DF</strong>045P36B− &<br />
070P36B<br />
INTAKE<br />
AIR<br />
EXHAUST<br />
AIR<br />
INTAKE12" (305mm) Min.<br />
AIR above grade or<br />
average snow accumulation.<br />
GRADE<br />
DIRECT VENT CONCENTRIC WALL TERMINATION<br />
71M80, 69M29 or 60L46 (US)<br />
41W92 or 41W93 (Canada)<br />
FIGURE 31<br />
EXHAUST<br />
VENT<br />
INTAKE<br />
AIR<br />
Inches (mm)<br />
5"<br />
(127mm)<br />
18" MAX.<br />
(457mm)<br />
EXHAUST VENT<br />
INTAKE<br />
AIR<br />
12"<br />
(305mm)<br />
5−1/2"<br />
(140mm)<br />
Front View<br />
12" (305mm) Min.<br />
above grade or<br />
average snow accumulation.<br />
Front View<br />
INTAKE<br />
AIR<br />
Top View<br />
DIRECT VENT WALL TERMINATION KIT<br />
(30G28 or 81J20)<br />
1/2" (13mm) Foam Insulation<br />
in Unconditioned Space<br />
FIELD−PROVIDED<br />
REDUCER MAY<br />
BE REQUIRED TO<br />
ADAPT LARGER<br />
VENT PIPE SIZE<br />
TO TERMINATION<br />
FIGURE 33<br />
FIGURE 34<br />
OUTSIDE WALL<br />
EXHAUST VENT<br />
SIZE<br />
TERMINATION<br />
PIPE PER<br />
TABLE 8.<br />
EXHAUST VENT<br />
INTAKE AIR<br />
DIRECT VENT WALL TERMINATION KIT<br />
(22G44 or 44J40)<br />
8" (206mm) MIN.<br />
OUTSIDE WALL<br />
optional intake elbow<br />
Side View<br />
OPTIONAL VENT TERMINATION FOR MULTIPLE UNIT<br />
INSTALLATION OF DIRECT VENT WALL TERMINATION KIT<br />
(22G44, 44J40, 30G28 or 81J20)<br />
FIGURE 32<br />
Page 24
If intake and exhause pipe is less than 12 in. (305 mm)<br />
above snow accumulation or other obstructions, field−<br />
fabricated piping must be installed.<br />
WALL SUPPORT*<br />
6” (152 mm)<br />
Maximum<br />
INTAKE<br />
AIR<br />
WALL TERMINATION KITS (CLOSE−COUPLE)<br />
EXTENDED VENT FOR GRADE CLEARANCE<br />
2 inch (51 mm) 22G44 (US)<br />
3 inch (76 mm) 44J40 (US)<br />
8” (203 mm) Min. for 2” (51 mm) & 3” (76 mm) DIA. pipe<br />
between the end of the exhaust pipe and intake pipe<br />
12” (305 mm) Max. for 2” (51 mm) Dia. Exhaust<br />
20” (508 mm) Max. for 3” (76 mm) Dia. Exhaust<br />
EXHAUST<br />
AIR<br />
INTAKE<br />
AIR<br />
5” (127 mm)<br />
FIELD−PROVIDED<br />
REDUCER MAY BE REQUIRED TO ADAPT<br />
LARGER VENT PIPE SIZE TO TERMINATION<br />
12”<br />
(305 mm)<br />
1/2” (13 mm)<br />
FOAM INSULATION<br />
(Field Furnished)<br />
EXHAUST<br />
AIR<br />
8” (203 mm) Min.<br />
12” (305 mm) Minimum<br />
Above Grade or Average<br />
Snow Accumulation<br />
ÉÉÉÉÉÉÉÉÉÉÉÉ<br />
GRADE<br />
5−1/2”<br />
(140 mm)<br />
12” (305 mm) Minimum<br />
Above Grade or Average<br />
Snow Accumulation<br />
GRADE<br />
12” (305 mm) Max. for 2” (51 mm) Dia. Exhaust<br />
20” (508 mm) Max. for 3” (76 mm) Dia. Exhaust<br />
*Use wall support every 24" (610). Use two supports if<br />
extension is greater than 24" but less than 48".<br />
ÉÉÉÉÉÉÉÉÉÉÉÉ<br />
FIGURE 35<br />
ÉÉÉÉÉÉÉÉÉÉÉÉ<br />
ÉÉÉÉÉÉÉÉÉÉÉÉ<br />
WALL TERMINATION KITS (CLOSE−COUPLE)<br />
EXTENDED VENT FOR GRADE CLEARANCE<br />
2 inch (51 mm) 30G28 (WTK Canada)<br />
3 inch (76 mm) 81J20 (WTK Canada)<br />
See <strong>Installation</strong> Instructions for additional information.<br />
If intake and exhause pipe is less than 12 in. (305 mm)<br />
above snow accumulation or other obstructions, field−<br />
fabricated piping must be installed.<br />
FIELD−PROVIDED<br />
REDUCER MAY BE REQUIRED TO ADAPT<br />
LARGER VENT PIPE SIZE TO TERMINATION<br />
WALL SUPPORT*<br />
6” (152 mm)<br />
Maximum<br />
12” (305 mm) Max. for 2” (51 mm) Dia. Exhaust<br />
20” (508 mm) Max. for 3” (76 mm) Dia. Exhaust<br />
EXHAUST<br />
AIR<br />
12”<br />
(305 mm)<br />
1/2” (13 mm)<br />
FOAM INSULATION<br />
(Field Furnished)<br />
INTAKE<br />
AIR<br />
6” (152 mm)<br />
Minimum<br />
INTAKE<br />
AIR<br />
5” (127 mm)<br />
EXHAUST<br />
AIR<br />
6” (152 mm)<br />
Minimum<br />
12” (305 mm) Minimum<br />
Above Grade or Average<br />
Snow Accumulation<br />
GRADE<br />
5−1/2”<br />
(140 mm)<br />
12” (305 mm) Minimum<br />
Above Grade or Average<br />
Snow Accumulation<br />
GRADE<br />
12” (305 mm) Max. for 2” (51 mm) Dia. Exhaust<br />
20” (508 mm) Max. for 3” (76 mm) Dia. Exhaust<br />
FIGURE 36<br />
*Use wall support every 24" (610). Use two supports if<br />
extension is greater than 24" but less than 48".<br />
ÉÉÉÉÉÉÉÉÉÉÉÉ<br />
ÉÉÉÉÉÉÉÉÉÉÉÉ<br />
Page 25
<strong>ML193DF</strong> DIRECT VENT APPLICATION<br />
USING EXISTING CHIMNEY<br />
8" − 12"<br />
(203mm − 305mm)<br />
3" − 8"<br />
(76mm−<br />
203mm)<br />
STRAIGHT−CUT OR<br />
ANGLE−CUT IN DIRECTION<br />
OF ROOF SLOPE *<br />
EXHAUST VENT<br />
1/2" (13mm)<br />
WEATHERPROOF<br />
INSULATION<br />
12" (305mm)<br />
ABOVE AVE.<br />
SNOW<br />
ACCUMULATION<br />
1/2" (13mm) FOAM<br />
INSULATION<br />
SIZE TERMINATION<br />
PIPE PER TABLE 8.<br />
Minimum 12" (305MM)<br />
above chimney top<br />
plate or average snow<br />
accumulation<br />
INTAKE PIPE<br />
INSULATION (optional)<br />
SHEET<br />
METAL TOP<br />
PLATE<br />
SHOULDER OF FITTINGS<br />
PROVIDE SUPPORT<br />
OF PIPE ON TOP PLATE<br />
ALTERNATE<br />
INTAKE PIPE<br />
3" (76mm) OR<br />
2" (51mm) PVC<br />
PROVIDE SUPPORT<br />
FOR EXHAUST LINES<br />
UNCONDITIONED<br />
ATTIC SPACE<br />
INSULATE<br />
TO FORM<br />
SEAL<br />
3" − 8"<br />
(76mm−<br />
203mm)<br />
EXTERIOR<br />
PORTION OF<br />
CHIMNEY<br />
*SIZE TERMINATION<br />
PIPE PER TABLE 8.<br />
NOTE − Do not discharge exhaust gases directly into any chimney or vent stack. If vertical<br />
discharge through an existing unused chimney or stack is required, insert piping<br />
inside chimney until the pipe open end is above top of chimney and terminate as illustrated.<br />
In any exterior portion of chimney, the exhaust vent must be insulated.<br />
FIGURE 37<br />
Details of Exhaust Piping Terminations for Non-Direct<br />
Vent Applications<br />
Exhaust pipes may be routed either horizontally through an<br />
outside wall or vertically through the roof. In attic or closet<br />
installations, vertical termination through the roof is preferred.<br />
Figures 38 through 41 show typical terminations.<br />
1 − Exhaust piping must terminate straight out or up as<br />
shown. The termination pipe must be sized as listed in<br />
table 8.The specified pipe size ensures proper velocity<br />
required to move the exhaust gases away from the<br />
building.<br />
2 − On field supplied terminations for side wall exit, exhaust<br />
piping may extend a maximum of 12 inches<br />
(305mm) for 2" PVC and 20 inches (508mm) for 3"<br />
(76mm) PVC beyond the outside wall. See figure 39.<br />
NON−DIRECT VENT ROOF TERMINATION KIT<br />
(15F75 or 44J41)<br />
1/2" (13mm) ARMAFLEX<br />
INSULATION IN<br />
UNCONDITIONED SPACE<br />
FIELD−PROVIDED<br />
REDUCER MAY<br />
BE REQUIRED TO<br />
ADAPT LARGER<br />
VENT PIPE SIZE<br />
TO TERMINATION<br />
SIZE TERMINATION<br />
PIPE PER TABLE 8.<br />
FIGURE 38<br />
12" (305mm) MAX. for 2" (51mm)<br />
20" (508mm) MAX. for 3" (76mm)<br />
1/2" (13mm)<br />
ARMAFLEX<br />
INSULATION<br />
PVC REDUCER<br />
12" MIN.<br />
(305mm)<br />
Above Grade or<br />
average snow<br />
accumulation<br />
NON−DIRECT VENT FIELD SUPPLIED WALL TERMINATION OR<br />
(15F74) WALL TERMINATION KIT<br />
FIGURE 39<br />
3 − If exhaust piping must be run up a side wall to position<br />
above snow accumulation or other obstructions, piping<br />
must be supported every 24 inches (610mm) as<br />
shown in figure 40. When exhaust piping must be run<br />
up an outside wall, any reduction in exhaust pipe size<br />
must be done after the final elbow.<br />
Page 26
UNCONDITIONED<br />
SPACE<br />
6" (152mm)<br />
Max<br />
*WALL SUPPORT<br />
OUTSIDE WALL<br />
FIELD−PROVIDED<br />
REDUCER MAY BE<br />
REQUIRED TO<br />
ADAPT LARGER<br />
VENT PIPE SIZE TO<br />
TERMINATION<br />
12" (305mm) MAX. for 2" (51mm)<br />
20" (508mm) MAX. for 3" (76mm)<br />
SIZE TER-<br />
MINATION<br />
PIPE PER<br />
TABLE 8.<br />
12" (305mm)<br />
ABOVE GRADE OR<br />
AVERAGE SNOW<br />
ACCUMULATION<br />
NOTE − If necessary the condensate trap may be installed<br />
up to 5´ away from the furnace. Use PVC pipe to connect<br />
trap to furnace condensate outlet. Piping from furnace<br />
must slope down a minimum of 1/4" per ft. toward trap.<br />
CONDENSATE TRAP AND PLUG LOCATIONS<br />
1/2" (13mm) FOAM<br />
INSULATION IN<br />
UNCONDITIONED<br />
SPACE<br />
*Use wall support every 24" (610). Use<br />
two supports if extension is greater<br />
than 24" but less than 48".<br />
FIGURE 40<br />
1/2" (13mm) FOAM<br />
INSULATION<br />
NON−DIRECT VENT FIELD SUPPLIED WALL TERMINATION EX-<br />
TENDED OR (15F74) WALL TERMINATION VENT PIPE EXTENDED<br />
Trap<br />
(same on<br />
right side)<br />
1−1/2 in.<br />
Plug<br />
(same on left<br />
side)<br />
<strong>ML193DF</strong> NON−DIRECT VENT APPLICATION<br />
USING EXISTING CHIMNEY<br />
SIZE TERMINATION<br />
PIPE PER TABLE 8.<br />
STRAIGHT−CUT OR<br />
ANGLE−CUT IN DIRECTION<br />
OF ROOF SLOPE<br />
Minimum 12" (305MM)<br />
above chimney top<br />
plate or average snow<br />
accumulation<br />
INSULATE<br />
TO FORM<br />
SEAL<br />
SHEET<br />
METAL TOP<br />
PLATE<br />
3" − 8"<br />
(76mm−<br />
203mm)<br />
3" − 8"<br />
(76mm−<br />
203mm)<br />
NOTE − Do not discharge exhaust gases directly into any chimney or vent stack. If vertical<br />
discharge through an existing unused chimney or stack is required, insert piping<br />
inside chimney until the pipe open end is above top of chimney and terminate as illustrated.<br />
In any exterior portion of chimney, the exhaust vent must be insulated.<br />
FIGURE 41<br />
EXHAUST VENT<br />
1/2" (13mm)<br />
WEATHERPROOF<br />
INSULATION<br />
SHOULDER OF FITTINGS<br />
PROVIDE SUPPORT<br />
OF PIPE ON TOP PLATE<br />
EXTERIOR<br />
PORTION OF<br />
CHIMNEY<br />
Condensate Piping<br />
This unit is designed for either right- or left-side exit of condensate<br />
piping. Refer to figure 42 for condensate trap locations.<br />
FIGURE 42<br />
1 − Determine which side condensate piping will exit the<br />
unit, location of trap, field−provided fittings and length of<br />
PVC pipe required to reach available drain.<br />
2 − Remove plug (figure 42) from the cold end header box<br />
at the appropriate location on the side of the unit. Install<br />
field−provided 1/2" NPT male fitting into cold end header<br />
box. Use teflon tape or appropriate pipe dope.<br />
3 − Install the cap over the clean out opening at the base of<br />
the trap. See figure 45.<br />
NOTE − Vinyl tubing may be used for condensate drain.<br />
Tubing must be 1−1/4" OD X 1" ID and should be attached to<br />
the drain on the trap using a hose clamp.<br />
4 − Install drain trap using appropriate PVC fittings, glue<br />
all joints. Glue the provided drain trap as shown in figure<br />
45. Route the condensate line to an open drain.<br />
NOTE − If necessary the condensate trap may be installed<br />
up to 5 feet away from the furnace. Piping from furnace<br />
must slope down a minimum of 1/4" per ft. toward trap.<br />
Page 27
5 − If unit will be started immediately upon completion of<br />
installation, prime trap per procedure outlined in Unit<br />
Start−Up section.<br />
Condensate line must slope downward away from the<br />
trap to drain. If drain level is above condensate trap,<br />
condensate pump must be used. Condensate drain<br />
line should be routed within the conditioned space to<br />
avoid freezing of condensate and blockage of drain<br />
line. If this is not possible, a heat cable kit may be used<br />
on the condensate trap and line. Heat cable kit is available<br />
from <strong>Lennox</strong> in various lengths; 6 ft. (1.8m) − kit<br />
no. 26K68; 24 ft. (7.3m) − kit no. 26K69; and 50 ft.<br />
(15.2m) − kit no. 26K70.<br />
Field−Provided Vent<br />
<strong>ML193DF</strong> with Evaporator Coil<br />
Condensate trap and<br />
evaporator coil must drain<br />
separately as shown.<br />
CONDENSATE TRAP LOCATION<br />
(shown with right side exit of condensation)<br />
Drain<br />
Field Provided Vent<br />
min. 1" Above<br />
Condensate Drain<br />
FIGURE 44<br />
1" min.<br />
Trap can be installed a<br />
maximum of 5 ft. from furnace.<br />
(*PVC Only)<br />
5’ max.<br />
CAUTION<br />
Do not use copper tubing or existing copper<br />
condensate lines for drain line.<br />
to drain<br />
*Piping from furnace must slope down a minimum of<br />
1/4" per ft. toward trap.<br />
FIGURE 43<br />
CAUTION<br />
A separate drain line must be run to the drain<br />
from the condensate trap to ensure proper<br />
drainage and pressure switch operation. DO<br />
NOT connect the condensate trap drain into the<br />
drain line from the evaporator coil.<br />
Page 28
OPTIONAL Condensate Drain Connection<br />
TRAP / DRAIN ASSEMBLY USING 1/2" PVC OR 3/4" PVC<br />
Adapter 1/2 inch slip X<br />
1/2 inch mpt (Not Furnished)<br />
90° Street Elbow<br />
1/2 inch PVC<br />
(Not Furnished)<br />
Vent<br />
1 (25) Minimum<br />
Above Top of Condensate Drain<br />
Connection In Unit<br />
Adapter 1/2 inch slip X<br />
1/2 inch mpt (Not Furnished)<br />
5 Feet<br />
Maximum<br />
Condensate Drain<br />
Connection In Unit<br />
Condensate Drain<br />
Connection In Unit<br />
90° Elbow 1/2 inch PVC<br />
(Not Furnished)<br />
OPTIONAL Drain Piping<br />
Drain Assembly for 1/2 inch Drain Pipe<br />
1/2 inch PVC Pipe<br />
(Not Furnished)<br />
1/2 inch PVC Pipe<br />
(Not Furnished)<br />
Coupling 1/2 inch slip X slip<br />
(Not Furnished)<br />
To<br />
Drain<br />
1/2 inch PVC<br />
(Furnished)<br />
To<br />
Drain<br />
90° Elbow<br />
1/2 inch PVC<br />
(Not Furnished)<br />
Drain Assembly for 3/4 inch Drain Pipe<br />
1/2 inch PVC Pipe<br />
(Not Furnished)<br />
Drain Trap<br />
Assembly<br />
(Furnished)<br />
Drain Trap<br />
Clean Out<br />
90° Elbow<br />
3/4 inch PVC<br />
(Not Furnished)<br />
90° Elbow<br />
3/4 inch PVC<br />
(Not Furnished)<br />
To<br />
Drain<br />
To<br />
Drain<br />
Coupling 3/4 inch slip X slip<br />
(Not Furnished)<br />
Drain Trap Assembly<br />
(Furnished)<br />
Drain Trap Assembly with 1/2 inch Piping<br />
1 inch (25mm) Minimum Above Top of<br />
Condensate Drain Connection In Unit<br />
Vent<br />
Drain Trap Assembly with 3/4 inch Piping<br />
1 inch (25mm) Minimum Above Top of<br />
Condensate Drain Connection In Unit<br />
Vent<br />
7<br />
(178)<br />
Condensate Drain<br />
Connection In Unit<br />
Condensate Drain<br />
Connection In Unit<br />
To<br />
Drain<br />
To<br />
Drain<br />
FIGURE 45<br />
Page 29
<strong>Gas</strong> Piping<br />
CAUTION<br />
If a flexible gas connector is required or allowed by<br />
the authority that has jurisdiction, black iron pipe<br />
shall be installed at the gas valve and extend outside<br />
the furnace cabinet. The flexible connector can then<br />
be added between the black iron pipe and the gas<br />
supply line.<br />
WARNING<br />
Do not exceed 600 in−lbs (50 ft−lbs) torque when attaching<br />
the gas piping to the gas valve.<br />
1 − <strong>Gas</strong> piping may be routed into the unit through either<br />
the left- or right-hand side. Supply piping enters into<br />
the gas valve from the side of the valve as shown in<br />
figure 47.<br />
2 − When connecting gas supply, factors such as length of<br />
run, number of fittings and furnace rating must be considered<br />
to avoid excessive pressure drop. Table 10<br />
lists recommended pipe sizes for typical applications.<br />
NOTE − Use two wrenches when connecting gas piping<br />
to avoid transferring torque to the manifold.<br />
3 − <strong>Gas</strong> piping must not run in or through air ducts, clothes<br />
chutes, chimneys or gas vents, dumb waiters or elevator<br />
shafts. Center gas line through piping hole. <strong>Gas</strong><br />
line should not touch side of unit. See figures 47.<br />
4 − Piping should be sloped 1/4 inch per 15 feet (6mm per<br />
5.6m) upward toward the gas meter from the furnace.<br />
The piping must be supported at proper intervals, every<br />
8 to 10 feet (2.44 to 3.05m), using suitable hangers<br />
or straps. Install a drip leg in vertical pipe runs to serve as<br />
a trap for sediment or condensate.<br />
5 − A 1/8" N.P.T. plugged tap or pressure post is located<br />
on the gas valve to facilitate test gauge connection.<br />
See figure 54.<br />
6 − In some localities, codes may require installation of a<br />
manual main shut-off valve and union (furnished by installer)<br />
external to the unit. Union must be of the<br />
ground joint type.<br />
IMPORTANT<br />
Compounds used on threaded joints of gas piping<br />
must be resistant to the actions of liquified petroleum<br />
gases.<br />
Leak Check<br />
After gas piping is completed, carefully check all piping<br />
connections (factory− and field−installed) for gas leaks. Use<br />
a leak detecting solution or other preferred means.<br />
The furnace must be isolated from the gas supply system<br />
by closing its individual manual shut-off valve during any<br />
pressure testing of the gas supply system at pressures less<br />
than or equal to 1/2 psig (3.48 kPa, 14 inches w.c.).<br />
MANUAL MAIN SHUT−OFF<br />
VALVE WILL NOT HOLD<br />
NORMAL TEST PRESSURE<br />
1/8" N.P.T. PLUGGED TAP<br />
CAP<br />
FIGURE 46<br />
FURNACE<br />
ISOLATE<br />
GAS VALVE<br />
IMPORTANT<br />
When testing pressure of gas lines, gas valve must<br />
be disconnected and isolated. See figure 46. <strong>Gas</strong><br />
valves can be damaged if subjected to pressures<br />
greater than 1/2 psig (3.48 kPa).<br />
WARNING<br />
FIRE OR EXPLOSION HAZARD<br />
Failure to follow the safety warnings exactly could<br />
result in serious injury, death, or property damage.<br />
Never use an open flame to test for gas leaks. Check<br />
all connections using a commercially available soap<br />
solution made specifically for leak detection. Some<br />
soaps used for leak detection are corrosive to certain<br />
metals. Carefully rinse piping thoroughly after leak<br />
test has been completed.<br />
Page 30
MANUAL<br />
MAIN SHUT−OFF<br />
VALVE<br />
(With 1/8 in. NPT<br />
Plugged Tap Shown)<br />
Left Side Piping<br />
(Standard)<br />
AUTOMATIC<br />
GAS VALVE<br />
(with manual<br />
shut−off valve)<br />
Plug<br />
Plug<br />
AUTOMATIC<br />
GAS VALVE<br />
(with manual<br />
shut−off valve)<br />
MANUAL<br />
MAIN SHUT−OFF<br />
VALVE<br />
(With 1/8 in. NPT<br />
Plugged Tap<br />
Shown)<br />
GROUND<br />
JOINT<br />
UNION<br />
GROUND<br />
JOINT<br />
UNION<br />
DRIP LEG<br />
Bellows Grommet<br />
DRIP LEG<br />
FIELD<br />
PROVIDED<br />
AND INSTALLED<br />
NOTE − BLACK IRON PIPE ONLY TO BE ROUTED INSIDE OF CABINET<br />
Right Side Piping<br />
(Alternate)<br />
Bellows Grommet<br />
FIGURE 47<br />
TABLE 10<br />
GAS PIPE CAPACITY − FT 3 /HR (kL/HR)<br />
Nominal Internal<br />
Length of Pipe−Feet(m)<br />
Iron Pipe Size Diameter 10 20 30 40 50 60 70 80<br />
−Inches(mm) −Inches(mm) (3.048) (6.096) (9.144) (12.192) (15.240) (18.288) (21.336) (24.384)<br />
1/2<br />
.622<br />
175 120 97 82 73 66 61 57<br />
(12.7)<br />
(17.799) (4.96) (3.40) (2.75) (2.32) (2.07) (1.87) (1.73) (1.61)<br />
3/4<br />
.824<br />
360 250 200 170 151 138 125 118<br />
(19.05)<br />
(20.930) (10.19) (7.08) (5.66) (4.81) (4.28) (3.91) (3.54) (3.34)<br />
1<br />
1.049<br />
680 465 375 320 285 260 240 220<br />
(25.4)<br />
(26.645) (19.25) (13.17) (10.62) (9.06) (8.07) (7.36) (6.80) (6.23)<br />
1−1/4<br />
1.380<br />
1400 950 770 660 580 530 490 460<br />
(31.75)<br />
(35.052) (39.64) (26.90) (21.80) (18.69) (16.42) (15.01) (13.87) (13.03)<br />
1−1/2<br />
1.610<br />
2100 460 1180 990 900 810 750 690<br />
(38.1)<br />
(40.894) (59.46) (41.34) (33.41) (28.03) (25.48) (22.94) (21.24) (19.54)<br />
2<br />
2.067<br />
3950 2750 2200 1900 1680 1520 1400 1300<br />
(50.8)<br />
(52.502) (111.85) (77.87) (62.30) (53.80) (47.57) (43.04) (39.64) (36.81)<br />
2−1/2<br />
2.469<br />
6300 4350 3520 3000 2650 2400 2250 2050<br />
(63.5)<br />
(67.713) (178.39) (123.17) (99.67) (84.95) (75.04) (67.96) (63.71) (58.05)<br />
3<br />
3.068<br />
11000 7700 6250 5300 4750 4300 3900 3700<br />
(76.2)<br />
(77.927) (311.48) (218.03) (176.98) (150.07) (134.50) (121.76) (110.43) (104.77)<br />
4<br />
4.026<br />
23000 15800 12800 10900 9700 8800 8100 7500<br />
(101.6)<br />
(102.260) (651.27) (447.39) (362.44) (308.64) (274.67) (249.18) (229.36) (212.37)<br />
NOTE − Capacity given in cubic feet of gas per hour (kilo liters of gas per hour) and based on 0.60 specific gravity gas.<br />
90<br />
(27.432)<br />
53<br />
(1.50)<br />
110<br />
(3.11)<br />
205<br />
(5.80)<br />
430<br />
(12.18)<br />
650<br />
(18.41)<br />
1220<br />
(34.55)<br />
1950<br />
(55.22)<br />
3450<br />
(97.69)<br />
7200<br />
(203.88)<br />
100<br />
(30.480)<br />
50<br />
(1.42)<br />
103<br />
(2.92)<br />
195<br />
(5.52)<br />
400<br />
(11.33)<br />
620<br />
(17.56)<br />
1150<br />
(32.56)<br />
1850<br />
(52.38)<br />
3250<br />
(92.03)<br />
6700<br />
(189.72)<br />
Page 31
Removal of the <strong>Furnace</strong> from Common Vent<br />
In the event that an existing furnace is removed from a<br />
venting system commonly run with separate gas appliances,<br />
the venting system is likely to be too large to<br />
properly vent the remaining attached appliances.<br />
Conduct the following test while each appliance is operating<br />
and the other appliances (which are not operating) remain<br />
connected to the common venting system. If the<br />
venting system has been installed improperly, you must<br />
correct the system as indicated in the general venting requirements<br />
section.<br />
WARNING<br />
CARBON MONOXIDE POISONING HAZARD<br />
Failure to follow the steps outlined below for each<br />
appliance connected to the venting system being<br />
placed into operation could result in carbon monoxide<br />
poisoning or death.<br />
The following steps shall be followed for each appliance<br />
connected to the venting system being<br />
placed into operation, while all other appliances<br />
connected to the venting system are not in<br />
operation:<br />
1 − Seal any unused openings in the common venting system.<br />
2 − Inspect the venting system for proper size and horizontal<br />
pitch. Determine that there is no blockage, restriction,<br />
leakage, corrosion, or other deficiencies which could<br />
cause an unsafe condition.<br />
3 − Close all building doors and windows and all doors between<br />
the space in which the appliances remaining<br />
connected to the common venting system are located<br />
and other spaces of the building. Turn on clothes dryers<br />
and any appliances not connected to the common<br />
venting system. Turn on any exhaust fans, such as<br />
range hoods and bathroom exhausts, so they will operate<br />
at maximum speed. Do not operate a summer exhaust<br />
fan. Close fireplace dampers.<br />
4 − Follow the lighting instructions. Turn on the appliance<br />
that is being inspected. Adjust the thermostat so that<br />
the appliance operates continuously.<br />
5 − After the main burner has operated for 5 minutes, test<br />
for leaks of flue gases at the draft hood relief opening.<br />
Use the flame of a match or candle.<br />
6 − After determining that each appliance connected to the<br />
common venting system is venting properly, (step 3)<br />
return all doors, widows, exhaust fans, fireplace dampers,<br />
and any other gas−burning appliances to their previous<br />
mode of operation.<br />
7 − If a venting problem is found during any of the preceding<br />
tests, the common venting system must be modified<br />
to correct the problem.<br />
Resize the common venting system to the minimum<br />
vent pipe size determined by using the appropriate<br />
tables in Appendix G. (These are in the current standards<br />
of the National Fuel <strong>Gas</strong> Code ANSI Z223.1.<br />
Electrical<br />
ELECTROSTATIC DISCHARGE (ESD)<br />
Precautions and Procedures<br />
CAUTION<br />
Electrostatic discharge can affect electronic components.<br />
Take precautions during furnace installation<br />
and service to protect the furnace’s electronic<br />
controls. Precautions will help to avoid control exposure<br />
to electrostatic discharge by putting the furnace,<br />
the control and the technician at the same<br />
electrostatic potential. Neutralize electrostatic<br />
charge by touching hand and all tools on an unpainted<br />
unit surface, such as the gas valve or blower<br />
deck, before performing any service procedure.<br />
The unit is equipped with a field make−up box on the left<br />
hand side of the cabinet. A field−provided make−up box can<br />
be installed on the exterior of the right side of the furnace to<br />
facilitate installation. If the make−up box is moved to the<br />
right side, clip the wire ties that bundle the wires together<br />
and install on the outside of the cabinet. See figure 49. The<br />
excess wire must be pulled into the blower compartment.<br />
Secure the excess wire to the existing harness to protect it<br />
from damage.<br />
Page 32
Left side<br />
INTERIOR MAKE−UP BOX<br />
(FACTORY− INSTALLED LEFT SIDE)<br />
FIGURE 48<br />
FIGURE 49<br />
MAKE−UP<br />
BOX INSIDE<br />
CABINET<br />
EXTERIOR MAKE−UP BOX<br />
(FIELD PROVIDED RIGHT SIDE)<br />
MAKE−UP<br />
BOX<br />
OUTSIDE<br />
CABINET<br />
Right Side<br />
Refer to figure 51 for field wiring and figure 52 for schematic<br />
wiring diagram and troubleshooting.<br />
The power supply wiring must meet Class I restrictions.<br />
Protected by either a fuse or circuit breaker, select circuit<br />
protection and wire size according to unit nameplate.<br />
NOTE − Unit nameplate states maximum current draw.<br />
Maximum Over−Current Protection allowed is 15 AMP.<br />
Holes are on both sides of the furnace cabinet to facilitate<br />
wiring.<br />
Install a separate (properly sized) disconnect switch near<br />
the furnace so that power can be turned off for servicing.<br />
Before connecting the thermostat or the power wiring,<br />
check to make sure the wires will be long enough for servicing<br />
at a later date. Remove the blower access panel to<br />
check the length of the wire.<br />
Complete the wiring connections to the equipment. Use the<br />
provided unit wiring diagram and the field wiring diagram<br />
shown in figure 51. Use 18−gauge wire or larger that is suitable<br />
for Class II rating for thermostat connections.<br />
Electrically ground the unit according to local codes or, in<br />
the absence of local codes, according to the current National<br />
Electric Code (ANSI/NFPA No. 70) for the USA and<br />
current Canadian Electric Code part 1 (CSA standard<br />
C22.1) for Canada. A green ground wire is provided in the<br />
field make−up box.<br />
NOTE − The <strong>ML193DF</strong> furnace contains electronic components<br />
that are polarity sensitive. Make sure that the furnace<br />
is wired correctly and is properly grounded.<br />
Generator Use − Voltage Requirements<br />
The following requirements must be kept in mind when<br />
specifying a generator for use with this equipment:<br />
The furnace requires 120 volts + 10% (Range: 108<br />
volts to 132 volts)<br />
The furnace operates at 60 Hz + 5% (Range: 57 Hz to<br />
63 Hz)<br />
The furnace integrated control requires both polarity<br />
and proper ground. Both polarity and proper grounding<br />
should be checked before attempting to operate the<br />
furnace on either permanent or temporary power<br />
Generator should have a wave form distortion of less<br />
than 5% RHD<br />
Accessory Terminals<br />
One line voltage EAC" 1/4" spade terminal is provided on<br />
the furnace integrated control. See figure 53 for integrated<br />
control configuration. This terminal is energized when the<br />
indoor blower is operating. Any accessory rated up to one<br />
amp can be connected to this terminal with the neutral leg<br />
of the circuit being connected to one of the provided neutral<br />
terminals. If an accessory rated at greater than one amp is<br />
connected to this terminal, it is necessary to use an external<br />
relay.<br />
One line voltage HUM" 1/4" spade terminal is provided on<br />
the furnace integrated control. See figure 53 for integrated<br />
control configuration. This terminal is energized in the<br />
heating mode when the combustion air inducer is operating.<br />
Any humidifier rated up to one amp can be connected<br />
to this terminal with the neutral leg of the circuit being connected<br />
to one of the provided neutral terminals. If a humidifier<br />
rated at greater than one amp is connected to this terminal,<br />
it is necessary to use an external relay.<br />
Page 33
<strong>ML193DF</strong> and CONDENSING UNIT<br />
THERMOSTAT DESIGNATIONS<br />
(Refer to specific thermostat and outdoor unit.)<br />
Thermostat <strong>Furnace</strong> Condensing<br />
Unit<br />
R<br />
W1<br />
Y<br />
G<br />
C<br />
POWER<br />
HEAT<br />
COOLING<br />
INDOOR BLOWER<br />
COMMON<br />
R<br />
W<br />
Y<br />
G<br />
C<br />
*CONDENSING<br />
UNIT<br />
CONDENSING<br />
UNIT<br />
CONDENSING<br />
UNIT COMMON<br />
Install the room thermostat according to the instructions<br />
provided with the thermostat. See figure 50 for<br />
thermostat designations. If the furnace is being<br />
matched with a heat pump, refer to the FM21 installation<br />
instruction or appropriate dual fuel thermostat instructions.<br />
Indoor Blower Speeds<br />
1 − When the thermostat is set to FAN ON," the indoor<br />
blower will run continuously on the heating speed<br />
when there is no cooling or heating demand.<br />
2 − When the <strong>ML193DF</strong> is running in the heating mode,<br />
the indoor blower will run on the heating speed.<br />
3 − When there is a cooling demand, the indoor blower will<br />
run on the cooling speed.<br />
*NOTE − R" REQUIRED ON SOME OUTDOOR UNITS<br />
FIGURE 50<br />
TYPICAL <strong>ML193DF</strong> FIELD WIRING DIAGRAM<br />
IGNITOR<br />
*NOTE − R" REQUIRED ON SOME OUTDOOR UNITS<br />
*R<br />
FIGURE 51<br />
Page 34
TYPICAL <strong>ML193DF</strong> WIRING DIAGRAM<br />
FIGURE 52<br />
Page 35
INTEGRATED CONTROL<br />
(Automatic Hot Surface Ignition System)<br />
HUM<br />
LINE<br />
XFMR<br />
EAC<br />
COOL<br />
HEAT<br />
PARK<br />
FLAME<br />
NEUTRALS<br />
TERMINAL DESIGNATIONS<br />
Humidifier (120VAC)<br />
Input (120VAC)<br />
Transformer (120VAC)<br />
Electronic Air Cleaner (120VAC)<br />
Blower − Cooling Speed (120VAC)<br />
Blower − Heating Speed (120VAC)<br />
Dead terminals to park alternate spd taps<br />
Flame sensor<br />
Neutral terminals (120VAC)<br />
3 AMP, 32 VAC FUSE<br />
BLOWER OFF<br />
DELAY JUMPER<br />
FIGURE 53<br />
Unit Start−Up<br />
FOR YOUR SAFETY READ BEFORE OPERATING<br />
WARNING<br />
Do not use this furnace if any part has been underwater.<br />
A flood−damaged furnace is extremely dangerous.<br />
Attempts to use the furnace can result in<br />
fire or explosion. Immediately call a qualified service<br />
technician to inspect the furnace and to replace<br />
all gas controls, control system parts, and electrical<br />
parts that have been wet or to replace the furnace,<br />
if deemed necessary.<br />
CAUTION<br />
Before attempting to perform any service or maintenance,<br />
turn the electrical power to unit OFF at disconnect<br />
switch.<br />
WARNING<br />
Danger of explosion. Can cause injury<br />
or product or property damage. Should<br />
the gas supply fail to shut off or if<br />
overheating occurs, shut off the gas<br />
valve to the furnace before shutting off<br />
the electrical supply.<br />
BEFORE LIGHTING the unit, smell all around the furnace<br />
area for gas. Be sure to smell next to the floor because<br />
some gas is heavier than air and will settle on the<br />
floor.<br />
The gas valve on the <strong>ML193DF</strong> is equipped with a gas<br />
control switch. Use only your hand to move switch. Never<br />
use tools. If the switch will not move by hand, do not try to<br />
repair it. Force or attempted repair may result in a fire or<br />
explosion.<br />
Page 36
Placing the furnace into operation:<br />
<strong>ML193DF</strong> units are equipped with an automatic hot surface<br />
ignition system. Do not attempt to manually light<br />
burners on this furnace. Each time the thermostat calls<br />
for heat, the burners will automatically light. The ignitor<br />
does not get hot when there is no call for heat on these<br />
units.<br />
Priming Condensate Trap<br />
The condensate trap should be primed with water prior to<br />
start−up to ensure proper condensate drainage. Either<br />
pour 10 fl. oz. (300 ml) of water into the trap, or follow<br />
these steps to prime the trap:<br />
1 − Follow the lighting instructions to place the unit into operation.<br />
2 − Set the thermostat to initiate a heating demand.<br />
3 − Allow the burners to fire for approximately 3 minutes.<br />
4 − Adjust the thermostat to deactivate the heating demand.<br />
5 − Wait for the combustion air inducer to stop. Set the<br />
thermostat to initiate a heating demand and again allow<br />
the burners to fire for approximately 3 minutes.<br />
6 − Adjust the thermostat to deactivate the heating demand<br />
and wait for the combustion air inducer to stop.<br />
At this point, the trap should be primed with sufficient<br />
water to ensure proper condensate drain operation.<br />
WARNING<br />
If you do not follow these instructions exactly, a fire<br />
or explosion may result causing property damage,<br />
personal injury or death.<br />
<strong>Gas</strong> Valve Operation (Figure 54)<br />
1 − STOP! Read the safety information at the beginning of<br />
this section.<br />
2 − Set the thermostat to the lowest setting.<br />
3 − Turn off all electrical power to the unit.<br />
4 − This furnace is equipped with an ignition device which<br />
automatically lights the burners. Do not try to light the<br />
burners by hand.<br />
5 − Remove the upper access panel.<br />
6 − Move gas valve switch to OFF. See figure 54.<br />
7 − Wait five minutes to clear out any gas. If you then smell<br />
gas, STOP! Immediately call your gas supplier from a<br />
neighbor’s phone. Follow the gas supplier’s instructions.<br />
If you do not smell gas go to next step.<br />
8 − Move gas valve switch to ON. See figure 54.<br />
9 − Replace the upper access panel.<br />
10− Turn on all electrical power to to the unit.<br />
11− Set the thermostat to desired setting.<br />
NOTE − When unit is initially started, steps 1 through 11<br />
may need to be repeated to purge air from gas line.<br />
MANIFOLD<br />
PRESSURE<br />
ADJUSTMENT<br />
SCREW<br />
INLET<br />
PRESSURE<br />
PORT<br />
GAS VALVE SHOWN IN ON POSITION<br />
MANIFOLD<br />
PRESSURE<br />
OUTLET<br />
FIGURE 54<br />
12− If the appliance will not operate, follow the instructions<br />
Turning Off <strong>Gas</strong> to Unit" and call your service technician<br />
or gas supplier.<br />
Turning Off <strong>Gas</strong> to Unit<br />
1 − Set the thermostat to the lowest setting.<br />
2 − Turn off all electrical power to the unit if service is to be<br />
performed.<br />
3 − Remove the upper access panel.<br />
4 − Move gas valve switch to OFF.<br />
5 − Replace the upper access panel.<br />
Failure To Operate<br />
If the unit fails to operate, check the following:<br />
1 − Is the thermostat calling for heat?<br />
2 − Are access panels securely in place?<br />
3 − Is the main disconnect switch closed?<br />
4 − Is there a blown fuse or tripped breaker?<br />
5 − Is the filter dirty or plugged? Dirty or plugged filters will<br />
cause the limit control to shut the unit off.<br />
6 − Is gas turned on at the meter?<br />
7 − Is the manual main shut-off valve open?<br />
8 − Is the internal manual shut-off valve open?<br />
9 − Is the unit ignition system in lockout? If the unit locks out<br />
again, inspect the unit for blockages.<br />
Heating Sequence Of Operation<br />
1 − When thermostat calls for heat, combustion air inducer<br />
starts.<br />
2 − Combustion air pressure switch proves blower operation.<br />
Switch is factory−set and requires no adjustment.<br />
3 − After a 15−second prepurge, the hot surface ignitor energizes.<br />
4 − After a 20−second ignitor warm−up period, the gas<br />
valve solenoid opens. A 4−second Trial for Ignition period<br />
begins."<br />
5 − <strong>Gas</strong> is ignited, flame sensor proves the flame, and the<br />
combustion process continues.<br />
6 − If flame is not detected after first ignition trial, the ignition<br />
control will repeat steps 3 and 4 four more times<br />
before locking out the gas valve (WATCHGUARD"<br />
flame failure mode). The ignition control will then automatically<br />
repeat steps 1 through 6 after 60 minutes.<br />
To interrupt the 60−minute WATCHGUARD" period,<br />
move thermostat from Heat" to OFF" then back to<br />
Heat". Heating sequence then restarts at step 1.<br />
Page 37
<strong>Gas</strong> Pressure Adjustment<br />
<strong>Gas</strong> Flow (Approximate)<br />
TABLE 11<br />
GAS METER CLOCKING CHART<br />
Seconds for One Revolution<br />
ML193 Natural<br />
LP<br />
Unit 1 cu ft<br />
Dial<br />
2 cu ft<br />
Dial<br />
1 cu ft<br />
Dial<br />
2 cu ft<br />
DIAL<br />
−045 80 160 200 400<br />
−070 55 110 136 272<br />
−090 41 82 102 204<br />
−110 33 66 82 164<br />
Natural−1000 btu/cu ft LP−2500 btu/cu ft<br />
NOTE − To obtain accurate reading, shut off all other gas<br />
appliances connected to meter.<br />
<strong>Furnace</strong> should operate at least 5 minutes before checking<br />
gas flow. Determine time in seconds for two revolutions<br />
of gas through the meter. (Two revolutions assures a<br />
more accurate time). Divide by two and compare to time<br />
in table 11. If manifold pressure matches table 12 and rate<br />
is incorrect, check gas orifices for proper size and restriction.<br />
Remove temporary gas meter if installed.<br />
Supply Pressure Measurement<br />
A threaded plug on the inlet side of the gas valve provides<br />
access to the supply pressure tap. Remove the threaded<br />
plug, install a field−provided barbed fitting and connect a<br />
manometer to measure supply pressure. See table 12 for<br />
proper supply line pressure. Replace the threaded plug after<br />
measurements have been taken.<br />
TABLE 12<br />
Manifold and Supply Pressure (Outlet) inches w.c.<br />
Fuel<br />
Nat. <strong>Gas</strong><br />
L.P. <strong>Gas</strong><br />
Model<br />
Input Sizes<br />
All sizes<br />
All sizes<br />
Manifold<br />
Pressure in.wg.<br />
Supply<br />
Pressure in.wg.<br />
Min.<br />
Max.<br />
3.5 4.5 10.0<br />
10.0 11.0 13.0<br />
NOTE − A natural to L.P. propane gas changeover kit is necessary<br />
to convert this unit. Refer to the changeover kit<br />
installation instruction for the conversion procedure.<br />
Manifold Pressure Measurement<br />
1 − Remove the threaded plug from the outlet side of the<br />
gas valve and install a field−provided barbed fitting.<br />
Connect to a manometer to measure manifold pressure.<br />
2 − Start unit and allow 5 minutes for unit to reach steady<br />
state.<br />
3 − While waiting for the unit to stabilize, notice the flame.<br />
Flame should be stable and should not lift from burner.<br />
Natural gas should burn blue.<br />
4 − After allowing unit to stabilize for 5 minutes, record<br />
manifold pressure and compare to value given in table<br />
12.<br />
NOTE − Shut unit off and remove manometer as soon as an<br />
accurate reading has been obtained. Take care to remove<br />
barbed fitting and replace threaded plug.<br />
Proper Combustion<br />
<strong>Furnace</strong> should operate minimum 15 minutes with correct<br />
manifold pressure and gas flow rate before checking combustion.<br />
Take combustion sample beyond the flue outlet<br />
and compare to the tables below. The maximum carbon<br />
monoxide reading should not exceed 50 ppm.<br />
TABLE 13<br />
ML193<br />
Unit<br />
CO 2 % For Nat CO 2 % For L.P.<br />
−045<br />
−070<br />
−090<br />
−110<br />
7.2 − 7.9 8.6 − 9.3<br />
High Altitude Information<br />
NOTE − In Canada, certification for installations at elevations<br />
over 4500 feet (1372 m) is the jurisdiction of local authorities.<br />
<strong>ML193DF</strong> units require no manifold pressure adjustments<br />
for operation at altitudes up to 10,000 feet (3048 m) above<br />
sea level. Units installed at altitude of 4501 − 10,000 feet<br />
(1373 to 3048m) require a pressure switch change which<br />
can be ordered separately. Table 14 lists conversion kit and<br />
pressure switch requirements at varying altitudes.<br />
The combustion air pressure switch is factory−set and requires<br />
no adjustment.<br />
NOTE − A natural to LP/propane gas changeover kit is necessary<br />
to convert this unit. Refer to the changeover kit<br />
installation instruction for the conversion procedure.<br />
Page 38
TABLE 14<br />
Conversion Kit and Pressure Switch Requirements at Varying Altitudes<br />
ML193<br />
Unit<br />
Natural to<br />
LP/Propane<br />
0 − 7500 ft<br />
(0 − 2286m)<br />
High Altitude<br />
Natural Burner<br />
Orifice Kit<br />
7501 − 10,000 ft<br />
(2286 − 3038m)<br />
LP/Propane<br />
to Natural<br />
0 − 7500 ft<br />
(0 − 2286m)<br />
High Altitude<br />
LP/Propane<br />
Burner Orifice Kit<br />
7501 − 10,000 ft<br />
(2286 − 3038m)<br />
High Altitude Pressure<br />
Switch<br />
4501 − 7500<br />
ft<br />
(1373 −<br />
2286m)<br />
7501 −10,000<br />
ft<br />
(2286 −<br />
3048m)<br />
−045<br />
−070<br />
−090<br />
*69W73 73W37 *73W81 *68W68 74W90 74W91<br />
−110<br />
* Conversion requires installation of a gas valve manifold spring which is provided with the gas conversion kit.<br />
Pressure switch is factory set. No adjustment necessary. All models use the factory−installed pressure switch from 0−4500 feet (0−1370 m).<br />
Testing of Non−Direct Vent Applications<br />
for Proper Venting and Sufficient<br />
Combustion Air<br />
WARNING<br />
CARBON MONOXIDE POISONING HAZARD!<br />
Failure to follow the steps outlined below for each<br />
appliance connected to the venting system being<br />
placed into operation could result in carbon monoxide<br />
poisoning or death.<br />
The following steps shall be followed for each appliance<br />
connected to the venting system being<br />
placed into operation, while all other appliances connected<br />
to the venting system are not in operation.<br />
After the <strong>ML193DF</strong> gas furnace has been started, the following<br />
test should be conducted to ensure proper venting<br />
and sufficient combustion air has been provided to the<br />
<strong>ML193DF</strong> as well as to other gas-fired appliances which<br />
are separately vented.<br />
If a <strong>ML193DF</strong> furnace replaces a Category I furnace which<br />
was commonly vented with another gas appliance, the size<br />
of the existing vent pipe for that gas appliance must be<br />
checked. Without the heat of the original furnace flue products,<br />
the existing vent pipe is probably oversized for the<br />
single water heater or other appliance. The vent should be<br />
checked for proper draw with the remaining appliance.<br />
The test should be conducted while all appliances (both in<br />
operation and those not in operation) are connected to the<br />
venting system being tested. If the venting system has<br />
been installed improperly, or if provisions have not been<br />
made for sufficient amounts of combustion air, corrections<br />
must be made as outlined in the previous section.<br />
1 − Seal any unused openings in the venting system.<br />
2 − Visually inspect the venting system for proper size and<br />
horizontal pitch. Determine there is no blockage or restriction,<br />
leakage, corrosion, or other deficiencies<br />
which could cause an unsafe condition.<br />
3 − To the extent that it is practical, close all building doors<br />
and windows and all doors between the space in which<br />
the appliances connected to the venting system are located<br />
and other spaces of the building.<br />
4 − Close fireplace dampers.<br />
5 − Turn on clothes dryers and any appliances not connected<br />
to the venting system. Turn on any exhaust<br />
fans, such as range hoods and bathroom exhausts, so<br />
they will operate at maximum speed. Do not operate a<br />
summer exhaust fan.<br />
6 − Follow the lighting instruction to place the appliance<br />
being inspected into operation. Adjust thermostat so<br />
appliance will operate continuously.<br />
7 − Use the flame of match or candle to test for spillage of<br />
flue gases at the draft hood relief opening after 5 minutes<br />
of main burner operation.<br />
8 − If improper venting is observed during any of the<br />
above tests, the venting system must be corrected or<br />
sufficient combustion/make-up air must be provided.<br />
The venting system should be re-sized to approach<br />
the minimum size as determined by using the appropriate<br />
tables in appendix G in the current standards<br />
of the National Fuel <strong>Gas</strong> Code ANSI−Z223.1/NPFA 54<br />
in the U.S.A., and the appropriate Natural <strong>Gas</strong> and<br />
Propane appliances venting sizing tables in the current<br />
standard of the CSA−B149 Natural <strong>Gas</strong> and Propane<br />
<strong>Installation</strong> Codes in Canada.<br />
9 − After determining that each appliance remaining<br />
connected to the common venting system properly<br />
vents when tested as indicated in step 3, return<br />
doors, windows, exhaust fans, fireplace dampers<br />
and any other gas-burning appliance to their previous<br />
condition of use.<br />
Page 39
Other Unit Adjustments<br />
NOTE − See troubleshooting flow charts if any safety<br />
switches are found to be open.<br />
Primary Limit<br />
The primary limit is located on the heating compartment<br />
vestibule panel. This limit is factory set and requires no adjustment.<br />
Flame Rollout Switches (Two)<br />
These manually reset switches are located on the front of<br />
the burner box.<br />
Pressure Switch<br />
The pressure switch is located in the heating compartment<br />
on the cold end header box. This switch checks for proper<br />
combustion air inducer operation before allowing ignition<br />
trial. The switch is factory−set and must not be adjusted.<br />
Temperature Rise<br />
After the furnace has been started and supply and return air<br />
temperatures have been allowed to stabilize, check the<br />
temperature rise. If necessary, adjust the blower speed to<br />
maintain the temperature rise within the range shown on<br />
the unit nameplate. Increase the blower speed to decrease<br />
the temperature. Decrease the blower speed to increase<br />
the temperature rise. Failure to adjust the temperature rise<br />
may cause erratic limit operation.<br />
Fan Control<br />
The fan on time of 30 seconds is not adjustable. The fan off<br />
delay (amount of time that the blower operates after the<br />
heat demand has been satisfied) may be adjusted by<br />
changing the jumper position across the five pins on the<br />
integrated control. The unit is shipped with a factory fan off<br />
setting of 90 seconds. The fan off delay affects comfort and<br />
is adjustable to satisfy individual applications. Adjust the<br />
fan off delay to achieve a supply air temperature between<br />
90° and 110°F at the moment that the blower is de−energized.<br />
Longer off delay settings provide lower return air<br />
temperatures; shorter settings provide higher return air<br />
temperatures. See figure 55.<br />
Thermostat Heat Anticipation<br />
Set the heat anticipator setting (if adjustable) according to<br />
the amp draw listed on the wiring diagram that is attached<br />
to the unit.<br />
Electrical<br />
1 − Check all wiring for loose connections.<br />
2 − Check for the correct voltage at the furnace (furnace<br />
operating).<br />
3 − Check amp-draw on the blower motor.<br />
Motor Nameplate__________Actual__________<br />
HEAT FAN-OFF TIME IN SECONDS<br />
NO JUMPER<br />
To adjust fan−off timing, reposition jumper across pins to<br />
achieve desired setting.<br />
60 Second<br />
off Time<br />
60<br />
90<br />
120<br />
180<br />
90 Second<br />
off Time<br />
60<br />
90<br />
120<br />
180<br />
FIGURE 55<br />
120 Second<br />
off Time<br />
60<br />
90<br />
120<br />
180<br />
180 Second<br />
off Time<br />
60<br />
90<br />
120<br />
180<br />
Blower Speeds<br />
Follow the steps below to change the blower speeds.<br />
1 − Turn off electrical power to furnace.<br />
2 − Remove blower access panel.<br />
3 − Disconnect existing speed tap at integrated control<br />
speed terminal.<br />
NOTE − Termination of any unused motor leads must be<br />
insulated.<br />
4 − Place unused blower speed tap on integrated control<br />
PARK" terminal or insulate.<br />
5 − Refer to blower speed selection chart on unit wiring diagram<br />
for desired heating or cooling speed. See Blower<br />
performance data beginning on the next page.<br />
6 − Connect selected speed tap at integrated control<br />
speed terminal.<br />
7 − Resecure blower access panel.<br />
8 − Turn on electrical power to furnace.<br />
9 − Recheck temperature rise.<br />
Exhaust and Air Intake Pipe<br />
1 − Check exhaust and air intake connections for tightness<br />
and to make sure there is no blockage.<br />
2 − Is pressure switch closed? Obstructed exhaust pipe<br />
will cause unit to shut off at pressure switch. Check termination<br />
for blockages.<br />
3 − Obstructed pipe or termination may cause rollout<br />
switches to open. Reset manual flame rollout switches<br />
on burner box assembly if necessary.<br />
Page 40
BLOWER DATA<br />
<strong>ML193DF</strong>045P36B PERFORMANCE (Less Filter)<br />
External<br />
Static<br />
Pressure<br />
in. w.g.<br />
Air Volume / Watts at Various Blower Speeds<br />
High<br />
Medium-<br />
High<br />
Medium-<br />
Low<br />
Low<br />
cfm Watts cfm Watts cfm Watts cfm Watts<br />
0.00 1615 650 1385 555 1205 465 1045 390<br />
0.10 1605 640 1375 545 1195 455 1035 380<br />
0.20 1500 620 1340 525 1165 445 1015 370<br />
0.30 1450 590 1290 490 1125 420 975 365<br />
0.40 1350 560 1235 480 1090 405 920 345<br />
0.50 1300 545 1170 450 1035 380 875 335<br />
0.60 1195 500 1095 425 990 365 840 320<br />
0.70 1140 485 1020 400 895 345 780 300<br />
0.80 1025 450 920 370 840 330 695 275<br />
0.90 945 435 800 335 700 295 605 250<br />
<strong>ML193DF</strong>090P48C PERFORMANCE (Less Filter)<br />
External<br />
Static<br />
Pressure<br />
in. w.g.<br />
Air Volume / Watts at Various Blower Speeds<br />
High<br />
Medium-<br />
High<br />
Medium-<br />
Low<br />
Low<br />
cfm Watts cfm Watts cfm Watts cfm Watts<br />
0.00 2145 900 1865 740 1545 635 1295 530<br />
0.10 2135 890 1855 730 1540 625 1290 520<br />
0.20 2065 845 1815 710 1525 600 1285 500<br />
0.30 2010 825 1760 685 1510 580 1275 485<br />
0.40 1930 775 1705 630 1495 575 1235 455<br />
0.50 1845 740 1645 610 1450 530 1215 450<br />
0.60 1745 700 1525 550 1380 505 1185 430<br />
0.70 1620 650 1460 535 1315 480 1110 405<br />
0.80 1450 585 1340 505 1220 445 1020 375<br />
0.90 1320 555 1130 450 1010 385 920 345<br />
<strong>ML193DF</strong>070P36B PERFORMANCE (Less Filter)<br />
External<br />
Static<br />
Pressure<br />
in. w.g.<br />
Air Volume / Watts at Various Blower Speeds<br />
High<br />
Medium-<br />
High<br />
Medium-<br />
Low<br />
Low<br />
cfm Watts cfm Watts cfm Watts cfm Watts<br />
0.00 1505 660 1310 570 1090 455 940 390<br />
0.10 1480 625 1295 550 1070 435 935 365<br />
0.20 1405 585 1255 515 1055 425 930 350<br />
0.30 1355 580 1225 475 1045 405 900 330<br />
0.40 1305 540 1165 470 1010 385 890 325<br />
0.50 1270 525 1110 425 975 370 835 305<br />
0.60 1175 500 1080 415 925 345 815 290<br />
0.70 1105 460 1000 395 855 320 745 270<br />
0.80 1040 440 925 365 790 300 670 250<br />
0.90 920 400 825 335 680 270 560 225<br />
<strong>ML193DF</strong>110P60C PERFORMANCE (Less Filter)<br />
External<br />
Static<br />
Pressure<br />
in. w.g.<br />
Air Volume / Watts at Various Blower Speeds<br />
High<br />
Medium-<br />
High<br />
Medium-<br />
Low<br />
Low<br />
cfm Watts cfm Watts cfm Watts cfm Watts<br />
0.00 2410 1390 2190 1080 1860 910 1560 735<br />
0.10 2405 1385 2180 1070 1855 905 1555 730<br />
0.20 2285 1345 2120 1030 1850 865 1540 720<br />
0.30 2220 1315 2015 1005 1770 840 1535 705<br />
0.40 2185 1295 1950 955 1750 815 1530 685<br />
0.50 2045 1240 1830 925 1680 790 1500 660<br />
0.60 1965 1220 1710 890 1575 755 1445 640<br />
0.70 1820 1165 1610 850 1495 720 1370 615<br />
0.80 1625 1155 1510 820 1400 695 1315 595<br />
0.90 1455 1110 1390 790 1350 660 1210 565<br />
Page 41
Service<br />
WARNING<br />
ELECTRICAL SHOCK, FIRE,<br />
OR EXPLOSION HAZARD.<br />
Failure to follow safety warnings exactly could result<br />
in dangerous operation, serious injury, death or<br />
property damage.<br />
Improper servicing could result in dangerous operation,<br />
serious injury, death, or property damage.<br />
Before servicing, disconnect all electrical power to<br />
furnace.<br />
When servicing controls, label all wires prior to disconnecting.<br />
Take care to reconnect wires correctly.<br />
Verify proper operation after servicing.<br />
At the beginning of each heating season, system should be<br />
checked as follows by a qualified service technician:<br />
Blower<br />
Check the blower wheel for debris and clean if necessary.<br />
The blower motors are prelubricated for extended bearing<br />
life. No further lubrication is needed.<br />
WARNING<br />
The blower access panel must be securely in place<br />
when the blower and burners are operating. <strong>Gas</strong><br />
fumes, which could contain carbon monoxide, can<br />
be drawn into living space resulting in personal injury<br />
or death.<br />
Filters<br />
All air filters are installed external to the unit. Filters should<br />
be inspected monthly. Clean or replace the filters when<br />
necessary to ensure proper furnace operation. Table 3<br />
lists recommended filter sizes.<br />
Exhaust and air intake pipes<br />
Check the exhaust and air intake pipes and all connections<br />
for tightness and to make sure there is no blockage.<br />
NOTE − After any heavy snow, ice or frozen fog event the<br />
furnace vent pipes may become restricted. Always check<br />
the vent system and remove any snow or ice that may be<br />
obstructing the plastic intake or exhaust pipes.<br />
Electrical<br />
1 − Check all wiring for loose connections.<br />
2 − Check for the correct voltage at the furnace (furnace<br />
operating).<br />
3 − Check amp−draw on the blower motor.<br />
Motor Nameplate__________Actual__________<br />
Winterizing and Condensate Trap Care<br />
1 − Turn off power to the furnace.<br />
2 − Have a shallow pan ready to empty condensate water.<br />
3 − Remove the clean out cap from the condensate trap<br />
and empty water. Inspect the trap then reinstall the<br />
drain plug.<br />
Cleaning Heat Exchanger<br />
If cleaning the heat exchanger becomes necessary, follow<br />
the below procedures and refer to figure 1 when disassembling<br />
unit. Use papers or protective covering in front of furnace<br />
while removing heat exchanger assembly.<br />
1 − Turn off electrical and gas supplies to the furnace.<br />
2 − Remove the furnace access panels.<br />
3 − Disconnect the 2 wires from the gas valve.<br />
4 − Remove gas supply line connected to gas valve. Remove<br />
gas valve/manifold assembly.<br />
5 − Remove sensor wire from sensor. Disconnect 2-pin<br />
plug from the ignitor.<br />
6 − Disconnect wires from flame roll−out switches.<br />
7 − Loosen clamps at vent elbow. Disconnect condensate<br />
drain tubing from flue collar. and remove the vent elbow.<br />
8 − Remove four burner box screws at the vestibule panel<br />
and remove burner box. Set burner box assembly<br />
aside.<br />
NOTE − If necessary, clean burners at this time. Follow<br />
procedures outlined in Burner Cleaning section.<br />
9 − Mark and disconnect all combustion air pressure tubing<br />
from cold end header collector box.<br />
10 − Mark and remove wires from pressure switches. Remove<br />
pressure switches. Keep tubing attached to<br />
pressure switches.<br />
11 − Disconnect the plug from the combustion air inducer.<br />
Remove two screws which secure combustion air inducer<br />
to collector box. Remove combustion air inducer<br />
assembly. Remove ground wire from vest panel.<br />
12 − Remove electrical junction box from the side of the furnace.<br />
13 − Mark and disconnect any remaining wiring to heating<br />
compartment components. Disengage strain relief<br />
bushing and pull wiring and bushing through the hole in<br />
the blower deck.<br />
14 − Remove the primary limit from the vestibule panel.<br />
15 − Remove two screws from the front cabinet flange at<br />
the blower deck. Spread cabinet sides slightly to allow<br />
clearance for removal of heat exchanger.<br />
16 − Remove screws along vestibule sides and bottom<br />
which secure vestibule panel and heat exchanger assembly<br />
to cabinet. Remove two screws from blower<br />
rail which secure bottom heat exchanger flange. Remove<br />
heat exchanger from furnace cabinet.<br />
17 − Back wash heat exchanger with soapy water solution<br />
or steam. If steam is used it must be below 275°F<br />
(135°C) .<br />
18 − Thoroughly rinse and drain the heat exchanger. Soap<br />
solutions can be corrosive. Take care to rinse entire<br />
assembly.<br />
Page 42
19 − Reinstall heat exchanger into cabinet making sure that<br />
the clamshells of the heat exchanger assembly are<br />
resting on the support located at the rear of the cabinet.<br />
Remove the indoor blower to view this area<br />
through the blower opening.<br />
20 − Re-secure the supporting screws along the vestibule<br />
sides and bottom to the cabinet. Reinstall blower and<br />
mounting screws.<br />
21 − Reinstall cabinet screws on front flange at blower<br />
deck.<br />
22 − Reinstall the primary limit on the vestibule panel.<br />
23 − Route heating component wiring through hole in blower<br />
deck and reinsert strain relief bushing.<br />
24 − Reinstall electrical junction box.<br />
25 − Reinstall the combustion air inducer. Reconnect the<br />
combustion air inducer to the wire harness.<br />
26 − Reinstall pressure switches and reconnect pressure<br />
switch wiring.<br />
27 − Carefully connect combustion air pressure switch<br />
hosing from pressure switches to proper stubs on<br />
cold end header collector box.<br />
28 − Reinstall condensate trap.<br />
29 − Reconnect exhaust piping and exhaust drain tubing.<br />
30 − Reinstall burner box assembly in vestibule area.<br />
31 − Reconnect flame roll−out switch wires.<br />
32 − Reconnect sensor wire and reconnect 2−pin plug from<br />
ignitor.<br />
33 − Secure burner box assembly to vestibule panel using<br />
four existing screws. Make sure burners line up in<br />
center of burner ports.<br />
34 − Reinstall gas valve manifold assembly. Reconnect<br />
gas supply line to gas valve.<br />
35 − Reconnect 2 wires to gas valve.<br />
36 − Replace the blower compartment access panel.<br />
37 − Refer to instruction on verifying gas and electrical connections<br />
when re−establishing supplies.<br />
38 − Follow lighting instructions to light and operate furnace<br />
for 5 minutes to ensure that heat exchanger is<br />
clean and dry and that furnace is operating properly.<br />
39 − Replace heating compartment access panel.<br />
Cleaning the Burner Assembly<br />
1 − Turn off electrical and gas power supplies to furnace.<br />
Remove upper and lower furnace access panels.<br />
2 − Disconnect the 2−pin plug from the gas valve.<br />
3 − Remove the burner box cover.<br />
4 − Disconnect the gas supply line from the gas valve. Remove<br />
gas valve/manifold assembly.<br />
5 − Mark and disconnect sensor wire from the sensor. Disconnect<br />
2-pin plug from the ignitor at the burner box.<br />
6 − Remove four screws which secure burner box assembly<br />
to vest panel. Remove burner box from the unit.<br />
7 − Use the soft brush attachment on a vacuum cleaner to<br />
gently clean the face of the burners. Visually inspect<br />
the inside of the burners and crossovers for any blockage<br />
caused by foreign matter. Remove any blockage.<br />
8 − Reconnect the sensor wire and reconnect the 2−pin<br />
plug to the ignitor wiring harness.<br />
9 − Reinstall the burner box assembly using the existing<br />
four screws. Make sure that the burners line up in the<br />
center of the burner ports.<br />
10 − Reinstall the gas valve manifold assembly. Reconnect<br />
the gas supply line to the gas valve. Reinstall the burner<br />
box cover.<br />
11 − Reconnect 2−pin plug to gas valve.<br />
12 − Replace the blower compartment access panel.<br />
13 − Refer to instruction on verifying gas and electrical connections<br />
when re−establishing supplies.<br />
14 − Follow lighting instructions to light and operate furnace<br />
for 5 minutes to ensure that heat exchanger is<br />
clean and dry and that furnace is operating properly.<br />
15 − Replace heating compartment access panel.<br />
Page 43
Planned Service<br />
A service technician should check the following items during<br />
an annual inspection. Power to the unit must be shut off<br />
for safety.<br />
Fresh air grilles and louvers (on the unit and in the room<br />
where the furnace is installed) − Must be open and unobstructed<br />
to provide combustion air.<br />
Burners − Must be inspected for rust, dirt, or signs of water.<br />
Vent pipe − Must be inspected for signs of water, cracked,<br />
damaged or sagging pipe, or disconnected joints.<br />
Unit appearance − Must be inspected for rust, dirt, signs<br />
of water, burnt or damaged wires, or components.<br />
Blower access door − Must be properly in place and provide<br />
a seal between the return air and the room where the<br />
furnace is installed.<br />
Ignition Control Board Diagnostic Codes<br />
DIAGNOSTIC CODES<br />
Make sure to Identify LED’S Correctly.<br />
LED #1 (Red) LED #2 (Green) DESCRIPTION<br />
SIMULTANEOUS<br />
SLOW FLASH<br />
SIMULTANEOUS<br />
FAST FLASH<br />
SLOW FLASH<br />
OFF<br />
ALTERNATING<br />
SLOW FLASH<br />
SIMULTANEOUS<br />
SLOW FLASH<br />
SIMULTANEOUS<br />
FAST FLASH<br />
ON<br />
SLOW FLASH<br />
ALTERNATING<br />
SLOW FLASH<br />
Return air duct − Must be properly attached and provide<br />
an air seal to the unit.<br />
Operating performance − Unit must be observed during<br />
operation to monitor proper performance of the unit and the<br />
vent system.<br />
Combustion gases − Flue products must be analyzed and<br />
compared to the unit specifications.<br />
Problems detected during the inspection may make it necessary<br />
to temporarily shut down the furnace until the items<br />
can be repaired or replaced.<br />
Instruct the homeowners to pay attention to their<br />
furnace. Situations can arise between annual furnace inspections<br />
that may result in unsafe operation. For instance,<br />
items innocently stored next to the furnace may obstruct<br />
the combustion air supply. This could cause incomplete<br />
combustion and the production of carbon monoxide gas.<br />
Power on − Normal operation.<br />
Also signaled during cooling and continuous fan.<br />
Normal operation − signaled when heating demand initiated at thermostat.<br />
Primary limit switch open. Limit must close within 3 minutes or unit goes into 1<br />
hour Watchguard.<br />
Pressure prove switch open.<br />
OR: Blocked inlet/exhaust vent;<br />
OR: Pressure switch closed prior to activation of combustion air inducer.<br />
Watchguard 1 hour −− burners failed to ignite or lost flame 5 times during single<br />
heating demand.<br />
SLOW FLASH OFF Flame sensed without gas valve energized.<br />
ON SLOW FLASH Rollout switch open. OR: 12-pin connector improperly attached.<br />
ON<br />
ON<br />
ON<br />
OFF Circuit board failure or control wired incorrectly.<br />
OFF<br />
ON<br />
FAST FLASH SLOW FLASH Main power polarity reversed. Switch line and neutral.<br />
SLOW FLASH FAST FLASH Low flame signal. Measures below 1.5 microamps. Replace flame sense rod.<br />
ALTERNATING<br />
FAST FLASH<br />
ALTERNATING<br />
FAST FLASH<br />
Improper main ground.<br />
OR: Line voltage below 90 volts.<br />
NOTE − Slow flash rate equals 1 Hz (one flash per second). Fast flash rate equals 3 Hz (three flashes per second).<br />
Minimum flame sense current = 0.5 microAmps.<br />
Page 44
Troubleshooting: Heating Sequence of Operation<br />
HEATING SEQUENCE OF OPERATION<br />
NORMAL HEATING MODE<br />
ABNORMAL HEATING MODE<br />
POWER ON<br />
CONTROL SELF−CHECK OKAY?<br />
YES<br />
IS POLARITY CORRECT?<br />
YES<br />
IS THERE A PROPER GROUND?<br />
YES<br />
NO<br />
NO<br />
NO<br />
GAS VALVE OFF. COMBUSTION AIR INDUCER OFF.<br />
INDOOR BLOWER DELAY OFF.<br />
LED #1 ON<br />
LED #2 ON<br />
(RESET CONTROL BY TURNING MAIN POWER OFF.)<br />
POLARITY REVERSED.<br />
LED #1 −− FAST FLASH<br />
LED #2 −− SLOW FLASH<br />
IMPROPER GROUND.<br />
LED #1 −− ALTERNATING FAST FLASH<br />
LED #2 −− ALTERNATING FAST FLASH<br />
IS VOLTAGE<br />
ABOVE 90 VOLTS?<br />
NO<br />
LEDs SIGNAL FAST ALTERNATING FLASH.<br />
CONTROL WILL NOT RESPOND TO A CALL FOR<br />
HEATING UNTIL VOLTAGE RISES ABOVE 95 VOLTS.<br />
YES<br />
ROLLOUT SWITCH CLOSED?<br />
YES<br />
NO<br />
GAS VALVE OFF. COMBUSTION AIR INDUCER ON.<br />
INDOOR BLOWER ON.<br />
LED #1 −− ON. LED #2 −− SLOW FLASH.<br />
SEQUENCE HOLDS UNTIL ROLLOUT SWITCH CLOSES<br />
AND POWER IS RESET OR T’STAT IS INTERRUPTED<br />
FOR MINIMUM OF 1 SECOND.<br />
BURNER OFF?<br />
(Flame sensed without gas valve energized)<br />
YES<br />
NO<br />
GAS VALVE OFF. COMBUSTION AIR INDUCER ON.<br />
INDOOR BLOWER ON HEATING SPEED.<br />
LED #1 −− SLOW FLASH<br />
LED #2 −− OFF<br />
NO<br />
NORMAL OPERATION:<br />
LED #1 −− SLOW FLASH<br />
LED #2 −− SLOW FLASH<br />
YES<br />
THERMOSTAT CALLS FOR HEAT:<br />
LED #1 −− FAST FLASH<br />
LED #2 −− FAST FLASH<br />
YES<br />
NO<br />
COMBUSTION AIR INDUCER OFF.<br />
INDOOR BLOWER ON<br />
LED #1 SLOW FLASH RATE<br />
LED #2 −− ON<br />
PRIMARY LIMIT SWITCH. CLOSED?<br />
YES<br />
IS COMBUSTION AIR<br />
PRESSURE SWITCH OPEN?<br />
YES<br />
IS COMBUSTION AIR INDUCER<br />
ENERGIZED?<br />
NO<br />
GAS VALVE OFF.<br />
COMBUSTION AIR INDUCER OFF.<br />
INDOOR BLOWER OFF WITH DELAY.<br />
LED #1 OFF<br />
LED #2 SLOW FLASH<br />
(Sequence holds until pressure switch<br />
opens or thermostat resets control.)<br />
YES<br />
HAS COMBUSTION AIR PRESSURE<br />
SWITCH CLOSED IN 2.5 MINUTES?<br />
YES<br />
NO<br />
PRESSURE SWITCH IS IN WATCHGUARD MODE.<br />
GAS VALVE OFF. COMBUSTION AIR INDUCER OFF.<br />
INDOOR BLOWER OFF WITH DELAY.<br />
LED #1 −− OFF. LED #2 −− SLOW FLASH.<br />
IS 5-MINUTE RESET PERIOD COMPLETE?<br />
YES<br />
CONTINUED NEXT PAGE<br />
Page 45
Troubleshooting: Heating Sequence of Operation (Continued)<br />
HEATING SEQUENCE CONTINUED<br />
NORMAL HEATING MODE<br />
ABNORMAL HEATING MODE<br />
15-SECOND COMBUSTION AIR INDUCER PREPURGE<br />
INITIATED BY CLOSED PRESSURE SWITCH.<br />
YES<br />
IGNITOR WARM-UP −− 20 SECONDS.<br />
YES<br />
4-SECOND TRIAL FOR IGNITION.<br />
GAS VALVE OPENS. IGNITOR ENERGIZED FOR<br />
FIRST 3 SECONDS OF THE TRIAL.<br />
YES<br />
FLAME STABILIZATION PERIOD.<br />
4 SECONDS<br />
FLAME RECTIFICATION CURRENT<br />
CHECK. CAN FLAME BE PROVEN WITHIN<br />
4 SECONDS AFTER GAS VALVE OPENS?<br />
(0.5 microamps)<br />
YES<br />
FLAME PRESENT?<br />
YES<br />
FLAME SIGNAL 1.5 MICROAMPS OR GREATER?<br />
YES<br />
INDOOR BLOWER ON<br />
AFTER 30−SECOND DELAY<br />
YES<br />
PRIMARY AND SECONDARY LIMIT<br />
SWITCHES CLOSED?<br />
YES<br />
NO<br />
NO<br />
NO<br />
NO<br />
NO<br />
IS VOLTAGE ABOVE 90 VOLTS?<br />
YES<br />
GAS VALVE OFF. COMBUSTION AIR INDUCER ON.<br />
INDOOR BLOWER OFF.<br />
HAS CONTROL FAILED TO SENSE FLAME FOR<br />
FIVE CONSECUTIVE TRIES DURING A SINGLE<br />
HEAT DEMAND?<br />
WATCHGUARD MODE. GAS VALVE OFF.<br />
COMBUSTION AIR INDUCER OFF.<br />
INDOOR BLOWER OFF WITH DELAY<br />
LEDs SIGNAL WATCHGUARD FAILURE CODE.<br />
IS 60-MINUTE RESET PERIOD COMPLETE?<br />
HAS CONTROL RESET IGNITION<br />
SEQUENCE FOUR TIMES?<br />
LOW FLAME SIGNAL<br />
(Does not affect operation of control)<br />
LED #1 −− SLOW FLASH<br />
LED #2 −− FAST FLASH<br />
GAS VALVE DE−ENERGIZED.<br />
COMBUSTION AIR INDUCER DE−ENERGIZED.<br />
INDOOR BLOWER ON UNTIL SWITCH CLOSES.<br />
LED #1 −− SLOW FLASH. LED #2 −− ON.<br />
IS LIMIT SWITCH CLOSED?<br />
YES<br />
HAS PRIMARY LIMIT RESET<br />
TIME EXCEEDED 3 MINUTES?<br />
NO<br />
LEDS SIGNAL<br />
ALTERNATING<br />
FAST FLASH UNTIL<br />
VOLTAGE IS ABOVE<br />
95 VOLTS, THEN<br />
RESTARTS HEATING<br />
SEQUENCE.<br />
YES<br />
NO<br />
YES<br />
NO<br />
LIMIT SWITCH WATCHGUARD<br />
MODE. GAS VALVE, COMB. AIR<br />
INDUCER AND INDOOR BLOW-<br />
ER OFF. LEDs SIGNAL LIMIT<br />
SWITCH OPEN UNTIL MAIN<br />
POWER IS<br />
YES<br />
NO<br />
YES<br />
INTERRUPTED OR<br />
T’STAT IS CYCLED<br />
OFF/ON FOR 1 SEC.<br />
MINIMUM. 60−MINUTE<br />
WATCHGUARD PE-<br />
RIOD STARTS AT<br />
TIME LIMIT CLOSES.<br />
IS 60−MIN. PERIOD<br />
COMPLETE?<br />
ROLLOUT SWITCH CLOSED?<br />
YES<br />
COMBUSTION AIR PRESSURE<br />
SWITCH CLOSED?<br />
YES<br />
THERMOSTAT DEMAND SATISFIED.<br />
YES<br />
LED #1 & #2 SIMULTANEOUS SLOW FLASHES.<br />
YES<br />
COMB. AIR INDUCER CONTINUES 5-SECOND<br />
POST PURGE AFTER T’STAT DEMAND IS SATISFIED.<br />
INDOOR AIR BLOWER COMPLETES SELECTED OFF"<br />
DELAY BEFORE SHUTTING OFF.<br />
NO<br />
NO<br />
GAS VALVE POWER OFF.<br />
COMBUSTION AIR INDUCER POWER ON.<br />
INDOOR BLOWER ON<br />
LED #1 −− ON. LED #2 −− SLOW FLASH.<br />
SEQUENCE HOLDS UNTIL ROLLOUT SWITCH IS RESET<br />
AND MAIN POWER IS INTERRUPTED OR<br />
THERMOSTAT IS CYCLED OFF/ON FOR 1 SEC. MINIMUM.<br />
GAS VALVE DE−ENERGIZED.<br />
COMBUSTION AIR INDUCER ON.<br />
INDOOR BLOWER OFF WITH DELAY<br />
LED #1 −− OFF. LED #2 −− SLOW FLASH.<br />
HAS CAB SWITCH CLOSED IN 2.5 MINUTES?<br />
NO<br />
5-MINUTE PRESSURE SWITCH<br />
WATCHGUARD MODE.<br />
YES<br />
Page 46
Troubleshooting: Cooling Sequence of Operation<br />
COOLING SEQUENCE OF OPERATION<br />
NORMAL COOLING MODE<br />
ABNORMAL COOLING MODE<br />
POWER ON<br />
IGNITION CONTROL MAIN POWER ON.<br />
CONTROL SELF DIAGNOSTIC CHECK.<br />
IS CONTROL OPERATING NORMALLY?<br />
YES<br />
IS THERE A PROPER GROUND?<br />
YES<br />
IS POLARITY CORRECT?<br />
YES<br />
IS VOLTAGE<br />
ABOVE 90 VOLTS?<br />
YES<br />
ROLLOUT SWITCH MONITORED CONTINUOUSLY.<br />
IS ROLLOUT SWITCH CLOSED?<br />
YES<br />
NO<br />
NO<br />
NO<br />
NO<br />
NO<br />
GAS VALVE OFF. COMBUSTION AIR INDUCER OFF.<br />
INDOOR BLOWER OFF WITH NORMAL DELAY.<br />
SIGNAL CIRCUIT BOARD FAILURE AT LED.<br />
INTERRUPT MAIN POWER TO RESET CONTROL.<br />
SIGNAL IMPROPER GROUND AT LED.<br />
CONTROL WILL CONTINUE TO CALL FOR COOLING<br />
IN THIS CONDITION.<br />
SIGNAL POLARITY REVERSED AT LED. CONTROL<br />
WILL CONTINUE TO CALL FOR COOLING IN THIS<br />
CONDITION.<br />
LED SIGNALS LOW VOLTAGE. CONTROL WILL<br />
CONTINUE TO CALL FOR COOLING<br />
IN THIS CONDITION.<br />
GAS VALVE OFF. COMBUSTION AIR INDUCER ON.<br />
INDOOR BLOWER ON.<br />
SIGNAL ROLL-OUT SWITCH OPEN AT LED.<br />
SEQUENCE HOLDS UNTIL ROLLOUT SWITCH CLOSES<br />
AND MAIN POWER IS INTERRUPTED OR THERMOSTAT<br />
IS CYCLED OFF/ON FOR 1 SEC. MINIMUM.<br />
LED: SLOW FLASH RATE REMAINS UNCHANGED<br />
THROUGHOUT COOLING CYCLE.<br />
THERMOSTAT CALLS FOR COOLING.<br />
COMPRESSOR CONTACTOR AND SYSTEM FAN<br />
ENERGIZED WITH 2-SECOND DELAY<br />
(COOLING SPEED). EAC TERM. ENERGIZED.<br />
THERMOSTAT OPENS.<br />
COMPRESSOR OFF.<br />
SYSTEM FAN AND EAC TERM. OFF<br />
WITH 45-SECOND DELAY.<br />
Page 47
Troubleshooting: Continuous Fan Sequence of Operation<br />
CONTINUOUS HEAT SPEED FAN SEQUENCE OF OPERATION<br />
LED: SLOW FLASH RATE REMAINS<br />
UNCHANGED THROUGHOUT SEQUENCE.<br />
MANUAL FAN SELECTION MADE AT THERMOSTAT.<br />
CONTROL (G) ENERGIZES SYSTEM FAN AT HEAT<br />
SPEED. EAC TERMINAL IS ENERGIZED.<br />
THERMOSTAT CALLS FOR HEAT (W).<br />
NO<br />
YES<br />
HUM TERM. ENERGIZES<br />
WITH COMB. AIR INDUCER.<br />
THERMOSTAT CALLS FOR COOLING.<br />
YES<br />
SYSTEM FAN SWITCHED TO COOL SPEED.<br />
EAC TERM. REMAINS ON.<br />
NO<br />
SYSTEM FAN REMAINS ON<br />
HEATING SPEED.<br />
THERMOSTAT OPENS.<br />
THERMOSTAT OPENS.<br />
HUM TERM. DE−ENERGIZES<br />
WITH COMB. AIR INDUCER<br />
MANUAL FAN SELECTION MADE AT THERMOSTAT.<br />
CONTROL (G) ENERGIZES SYSTEM FAN AT HEAT<br />
SPEED. EAC TERM. ENERGIZED.<br />
SYSTEM FAN REMAINS ON<br />
HEATING SPEED.<br />
Page 48
Repair Parts List<br />
The following repair parts are available through <strong>Lennox</strong> dealers. When ordering parts, include the complete furnace model<br />
number listed on the CSA nameplate −− Example: <strong>ML193DF</strong>04536B. All service must be performed by a licensed professional<br />
installer (or equivalent), service agency, or gas supplier.<br />
Cabinet Parts<br />
Upper access panel<br />
Blower access panel<br />
Top Cap<br />
Control Panel Parts<br />
Transformer<br />
Integrated control board<br />
Door interlock switch<br />
Blower Parts<br />
Blower wheel<br />
Motor<br />
Motor mounting frame<br />
Motor capacitor<br />
Blower housing cutoff plate<br />
Heating Parts<br />
Flame Sensor<br />
Heat exchanger assembly<br />
<strong>Gas</strong> manifold<br />
Combustion air inducer<br />
<strong>Gas</strong> valve<br />
Main burner cluster<br />
Main burner orifices<br />
Pressure switch<br />
Ignitor<br />
Primary limit control<br />
Flame rollout switches<br />
Page 49
Start−Up & Performance Check List<br />
UNIT SET UP<br />
<strong>Furnace</strong>:<br />
Model Number_______________<br />
Serial Number_________________<br />
2<br />
Line Voltage<br />
4<br />
SUPPLY<br />
AIR<br />
1<br />
GAS SUPPLY<br />
Natural <strong>Gas</strong><br />
LP Propane <strong>Gas</strong><br />
Piping Connections Tight<br />
3<br />
2<br />
Leak Tested<br />
Supply Line Pressure W.C.________<br />
Flter<br />
RETURN AIR<br />
1<br />
1<br />
<strong>Gas</strong> Supply Pressure<br />
3 DUCT SYSTEM<br />
SUPPLY AIR DUCT<br />
Sealed<br />
Insulated (if necessary)<br />
2<br />
INTAKE / EXHAUST PIPE<br />
All Joints Primed and Glued<br />
Terminations Installed Properly<br />
Horizontal Pipes Sloped (if applicable)<br />
Condensate Trap Primed / Line Sloped<br />
Pipes Supported<br />
Heat Cable Installed and Operable (if applicable)<br />
RETURN DUCT<br />
Sealed<br />
Filter Installed and Clean<br />
Grilles Unobstructed<br />
4 VOLTAGE CHECK<br />
Supply Voltage _____<br />
Electrical Connections Tight<br />
Page 50
1<br />
UNIT OPERATION<br />
HEATING MODE<br />
GAS MANIFOLD PRESSURE W.C._____<br />
3<br />
COOLING MODE<br />
INDOOR BLOWER AMPS______<br />
2<br />
COMBUSTION SAMPLE CO 2 % ______ CO PPM_______<br />
4<br />
TEMPERATURE DROP<br />
3<br />
INDOOR BLOWER AMPS______<br />
Return Duct Temperature _________<br />
Supply Duct Temperature _ _______<br />
4<br />
5<br />
TEMPERATURE RISE<br />
Supply Duct Temperature ________<br />
Return Duct Temperature _ _____<br />
Temperature Rise = ________<br />
TOTAL EXTERNAL STATIC<br />
Supply External Static _______<br />
Return External Static + ______<br />
Total External Static = _______<br />
5<br />
8<br />
Temperature Drop = _________<br />
TOTAL EXTERNAL STATIC (dry coil)<br />
Supply External Static _______<br />
Return External Static + ______<br />
Total External Static = _______<br />
DRAIN LINE<br />
Leak Free<br />
6<br />
CONDENSATE LINE<br />
Leak Free<br />
9<br />
THERMOSTAT<br />
Adjusted and Programmed<br />
7<br />
VENT PIPE<br />
Explained Operation to Owner<br />
Leak Free<br />
Combustion CO 2<br />
2<br />
7<br />
SUPPLY<br />
AIR<br />
Thermostat<br />
8<br />
Temperatures<br />
9<br />
<strong>Gas</strong> Manifold Pressure<br />
1<br />
4<br />
Blower Motor Amps<br />
3<br />
6<br />
Duct Static<br />
5<br />
RETURN AIR<br />
Contractor’s: Name_________________________Telephone_____________Checklist Completed____________________<br />
Job Address_____−________________________________Technician’s Name___________________________________<br />
Page 51
Requirements for Commonwealth of Massachusetts<br />
Modifications to NFPA−54, Chapter 10<br />
Revise NFPA−54 section 10.8.3 to add the following requirements:<br />
For all side wall, horizontally vented, gas−fueled equipment<br />
installed in every dwelling, building or structure used in<br />
whole or in part for residential purposes, including those<br />
owned or operated by the Commonwealth and where the<br />
side wall exhaust vent termination is less than seven (7)<br />
feet above the finished grade in the area of the venting, including<br />
but not limited to decks and porches, the following<br />
requirements shall be satisfied:<br />
1 − INSTALLATION OF CARBON MONOXIDE DETEC-<br />
TORS. At the time of installation of the side wall, horizontally<br />
vented, gas−fueled equipment, the installing<br />
plumber or gasfitter shall observe that a hard−wired<br />
carbon monoxide detector with an alarm and battery<br />
backup is installed on the floor level where the gas<br />
equipment is to be installed. In addition, the installing<br />
plumber or gasfitter shall observe that a battery−operated<br />
or hard−wired carbon monoxide detector with an<br />
alarm is installed on each additional level of the dwelling,<br />
building or structure served by the side wall, horizontally<br />
vented, gas−fueled equipment. It shall be the<br />
responsibility of the property owner to secure the services<br />
of qualified licensed professionals for the installation<br />
of hard−wired carbon monoxide detectors.<br />
a − In the event that the side wall, horizontally vented,<br />
gas−fueled equipment is installed in a crawl space<br />
or an attic, the hard−wired carbon monoxide detector<br />
with alarm and battery back−up may be installed<br />
on the next adjacent floor level.<br />
b − In the event that the requirements of this subdivision<br />
cannot be met at the time of completion of<br />
installation, the owner shall have a period of thirty<br />
(30) days to comply with the above requirements;<br />
provided, however, that during said thirty (30) day<br />
period, a battery−operated carbon monoxide detector<br />
with an alarm shall be installed.<br />
2 − APPROVED CARBON MONOXIDE DETECTORS.<br />
Each carbon monoxide detector as required in accordance<br />
with the above provisions shall comply with<br />
NFPA 720 and be ANSI/UL 2034 listed and IAS certified.<br />
3 − SIGNAGE. A metal or plastic identification plate shall<br />
be permanently mounted to the exterior of the building<br />
at a minimum height of eight (8) feet above grade directly<br />
in line with the exhaust vent terminal for the horizontally<br />
vented, gas−fueled heating appliance or<br />
equipment. The sign shall read, in print size no less<br />
than one−half (1/2) inch in size, GAS VENT DIRECT-<br />
LY BELOW. KEEP CLEAR OF ALL OBSTRUC-<br />
TIONS."<br />
4 − INSPECTION. The state or local gas inspector of the<br />
side wall, horizontally vented, gas−fueled equipment<br />
shall not approve the installation unless, upon inspection,<br />
the inspector observes carbon monoxide detectors<br />
and signage installed in accordance with the provisions<br />
of 248 CMR 5.08(2)(a) 1 through 4.<br />
EXEMPTIONS: The following equipment is exempt<br />
from 24 CMR 5.08(2)(a) 1 through 4:<br />
1 − The equipment listed in Chapter 10 entitled Equipment<br />
Not Required to Be Vented" in the most current<br />
edition of NFPA 54 as adopted by the Board; and<br />
2 − Product Approved side wall, horizontally vented, gas−<br />
fueled equipment installed in a room or structure separate<br />
from the dwelling, building or structure used in<br />
whole or in part for residential purposes.<br />
MANUFACTURER REQUIREMENTS −<br />
GAS EQUIPMENT VENTING SYSTEM PROVIDED.<br />
When the manufacturer of Product Approved side wall,<br />
horizontally vented, gas−fueled equipment provides a venting<br />
system design or venting system components with the<br />
equipment, the instructions provided by the manufacturer<br />
for installation of the equipment and the venting system<br />
shall include:<br />
1 − Detailed instructions for the installation of the venting<br />
system design or the venting system components:<br />
and<br />
2 − A complete parts list for the venting system design or<br />
venting system.<br />
MANUFACTURER REQUIREMENTS −<br />
GAS EQUIPMENT VENTING SYSTEM NOT PROVIDED.<br />
When the manufacturer of Product Approved side wall,<br />
horizontally vented, gas−fueled equipment does not provide<br />
the parts for venting the flue gases, but identifies special<br />
venting systems," the following requirements shall be<br />
satisfied by the manufacturer:<br />
1 − The referenced special venting system" instructions<br />
shall be included with the appliance or equipment<br />
installation instructions; and<br />
2 The special venting systems" shall be Product Approved<br />
by the Board, and the instructions for that system<br />
shall include a parts list and detailed installation<br />
instructions.<br />
A copy of all installation instructions for all Product<br />
Approved side wall, horizontally vented, gas−fueled<br />
equipment, all venting instructions, all parts lists for<br />
venting instructions, and/or all venting design instructions<br />
shall remain with the appliance or equipment at<br />
the completion of the installation.<br />
Page 52


