Sweeper 7100 Cleanstar - compact - comfort Operating Instructions
Sweeper 7100 Cleanstar - compact - comfort Operating Instructions
Sweeper 7100 Cleanstar - compact - comfort Operating Instructions
Create successful ePaper yourself
Turn your PDF publications into a flip-book with our unique Google optimized e-Paper software.
<strong>Operating</strong> <strong>Operating</strong> <strong>Instructions</strong><br />
<strong>Instructions</strong><br />
Translation Translation of of the the the original original operating operating instructions<br />
instructions<br />
<strong>Sweeper</strong><br />
<strong>Sweeper</strong><br />
<strong>7100</strong> <strong>7100</strong> <strong>Cleanstar</strong><br />
<strong>Cleanstar</strong><br />
- - <strong>compact</strong><br />
<strong>compact</strong><br />
- - <strong>comfort</strong><br />
<strong>comfort</strong><br />
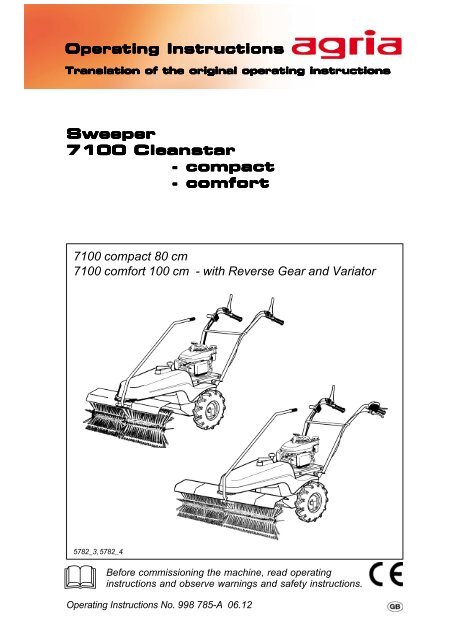
<strong>7100</strong> <strong>compact</strong> 80 cm<br />
<strong>7100</strong> <strong>comfort</strong> 100 cm - with Reverse Gear and Variator<br />
5782_3, 5782_4<br />
�<br />
Before commissioning the machine, read operating<br />
instructions and observe warnings and safety instructions.<br />
<strong>Operating</strong> <strong>Instructions</strong> No. 998 785-A 06.12
Symbols, Name Plate<br />
Please complete:<br />
Machine Type No. .......................<br />
Identification No. ...................<br />
......................................................<br />
Engine Type: ..............................<br />
Engine No. .................................<br />
Date of Purchase: ......................<br />
For name plate,<br />
refer to p3/fig.A/22 or B/22.<br />
For engine type and number,<br />
refer to p460/fig. C/7.<br />
Please state these data when ordering<br />
spare parts to avoid wrong deliveries.<br />
Only use original agria spare<br />
parts!<br />
Specifications, figures, and dimensions<br />
stated in these instructions are<br />
not binding. No claims can be derived<br />
from them. We reserve the right<br />
for improvements without changing<br />
these instructions.<br />
Amount of delivery:<br />
� <strong>Operating</strong> instructions<br />
� Base machine<br />
� Tool kit<br />
Please observe that only those<br />
activities are described here<br />
which are required for operating<br />
the sweeper. All other information<br />
on the engine may be taken<br />
from the enclosed engine operating<br />
instructions!<br />
Symbols<br />
Warning – Danger<br />
Important information<br />
Choke<br />
Fuel<br />
2 agria <strong>Sweeper</strong> <strong>7100</strong> <strong>Cleanstar</strong> <strong>compact</strong>/<strong>comfort</strong><br />
Oil<br />
Engine Start<br />
Engine Stop<br />
Brush drive<br />
Wheel drive<br />
Wheel drive engaged<br />
Wheel drive disengaged<br />
Slow<br />
Fast<br />
Open (unlocked)<br />
Closed (locked)<br />
� - Service�= contact<br />
your agria-workshop<br />
see engine operating<br />
instructions
Designation of Parts<br />
13<br />
13<br />
Fig. A<br />
12<br />
Fig. B<br />
12<br />
11<br />
11<br />
9<br />
10<br />
9<br />
10<br />
21<br />
21<br />
22<br />
22<br />
8<br />
8<br />
7<br />
7<br />
14<br />
6<br />
15 16<br />
14<br />
6<br />
15 16<br />
20<br />
19<br />
18<br />
24 1 2<br />
agria <strong>Sweeper</strong> <strong>7100</strong> <strong>Cleanstar</strong> <strong>compact</strong>/<strong>comfort</strong> 3<br />
17<br />
17<br />
5<br />
20<br />
19<br />
18<br />
24<br />
23<br />
5<br />
23<br />
4<br />
25<br />
3
Designation of Parts<br />
Figures A and B<br />
1 Pawl for clutch lever (<strong>comfort</strong> version)<br />
2 Clutch and F/R lever for wheel drive engagement (<strong>comfort</strong> version)<br />
3 Safety circuit lever (<strong>comfort</strong> version)<br />
4 Clutch lever and safety circuit lever for wheel drive engagement<br />
(<strong>compact</strong> version)<br />
5 Clutch lever for brush drive<br />
6 Speed control lever<br />
7 Rod that pivots the implement<br />
8 Height adjustment crank<br />
9 Protective hood<br />
10 Notched plate to lock the rod<br />
11 Main guard<br />
12 Coupling pin for implement attachment<br />
13 Extension guard<br />
14 Rotary brushes<br />
15 Worm gear (wheel drive)<br />
16 Wheel dog<br />
17 Drive wheel<br />
18 V-belt housing cover (rear)<br />
19 V-belt housing<br />
20 Engine base plate<br />
21 Clamping lever for handlebars height adjustment<br />
22 Name plate/machine identification no.<br />
23 Engine<br />
24 Handlebars<br />
25 Dial for manual speed adjustment of rotary brushes (<strong>comfort</strong> version)<br />
4 agria <strong>Sweeper</strong> <strong>7100</strong> <strong>Cleanstar</strong> <strong>compact</strong>/<strong>comfort</strong>
Index<br />
Amount of delivery .................. 2<br />
Recommendations<br />
Lubricants, Anti-Corrosive Agents ... 6<br />
Fuel ................................................... 6<br />
Maintenance and Repair .................. 6<br />
Designation of Parts .......... 3, 46<br />
Unpacking and Assembly ....... 7<br />
1. Safety <strong>Instructions</strong> .......... 8-12<br />
Due Use ............................................ 8<br />
2. Specifications<br />
Dimensions ..................................... 13<br />
<strong>Sweeper</strong> .......................................... 13<br />
Noise Level ..................................... 13<br />
Vibration Acceleration Value ........... 13<br />
Engine ....................................... 14–15<br />
Operation on Slopes ................ 14 - 15<br />
3. Devices and <strong>Operating</strong><br />
Elements<br />
Engine ............................................. 16<br />
Safety Circuit Function ............ 17 - 18<br />
Clutch ....................................... 17 - 18<br />
Handlebars ..................................... 20<br />
Drive Wheels .................................. 20<br />
Snow Chains ................................... 20<br />
Rotary Brushes ............................... 21<br />
Sweeping Height Adjustment ......... 22<br />
Brush Speed ............................ 23 - 24<br />
Implements ..................................... 25<br />
4. Commissioning and<br />
Operation<br />
Commissioning the Machine ..... 26<br />
Starting the Engine .................... 27<br />
Shutting off the Engine .............. 28<br />
Danger Zone .............................. 29<br />
Sweeping ................................... 30<br />
Snow Clearance ........................ 30<br />
5. Maintenance<br />
Brush drive ................................ 31<br />
Drive Wheels ............................. 32<br />
<strong>Sweeper</strong> ..................................... 32<br />
Reel ............................................ 32<br />
Clutch Play ................................. 33<br />
Safety Circuit ............................. 34<br />
Engine Oil .................................. 35<br />
Air Cooling System .................... 36<br />
Governor .................................... 36<br />
Exhaust System ........................ 36<br />
Speed Control ............................ 36<br />
General ...................................... 37<br />
Cleaning ..................................... 37<br />
Storage ...................................... 38<br />
6. Troubleshooting...... 40 - 41<br />
Electrical Wiring ......................... 42<br />
Varnishes and Wear Parts ......... 43<br />
Inspection and<br />
Maintenance Chart .................... 44<br />
Lubrication Chart ....................... 45<br />
Conformity Declaration .... 47<br />
Note fold-out pages!<br />
Figures A and B .................. 3<br />
Figure C ............................. 46<br />
agria <strong>Sweeper</strong> <strong>7100</strong> <strong>Cleanstar</strong> <strong>compact</strong>/<strong>comfort</strong> 5<br />
1<br />
2<br />
3<br />
4<br />
5<br />
6
Recommendations<br />
Lubricants and<br />
Anti-Corrosive<br />
Agents:<br />
Use the lubricants<br />
specified for engine and<br />
gearbox (see “Specifications”).<br />
We recommend using<br />
Bio-lubricating oil or<br />
Bio-lubricating grease<br />
for “open” lubrication<br />
points or nipples (as<br />
specified in the operating<br />
instructions).<br />
We recommend using<br />
Bio-slushing oil to<br />
preserve machines and<br />
attachments (do not<br />
apply on painted covers).<br />
You can brush or spray<br />
the oil.<br />
Anti-corrosive agents are<br />
environmentally friendly<br />
and degrade fast.<br />
Using ecologically safe<br />
Bio-lubricants and Bioanti-corrosives,<br />
you contribute<br />
to environmental<br />
protection and to the<br />
wellbeing of humans,<br />
animals and plants.<br />
Fuel:<br />
This engine runs<br />
smoothly on conventional<br />
unleaded regular<br />
and supergrade petrol<br />
(including E10).<br />
Do not add oil to petrol.<br />
If, for environmental<br />
reasons, you use<br />
unleaded petrol, make<br />
sure the fuel is drained<br />
completely when shutting<br />
down the engine for more<br />
than 30 days. This is to<br />
prevent resin residue from<br />
depositing in the<br />
carburetor, fuel filter, and<br />
tank. Or add a fuel stabilizer<br />
to the fuel.<br />
For further instructions<br />
see “Engine Preservation”.<br />
Maintenance<br />
and Repair:<br />
6 agria <strong>Sweeper</strong> <strong>7100</strong> <strong>Cleanstar</strong> <strong>compact</strong>/<strong>comfort</strong><br />
The trained mechanics of<br />
your agria workshop<br />
expertly carry out any<br />
maintenance and repair<br />
work.<br />
You should only carry out<br />
major maintenance work<br />
and repairs on your own,<br />
if you have the proper<br />
tools and knowledge of<br />
machines and internal<br />
combustion engines.<br />
Do not hammer against<br />
the flywheel with a hard<br />
object or metal tools as it<br />
might crack and shatter in<br />
operation, causing<br />
injuries and damage. Only<br />
use suitable tools to pull<br />
off the flywheel.
Unpacking and Assembly<br />
1.<br />
2.<br />
3.<br />
4.<br />
21<br />
5.<br />
9<br />
F<br />
8<br />
D<br />
24<br />
K<br />
Unpacking<br />
� Open the box top.<br />
� Cut all corners open and<br />
fold down the sides.<br />
1. Attaching the handlebars<br />
Raise the handlebars<br />
� Unscrew the clamping lever (21) until<br />
the notches are exposed<br />
� Pivot the handlebars (24) to the rear<br />
up to correct working height<br />
� page 20<br />
� Re-tighten clamping lever (21).<br />
Attach cables and electric lines with<br />
the three clips (28) to the handlebars in<br />
accordance with fig.<br />
2. Fitting the protective hood (9)<br />
with spacer (D), crank (8) and linch pin<br />
(K).<br />
3. Fitting the drive wheels<br />
� Coat the wheel shaft on both sides<br />
with a little grease<br />
� fit washers and drive wheels on both<br />
sides - pay attention to direction of arrow<br />
for cleated tyres.<br />
� Mount wheel dog with screw (2) and<br />
securing nut - wheel dog settings<br />
� page 20.<br />
4. Mounting extension guards<br />
� Attach an extension guard to either<br />
side of the main guard (11), using three<br />
hex head bolts and locking nuts for each<br />
guard � page 22.<br />
5. Attaching the rotary brushes<br />
� page 21<br />
6. Starting up<br />
See page 26 for details.<br />
agria <strong>Sweeper</strong> <strong>7100</strong> <strong>Cleanstar</strong> <strong>compact</strong>/<strong>comfort</strong> 7
1<br />
1. Safety <strong>Instructions</strong><br />
Before starting the engine, read the operating<br />
instructions and note:<br />
Warning<br />
This symbol marks all paragraphs which<br />
affect your safety. Pass all safety instructions<br />
to other users and operators.<br />
Due Use<br />
The sweeper, including the implements<br />
approved by the manufacturer, is<br />
constructed for normal use in cleaning<br />
park and pathway areas, for gathering<br />
and sweeping up loose dirt, and may<br />
also be used as a snow-clearing<br />
machine after it has been fitted with<br />
suitable brushes and a rake blade (due<br />
use).<br />
Any other type of operation is considered<br />
undue. The manufacturer is not liable<br />
for any damages resulting from<br />
undue use, for which the risk lies with<br />
the user alone.<br />
Due use includes compliance with<br />
manufacturer’s instructions on operation,<br />
maintenance and repair.<br />
Any unauthorized changes to the<br />
sweeper render manufacturer liability<br />
null and void.<br />
General <strong>Instructions</strong> on<br />
Safety and Accident<br />
Prevention<br />
Basic Rule:<br />
The standard accident prevention regulations<br />
must be adhered to, as well as<br />
all other generally accepted rules governing<br />
operational safety, occupational<br />
health and road traffic regulations.<br />
For drives on public roads, the national<br />
traffic code applies.<br />
Accordingly, check the sweeper for road<br />
and operational safety each time you<br />
take up operation.<br />
Only persons familiar with the sweeper<br />
and instructed on the hazards of operation<br />
are allowed to use, maintain and<br />
repair the sweeper.<br />
Teenagers of 16 years or younger may<br />
not operate the sweeper!<br />
Only work in good light and visibility.<br />
Operator’s clothes should fit tight. Avoid<br />
wearing loose fitting clothes. Wear solid<br />
shoes.<br />
Note the warning and instruction signs<br />
on the sweeper for safe operation. Compliance<br />
is for your own safety.<br />
When transporting the sweeper on vehicles<br />
or trailers outside the area to be<br />
sweeped, ensure that the engine is<br />
turned off and the wheel dogs are<br />
engaged.<br />
Careful with rotating tools – keep at a<br />
safe distance!<br />
Beware of coasting tools. Before you<br />
start any maintenance or repair on them,<br />
wait until tools have come to a complete<br />
stop.<br />
8 agria <strong>Sweeper</strong> <strong>7100</strong> <strong>Cleanstar</strong> <strong>compact</strong>/<strong>comfort</strong>
1. Safety <strong>Instructions</strong><br />
Riding on the machine during operation<br />
is not permitted.<br />
Implements and their weight affect the<br />
driving, steering, braking, and tip-over<br />
characteristics of the sweeper. Therefore,<br />
ensure steering and braking functions<br />
are sufficient. Match operating<br />
speed to conditions.<br />
Do not change settings of governor. High<br />
engine speed increases risk of<br />
accidents.<br />
Working Area and Danger<br />
Zone<br />
The user is liable to third parties working<br />
within the sweeper’s working range.<br />
Staying in the danger zone is not permitted.<br />
Check the immediate surroundings of<br />
the sweeper before you start it. Watch<br />
out for children and animals.<br />
Careful! Dirt and stones may get airborne<br />
during sweeping. People and animals<br />
must keep out of this area. Watch<br />
out for vehicles, window panes and other<br />
objects to avoid damage.<br />
Before you start work, clear the area<br />
from any foreign object. During operation,<br />
always watch out for further objects<br />
and remove them in time.<br />
For operation in enclosed areas, ensure<br />
that a safety distance is kept to enclosures<br />
to prevent damage to tools.<br />
Operation and Safety<br />
Devices<br />
Before You Start the Engine<br />
Become familiar with the devices and<br />
operating elements and their functions.<br />
Above all, learn how to turn the engine<br />
off quickly and safely in an emergency.<br />
Ensure that all protective devices are<br />
mounted and positioned to provide protection.<br />
Starting the Engine<br />
Do not start engine in closed rooms. The<br />
carbon monoxide contained in the exhaust<br />
fume is extremely toxic when inhaled.<br />
Before you start the engine set all operating<br />
elements to neutral or idling position.<br />
For starting the engine, do not step in<br />
front of the sweeper and the implement.<br />
Operation<br />
Never leave the operator’s position at<br />
the handlebars while sweeper is at work.<br />
Never adjust the operating handles during<br />
work – danger!<br />
During operation the operator must keep<br />
at a distance as defined by the handlebars,<br />
especially when turning the machine.<br />
Riding on the machine during operation<br />
or in transport is not permitted.<br />
agria <strong>Sweeper</strong> <strong>7100</strong> <strong>Cleanstar</strong> <strong>compact</strong>/<strong>comfort</strong> 9<br />
1
1<br />
1. Safety <strong>Instructions</strong><br />
If clogging occurs in the brushes or in<br />
the implement, turn off the engine and<br />
clean the brushes or the implement with<br />
an appropriate tool.<br />
In case of damage to the sweeper or to<br />
the implement, immediately turn off the<br />
engine and have it repaired.<br />
If steering causes problems, immediately<br />
bring the sweeper to a halt and<br />
turn it off. Have the malfunction removed<br />
without delay.<br />
To prevent the sweeper from sliding on<br />
slopes, make sure it is secured by another<br />
person using a bar or a rope. This<br />
person must be located at a higher position<br />
than the vehicle and at a safe distance<br />
from the attachment at work.<br />
If possible, always work horizontally on<br />
the slope.<br />
End of Operation<br />
Never leave the sweeper unattended<br />
with the engine running.<br />
Before you leave the sweeper, turn off<br />
the engine.<br />
Secure sweeper against unauthorized<br />
use - remove spark plug connector.<br />
Implements<br />
Only mount implements with the engine<br />
and the implement drive switched off.<br />
Always use appropriate tools and wear<br />
gloves when changing implements and<br />
parts thereof.<br />
For mounting and dismounting implements<br />
bring stands into proper position<br />
and ensure stability.<br />
Secure sweeper and implements<br />
against rolling off (wheel chocks).<br />
Beware of injuries while coupling implements.<br />
Mount implements as specified and only<br />
couple at specified points.<br />
Secure sweeper and implement against<br />
unauthorized use and rolling off when<br />
you leave the machine. If necessary, install<br />
transport or security devices and<br />
secure.<br />
Weights<br />
Always fit weights onto appropriate<br />
weight mounting devices.<br />
Snow Clearing<br />
Ensure snow dozer is mounted correctly!<br />
Wear slip-proof shoes.<br />
When pivoting the snow dozer watch out<br />
for crush and shear points. Adjust working<br />
speed to conditions. Operator may<br />
be injured when the machine hits an<br />
obstacle.<br />
10 agria <strong>Sweeper</strong> <strong>7100</strong> <strong>Cleanstar</strong> <strong>compact</strong>/<strong>comfort</strong>
1. Safety <strong>Instructions</strong><br />
Maintenance and<br />
Cleaning<br />
Never carry out any maintenance or<br />
cleaning with the engine running.<br />
Before you work on the engine, always<br />
remove spark plug connector (petrol<br />
engine only).<br />
Check regularly and, if necessary, replace<br />
all guards and tools subject to<br />
wear and tear.<br />
Keep sweeper and implement clean to<br />
avoid risk of fire.<br />
Check nuts and bolts regularly for tight<br />
fit and re-tighten, if necessary.<br />
After maintenance and cleaning, ensure<br />
that you re-install all safety devices and<br />
guards and adjust them properly.<br />
Only use original agria spare parts. All<br />
other commercial spare parts must correspond<br />
to quality and technical requirements<br />
specified by agria.<br />
Storage<br />
It is not allowed to store the sweeper in<br />
rooms with open heating.<br />
Never park the sweeper in closed rooms<br />
with fuel left in tank. Fuel vapours are<br />
hazardous.<br />
Engine, Fuel, and Oil<br />
Never let the engine run in closed rooms.<br />
Extreme danger of intoxication! For the<br />
same reason, also replace damaged<br />
exhaust parts immediately.<br />
Caution with hot engine parts!<br />
The exhaust and other engine parts<br />
become very hot, if the engine runs and<br />
immediately after turning off. Hold for<br />
sufficient distance from hot surfaces and<br />
keep children away from the running<br />
engine.<br />
Be careful when dealing with fuel. Great<br />
danger of fire! Never refill fuel close to<br />
open fire, inflammable sparks or hot<br />
engine parts. Do not refill fuel in closed<br />
rooms. Do not smoke when refilling!<br />
Refill only with the engine switched off<br />
and cooled down.<br />
Do not spill any fuel, use a proper filling<br />
device.<br />
In case of fuel spillage, pull the sweeper<br />
away from the spillage before you start<br />
the engine.<br />
Make sure fuel is of specified quality.<br />
Store fuel in approved cans only.<br />
For safety reasons the petrol tank and<br />
fuel cap should be replaced regularly.<br />
Store anti-corrosive agents and stabilizing<br />
liquids out of reach of children. If<br />
sickness and vomiting occur, see a doctor.<br />
If fuel has contacted eyes, rinse<br />
them thoroughly, avoid inhaling of vapours.<br />
Read and observe enclosed instructions.<br />
agria <strong>Sweeper</strong> <strong>7100</strong> <strong>Cleanstar</strong> <strong>compact</strong>/<strong>comfort</strong> 11<br />
1
1<br />
1. Safety <strong>Instructions</strong><br />
Before you dispose of opened and<br />
seemingly empty pressurised tins (e.g.<br />
of assist-starting liquids) make sure they<br />
are completely empty. Empty them in<br />
ventilated places safe from spark formation<br />
or flames. If necessary, dispose<br />
of tins in hazardous waste deposits.<br />
Be careful when draining hot oil, danger<br />
of burns.<br />
Make sure oil is of specified quality. Storage<br />
is in approved cans only.<br />
Dispose of oil, greases, and filters separately<br />
and properly.<br />
Tyres and<br />
Tyre Air Pressure<br />
When working on tyres, make sure<br />
sweeper is parked properly and secured<br />
against rolling off.<br />
Any repairs are to be carried out by<br />
trained mechanics only and with the<br />
appropriate tools.<br />
Regularly check tyre air pressure.<br />
Excessive pressure may cause bursts.<br />
Use appropriate tyre air pressure when<br />
mounting weights or implements.<br />
Electrical System<br />
Persons having a pacemaker must not<br />
touch live parts of ignition system when<br />
the engine is running.<br />
Explanation of<br />
Warning Signs<br />
Before any cleaning, maintenance, and<br />
repair work switch off the engine and<br />
pull spark plug connector.<br />
With engine running, keep at a safe distance.<br />
Dirt and stones may get airborne<br />
during sweeping. People and animals<br />
must keep out of this area.<br />
Signs<br />
When working with the machine,<br />
wear individual protective<br />
ear plugs.<br />
Wear protective gloves.<br />
Wear solid shoes.<br />
12 agria <strong>Sweeper</strong> <strong>7100</strong> <strong>Cleanstar</strong> <strong>compact</strong>/<strong>comfort</strong>
2. Specifications<br />
2.1 <strong>Sweeper</strong><br />
agria-<strong>Cleanstar</strong><br />
Dimensions:<br />
a ...................................... 890 mm<br />
b ...................................... 630 mm<br />
e .................................... 1335 mm<br />
h ............................. 960-1060 mm<br />
l ...................................... 1650 mm<br />
L Collector .................... 1930 mm<br />
L Snow dozer ............... 1890 mm<br />
A ........................ 800 or 1000 mm<br />
(depending on brush version)<br />
S ...................................... 480 mm<br />
Weights:<br />
<strong>compact</strong> 80 cm ............. approx. 91 kg<br />
<strong>comfort</strong> 100 cm ............. approx. 98 kg<br />
Collector 80 cm ........ approx. 11, 5 kg<br />
Collector 100 cm ........ approx. 13,0 kg<br />
Snow dozer blade 80 cm approx. 11,0 kg<br />
Snow dozer blade100 cm approx. 13,5 kg<br />
Tyres: ..................... 3.50 - 6 field tyres<br />
......................... 13x5.00-6 Lawn tyres<br />
Tyre pressure: ........................ 0,8 bar<br />
Clutch:<br />
There are two separately engageable<br />
V-belt clutches and idler pulleys fitted<br />
between engine and wheel drive/<br />
brush drive<br />
<strong>compact</strong> version:<br />
The rotary brushes are adjustable to one<br />
of two available speeds ........ 130 rpm<br />
.............................................. 230 rpm<br />
<strong>comfort</strong> version:<br />
Friction clutch for reversing<br />
Brush speed is adjusted steplessly via<br />
a variator from ... 100 rpm ... 200 rpm<br />
Always use original agria V-belts (see<br />
wear parts list on page 42)<br />
Transmission:<br />
Wheel drive: ....................... worm gear<br />
Brush drive: ....................... bevel gear<br />
Ground speeds:<br />
Forward travel ....................... 2.8 km/h<br />
Reverse travel<br />
(Comfort version only) .......... 1.8 km/h<br />
Handlebars:<br />
height-adjustable without tools<br />
Noise level:<br />
Noise level: .......................... L pA 75 dB<br />
in accordance with EN 11201 (at<br />
operator’s ear)<br />
sound power level in accordance with<br />
EN ISO 3744:1995 : ...............................<br />
measured ............................. L WA 95 dB<br />
guaranteed ........................... L WA 96 dB<br />
Vibration acceleration value:<br />
on handlebar grip ........ a hw = 3,02 m/s 2<br />
in accordance with 2002/44/EC<br />
agria <strong>Sweeper</strong> <strong>7100</strong> <strong>Cleanstar</strong> <strong>compact</strong>/<strong>comfort</strong> 13<br />
2
2<br />
2. Specifications<br />
2.2 Engine<br />
Manufacturer: .......................... Honda<br />
Type: ............................ GCV 135 N2E<br />
Version: ....................... Fan-air-cooled<br />
1 cylinder-4-stroke<br />
OHC engine (petrol)<br />
Bore: ........................................ 64 mm<br />
Stroke: ..................................... 42 mm<br />
Piston displacement: ......... 135 ccm<br />
Output: .................................... 3.4 kW<br />
at 3600 rpm<br />
Torque: ............................ max 9.7 Nm<br />
at 2500 rpm<br />
Spark plug: ...... NGK BPR6ES Bosch<br />
Spark plug gap: ............... 0.7–0.8 mm<br />
Ignition:<br />
Transistor trip coil, contactless;<br />
ignition point: 20° bef ore dead centre,<br />
radio remote screened according to<br />
VDE 0879<br />
Valve lash (engine cold)<br />
Intake: ........................ 0.15 ± 0.04 mm<br />
Outlet: ........................ 0.20 ± 0.04 mm<br />
Compact Version<br />
Starter: ..........................Recoil starter<br />
Fuel tank capacity: .................... 1.1 l<br />
Fuel: ........................... unleaded petrol<br />
octane number at least 91 RON<br />
(also E10)<br />
(refer to fuel recommendations<br />
in this manual)<br />
Air filter: ................. Dry element filter<br />
Carburetor: ............... Float carburetor<br />
Throttle valve type<br />
Mixture control screw: ..... opened by<br />
approx. 1 turn in base setting<br />
Top no-load speed: ............ 3250 rpm<br />
Idling speed: ............. 1550–1850 rpm<br />
Engine oil:<br />
Filling quantity ................ approx. 0.55 l<br />
Multi-grade oil SAE 10 W-40<br />
SG, SF or higher quality grade<br />
Operability on Slopes:<br />
Engine is suited for use on slopes<br />
(with oil level at “max” = upper level<br />
mark)<br />
Continuous operation possible up to<br />
20° inclination (37 %)<br />
14 agria <strong>Sweeper</strong> <strong>7100</strong> <strong>Cleanstar</strong> <strong>compact</strong>/<strong>comfort</strong>
2. Specifications<br />
2.3 Engine<br />
Manufacturer: .......................... Honda<br />
Type: ............................ GCV 160 N2E<br />
Version: ....................... Fan-air-cooled<br />
1 cylinder-4-stroke<br />
OHC engine (petrol)<br />
Bore: ........................................ 64 mm<br />
Stroke: ..................................... 50 mm<br />
Piston displacement: ......... 160 ccm<br />
Output: .................................... 4.1 kW<br />
at 3600 rpm<br />
Torque: .......................... max 11.4 Nm<br />
at 2500 rpm<br />
Spark plug: ...... NGK BPR6ES Bosch<br />
Spark plug gap: ............... 0.7–0.8 mm<br />
Ignition:<br />
Transistor trip coil, contactless;<br />
ignition point: 20° bef ore dead centre,<br />
radio remote screened according to<br />
VDE 0879<br />
Valve lash (engine cold)<br />
Intake: ........................ 0.15 ± 0.04 mm<br />
Outlet: ........................ 0.20 ± 0.04 mm<br />
Comfort Version<br />
Starter: .......................... Recoil starter<br />
Fuel tank capacity: .................... 1.1 l<br />
Fuel: ........................... unleaded petrol<br />
octane number at least 91 RON<br />
(also E10)<br />
(refer to fuel recommendations<br />
in this manual)<br />
Air filter: ................. Dry element filter<br />
Carburetor: ............... Float carburetor<br />
Throttle valve type<br />
Mixture control screw: ..... opened by<br />
approx. 1 turn in base setting<br />
Top no-load speed: ............ 3250 rpm<br />
Idling speed: ............. 1550–1850 rpm<br />
Engine oil:<br />
Filling quantity ................ approx. 0.55 l<br />
Multi-grade oil SAE 10 W-40<br />
SG, SF or higher quality grade<br />
Operability on Slopes:<br />
Engine is suited for use on slopes<br />
(with oil level at “max” = upper level<br />
mark)<br />
Continuous operation possible up to<br />
20° inclination (37 %)<br />
agria <strong>Sweeper</strong> <strong>7100</strong> <strong>Cleanstar</strong> <strong>compact</strong>/<strong>comfort</strong> 15<br />
2
3<br />
3. Devices and <strong>Operating</strong> Elements<br />
The agria <strong>Cleanstar</strong> sweeper is suited<br />
for application in amenity areas and winter<br />
road clearance. The following components<br />
are available for sweepers:<br />
� Rotary brushes<br />
80 cm coarse agria item no. 6194 051<br />
80 cm fine agria item no. 6194 061<br />
100 cm coarse agria item no. 6194 151<br />
100 cm fine agria item no.6194 161<br />
� Collectors<br />
80 cm agria item no. 6194 211<br />
100 cm agria item no. 6194 221<br />
� Sprinkling assy<br />
agria item no.6194 481<br />
� Spray apron<br />
agria item no.6194 921<br />
The following implements are available<br />
for winter road clearance:<br />
� Snow dozers<br />
80 cm agria item no.6196 011<br />
100 cm agria item no. 6196 021<br />
3.1 Engine<br />
The four-stroke petrol engine runs on<br />
commercial petrol (refer to fuel recommendations<br />
p6).<br />
During the first 20 operating hours<br />
(break-in period) do not operate the engine<br />
at maximum speed.<br />
Even after the break-in period never<br />
operate the engine at higher speed than<br />
is necessary for the work in hand.<br />
IHigh engine speed is harmful<br />
to any engine and considerably<br />
affects its longevity. This applies<br />
especially for no load operation.<br />
Any overspeed (have the engine roar)<br />
can result in immediate damage.<br />
Cooling System<br />
The engine is fan-cooled. Therefore<br />
keep the grille on the recoil starter and<br />
the cooling fins on the cylinder clean and<br />
free from sucked-in plant trash.<br />
Idling-Speed<br />
Always ensure that idling-speed is adjusted<br />
correctly. At low speeds and with<br />
the speed control lever set to idle, the<br />
engine is supposed to run smoothly and<br />
without run-out.<br />
Air Filter<br />
The air filter cleans the air as it is inducted.<br />
A clogged filter reduces engine<br />
output.<br />
Ignition System<br />
The engine is equipped with a maintenance-free,<br />
contactless electronic ignition<br />
system. We recommend to have<br />
necessary check-ups done by an expert<br />
only.<br />
Speed Control Lever<br />
(Engine-shut-off switch)<br />
The speed control lever (A/6) on the<br />
handlebar sets the engine speed<br />
steplessly and actuates the CHOKE and<br />
the engine-shut-off switch. For the appropriate<br />
positions see the illustration.<br />
IThe speed control lever also<br />
serves as engine safety circuit.<br />
In an emergency move the lever to position<br />
"STOP" to shut off the engine<br />
instantly.<br />
16 agria <strong>Sweeper</strong> <strong>7100</strong> <strong>Cleanstar</strong> <strong>compact</strong>/<strong>comfort</strong>
3. Devices and <strong>Operating</strong> Elements<br />
Compact Version<br />
0<br />
0<br />
5 4<br />
3.2 Safety Circuit Lever<br />
The <strong>Cleanstar</strong> <strong>compact</strong> sweeper has<br />
a safety circuit mechanism for wheel/<br />
brush drives integrated in the clutch lever.<br />
� Stop position: Release the clutch<br />
levers (A/4 or A/5) to disengage either<br />
drive.<br />
WDo not tie down the safety<br />
circuit lever.<br />
IThe safety circuit lever also serves<br />
as engine safety circuit in an<br />
emergency. Upon release, the lever will<br />
automatically go to STOP position.<br />
3.3 Clutch<br />
Wheel drive and brush drive engagement<br />
is via a V-belt clutch. To engage<br />
the clutch, depress the wheel drive<br />
clutch lever (A/4) and the brush drive<br />
clutch lever (A/5). Upon release, the<br />
clutch levers will automatically move to<br />
position “0” (drives are disengaged).<br />
Each clutch is operated individually and<br />
independently.<br />
agria <strong>Sweeper</strong> <strong>7100</strong> <strong>Cleanstar</strong> <strong>compact</strong>/<strong>comfort</strong> 17<br />
3
3<br />
3. Devices and <strong>Operating</strong> Elements<br />
Comfort Version<br />
0<br />
STOP position<br />
Start position<br />
<strong>Operating</strong> position<br />
0<br />
5<br />
2<br />
3.2 Safety circuit<br />
The <strong>Cleanstar</strong> <strong>comfort</strong> sweeper is<br />
equipped with a safety circuit lever.<br />
� Stop position: Upon release of the lever<br />
– with wheel drive and brush drive engaged<br />
– the ignition system is switched off (engine<br />
is shut off).<br />
Caution – engine keeps running due to<br />
centrifugal mass.<br />
� Start position: Pull the clutch lever (B/2)<br />
to start the machine and to interrupt work.<br />
Lock the lever with pawl (B/1) and move<br />
the brush drive lever (B/5) to position “0”.<br />
� <strong>Operating</strong> position: Press the safety<br />
circuit lever (B/3) down to start operation.<br />
W Do<br />
not tie down the safety<br />
circuit lever.<br />
IThe safety circuit lever also serves<br />
as engine safety circuit in an<br />
emergency. Upon release, the lever will<br />
automatically go to STOP position.<br />
3.3 Clutch<br />
Wheel drive and brush drive engagement<br />
is via a V-belt clutch. To engage the clutch,<br />
depress the wheel drive clutch lever (B/2)<br />
and the brush drive clutch lever (B/5).<br />
Each clutch is operated individually and<br />
independently.<br />
The wheel drive clutch is combined with<br />
reverse speed engagement.<br />
18 agria <strong>Sweeper</strong> <strong>7100</strong> <strong>Cleanstar</strong> <strong>compact</strong>/<strong>comfort</strong>
3. Devices and <strong>Operating</strong> Elements<br />
Comfort Version<br />
Wheel Drive<br />
The <strong>Cleanstar</strong> <strong>comfort</strong> sweeper has<br />
one forward and one reverse speed.<br />
The forward/reverse speed is engaged/<br />
disengaged via clutch lever (B/2).<br />
� Forward speed is engaged when the<br />
clutch lever is (B/2) released and the<br />
pawl is not locked.<br />
� No gear is engaged when the clutch<br />
lever is pulled half way (B/2, pawl is<br />
locked).<br />
� Reverse speed is engaged when the<br />
the clutch lever (B/2) is pulled all the<br />
way.<br />
It is possible to lock the clutch lever in<br />
position “0” with pawl (B/1).<br />
WDuring slope operation always<br />
turn machine towards<br />
the slope.<br />
The levers are factory-set to a play of<br />
1–2 mm to prevent the clutch from slipping<br />
during work.<br />
Check the clutch play after the first operating<br />
hour and readjust the play if necessary<br />
(see maintenance instructions).<br />
Brush drive<br />
The brushes are driven by a V-belt clutch<br />
and a bevel gear.<br />
0<br />
Operate lever (B/5) to turn the brushes<br />
on/off:<br />
� Depress the lever to turn them on.<br />
The engine starts driving the brushes.<br />
� Push the lever (B/5) up to turn them<br />
off.<br />
I Note: Park the sweeper only<br />
when all drives are disengaged<br />
(see “Storage”, page 41) to avoid clutch<br />
problems.<br />
agria <strong>Sweeper</strong> <strong>7100</strong> <strong>Cleanstar</strong> <strong>compact</strong>/<strong>comfort</strong> 19<br />
3
3<br />
3. Devices and <strong>Operating</strong> Elements<br />
�<br />
�<br />
1 Wheel dog<br />
2 Screw with nut<br />
3 Drive wheel<br />
4 Washer or Spacer tube<br />
3<br />
2<br />
1<br />
1 Grip end<br />
2 Dog pin<br />
3 Hole on drive wheel<br />
3.4 Handlebars<br />
Handlebars Height Adjustment<br />
� Unscrew the clamping lever (21) until the notches<br />
are exposed<br />
� Adjust the handlebars (24) to the desired height<br />
and notch them into the proper position.<br />
� Re-tighten clamping lever (21).<br />
3.5 Drive Wheels<br />
The drive wheels (3) are attached with dogs (1)<br />
and screws (2) to the shaft. This allows attachment<br />
and removal.<br />
Washers or spacer tubes (4) are fitted between the<br />
gearbox and drive wheels.<br />
3.6 Snow Chains<br />
The mounting of snow chains is to be undertaken<br />
when the driving wheels have been removed.<br />
The lock and the tightening chains must be on the<br />
inner side of the wheels, otherwise there may be<br />
possible damage to the wheel dog (1).<br />
3.7 Wheel Dogs<br />
Wheel dogs are fitted to engage/disengage the<br />
wheels independently of the gearbox.<br />
Pushing the Machine<br />
Disengage the dogs to push the machine when<br />
the engine is shut off.<br />
Turning Aid<br />
Engange the dog on one wheel for easier turning.<br />
� Engaging the Wheel Dogs<br />
� Align the dog pins (2) with the appropriate holes<br />
(3) on the drive wheels.<br />
� Turn the pins on their ends (1) by 90 degrees<br />
until the ends mesh into the slot. Turn each dog to<br />
either side until the pin locks completely into the<br />
hole.<br />
� Disengaging the Wheel Dogs<br />
� Grab the end (1) of each dog pin to pull it out<br />
and rotate it by 90 degrees.<br />
20 agria <strong>Sweeper</strong> <strong>7100</strong> <strong>Cleanstar</strong> <strong>compact</strong>/<strong>comfort</strong>
3. Devices and <strong>Operating</strong> Elements<br />
�<br />
�<br />
�<br />
�<br />
�<br />
1 Right rotary brush<br />
2 Left rotary brush<br />
3 Nut cap<br />
4 Tensioning anchorage<br />
5 Disc<br />
6 Nut<br />
3.8 Attaching the<br />
Rotary Brushes<br />
Wear safety gloves to<br />
attach/remove the<br />
brushes. Danger of<br />
crushing.<br />
� Mount the discs onto both<br />
sides of the rotary brushes.<br />
�Push the tensioning<br />
anchorage through the left<br />
rotary brush.<br />
� Push the tensioning<br />
anchorage with the rotary<br />
brush through the drive shaft<br />
from the left - insert groove (S)<br />
on rotary brushes into cam (N)<br />
of the drive plate.<br />
� slide right rotary brush onto<br />
tensioning anchorage<br />
- insert groove on rotary<br />
brushes into cam of the drive<br />
plate.<br />
� Screw on and tighten hexagonal<br />
nut.<br />
To remove the brushes, reverse<br />
the above order.<br />
agria <strong>Sweeper</strong> <strong>7100</strong> <strong>Cleanstar</strong> <strong>compact</strong>/<strong>comfort</strong> 21<br />
3
3<br />
3. Devices and <strong>Operating</strong> Elements<br />
80 cm<br />
100 cm<br />
Mounting Extension Guards:<br />
Attach the extension guards (13) to the<br />
main guard (11) to match brush width.<br />
Use three hex head bolts and lock nuts<br />
for each guard.<br />
3.9 Sweeping Height<br />
Adjustment<br />
The sweeping height is altered by adjusting<br />
the castor wheel.<br />
� Turn the crank (8) to adjust the wheel<br />
height.<br />
� Reduce the sweeping height only if<br />
absolutely necessary (to the height of<br />
X) to ensure clean sweeping and long<br />
service life of the brushes.<br />
Dirt, powder snow ............. x = 2–3mm<br />
Wet snow ..................... x = max 8 mm<br />
3.10 Side Adjustment<br />
The brush can be angled to the right or<br />
left to sweep the rubbish or snow to one<br />
side.<br />
� Fold the rod (7) forward until the<br />
notches are exposed.<br />
� Pivot the rod to turn the brushes to<br />
the left or right.<br />
� Fold the rod to the rear and down<br />
again and mesh it into the proper notch.<br />
22 agria <strong>Sweeper</strong> <strong>7100</strong> <strong>Cleanstar</strong> <strong>compact</strong>/<strong>comfort</strong>
3<br />
3. Devices and <strong>Operating</strong> Elements<br />
29<br />
Compact Version<br />
3.11 Sweeping Speed<br />
The speed of the rotary brushes is adjusted<br />
by changing the V-belt. Remove<br />
the protective hood (9) to do this.<br />
Adjustment<br />
Select a slow speed for dust sweeping<br />
= .<br />
Select a fast speed for snow sweeping<br />
= .<br />
W Always<br />
shut off the engine and<br />
remove the spark plug<br />
connector to change the V-belt.<br />
� Remove the R-clip (26).<br />
� Remove the crank (8).<br />
� Remove the protective hood (9) and<br />
spacer (29).<br />
� Change the V-belt (27) to the right<br />
pulley and re-route it around the idler<br />
pulleys, see illustration.<br />
� Reverse the above order to attach the<br />
protective hood, spacer, crank and Rclip.<br />
WDo not operate the engine<br />
without the protective hood<br />
mounted.<br />
agria <strong>Sweeper</strong> <strong>7100</strong> <strong>Cleanstar</strong> <strong>compact</strong>/<strong>comfort</strong> 23<br />
3
3<br />
3. Devices and <strong>Operating</strong> Elements<br />
25<br />
Comfort Version<br />
3.11 Sweeping Speed<br />
The speed of the rotary brushes is steplessly<br />
adjusted via a variator.<br />
Always engage the brush drive before<br />
you adjust sweeping speed.<br />
Adjustment<br />
Select a slow speed for dust sweeping:<br />
Turn the dial (25) in counter-clockwise<br />
direction.<br />
Select a fast speed for snow sweeping:<br />
Turn the dial (25) in clockwise direction.<br />
ITo adjust the speed from slow<br />
to fast, give the dial a maximum<br />
turn of 6 full turns.<br />
24 agria <strong>Sweeper</strong> <strong>7100</strong> <strong>Cleanstar</strong> <strong>compact</strong>/<strong>comfort</strong>
3. Devices and <strong>Operating</strong> Elements<br />
1.<br />
2.<br />
3.<br />
4.<br />
5.<br />
Transport<br />
position<br />
3.12 Implements<br />
1. Coupling Pin<br />
Fit the coupling pins (12) to attach the<br />
collector or the snow dozer.<br />
�Attach the pins (12) together with washers<br />
and hex nuts to both sides of the<br />
main guard (for a working width of 80<br />
cm the coupling pins is fitted through<br />
the extension guards).<br />
2. Attaching the Collector<br />
�Attach the collector by sliding its tubes<br />
onto the coupling pins from the top front.<br />
3. Emptying the Collector<br />
�Take the machine to the dump area<br />
and fold the box upwards by pulling on<br />
its handle to the rear or on its frame from<br />
the front – the swept up material will now<br />
drop from the collector.<br />
Alternatively:<br />
�Remove the collector upwards from its<br />
coupling pins and carry it to the dump<br />
area for emptying.<br />
4. Snow Dozer Assembly<br />
�When attaching the snow dozer for the<br />
first time fit the stop (32) to the lower<br />
front of the main guard using the rod<br />
attachment bolts. The stop does not<br />
need to be removed for sweeping.<br />
5. Attaching the Snow Dozer<br />
�Attach the snow dozer blade by sliding<br />
its tubes onto the coupling pins from<br />
the top front (12).<br />
�Operate the rod to pivot the blade like<br />
the rotary brushes.<br />
�To move the blade into transport position,<br />
lift it and rest it on the tang on the<br />
stop (32).<br />
agria <strong>Sweeper</strong> <strong>7100</strong> <strong>Cleanstar</strong> <strong>compact</strong>/<strong>comfort</strong> 25<br />
3
4<br />
4. Commissioning and Operation<br />
4.1 Commissioning the<br />
Machine<br />
Please note that durability and operational<br />
safety of the engine depend to a<br />
large extent on its breaking-in. Always<br />
allow a cold engine to warm up for some<br />
minutes and never run it at full throttle<br />
at the beginning. Make sure the air filter<br />
is serviced regularly and to use clean<br />
fuel.<br />
Please note: for the first 20 hours of<br />
operation (break-in period) do not use<br />
I Note:<br />
For reasons of transport,<br />
the engine is not filled<br />
with engine oil!<br />
Before you operate the<br />
engine the first time, fill<br />
in engine oil!<br />
the engine at full power.<br />
For this purpose, park the machine in<br />
such a way that the engine is in a horizontal<br />
position. For oil filling quantity and<br />
quality refer to “Specifications”.<br />
Check the oil level after filling.<br />
Each time you take up operation<br />
Check the engine oil level:<br />
� Remove the oil fill plug (C/4).<br />
� Clean the oil dip-stick with a clean<br />
rag, insert it again but do not screw it in.<br />
� Remove the dip-stick and read the<br />
oil level. If necessary, fill engine oil up<br />
to the level mark ”max”.<br />
Ensure the oil fill plug is tightly screwed<br />
into the filler neck during engine operation.<br />
Oil fill plug<br />
� Check whether sufficient fuel is filled<br />
into the tank.<br />
Do not fill the fuel tank to the point of<br />
spillage. Instead, top up fuel to the top<br />
level mark to allow the fuel to expand.<br />
WBe careful when dealing with<br />
fuel.<br />
� Fuel is easily inflammable and explosive<br />
in certain conditions!<br />
� Never refill close to open fire, inflammable<br />
sparks or hot engine parts.<br />
� Do not refill in closed rooms.<br />
� Before each fuel fill, shut off the engine<br />
and wait until it has cooled off.<br />
� Do not smoke during filling<br />
and keep away from<br />
open fire and sparks.<br />
� Do not spill any fuel, use a proper<br />
filling device. If fuel is spilled on the<br />
ground, ensure the area is absolutely<br />
dry and the vapours have evaporated<br />
before you start the engine.<br />
26 agria <strong>Sweeper</strong> <strong>7100</strong> <strong>Cleanstar</strong> <strong>compact</strong>/<strong>comfort</strong><br />
Top level mark
4<br />
4. Commissioning and Operation<br />
4.2 Starting the Engine (with the engine in horizontal position)<br />
�<br />
�<br />
�<br />
�<br />
�<br />
� Check whether all guards are in proper position.<br />
WDo not start the engine in closed rooms. Exhaust fumes<br />
contain carbon monoxide which acts toxic when inhaled.<br />
� Open the fuel tap (C/11).<br />
<strong>compact</strong> <strong>comfort</strong><br />
0<br />
0<br />
�<br />
Cold engine:<br />
Set the speed control lever (A/6 or B/6) to<br />
“START” (“CHOKE” ) position.<br />
When the engine is warm or in hot<br />
weather:<br />
Move the speed control lever to 1/3 position.<br />
�<br />
Compact Version:<br />
� Leave the wheel drive engagement lever<br />
(A/4) in position “0” (start position).<br />
Comfort Version:<br />
�Pull the clutch lever (B/2) and lock it with<br />
pawl (B/1) (start position).<br />
� Leave the brush drive engagement lever<br />
(A/5 or B/5) in position “0” (start position).<br />
� Pull the starting-rope on handle (C/2)<br />
until you feel the starter clutch engage. Then<br />
pull hard and fast to start the engine. After<br />
the start, let the rope glide back. Do not<br />
let it snap.<br />
WWarning: To start the engine,<br />
step behind the handlebars and<br />
pull the starter rope towards the rear. Keep<br />
off the danger zone.<br />
Caution with hot engine parts!<br />
The exhaust and other engine parts<br />
become very hot, if the engine runs and<br />
immediately after turning off. Hold for<br />
sufficient distance from hot surfaces and<br />
keep children away from the running engine.<br />
agria <strong>Sweeper</strong> <strong>7100</strong> <strong>Cleanstar</strong> <strong>compact</strong>/<strong>comfort</strong> 27<br />
4
4<br />
4. Commissioning and Operation<br />
�30 sec<br />
4.3 Shutting off the<br />
Engine<br />
� Set the speed control lever to idling<br />
position and let the engine run with idling<br />
speed for approximately 1/2 minute.<br />
� Move the speed control lever completely<br />
to the STOP position.<br />
W For<br />
shutting off the engine, do<br />
not set the control lever to the<br />
CHOKE position – risk of fire!<br />
� Close the fuel tap.<br />
IThe speed control lever also<br />
serves as engine shut-off lever.<br />
When necessary, move the speed<br />
control lever to STOP to stop the engine.<br />
28 agria <strong>Sweeper</strong> <strong>7100</strong> <strong>Cleanstar</strong> <strong>compact</strong>/<strong>comfort</strong>
4. Commissioning and Operation<br />
W Danger Zone<br />
max. 20°<br />
(37 %)<br />
4.4 Danger zone<br />
WKeep out of the sweeper’s<br />
danger zone during starts and operation.<br />
Check the immediate surroundings for foreign<br />
objects and for children and animals in<br />
particular!<br />
Careful! Dirt and stones may get airborne<br />
during sweeping.<br />
People and animals must keep out of this<br />
area.<br />
Watch out for vehicles, window panses and<br />
other objets to avoid damage.<br />
Only work on slopes of up to a max. of 20°.<br />
For operation on banks, always turn machine<br />
towards the slope!<br />
agria <strong>Sweeper</strong> <strong>7100</strong> <strong>Cleanstar</strong> <strong>compact</strong>/<strong>comfort</strong> 29<br />
4
4<br />
4. Commissioning and Operation<br />
�<br />
�<br />
�<br />
�<br />
�<br />
�<br />
4.6 Snow Clearance<br />
W Attach<br />
0<br />
W Shut<br />
4.5 Sweeping<br />
� Start the engine as described in “Starting<br />
the engine“<br />
WCheck safety circuit function - Only<br />
operate the machine if safety circuit<br />
works!<br />
� Wear individual protective ear plugs and<br />
solid shoes.<br />
� Slowly pull the brush drive engagement<br />
lever (A/5 or B/5) and pull the throttle at the<br />
same time to start the brushes.<br />
Compact version:<br />
� Slowly depress the clutch lever (A/4); the<br />
sweeper travels forward.<br />
Comfort version:<br />
� Pull softly on the clutch lever that engages<br />
the wheel drive (B/2), unlock the pawl (B/1),<br />
release it slowly: the sweeper moves off in<br />
forward direction.<br />
After sweeping or in case of clogging:<br />
� Disengage both drives<br />
� Shut off the engine<br />
off the engine and disconnect the spark<br />
plug connector, if cleaning is necessary during<br />
operation.<br />
the snow dozer blade properly. Wear slip-proof footwear.<br />
Working speed must suit conditions to prevent the operator is injured<br />
if the machine hits an obstacle.<br />
30 agria <strong>Sweeper</strong> <strong>7100</strong> <strong>Cleanstar</strong> <strong>compact</strong>/<strong>comfort</strong>
5. Maintenance<br />
Apart from adhering to operating instructions for the sweeper, it is also<br />
important to observe the following maintenance instructions.<br />
WWarning: Only do maintenance work with the engine shut off. To prevent<br />
accidental start while working on the rotary brushes or on the engine,<br />
always remove the spark plug connector from the spark plug.<br />
A/8<br />
A/9<br />
K<br />
D<br />
�<br />
�<br />
�<br />
� J<br />
� J<br />
5.1 Drive<br />
����� Worm Gear of Wheel Drive<br />
The worm gear is permanently lubricated.<br />
Lubricating and servicing is not necessary.<br />
����� Worm Gear of Brush Drive<br />
The worm gear is permanently lubricated to<br />
work for approximately 250 operating hours.<br />
Oil change is not necessary if there are no<br />
leakages.<br />
Suitable oil is SAE 90 transmission oil, approx.<br />
0.3 l<br />
����� V-Belts<br />
Inspect the condition of the V-belts at least once<br />
per year.<br />
� Remove the protective hood. For details see<br />
“Sweeping Speed”.<br />
� Replace the V-belts when they are worn. Only<br />
use original agria V-belts!<br />
agria <strong>Sweeper</strong> <strong>7100</strong> <strong>Cleanstar</strong> <strong>compact</strong>/<strong>comfort</strong> 31<br />
5 5
5<br />
5. Maintenance<br />
� 8 h<br />
� J; B<br />
� 25 h<br />
� J; B<br />
Drive-wheels<br />
� Check the tyre pressure periodically.<br />
In particular, ensure that both tyres have<br />
equal pressures to give smooth riding.<br />
� Attach the wheels with the pointed<br />
part of tread lugs showing in travel direction<br />
(seen from above) to obtain full<br />
traction.<br />
Wheel Shaft<br />
Apply bio-lubricating grease to the<br />
wheel shaft around the hub each time<br />
the machine was cleaned with a<br />
pressure washer or at least once per<br />
year.<br />
5.2 <strong>Sweeper</strong><br />
Check the tensioning anchorage for<br />
tight fit before each operation and at<br />
intervals of 8 operating hours.<br />
Check the rotary brushes for wear<br />
at least after every 25 hours and replace<br />
them in good time. Minimum diameter<br />
is 250 mm.<br />
5.3 Adjusting Spindle<br />
Apply bio-lubricating grease to the<br />
adjusting spindle in the area of the<br />
swinging hub each time the machine<br />
was cleaned with a pressure washer or<br />
at least once per year.<br />
32 agria <strong>Sweeper</strong> <strong>7100</strong> <strong>Cleanstar</strong> <strong>compact</strong>/<strong>comfort</strong>
5. Maintenance<br />
1<br />
1 2<br />
X<br />
5.4 Checking and Adjusting<br />
Clutch Play<br />
Wheel and Brush Drive,<br />
Compact Version<br />
� The clutches must be disengaged i.e. wheel<br />
and brush drive must come to a stop when the<br />
levers (A/4 or A/5) are released and in top position.<br />
� When the lever is pushed down, the drive must<br />
be engaged and the V-belts must not slip. If<br />
necessary, adjust the cable on the cable setting<br />
screw (1).<br />
Wheel Drive,<br />
Comfort Version<br />
For smooth V-belt clutch operation ensure the play<br />
X on clutch lever (B/2) is set to 1–2mm. Check<br />
the clutch play while the drive is engaged.<br />
Also ensure that the clutch is disengaged i.e.<br />
the wheel drive must come to a stop when the<br />
lever is in position ”0” (pawl is locked).<br />
If the clutch play needs further adjustment, set it<br />
on the cable-setting screw.<br />
� Undo locking nut (2)<br />
� Adjust the setting screw (1) in such<br />
a way that the play on the lever is X = 1–2 mm.<br />
� Retighten the locking nut (2)<br />
Brush Drive,<br />
Comfort Version<br />
For checking and adjusting refer to “Brush Drive,<br />
Compact Version”.<br />
agria <strong>Sweeper</strong> <strong>7100</strong> <strong>Cleanstar</strong> <strong>compact</strong>/<strong>comfort</strong> 33<br />
5
5<br />
5. Maintenance<br />
1<br />
1<br />
1<br />
A/4<br />
A/5<br />
B/5<br />
<strong>compact</strong><br />
<strong>comfort</strong><br />
B/3<br />
5.5 Safety circuit<br />
Check the safety circuit function each time<br />
you take up operation and each time you<br />
maintain or service the machine.<br />
Compact Version:<br />
Wheel Drive<br />
� Upon release of the handle (A/4) the<br />
wheel drive must come to a stop.<br />
� If necessary, adjust the levers by setting<br />
the cable-setting screw (1).<br />
Brush Drive<br />
� Upon release of the handle (A/5) the<br />
brush drive must come to a stop.<br />
� If necessary, adjust the levers by setting<br />
the cable-setting screw (1).<br />
Comfort Version:<br />
Drive<br />
� Upon release of the handle (B/3) and<br />
with clutch engaged the engine must come<br />
to a stop.<br />
� Check the electric lines and connections<br />
for good condition, replace, if necessary.<br />
� - Service�<br />
Brush Drive<br />
� Upon release of the handle (B/5) the<br />
brush drive must come to a stop.<br />
� If necessary, adjust the levers by setting<br />
the cable-setting screw (1).<br />
34 agria <strong>Sweeper</strong> <strong>7100</strong> <strong>Cleanstar</strong> <strong>compact</strong>/<strong>comfort</strong>
5. Maintenance<br />
C/4<br />
I Please<br />
observe that only those activities are described here which<br />
are required for operating the sweeper.<br />
All other information on the engine may be taken from the enclosed<br />
engine operating instructions!<br />
5.6 Checking the Engine Oil Level<br />
Before each operation and after 5 operating hours!<br />
� Only with the engine shut off and in horizontal position.<br />
see engine operating instructions<br />
5.7 Changing the Engine Oil<br />
For the first time after 5 operating hours, after that after<br />
every 50 operating hours or annually (whatever comes first).<br />
Under high loads or at high temperatures, change the oil already<br />
after 25 operating hours.<br />
� Drain and filler plug (C/4).<br />
� To drain the oil, pivot the handlebars upwards. Tilt the machine<br />
backwards and to the left. Then drain the oil into a suitable<br />
container .<br />
We recommend to drain the fuel through the filler neck into a<br />
fuel can before draining the oil.<br />
Alternatively,<br />
use a suction pump to pump the oil from the machine .<br />
�Dispose of the waste oil properly!<br />
� Fill in fresh engine oil. For oil filling capacity and quality see<br />
specifications.<br />
Fill in the oil using a funnel or similar device if possible .<br />
Only change oil while the engine is still warm, but not hot –<br />
danger of burns!<br />
agria <strong>Sweeper</strong> <strong>7100</strong> <strong>Cleanstar</strong> <strong>compact</strong>/<strong>comfort</strong> 35<br />
55
5<br />
5. Maintenance<br />
1.)<br />
2.)<br />
5.8 Cooling fan grille<br />
After prolonged operation, the cooling system may<br />
become clogged by dirt etc. To avoid any overheating<br />
and damage to the engine, regularly clean the cooling<br />
fan grille (C/3).<br />
Check before each operation!<br />
5.9 Air cooling system<br />
1) Clean the rotating strainer at 50-hour intervals as a<br />
minimum (earlier in very dusty and trashy conditions).<br />
To do this, remove the recoil starter. See the illustration<br />
below.<br />
2) Clean the internal cooling fins and surfaces at 100hour<br />
intervals as a minimum (earlier in very dusty and<br />
trashy conditions).<br />
� - Service�<br />
5.10 Governor<br />
For smooth engine performance keep governor<br />
linkages, springs and actuating devices clean and free<br />
from dust and dirt. Do not bend or twist parts. (Governor<br />
linkages on carburetor C/6).<br />
5.11 Exhaust system<br />
Regularly clean the area around the exhaust (C/9) from<br />
grass, dirt, and inflammable deposits.<br />
– Risk of fire!<br />
Check before each operation.<br />
Caution with hot engine parts!<br />
The exhaust and other engine parts become very hot,<br />
if the engine runs and immediately after turning off.<br />
Hold for sufficient distance from hot surfaces and keep<br />
children away from the running engine.<br />
5.12 Speed Control<br />
Devices for actuating engine speed must be adjusted<br />
correctly to start, operate and shut off the engine at<br />
correct speed rates.<br />
� - Service�<br />
36 agria <strong>Sweeper</strong> <strong>7100</strong> <strong>Cleanstar</strong> <strong>compact</strong>/<strong>comfort</strong>
5. Maintenance<br />
�<br />
�<br />
�<br />
�<br />
�<br />
5.13 General<br />
� Watch out for fuel and oil leakage and repair, if<br />
necessary.<br />
� Regularly check bolts and nuts for tight fit and retighten,<br />
if necessary.<br />
� Slightly grease all gliding and moving parts (e.g. rod<br />
that pivots the implement, etc.) with Bio-lubricating grease<br />
and Bio-slushing oil.<br />
5.14 Cleaning<br />
�On no account spray water into the fan slots in the<br />
drive housing!<br />
After each cleaning (washing with water, especially with<br />
pressure washer) lubricate all lubrication points, oil and<br />
let the sweeper run for a short time to press water out.<br />
�Clean the engine only with a cloth. Avoid spraying<br />
with air-compressed water jets, as water might leak into<br />
ignition and fuel system, causing malfunctions.<br />
agria <strong>Sweeper</strong> <strong>7100</strong> <strong>Cleanstar</strong> <strong>compact</strong>/<strong>comfort</strong> 37<br />
5
55<br />
5. Maintenance<br />
5.15 Storage<br />
For longer periods of no operation<br />
a) Clean thoroughly<br />
Repair paint coat<br />
b) Engine preservation<br />
� Drain fuel completely or fill fuel tank and add fuel stabilizer (agria no. 799 09).<br />
- Observe enclosed instructions. Let engine run for approx. 1 minute.<br />
� Change the engine oil.<br />
� Fill a tea-spoon (approx. 0.03l) of engine oil into the spark plug opening. Slowly<br />
crank the engine.<br />
� Re-fit the spark plug and set the piston to compression via the recoil starter (pull<br />
the starter grip until resistance is felt) – valves are closed.<br />
� Slowly crank the engine after every 2–3 weeks (spark-plug connector is removed).<br />
Then set the piston to compression again.<br />
c) Drive-wheels<br />
Support drive-wheels in such a way that tyres have<br />
no ground contact. Pneumatic tyres are quickly<br />
destroyed, if left standing under load and uninflated.<br />
d) Disengaging the Drives<br />
Always park the machine with wheel drives<br />
disengaged (position “0”) to avoid clutch problems.<br />
e) Parking<br />
To avoid severe corrosion:<br />
- to preserve the machine from atmosperic<br />
influences<br />
do not park the machine:<br />
- in humid rooms<br />
- in rooms where fertilizer is stored<br />
- in stables or adjacent rooms.<br />
f) Covering the machine<br />
Protect the machine with cloth or a similar cover.<br />
38 agria <strong>Sweeper</strong> <strong>7100</strong> <strong>Cleanstar</strong> <strong>compact</strong>/<strong>comfort</strong>
agria <strong>Sweeper</strong> <strong>7100</strong> <strong>Cleanstar</strong> <strong>compact</strong>/<strong>comfort</strong> 39<br />
5
6<br />
6. Troubleshooting<br />
W<br />
Observe safety instructions! Have all serious malfunctions on the machine or engine repaired<br />
by your agria workshop. They have the proper tools. Improper repairs can only add to the<br />
damage.<br />
Problem Possible cause Remedy Page<br />
Engine - Spark plug connector not connected Connect spark plug connector<br />
does not start - Speed control lever not in Move speed control lever to<br />
position CHOKE position “CHOKE” 27<br />
- Fuel tank empty or poor fuel Fill fresh fuel 26<br />
- Fuel line clogged Clean fuel line<br />
- Defective spark plug Clean, adjust or exchange spark plug BM<br />
- Engine too much fuel Dry and clean spark plug and<br />
(“flooded engine”) start at FULL THROTTLE BM<br />
- Inleaked air due to loose caburetor Tighten attachment bolts<br />
and suction line<br />
Misfirings in - Engine running in CHOKE range Move speed control-lever to operating position, 27<br />
engine if necessary, adjust speed control � BM<br />
- Loose ignition cable Fit connector tightly on ignition cable,<br />
fix ignition cable retaining device,<br />
fit connector tightly on spark plug<br />
- Clogged fuel line or poor fuel Clean fuel line, fill fresh fuel 26<br />
- Vent opening in fuel tank cap clogged Exchange fuel tank cap<br />
- Water or dirt in fuel system Drain fuel and fill fresh fuel<br />
- Air filter clogged Clean air filter or exchange BM<br />
- Carburetor misadjusted Re-adjust carburetor � BM<br />
Excessive - Low engine oil level Refill oil immediately 35<br />
temperature - Impaired cooling Clean cooling fan grille, 36<br />
in engine clean internal cooling fins � 36<br />
- Air filter clogged Clean air filter BM<br />
- Carburetor misadjusted Re-adjust carburetor � BM<br />
Misfirings - Short firing intervals Adjust spark plug BM<br />
in engine - Incorrect idle mix Adjust carburetor � BM<br />
at high speeds<br />
Engine - Firing interval too long, Adjust or replace spark plug BM<br />
frequently defective spark plug<br />
stalls - Carburetor misadjusted Re-adjust carburetor � BM<br />
in idle - Air filter clogged Clean air filter BM<br />
Engine does - Speed control linkages are Clean speed control linkages 36<br />
not run clogged or jammed<br />
smoothly<br />
40 agria <strong>Sweeper</strong> <strong>7100</strong> <strong>Cleanstar</strong> <strong>compact</strong>/<strong>comfort</strong>
6. Troubleshooting<br />
Problem Possible cause Remedy Page<br />
Engine - Speed and engine stop are not Readjust speed control � BM<br />
does not stop properly adjusted<br />
when set<br />
to stop<br />
Engine - Loose cylinder head or Tighten cylinder head, �<br />
output too low damaged gasket exchange gasket<br />
- Poor compression Have engine checked �<br />
- Air filter clogged Clean the air filter BM<br />
Wheel drive - Incorrect hand clutch lever adjustment Adjust hand clutch lever � 33<br />
or brush drive<br />
does not stop<br />
with disengaged<br />
clutch<br />
Excessive - Attachment bolts loosened Tighten attachment bolts 37<br />
vibration - Loose anchorage fixture on Immediately turn off engine!<br />
rotary brushes Check anchorage fixture and<br />
all bolts and nuts for tightness,<br />
exchange damaged parts 32<br />
� = For this purpose contact your agria workshop.<br />
BM = See engine operating instructions.<br />
agria <strong>Sweeper</strong> <strong>7100</strong> <strong>Cleanstar</strong> <strong>compact</strong>/<strong>comfort</strong> 41<br />
6
5<br />
Electrical Wiring Diagram<br />
Electrical Wiring Diagram, Comfort Version<br />
1 Engine<br />
2 Magnet ignition system<br />
3 Engine-off-switch<br />
(on speed control lever next<br />
to engine)<br />
4 Connector pair<br />
5 Switch in safety circuit lever<br />
6 Switch in clutch lever<br />
42 agria <strong>Sweeper</strong> <strong>7100</strong> <strong>Cleanstar</strong> <strong>compact</strong>/<strong>comfort</strong>
Varnishes, Wear Parts<br />
agria Order No.<br />
799 09 Fuel stabilizer pouch 5g<br />
771 83 Oil suction pump<br />
Varnishes<br />
181 03 Spray varnish birch-green spray tin 400ml<br />
712 98 Spray varnish red, RAL 2002 spray tin 400ml<br />
509 68 Spray varnish black, RAL 9005 spray tin 400ml<br />
Wear Parts<br />
761 98 Air filter element<br />
759 99 Spark plug NGK BPR 6ES; BOSCH WR 7 DC<br />
766 44 V-belt for wheel drive X10x872<br />
100 796 V-belt for brush drive 10x1900 (<strong>compact</strong>)<br />
762 81 Reverse gear flat belt 20x960 (<strong>comfort</strong>)<br />
765 43 V-belt for brush drive 13x760 (<strong>comfort</strong>)<br />
784 03 V-belt for brush drive 13x1480 (<strong>comfort</strong>)<br />
6194 051 rotary brushes 80 cm coarse<br />
6194 061 rotary brushes 80 cm fine<br />
6194 151 rotary brushes 100 cm coarse<br />
6194 161 rotary brushes 100 cm fine<br />
Emergency Tyre Repair:<br />
713 13 Tyre repair gel bottle 1l<br />
Spare Parts List<br />
997 157 <strong>Cleanstar</strong> sweeper type <strong>7100</strong><br />
997 145 Honda Engines<br />
agria <strong>Sweeper</strong> <strong>7100</strong> <strong>Cleanstar</strong> <strong>compact</strong>/<strong>comfort</strong> 43
Inspection and Maintenance Chart<br />
A = Each time before you take up operation<br />
B = After each cleaning<br />
K = Checks and maintenance to be executed by operator<br />
W = Maintenance to be executed by professional workshop<br />
P = Item no. in lubrication chart<br />
BM = See engine operating instructions<br />
* = After 2 years<br />
P A 5 8 25 50 100 250<br />
Check safety circuit function K 34<br />
Check free play of levers K 33<br />
Check air filter K BM<br />
Clean cooling grille K 36<br />
Check engine oil level,<br />
refill, if necessary<br />
1 K K<br />
Clean exhaust K 36<br />
First engine oil change 1 W 35<br />
subsequent oil changes 1 W 35<br />
Clean engine,<br />
check bolts and nuts<br />
Check wear of rotary brushes<br />
earlier if required<br />
44 agria <strong>Sweeper</strong> <strong>7100</strong> <strong>Cleanstar</strong> <strong>compact</strong>/<strong>comfort</strong><br />
35<br />
BM<br />
K 37<br />
W 32<br />
Clean air filter insert W W BM<br />
Replace air filter insert,<br />
earlier, if required<br />
W BM<br />
Clean spark plug, adjust gap W BM<br />
Replace spark plug K BM<br />
Clean guide plates, cooling fins,<br />
earlier, if required<br />
W 36<br />
Clean fuel tank W BM<br />
Clean fuel strainer W BM<br />
Change oil in worm gear<br />
of brush drive<br />
After operating hours<br />
min.<br />
every<br />
3<br />
months<br />
min.<br />
yearly B<br />
W 31<br />
Lubricate all gliding parts 4 K K 37<br />
Grease wheel-shaft 2 K K 32<br />
Grease adjusting spindle 3 K K 32<br />
Replace fuel hoses W* BM<br />
page
Lubrication Chart<br />
4 4<br />
3<br />
1 Engine oil 8 h (page 35)<br />
2 Wheel shafts annually (page 32)<br />
3 Adjusting spindle annually (page 32)<br />
4 Lever bearings etc. annually (page 37)<br />
2<br />
1<br />
agria <strong>Sweeper</strong> <strong>7100</strong> <strong>Cleanstar</strong> <strong>compact</strong>/<strong>comfort</strong> 45
Designation of Parts<br />
Fig. C<br />
Honda GCV135 and GCV160 Engines<br />
1 Fuel tank cap<br />
2 Starter handle<br />
3 Air strainer<br />
4 Oil fill plug, dip-stick<br />
5 Air filter<br />
6 Carburetor / speed control governor<br />
7 Engine type no. / identification no.<br />
8 Spark plug / spark plug connector<br />
9 Exhaust with guard<br />
10 Fuel tank<br />
11 Fuel tap<br />
46 agria <strong>Sweeper</strong> <strong>7100</strong> <strong>Cleanstar</strong> <strong>compact</strong>/<strong>comfort</strong>
Declaration of Conformity<br />
agria <strong>Sweeper</strong> <strong>7100</strong> <strong>Cleanstar</strong> <strong>compact</strong>/<strong>comfort</strong> 47
agria-Werke GmbH<br />
Bittelbronner Straße 42<br />
D-74219 Möckmühl<br />
Tel. +49/ (0)6298 /39-0<br />
Fax +49/ (0)6298/39-111<br />
e-mail: info@agria.de<br />
Internet: www.agria.de<br />
Your local agria specialist dealer:


