
Create successful ePaper yourself
Turn your PDF publications into a flip-book with our unique Google optimized e-Paper software.
<strong>CHROMATIC</strong> <strong>TUNER</strong> <strong>TU300</strong><br />
Thank you for showing your confidence in us by purchasing the BEHRINGER <strong>CHROMATIC</strong> <strong>TUNER</strong><br />
<strong>TU300</strong>. This compact guitar and bass tuner provides 7 different tuning modes. Thanks to its 7-segment<br />
LED display and 11-point LED indicators, it provides great visibility, especially in dark environments.<br />
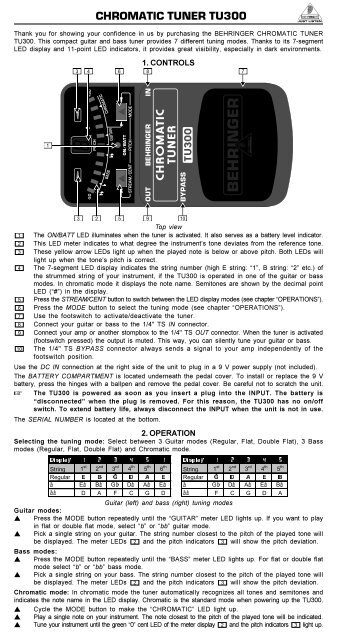
1. CONTROLS<br />
Top view<br />
The ON/BATT LED illuminates when the tuner is activated. It also serves as a battery level indicator.<br />
This LED meter indicates to what degree the instrument’s tone deviates from the reference tone.<br />
These yellow arrow LEDs light up when the played note is below or above pitch. Both LEDs will<br />
light up when the tone’s pitch is correct.<br />
The 7-segment LED display indicates the string number (high E string: “1”, B string: “2” etc.) of<br />
the strummed string of your instrument, if the <strong>TU300</strong> is operated in one of the guitar or bass<br />
modes. In chromatic mode it displays the note name. Semitones are shown by the decimal point<br />
LED (“#”) in the display.<br />
Press the STREAM/CENT button to switch between the LED display modes (see chapter “OPERATIONS”).<br />
Press the MODE button to select the tuning mode (see chapter “OPERATIONS”).<br />
Use the footswitch to activate/deactivate the tuner.<br />
Connect your guitar or bass to the 1/4" TS IN connector.<br />
Connect your amp or another stompbox to the 1/4" TS OUT connector. When the tuner is activated<br />
(footswitch pressed) the output is muted. This way, you can silently tune your guitar or bass.<br />
The 1/4" TS BYPASS connector always sends a signal to your amp independently of the<br />
footswitch position.<br />
Use the DC IN connection at the right side of the unit to plug in a 9 V power supply (not included).<br />
The BATTERY COMPARTMENT is located underneath the pedal cover. To install or replace the 9 V<br />
battery, press the hinges with a ballpen and remove the pedal cover. Be careful not to scratch the unit.<br />
+ The <strong>TU300</strong> is powered as soon as you insert a plug into the INPUT. The battery is<br />
“disconnected” when the plug is removed. For this reason, the <strong>TU300</strong> has no on/off<br />
switch. To extend battery life, always disconnect the INPUT when the unit is not in use.<br />
The SERIAL NUMBER is located at the bottom.<br />
2. OPERATION<br />
Selecting the tuning mode: Select between 3 Guitar modes (Regular, Flat, Double Flat), 3 Bass<br />
modes (Regular, Flat, Double Flat) and Chromatic mode.<br />
'LVSOD\ 'LVSOD\ <br />
String 1 st 2 nd 3 rd 4 th 5 th 6 th String 1 st 2 nd 3 rd 4 th 5 th<br />
Regular ( % * ' $ ( Regular * ' $ ( %<br />
E EE BE GE DE AE EE E GE DE AE EE BE<br />
EE D A F C G D EE F C G D A<br />
Guitar (left) and bass (right) tuning modes<br />
Guitar modes:<br />
s Press the MODE button repeatedly until the “GUITAR” meter LED lights up. If you want to play<br />
in flat or double flat mode, select “b” or “bb” guitar mode.<br />
s Pick a single string on your guitar. The string number closest to the pitch of the played tone will<br />
be displayed. The meter LEDs and the pitch indicators will show the pitch deviation.<br />
Bass modes:<br />
s Press the MODE button repeatedly until the “BASS” meter LED lights up. For flat or double flat<br />
mode select “b” or “bb” bass mode.<br />
s Pick a single string on your bass. The string number closest to the pitch of the played tone will<br />
be displayed. The meter LEDs and the pitch indicators will show the pitch deviation.<br />
Chromatic mode: In chromatic mode the tuner automatically recognizes all tones and semitones and<br />
indicates the note name in the LED display. Chromatic is the standard mode when powering up the <strong>TU300</strong>.<br />
s Cycle the MODE button to make the “<strong>CHROMATIC</strong>” LED light up.<br />
s Play a single note on your instrument. The note closest to the pitch of the played tone will be indicated.<br />
s Tune your instrument until the green “0” cent LED of the meter display and the pitch indicators light up.
<strong>CHROMATIC</strong> <strong>TUNER</strong> <strong>TU300</strong><br />
'LVSOD\ ! ! " # # $ $ <br />
Note C C# D D# E F F# G G# A A# B<br />
Chromatic mode<br />
Selecting the display mode<br />
Stream mode: If the played tone deviates from the reference tone this will be displayed by a stream<br />
of LEDs in the meter display . If the LED stream moves to the left, the input pitch is flat, when it<br />
moves to the right, it is sharp. As you approach the correct pitch, the LEDs will stop moving and both<br />
yellow arrows LEDs will start flashing.<br />
Cent mode: Compare the Cent mode to a VU meter needle: one LED shows the deviation of the reference<br />
tone within a range of +/-50 cents. If the pitch is perfect the green LED (0 cent) lights up.<br />
Setting up the “a” reference tone: When you power up your <strong>TU300</strong>, it is set to 440 Hz.<br />
s Press the STREAM/CENT and the MODE button simultaneously.<br />
s Increase the reference tone in 1-Hz steps by pressing the MODE button .<br />
s Decrease the reference tone by pressing the STREAM/CENT button .<br />
The display will show 8/9/0/1/2/3/4/5/6/7 to indicate the reference tone from 438 to 447 Hz.<br />
3. WARRANTY<br />
For our current warranty terms, please refer to our website at http://www.behringer.com.<br />
4. SPECIFICATIONS<br />
In<br />
Connector<br />
1/4" TS<br />
Impedance<br />
500 kW<br />
Out<br />
Connector<br />
1/4" TS<br />
Impedance<br />
1 kW<br />
Bypass<br />
Connector<br />
1/4" TS<br />
Impedance<br />
1 kW<br />
Power supply 9 V , 100 mA, regulated<br />
BEHRINGER PSU-SB<br />
U.S./Canada 120 V~, 60 Hz<br />
China/Korea 220 V~, 50 Hz<br />
U.K./Australia 240 V~, 50 Hz<br />
Europe<br />
230 V~, 50 Hz<br />
Japan<br />
100 V~, 50 - 60 Hz<br />
Power connector<br />
2 mm DC jack, negative center<br />
Battery<br />
9 V type 6LR61<br />
Power consumption<br />
70 mA<br />
Dimensions (H x W x D) approx. 54 mm (2 1/8") x 70 mm (2 3/4") x 123 mm (4 4/5")<br />
Weight<br />
approx. 0.33 kg (0.73 lbs)<br />
BEHRINGER is constantly striving to maintain the highest professional standards. As a result of these efforts, modifications may be made<br />
from time to time to existing products without prior notice. Specifications and appearance may therefore differ from those listed or shown.<br />
5. SAFETY INSTRUCTIONS<br />
Do not use near water, or install near heat sources. Use only authorized attachments/accessories. Do not service product yourself.<br />
Contact our qualified servicing personnel for servicing or repairs, especially when power supply cord or plug is damaged.<br />
No utilizar cerca de agua o instalar cerca de fuentes de calor. Utilice sólo accesorios y aditamentos autorizados. No intenté reparar<br />
el producto usted mismo. Contacte a nuestro personal técnico cualificado para servicio y reparaciones, especialmente cuando la<br />
fuente o el cable de alimentación estén dañados.<br />
Íå ýêñïëóàòèðóéòå ïðèáîð âáëèçè îò èñòî÷íèêîâ âîäû è òåïëà. Ïðèìåíÿéòå òîëüêî àâòîðèçîâàííûå äîïîëíèòåëüíûå<br />
óñòðîéñòâà. Íèêîãäà íå ðåìîíòèðóéòå ïðèáîð ñàìîñòîÿòåëüíî. Ðåìîíò ìîæåò ïðîèçâîäèòü òîëüêî êâàëèôèöèðîâàííûé<br />
ñïåöèàëèçèðîâàííûé ïåðñîíàë, îñîáåííî ïðè ïîâðåæäåíèÿõ ñåòåâîãî ïðîâîäà èëè ñåòåâîé âèëêè.<br />
Die deutsche Anleitung ist erhältlich @ www.behringer.com<br />
Manuel francophone en téléchargement sur www.behringer.com<br />
Manual en español disponible en www.behringer.com<br />
Manuali italiani disponibili @ www.behringer.com<br />
Ðóññêîÿçû÷íîå ðóêîâîäñòâî @ www.behringer.com<br />
Polska instrukcja dostêpna jest pod adresem @ www.behringer.com<br />
Nederlandse handleiding beschikbaar @ www.behringer.com<br />
Suomenkielinen käyttöohje saatavilla osoitteesta www.behringer.com<br />
Svensk manual finns tillgänglig på www.behringer.com<br />
Dansk vejledning findes på @ www.behringer.com<br />
Manual português disponível @ www.behringer.com<br />
Åëëçíéêü åã÷åéñßäéï õðÜñ÷åé äéáèÝóéìï óôç äéåýèõíóç www.behringer.com<br />
Technical specifications and appearance subject to change without notice. The information contained herein is correct at the time of printing.<br />
The names of companies, institutions or publications pictured or mentioned and their respective logos are registered trademarks of their respective<br />
owners. Their use neither constitutes a claim of the trademarks by BEHRINGER ® nor affiliation of the trademark owners with BEHRINGER ® .<br />
BEHRINGER ® accepts no liability for any loss which may be suffered by any person who relies either wholly or in part upon any description,<br />
photograph or statement contained herein. Colours and specification may vary slightly from product. Products are sold through our authorised<br />
dealers only. Distributors and dealers are not agents of BEHRINGER ® and have absolutely no authority to bind BEHRINGER ® by any express or<br />
implied undertaking or representation. No part of this manual may be reproduced or transmitted in any form or by any means, electronic or<br />
mechanical, including photocopying and recording of any kind, for any purpose, without the express written permission of BEHRINGER Spezielle<br />
Studiotechnik GmbH. BEHRINGER ® is a registered trademark. ALL RIGHTS RESERVED. © 2006 BEHRINGER Spezielle Studiotechnik GmbH,<br />
Hanns-Martin-Schleyer-Str. 36-38, 47877 Willich-Münchheide II, Germany. Tel. +49 2154 9206 0, Fax +49 2154 9206 4903