BT Freelance XH2100 User Guide - UkCordless
BT Freelance XH2100 User Guide - UkCordless
BT Freelance XH2100 User Guide - UkCordless

You also want an ePaper? Increase the reach of your titles
YUMPU automatically turns print PDFs into web optimized ePapers that Google loves.
YOU MUST<br />
SUBSCRIBE TO YOUR<br />
NETWORK PROVIDER’S<br />
CALLER DISPLAY AND CALL WAITING<br />
SERVICES BEFORE THESE FEATURES WILL<br />
WORK. A QUARTERLY FEE IS PAYABLE<br />
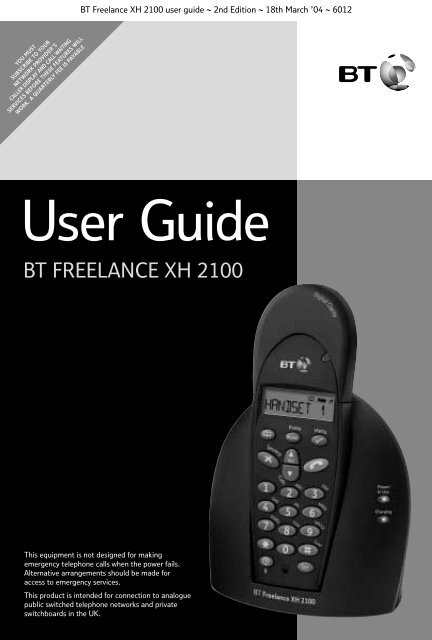
<strong>BT</strong> <strong>Freelance</strong> XH 2100 user guide ~ 2nd Edition ~ 18th March ’04 ~ 6012<br />
<strong>User</strong> <strong>Guide</strong><br />
<strong>BT</strong> FREELANCE XH 2100<br />
This equipment is not designed for making<br />
emergency telephone calls when the power fails.<br />
Alternative arrangements should be made for<br />
access to emergency services.<br />
This product is intended for connection to analogue<br />
public switched telephone networks and private<br />
switchboards in the UK.
<strong>BT</strong> <strong>Freelance</strong> XH 2100 user guide ~ 2nd Edition ~ 18th March ’04 ~ 6012<br />
Please open this page for an ‘at a glance’<br />
guide to your <strong>BT</strong> <strong>Freelance</strong> XH 2100
<strong>BT</strong> <strong>Freelance</strong> XH 2100 user guide ~ 2nd Edition ~ 18th March ’04 ~ 6012<br />
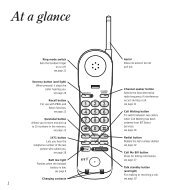
At a glance<br />
Volume buttons<br />
Use to adjust the<br />
handset earpiece speech<br />
volume (see page 15)<br />
and handset and base<br />
ringer volume, see pages<br />
20 and 23.<br />
Also used to access the<br />
redial and calls list and<br />
scroll through the<br />
phonebook, menu options,<br />
redial and calls list.<br />
Phonebook button<br />
Use to access the 50<br />
names and numbers<br />
stored in the phonebook,<br />
see page 17.<br />
Secrecy button<br />
During a call press to<br />
mute the call so your<br />
caller cannot hear<br />
you talk to someone<br />
close by, see page 16.<br />
Also used as a delete,<br />
edit and exit button.<br />
Keypad<br />
Recall/Power button<br />
For use with a<br />
switchboard/PBX and <strong>BT</strong><br />
Calling Features, see page 35.<br />
Also used to switch<br />
off the handset, see page 14.<br />
Secrecy<br />
1 2<br />
4<br />
7<br />
GHI<br />
PQRS<br />
Handset<br />
HANDSET 1<br />
Pause<br />
Redial<br />
<br />
Vol<br />
Calls<br />
5<br />
8<br />
0<br />
ABC<br />
JKL<br />
TUV<br />
Digital<br />
3<br />
6<br />
9<br />
Int<br />
R<br />
Clarity<br />
Men<br />
u<br />
DEF<br />
MNO<br />
WXYZ<br />
Conf<br />
Red light<br />
To indicate that<br />
the phone is ringing or<br />
in use.<br />
Liquid Crystal<br />
Display<br />
Display shows you<br />
incoming caller’s<br />
details, the name<br />
and/or number you<br />
have dialled, and the<br />
status of the handset.<br />
Pause/Redial<br />
Press to redial one of<br />
the last five numbers<br />
dialled. Also, press to<br />
dial or store a pause in<br />
the stored number,<br />
see page 16.<br />
Menu button<br />
Use to access and<br />
select the options in<br />
the menu, see pages 4-5.<br />
Talk button<br />
Use to make, receive<br />
and end calls, see pages<br />
14-15.<br />
Internal button<br />
To make internal calls<br />
between handsets<br />
registered to the base.<br />
1
<strong>BT</strong> <strong>Freelance</strong> XH 2100 user guide ~ 2nd Edition ~ 18th March ’04 ~ 6012<br />
Base<br />
Page<br />
Page button<br />
Lets you page the handset.<br />
Also used to register the<br />
handset.<br />
DECT<br />
Digital Clarity<br />
Power/<br />
In Use<br />
Charging<br />
Power/In use light<br />
Green light remains lit<br />
when there is power to the<br />
base and flashes when the<br />
line is in use.<br />
<strong>BT</strong> <strong>Freelance</strong> XH 2100<br />
Charging light<br />
Lights up red to indicate<br />
charging when the<br />
handset is on the base.<br />
Explanation of the display icons<br />
Standby screen<br />
To personalise the<br />
name of your handset,<br />
see page 21.<br />
EXT<br />
INT<br />
JOHN<br />
HS1<br />
HS1<br />
Displays the number of<br />
the handset at all times.<br />
Icon Steady Flashing<br />
EXT<br />
External line in use<br />
Incoming call<br />
INT Internal call Internal call from another handset<br />
In calls list<br />
New call received in calls list<br />
EXT<br />
INT<br />
3 way conversation in progress<br />
Battery exhausted<br />
Battery weak<br />
Battery half-full<br />
Battery full<br />
Phonebook<br />
Menu in use<br />
Handset linked to base station<br />
Out of range or searching for base station<br />
2
<strong>BT</strong> <strong>Freelance</strong> XH 2100 user guide ~ 2nd Edition ~ 18th March ’04 ~ 6012<br />
Quick <strong>Guide</strong><br />
Information for the handset settings<br />
Function<br />
Answer a call/End a call<br />
Key combination<br />
*<br />
Make a call<br />
Redial a number<br />
<br />
Vol<br />
Store a number in the<br />
memory<br />
Men<br />
u<br />
Men<br />
u<br />
Men<br />
u<br />
enter the name<br />
the telephone number<br />
Men<br />
u<br />
u<br />
Men<br />
enter<br />
Dial a number in the memory<br />
<br />
Vol<br />
Calls<br />
<br />
Adjust the earpiece volume<br />
During a call, press the<br />
Vol<br />
<br />
during a<br />
call until the required level is reached.<br />
<br />
Calls<br />
Secrecy on/off<br />
During a call, press<br />
to switch off.<br />
Secrecy<br />
to switch on and again<br />
Transfer call to another handset<br />
Int<br />
enter handset number<br />
Three way conversation<br />
Int<br />
enter handset number<br />
Conf<br />
Int<br />
Access to redial list<br />
Access to calls list<br />
Set handset ringer volume<br />
Calls<br />
<br />
Vol<br />
<br />
Men<br />
u<br />
<br />
Vol<br />
Calls<br />
RING VOL<br />
– Press and release continuously to<br />
scroll through.<br />
Vol<br />
– Press and release continuously to<br />
<br />
scroll through.<br />
<br />
Calls<br />
<br />
Calls<br />
<br />
Men<br />
u<br />
Men<br />
<br />
HANDSET<br />
Vol<br />
to select volume<br />
<br />
Calls<br />
u<br />
Calls<br />
Men<br />
u<br />
Set base unit ringer volume<br />
Men<br />
<br />
Vol<br />
u<br />
Calls<br />
<br />
Calls<br />
<br />
SETUP<br />
Men<br />
to select volume<br />
u<br />
BASE VOL<br />
Men<br />
u<br />
Men<br />
u<br />
3
<strong>BT</strong> <strong>Freelance</strong> XH 2100 user guide ~ 2nd Edition ~ 18th March ’04 ~ 6012<br />
Menu Structure<br />
Phonebook<br />
Add<br />
Delete<br />
Modifiy<br />
Setup<br />
Base Vol<br />
Handset 1.....5<br />
Vol Off<br />
Base Mel<br />
Sel Base<br />
Melody 1.....5<br />
Base 1.....4<br />
Auto<br />
Del H/S<br />
PIN?<br />
Handset 1.....5<br />
PIN Code<br />
PIN?<br />
New PIN<br />
MENU STRUCTURE<br />
Priority<br />
Off<br />
On<br />
Select<br />
Retype<br />
Base<br />
Handset 1.....5<br />
Dial Mode<br />
Pulse<br />
Tone<br />
Recall Recall 1<br />
Recall 2<br />
PABX<br />
PBX1<br />
PBX2<br />
Pause<br />
PIN?<br />
PIN?<br />
3 Sec<br />
5 Sec<br />
Cont......<br />
Default<br />
PIN?<br />
4
<strong>BT</strong> <strong>Freelance</strong> XH 2100 user guide ~ 2nd Edition ~ 18th March ’04 ~ 6012<br />
Handset<br />
Beep<br />
Keytone<br />
On or Off<br />
Low Batt<br />
On or Off<br />
Outrange<br />
On or Off<br />
Ring Vol<br />
Volume 1.....5<br />
Vol Off<br />
Ear Vol<br />
Ear Vol 1.....5<br />
Int Mel<br />
Melody 1.....5<br />
Ext Mel<br />
Melody 1.....5<br />
Auto Ans<br />
Off<br />
On<br />
Name<br />
Language<br />
English<br />
Francais<br />
Deutsch<br />
Nederl<br />
Italiano<br />
Espanol<br />
MENU STRUCTURE<br />
Portuges<br />
Norsk<br />
Dansk<br />
Svenska<br />
Suomi<br />
Register<br />
BS 1234<br />
PIN?<br />
Important. If you make a mistake you can return to the previous menu heading by pressing the ✘ button. If you press<br />
and hold the ✘ button at any time you will return to the standby screen. After 15 seconds if no buttons are pressed<br />
the handset will automatically return to the standby screen.<br />
5
<strong>BT</strong> <strong>Freelance</strong> XH 2100 user guide ~ 2nd Edition ~ 18th March ’04 ~ 6012<br />
In this guide<br />
Note<br />
There is a detailed INDEX at the end of this guide, see page 37.<br />
IN THIS GUIDE<br />
At a glance<br />
Handset 1<br />
Display icons 2<br />
Quick <strong>Guide</strong> 3<br />
Menu structure 4<br />
Introduction 7<br />
Unpacking your<br />
<strong>BT</strong> <strong>Freelance</strong> XH 2100 8<br />
For your records 8<br />
Safety information 9<br />
Setting up 10<br />
Plan the location 10<br />
Using the telephone 14<br />
Making and receiving calls 14<br />
Call timer 14<br />
Redial 16<br />
Secrecy 16<br />
Name and number<br />
Phonebook 16<br />
Paging handsets 19<br />
Handset settings 20<br />
Base settings 23<br />
Caller Display<br />
and Call Waiting 26<br />
Using Caller Display 26<br />
Calls list 27<br />
Call Waiting 28<br />
Using <strong>BT</strong> <strong>Freelance</strong><br />
XH 2100 additional<br />
handsets and bases 30<br />
Help 32<br />
General information 34<br />
Guarantee 34<br />
Technical information 35<br />
Switchboard compatibility 35<br />
Switchboard external line<br />
access code 35<br />
Recall 35<br />
Index 37<br />
Note<br />
In this user guide, we’ve included<br />
helpful tips and useful notes. They<br />
are shown in a white box like this.<br />
6
Redial<br />
Vol<br />
<br />
3<br />
4 5 6<br />
7 8 9<br />
0<br />
Int<br />
R<br />
Secrecy<br />
GHI<br />
PQRS<br />
Calls<br />
Pause<br />
<br />
ABC<br />
JKL<br />
TUV<br />
Digital<br />
Clarity<br />
Men<br />
Redial<br />
Vol<br />
<br />
3<br />
4 5 6<br />
7 8 9<br />
0<br />
Int<br />
R<br />
Secrecy<br />
GHI<br />
PQRS<br />
Calls<br />
Pause<br />
<br />
ABC<br />
JKL<br />
TUV<br />
Digital<br />
u<br />
DEF<br />
MNO<br />
WXYZ<br />
Conf<br />
Clarity<br />
Men<br />
u<br />
DEF<br />
MNO<br />
WXYZ<br />
Conf<br />
DECT<br />
Digital Clarity<br />
Redial<br />
Vol<br />
<br />
3<br />
4 5 6<br />
7 8 9<br />
0<br />
Int<br />
R<br />
Secrecy<br />
GHI<br />
PQRS<br />
Calls<br />
Pause<br />
<br />
ABC<br />
JKL<br />
TUV<br />
Digital<br />
Clarity<br />
Men<br />
u<br />
DEF<br />
MNO<br />
WXYZ<br />
Conf<br />
Power/<br />
In Use<br />
Charging<br />
Redial<br />
Vol<br />
<br />
3<br />
4 5 6<br />
7 8 9<br />
0<br />
Int<br />
R<br />
Secrecy<br />
GHI<br />
PQRS<br />
Calls<br />
Pause<br />
<br />
ABC<br />
JKL<br />
TUV<br />
Digital<br />
Clarity<br />
Men<br />
Redial<br />
Vol<br />
<br />
3<br />
4 5 6<br />
7 8 9<br />
0<br />
Int<br />
R<br />
Secrecy<br />
GHI<br />
PQRS<br />
Calls<br />
Pause<br />
<br />
ABC<br />
JKL<br />
TUV<br />
Digital<br />
u<br />
DEF<br />
MNO<br />
WXYZ<br />
Conf<br />
Clarity<br />
Men<br />
u<br />
DEF<br />
MNO<br />
WXYZ<br />
Conf<br />
<strong>BT</strong> <strong>Freelance</strong> XH 2100 user guide ~ 2nd Edition ~ 18th March ’04 ~ 6012<br />
Introduction<br />
Your <strong>BT</strong> <strong>Freelance</strong> XH 2100 has been designed for ease of use<br />
and made to the high standards set by <strong>BT</strong><br />
Please read the instructions carefully<br />
before use and keep this user guide for<br />
future reference.<br />
DECT<br />
By purchasing the <strong>BT</strong> <strong>Freelance</strong><br />
XH 2100 you now own a product which<br />
combines the advantages of cordless<br />
operation with the performance of a<br />
high quality corded telephone. It<br />
complies with the Digitally Enhanced<br />
Cordless Telecommunications (DECT)<br />
standard and offers unparalleled quality<br />
and features.<br />
You can use up to 5 handsets with your<br />
<strong>BT</strong> <strong>Freelance</strong> XH 2100 base station<br />
without the need for additional wiring.<br />
This user guide applies to both single<br />
and multiple handset packs. The<br />
internal call functions described in this<br />
guide apply only to <strong>BT</strong> <strong>Freelance</strong><br />
XH 2100 base stations with more than<br />
one handset connected.<br />
Important<br />
If you wear a hearing aid, please<br />
note that the <strong>BT</strong> <strong>Freelance</strong> XH 2100<br />
works by sending radio signals<br />
between the base station and the<br />
handset. These signals may interfere<br />
with some hearing aids, causing a<br />
humming noise.<br />
INTRODUCTION<br />
HANDSET 1<br />
Page<br />
HANDSET 1<br />
1 2<br />
1 2<br />
HANDSET 1<br />
<strong>BT</strong> <strong>Freelance</strong> XH 2100<br />
HANDSET 1<br />
1 2<br />
1 2<br />
HANDSET 1<br />
1 2<br />
7
Digital<br />
<strong>BT</strong> <strong>Freelance</strong> XH 2100<br />
Clarity<br />
Page<br />
DECT<br />
Digital Clarity<br />
Pause<br />
Secrecy<br />
Redial<br />
<br />
Vol<br />
Calls<br />
Men<br />
<br />
GHI<br />
u<br />
ABC<br />
PQRS<br />
JKL<br />
3<br />
4 5 6<br />
7 8 9<br />
0<br />
TUV<br />
R<br />
DEF<br />
MNO<br />
WXYZ<br />
Conf<br />
Int<br />
Power/<br />
In Use<br />
Charging<br />
<strong>BT</strong> <strong>Freelance</strong> XH 2100 user guide ~ 2nd Edition ~ 18th March ’04 ~ 6012<br />
Unpacking your<br />
<strong>BT</strong> <strong>Freelance</strong> XH 2100<br />
If anything is missing, please contact<br />
your place of purchase immediately.<br />
For your records<br />
Date of purchase:<br />
Place of purchase:<br />
One <strong>BT</strong> <strong>Freelance</strong> XH 2100<br />
base station<br />
Serial number:<br />
One <strong>BT</strong> <strong>Freelance</strong> XH 2100<br />
handset<br />
HANDSET 1<br />
1 2<br />
For guarantee purposes proof of<br />
purchase is required so please keep<br />
your receipt.<br />
2 x AAA rechargeable<br />
batteries (Ni-MH)<br />
If you change your PIN, keep a record<br />
of the new number here:<br />
(original setting 0000)<br />
INTRODUCTION<br />
One battery cover<br />
One power supply<br />
for base station<br />
(Item code: 872260)<br />
See page 24 for more information.<br />
One telephone line cord<br />
In addition, if you have purchased<br />
a <strong>BT</strong> <strong>Freelance</strong> XH 2100 with<br />
multiple handsets you will receive<br />
the following for each handset:<br />
<strong>BT</strong> <strong>Freelance</strong> XH 2100 handset.<br />
<strong>BT</strong> <strong>Freelance</strong> XH 2100 charger.<br />
2 x AAA rechargeable batteries (NiMH).<br />
One power supply for the charger<br />
(item code 003313)<br />
8
<strong>BT</strong> <strong>Freelance</strong> XH 2100 user guide ~ 2nd Edition ~ 18th March ’04 ~ 6012<br />
Safety information<br />
General<br />
Only use the power supply included<br />
with the product. Using an unauthorised<br />
power supply will invalidate your<br />
guarantee and may damage the telephone.<br />
The item number for the power supply<br />
used with the base station is 872260.<br />
If you have purchased a multiple pack,<br />
the item number for the power supply<br />
used with the charger is 003313.<br />
Only use the approved rechargeable<br />
batteries supplied. Spare rechargeable<br />
batteries are available from the <strong>Freelance</strong><br />
Helpline 0870 605 8047.<br />
Do not open the handset or base station.<br />
This could expose you to high voltages<br />
or other risks. Contact the Helpline for<br />
all repairs.<br />
Radio signals transmitted between the<br />
handset and base may cause interference<br />
to hearing aids.<br />
It is recommended that advice from a<br />
qualified expert be sought before using<br />
this product in the vicinity of emergency/<br />
intensive care medical equipment.<br />
It is recommended that if you have<br />
a pacemaker fitted you check with a<br />
medical expert before using this product.<br />
Your product may interfere with other<br />
electrical equipment, e.g. TV and radio<br />
sets, clock/alarms and computers if placed<br />
too close. It is recommended that you<br />
place your product at least one metre<br />
away from such appliances to minimise<br />
any risk of interference.<br />
Never dispose of the batteries in a fire.<br />
There is a serious risk of explosion and/or<br />
the release of highly toxic chemicals.<br />
Cleaning<br />
Simply clean the handset and base station<br />
with a damp (not wet) cloth, or an antistatic<br />
wipe. Never use household polish<br />
as this will damage the product. Never<br />
use a dry cloth as this may cause a<br />
static shock.<br />
Environmental<br />
Do not expose to direct sunlight.<br />
The product may heat up when the<br />
batteries are being recharged. This is<br />
normal. However, we recommend<br />
that you do not place the product on<br />
antique/veneered wood to avoid damage.<br />
Do not stand your product on carpets<br />
or other surfaces which generate fibres,<br />
or place it in locations preventing the<br />
free flow of air over its surfaces.<br />
Do not submerge any part of your<br />
product in water and do not use it in<br />
damp conditions, such as bathrooms.<br />
Do not expose your product to fire,<br />
explosive or other hazardous conditions.<br />
There is a slight chance that your phone<br />
could be damaged by an electrical storm.<br />
We recommend that you unplug the<br />
power and telephone line cord for the<br />
duration of the storm.<br />
INTRODUCTION<br />
9
<strong>BT</strong> <strong>Freelance</strong> XH 2100 user guide ~ 2nd Edition ~ 18th March ’04 ~ 6012<br />
Setting up<br />
Follow these steps to set up your <strong>BT</strong> <strong>Freelance</strong> XH 2100 ready<br />
for use<br />
SETTING UP<br />
Plan the location<br />
Position your <strong>BT</strong> <strong>Freelance</strong> XH 2100<br />
within 2 metres of a power socket and<br />
phone socket otherwise extension<br />
cables will be required.<br />
Make sure it is at least 2-3 metres<br />
away from other electrical products to<br />
avoid interference.<br />
Do not place your <strong>BT</strong> <strong>Freelance</strong><br />
XH 2100 product in the bathroom or<br />
other humid areas.<br />
Note<br />
The <strong>BT</strong> <strong>Freelance</strong> XH 2100 has a<br />
range of 300m outdoors when there<br />
is a clear line of sight between the<br />
base and the handset. When there is<br />
no clear line of sight between the<br />
handset and the base, e.g. the base is<br />
indoors and the handset is either<br />
indoors or outdoors, the range could<br />
be reduced to 50m. Thick stone walls<br />
will severely affect the range.<br />
1 Connect the power supply to<br />
the base<br />
Plug the power adaptor into the mains<br />
power socket and switch on. The green<br />
Power/In Use light comes on.<br />
Note<br />
The base station must be plugged into<br />
the mains power socket at all times.<br />
10
<strong>BT</strong> <strong>Freelance</strong> XH 2100 user guide ~ 2nd Edition ~ 18th March ’04 ~ 6012<br />
2 Install the rechargeable<br />
batteries in the handset<br />
Please note that the red charging light<br />
will remain on even when the batteries<br />
are fully charged.<br />
BATTERY LEVELS<br />
WEAK HALF-FULL FULL<br />
The handset uses two rechargeable<br />
Nickel Metal Hydride (Ni-MH) AAA<br />
batteries which are supplied. Take<br />
care to insert the batteries as shown<br />
and then fit the battery cover (the<br />
battery cover may be found in the<br />
packaging with the batteries).<br />
3 Charge the handset batteries<br />
for at least 16 hours<br />
Before you use your <strong>BT</strong> <strong>Freelance</strong><br />
XH 2100 for the first time, it is important<br />
to have the handset batteries fully<br />
charged. The batteries need to charge<br />
continuously for at least 16 hours<br />
to reach full charge.<br />
Place the handset on the base. The<br />
red charging light will come on. The<br />
handset comes pre-registered to the<br />
base station as HANDSET HS1. This<br />
is shown on the display. The icon<br />
and the battery icon are shown on<br />
the display. Once the handset is fully<br />
charged, the display shows a full<br />
battery symbol.<br />
Battery low warning<br />
If the handset battery symbol is empty<br />
and flashing, and you hear a warning<br />
beep every minute, you will need<br />
to recharge your handset before you<br />
can use it.<br />
Note<br />
The symbol on your handset display<br />
indicates when you are in range of<br />
the base station. If the symbol flashes<br />
and you hear a warning beep, you<br />
are out of range and will need to move<br />
closer to the base station.<br />
SETTING UP<br />
11
<strong>BT</strong> <strong>Freelance</strong> XH 2100 user guide ~ 2nd Edition ~ 18th March ’04 ~ 6012<br />
SETTING UP<br />
For <strong>BT</strong> <strong>Freelance</strong> XH 2100<br />
multiple pack owners only:<br />
Plug the mains power adaptor into the<br />
power socket on the underside of the<br />
charger(s) and connect the other end<br />
to the mains power.<br />
Insert the 2 x AAA rechargeable<br />
batteries supplied. Take care to insert<br />
the batteries as shown on page 11 and<br />
then fit the battery cover.<br />
The display will show the handset<br />
number, e.g. HANDSET HS2, to show<br />
it is registered to the base.<br />
Place the handset(s) on the charger(s).<br />
The red charging light will come on.<br />
Leave the handset to charge<br />
continuously for at least 16 hours.<br />
Battery performance<br />
Under no circumstances should<br />
non-rechargeable batteries be used.<br />
Only use the approved batteries, type:<br />
rechargeable Nickel Metal Hydride<br />
(Ni-MH); size AAA; capacity<br />
550mAh 1.2v. Using unapproved<br />
batteries will invalidate your guarantee<br />
and may damage the telephone.<br />
To keep your batteries in the best<br />
condition, leave the handset off the<br />
base station for a few hours at a time.<br />
(after the intial 16 hour charge).<br />
Please note, however, that new Nickel<br />
Metal Hydride (Ni-MH) batteries<br />
do not reach their full capacity until<br />
they have been in normal use for<br />
several days.<br />
Fully discharging the batteries at<br />
least once a week will help them last<br />
as long as possible. However, the charge<br />
capacity of rechargeable batteries will<br />
reduce with time as they wear out, so<br />
reducing the talk/standby time of the<br />
handset. Eventually they will need<br />
to be replaced. New batteries can be<br />
obtained from the <strong>BT</strong> <strong>Freelance</strong><br />
Helpline 0870 605 8047.<br />
Note: Under ideal conditions, the<br />
handset batteries should give about<br />
14 hours talktime or 350 hours<br />
standby on a single charge. Optimum<br />
times for talk and standby are only<br />
achieved when the handset batteries<br />
are fully charged.<br />
12
<strong>BT</strong> <strong>Freelance</strong> XH 2100 user guide ~ 2nd Edition ~ 18th March ’04 ~ 6012<br />
4 Connect the telephone line<br />
cord to the <strong>BT</strong> <strong>Freelance</strong><br />
XH 2100 base station<br />
5 Connect the telephone line cord<br />
Note<br />
It is recommended that you do not<br />
connect the telephone line cord to the<br />
phone socket until your handset is<br />
fully charged. This will prevent the<br />
risk of the batteries discharging<br />
during a conversation, which could<br />
cause you to lose a call.<br />
SETTING UP<br />
Your <strong>BT</strong> <strong>Freelance</strong> XH 2100<br />
is now ready for use.<br />
13
<strong>BT</strong> <strong>Freelance</strong> XH 2100 user guide ~ 2nd Edition ~ 18th March ’04 ~ 6012<br />
Using the telephone<br />
USING YOUR PHONE<br />
To switch the handset on and off<br />
R<br />
Note<br />
To exit and return to the previous<br />
menu at any time, press the<br />
button. If you press and hold the<br />
button you will return to the<br />
standby screen.<br />
Press and hold the POWER<br />
button to switch the handset off<br />
or on.<br />
Making and receiving calls<br />
To make an external call<br />
Secrecy<br />
Secrecy<br />
Preparatory dialling<br />
Secrecy<br />
Preparatory dialling allows<br />
you to enter the number<br />
before pressing the TALK<br />
button. This enables you to<br />
correct any mistakes before<br />
you actually make the call.<br />
Enter the number to be<br />
dialled.<br />
The number is shown in the<br />
display.<br />
(If you make a mistake, press<br />
the ✘ button to delete the<br />
incorrect digit).<br />
When you have entered the<br />
number correctly, press the<br />
TALK button to dial the number.<br />
Press the TALK button.<br />
You will hear the dial tone and<br />
EXT<br />
the display will show the<br />
symbol.<br />
Enter the number you want.<br />
The number is dialled<br />
automatically.<br />
Call timer<br />
Your handset will automatically time<br />
the duration of all external calls.<br />
The handset display shows the call<br />
duration both during your call and for<br />
a few seconds after it is complete.<br />
EXT<br />
14
<strong>BT</strong> <strong>Freelance</strong> XH 2100 user guide ~ 2nd Edition ~ 18th March ’04 ~ 6012<br />
To end a call<br />
To adjust the speech volume<br />
during a call<br />
Press the TALK button.<br />
During a call:<br />
Or<br />
Place the handset back on<br />
the base.<br />
To receive a call<br />
Calls<br />
<br />
Vol<br />
<br />
You can adjust the earpiece<br />
volume. There are 5 levels to<br />
choose from.<br />
Press the UP or DOWN<br />
button until you reach the<br />
required level. This will be<br />
shown on the display.<br />
eg: EAR VOL 3.<br />
When the phone rings the<br />
display will show CALL and<br />
the EXT symbol will flash.<br />
If you have subscribed to a<br />
Caller Display Service, the<br />
number (and name if stored<br />
in the phonebook) will be<br />
displayed.<br />
Press the TALK button.<br />
Or<br />
If the handset is on the base,<br />
simply lift it up and speak.<br />
Note<br />
You can switch the Auto-Talk feature<br />
on or off. Please see page 21<br />
Calls<br />
Calls<br />
Men<br />
Calls<br />
Men<br />
Men<br />
<br />
Vol<br />
<br />
Men<br />
u<br />
u<br />
u<br />
u<br />
Secrecy<br />
In standby mode:<br />
Press the button.<br />
Press the DOWN button until<br />
HANDSET is displayed.<br />
Press the button.<br />
Press the DOWN button until<br />
EAR VOL is displayed.<br />
Press the button.<br />
Press the UP or DOWN<br />
button until you reach the<br />
required level.<br />
Press the button to confirm<br />
the selected level.<br />
Press and hold the ✘ button to<br />
return to the standby screen.<br />
USING YOUR PHONE<br />
15
<strong>BT</strong> <strong>Freelance</strong> XH 2100 user guide ~ 2nd Edition ~ 18th March ’04 ~ 6012<br />
Redial<br />
You can redial up to 5 of the last<br />
numbers called. They are stored in the<br />
redial list. If you have stored a name<br />
to go with a number in the phonebook,<br />
the name will be displayed instead. See<br />
“Name and number Phonebook”, opposite.<br />
Name and number Phonebook<br />
You can store up to 50 of your most<br />
frequently used names and numbers<br />
in the Phonebook. Stored numbers<br />
can be no longer than 20 digits and<br />
a maximum of 8 characters can be<br />
stored.<br />
USING YOUR PHONE<br />
Pause<br />
Dial from the redial list<br />
Redial<br />
Calls<br />
<br />
Vol<br />
<br />
Secrecy<br />
When on a call you can talk to<br />
someone in the same room, without<br />
your caller hearing.<br />
To switch secrecy on / off<br />
Secrecy<br />
Secrecy<br />
Press the REDIAL button to<br />
enter the redial list.<br />
Press the UP or DOWN button<br />
to scroll through the list.<br />
Press the TALK button when<br />
the number (or name) you<br />
want to call is displayed. The<br />
number is dialled automatically.<br />
During a call, press the ✘<br />
button. The display will show<br />
MUTE. Your caller cannot hear<br />
you.<br />
Press the ✘ button again to<br />
resume your call.<br />
To store a name and number in<br />
the Phonebook<br />
Men<br />
Men<br />
Men<br />
8<br />
u<br />
u<br />
u<br />
TUV<br />
6<br />
MNO<br />
6<br />
6<br />
MNO<br />
MNO<br />
Press the button to enter<br />
the menu.<br />
The display will show<br />
PHONEBK, press the button.<br />
The display will show ADD,<br />
press the button.<br />
The display shows NAME?<br />
Enter the name using the<br />
letters on the keypad. Names<br />
can be no longer than 8<br />
characters.<br />
Entering names:<br />
Use the keypad letters to<br />
enter names, e.g. if you wish<br />
to store the name TOM:<br />
To enter the letter T, press the<br />
8 button once.<br />
To enter O, press the 6 button<br />
three times and wait for the<br />
cursor to move across.<br />
16
<strong>BT</strong> <strong>Freelance</strong> XH 2100 user guide ~ 2nd Edition ~ 18th March ’04 ~ 6012<br />
6<br />
MNO<br />
Secrecy<br />
Men<br />
Men<br />
Men<br />
u<br />
u<br />
u<br />
Secrecy<br />
To enter M, press the 6 button<br />
once.<br />
If you enter a digit incorrectly,<br />
press the ✘ button to delete it.<br />
Press to confirm the name.<br />
You will hear a confirmation<br />
beep.<br />
The display shows NUMBER?<br />
Enter the telephone number<br />
you want to store.<br />
Press the button. You will<br />
hear a confirmation beep.<br />
Alternatively, press the <br />
button to continue storing<br />
entries in the phonebook.<br />
Press and hold the ✘ button to<br />
return to the standby screen.<br />
Note<br />
Press the 1 button once to insert a<br />
space, press twice for a - (hyphen),<br />
press 3 times for the number 1.<br />
Note<br />
If you subscribe to a Caller Display<br />
Service (see page 26) and want<br />
directory names to be displayed when<br />
a call is received from one of your<br />
directory numbers, you must ensure<br />
that you always enter the full<br />
telephone number, including the<br />
national code.<br />
Calls<br />
To enter a pause in a stored<br />
number<br />
<br />
Vol<br />
You may want to enter a pause<br />
when storing international<br />
numbers, charge card numbers<br />
or if you connect your<br />
telephone to a switchboard.<br />
(For more information on<br />
switchboard use see page 35.)<br />
When storing the number,<br />
press and hold the UP button,<br />
until a P is displayed, at the<br />
point where you want to enter<br />
the pause.<br />
You may enter as many pauses<br />
as required.<br />
To dial a name and number<br />
from the Phonebook<br />
<br />
Vol<br />
<br />
8<br />
TUV<br />
Press the PHONEBOOK<br />
button to enter the phonebook.<br />
Use the UP or DOWN button<br />
to scroll through.<br />
Or<br />
Enter the first letter of the<br />
name you want, e.g. for Tom,<br />
press the 8 button to search<br />
for names beginning with T.<br />
Press the TALK button to<br />
dial the number of the name<br />
displayed. The number is<br />
dialled automatically.<br />
USING YOUR PHONE<br />
17
<strong>BT</strong> <strong>Freelance</strong> XH 2100 user guide ~ 2nd Edition ~ 18th March ’04 ~ 6012<br />
Note<br />
You can scroll in either direction to<br />
search through the list.<br />
Men<br />
u<br />
Secrecy<br />
Press the button to store<br />
the new number. You will hear<br />
a confirmation beep.<br />
Press and hold the ✘ button to<br />
return to the standby screen.<br />
To edit an entry in the<br />
Phonebook<br />
To delete a Phonebook entry<br />
USING YOUR PHONE<br />
Men<br />
Men<br />
Calls<br />
Calls<br />
Calls<br />
Men<br />
<br />
Vol<br />
<br />
Men<br />
<br />
Vol<br />
<br />
u<br />
u<br />
u<br />
u<br />
Secrecy<br />
Press the button to enter<br />
the menu.<br />
The display will show<br />
PHONEBK, press the button.<br />
Use the DOWN button to<br />
scroll to MODIFY and press<br />
the button.<br />
Use the UP or DOWN button to<br />
find the name you want to edit.<br />
Press the button.<br />
Use the UP or DOWN button to<br />
move through the name and<br />
press ✘ button to delete<br />
unwanted letters. You can<br />
enter new letters as shown in<br />
‘Entering names’ on page 16.<br />
Men<br />
Men<br />
Calls<br />
Calls<br />
Men<br />
<br />
Vol<br />
<br />
Men<br />
Men<br />
Men<br />
u<br />
u<br />
u<br />
u<br />
u<br />
u<br />
Press the button to enter<br />
the menu.<br />
The display will show<br />
PHONEBK, press the button.<br />
Use the DOWN button to<br />
scroll to DELETE and press<br />
the button.<br />
Use the UP and DOWN<br />
buttons to scroll through to<br />
the entry you want to delete.<br />
When you have found the name<br />
to delete, press the button.<br />
The number will be displayed,<br />
press the button.<br />
The display will show<br />
CONFIRM?, press the button.<br />
Men<br />
u<br />
Press to store the new<br />
name. You will hear a<br />
confirmation beep.<br />
You will hear a confirmation<br />
beep. The number is now<br />
deleted.<br />
Secrecy<br />
The number will be displayed.<br />
Use the ✘ button to delete<br />
unwanted digits and re-enter<br />
the correct ones.<br />
Secrecy<br />
Press and hold the ✘ button to<br />
return to the standby screen.<br />
18
<strong>BT</strong> <strong>Freelance</strong> XH 2100 user guide ~ 2nd Edition ~ 18th March ’04 ~ 6012<br />
Paging handsets<br />
You can page your handset(s) from<br />
the base station to alert a handset<br />
user that they are wanted or to locate<br />
a missing handset.<br />
Note<br />
Paging calls cannot be answered by<br />
a handset.<br />
To page a handset from the base<br />
Page<br />
Page<br />
Press the PAGE button on the<br />
base.<br />
The handset(s) will ring.<br />
The display will show<br />
INT 8 8 8 8 flashing.<br />
To stop paging, press the<br />
PAGE button again.<br />
Or<br />
To stop paging, press any<br />
button on the handset.<br />
If you do not stop the paging,<br />
the base will time out and stop<br />
ringing after 30 seconds.<br />
USING YOUR PHONE<br />
19
<strong>BT</strong> <strong>Freelance</strong> XH 2100 user guide ~ 2nd Edition ~ 18th March ’04 ~ 6012<br />
Handset settings<br />
To switch keypad beeps on<br />
and off<br />
To adjust the handset ringer<br />
volume<br />
Men<br />
Calls<br />
Men<br />
u<br />
u<br />
Press the button to enter<br />
the menu.<br />
Use the DOWN button to<br />
scroll to HANDSET and press<br />
the button.<br />
Men<br />
u<br />
There are 5 levels to choose<br />
from (1-5), or you can turn<br />
the ringer off altogether.<br />
Press the button to enter<br />
the menu.<br />
HANDSET SETTINGS<br />
Calls<br />
Men<br />
Men<br />
<br />
Vol<br />
<br />
Men<br />
u<br />
u<br />
u<br />
Secrecy<br />
The display will show BEEP,<br />
press the button.<br />
The display will show KEYTONE,<br />
press the button.<br />
Use the UP or DOWN button<br />
to select either ON or OFF.<br />
Press the button. You will<br />
hear a confirmation beep.<br />
Press and hold the ✘ button to<br />
return to the standby screen.<br />
Important<br />
Calls<br />
Men<br />
Calls<br />
Calls<br />
Men<br />
<br />
Vol<br />
<br />
u<br />
u<br />
Use the DOWN button to<br />
scroll to HANDSET and press<br />
the button.<br />
Use the DOWN button to<br />
scroll to RING VOL and press<br />
the button.<br />
You will hear the current<br />
volume setting and it will be<br />
shown on the display.<br />
Use the UP or DOWN button<br />
to select the required volume<br />
(VOLUME 1-5 or VOL OFF).<br />
You will hear a sample ring.<br />
Press and hold the ✘ button at any<br />
time to exit the menu and return to<br />
the standby screen.<br />
Men<br />
u<br />
Press the button to confirm<br />
the new setting. You will hear<br />
a confirmation tone.<br />
Secrecy<br />
Press and hold the ✘ button to<br />
return to the standby screen.<br />
20
<strong>BT</strong> <strong>Freelance</strong> XH 2100 user guide ~ 2nd Edition ~ 18th March ’04 ~ 6012<br />
To set the external or internal<br />
ringer melody<br />
To switch auto-talk on/off<br />
Men<br />
Calls<br />
Men<br />
Calls<br />
Men<br />
u<br />
u<br />
u<br />
There are 5 melodies to<br />
choose from and you have the<br />
option to choose a different<br />
melody for external and<br />
internal calls. (Internal calls<br />
for when you have more than<br />
one handset).<br />
Press the button to enter<br />
the menu.<br />
Use the DOWN button to<br />
scroll to HANDSET and press<br />
the button.<br />
Use the DOWN button to<br />
scroll to either INT MEL or<br />
EXT MEL.<br />
Press the button.<br />
You will hear the current<br />
melody setting and it will be<br />
shown on the display. e.g.<br />
MELODY 4.<br />
Men<br />
Calls<br />
Men<br />
Calls<br />
Calls<br />
Men<br />
<br />
Vol<br />
<br />
Men<br />
u<br />
u<br />
u<br />
u<br />
Secrecy<br />
When the handset is on the<br />
base or the charging unit you<br />
can answer the call by picking<br />
it up from the base. This will<br />
automatically answer the call<br />
without having to press the<br />
TALK button.<br />
Press the button.<br />
Use the DOWN button to<br />
scroll to HANDSET and press<br />
the button.<br />
Use the DOWN button to<br />
scroll to AUTO ANS.<br />
Press the button.<br />
Use the UP or DOWN button<br />
to turn ON or OFF.<br />
Press the button to<br />
confirm.<br />
Press and hold the ✘ button to<br />
return to the standby screen.<br />
HANDSET SETTINGS<br />
Calls<br />
<br />
Vol<br />
<br />
Use the UP or DOWN button<br />
to select the required melody.<br />
You will hear a sample melody.<br />
To name a handset<br />
Men<br />
u<br />
Secrecy<br />
Press the button to confirm<br />
the new melody. You will hear<br />
a confirmation tone.<br />
Press and hold the ✘ button to<br />
return to the standby screen.<br />
The handset name is pre-set<br />
as HANDSET, however, you can<br />
personalise each handset by<br />
giving it a name. A maximum<br />
of 8 characters can be stored.<br />
21
<strong>BT</strong> <strong>Freelance</strong> XH 2100 user guide ~ 2nd Edition ~ 18th March ’04 ~ 6012<br />
HANDSET SETTINGS<br />
Men<br />
Calls<br />
Men<br />
Calls<br />
Men<br />
u<br />
u<br />
Secrecy<br />
Men<br />
<br />
Vol<br />
Calls<br />
u<br />
u<br />
Redial<br />
Secrecy<br />
Secrecy<br />
Press the button to enter<br />
the menu.<br />
Use the DOWN button to<br />
scroll to HANDSET and press<br />
the button.<br />
Use the DOWN button to<br />
scroll to NAME and press the<br />
button.<br />
Press the ✘ button to delete<br />
the name already set.<br />
Enter the name you want using<br />
the keypad and press the <br />
button. You can use the UP<br />
and DOWN button to scroll<br />
through the name and correct<br />
any mistakes by pressing the<br />
✘ button.<br />
You will hear a confirmation<br />
beep.<br />
Press and hold the ✘ button to<br />
return to the standby screen.<br />
Calls<br />
Men<br />
Calls<br />
Calls<br />
Men<br />
<br />
Vol<br />
<br />
Men<br />
Calls<br />
u<br />
u<br />
u<br />
Secrecy<br />
Men<br />
u<br />
Use the DOWN button to<br />
scroll to HANDSET and press<br />
the button.<br />
Use the DOWN button to<br />
scroll to LANGUAGE and press<br />
the button.<br />
Use the UP or DOWN button<br />
to scroll through the language<br />
options.<br />
Press the button to confirm<br />
your choice. You will hear a<br />
confirmation beep.<br />
Press and hold the ✘ button to<br />
return to the standby screen.<br />
Note<br />
To default back to the English<br />
language follow:<br />
Press the MENU button.<br />
Press the DOWN button twice.<br />
To set the handset language<br />
If you wish, you can change the<br />
language used on the handset<br />
display. You can choose from<br />
English, Francais, Deutsch,<br />
Nederl, Italiano, Espanol,<br />
Portuges, Norsk, Dansk,<br />
Svenska and Suomi.<br />
Calls<br />
Calls<br />
Men<br />
Men<br />
<br />
Vol<br />
<br />
Men<br />
u<br />
u<br />
u<br />
Press the MENU button.<br />
Press the DOWN button seven<br />
times.<br />
Press the MENU button.<br />
Press the UP or DOWN button<br />
until ENGLISH is displayed.<br />
Press the MENU button once.<br />
Men<br />
u<br />
Press the button to enter<br />
the menu.<br />
22
<strong>BT</strong> <strong>Freelance</strong> XH 2100 user guide ~ 2nd Edition ~ 18th March ’04 ~ 6012<br />
Base settings<br />
To adjust the base ringer volume<br />
To adjust the base ringer melody<br />
Men<br />
Calls<br />
Calls<br />
Men<br />
Men<br />
<br />
Vol<br />
<br />
u<br />
u<br />
u<br />
There are 6 levels to choose<br />
from (off-5), or you can turn<br />
the ringer off altogether.<br />
Press the button to enter<br />
the menu.<br />
Use the DOWN button to<br />
scroll to SETUP and press the<br />
button.<br />
The display will show BASE<br />
VOL. Press the button.<br />
Use the UP or DOWN button<br />
to select the required volume<br />
(VOLUME 1-5 or VOL OFF).<br />
You will hear a sample ring.<br />
Men<br />
Calls<br />
Men<br />
Calls<br />
Calls<br />
Men<br />
<br />
Vol<br />
<br />
u<br />
u<br />
u<br />
There are 5 melodies to<br />
choose from (1-5)<br />
Press the button to enter<br />
the menu.<br />
Use the DOWN button to<br />
scroll to SETUP and press the<br />
button.<br />
Use the DOWN button to<br />
scroll to BASE MEL and press<br />
the button.<br />
Use the UP or DOWN button<br />
to select the required melody<br />
(MELODY 1-5). You will hear<br />
a sample melody.<br />
BASE SETTINGS<br />
Men<br />
u<br />
Press the button to confirm<br />
the new setting. You will hear<br />
a confirmation beep.<br />
Men<br />
u<br />
Press the button to confirm<br />
the new setting. You will hear<br />
a confirmation beep.<br />
Secrecy<br />
Press and hold the ✘ button to<br />
return to the standby screen.<br />
Secrecy<br />
Press and hold the ✘ button to<br />
return to the standby screen.<br />
23
<strong>BT</strong> <strong>Freelance</strong> XH 2100 user guide ~ 2nd Edition ~ 18th March ’04 ~ 6012<br />
To select a base station<br />
To change the base station<br />
PIN code<br />
BASE SETTINGS<br />
Men<br />
Calls<br />
Men<br />
Calls<br />
Calls<br />
Men<br />
<br />
Vol<br />
<br />
Men<br />
u<br />
u<br />
u<br />
u<br />
Secrecy<br />
If a handset is registered to<br />
more than one base station,<br />
you can select which base your<br />
handset will use.<br />
For more information on<br />
registering your handset to<br />
another base, see page 30.<br />
Press the button to enter<br />
the menu.<br />
Use the DOWN button to<br />
scroll to SETUP and press the<br />
button.<br />
Use the DOWN button to<br />
scroll to SEL BASE and press<br />
the button.<br />
Use the UP or DOWN button<br />
to select the base you want<br />
(BASE 1-4 or AUTO).<br />
Press the button. You will<br />
hear a confirmation beep.<br />
Press and hold the ✘ button to<br />
return to the standby screen.<br />
Men<br />
Calls<br />
Men<br />
Calls<br />
Men<br />
Men<br />
Men<br />
u<br />
u<br />
u<br />
u<br />
u<br />
If you change the base station<br />
PIN, keep a record of the new<br />
number by writing it in the<br />
space provided on page 8.<br />
You will need to use your base<br />
station PIN for registering<br />
handsets and for some other<br />
optional settings.<br />
Press the button to enter<br />
the menu.<br />
Use the DOWN button to<br />
scroll to SETUP and press the<br />
button.<br />
Use the DOWN button to<br />
scroll to PIN CODE and press<br />
the button.<br />
The display will show PIN?<br />
Enter your 4-digit PIN<br />
(original setting OOOO).<br />
Press the button.<br />
The display will show NEW PIN.<br />
Enter your new 4-digit PIN.<br />
Press the button.<br />
The display will show RETYPE.<br />
Re-enter your new 4-digit PIN.<br />
Men<br />
u<br />
Press the button. You will<br />
hear a confirmation beep.<br />
Secrecy<br />
Press and hold the ✘ button to<br />
return to the standby screen.<br />
24
<strong>BT</strong> <strong>Freelance</strong> XH 2100 user guide ~ 2nd Edition ~ 18th March ’04 ~ 6012<br />
To default/reset the handset and<br />
base to their original/default<br />
factory settings<br />
Men<br />
Calls<br />
Men<br />
Calls<br />
Men<br />
Men<br />
u<br />
u<br />
u<br />
u<br />
Please note that if you reset<br />
your <strong>BT</strong> <strong>Freelance</strong> XH 2100<br />
the Phonebook, Redial and<br />
Calls list will be deleted.<br />
Press the button to enter<br />
the menu.<br />
Use the DOWN button to<br />
scroll to SETUP and press the<br />
button.<br />
Use the DOWN button to<br />
scroll to DEFAULT and press<br />
the button.<br />
The display will show PIN?<br />
Enter the base PIN (original<br />
setting OOOO)<br />
Press the button.<br />
You will hear a confirmation<br />
tone at the base and<br />
handset. The handset display<br />
will flash BASE 1 and then<br />
HANDSET 1.<br />
Your <strong>BT</strong> <strong>Freelance</strong> XH 2100<br />
is now reset to the factory<br />
settings.<br />
The default settings are:<br />
Earpiece volume 3<br />
Handset ringer volume 5<br />
Base ringer volume 3<br />
Handset & Base melody 1<br />
PIN code 0000<br />
Handset name<br />
Handset language<br />
Button beeps<br />
Battery low indicator beeps<br />
Out of range warning beeps<br />
Auto answer<br />
Dialling mode<br />
Pause after<br />
picking up line /<br />
dial-out code<br />
Phonebook<br />
Redial list<br />
Calls list<br />
HANDSET<br />
ENGLISH<br />
ON<br />
ON<br />
ON<br />
ON<br />
TONE<br />
3 seconds<br />
Empty<br />
Empty<br />
Empty<br />
BASE SETTINGS<br />
25
<strong>BT</strong> <strong>Freelance</strong> XH 2100 user guide ~ 2nd Edition ~ 18th March ’04 ~ 6012<br />
Caller Display and Call Waiting<br />
CALLER DISPLAY<br />
Important<br />
To use Caller Display or Call<br />
Waiting you must first subscribe<br />
to your network provider’s Caller<br />
Display or Call Waiting Service.<br />
A quarterly fee is payable.<br />
For more information on <strong>BT</strong>’s<br />
Calling Features, call <strong>BT</strong> free on<br />
0800 800 150.<br />
Using Caller Display<br />
If you subscribe to a Caller Display<br />
Service you can see your caller’s<br />
number (provided it is not withheld)<br />
on your handset display, as well as the<br />
time and date of their call. If you have<br />
your caller’s name and number stored<br />
in your handset phonebook, you will<br />
see the name of your caller displayed<br />
instead of the number.<br />
Please ensure that you have stored<br />
the full telephone number, including<br />
the area code, otherwise the name<br />
will not match the number stored in<br />
the phonebook.<br />
Whether you take a call or not, the<br />
caller’s details are stored in the Calls<br />
list. You can display, scroll through<br />
and dial numbers on the list and copy<br />
them into the phonebook.<br />
Caller information not available<br />
With some incoming calls the telephone<br />
number of the caller is not available<br />
and cannot therefore be displayed.<br />
In this case, your <strong>BT</strong> <strong>Freelance</strong> XH 2100<br />
provides you with some explanatory<br />
information about the type of call<br />
received. This will be one of the<br />
following.<br />
UNAVAILA<br />
The number is unavailable.<br />
WITHHELD<br />
The caller has withheld their number.<br />
RINGBACK<br />
Ringback call.<br />
OPERATOR<br />
The call has been made via the operator.<br />
PAYPHONE<br />
The caller is ringing from a payphone.<br />
INTERNAT<br />
International call.<br />
26
<strong>BT</strong> <strong>Freelance</strong> XH 2100 user guide ~ 2nd Edition ~ 18th March ’04 ~ 6012<br />
Calls list<br />
The Calls list contains the telephone<br />
numbers of your last 20 callers.<br />
New calls in the Calls list are indicated<br />
by the flashing symbol on the<br />
display.<br />
If a call is received when the Calls list<br />
is full then the oldest entry will be<br />
deleted automatically.<br />
To enter and view the Calls list<br />
Calls<br />
Calls<br />
To dial a number from the<br />
Calls list<br />
<br />
Vol<br />
<br />
Press the DOWN button to<br />
enter the Calls list.<br />
Use the UP or DOWN button<br />
to scroll to the number you<br />
want to dial.<br />
Press the TALK button. The<br />
number will be dialled<br />
automatically.<br />
Calls<br />
Calls<br />
<br />
Vol<br />
<br />
Men<br />
Men<br />
u<br />
u<br />
Secrecy<br />
Press the DOWN button to<br />
enter the Calls list. The<br />
symbol is displayed.<br />
Use the UP or DOWN button<br />
to scroll backwards and<br />
forwards through the Calls list.<br />
If the ‘name’ of your caller has<br />
been stored in the phonebook,<br />
this will be displayed. Press<br />
the button and the number<br />
will be displayed.<br />
Press the button and the<br />
time and date of the call will be<br />
displayed.<br />
Keep pressing the ✘ button to<br />
return to the Calls list entry.<br />
Note<br />
Press and hold the ✘ button to<br />
return to the standby screen.<br />
Calls<br />
Calls<br />
To store a number from the<br />
Calls list into the Phonebook<br />
<br />
Vol<br />
<br />
Men<br />
Men<br />
Men<br />
u<br />
u<br />
u<br />
Press the DOWN button to<br />
enter the Calls list.<br />
Use the UP or DOWN button<br />
to scroll to the number you<br />
want to store in the<br />
phonebook.<br />
Press the button.<br />
The display shows the date and<br />
time of the call.<br />
Press the button again, the<br />
display shows ADD.<br />
Press the button, the display<br />
shows NAME?.<br />
Press keypad buttons to enter<br />
name as described before<br />
under the “Entering names”<br />
section.<br />
CALLER DISPLAY<br />
27
<strong>BT</strong> <strong>Freelance</strong> XH 2100 user guide ~ 2nd Edition ~ 18th March ’04 ~ 6012<br />
CALLER DISPLAY<br />
Calls<br />
Calls<br />
Calls<br />
Men<br />
To delete a number from the<br />
Calls list<br />
<br />
Vol<br />
<br />
Men<br />
Men<br />
<br />
Vol<br />
<br />
Men<br />
u<br />
u<br />
u<br />
Note<br />
You can enter names up to 8<br />
characters long. If necessary, you<br />
can edit the entry, when<br />
the entry is correct, press the<br />
button. The number is now<br />
stored in the phonebook.<br />
u<br />
Press the button.<br />
The name and number are<br />
now stored in the phonebook.<br />
Important<br />
Once stored in the phonebook the<br />
number will be deleted from the<br />
Calls list.<br />
Press the DOWN button to<br />
enter the Calls list.<br />
Use the UP or DOWN button<br />
to scroll to the number you<br />
want to delete.<br />
Press the button twice,<br />
ADD will be displayed.<br />
Use the UP or DOWN button<br />
to scroll to DELETE? and<br />
press the button.<br />
The number is deleted from<br />
the Calls list.<br />
Calls<br />
To delete all numbers from the<br />
Calls list<br />
Secrecy<br />
Men<br />
u<br />
Press the DOWN button to<br />
enter the Calls list.<br />
Press the ✘ button. The<br />
display will show DEL ALL.<br />
Press the button. The display<br />
will show EMPTY for 2 seconds.<br />
*Call Waiting<br />
If an incoming call arrives while you<br />
are already engaged on a telephone<br />
call, you will hear a soft beep every<br />
5 seconds (this beep is not audible to<br />
the person you are speaking to). The<br />
second caller’s number (and name if<br />
stored in the directory) will appear on<br />
the handset display.<br />
Instead of the engaged tone, the second<br />
caller will hear an announcement to<br />
hold on as you are aware that there is<br />
a second call.<br />
*You must subscribe to your network provider’s<br />
Call Waiting Service before this feature will<br />
work. A quarterly fee is payable.<br />
To accept a Call Waiting call<br />
If you hear the tone that tells<br />
you there is another caller,<br />
whilst you are on a call:<br />
28
<strong>BT</strong> <strong>Freelance</strong> XH 2100 user guide ~ 2nd Edition ~ 18th March ’04 ~ 6012<br />
R<br />
R<br />
Press the Recall button. The<br />
first caller will be put on hold<br />
and you can now speak to<br />
your second caller.<br />
To return to the first caller<br />
press the Recall button again.<br />
Note<br />
You can switch back and forth<br />
between the two calls without<br />
disconnecting either if you wish.<br />
If you wish to disconnect the<br />
first call press the TALK<br />
button after speaking to the<br />
first caller.<br />
The handset will then ring.<br />
Press the TALK button again<br />
and continue with the second<br />
caller.<br />
CALLER DISPLAY<br />
Note<br />
The second caller will only be<br />
charged for their call from the<br />
moment you answer and not<br />
while they are waiting for your<br />
initial contact.<br />
29
Secrecy<br />
Vol<br />
Calls<br />
3<br />
4 5 6<br />
7 8 9<br />
0<br />
Int<br />
R<br />
Secrecy<br />
GHI<br />
PQRS<br />
Handsfree<br />
<br />
Redial<br />
ABC<br />
JKL<br />
TUV<br />
Digital<br />
Men<br />
Vol<br />
Calls<br />
3<br />
4 5 6<br />
7 8 9<br />
0<br />
Int<br />
R<br />
GHI<br />
PQRS<br />
Handsfree<br />
<br />
Redial<br />
ABC<br />
JKL<br />
TUV<br />
Digital<br />
u<br />
DEF<br />
MNO<br />
WXYZ<br />
Conf<br />
Clarity<br />
Men<br />
u<br />
DEF<br />
MNO<br />
WXYZ<br />
Conf<br />
Secrecy<br />
DECT<br />
Digital Clarity<br />
Vol<br />
Calls<br />
3<br />
4 5 6<br />
7 8 9<br />
0<br />
Int<br />
R<br />
GHI<br />
PQRS<br />
Handsfree<br />
<br />
Redial<br />
ABC<br />
JKL<br />
TUV<br />
Digital<br />
Men<br />
u<br />
DEF<br />
MNO<br />
WXYZ<br />
Conf<br />
Power/<br />
In Use<br />
Charging<br />
Secrecy<br />
Vol<br />
Calls<br />
3<br />
4 5 6<br />
7 8 9<br />
0<br />
Int<br />
R<br />
Secrecy<br />
GHI<br />
PQRS<br />
Handsfree<br />
<br />
Redial<br />
ABC<br />
JKL<br />
TUV<br />
Digital<br />
Men<br />
Vol<br />
Calls<br />
3<br />
4 5 6<br />
7 8 9<br />
0<br />
Int<br />
R<br />
GHI<br />
PQRS<br />
Handsfree<br />
<br />
Redial<br />
ABC<br />
JKL<br />
TUV<br />
Digital<br />
u<br />
DEF<br />
MNO<br />
WXYZ<br />
Conf<br />
Clarity<br />
Men<br />
u<br />
DEF<br />
MNO<br />
WXYZ<br />
Conf<br />
<strong>BT</strong> <strong>Freelance</strong> XH 2100 user guide ~ 2nd Edition ~ 18th March ’04 ~ 6012<br />
Using <strong>BT</strong> <strong>Freelance</strong> XH 2100<br />
additional handsets and bases<br />
Up to 5 handsets can be registered and<br />
operated from any one <strong>BT</strong> <strong>Freelance</strong><br />
XH 2100 base. This allows you to make<br />
internal calls between two handsets<br />
while a third is making an external call.<br />
HANDSET 1<br />
1 2<br />
Clarity<br />
Page<br />
HANDSET 1<br />
1 2<br />
Clarity<br />
Note<br />
Remember to charge the battery pack<br />
of new handsets for at least 16 hours<br />
before use.<br />
If the display shows NOT REG and<br />
the symbol is flashing, your<br />
handset is not yet registered with<br />
the base.<br />
ADDITIONAL<br />
HANDSET 1<br />
1 2<br />
<strong>BT</strong> <strong>Freelance</strong> XH 2100<br />
HANDSET 1<br />
1 2<br />
Each handset can be registered to up<br />
to 4 bases.<br />
Each additional handset you purchase<br />
must be registered to the base.<br />
If you have purchased a multiple pack<br />
the handsets are already pre-registered<br />
to the base supplied (Base 1).<br />
Clarity<br />
HANDSET 1<br />
1 2<br />
To register a <strong>BT</strong> <strong>Freelance</strong><br />
XH 2100 handset to another base<br />
Page<br />
Men<br />
Calls<br />
Men<br />
u<br />
u<br />
At the base:<br />
Press and hold the base PAGE<br />
button for at least 10 seconds,<br />
until you hear the validation<br />
tone (two beeps), then release<br />
the button.<br />
At the handset:<br />
Press the button to enter<br />
the menu.<br />
Use the DOWN button to<br />
scroll to REGISTER and press<br />
the button.<br />
The display will show<br />
BS 1 2 3 4. (The numbers<br />
that are flashing indicate<br />
30
<strong>BT</strong> <strong>Freelance</strong> XH 2100 user guide ~ 2nd Edition ~ 18th March ’04 ~ 6012<br />
other bases that the handset is<br />
already registered to).<br />
Enter the base number<br />
(BS 1-4) that you want to<br />
register the handset to.<br />
Enter your 4-digit PIN<br />
(original factory setting OOOO)<br />
and press the button.<br />
The display will show<br />
SEARCH 1, 2, 3, 4 and the<br />
symbol will flash as the<br />
handset tries to locate the base.<br />
When the handset locates<br />
the base, the handset will be<br />
automatically selected and<br />
shown on the display.<br />
Note<br />
If the handset does not locate the<br />
base, the handset will return to<br />
the previous menu. Try to register<br />
again by using a different<br />
available base number. Ensure<br />
that you are in close vicinity of<br />
the base).<br />
Note<br />
Your 4 digit PIN number is 0000<br />
unless you have previously allocated<br />
a new PIN number as explained on<br />
page 24.<br />
To de-register a <strong>BT</strong> <strong>Freelance</strong><br />
XH 2100 handset from the base<br />
Note<br />
Handsets can only be de-registered<br />
via another handset.<br />
Men<br />
Calls<br />
Men<br />
Calls<br />
Calls<br />
Men<br />
Men<br />
<br />
Vol<br />
<br />
Men<br />
Men<br />
u<br />
u<br />
u<br />
u<br />
u<br />
u<br />
Press the button to enter<br />
the menu.<br />
Use the DOWN button to<br />
scroll to SETUP and press the<br />
button.<br />
Use the DOWN button to<br />
scroll to DEL HS and press<br />
the button.<br />
The display will show PIN?<br />
Enter your 4-digit PIN.<br />
Press the button.<br />
Use the UP or DOWN button<br />
to select the handset you want<br />
to de-register (HANDSET 1-5).<br />
Press the button. Display<br />
shows CONFIRM?.<br />
Press . You will hear a<br />
confirmation beep.<br />
Once de-registered, the<br />
handset will display NOT REG.<br />
ADDITIONAL<br />
31
<strong>BT</strong> <strong>Freelance</strong> XH 2100 user guide ~ 2nd Edition ~ 18th March ’04 ~ 6012<br />
Help<br />
HELP<br />
Replacing the handset batteries.<br />
After a time, you may find that the<br />
handset batteries are running out of<br />
charge more quickly. This is a<br />
standard sign of wear and the batteries<br />
will need replacing.<br />
For spare 2 x AAA rechargeable<br />
batteries please contact the<br />
<strong>BT</strong> <strong>Freelance</strong> XH 2100 Helpline<br />
0870 605 8047.<br />
Replacing the batteries<br />
In the event that you should need<br />
to change or replace the batteries:<br />
Remove the battery compartment<br />
cover and take out the batteries.<br />
Insert new 2 x AAA re-chargeable<br />
batteries and replace the battery<br />
compartment cover.<br />
Do not immerse the batteries in water<br />
or throw into a fire, or dispose of with<br />
ordinary domestic refuse.<br />
<strong>BT</strong> accepts no responsibility for<br />
damage caused to your <strong>BT</strong> <strong>Freelance</strong><br />
handset by using any other type of<br />
batteries.<br />
No display appears.<br />
The batteries may be flat or dead.<br />
Recharge or replace the batteries.<br />
The handset may be switched off.<br />
No dial tone.<br />
Is the telephone line cord plugged into<br />
the phone socket?<br />
Check that: The base station is<br />
connected to the mains power and<br />
switched on.<br />
You cannot link up with the base<br />
station.<br />
Is the display flashing ?<br />
The mains power cable may not be<br />
connected at the base or switched on.<br />
Are you in range of the base station?<br />
The batteries could be low or flat.<br />
If using more than one base station,<br />
check that you are connected to the<br />
correct base. See page 24.<br />
32
<strong>BT</strong> <strong>Freelance</strong> XH 2100 user guide ~ 2nd Edition ~ 18th March ’04 ~ 6012<br />
Handset does not ring.<br />
The ringer volume may be switched<br />
to off. To adjust the ringer volume on<br />
the handset. See page 20.<br />
Check that: The base station is<br />
plugged into the phone socket.<br />
Check that: The base station is<br />
plugged into the mains power and<br />
switched on.<br />
Buzzing noise on my radio, TV,<br />
computer or hearing aid.<br />
Sometimes, your <strong>BT</strong> <strong>Freelance</strong> XH<br />
2100 can interfere with other electrical<br />
equipment if it is placed too close.<br />
It is recommended that you place your<br />
<strong>BT</strong> <strong>Freelance</strong> XH 2100 and other<br />
<strong>BT</strong> <strong>Freelance</strong>/DECT GAP compatible<br />
handsets at least 2-3 metres away<br />
from such appliances to avoid any risk<br />
of interference.<br />
Are you using the correct power<br />
adaptor?<br />
<strong>BT</strong> <strong>Freelance</strong> XH 2100 base station<br />
power supply is Item Code 872260.<br />
<strong>BT</strong> <strong>Freelance</strong> XH 2100 charger power<br />
supply is item code 003313 (multiple<br />
pack users only).<br />
Cannot adjust an option in the<br />
base station.<br />
Is someone else making changes via<br />
another handset?<br />
Have you pressed the button to<br />
confirm your selection?<br />
Customer Helpline<br />
If you are still experiencing difficulty,<br />
call the <strong>BT</strong> <strong>Freelance</strong> XH 2100<br />
Helpline on 0870 605 8047.<br />
HELP<br />
The charger does not appear to be<br />
working.<br />
Check that: The power adaptor is<br />
properly plugged into the charger.<br />
Check that: Your handset has slotted<br />
correctly into the charger.<br />
Check that: The batteries are correctly<br />
fitted into the handset.<br />
Check that: The base is plugged in to a<br />
working socket and that the socket<br />
is switched on.<br />
<strong>BT</strong> accessories and<br />
replacement items<br />
For a full range of accessories and<br />
replacement items for <strong>BT</strong> products<br />
please call 0870 240 5522, or visit:<br />
33
<strong>BT</strong> <strong>Freelance</strong> XH 2100 user guide ~ 2nd Edition ~ 18th March ’04 ~ 6012<br />
General information<br />
GENERAL INFORMATION<br />
34<br />
Guarantee<br />
Your <strong>BT</strong> <strong>Freelance</strong> XH 2100 is<br />
guaranteed for a period of 12 months<br />
from the date of purchase.<br />
Subject to the terms listed below the<br />
guarantee will provide for the repair of,<br />
or at <strong>BT</strong>’s or its agent’s discretion,<br />
the option to replace the <strong>BT</strong> <strong>Freelance</strong><br />
XH 2100, or any component thereof,<br />
(other than the batteries), which is<br />
identified as faulty or below standard,<br />
or as a result of inferior workmanship<br />
or materials. Products over 28 days<br />
old from the date of purchase may be<br />
replaced with a refurbished or<br />
repaired product.<br />
The conditions of this guarantee are:<br />
• The guarantee shall only apply to<br />
defects that occur within the 12<br />
month guarantee period.<br />
• Proof of purchase is provided.<br />
• The equipment is returned to <strong>BT</strong> or<br />
its agent as instructed.<br />
• This guarantee does not cover the<br />
battery pack and any faults or defects<br />
caused by accidents, misuse, fair<br />
wear and tear, neglect, storm damage,<br />
tampering with the equipment, or<br />
any attempt at adjustment or repair<br />
other than through approved agents.<br />
• This guarantee does not affect your<br />
statutory rights.<br />
Within the 12 month guarantee<br />
period:<br />
If you experience difficulty using the<br />
product, prior to returning your product,<br />
please read the Help section beginning<br />
on page 32, or contact the <strong>BT</strong> <strong>Freelance</strong><br />
XH 2100 Helpline for assistance:<br />
Helpline 0870 605 8047, 9am to<br />
5.30pm Monday to Friday and<br />
9.30am to 2.30pm on Saturdays.<br />
In the unlikely event of a defect<br />
occurring, please follow the Helpline’s<br />
instructions for replacement or repair.<br />
Outside of the 12 month guarantee<br />
period:<br />
If your product needs repair after the<br />
guarantee period has ended, the<br />
repair must meet the approval<br />
requirements for connection to the<br />
telephone network. We recommend<br />
that you contact <strong>BT</strong>’s approved repair<br />
agent, TecLogic on 01672 564444 or a<br />
local qualified repairer.<br />
Instructions for returning the product:<br />
If the Helpline is unable to remedy<br />
your problem they will ask you to<br />
return the product. Where possible,<br />
pack the product in its original<br />
packaging. Please remember to<br />
include all parts, including line cords,<br />
power supply units, and the original
<strong>BT</strong> <strong>Freelance</strong> XH 2100 user guide ~ 2nd Edition ~ 18th March ’04 ~ 6012<br />
batteries. (Please note that we cannot<br />
take responsibility for goods damaged<br />
in transit.) Please obtain and keep<br />
proof of posting from the Post Office.<br />
Technical information<br />
How many telephones can you have?<br />
All items of telephone equipment have<br />
a Ringer Equivalence Number (REN),<br />
which is used to calculate the number<br />
of items which may be connected to any<br />
one telephone line. Your <strong>BT</strong> <strong>Freelance</strong><br />
XH 2100 has a REN of 1. A total REN<br />
of 4 is allowed, if the total REN of 4 is<br />
exceeded, the telephones may not ring.<br />
With different telephone types there<br />
is no guarantee of ringing, even when<br />
the REN is less than 4.<br />
Only use approved power supply, item<br />
code 872260 for base station.<br />
Only use approved power supply, item<br />
code 003313 for charger (only applicable<br />
if you have purchased a multiple pack).<br />
Use only approved (Ni-MH)<br />
rechargeable batteries.<br />
Switchboard compatibility<br />
This product is intended for use<br />
within the UK for connection to the<br />
public telephone network and<br />
compatible switchboards, which<br />
support tone dialling and timed break<br />
recall. If in doubt please consult your<br />
service provider.<br />
Switchboard external line<br />
access code<br />
You may need to enter an access code<br />
(e.g. 9) in order to get an outside line.<br />
So that the switchboard has time to pick<br />
up an outside line, you may also need<br />
to add a Pause after the access code.<br />
Recall<br />
To use the recall button<br />
R<br />
Men<br />
Calls<br />
Men<br />
Calls<br />
Calls<br />
Men<br />
<br />
Vol<br />
<br />
Men<br />
This is used when connected<br />
to certain switchboards and<br />
for some <strong>BT</strong> Calling Features<br />
or those services available via<br />
your network provider.<br />
To set the dialling mode<br />
u<br />
u<br />
u<br />
u<br />
Press the button to enter<br />
the menu.<br />
Use the DOWN button to<br />
scroll to SETUP and press the<br />
button.<br />
Use the DOWN button to<br />
scroll to DIALMODE and press<br />
the button.<br />
Use the UP or DOWN button to<br />
select either TONE or PULSE.<br />
Press the button. You will<br />
hear a confirmation beep.<br />
GENERAL INFORMATION<br />
35
<strong>BT</strong> <strong>Freelance</strong> XH 2100 user guide ~ 2nd Edition ~ 18th March ’04 ~ 6012<br />
GENERAL INFORMATION<br />
To automatically insert a pause<br />
after an access code<br />
Men<br />
Calls<br />
Men<br />
u<br />
u<br />
With some switchboards it<br />
may be helpful to dial a pause<br />
after entering the switchboard<br />
access code, e.g. 9, 11 etc. to<br />
enable you to get an outside<br />
line.<br />
This feature automatically<br />
inserts a pause between the<br />
access code and the telephone<br />
number that you have entered<br />
in the Phonebook. However<br />
for this feature to work you<br />
must still enter the access<br />
code at the front of the<br />
telephone number when<br />
storing in the Phonebook.<br />
Press the button to enter<br />
the menu.<br />
Use the DOWN button to<br />
scroll to SETUP.<br />
Press the button.<br />
Men<br />
Men<br />
Calls<br />
Men<br />
Calls<br />
Men<br />
Calls<br />
Calls<br />
Men<br />
u<br />
u<br />
u<br />
u<br />
u<br />
Press the button.<br />
You can also adjust the length<br />
of the pause to be inserted.<br />
There are two options available,<br />
3 or 5 seconds to be set to suit<br />
the switchboard:<br />
Press the button.<br />
Use the DOWN button to<br />
scroll to SETUP.<br />
Press the button.<br />
Use the DOWN button to<br />
scroll to PABX.<br />
Press the button.<br />
Use the DOWN button to<br />
scroll to PAUSE.<br />
Display shows 3 SEC.<br />
Use the DOWN button to<br />
scroll to 5 SEC.<br />
Press the button. You will<br />
hear a confirmation tone.<br />
Calls<br />
Men<br />
u<br />
Use the DOWN button to<br />
scroll to PABX.<br />
Press the button.<br />
Calls<br />
Use the DOWN button to<br />
scroll to PBX 1.<br />
Men<br />
Men<br />
u<br />
u<br />
Press the button.<br />
Display shows PIN?.<br />
Enter PIN number.<br />
Press the button.<br />
Enter the access code.<br />
36
<strong>BT</strong> <strong>Freelance</strong> XH 2100 user guide ~ 2nd Edition ~ 18th March ’04 ~ 6012<br />
Index<br />
Additional handsets 30<br />
Auto talk on/off 21<br />
Base ringer volume 23<br />
Base settings<br />
default/reset 25<br />
diagram 2<br />
melody 23<br />
PIN number 24<br />
ringer volume 23<br />
select which base station 24<br />
Batteries<br />
charging 11<br />
install 11<br />
low warning 11<br />
performance 12<br />
replacing 32<br />
Button beeps on/off 20<br />
Caller Display 26<br />
Calls<br />
end 15<br />
make 14<br />
preparatory dialling 14<br />
receive 15<br />
redial 16<br />
secrecy 16<br />
Calls list 27<br />
delete 28<br />
delete all 28<br />
dial number 27<br />
enter 27<br />
store in phonebook 27<br />
view 27<br />
Call timer 14<br />
Call Waiting 28<br />
Cleaning 9<br />
Delete<br />
calls list 28<br />
phonebook numbers 18<br />
De-register 31<br />
Dialling mode 35<br />
Display icons 2<br />
Earpiece volume 15<br />
End a call 15<br />
Guarantee 34<br />
Handset settings<br />
default/reset 25<br />
keypad beeps on/off 20<br />
language setting 22<br />
name handset 21<br />
on/off 14<br />
register to another base 30<br />
ringer melody 21<br />
ringer volume 20<br />
Help 32<br />
Helpline 34<br />
Keypad<br />
beeps on/off 20<br />
Language 22<br />
Location of product 10<br />
INDEX<br />
37
<strong>BT</strong> <strong>Freelance</strong> XH 2100 user guide ~ 2nd Edition ~ 18th March ’04 ~ 6012<br />
INDEX<br />
Make a call 14<br />
Melody<br />
base 23<br />
handset 21<br />
Menu structure 4<br />
Name a handset 21<br />
On/off<br />
auto-talk 21<br />
handset 14<br />
keypad beeps 20<br />
secrecy 16<br />
Pause – insert 17, 36<br />
Paging handsets 19<br />
Phonebook 16<br />
delete 18<br />
dial 17<br />
edit 18<br />
enter a pause 17<br />
store 16<br />
PIN base 24<br />
Power supply 10<br />
Preparatory dialling 14<br />
Pulse dialling 35<br />
Ringer melody<br />
base 23<br />
handset 21<br />
Ringer volume<br />
base 23<br />
handset 20<br />
Safety information 9<br />
Secrecy 16<br />
Setting up 10<br />
Speech volume 15<br />
Storing a number 16<br />
Switchboard access code 35<br />
Switchboard compatibility 35<br />
Technical information 35<br />
Telephone line cord 13<br />
Tone dialling 35<br />
Unpacking 8<br />
Volume<br />
base ringer 23<br />
earpiece 15<br />
handset ringer 20<br />
Quick guide – handset settings 3<br />
Recall 35<br />
Receive a call 15<br />
Redial 16<br />
Register handset to another base 30<br />
REN (Ringer Equivalence Number) 35<br />
Reset handset/base 25<br />
Returning your<br />
<strong>BT</strong> <strong>Freelance</strong> XH 2100 34<br />
38
<strong>BT</strong> <strong>Freelance</strong> XH 2100 user guide ~ 2nd Edition ~ 18th March ’04 ~ 6012<br />
R&TTE<br />
This product is intended for use<br />
within the UK for connection to the<br />
public telephone network and<br />
compatible switchboards.<br />
This equipment complies with the<br />
essential requirements for the Radio<br />
Equipment and Telecommunications<br />
Terminal Equipment Directive<br />
1999/5/EC.<br />
Declaration of Conformance.<br />
Hereby, Suncorp Technologies,<br />
declares that this <strong>BT</strong> <strong>Freelance</strong><br />
XH 2100 is in compliance with the<br />
essential requirements and other<br />
relevant provisions of Directive<br />
1999/5/EC.<br />
The Declaration of Conformance<br />
for the <strong>BT</strong> <strong>Freelance</strong> XH 2100 is<br />
published on the web site<br />
http://www.suncorptech.com/bt<br />
39
<strong>BT</strong> <strong>Freelance</strong> XH 2100 user guide ~ 2nd Edition ~ 18th March ’04 ~ 6012<br />
Visit us at www.bt.com<br />
Offices worldwide<br />
The telecommunications services described in this publication<br />
are subject to availability and may be modified from time to time.<br />
Services and equipment are provided subject to British<br />
Telecommunications plc’s respective standard conditions of<br />
contract. Nothing in this publication forms any part of any contract.<br />
© British Telecommunications plc 2004.<br />
Registered Office: 81 Newgate Street, London EC1A 7AJ.<br />
Registered in England No. 1800000.<br />
<strong>BT</strong> <strong>Freelance</strong> XH 2100 (03/04) 2<br />
Designed and produced by The Art & Design Partnership Ltd.<br />
Printed in China