MODEL: CB - Shark Pressure Washers
MODEL: CB - Shark Pressure Washers
MODEL: CB - Shark Pressure Washers
Create successful ePaper yourself
Turn your PDF publications into a flip-book with our unique Google optimized e-Paper software.
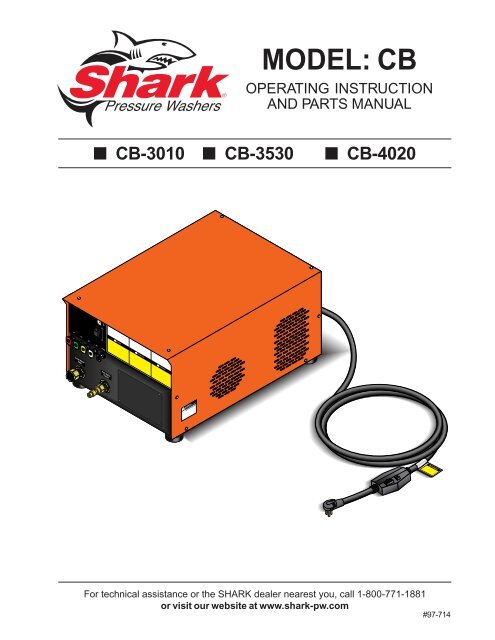
<strong>MODEL</strong>: <strong>CB</strong><br />
OPERATING INSTRUCTION<br />
AND PARTS MANUAL<br />
■ <strong>CB</strong>-3010 ■ <strong>CB</strong>-3530<br />
■ <strong>CB</strong>-4020<br />
For technical assistance or the SHARK dealer nearest you, call 1-800-771-1881<br />
or visit our website at www.shark-pw.com<br />
#97-714
CONTENTS<br />
Important Safety Information ................................................................ 4-5<br />
Component Identification ........................................................................ 6<br />
Assembly Instructions ............................................................................. 7<br />
Operating Instructions............................................................................. 8<br />
Applying Detergent and General Operating Techniques .......................... 9<br />
Shut Down and Clean-Up ..................................................................... 10<br />
Storage ................................................................................................. 10<br />
Troubleshooting ............................................................................... 11-12<br />
Preventative Maintenance ..................................................................... 13<br />
Oil Change Record ............................................................................... 13<br />
Exploded View ................................................................................. 14-15<br />
Exploded View Parts List ................................................................. 16-17<br />
Pump Exploded View and Parts List ..................................................... 18<br />
Hose & Spray Gun Assembly and Parts list .......................................... 19<br />
Specifications Page ......................................................................... 20-21<br />
Multi-Room Installation Guide ............................................................... 22<br />
Warranty<br />
Model Number ______________________________<br />
Serial Number ______________________________<br />
Date of Purchase ___________________________<br />
The model and serial numbers will be found on a decal attached to<br />
the pressure washer. You should record both serial number and<br />
date of purchase and keep in a safe place for future reference.<br />
97-713, 97-714 • REV. 2/04<br />
3
OPERATOR’S MANUAL PRESSURE WASHER<br />
4<br />
INTRODUCTION<br />
Thank you for purchasing this <strong>Pressure</strong> Washer.<br />
All information in this manual is based on the latest product<br />
information available at the time of printing.<br />
Manufacturer reserves the right to make changes at<br />
any time without incurring any obligation.<br />
Theis model was designed for maximum<br />
use of 8 hours per day, 5 days per week.<br />
Owner/User Responsibility:<br />
The owner and/or user must have an understanding of<br />
the manufacturer’s operating instructions and warnings<br />
before using this pressure washer. Warning information<br />
should be emphasized and understood. If the operator<br />
is not fluent in English, the manufacturer’s instructions<br />
and warnings shall be read to and discussed with the<br />
operator in the operator’s native language by the purchaser/owner,<br />
making sure that the operator comprehends<br />
its contents.<br />
Owner and/or user must study and maintain for future<br />
reference the manufacturers’ instructions.<br />
This manual should be considered a permanent<br />
part of the machine and should remain with it if<br />
machine is resold.<br />
When ordering parts, please specify model and<br />
serial number.<br />
IMPORTANT SAFETY<br />
INFORMATION<br />
WARNING CAUTION<br />
READ OPERATOR’S<br />
MANUAL<br />
THOROUGHLY<br />
PRIOR TO USE.<br />
CAUTION: To reduce the risk of<br />
injury, read operating instructions<br />
carefully before using.<br />
1. Read the owner's manual thoroughly.<br />
Failure to follow instructions<br />
could cause malfunction<br />
of the machine and<br />
result in death, serious bodily<br />
injury and/or property damage.<br />
2. Know how to stop the machine and bleed pressure<br />
quickly. Be thoroughly familiar with the controls.<br />
3. Stay alert — watch what you are doing.<br />
4. All installations must comply with local codes. Contact<br />
your electrician, plumber, utility company or the<br />
selling distributor for specific details.<br />
To comply with the National Electrical code (NFPA<br />
70) and provide additional protection from risk of<br />
electric shock, these pressure washers are<br />
equipped with a UL approved ground fault circuit<br />
interrupter (GFCI) power cord.<br />
97-713, 97-714 • REV. 2/04<br />
WARNING<br />
RISK OF EXPLOSION:<br />
DO NOT USE WITH<br />
FLAMMABLE<br />
LIQUIDS.<br />
WARNING<br />
KEEP WATER SPRAY<br />
AWAY FROM<br />
ELECTRICAL WIRING.<br />
WARNING: Flammable liquids<br />
can create fumes which can ignite<br />
causing property damage or<br />
severe injury.<br />
WARNING: Risk of explosion —<br />
do not spray flammable liquids.<br />
5. Risk of explosion — do not<br />
spray flammable liquids or operate<br />
in an explosive location.<br />
WARNING: Keep water spray<br />
away from electrical wiring or fatal<br />
electric shock may result.<br />
6. To protect the operator from<br />
electrical shock, the machine<br />
must be electrically grounded.<br />
It is the responsibility of the<br />
owner to connect this machine<br />
to a UL grounded receptacle<br />
of proper voltage and amperage ratings. Do not<br />
spray water on or near electrical components. Do<br />
not touch machine with wet hands or while standing<br />
in water. Always disconnect power before servicing.<br />
7. Grip cleaning wand securely with both hands before<br />
starting. Failure to do this could result in injury<br />
from a whipping wand.<br />
WARNING<br />
HIGH PRESSURE<br />
STREAM CAN<br />
PIERCE SKIN AND<br />
TISSUES.<br />
WARNING: High pressure stream<br />
of fluid that this equipment can<br />
produce can pierce skin and its<br />
underlying tissues, leading to serious<br />
injury and possible amputation.<br />
8. High pressure developed by<br />
these machines will cause<br />
personal injury or equipment<br />
damage. Use caution when operating. Do not direct<br />
discharge stream at people, or severe injury or<br />
death will result.<br />
9. Never make adjustments on machine while in operation.<br />
WARNING: High pressure spray<br />
WARNING<br />
can cause paint chips or other<br />
particles to become airborne and<br />
fly at high speeds.<br />
USE PROTECTIVE<br />
EYEWEAR<br />
WHEN OPERATING<br />
EQUIPMENT.<br />
10. Eye safety devices and foot<br />
protection must be worn when<br />
using this equipment.<br />
11. When the machine is working,<br />
do not cover or place in a closed space where ventilation<br />
is insufficient.<br />
12. Protect from freezing.<br />
13. Be certain all quick coupler fittings are secured before<br />
using pressure washer.<br />
14. Do not allow acids, caustic or abrasive fluids to pass<br />
through the pump.
15. Inlet water must be no hotter then 90° and clean<br />
fresh water.<br />
16. The best insurance against an accident is precaution<br />
and knowledge of the machine.<br />
17. Manufacturer will not be liable for any changes made<br />
to our standard machines or any components not<br />
purchased from them.<br />
18. To reduce the risk of injury, close supervision is necessary<br />
when a machine is used near children. Do<br />
not allow children to operate the pressure washer.<br />
This machine must be attended during operation.<br />
19. Do not operate this machine when fatigued or under<br />
the influence of alcohol or drugs.<br />
20. Keep operating area clear of all persons.<br />
21. Do not overreach or stand on unstable support.<br />
Keep good footing and balance at all times.<br />
22. Follow the maintenance instructions specified in the<br />
manual.<br />
PRESSURE WASHER OPERATOR’S MANUAL<br />
97-713, 97-714 • REV. 2/04<br />
5
OPERATOR’S MANUAL PRESSURE WASHER<br />
Water<br />
Supply<br />
Garden Hose<br />
(not included)<br />
Quick<br />
Coupler<br />
COMPONENT IDENTIFICATION<br />
High <strong>Pressure</strong><br />
Nozzle<br />
Soap Nozzle<br />
Garden Hose Inlet<br />
On/Off<br />
Switch<br />
Detergent<br />
Injector<br />
Discharge<br />
Nipple<br />
Wand<br />
Trigger<br />
Spray<br />
Gun<br />
Swivel<br />
Connector<br />
Hose<br />
Coupler<br />
Detergent<br />
Pick-up Tube<br />
High <strong>Pressure</strong><br />
Hose<br />
Detergent Bucket<br />
(not included)<br />
Detergent Injector - Allows you to siphon and mix detergents.<br />
High <strong>Pressure</strong> Hose — Connect one end to water<br />
pump discharge nipple and the other end to spray gun.<br />
Spray Gun — Controls the application of water and<br />
detergent onto cleaning surface with trigger device. Includes<br />
safety latch.<br />
Wand — Must be connected to the spray gun.<br />
Swivel Connector - Allows free range of movement to<br />
avoid coiling hoses.<br />
Note: If trigger on spray gun is released for more<br />
than 2 minutes, water will leak from valve. Warm<br />
water will discharge from pump protector onto floor.<br />
This system prevents internal pump damage.<br />
6<br />
97-713, 97-714 • REV. 2/04
Safety<br />
Latch<br />
High <strong>Pressure</strong><br />
Hose<br />
Spray<br />
Gun<br />
STEP 1: Attach the high<br />
pressure hose to the spray<br />
gun using teflon tape on<br />
hose threads.<br />
ASSEMBLY INSTRUCTIONS<br />
STEP 2: Insert nozzle into coupler.<br />
Outlet Fitting<br />
Nozzle<br />
Coupler<br />
STEP 3: Release the coupler collar<br />
and push the nozzle until the<br />
collar clicks. Pull the nozzle to make<br />
sure it is seated properly.<br />
PRESSURE WASHER OPERATOR’S MANUAL<br />
STEP 4: Connect garden hose to<br />
the cold water source.<br />
STEP 5: Connect the high pressure hose to the outlet discharge<br />
fitting. Push coupler collar forward until secure.<br />
Connect the garden hose to pump water inlet. Inspect<br />
inlets. CAUTION: Do not run the pump without water<br />
or pump damage will result.<br />
97-713, 97-714 • REV. 2/04<br />
7
OPERATOR’S MANUAL PRESSURE WASHER<br />
Garden<br />
Hose<br />
Cold<br />
Water<br />
Source<br />
STEP 1: Connect garden hose to the<br />
cold water source and turn water on<br />
completely. Never use hot water.<br />
OPERATING INSTRUCTIONS<br />
STEP 2: Trigger the spray gun to<br />
eliminate trapped air then wait for<br />
a steady flow of water to emerge<br />
from the spray nozzle.<br />
STEP 4: Connect to appropriate<br />
power supply.<br />
Safety<br />
Latch<br />
STEP 4: Turn machine on by flipping<br />
switch at front of machine.<br />
WARNING! Never replace<br />
nozzles without engaging the<br />
safety latch on the spray gun<br />
trigger.<br />
NOZZLES<br />
The five color-coded quick connect nozzles provide a wide array of spray<br />
widths from 0° to 45° and are easily accessible when placed in the convenient<br />
rubber nozzle holder, which is provided on the front of the machine.<br />
NOTE: For a more gentle rinse, select the white 40° or green 25° nozzle.<br />
To scour the surface, select the yellow 15° or red 0° nozzle. To apply detergent<br />
select the black nozzle.<br />
8<br />
97-713, 97-714 • REV. 2/04
DETERGENTS AND GENERAL OPERATING TECHNIQUES<br />
WARNING<br />
WARNING: Some detergents<br />
may be harmful if inhaled or ingested,<br />
causing severe nausea,<br />
fainting or poisoning. The harmful<br />
elements may cause property<br />
damage or severe injury.<br />
STEP 1: Use detergent designed<br />
specifically for pressure washers.<br />
Household detergents could damage<br />
the pump. Prepare detergent<br />
solution as required by the manufacturer.<br />
Fill a container with pressure<br />
washer detergent. Place the<br />
filter end of detergent suction tube<br />
into the detergent container.<br />
STEP 2: Apply safety latch to spray gun trigger. Secure<br />
black detergent nozzle into quick coupler. NOTE: Detergent<br />
cannot be applied using the Yellow nozzle.<br />
STEP 3: With the engine running,<br />
pull trigger to operate machine.<br />
Liquid detergent is<br />
drawn into the machine and<br />
mixed with water. Apply detergent<br />
to work area. Do not allow<br />
detergent to dry on surface.<br />
IMPORTANT: You must flush the detergent injection<br />
system after each use by placing the suction tube<br />
into a bucket of clean water, then run the pressure<br />
washer in low pressure for 1-2 minutes.<br />
THERMAL PUMP PROTECTION<br />
97-713, 97-714 • REV. 2/04<br />
If you run the engine on your pressure washer for 3-5<br />
minutes without pressing the trigger on the spray gun,<br />
circulating water in the pump can reach high temperatures.<br />
When the water reaches this temperature, the<br />
pump protector engages and cools the pump by discharging<br />
the warm water onto the ground. This thermal<br />
device prevents internal damage to the pump.<br />
CLEANING TIPS<br />
Pre-rinse cleaning surface with fresh water. Place detergent<br />
suction tube directly into cleaning solution and<br />
apply to surface at low pressure (for best results, limit<br />
your work area to sections approximately 6 feet square<br />
and always apply detergent from bottom to top). Allow<br />
detergent to remain on surface 1-3 minutes. Do not allow<br />
detergent to dry on surface. If surface appears to<br />
be drying, simply wet down surface with fresh water. If<br />
needed, use brush to remove stubborn dirt. Rinse at<br />
high pressure from top to bottom in an even sweeping<br />
motion keeping the spray nozzle approximately 1 foot<br />
from cleaning surface. Use overlapping strokes as you<br />
clean and rinse any surface. For best surface cleaning<br />
action spray at a slight angle.<br />
Recommendations:<br />
• Before cleaning any surface, an inconspicuous<br />
area should be cleaned to test spray pattern and<br />
distance for maximum cleaning results.<br />
• If painted surfaces are peeling or chipping, use<br />
extreme caution as pressure washer may remove<br />
the loose paint from the surface.<br />
• Keep the spray nozzle a safe distance from the<br />
surface you plan to clean. High pressure wash a<br />
small area, then check the surface for damage. If<br />
no damage is found, continue to pressure washing.<br />
CAUTION - Never use:<br />
• Bleach, chlorine products and other corrosive<br />
chemicals<br />
• Liquids containing solvents (i.e., paint thinners,<br />
gasoline, oils)<br />
• Tri-sodium phosphate products<br />
• Ammonia products<br />
• Acid-based products<br />
These chemicals will harm the machine and will damage<br />
the surface being cleaned.<br />
RINSING<br />
• It will take a few seconds for the detergent to clear.<br />
Apply safety latch to spray gun. Remove black soap<br />
nozzle from the quick coupler. Select and install the<br />
desired high pressure nozzle. NOTE: You can also<br />
stop detergent from flowing by simply removing detergent<br />
siphon tube from bottle.<br />
PRESSURE WASHER OPERATOR’S MANUAL<br />
9
OPERATOR’S MANUAL PRESSURE WASHER<br />
STEP 1: Remove detergent<br />
suction tube<br />
from container and insert<br />
into one gallon of<br />
fresh water. Slide<br />
nozzle forward for low<br />
pressure or to connect<br />
black detergent<br />
nozzle. Pull trigger on<br />
spray gun and siphon<br />
water for one minute.<br />
SHUTTING DOWN AND CLEAN-UP<br />
STEP 2: Turn off machine by<br />
flipping switch on front of motor.<br />
STEP 3: Turn off water supply.<br />
STEP 4: Press trigger<br />
to release water pressure.<br />
Pump<br />
Water<br />
Inlet<br />
STEP 5: Disconnect the garden<br />
hose from the water inlet on the<br />
machine.<br />
High<br />
<strong>Pressure</strong><br />
Outlet<br />
STEP 6: Disconnect the high<br />
pressure hose from high pressure<br />
outlet.<br />
STORAGE<br />
Safety<br />
Latch<br />
STEP 7: Engage<br />
the spray gun<br />
safety lock.<br />
10<br />
Pump Storage<br />
CAUTION: Always store your pressure<br />
washer in a location where the<br />
temperature will not fall below 32° F<br />
(0° C). The pump in this machine is<br />
susceptible to permanent damage if<br />
CAUTION frozen.<br />
FREEZE DAMAGE IS NOT COVERED<br />
BY WARRANTY.<br />
If you must store your pressure washer in a location<br />
where the temperature is below 32° F, you can minimize<br />
the chance of damage to your machine by draining<br />
your machine as follows:<br />
1. Stop the pressure washer and detach supply hose<br />
and high pressure hose. Squeeze the trigger of the<br />
spray gun to drain all water from the wand and<br />
hose.<br />
2. Restart pressure washer and let it run briefly (about<br />
5 seconds) until water no longer discharges from<br />
the high pressure outlet.<br />
97-713, 97-714 • REV. 2/04
PROBLEM POSSIBLE CAUSE SOLUTION<br />
PUMP RUNNING<br />
NORMALLY BUT<br />
PRESSURE LOW ON<br />
INSTALLATION<br />
FLUCTUATING<br />
PRESSURE<br />
PRESSURE LOW<br />
AFTER PERIOD<br />
OF NORMAL USE<br />
Pump sucking air<br />
Check valves sticking<br />
Unloader valve seat faulty<br />
Nozzle incorrectlly sized<br />
Worn piston packing<br />
Valves worn<br />
Blockage in valve<br />
Pump sucking air<br />
Worn piston packing<br />
Insufficient water<br />
Nozzle worn<br />
TROUBLESHOOTING<br />
Suction or delivery valves worn<br />
Check water supply and possibility of air<br />
seepage.<br />
Check and clean or replace if necessary.<br />
Check and replace if necessary.<br />
Check and replace if necessary.<br />
Check and replace if necessary.<br />
Check and replace if necessary.<br />
Check and clean out if necessary.<br />
Check water supply connections.<br />
Check and replace if necessary.<br />
Check filter and hose for breakage.<br />
Check and replace if necessary.<br />
Check and replace if necessary.<br />
PRESSURE WASHER Troubleshooting Guide<br />
Suction or delivery valves blocked<br />
Unloader valve seat worn<br />
Unloader adjusted improperly<br />
Worn piston packing<br />
Bypass valve within unloader is<br />
obstructed or leaking<br />
Check and clean if necessary.<br />
Check and replace if necessary.<br />
Call local Landa dealer.<br />
Check and replace if necessary.<br />
Remove and clean bypass cartridge.<br />
PUMP NOISY Air in suction line Check water supply and connections on suction<br />
line.<br />
Broken or weak suction or delivery<br />
valve spring<br />
Foreign matter in valves<br />
Worn bearings<br />
Check and replace if necessary.<br />
Check and clean if necessary.<br />
Check and replace if necessary.<br />
Excessive temperature of water Reduce to below 140 o F.<br />
97-713, 97-714 • REV. 2/04<br />
11
PRESSURE WASHER Troubleshooting Guide<br />
PROBLEM POSSIBLE CAUSE SOLUTION<br />
PRESENCE OF WATER<br />
IN PUMP OIL<br />
WATER DRIPPING<br />
FROM UNDER PUMP<br />
OIL DRIPPING FROM<br />
PUMP<br />
EXCESSIVE VIBRATION<br />
IN HIGH PRESSURE<br />
HOSE<br />
Oil seal worn<br />
High humidity in air<br />
Piston packing worn<br />
Piston packing worn<br />
O-Ring plunger retainer worn<br />
Oil seal worn<br />
TROUBLESHOOTING<br />
Irregular functioning of the pump<br />
valves<br />
Obstruction in filter<br />
Check and replace if necessary.<br />
Check and change oil twice as often.<br />
Check and replace if necessary.<br />
Check and replace if necessary.<br />
Check and replace if necessary.<br />
Check and replace if necessary.<br />
Check and replace if necessary.<br />
Clean inlet filter.<br />
MOTOR WILL NOT RUN Motor overload Push in the overload button located on the<br />
motor (single phase) or the overload button on<br />
the magnetic start switch (three phase).<br />
Stepdown transformer fuses<br />
Coil of magnetic starter defective<br />
Check fuses and voltage. Replace if necessary.<br />
Replace coil after the timer and unloader switch<br />
have been tested.<br />
MACHINE WILL NOT<br />
TURN ON WHEN<br />
SWITCH IS PUSHED<br />
Timer is defective<br />
Join wires 15 and 16 together on timer. If<br />
works, replace timer.<br />
12<br />
97-713, 97-714 • REV. 2/04
PREVENTATIVE MAINTENANCE<br />
PREVENTATIVE MAINTENANCE<br />
This pressure washer was produced with the best available materials and quality craftsmanship. However, you as<br />
the owner, have certain responsibilities for the correct care of the equipment. Attention to regular preventative<br />
maintenance procedure will assist in preserving the performance of your equipment. Contact your dealer for<br />
maintenance. Regular preventative maintenance will add many hours to the life of your pressure washer. Perform<br />
maintenance more often under severe conditions.<br />
Pump Oil<br />
Check Valve Clearance<br />
Water Filter<br />
MAINTENANCE SCHEDULE<br />
Inspect<br />
Change<br />
Inspect<br />
Clean<br />
25 Hours or Weekly<br />
Yearly<br />
Yearly<br />
Every 6 Hours or Daily<br />
Yearly<br />
PRESSURE WASHER Troubleshooting Guide<br />
OIL CHANGE RECORD<br />
Check pump oil level before first use. Change pump oil after first 50 hours and every month or 500 hours thereafter.<br />
Use SAE 30 weight oil.<br />
Date Oil Changed<br />
Month/Day/Year<br />
Estimated Operating<br />
Hours Since Last<br />
Oil Change<br />
Date Oil Changed<br />
Month/Day/Year<br />
Estimated Operating<br />
Hours Since Last<br />
Oil Change<br />
97-713, 97-714 • REV. 2/04<br />
13
OPERATOR’S MANUAL PRESSURE WASHER<br />
5<br />
4<br />
6<br />
7<br />
9<br />
7<br />
(Reversed View of<br />
Components)<br />
3010D<br />
Model<br />
EXPLODED VIEW<br />
73<br />
(Reversed View of<br />
Label)<br />
10<br />
21<br />
64 64 11<br />
13<br />
22<br />
63<br />
62<br />
58<br />
3<br />
25<br />
15<br />
8<br />
8<br />
54<br />
12<br />
1<br />
51<br />
19<br />
2<br />
For<br />
Detail See<br />
General<br />
Pump<br />
Assy.<br />
20<br />
23<br />
23<br />
66<br />
24<br />
17<br />
50<br />
50<br />
16<br />
19<br />
14<br />
18<br />
19<br />
52<br />
19<br />
19<br />
19<br />
14<br />
97-713, 97-714 • REV. 2/04
EXPLODED VIEW<br />
27<br />
43<br />
39<br />
46<br />
PRESSURE WASHER OPERATOR’S MANUAL<br />
44<br />
68<br />
42<br />
40<br />
41<br />
71<br />
28<br />
74<br />
26<br />
71<br />
29<br />
38<br />
73<br />
69<br />
49<br />
53<br />
32<br />
46<br />
37<br />
31<br />
33<br />
65<br />
67<br />
60<br />
19<br />
59<br />
55<br />
50<br />
57<br />
56<br />
30<br />
47<br />
35 36<br />
34<br />
48<br />
48<br />
19<br />
19<br />
48<br />
19<br />
50<br />
71<br />
61<br />
97-713, 97-714 • REV. 2/04<br />
15
OPERATOR’S MANUAL PRESSURE WASHER<br />
ITEM PART NO. DESCRIPTION QTY<br />
1 Unloader, See Specifications pages 20-21<br />
2 Pump, See Specifications pages 20-21<br />
3 Motor, See Specifications pages 20-21<br />
4 Transformer, See Specifications pages 20-21<br />
5 6-02294 Fuse, ATMR, 1 Amp, 600V<br />
(3530A, B; 4020A, B) 2<br />
6-02295 Fuse, 1/2 Amp, 600V (3530C,<br />
4020C) 2<br />
6 6-022970 Fuse, Paper, Buss FNM-1/2,<br />
250V Midget 1<br />
7 Contactor, See Specification pages 20-21<br />
8 2-1105 Swivel, 1/2" JIC Fem,<br />
Push-On 4<br />
9 6-021595 Din Rail, 35 mm 4"<br />
10 6-03909 Box, Plastic, 10" x 8" x 6"<br />
w/Lid (4020, 3530) 1<br />
6-03907 Box, Plastic 8" x 8" x 4",<br />
(3010) 1<br />
11 95-07603907 Bracket, Electric Box<br />
Support 1<br />
12 6-051595 Strain Relief, STRT, LQ Tite 1<br />
6-05172 Locknut, 3/4" Conduit 1<br />
6-05170 Strain Relief, 3/4" Galvanized,<br />
Watertight (3530A) 1<br />
13 6-05153 Strain Relief, STRT, 3200<br />
Medium (All Models Except<br />
3530A) 2<br />
6-05170 Strain Relief, 3/4" Galvanized,<br />
Watertight (3530A) 1<br />
6-05181 Locknut, 1/2" Conduit 2<br />
14 4-02047720 Hose, 3/8" x 20", 2 Wire,<br />
<strong>Pressure</strong> Loop (3010, 4020,<br />
3530) 1<br />
15 4-02110000 Hose, 1/2" Push-On 1 ft.<br />
16 95-07141110 Retainer, Pump Take Up 1<br />
17 95-07102112 Rail, Pump General 1<br />
9507163136 Rail, Pump Legacy 1<br />
18 90-10220 Bolt, 3/8" x 3-1/2" Tap 2<br />
19 90-4002 Washer, 3/8", Flat, SAE 26<br />
90-4001 Washer, 5/16", Flat, SAE<br />
(3010) 4<br />
20 2-0053 Elbow, 1/2" JIC x 3/8" MPT<br />
90° 1<br />
21 95-07290068 Standoff, Electrical Box 1<br />
22 6-0517 Strain Relief, 3/4" 3303 1<br />
23 2-1062 Elbow, 1/2" JIC x 1/2", 90° 2<br />
24 2-0053 Elbow, 1/2" JIC x 3/8" 90° 1<br />
EXPLODED VIEW PARTS LIST<br />
ITEM PART NO. DESCRIPTION QTY<br />
25 6-0108 Cord, Serv, SEO, 10/3<br />
Coleman (4020A) 3 ft.<br />
6-01041 Cord, Service, 12/3<br />
(3010D)<br />
3 ft.<br />
6-0102 Cord, Service, 8/3 (3530A) 3 ft.<br />
26 10-08021 Label, Disconnect Power<br />
Supply 1<br />
27 95-07102129 Cover, Cold Water 1<br />
28 95-07102122 Base 1<br />
29 6-020240 Switch, Rocker, Carling<br />
w/Green Lens 1<br />
30 2-01041 Pad, Soft Rubber, Duro 50 4<br />
31 2-0103 Grommet, Rubber<br />
(Nozzle Holder) 5<br />
32 2-10942 Swivel, 1/2" MP x 3/4"<br />
GHF w/strainer 1<br />
33 2-11041 Connector, 1/2" Anchor 1<br />
34 2-11039 Connector, 3/8" Anchor 1<br />
35 4-011184 Downstream Injector Assembly,<br />
Non-Adj. 1<br />
36 2-2007 Nipple, 3/8" x 3/8" NPT ST<br />
Male 1<br />
37 4-12806000 Nozzle, 0006, Red 1<br />
4-12806015 Nozzle, 1506, Yellow 1<br />
4-12806025 Nozzle, 2506, Green 1<br />
4-12806040 Nozzle, 4006, White 1<br />
4-12804000 Nozzle, 0004, Red 1<br />
4-12804015 Nozzle, 1504, Yellow 1<br />
4-12804025 Nozzle, 2504, Green 1<br />
4-12804040 Nozzle, 4004, White 1<br />
4-12805500 Nozzle, 0005.5, Red 1<br />
4-12805515 Nozzle, 1505.5, Yellow 1<br />
4-12805525 Nozzle, 2505.5, Green 1<br />
4-12805540 Nozzle, 4005.5, White 1<br />
38 11-0502 Label, Control Panel (CT<br />
Models) 1<br />
11-0308 Label, Control Panel (<strong>CB</strong><br />
Models) 1<br />
39 11-0603 Label, Stripe 29" (CT<br />
Models) 2<br />
11-0601 Label, Stripe (<strong>CB</strong> Models) 2<br />
40 5-512024 Bushing, H x 24 mm 1<br />
41 5-511113 Bushing, H x 1-1/8" (4020) 1<br />
5-511138 Bushing, H x 1-3/8" 1<br />
42 Pump Pulley, See Specifications pages 20-21<br />
43 Motor Pulley, See Specifications pages 20-21<br />
44 Belt, See Specifications pages 20-21<br />
45 90-1017 ▲ Bolt, 3/8" x 1-1/4", NC HH<br />
(353001, 402001) 22<br />
90-1007 Bolt, 5/16" x 1", NC HH<br />
(3010) 4<br />
16<br />
97-713, 97-714 • REV. 2/04
ITEM PART NO. DESCRIPTION QTY<br />
46 90-1995 Screw, 1/4" x 1/2", BH SOC<br />
CS 8<br />
47 90-40125 Washer, 3/8" x 1" Steel 4<br />
48 90-1016 Bolt, 3/8" x 1", NC HH 6<br />
49 10-9999 Label, Clear Lexan,<br />
2-1/4" x 4-1/2" 1<br />
50 90-2002 Nut, 3/8", ESNA, NC 8<br />
51 90-2002 Nut, 3/8" ESNA, NC<br />
(3530, 4020) 4<br />
90-2001 Nut, 5/16", ESNA, NC<br />
(3010) 4<br />
52 90-2007 Nut, 3/8" HEX, NC 2<br />
53 95-07102289 Cover, Access Hole 1<br />
54 90-2000 Nut, 1/4", ESNA NC 2<br />
55 90-1018 Bolt, 3/8" x 1-1/2", NC HH 4<br />
56 2-0108 Bumper Pad, Engine 4<br />
57 90-4007 Washer, 3/8" x 1-1/2"<br />
Fender 4<br />
58 6-01060 GFCI, 120V 20A w/36'<br />
12-3 Cord (3010D) 1<br />
6-01059 GFCI, 240V 1Ph, 30A, 36'<br />
10-3 Cord (4020A) 1<br />
6-010690 GFCI 240V 1Ph 40A, 36'<br />
8-3 Cord (3530A) 1<br />
6-0105 Cord, Serv, SEO 12/4<br />
(4020B, C, 3530B, C) 15 ft.<br />
EXPLODED VIEW PARTS LIST<br />
ITEM PART NO. DESCRIPTION QTY<br />
59 90-202301 Nut, Cage, 1/4" x 12 Gauge 4<br />
60 2-0114 Nut, 1/4" Square Head<br />
Grommet, Nylon 4<br />
61 95-07102124 Rail, Stabilizer 2<br />
62 90-1994 Screw, 10/32" x 1-1/4" RH,<br />
SL 1<br />
63 90-1991 Screw, 10/32" x 1/2"<br />
BHSOC 1<br />
64 90-017 Nut, 10/32" KEPS 2<br />
65 10-09003 Label, Cold Water Inlet, HS 1<br />
66 2-30082 Pump Protector, 1/2", 90° 1<br />
67 10-09002 Label, Cold Water Outlet 1<br />
68 10-02028 Label, Warning, Exposed<br />
Pulleys 1<br />
69 10-08016 Label, Intended for Indoor<br />
Use 1<br />
70 90-20231 Cage Nut, 1/4” x 12 Gauge 8<br />
71 2-01107 Weather Stripping 7 ft.<br />
72 90-1016 Bolt, 3/8” x 1” 8<br />
73 11-1042 Label, Ground 1<br />
74 6-05171 Strain Relief, 1" 1<br />
▲ Not Shown<br />
PRESSURE WASHER OPERATOR’S MANUAL<br />
97-713, 97-714 • REV. 2/04<br />
17
OPERATOR’S MANUAL PRESSURE WASHER<br />
2<br />
3<br />
2<br />
1<br />
PUMP EXPLODED VIEW<br />
4<br />
9<br />
7<br />
8<br />
10<br />
12<br />
6<br />
5 11<br />
PUMP EXPLODED VIEW PARTS LIST<br />
ITEM PART NO. DESCRIPTION QTY<br />
1 Unloader, See Specifications Page 21<br />
2 2-0053 Elbow, 1/2" JIC, 3/8", 90° 2<br />
3 2-0079 Swivel, 1/2" JIC x 3/8" Male 1<br />
4 2-1060 Elbow, 1/2 "JIC x 3/8" 1<br />
5 2-1006 Nipple, 1/2" Close 1<br />
6 2-1035 Tee, 1/2" Female 1<br />
ITEM PART NO. DESCRIPTION QTY<br />
7 2-1053 Nipple, 1/2" JIC x1/2" MPT<br />
Pipe 1<br />
8 2-1062 Elbow, 1/2" JIC x 1/2" Male 1<br />
9 2-1105 Swivel Push-On, 1/2" JIC<br />
Female 2<br />
10 4-02110000 Hose, 1/2" Push-On 12"<br />
11 2-30082 Protector, Pump, 1/2" 1<br />
12 Pump, See Specifications page 21<br />
18<br />
97-713, 97-714 • REV. 2/04
8<br />
5<br />
6<br />
1<br />
HOSE & SPRAY GUN ASSEMBLY<br />
4<br />
7 10<br />
3<br />
PRESSURE WASHER OPERATOR’S MANUAL<br />
9<br />
11<br />
2<br />
HOSE & SPRAY GUN ASSEMBLY PARTS LIST<br />
ITEM PART NO. DESCRIPTION QTY<br />
1 2-2002 Coupler, 3/8” Female 1<br />
2-0121 Quick Coupler O-Ring 1<br />
2 4-020650C Hose (CT Models) 1<br />
4-02093450BC Hose (<strong>CB</strong> Models) 1<br />
3 4-01246 Spray Gun 1<br />
4 4-0110322 Wand w/Side grip 1<br />
5 4-16540 Nozzle, Soap, Brass 1<br />
6 Nozzle, See Exploded View Parts List<br />
ITEM PART NO. DESCRIPTION QTY<br />
7 4-011184 Detergent Injector 1<br />
4-011183 Detergent Injector (Model 3-1000<br />
Only) 1<br />
8 2-2000 Coupler, 1/4” Female 1<br />
2-0119 Quick Coupler O-Ring 1<br />
9 4-02080000 Tube, 1/4” x 1/2” Clear Vinyl 6 ft.<br />
10 2-9040 Clamp, Hose 2<br />
11 2-1904 Strainer 1<br />
97-713, 97-714 • REV. 2/04<br />
19
PRESSURE WASHER Specifications<br />
SPECIFICATIONS<br />
Nozzle Pump Unloader Pump Pump Pulley Pump Bushing Motor<br />
Model Size Pump Part No. Part No. Pulley Part No. Bushing Part No. Size Voltage/ph<br />
301001D 5.5 T991 5-23020 5-3208 AK74H 5-40107401 24MM 5-512024 2HP 120V/1PH<br />
402007A 06 GM4035HR 5-1922 5-3029 2AK74H 5-40207401 24MM 5-512024 6.2HP 230V/1PH<br />
402007B 06 GM4035HR 5-1922 5-3029 2AK74H 5-40207401 24MM 5-512024 6.2HP 230V/3PH<br />
402007C 06 GM4035HR 5-1922 5-3029 2AK74H 5-40207401 24MM 5-512024 6.2HP 460V/3PH<br />
402007G 06 GM4035HR 5-1922 5-3029 2AK74H 5-40207401 24MM 5-512024 6.2HP 208V/1PH<br />
402007H 06 GM4035HR 5-1922 5-3029 2AK74H 5-40207401 24MM 5-512024 6.2HP 208V/3PH<br />
353007A 04 GM4035HR 5-1922 5-3029 2BK80H 5-40508001 24MM 5-512024 7.5HP 230V/1PH<br />
353007B 04 GM4035HR 5-1922 5-3029 2BK80H 5-40508001 24MM 5-512024 7.5HP 230V/3PH<br />
353007C 04 GM4035HR 5-1922 5-3029 2BK80H 5-40508001 24MM 5-512024 7.5HP 460V/3PH<br />
353007G 04 GM4035HR 5-1922 5-3029 2BK80H 5-40508001 24MM 5-512024 7.5HP 208V/1PH<br />
353007H 04 GM4035HR 5-1922 5-3029 2BK80H 5-40508001 24MM 5-512024 7.5HP 208V/3PH<br />
20<br />
97-713, 97-714 • REV. 2/04
SPECIFICATIONS<br />
Motor Motor Motor Pulley Motor Bushing Belt Belt Contactor Overload<br />
Hz Part No. Pulley Part No. Bushing Part No. Size Part No. Part No. Part No.<br />
60 5-1047 AK25 x 5/8 5-40102558 n/a n/a AX35 (1) 5-602035 6-4031 n/a<br />
60 5-10401 2AK56H 5-40205601 HX1-1/8" 5-511113 AX38 (2) 5-602038 6-4018 6-5013<br />
60 5-1011 2AK56H 5-40205601 HX1-1/8" 5-511113 AX38 (2) 5-602038 6-4010 6-5012<br />
60 5-1011 2AK56H 5-40205601 HX1-1/8" 5-511113 AX38 (2) 5-602038 6-4004 6-5010<br />
60 5-10402 2AK56H 5-40205601 HX1-1/8" 5-511138 AX38 (2) 5-602038 6-4018 6-5013<br />
60 5-10111 2AK56H 5-40205601 HX1-1/8" 5-511138 AX38 (2) 5-602038 6-4013 6-5011<br />
60 5-1013 2BK52H 5-40505201 HX1-3/8" 5-511138 BX39 (2) 5-604039 6-4018 6-5015<br />
60 5-10145 2BK52H 5-40505201 HX1-3/8" 5-511138 BX39 (2) 5-604039 6-4010 6-5011<br />
60 5-10145 2BK52H 5-40505201 HX1-3/8" 5-511138 BX39 (2) 5-604039 6-4040 6-5010<br />
60 5-10131 2BK52H 5-40505201 HX1-3/8" 5-511138 BX39 (2) 5-604039 6-4021 6-5015<br />
60 5-10144 2BK52H 5-40505201 HX1-3/8" 5-511138 BX39 (2) 5-604039 6-4018 6-5014<br />
PRESSURE WASHER Specifications<br />
97-713, 97-714 • REV. 2/04<br />
21
OPERATOR’S MANUAL PRESSURE WASHER<br />
MULTI-ROOM INSTALLATION<br />
22<br />
97-713, 97-714 • REV. 2/04
<strong>CB</strong> SERIES PRESSURE WASHER<br />
WARRANTY<br />
SHARK LIMITED NEW PRODUCT WARRANTY<br />
PRESSURE WASHERS<br />
WHAT THIS WARRANTY COVERS<br />
All SHARK PRESSURE WASHERS are warranted by SHARK to the original purchaser to be free from defects in materials and<br />
workmanship under normal use, for the periods specified below. This Limited Warranty is subject to the exclusions shown below,<br />
is calculated from the date of the original purchase, and applies to the original components only. Any parts replaced under this<br />
warranty will assume the remainder of the part’s warranty period. This warranty applies to the original purchaser and is not<br />
transferable.<br />
LIMITED LIFETIME PARTS WARRANTY:<br />
Components manufactured by SHARK, such as frames, handles, coil wraps, float tanks, and belt guards. Forged brass pump<br />
manifold. All heating coils will have a three year warranty. Internal components on the oil-end of all pressure washer pumps will<br />
have a seven year warranty.<br />
ONE YEAR PARTS WARRANTY:<br />
All other components, excluding normal wear items as described below, will be warranted for one year on parts. Warranty on<br />
these parts will be for one year regardless of the duration of the original component manufacturer’s part warranty.<br />
WARRANTY PROVIDED BY OTHER MANUFACTURERS:<br />
Motors, generators, and engines, which are warranted by their respective manufacturers, are serviced through these manufacturers’<br />
local authorized service centers. SHARK cannot provide warranty on these items.<br />
WHAT THIS WARRANTY DOES NOT COVER<br />
This warranty does not cover the following items:<br />
1. Normal wear items, such as nozzles, guns, discharge hoses, wands, quick couplers, seals, filters, gaskets, O-rings,<br />
packings, pistons, pump valve assemblies, strainers, belts, brushes, rupture disks, fuses, pump protectors.<br />
2. Damage or malfunctions resulting from accidents, abuse, modifications, alterations, incorrect installation, improper<br />
servicing, failure to follow manufacturer’s maintenance instructions, or use of the equipment beyond its stated usage<br />
specifications as contained in the operator’s manual.<br />
3. Damage due to freezing, chemical deterioration, scale buildup, rust, corrosion, or thermal expansion.<br />
4. Damage to components from fluctuations in electrical or water supply.<br />
5. Normal maintenance service, including adjustments, fuel system cleaning, and clearing of obstructions.<br />
6. Transportation to service center, shop labor charges, field labor charges, or freight damage.<br />
WHAT YOU MUST DO TO OBTAIN WARRANTY SERVICE<br />
While not required for warranty service, we request that you register your SHARK pressure washer by returning the completed<br />
registration card. In order to obtain warranty service on items, you must return the product to an Authorized SHARK Dealer,<br />
freight prepaid, with proof of purchase, within the applicable warranty period. If the product is permanently installed, you must<br />
notify your Authorized SHARK Dealer of the defect. The Authorized Dealer will file a claim, which must subsequently verify the<br />
defect. In most cases, the part must be returned to SHARK freight prepaid with the claim. For warranty service on components<br />
warranted by other manufacturers, the Authorized Dealer can help you obtain warranty service through these manufacturers’<br />
local authorized service centers.<br />
LIMITATION OF LIABILITY<br />
SHARK’S liability for special, incidental, or consequential damages is expressly disclaimed. In no event shall SHARK’S liability<br />
exceed the purchase price of the product in question. SHARK makes every effort to ensure that all illustrations and specifications<br />
are correct, however, these do not imply a warranty that the product is merchantable or fit for a particular purpose, or that<br />
the product will actually conform to the illustrations and specifications. THE WARRANTY CONTAINED HEREIN IS IN LIEU OF<br />
ALL OTHER WARRANTIES, EXPRESS OR IMPLIED, INCLUDING ANY IMPLIED WARRANTY OF FITNESS FOR A PAR-<br />
TICULAR PURPOSE. SHARK does not authorize any other party, including authorized Dealers, to make any representation or<br />
promise on behalf of SHARK, or to modify the terms, conditions, or limitations in any way. It is the buyer’s responsibility to ensure<br />
that the installation and use of SHARK products conforms to local codes. While SHARK attempts to assure that its products<br />
meet national codes, it cannot be responsible for how the customer chooses to use or install the product.<br />
SHARK PRESSURE WASHERS<br />
1-360-833-9100 • 1-800-771-1881 • www.shark-pw.com<br />
PRESSURE WASHER WARRANTY<br />
SHARK <strong>CB</strong> • 97-714 • REV. 2/04
Form #97-714 • Revised 2/04 • Printed in U.S.A.


