
You also want an ePaper? Increase the reach of your titles
YUMPU automatically turns print PDFs into web optimized ePapers that Google loves.
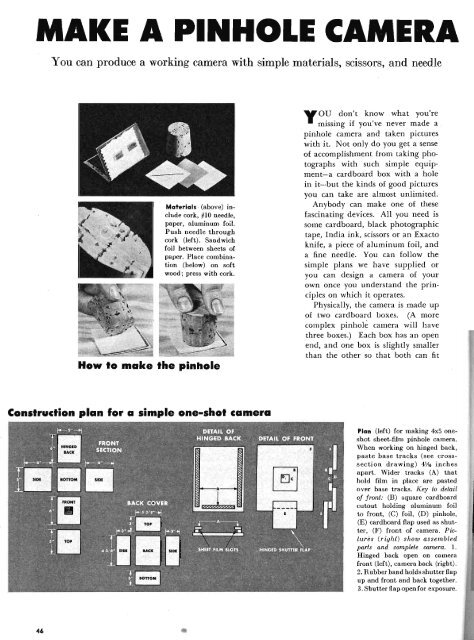
<strong>MAKE</strong> A <strong>PINHOLE</strong> <strong>CAMERA</strong><br />
You can produce a working camera with simple materials~<br />
scissors, and needle<br />
Materials (above) include<br />
cork, #10 needle,<br />
paper, aluminum foil.<br />
Push needle through<br />
cork (left). Sandwich<br />
foil between sheets of<br />
paper. Place combination<br />
(below) on soft<br />
wood; press with cork.<br />
How to make the pinhole<br />
you don't know what you're<br />
missing if you've never made a<br />
pinhole camera and taken pictures<br />
with it. Not only do you get a sense<br />
of accomplishment from taking photographs<br />
with such simple equipment-a<br />
cardboard box with a hole<br />
in it-but the kinds of good pictures<br />
you can take are almost unlimited.<br />
Anybody can make one of these<br />
fascinating devices. All you need is<br />
some cardboard, black photographic<br />
tape, India ink, scissors or an Exacto<br />
knife, a piece of aluminum foil, and<br />
a fine needle. You can follow the<br />
simple plans we have supplied or<br />
you can design a camera of your<br />
own once you understand the principles<br />
on which it operates.<br />
Physically, the camera is made up<br />
of two cardboard boxes. (A more<br />
complex pinhole camera will have<br />
three boxes.) Each box has an open<br />
end, and one box is slightly smaller<br />
than the other so that both can fit<br />
Construction plan for a simple one-shot camera<br />
Plan (left) for making 4x5 oneshot<br />
sheet-film pinhole camera.<br />
When working on hinged back,<br />
paste base tracks (see crosssection<br />
drawing) 41;\6 inches<br />
apart. Wider tracks (A) that<br />
hold film in place are pasted<br />
over base tracks. Key to detail<br />
of front: (B) square cardboard<br />
cutout holding almninum foil<br />
to front, (C) foil, (D) pinhole,<br />
(E) cardboard flap used as shutter,<br />
(F) front of camera. Pictures<br />
(right) show assembled<br />
parts and complete camera. 1.<br />
Hinged back open on camera<br />
front (left), camerl). back (right).<br />
2. Rubber band holds shutterflap<br />
up and front and back together.<br />
3. Shutter flap openfor exposure.<br />
46 ...
Photographs by Joseph Foldes<br />
You c:an make either a wide-angle or telephoto pinhole camera. Area covered depends on film-to-pinhole distance. Both pictures were<br />
made from same position; left, picture made on camera with pinhole 8Y2 inches from film, and right, shot with pinhole 3 inches from film.<br />
Here's the completed camera<br />
1 2 3<br />
47
together forming a light-tight unit.<br />
The front, smaller box, has a small<br />
hole in it which acts as the lens. A<br />
piece of film is placed inside the<br />
back of the rear box either by using<br />
tape or the more elaborate slot system.<br />
(Loading must be done in<br />
complete darkness, of course.)<br />
How does the pinhole act as a<br />
lens? Theoretically, t~le pinhole is<br />
so small that it admits only one ray<br />
of light from any given point on<br />
objects in front of the camera. Light<br />
rays enter the pinhole from all<br />
points and form an image on the inside<br />
of the camera. The sharpness<br />
of the image depends on the size of<br />
the hole. The smaller the hole<br />
(aperture), the sharper the image.<br />
First, let's consider plans for making<br />
two types of pinhole camerasthe<br />
simple one-shot, and the sheetfilm-type<br />
camera, and second, how to<br />
take indoor and outdoor pictures<br />
with them.<br />
(If you own a press-type camera<br />
and don't want to go to the trouble<br />
of making the box, you can turn this<br />
camera into a pinhole type by substituting<br />
for the lens a piece of<br />
aluminum foil with a pinhole in it.<br />
The foil can be fastened over the<br />
opening on the front standard of the<br />
camera with black photographic<br />
tape to insure against light leaks.)<br />
A plan for the simple one-shot<br />
camera appears on page 46. ''''ith<br />
this camera only one picture can be<br />
taken during a shooting session. The<br />
photographer using this pinhole<br />
camera must go into the darkroom<br />
or use a loading bag to unload and<br />
reload before making another shot.<br />
The hinged back allows for easy<br />
loading of sheet film, and is extra<br />
protection against light leaks.<br />
Once you have cut out the pieces<br />
of cardboard, blackened them on<br />
the inside with diluted India ink,<br />
and assembled them into box form,<br />
you are (Continued on page go)<br />
How to build a pinhole camera for use with film packs<br />
Pinhole camera with film pack<br />
back allows photographer to shoot<br />
more than one negative during a<br />
session without running to darkroom.<br />
Three boxes (right) must<br />
be constructed. Inner box fits<br />
into back (illustrated opposite<br />
page). Front fits over these boxes.<br />
String or rubber band holds<br />
wlits together. Pinhole is made<br />
as illustrated on page 46 and<br />
taped inside the front box.<br />
Inner Box Back Front<br />
48
Only your imagination<br />
limits types of<br />
pictures you can make<br />
Ac:tion pic:ture made with pinhole<br />
camera and 2 speedlights<br />
placed within 18 inches of subject.<br />
Kodak Super Panchro-Press<br />
Type B film was forced in DK-50<br />
at 68 degrees for 25 minutes.<br />
Outdoor portrait was made with<br />
a 16-second exposure. The<br />
model leaned motionless on rock.<br />
Front<br />
Still life was made with two<br />
#2 photofioods, 3 - feet from objects,<br />
and 60-second exposure.
Make a Pinhole Camera<br />
(Continued jrompage 48)<br />
ready to make your "lens." The pinhole<br />
itself is made in a small square piece of<br />
aluminum foil, the kind used around<br />
kitchens. (See page 46 for step-by-step<br />
illustrations.) Place the aluminum foil between<br />
two pieces of smooth writing paper<br />
and then put this "sandwich" on a soft<br />
wood support. A drawing board is good.<br />
Now, using a #10 sewing needle, push the<br />
needle through the combination. This will<br />
leave a hole about 1/100 inch in diameter.<br />
(The needle can be pushed through a<br />
cork first so that you don't accidentally<br />
make a bigger hole than you need when<br />
pressing down on the paper and foil.)<br />
Remove the aluminum foil carefully<br />
from between the papers and tape it<br />
over the opening in the cardboard on<br />
the front end of your pinhole camera.<br />
A heavy rubber band can be used to<br />
keep the front and back sections of the<br />
camera together. Remember, all loading<br />
or unloading must be done under darkness<br />
of a loading bag or a darkroom when<br />
using this single-shot camera.<br />
A step beyond the simple one-shot<br />
pinhole camera is the film-pack pinhole.<br />
Extra effort is required to make this<br />
unit, but it pays off. The photographer<br />
with a sheet-film-pack pinhole has 12<br />
times the shooting power of his fellow<br />
photographer who has a single-shot camera.<br />
The "pack" pinhole allows several<br />
different exposures or test exposures to<br />
be made of a scene with only the pull of<br />
the black tabs in the pack. (Plans for<br />
"pack" pinhole are on pages 48-49.)<br />
Extreme care must be taken when<br />
working on the film-pack back of the<br />
camera. If you use the plans given here,<br />
a piece of heavy black velvet should be<br />
attached to the outer, front side of the<br />
back slot in the pack. The cloth will<br />
make the back light-tight.<br />
A few "do's" to remember while working<br />
on either of the cameras: paint the<br />
inside surfaces of your camera with diluted<br />
India ink to insure that stray light<br />
rays are not reflected inside the camera.<br />
Check the edges and corners of the<br />
camera for light leaks. Seal any leaks<br />
with pieces of black photographic tape.<br />
Cut pieces for the camera with great<br />
care so parts will fit together well.<br />
Here's what makes a picture:<br />
FILM: Since pinhole apertures vary
from about f/192 to f/384, you should<br />
use a fast panchromatic film in order to<br />
be able to give shorter exposures. Color<br />
pictures can be made also with pinhole<br />
cameras. In color work, only tests will<br />
give you an idea of how to expose properly,<br />
and what filters to use.<br />
EXPOSURE: For a pinhole camera<br />
which has a "lens" made with a #10<br />
needle, and placed 5 inches from a fast<br />
panchromatic film, the following exposures<br />
might serve as a guide: (For best<br />
results run exposure tests. Shoot several<br />
shots, varying the time on each.<br />
Develop normally and choose the best<br />
negative for a standard of exposure.)<br />
Bright subject in full sunlight, 8 seconds,<br />
under thin clouds, 20 seconds: Average<br />
subjects, in full sunlight 16 seconds,<br />
under thin clouds, 40 seconds. Dark<br />
subjects, under full sunlight, 40 seconds,<br />
under thin clouds, 100 seconds. Indoors<br />
use two #2 photo-flood lamps, one on<br />
each side of the subject, pointed at it<br />
from 3 feet away. Expose 1 minute.<br />
PROCESSING: It is best to develop<br />
film by inspection. However, the above<br />
exposure guides are based on development<br />
in Kodak Dektol, diluted one part<br />
stock solution to three parts water, for<br />
4 min at 68-degrees F with agitation.<br />
VIEWFINDER: The most common way<br />
of judging what areas will be included<br />
in a picture made by a pinhole camera<br />
is to sight from the center, back part of<br />
the camera, at eye level, using the front<br />
corners of the camera to designate the<br />
right and left hand limits of the picture.<br />
By holding your hand about 4 or 5<br />
inches above the front section (this depends<br />
on whether you're taking a<br />
vertical or horizontal picture with your<br />
4x5 camera), you can get an approximate<br />
idea of your coverage.<br />
FOCUSING: Since the "lens" opening<br />
is somewhere within a few points on<br />
either side of f/200, you need not worry<br />
about focusing. Your picture will be as<br />
sharp in foreground as background.<br />
IMAGE SIZE: This depends primarily<br />
on the distance of the film from the pinhole.<br />
If the pinhole is 3 inches from a<br />
4x5 piece of film it will produce a wideangle<br />
effect. Using the sam~ film, but<br />
moving the .pinhole 5 inches away, you<br />
will get a view that could be classified<br />
as "normal." Using the pinhole beyond<br />
the normal focal length for 4x5 film will<br />
start producing a telephoto effect. You<br />
must remember that as you increase the<br />
focal length of your pinhole camera, that<br />
you are increasing the time of exposure<br />
also. If on a pinhole camera with a<br />
5-inch focal length the exposure in<br />
bright sunlight is 16 seconds, the exposure<br />
for a pinhole camera 10 inches<br />
long will be slightly more than 4 times,<br />
or about 70 seconds. For extra long pinhole<br />
cameras it is best to run exposure<br />
tests.<br />
SHUTTER: Since most pinhole exposures<br />
are long, a cardboard piece<br />
hinged over the front of the pinhole<br />
camera can act as a shutter. It is operated<br />
manually. With flash, electronic or<br />
flash bulbs, the duration of the light acts<br />
as the shutter. The open-flash system is<br />
used when working with flash. Open the<br />
shutter, fire, and then close it.-I!!!<br />
August. 1954