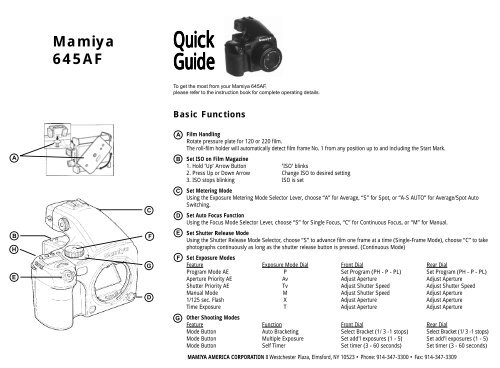
Mamiya 645 AFD Quick Guide - Stephen Grote
Mamiya 645 AFD Quick Guide - Stephen Grote
Mamiya 645 AFD Quick Guide - Stephen Grote

You also want an ePaper? Increase the reach of your titles
YUMPU automatically turns print PDFs into web optimized ePapers that Google loves.
<strong>Mamiya</strong><br />
<strong>645</strong>AF<br />
<strong>Quick</strong><br />
<strong>Guide</strong><br />
To get the most from your <strong>Mamiya</strong> <strong>645</strong>AF,<br />
please refer to the instruction book for complete operating details.<br />
Basic Functions<br />
A<br />
A<br />
B<br />
Film Handling<br />
Rotate pressure plate for 120 or 220 film.<br />
The roll-film holder will automatically detect film frame No. 1 from any position up to and including the Start Mark.<br />
Set ISO on Film Magazine<br />
1. Hold "Up" Arrow Button "ISO" blinks<br />
2. Press Up or Down Arrow Change ISO to desired setting<br />
3. ISO stops blinking ISO is set<br />
C<br />
C<br />
D<br />
Set Metering Mode<br />
Using the Exposure Metering Mode Selector Lever, choose “A” for Average, “S” for Spot, or “A-S AUTO” for Average/Spot Auto<br />
Switching.<br />
Set Auto Focus Function<br />
Using the Focus Mode Selector Lever, choose “S” for Single Focus, “C” for Continuous Focus, or “M” for Manual.<br />
B<br />
H<br />
E<br />
F<br />
G<br />
D<br />
E<br />
F<br />
Set Shutter Release Mode<br />
Using the Shutter Release Mode Selector, choose “S” to advance film one frame at a time (Single-Frame Mode), choose “C” to take<br />
photographs continuously as long as the shutter release button is pressed. (Continuous Mode)<br />
Set Exposure Modes<br />
Feature Exposure Mode Dial Front Dial Rear Dial<br />
Program Mode AE P Set Program (PH - P - PL) Set Program (PH - P - PL)<br />
Aperture Priority AE Av Adjust Aperture Adjust Aperture<br />
Shutter Priority AE Tv Adjust Shutter Speed Adjust Shutter Speed<br />
Manual Mode M Adjust Shutter Speed Adjust Aperture<br />
1/125 sec. Flash X Adjust Aperture Adjust Aperture<br />
Time Exposure T Adjust Aperture Adjust Aperture<br />
G<br />
Other Shooting Modes<br />
Feature Function Front Dial Rear Dial<br />
Mode Button Auto Bracketing Select Bracket (1/ 3 -1 stops) Select Bracket (1/ 3 -1 stops)<br />
Mode Button Multiple Exposure Set add'l exposures (1 - 5) Set add'l exposures (1 - 5)<br />
Mode Button Self Timer Set timer (3 - 60 seconds) Set timer (3 - 60 seconds)<br />
MAMIYA AMERICA CORPORATION 8 Westchester Plaza, Elmsford, NY 10523 • Phone: 914-347-3300 • Fax: 914-347-3309
Advanced Functions<br />
H<br />
H<br />
H<br />
Superimposing Data<br />
Feature Function Action Effect<br />
Set DAY Day/Date/Time 1. Hold F2 button "Set 1" appears<br />
2. Press F2 again DAY / YEAR APPEAR<br />
3. Turn front dial Select Month, Date, Year, Hr.,Min.<br />
4. Turn rear dial Change Month, Date, Year, Hr., Min.<br />
5. Hold SET button Saves Adjustments<br />
Set DATA Index Number from 000 - 999 1. Hold F2 button "Set 1" appears<br />
2. Turn front or rear dial Select "Set 2"<br />
3. Press F2 again Index number appears<br />
4. Turn front dial Select one of three digits to<br />
adjust<br />
5. Turn rear dial Change digit from 0 - 9<br />
6. Hold SET button Saves Adjustments<br />
Data Imprint Data / Exposure / Index Number 1. Hold F1 button "Func" appears<br />
Select type On Day/Date 2. Press F1 again "OF" or "DATA" or "DAY" appears<br />
or OFF OFF 3. Turn front or rear dial Select "OF" or "DATA" or "DAY"<br />
4. Hold SET button DATA, DAY or OF is now set<br />
To Lock the Adjustment Dials<br />
Feature Function Action Effect<br />
Dial Lock (dLoc) Av - aperture adjustment locked 1. Hold F1 button "Func" appears<br />
Dial Lock (dLoc) Tv - shutter speed adjustment locked 2. Turn front or rear dial turn until "dLoc" appears<br />
Dial Lock (dLoc) M - both shutter and aperture locked 3. Press F1 again "OF" or "ON" appears<br />
4. Turn front or rear dial Select "OF" or "ON"<br />
5. Hold SET button Lock OF or ON is now set<br />
Changing Viewfinder Display=<br />
Feature Function Action Effect<br />
Viewfinder Display Works in "M" Manual Mode only 1. Hold F1 button "Func" appears<br />
On or Off shuts off exposure information 2. Turn front or rear dial turn until "Fd" appears<br />
(Finder Display) infinder, focus confirmation only 3. Press F1 again "OF" or "ON" appears<br />
is displayed. 4. Turn front or rear dial Select "OF" or "ON"<br />
5. Hold SET button Lock OF or ON is now set


![FUJICOLOR NPH 400 PROFESSIONAL [NPH] - Fujifilm USA](https://img.yumpu.com/27607653/1/190x253/fujicolor-nph-400-professional-nph-fujifilm-usa.jpg?quality=85)