Wiggling Worms Gummy Worm Dissection - Project Wild
Wiggling Worms Gummy Worm Dissection - Project Wild
Wiggling Worms Gummy Worm Dissection - Project Wild

Create successful ePaper yourself
Turn your PDF publications into a flip-book with our unique Google optimized e-Paper software.
<strong>Wiggling</strong> <strong><strong>Worm</strong>s</strong><br />
Note: <strong>Gummy</strong> worms are often processed in plants that<br />
handle nuts and other allergenic foods. If allergies are an<br />
issue, use plastic worms and omit the tasting step.<br />
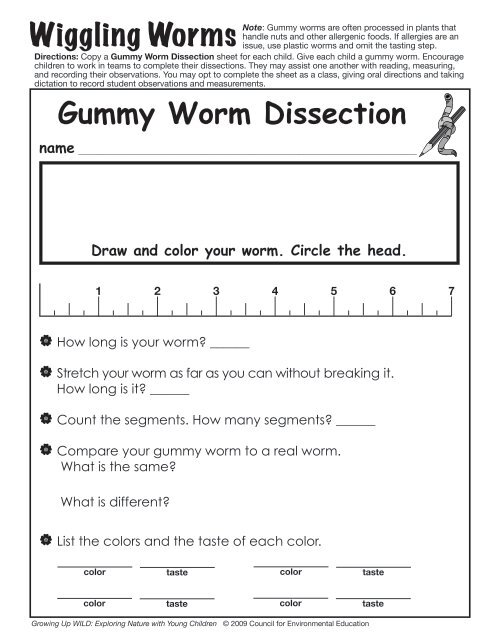
Directions: Copy a <strong>Gummy</strong> <strong>Worm</strong> <strong>Dissection</strong> sheet for each child. Give each child a gummy worm. Encourage<br />
children to work in teams to complete their dissections. They may assist one another with reading, measuring,<br />
and recording their observations. You may opt to complete the sheet as a class, giving oral directions and taking<br />
dictation to record student observations and measurements.<br />
<strong>Gummy</strong> <strong>Worm</strong> <strong>Dissection</strong><br />
name_ _____________________________________________________________________<br />
Draw and color your worm. Circle the head.<br />
1 2 3 4 5 6 7<br />
How long is your worm? ______<br />
Stretch your worm as far as you can without breaking it.<br />
How long is it? ______<br />
Count the segments. How many segments? ______<br />
Compare your gummy worm to a real worm.<br />
What is the same?<br />
What is different?<br />
List the colors and the taste of each color.<br />
color<br />
taste<br />
color<br />
taste<br />
color<br />
taste<br />
color<br />
taste<br />
Growing Up WILD: Exploring Nature with Young Children © 2009 Council for Environmental Education
<strong>Wiggling</strong> <strong><strong>Worm</strong>s</strong><br />
<strong>Worm</strong> Bin<br />
A worm bin is a fun and easy way to watch worms “recycle” food waste. Here’s how to set<br />
up and keep a worm bin:<br />
1. Order worms. Order red worms from a worm farm in your area or buy them from a bait<br />
shop. Be sure to ask for “red wigglers.” (Native earthworms will not thrive in a worm bin. Do<br />
not release red worms into the environment. They are an invasive species.)<br />
2. Choose a container. You may use a plastic tub with a lid, a wooden bin, or other container.<br />
A good size for a classroom is a 5- to 10- gallon container, or one approximately 24” x 18” x<br />
8”. It should be no more than 18” deep.<br />
3. Prepare the container. Rinse out the container before using it. Drill holes in the bottom of<br />
it and on the sides to allow for air flow and drainage. Cover it with a loose-fitting lid. Place<br />
a tray underneath it to catch moisture. Fill the bin about three-quarters full with moistened<br />
bedding such as shredded newspaper or office paper, dry leaves, straw, or sawdust. The<br />
bedding should be as wet as a squeezed-out sponge and no wetter. Add a handful of soil.<br />
4. Add the worms. After putting the worms in the bin, place it in an area that will not get over<br />
90° F in the summer or freeze in the winter. The bin can be kept indoors in a dark cupboard<br />
or closet, or in a protected area outdoors. Give the worms a day or two to settle in before<br />
feeding them.<br />
5. Feed the worms. You may feed the worms raw fruit and vegetable scraps, coffee grounds<br />
and filters, and tea bags. Do not feed them meat, dairy products, greasy or oily foods,<br />
grains or pet wastes. To feed the worms, bury the food under a handful of bedding.<br />
6. Keep the worms healthy. <strong><strong>Worm</strong>s</strong> require cool, consistent temperature, dark moist (not wet)<br />
places to live. You may need to remove the lid periodically to moderate moisture and<br />
temperature. You may add small amounts of food every day or a couple of times a week.<br />
Add moistened bedding as needed to keep the bin three-quarters full.<br />
7. Use the compost. After several months, you<br />
will see a dark layer of castings on the bottom<br />
of the bin. To remove this “vermicompost”<br />
without removing the worms, feed the worms<br />
on only one side of the bin for a few weeks.<br />
The worms will move to that side of the bin,<br />
enabling you to remove the compost from the<br />
empty side. Use the compost to fertilize house<br />
plants or garden plants.<br />
Note: You may want to post a note on the worm bin<br />
telling the custodian not to remove the bin or spray<br />
for pests near it. For more information on vermi–<br />
composting visit http://compost.css.cornell.edu/<br />
worms/wormhome.html.<br />
Growing Up WILD: Exploring Nature with Young Children © 2009 Council for Environmental Education

![Conceptual Framework [PDF] - Project Wild](https://img.yumpu.com/34019659/1/190x247/conceptual-framework-pdf-project-wild.jpg?quality=85)