Microscale Density And Refractometry
Microscale Density And Refractometry
Microscale Density And Refractometry

Create successful ePaper yourself
Turn your PDF publications into a flip-book with our unique Google optimized e-Paper software.
<strong>Microscale</strong> <strong>Density</strong> <strong>And</strong> <strong>Refractometry</strong><br />
INTRODUCTION<br />
In this experiment, the density of an unknown liquid will be determined using microscale<br />
techniques. By using the density, the student should able to identify their liquid from a table of<br />
compounds.<br />
DISCUSSION<br />
<strong>Density</strong> is an example of an intensive property of matter. That is, the density of a substance does<br />
not depend on the amount of the substance. The water in a single drop of water has the same<br />
density as the water in a 5-gallon pail of water, assuming they have the same temperature. Since<br />
the density of a substance can easily be obtained, even with a very small sample, it is often used<br />
to aid in the identification of an unknown substance. In some cases, it may also aid in<br />
determining the composition of a mixture of known substances. For example, when the liquid in<br />
an automobile radiator is tested to check its freezing temperature, the specific gravity (closely<br />
related to the density) of the liquid is measured and the freezing point is determined from a table.<br />
This is possible because it is assumed that a radiator contains a mixture of water and antifreeze.<br />
Different mixtures of water and antifreeze yield different densities. The density of a substance is<br />
defined as its mass per unit of volume, calculated as follows:<br />
d<br />
m<br />
V<br />
, where d = density, m = mass, and V = volume.<br />
The refractive index of a substance is another unique physical property that can aid in the<br />
determination of the identity of an unknown substance. The index of refraction can be measured<br />
with great accuracy (up to 8 decimal places) and consequently can be very useful in<br />
characterizing pure organic liquids. As with density, refractive index can also be used to assess<br />
the purity of known liquids and to determine the percent composition of known solutions. When<br />
a beam of light passes through a liquid, its velocity is reduced, causing it to bend downward.<br />
The extent that the light is bent when it passes through a liquid depends upon the identity of the<br />
liquid. The angle at which the light is bent is the characteristic that is measured in a refractive<br />
index determination.<br />
PROCEDURE<br />
CAUTION: Be careful when handling a Pasteur pipet. It has a sharp end that may cause cuts or<br />
puncture wounds if handled carelessly. You will also be heating glass over a Bunsen burner.<br />
Since hot glass and cold glass look alike, use caution to avoid burns. If you receive a cut or burn,<br />
notify the instructor immediately, even if it is minor.<br />
DISPOSAL: Dispose of all glass in one of the designated sharps containers in the laboratory.<br />
Liquid unknowns should be disposed into a designated waste container under one of the hoods in<br />
the laboratory.<br />
REMINDER: Use your laboratory notebook to record all data. Entries must be made in pen.
Part 1: Making a micropycnometer<br />
1. Obtain a Pasteur pipet. See caution above. Connect a Bunsen burner to the gas and ignite the<br />
burner. Adjust the flame to obtain a hot blue flame. Place the Pasteur pipet in the hottest part<br />
of the flame, about 1 cm from the capillary stem. Rotate the pipet in the flame to achieve<br />
even heating. When the glass becomes very soft, quickly remove the pipet from the flame<br />
and pull the two ends apart rapidly to yield a long thin capillary. Hold the pipet stretched and<br />
steady until the capillary hardens.<br />
heat here<br />
1 cm rotate<br />
2. To separate the micropycnometer, heat the capillary about 0.5 cm from the end. Continue<br />
heating the pycnometer to seal and yield a smooth end.<br />
heat here<br />
0.5 cm<br />
3. If necessary, cut the open end of the pycnometer to obtain a shorter neck and fire polish the<br />
opening. Use caution to avoid sealing the open end. Also, the opening of the pycnometer<br />
must be large enough for the pipet capillary to fit inside, as well as to allow air to be<br />
displaced from inside. If the neck of the pycnometer is too long, there is a greater chance of<br />
having the capillary break off inside.<br />
micropycnometer<br />
delivery pipet<br />
heat-sealed end<br />
long, thin capillary<br />
4. If the long, thin capillary of the delivery pipet fits easily into the pycnometer, attach a rubber<br />
bulb to the delivery pipet and move on to Part 2. If it does not easily fit, construct a new<br />
micropycnometer and/or delivery pipet.<br />
Part 2: Finding the volume of the micropycnometer<br />
NOTE: Since you will be calculating differences in mass that are very small, it is important<br />
to avoid introducing anything to the beaker or stopper that might cause the mass to change.<br />
This includes drops of water, tiny fragments of glass or dirt, or even fingerprints. From this<br />
point forward, the beaker, stopper, and micropycnometer should be handled only with<br />
KimWipes® and/or gloves.<br />
5. Obtain a one-hole rubber stopper. The hole in the stopper should be large enough for the<br />
pycnometer to sit without tipping.<br />
6. Wipe the pycnometer clean and place it into the hole of the stopper. Place the entire assembly<br />
onto an analytical balance and record the mass.
7. Place some water into a small beaker or vial. Measure and record the temperature of the<br />
water using a thermometer.<br />
8. Draw some water into the delivery pipet. Tip: Avoid spilling any liquid into the beaker or<br />
onto the stopper. You may use a second one-hole stopper as a pycnometer stand. Insert the<br />
tip of the pipet into the pycnometer and fill it with water. As the pycnometer is filled, slowly<br />
withdraw the capillary tip to avoid getting air bubbles trapped inside the pycnometer.<br />
Thoroughly wipe and dry any water that may have spilled over the pycnometer.<br />
9. Place the pycnometer back into the hole of the stopper and measure the mass. Calculate the<br />
mass of water in the pycnometer. Withdraw the water from the pycnometer using the<br />
delivery pipet.<br />
10. Repeat steps 8 and 9 to yield a total of four trials.<br />
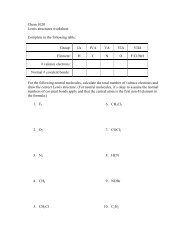
11. Calculate the volume of the micropycnometer for each trial using the mass and density of<br />
water from the table below. Determine the average volume of the pycnometer.<br />
<strong>Density</strong> of Water<br />
Temp<br />
(°C)<br />
<strong>Density</strong><br />
(g/cm 3 )<br />
Temp<br />
(°C)<br />
<strong>Density</strong><br />
(g/cm 3 )<br />
18.0 0.99860 22.0 0.99777<br />
18.5 0.99850 22.5 0.99766<br />
19.0 0.99840 23.0 0.99754<br />
19.5 0.99830 23.5 0.99742<br />
20.0 0.99820 24.0 0.99730<br />
20.5 0.99810 24.5 0.99717<br />
21.0 0.99799 25.0 0.99704<br />
21.5 0.99788 25.5 0.99691<br />
Part 3: Determining the <strong>Density</strong> of an Unknown Liquid<br />
12. Obtain a vial that contains an unknown liquid. Record the vial number.<br />
13. Before making any measurements, the micropycnometer must be washed with acetone<br />
followed by a wash with some of your unknown liquid. To do this, draw some acetone into<br />
the delivery pipet. Insert the tip of the pipet into the pycnometer and fill it with acetone.<br />
Next, withdraw the acetone from the pycnometer using the pipet. Repeat the filling and<br />
withdrawing two more times to ensure that all of the water has been removed. Repeat this<br />
wash procedure three times with your unknown liquid to now ensure that you have removed<br />
all of the acetone from the pycnometer.<br />
14. Fill the pycnometer with your unknown liquid and avoid trapping any air bubbles inside.<br />
Thoroughly wipe and dry any liquid that may have spilled over the pycnometer.<br />
15. Place the pycnometer into the stopper and beaker assembly and measure the mass. Calculate<br />
the mass of liquid in the pycnometer. As with the water withdraw and refill the pycnometer<br />
to yield four trials.
16. Calculate the density of the unknown liquid for each trial using the mass of the liquid and the<br />
average volume of the pycnometer. Determine the average density of the liquid.<br />
17. Determine the refractive index of your unknown liquid. (Your instructor will demonstrate<br />
how to use a refractometer). Wipe off the unknown liquid with a KimWipe® and repeat the<br />
determination of your refractive index one more time with a new sample of your unknown<br />
liquid. When you are finished, wash the prism with a SMALL amount of acetone and dry it<br />
again gently with a KimWipe®.<br />
18. Use the table below to identify your unknown.<br />
Substance<br />
20<br />
4<br />
b .p. (°C)<br />
20<br />
d (g/mL) n<br />
4<br />
760<br />
Cyclohexane 0.7786 1.4266 80.7<br />
Cyclohexanol 0.9624 1.4641 161.1<br />
Diethyl ether 0.7134 1.3550 34.6<br />
Ethyl acetate 0.9003 1.3723 77.1<br />
Hexane 0.6603 1.3751 69.0<br />
Isopropyl alcohol 0.7851 1.3772 82.5<br />
Methyl alcohol 0.7915 1.3292 64.7<br />
Toluene 0.8669 1.4961 110.6<br />
PRECISION OF DATA<br />
At this stage, you have probably determined the identity of your unknown. However, you have<br />
not determined the precision of your data. The precision of your data may be determined by<br />
using a statistical calculation called the standard deviation. To learn more about calculating<br />
various statistical functions such as the mean and standard deviation, go to the Statistics link at:<br />
http://webs.anokaramsey.edu/chemistry, click on “Chem 1061”, then click “<strong>Microscale</strong> <strong>Density</strong>”,<br />
then “Chemistry Statistics”.<br />
For help with various calculators, go to one of the following links. In particular, the Texas<br />
Instruments link contains a wealth of information, including online manuals.<br />
Texas Instruments: http://education.ti.com/<br />
Casio: http://www.casio.com, follow the links to “Calculators”<br />
Sharp: http://www.sharp-usa.com/products/FunctionLanding/0,1050,4,00.html<br />
Hewlett-Packard: http://www.hp.com/calculators<br />
LABORATORY REPORT<br />
Include the following information in your laboratory report, due at the beginning of the<br />
laboratory period next week. At your instructor’s discretion, individual or pair reports may be<br />
required.<br />
1. Title (including name, partner’s name, etc.)<br />
2. A description of the procedure you followed to produce the experimental data and results.<br />
Alternatively, you may reference the procedure by citing the URL’s (web addresses).
3. Results. A table or tables of your experimental data, clearly labeled with the proper units.<br />
Remember to use subscripts and superscripts where appropriate (examples: cm 3 or H 2 O). For<br />
each type of calculation performed, give the formula used to perform the calculation,<br />
rearranged to yield the desired variable. Alternatively, you may give one sample calculation<br />
for each type of calculation performed. These formulas and calculations may be neatly<br />
handwritten or typed. You may also use Microsoft Equation 3.0 to input equations. A<br />
tutorial for Equation 3.0 may be found at<br />
http://webs.anokaramsey.edu/chemistry/Chem1062/Labs/WritingTools/WritingTools.doc.<br />
Calculate the standard deviations for volume of the pycnometer and for the density of the<br />
unknown. Use the standard deviation to determine the proper number of significant figures in<br />
the mean volume of the pycnometer and the mean density of the unknown (round these<br />
values to the correct number of significant figures).<br />
4. Discussion. As part of the discussion, be sure to identify your unknown liquid and provide<br />
the evidence for your claim. You should also address any uncertainty in either the<br />
experiment or your calculations and how it affected your results. Other topics which may be<br />
included are things like whether or not the purpose of the lab was met and new concepts<br />
learned.<br />
5. References, properly cited, to any sources you may have used to perform, complete, or<br />
analyze the results of the lab.<br />
6. For the complete guidelines for preparing individual laboratory reports, go to<br />
http://webs.anokaramsey.edu/chemistry. Click on “Chem 1061”, then click on “Laboratory<br />
Reports”. The reports will be due at the beginning of the lab period for your next regularly<br />
scheduled lab.<br />
7. Follow your instructor’s directions for submission of the lab report. You may have the<br />
option of submitting this lab by email, through the D2L dropbox, or on paper. If you choose<br />
to submit by email, please attach a single file with a filename convention of Lastname<br />
Firstname <strong>Microscale</strong> and a subject line of “Chem 1061: <strong>Microscale</strong> <strong>Density</strong>”.<br />
Ideas for major portions of this lab were obtained at the 150 th 2YC 3 Conference: <strong>Microscale</strong> Chemistry in the 21 st Century, Fort Smith, AR,<br />
November 5-6, 1999.