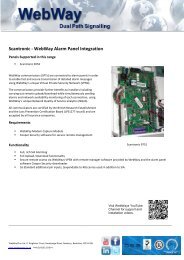
Guardall SeriesWebWay Alarm Panel Integration - WebWayOne
Guardall SeriesWebWay Alarm Panel Integration - WebWayOne
Guardall SeriesWebWay Alarm Panel Integration - WebWayOne

You also want an ePaper? Increase the reach of your titles
YUMPU automatically turns print PDFs into web optimized ePapers that Google loves.
<strong>Guardall</strong> Series WebWay <strong>Alarm</strong> <strong>Panel</strong> <strong>Integration</strong><br />
Modem Capture Connectivity<br />
<strong>WebWayOne</strong><br />
<strong>Alarm</strong><br />
<strong>Alarm</strong><br />
Mon-itorin<br />
System<br />
t<br />
integration improves security<br />
and reduces costs<br />
<strong>WebWayOne</strong> and UTC Fire and Security have integrated the <strong>Guardall</strong><br />
with the WebWay IP/GPRS and WebWay GPRS/PSTN to provide the six<br />
essential elements of a fully managed <strong>Alarm</strong> System.<br />
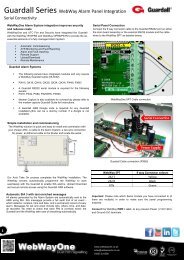
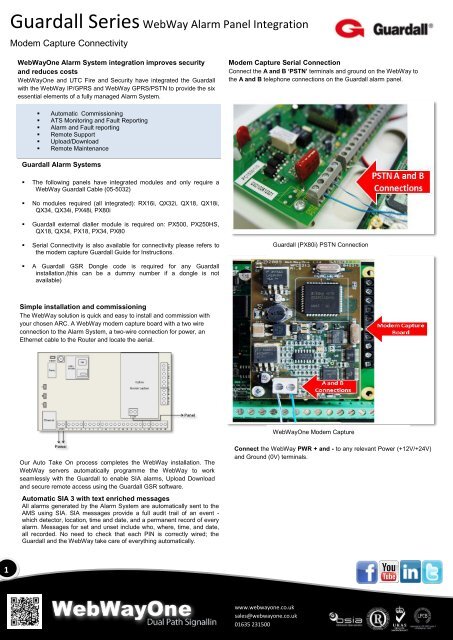
Modem Capture Serial Connection<br />
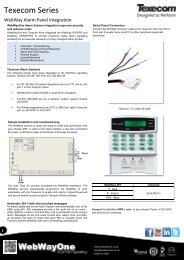
Connect the A and B ‘PSTN’ terminals and ground on the WebWay to<br />
the A and B telephone connections on the <strong>Guardall</strong> alarm panel.<br />
• Automatic Commissioning<br />
• ATS Monitoring and Fault Reporting<br />
• <strong>Alarm</strong> and Fault reporting<br />
• Remote Support<br />
• Upload/Download<br />
• Remote Maintenance<br />
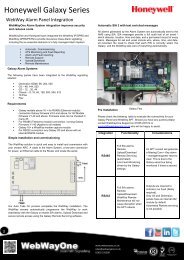
<strong>Guardall</strong> <strong>Alarm</strong> Systems<br />
• The following panels have integrated modules and only require a<br />
WebWay <strong>Guardall</strong> Cable (05-5032)<br />
• No modules required (all integrated): RX16i, QX32i, QX18, QX18i,<br />
QX34, QX34i, PX48i, PX80i<br />
• <strong>Guardall</strong> external dialler module is required on: PX500, PX250HS,<br />
QX18, QX34, PX18, PX34, PX80<br />
• Serial Connectivity is also available for connectivity please refers to<br />
the modem capture <strong>Guardall</strong> Guide for Instructions.<br />
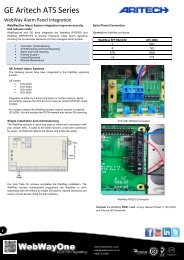
<strong>Guardall</strong> (PX80i) PSTN Connection<br />
• A <strong>Guardall</strong> GSR Dongle code is required for any <strong>Guardall</strong><br />
installation,(this can be a dummy number if a dongle is not<br />
available)<br />
Simple installation and commissioning<br />
The WebWay solution is quick and easy to install and commission with<br />
your chosen ARC. A WebWay modem capture board with a two wire<br />
connection to the <strong>Alarm</strong> System, a two-wire connection for power, an<br />
Ethernet cable to the Router and locate the aerial.<br />
<strong>WebWayOne</strong> Modem Capture<br />
Our Auto Take On process completes the WebWay installation. The<br />
WebWay servers automatically programme the WebWay to work<br />
seamlessly with the <strong>Guardall</strong> to enable SIA alarms, Upload Download<br />
and secure remote access using the <strong>Guardall</strong> GSR software.<br />
Automatic SIA 3 with text enriched messages<br />
All alarms generated by the <strong>Alarm</strong> System are automatically sent to the<br />
AMS using SIA. SIA messages provide a full audit trail of an event -<br />
which detector, location, time and date, and a permanent record of every<br />
alarm. Messages for set and unset include who, where, time, and date,<br />
all recorded. No need to check that each PIN is correctly wired; the<br />
<strong>Guardall</strong> and the WebWay take care of everything automatically.<br />
Connect the WebWay PWR + and - to any relevant Power (+12V/+24V)<br />
and Ground (0V) terminals.<br />
1<br />
www.webwayone.co.uk<br />
sales@webwayone.co.uk<br />
01635 231500
<strong>Guardall</strong> Series WebWay <strong>Alarm</strong> <strong>Panel</strong> <strong>Integration</strong><br />
Modem Capture Connectivity<br />
IMPORTANT - GSR Dongle Code<br />
For remote management of the panel the WebWay SPT and the<br />
<strong>Guardall</strong> panel must be programmed with same dongle number as<br />
used with the GSR panel software.<br />
If remote management is not in use the WebWay and <strong>Guardall</strong> panel<br />
still require a GSR code to send SIA alarms. This can be a generic<br />
number, e.g.; 12345. The Webway and <strong>Guardall</strong> cannot communicate if<br />
this number does not match. The dongle number can be entered<br />
manually via menu G in the WebWay SPT same manner as for “Auto<br />
Take-On” which uses menu D.<br />
For site roll outs we can pre populate the WebWay SPT with the GSR<br />
code. For more information on this, or and queries on the GSR code<br />
please contact support on, 01635 231514 or<br />
support@webwayone.co.uk.<br />
<strong>Panel</strong> Programming –Menu 11<br />
1. Select menu 11 - telephone number 1<br />
2. Select Tel Number <br />
3. Enter Tel Number <br />
4. Select Format <br />
5. Select Module or <br />
6. Select Auto Test <br />
7. Select Attempt <br />
8. Select Backup <br />
9. Select <strong>Alarm</strong> <br />
9. Select Set/Unset <br />
10. Select Bypass <br />
11. Select Trouble <br />
12. Select Log On <br />
13. Select Eng On <br />
14. Select Reset <br />
15. Select Restore <br />
16. Press X button twice<br />
11. Select Soak <br />
12. Select Log <br />
13. Select Config RD <br />
14. Select Config WR <br />
15. Select PINs RW <br />
16. Select A. Log Upload <br />
17. Select Exit Time <br />
18. Select KP Message <br />
19. Select Virtual KP <br />
20. Select Poll time <br />
21. Select X button once<br />
* Program the site/Chip ID here. If this configuration option is not<br />
found in menu 12, then please check menu 4.<br />
**GSR Dongle serial number, this number must match in the<br />
WebWay SPT.<br />
Menu 13<br />
1. Select the SM (Chosen in Menu 11)<br />
2. Set chosen SM to type <br />
3. Set SM Baud rate to <br />
4. Ensure all other SMs and Dialers have the type disabled<br />
5. The module required is either Internal or external dialler the<br />
type must be PSTN or PSTN&GSM<br />
6. If the type is PSTN&GSM, there will be ROUTE menus to set<br />
7. The first ROUTE menu must be set to PSTN and all others<br />
disabled<br />
2<br />
.<br />
Menu 12 – GSR 1<br />
1. Enter S/N *<br />
2. Enter GSR ID **<br />
3. Select Enable <br />
4. Enter IP Address <br />
5. Select CallBack <br />
6. Select Reset <br />
7. Select Unset <br />
8. Select Code <br />
9. Select Clock <br />
10. Select Bypass <br />
Menu 20<br />
1. Select Area ID<br />
2. Enter <br />
3. Select system ***<br />
4. Enter <br />
5. Select Area ***<br />
6. Press X button four times<br />
7. Select 05 to log out<br />
**** Enter the last four digits of the Site/ Chip ID here.<br />
www.webwayone.co.uk<br />
sales@webwayone.co.uk<br />
01635 231500