Gemini Owners Manual.pub - Gemini Gems
Gemini Owners Manual.pub - Gemini Gems
Gemini Owners Manual.pub - Gemini Gems

Create successful ePaper yourself
Turn your PDF publications into a flip-book with our unique Google optimized e-Paper software.
<strong>Gemini</strong> 105Mc Owner’s <strong>Manual</strong><br />
Mast and Rigging<br />
The <strong>Gemini</strong> 105Mc mast is 39’ off the deck and the<br />
bridge clearance is 46’<br />
The mast is deck stepped and sits on the main bulkhead.<br />
The main bulkhead is 3/4" teak ply, increased<br />
to 2 ¼” thick under the mast.<br />
The mast is a double spreader rig with the shrouds<br />
coming down to the main bulkhead. The chain plates<br />
are slotted through the deck and bolted to the main<br />
bulkhead. There are steel straps that transmit the<br />
load down to the bridge-deck.<br />
The slotting of the chain plates through the deck is<br />
the strongest system but requires periodic maintenance.<br />
As the chain plates take load and stretch, the<br />
seal can break. There is a stainless cap that is loaded<br />
with silicone sealant. Simply re-caulking the chain<br />
plate will solve any leak problems.<br />
Like most modern sailboats, the <strong>Gemini</strong>’s mast is<br />
relatively light to reduce pitching and improve performance.<br />
When a light section is used it is necessary<br />
to use double or triple spreaders. Most race boats<br />
will use running backstays to keep the mast straight.<br />
With <strong>Gemini</strong>, in place of running backstays there are<br />
permanently mounted check stays and a baby stay to<br />
the lower spreaders<br />
The cap and lower shrouds are 7mm (9/32”). The<br />
intermediate, baby, check, and back stays are 6mm<br />
(7/16”). The 7mm stays use a 1/2” turnbuckle while<br />
the 6mm stays use a 7/16” turnbuckle.<br />
The backstay is a single 6mm stay (33.36’ from center<br />
pin to Delta plate), with a 15 foot 7/32” bridle<br />
going to each transom. The tensioning device slides<br />
down the lower bridle pulling the bridles together,<br />
tensioning the backstay.<br />
Tensioning the backstay tensions the headstay which<br />
is needed for windward work.<br />
Caution: Leaving the backstay under permanent tension<br />
would damage the boat. Slack off the backstay<br />
when not in use for upwind work.<br />
Tensioning the Rigging<br />
If the <strong>Gemini</strong> 105Mc is commissioned at the Performance<br />
Cruising factory, all the rigging is tensioned<br />
before handover and should not need adjustment<br />
until such time as the tension has been altered<br />
through extended use. Typically, the rigging tension<br />
should be checked as part of the 6 month maintenance<br />
schedule.<br />
We recommend the use of a tensioning gauge for<br />
adjustments to the rigging. Both sets of cap, intermediate,<br />
and bottom stays are initially tightened by<br />
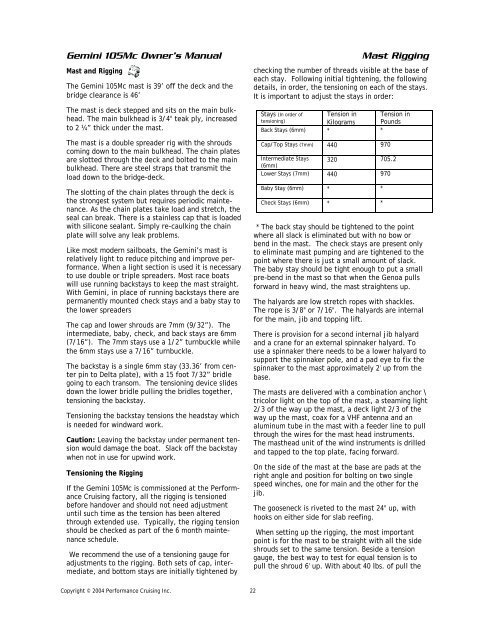
Mast Rigging<br />
checking the number of threads visible at the base of<br />
each stay. Following initial tightening, the following<br />
details, in order, the tensioning on each of the stays.<br />
It is important to adjust the stays in order:<br />
Stays (In order of Tension in Tension in<br />
tensioning)<br />
Kilograms Pounds<br />
Back Stays (6mm) * *<br />
Cap/Top Stays (7mm) 440 970<br />
Intermediate Stays 320 705.2<br />
(6mm)<br />
Lower Stays (7mm) 440 970<br />
Baby Stay (6mm) * *<br />
Check Stays (6mm) * *<br />
* The back stay should be tightened to the point<br />
where all slack is eliminated but with no bow or<br />
bend in the mast. The check stays are present only<br />
to eliminate mast pumping and are tightened to the<br />
point where there is just a small amount of slack.<br />
The baby stay should be tight enough to put a small<br />
pre-bend in the mast so that when the Genoa pulls<br />
forward in heavy wind, the mast straightens up.<br />
The halyards are low stretch ropes with shackles.<br />
The rope is 3/8" or 7/16". The halyards are internal<br />
for the main, jib and topping lift.<br />
There is provision for a second internal jib halyard<br />
and a crane for an external spinnaker halyard. To<br />
use a spinnaker there needs to be a lower halyard to<br />
support the spinnaker pole, and a pad eye to fix the<br />
spinnaker to the mast approximately 2' up from the<br />
base.<br />
The masts are delivered with a combination anchor \<br />
tricolor light on the top of the mast, a steaming light<br />
2/3 of the way up the mast, a deck light 2/3 of the<br />
way up the mast, coax for a VHF antenna and an<br />
aluminum tube in the mast with a feeder line to pull<br />
through the wires for the mast head instruments.<br />
The masthead unit of the wind instruments is drilled<br />
and tapped to the top plate, facing forward.<br />
On the side of the mast at the base are pads at the<br />
right angle and position for bolting on two single<br />
speed winches, one for main and the other for the<br />
jib.<br />
The gooseneck is riveted to the mast 24" up, with<br />
hooks on either side for slab reefing.<br />
When setting up the rigging, the most important<br />
point is for the mast to be straight with all the side<br />
shrouds set to the same tension. Beside a tension<br />
gauge, the best way to test for equal tension is to<br />
pull the shroud 6' up. With about 40 lbs. of pull the<br />
Copyright © 2004 Performance Cruising Inc.<br />
22