Automotive Catalogue GB 2013-14 - Hellermann Tyton
Automotive Catalogue GB 2013-14 - Hellermann Tyton
Automotive Catalogue GB 2013-14 - Hellermann Tyton

Create successful ePaper yourself
Turn your PDF publications into a flip-book with our unique Google optimized e-Paper software.
2.2<br />
136<br />
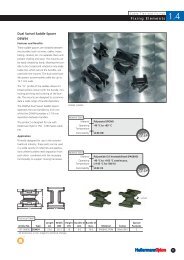
Application tooling<br />
How to use a cable tie tool (Example MK7)<br />
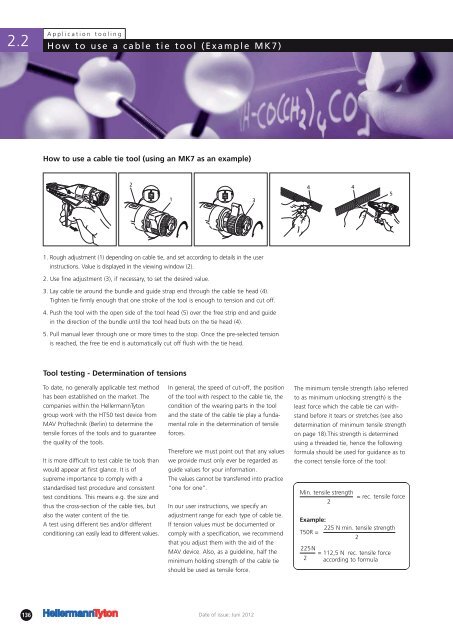
How to use a cable tie tool (using an MK7 as an example)<br />
1. Rough adjustment (1) depending on cable tie, and set according to details in the user<br />
instructions. Value is displayed in the viewing window (2).<br />
2. Use fine adjustment (3), if necessary, to set the desired value.<br />
3. Lay cable tie around the bundle and guide strap end through the cable tie head (4).<br />
Tighten tie firmly enough that one stroke of the tool is enough to tension and cut off.<br />
4. Push the tool with the open side of the tool head (5) over the free strip end and guide<br />
in the direction of the bundle until the tool head buts on the tie head (4).<br />
5. Pull manual lever through one or more times to the stop. Once the pre-selected tension<br />
is reached, the free tie end is automatically cut off flush with the tie head.<br />
Tool testing - Determination of tensions<br />
To date, no generally applicable test method<br />
has been established on the market. The<br />
companies within the <strong>Hellermann</strong><strong>Tyton</strong><br />
group work with the HT50 test device from<br />
MAV Prüftechnik (Berlin) to determine the<br />
tensile forces of the tools and to guarantee<br />
the quality of the tools.<br />
It is more difficult to test cable tie tools than<br />
would appear at first glance. It is of<br />
supreme importance to comply with a<br />
standardised test procedure and consistent<br />
test conditions. This means e.g. the size and<br />
thus the cross-section of the cable ties, but<br />
also the water content of the tie.<br />
A test using different ties and/or different<br />
conditioning can easily lead to different values.<br />
In general, the speed of cut-off, the position<br />
of the tool with respect to the cable tie, the<br />
condition of the wearing parts in the tool<br />
and the state of the cable tie play a fundamental<br />
role in the determination of tensile<br />
forces.<br />
Therefore we must point out that any values<br />
we provide must only ever be regarded as<br />
guide values for your information.<br />
The values cannot be transferred into practice<br />
“one for one”.<br />
In our user instructions, we specify an<br />
adjustment range for each type of cable tie.<br />
If tension values must be documented or<br />
comply with a specification, we recommend<br />
that you adjust them with the aid of the<br />
MAV device. Also, as a guideline, half the<br />
minimum holding strength of the cable tie<br />
should be used as tensile force.<br />
Date of issue: Juni 2012<br />
The minimum tensile strength (also referred<br />
to as minimum unlocking strength) is the<br />
least force which the cable tie can withstand<br />
before it tears or stretches (see also<br />
determination of minimum tensile strength<br />
on page 18).This strength is determined<br />
using a threaded tie, hence the following<br />
formula should be used for guidance as to<br />
the correct tensile force of the tool:<br />
Min. tensile strength<br />
= rec. tensile force<br />
2<br />
Example:<br />
225 N min. tensile strength<br />
T50R =<br />
2<br />
225N<br />
2<br />
= 112,5 N rec. tensile force<br />
according to formula