Jointing On The Table Saw - gerald@eberhardt.bz
Jointing On The Table Saw - gerald@eberhardt.bz
Jointing On The Table Saw - gerald@eberhardt.bz

Create successful ePaper yourself
Turn your PDF publications into a flip-book with our unique Google optimized e-Paper software.
MASTERING THE<br />
<strong>Table</strong> <strong>Saw</strong><br />
jointing on the<br />
<strong>Table</strong> <strong>Saw</strong><br />
Getting a clean, straight<br />
edge without a jointer is<br />
easier than you think.<br />
Most woodworking tasks, like gluing<br />
up a panel, depend on edges<br />
that are straight, smooth, and<br />
square. <strong>The</strong> first tool you think of<br />
is a jointer. But if you don’t have<br />
one, it doesn’t mean you need to<br />
settle for less than perfect cuts. You<br />
can turn to your table saw.<br />
<strong>Jointing</strong> on a table saw? I know<br />
it sounds hard to believe. But with<br />
this technique, you can put a clean,<br />
straight edge on a workpiece<br />
almost as smoothly as a jointer.<br />
Better yet, you can put a smooth<br />
edge on many materials that you<br />
wouldn’t think of running across<br />
your jointer, such as plywood,<br />
MDF, and particleboard.<br />
How It Works. <strong>The</strong> key to using<br />
your table saw like a jointer is<br />
duplicating the offset of a jointer’s<br />
infeed and outfeed tables. But<br />
instead of tables, I used the rip<br />
fence, as in the photo above. And<br />
all it takes is the auxiliary fence<br />
you see in the drawing below.<br />
MAKING THE FENCE<br />
<strong>The</strong> auxiliary fence is basically a<br />
long fence face that gets clamped to<br />
the existing rip fence. <strong>The</strong> long face<br />
(I used MDF) is about twice as long<br />
as my rip fence. <strong>The</strong> extra length<br />
www.ShopNotes.com Page 2 of 3 © August Home Publishing Company
1<br />
provides a nice, long reference edge<br />
and makes it easy to put a straight<br />
edge on a long workpiece.<br />
Laminate Face. <strong>On</strong> the rear portion<br />
of the fence, I applied a piece<br />
of plastic laminate. This is what<br />
creates a slight offset so you can<br />
remove a thin shaving from the<br />
edge of the workpiece. (<strong>The</strong> drawing<br />
on the previous page shows<br />
you where to locate it.) <strong>The</strong> laminate<br />
supports the workpiece after<br />
it passes across the blade.<br />
Blade Recess. Since the laminate<br />
is thinner than the blade,<br />
you’ll need to create a recess in the<br />
fence. This allows the blade to be<br />
set flush with the outfeed side, as<br />
you can see in the Side View on the<br />
bottom of the previous page.<br />
Creating the recess is a twostep<br />
process. First, lower the saw<br />
blade and position the auxiliary<br />
fence over it. <strong>The</strong> outside face of<br />
the blade should be flush with or<br />
extend slightly outside the edge of<br />
the auxiliary fence.<br />
Second, you can turn on the saw<br />
and slowly raise the blade up into<br />
the auxiliary fence (about 2"). This<br />
lets you joint wood up to 1 1 ⁄ 2" thick.<br />
2<br />
3<br />
To prevent the blade from rubbing<br />
against the fence, repeat the<br />
process after sliding the fence to<br />
the left a little (see End View on the<br />
previous page).<br />
Auxiliary Supports. Finally, I<br />
attached a support to each end of<br />
the fence. <strong>The</strong>y simply “extend”<br />
the top of the table saw to support<br />
long workpieces during a cut.<br />
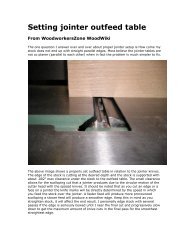
SETTING UP<br />
With the fence built, you’ll find<br />
that setting it up on your saw takes<br />
just a minute or so. You can see<br />
how this is done in Figure 1.<br />
After clamping<br />
the auxiliary fence<br />
to the rip fence, all<br />
you really have to do is align the<br />
outfeed side flush with the blade.<br />
To do this, place a straightedge<br />
along the face of the laminate.<br />
Adjust the fence so the straightedge<br />
just touches the outside edges<br />
of the blade’s teeth, as you can see<br />
in Figures 1a and 1b.<br />
USING THE FENCE<br />
<strong>Jointing</strong> an edge on the table saw<br />
with the fence is a little different<br />
than normal cutting. That’s<br />
because the fence and blade are on<br />
the same side of the workpiece.<br />
Starting the Cut. At the beginning,<br />
you want to concentrate on<br />
moving the workpiece forward<br />
steadily while applying firm pressure<br />
against the infeed side of the<br />
fence. You can see how this is done<br />
in Figure 2. I like to begin with<br />
both hands on the infeed side of<br />
the fence. I keep my left hand stationary<br />
near the blade and use my<br />
right hand to feed the stock.<br />
Completing the Cut. As the<br />
workpiece passes the blade, I move<br />
my left hand forward to hold the<br />
stock firmly against the outfeed<br />
side of the fence, while my right<br />
hand continues to feed the stock<br />
in a steady motion (Figure 3). This<br />
prevents the workpiece from pivoting<br />
in toward the blade.<br />
Now, you’re on your way to getting<br />
perfectly smooth edges. It’s<br />
the best way to get your projects<br />
off on the right start.<br />
a.<br />
b.<br />
www.ShopNotes.com Page 3 of 3 © August Home Publishing Company