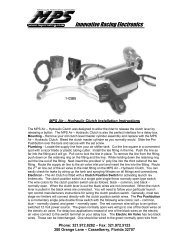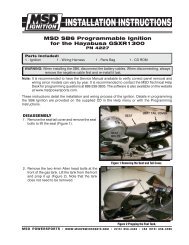
MSD SB6 Programmable Ignition for the Kawasaki ZX ... - MPS Racing
MSD SB6 Programmable Ignition for the Kawasaki ZX ... - MPS Racing
MSD SB6 Programmable Ignition for the Kawasaki ZX ... - MPS Racing

Create successful ePaper yourself
Turn your PDF publications into a flip-book with our unique Google optimized e-Paper software.
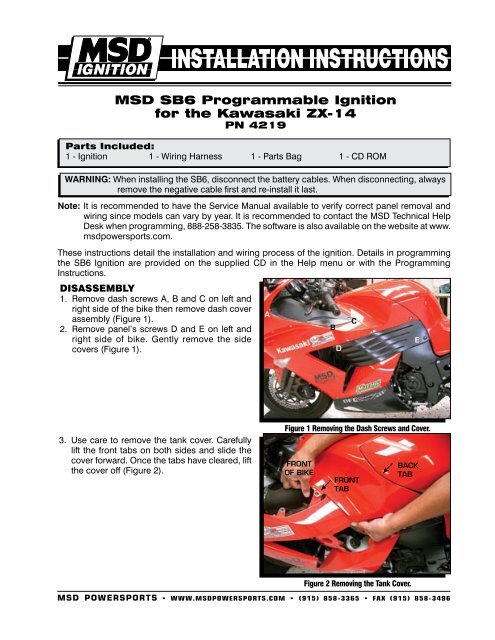
INSTALLATION INSTRUCTIONS<br />
<br />
<strong>MSD</strong> <strong>SB6</strong> <strong>Programmable</strong> <strong>Ignition</strong><br />
<strong>for</strong> <strong>the</strong> <strong>Kawasaki</strong> <strong>ZX</strong>-14<br />
PN 4219<br />
Parts Included:<br />
1 - <strong>Ignition</strong> 1 - Wiring Harness 1 - Parts Bag 1 - CD ROM<br />
WARNING: When installing <strong>the</strong> <strong>SB6</strong>, disconnect <strong>the</strong> battery cables. When disconnecting, always<br />
remove <strong>the</strong> negative cable first and re-install it last.<br />
Note: It is recommended to have <strong>the</strong> Service Manual available to verify correct panel removal and<br />
wiring since models can vary by year. It is recommended to contact <strong>the</strong> <strong>MSD</strong> Technical Help<br />
Desk when programming, 888-258-3835. The software is also available on <strong>the</strong> website at www.<br />
msdpowersports.com.<br />
These instructions detail <strong>the</strong> installation and wiring process of <strong>the</strong> ignition. Details in programming<br />
<strong>the</strong> <strong>SB6</strong> <strong>Ignition</strong> are provided on <strong>the</strong> supplied CD in <strong>the</strong> Help menu or with <strong>the</strong> Programming<br />
Instructions.<br />
DISASSEMBLY<br />
1. Remove dash screws A, B and C on left and<br />
right side of <strong>the</strong> bike <strong>the</strong>n remove dash cover<br />
assembly (Figure 1).<br />
2. Remove panel’s screws D and E on left and<br />
right side of bike. Gently remove <strong>the</strong> side<br />
covers (Figure 1).<br />
A<br />
B<br />
D<br />
C<br />
E<br />
3. Use care to remove <strong>the</strong> tank cover. Carefully<br />
lift <strong>the</strong> front tabs on both sides and slide <strong>the</strong><br />
cover <strong>for</strong>ward. Once <strong>the</strong> tabs have cleared, lift<br />
<strong>the</strong> cover off (Figure 2).<br />
Figure 1 Removing <strong>the</strong> Dash Screws and Cover.<br />
FRONT<br />
OF BIKE<br />
FRONT<br />
TAB<br />
BACK<br />
TAB<br />
Figure 2 Removing <strong>the</strong> Tank Cover.<br />
<strong>MSD</strong> POWERSPORTS • www.msdpowersports.com • (915) 858-3365 • FAX (915) 858-3496
INSTALLATION INSTRUCTIONS<br />
4. Remove <strong>the</strong> plastic rivet located on <strong>the</strong> bottom<br />
cover behind <strong>the</strong> front wheel (Figure 3). This<br />
will loosen <strong>the</strong> left and right side panels.<br />
Then remove <strong>the</strong> two plastic rivets under <strong>the</strong><br />
headlight to remove <strong>the</strong> panels (Figure 4).<br />
Figure 3 Bottom Cover.<br />
Figure 4 Removing <strong>the</strong> Headlight Panels.<br />
5. Lift <strong>the</strong> panel tab over <strong>the</strong> boss to release panel<br />
(Figure 5).<br />
TAB<br />
Figure 5 Panel Removal.<br />
<strong>MSD</strong> POWERSPORTS • www.msdpowersports.com • (915) 858-3365 • FAX (915) 858-3496
INSTALLATION INSTRUCTIONS<br />
<br />
6. Be<strong>for</strong>e removing <strong>the</strong> side panels, disconnect<br />
<strong>the</strong> turn signal connector (Figure 6). Slide <strong>the</strong><br />
panels down to remove.<br />
DISCONNECT<br />
TURN<br />
SIGNAL<br />
Figure 6 Disconnecting <strong>the</strong> Turn Signal.<br />
7. The front of <strong>the</strong> gas tank needs to be propped<br />
up to access wiring. Remove <strong>the</strong> four 10mm<br />
bolts (Figure 7). Note that <strong>the</strong> tank does not<br />
have to be removed. It can be propped up to<br />
gain access to <strong>the</strong> harness.<br />
1<br />
With <strong>the</strong> panels removed and <strong>the</strong> tank propped<br />
up, <strong>the</strong> installation can begin. Page 4 shows<br />
all of <strong>the</strong> wiring of <strong>the</strong> <strong>MSD</strong> <strong>SB6</strong>. The unit can<br />
be mounted with Velcro or secured under <strong>the</strong><br />
seat.<br />
3<br />
4<br />
2<br />
Figure 7 Prop <strong>the</strong> Gas Tank Up.<br />
<strong>MSD</strong> POWERSPORTS • www.msdpowersports.com • (915) 858-3365 • FAX (915) 858-3496
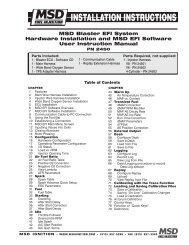
INSTALLATION INSTRUCTIONS<br />
PIN<br />
LOCATION<br />
WIRING<br />
Black<br />
Red/Black<br />
Gray<br />
11 Connect to Ground.<br />
16 Connect to <strong>the</strong> factory speed Sensor Yellow wire.<br />
22 Gear Position Sensor wire. Splice into <strong>the</strong> factory Red/Green wire.<br />
Red 1 Crankshaft Sensor positive.<br />
Crank Sensor Connectors, 2-pin<br />
Black<br />
14 Crankshaft Sensor negative.<br />
Input<br />
Green 2 Coil 1 input.<br />
Coil Connectors, 6-Pin<br />
Output<br />
Black/Orange 25 Coil 1 Trigger.<br />
White 7 Coil 2 input.<br />
Black/White<br />
26 Coil 2 Trigger.<br />
Yellow 4 Coil 3 input.<br />
Black/Yellow 13 Coil 3 Trigger.<br />
Violet<br />
20 Coil 4 input.<br />
Black/Red 9 Coil 4 Trigger.<br />
Red 8 12 volts.<br />
Red 8 12 volts.<br />
Accessories<br />
Blue<br />
Brown<br />
17 2-Step. Activates <strong>the</strong> <strong>MSD</strong> launch rpm setting when grounded. Connects to <strong>the</strong><br />
clutch switch Black wire.<br />
15 Step Retard. When connected to 12 volts, <strong>the</strong> timing will retard.<br />
Orange 3 Shift Light. Provides 12 volts to activate a shift light.<br />
Yellow/Black 18 Shift Kill. When connected to ground <strong>the</strong> ignition output is disabled.<br />
Red 5 0-5 Volt Sensor Input. Connect to any sensor that outputs a 0-5 volt signal.<br />
BLUE - TWO STEP (TO CLUTCH SWITCH)<br />
ORANGE - SHIFT LIGHT OUTPUT<br />
RED/BLACK - SPEED SENSOR<br />
RED - SENSOR, 0-5V<br />
BROWN - STEP RETARD<br />
GRAY - GEAR POSITION SENSOR<br />
GROUND<br />
YELLOW/BLACK - SHIFT KILL<br />
COIL<br />
CONNECTORS<br />
CRANK<br />
SENSOR<br />
CONNECTORS<br />
Figure 8 Wiring of <strong>the</strong> <strong>SB6</strong> <strong>for</strong> <strong>the</strong> <strong>Kawasaki</strong> <strong>ZX</strong>-14.<br />
<strong>MSD</strong> POWERSPORTS • www.msdpowersports.com • (915) 858-3365 • FAX (915) 858-3496
INSTALLATION INSTRUCTIONS<br />
<br />
INSTALLATION<br />
1. The <strong>MSD</strong> unit can be secured with a strap or<br />
Velcro ® under <strong>the</strong> seat <strong>for</strong> easy access. Route <strong>the</strong><br />
harness below <strong>the</strong> tank support bracket. Connect<br />
<strong>the</strong> ground eyelet to <strong>the</strong> bracket (Figure 9).<br />
GROUND<br />
TANK SUPPORT BRACKET<br />
Figure 9 Grounding.<br />
2. Locate <strong>the</strong> OEM Crank connectors on <strong>the</strong> right<br />
side of <strong>the</strong> bike, behind <strong>the</strong> throttle bodies<br />
(parallel to <strong>the</strong> ground bolt). Connect <strong>the</strong> <strong>MSD</strong><br />
harness inline (Figure 10).<br />
GROUND BOLT<br />
SENSOR<br />
CONNECTIONS<br />
Figure 10 Crank Position Connection.<br />
<strong>MSD</strong> POWERSPORTS • www.msdpowersports.com • (915) 858-3365 • FAX (915) 858-3496
INSTALLATION INSTRUCTIONS<br />
3. Locate <strong>the</strong> OEM 6-pin connectors on <strong>the</strong> left side<br />
of <strong>the</strong> bike. Remove <strong>the</strong> bracket bolt to access<br />
<strong>the</strong> connectors. Plug <strong>the</strong> <strong>MSD</strong> harness inline to<br />
<strong>the</strong> connectors (Figure 11 and 12). Reinstall <strong>the</strong><br />
coil connector bolt.<br />
6-PIN COIL<br />
CONNECTORS<br />
Figure 11 Coil Connector Location.<br />
Figure 12 Coil Connections.<br />
4. Locate <strong>the</strong> Gray 4-pin connector on <strong>the</strong> left side<br />
of <strong>the</strong> bike. Using <strong>the</strong> supplied splice connector,<br />
splice <strong>the</strong> Gray <strong>MSD</strong> wire into <strong>the</strong> Red/Green wire<br />
of <strong>the</strong> factory Gear Position Sensor (Figure 13).<br />
GEAR POSITION CONNECTOR<br />
See how to properly use <strong>the</strong> Wire Taps in Figure<br />
15.<br />
GRAY <strong>MSD</strong><br />
WIRE TAPS<br />
TO FACTORY<br />
RED/GREEN<br />
Figure 13 Splicing into <strong>the</strong> Gear Position Sensor.<br />
<strong>MSD</strong> POWERSPORTS • www.msdpowersports.com • (915) 858-3365 • FAX (915) 858-3496
INSTALLATION INSTRUCTIONS<br />
<br />
5. Locate <strong>the</strong> 3-pin Black connector of <strong>the</strong> Speed<br />
Sensor on <strong>the</strong> left side of <strong>the</strong> bike. Splice <strong>the</strong><br />
Red/Black wire of <strong>the</strong> <strong>MSD</strong> to Yellow factory wire<br />
(Figure 14).<br />
This completes <strong>the</strong> wiring and installation of <strong>the</strong><br />
<strong>SB6</strong>. To start <strong>the</strong> engine, it is recommended to<br />
position <strong>the</strong> rotary switch to position 0.<br />
SPLICED <strong>MSD</strong><br />
RED/BLACK<br />
INTO THE<br />
FACTORY<br />
YELLOW WIRE<br />
Figure 14 Splicing into <strong>the</strong> Speed Sensor Wiring.<br />
WIRE TAP INSTALLATION<br />
1. Insert male end cup into wire to be spliced.<br />
3. Hand tighten barrel into male end cup.<br />
3. Strip wire approximately 3/8” (10mm).<br />
4. Insert wire into male end exposing only bare<br />
wire.<br />
5. Hand tighten male end to barrel.<br />
BARREL<br />
3/8”<br />
(10mm)<br />
WIRE TO BE<br />
SPLICED<br />
MALE<br />
END<br />
CUP<br />
MALE<br />
END<br />
Figure 15 Wire Tap.<br />
TECH NOTES<br />
_________________________________________________________________________________________________________________________<br />
_________________________________________________________________________________________________________________________<br />
_________________________________________________________________________________________________________________________<br />
_________________________________________________________________________________________________________________________<br />
_________________________________________________________________________________________________________________________<br />
_________________________________________________________________________________________________________________________<br />
_________________________________________________________________________________________________________________________<br />
<strong>MSD</strong> POWERSPORTS • www.msdpowersports.com • (915) 858-3365 • FAX (915) 858-3496
INSTALLATION INSTRUCTIONS<br />
TECH NOTES<br />
_________________________________________________________________________________________________________________________<br />
_________________________________________________________________________________________________________________________<br />
_________________________________________________________________________________________________________________________<br />
_________________________________________________________________________________________________________________________<br />
_________________________________________________________________________________________________________________________<br />
_________________________________________________________________________________________________________________________<br />
_________________________________________________________________________________________________________________________<br />
_________________________________________________________________________________________________________________________<br />
_________________________________________________________________________________________________________________________<br />
_________________________________________________________________________________________________________________________<br />
_________________________________________________________________________________________________________________________<br />
_________________________________________________________________________________________________________________________<br />
_________________________________________________________________________________________________________________________<br />
_________________________________________________________________________________________________________________________<br />
_________________________________________________________________________________________________________________________<br />
Service<br />
In case of malfunction, this <strong>MSD</strong> component will be repaired free of charge according to <strong>the</strong> terms of <strong>the</strong> warranty.<br />
When returning <strong>MSD</strong> components <strong>for</strong> warranty service, Proof of Purchase must be supplied <strong>for</strong> verification. After<br />
<strong>the</strong> warranty period has expired, repair service is based on a minimum and maximum fee.<br />
All returns must have a Return Material Authorization (RMA) number issued to<br />
<strong>the</strong>m be<strong>for</strong>e being returned. To obtain an RMA number please contact <strong>MSD</strong> Customer Service at<br />
1 (888) <strong>MSD</strong>-7859 or visit www.msdignition.com/rma to automatically obtain a number and shipping in<strong>for</strong>mation.<br />
When returning <strong>the</strong> unit <strong>for</strong> repair, leave all wires at <strong>the</strong> length in which you have <strong>the</strong>m installed. Be sure to include<br />
a detailed account of any problems experienced, and what components and accessories are installed on <strong>the</strong> vehicle.<br />
The repaired unit will be returned as soon as possible using Ground shipping methods (ground shipping is covered<br />
by warranty). For more in<strong>for</strong>mation, call <strong>MSD</strong> Powersports at (915) 858-3365. <strong>MSD</strong> Powersports technicians are<br />
available from 8:00 a.m. to 5:00 p.m. Monday - Friday (mountain time).<br />
Limited Warranty<br />
<strong>MSD</strong> IGNITION warrants this product to be free from defects in material and workmanship under its intended<br />
normal use*, when properly installed and purchased from an authorized <strong>MSD</strong> dealer, <strong>for</strong> a period of one year from<br />
<strong>the</strong> date of <strong>the</strong> original purchase. This warranty is void <strong>for</strong> any new products purchased through auction websites.<br />
If found to be defective as mentioned above, it will be repaired or replaced at <strong>the</strong> option of <strong>MSD</strong> <strong>Ignition</strong>. Any item<br />
that is covered under this warranty will be returned free of charge using Ground shipping methods.<br />
This shall constitute <strong>the</strong> sole remedy of <strong>the</strong> purchaser and <strong>the</strong> sole liability of <strong>MSD</strong> <strong>Ignition</strong>. To <strong>the</strong> extent permitted<br />
by law, <strong>the</strong> <strong>for</strong>egoing is exclusive and in lieu of all o<strong>the</strong>r warranties or representation whe<strong>the</strong>r expressed or implied,<br />
including any implied warranty of merchantability or fitness. In no event shall <strong>MSD</strong> <strong>Ignition</strong> or its suppliers be liable<br />
<strong>for</strong> special or consequential damages.<br />
*Intended normal use means that this item is being used as was originally intended and <strong>for</strong> <strong>the</strong> original application<br />
as sold by <strong>MSD</strong> <strong>Ignition</strong>. Any modifications to this item or if it is used on an application o<strong>the</strong>r than what <strong>MSD</strong> <strong>Ignition</strong><br />
markets <strong>the</strong> product, <strong>the</strong> warranty will be void. It is <strong>the</strong> sole responsibility of <strong>the</strong> customer to determine that this item<br />
will work <strong>for</strong> <strong>the</strong> application <strong>the</strong>y are intending. <strong>MSD</strong> <strong>Ignition</strong> will accept no liability <strong>for</strong> custom applications.<br />
<strong>MSD</strong> POWERSPORTS • www.msdpowersports.com • (915) 858-3365 • FAX (915) 858-3496<br />
© 2008 Autotronic Controls Corporation<br />
FRM29031 Created 05/08 Printed in U.S.A.