User Manual - Antik Technology
User Manual - Antik Technology
User Manual - Antik Technology

You also want an ePaper? Increase the reach of your titles
YUMPU automatically turns print PDFs into web optimized ePapers that Google loves.
<strong>Manual</strong> for better understanding of<br />
processes, configurations and<br />
settings in web interface for SW<br />
management of Juice Hi-Density<br />
Transcoder TR-6120<br />
Juice Hi-Density<br />
Transcoder<br />
Management<br />
SW Overview
Juice Hi-Density Transcoder Management SW Overview<br />
Welcome to SW overview of Juice Hi-Density Transcoder TR6120. Juice Hi-Density<br />
Transcoder is professional tool for headend application developed to enhance<br />
encoding and transcoding efficiency and decrease its time delay. All features are well<br />
supported by Juice Transcoder Web Management, where you can easily configure<br />
settings for your optimal performance.<br />
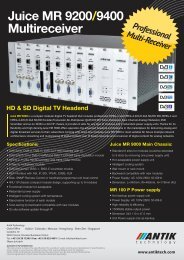
Key Features:<br />
• Real time transcoding of up to 15 video streams<br />
• Support for MPEG4 and H.264 Video Encoding<br />
• Multi-format IP2IP video transcode (H.264, MPEG2)<br />
• HD Encoding up to 1080i<br />
• 2x1U slim rack-mounted design<br />
• Low power consumption<br />
• 10/100/100 Base-TX Ethernet network interface<br />
• Front panel with OLED display<br />
• WEB-based remote configuration and control (HTTP), SNMP support<br />
• All SD and HD resolutions support<br />
• Support of wide range of bit rates: 0,5 Mbps to 30 Mbps<br />
• Compatible with all major television broadcasting standards: NTSC, PAL,<br />
SECAM<br />
2
Front panel functions<br />
Channels Settings<br />
Bitrate configuration<br />
System Monitor<br />
Info about system:<br />
temperature, Fan<br />
speed, voltage and<br />
power consumption<br />
Channel status<br />
On/Off line status of<br />
Slots<br />
Device commands<br />
Reset / On / Off<br />
3
Login screen<br />
As the first step will be obviously login to web interface management. Type your login<br />
name and password, then press Login button. Transcoder interface menu should<br />
appear immediately. You can create also more login accounts with various levels of<br />
authorization (see page 7).<br />
General configuration<br />
In general configuration you can create (or edit) name of the selected transcoding<br />
module, write some description, which can be useful for other users (for example this<br />
channel has problem with audio need to fix, etc.). From the scrollbox on the bottom<br />
you can select activate or deactivate status. If you will select Activate, all settings will<br />
change in next refresh period (once per minute) and module will be activated for the<br />
transcoding. If you select Deactivate, you will stop transcoding of selected module.<br />
4
Input configuration<br />
Here you can set name of network interface with predefined IP address and port of<br />
the transcoded content source. You can also select Input IP and write required IP<br />
address and port.<br />
Output configuration<br />
List of output settings of the selected transcoding module. Similar as in input<br />
configuration, firstly you need to set output IP address and port (if output IP address<br />
is same like input, then you need to have different ports).<br />
If you want you can also set UDP Timeout, which means time after transcoding<br />
module will turn off and on after stop of dataflow. Write this time in seconds, if you will<br />
keep this box empty (or you can type there 0), then transcoding module will restart<br />
immediately.<br />
Again you can set interface for multicast streaming (usable only in multicast network)<br />
In the box TTL for broadcasting multicast you can set required value.<br />
What is TTL?<br />
The TTL (Time To Live) field in the IP header has a double significance in multicast.<br />
As always, it controls the live time of the datagram to avoid it being looped forever<br />
due to routing errors. Routers decrement the TTL of every datagram as it traverses<br />
from one network to another and when its value reaches 0 the packet is dropped.<br />
In Video settings you can configure various output settings like:<br />
Video codec: AUTO – automatically set codec which is in input (Pass through)<br />
MPEG – option of variable (VBR) or constant (CBR) bitrate<br />
AVC - option of variable (VBR) or constant (CBR) bitrate<br />
Video bitrate – just type value of video bitrate which you want to have<br />
Resolution – choose from list of resolutions (and frame rates) which will be most<br />
suitable for you<br />
5
H.264 profiles – choose from list of profiles which will meet your requirements. For<br />
profile explanations see http://en.wikipedia.org/wiki/H.264/MPEG-4_AVC#Profiles<br />
H.264 levels – choose from list of levels which will meet your requirements. For level<br />
explanations see http://en.wikipedia.org/wiki/H.264/MPEG-4_AVC#Levels<br />
In Audio settings you can configure Audio codec and set audio bitrate which will be<br />
most suitable for you.<br />
Control panel<br />
Click on the Control icon in the upper part of the screen and control menu will appear<br />
immediately. Here you can see information about transcoding processes of each<br />
module in all connected devices. This information includes Data In, Data out, Video<br />
bitrate, Audio bitrate and Statuses.<br />
Statuses:<br />
1. Transcoding – Channel transcoding process is running by configured settings<br />
and server is communicating.<br />
2. Connected – Channel has not configured settings or transcoding is not turned<br />
on.<br />
3. Offline – Transcoding module isn’t connected, isn’t communicating with server,<br />
isn’t able to notify and cannot be pinged<br />
4. Server not available – Transcoding module is communicating but application is<br />
not. Server can be at least pinged in this status.<br />
5. Error – Error notification<br />
6
In the control menu you have various action buttons for controlling the transcoding<br />
process.<br />
Active/Deactive – Turn on/off transcoding of selected module<br />
Reset – Turn off and on power supply on selected transcoding module. All settings<br />
will be saved.<br />
Set bitrate – After click on this action button small window will appear, where you can<br />
type your required bitrate value.<br />
Configure – Switch to config menu of the selected transcoding module<br />
View log – show window with information and history of all operations on this module.<br />
7
Detailed graphs<br />
These graphs are showing basic information about usage and process of<br />
transcoding. <strong>User</strong> can see there:<br />
1. Cpu/load average – showing processor and server usage<br />
2. Network RX/TX – showing total usage of server and network interface<br />
3. Modules total RX/TX – ratio of connected transcoders and total network usage<br />
4. Transcoders – amount of connected active transcoding module slots<br />
5. Module count – amount of connected active transcoders<br />
Detailed graph of selected transcoder<br />
These graphs are showing information about condition of selected transcoder.<br />
1. RX/TX – received and transcoded data<br />
2. Transcoders – number of active transcoder module slots, 4 graphs symbolize<br />
4 USB hubs<br />
3. Temperature – show temperature of selected transcoder. Ideal is around 24°C<br />
Problems may occur when temperature is below 10°C and is<br />
higher than 50°C<br />
4. Voltage – showing power supply of 4 USB Hubs<br />
5. Fan – fan/ventilator usage in percentage<br />
8
Security<br />
Security has 2 parts:<br />
1. List of users<br />
2. Access IP Range<br />
1. List of users<br />
Here you can create, delete and edit user’s authentication settings. On the bottom<br />
you can find simple form, where you can add new user. This user will be listed in list<br />
of users which have access to the admin interface of Juice Hi-Density Transcoder<br />
TR-6120. You can adjust level of authentication to each one of them. There are 4<br />
levels of authentication:<br />
• Super Admin – full access<br />
• Admin – device configuration<br />
• <strong>User</strong> – read only access<br />
• Blocked – no access<br />
2. Access IP Range<br />
To increase security it’s possible to define ability to access to the admin interface<br />
from one IP address or range of IP addresses. If you want to add new range of IP<br />
addresses just type it into the bottom three boxes and click Add IP range. If you want<br />
to add just one IP address type this address into both boxes (IP range from and IP<br />
range to). When you want to delete IP address just click on the right side on button<br />
delete.<br />
Other buttons from the main menu<br />
Log – Screen where user can see information and history about performed<br />
operations<br />
System – Information about Juice Hi-Density Transcoder TR-6120<br />
Logout – This button will log you out from the Juice Hi-Density Transcoder TR-6120<br />
web interface management menu<br />
10
Safety instructions<br />
1. Please read these introductions carefully before use of the equipment.<br />
2. Make sure the working environment is kept between 10-50 degrees of Celsius.<br />
Make sure to leave approximately 10-20 cm of free space at the back of the device.<br />
Important - cooling fans can change rpm based on temperature, blowing hot air out of<br />
the chassis.<br />
3. During installation of the equipment, remember to connect all the cables correctly,<br />
data cables first then the power cord.<br />
4. To ensure the stability of device do not disengaged cables from their sockets<br />
before device is properly turned off.<br />
5. Before turning the device on make sure to control server is up and running.<br />
6. Do not open the lid to avoid electrical shock or damage of the unit.<br />
7. Do not turn on and off the equipment too often. The time interval between on and<br />
off should be at least 30 seconds.<br />
8. If the equipment would not be in use for long, please unplug the power cord. Do<br />
not use damaged power cords to evade the case of fire or electric shock.<br />
9. Do not touch the power line with wet hands. When any liquid flows into the<br />
chassis, cut power off IMMEDIATELY.<br />
10. Put the equipment in a horizontal position. Do not stack heavy objects on the<br />
equipment to prevent damage.<br />
11. Settle the equipment in ventilated environment and suitable temperature. Keep<br />
the equipment away from the fierce light, moisture and severe vibration.<br />
12. If the working environment has sharp temperature difference as previous, please<br />
keep the equipment off for one to two hours before power on again.<br />
11
Košice / Colorado / Moscow / Hong Kong / Shen-Zen / Singapore<br />
www.antiktech.com<br />
<strong>Antik</strong> <strong>Technology</strong><br />
Global Office<br />
Carskeho 10<br />
04001 Kosice, Slovakia (European Union)<br />
Tel.: +421 55 30 12345 / Fax: +421 55 623 4401 / E-mail: info@antiktech.com / Skype: juiceiptv<br />
ADVANCE INFORMATION:<br />
This document contains the specification for a product under continuous development. Specifications<br />
may change in any manner without notice. Visit www.antiktech.com for updates.<br />
Some of the technologies mentioned in this document can be licensed by third parties.<br />
License Agreement in such cases must be obtained separately.<br />
12