SWITCHBLADE 2 - Cabrinha
SWITCHBLADE 2 - Cabrinha
SWITCHBLADE 2 - Cabrinha

Create successful ePaper yourself
Turn your PDF publications into a flip-book with our unique Google optimized e-Paper software.
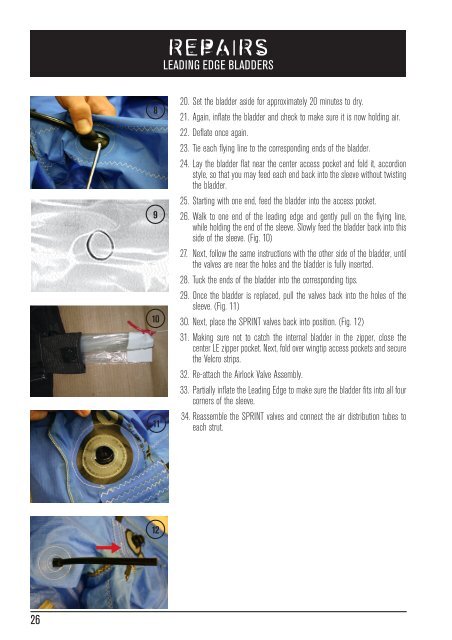
REPAIRS<br />
LEADING EDGE BLADDERS<br />
8<br />
9<br />
10<br />
11<br />
20. Set the bladder aside for approximately 20 minutes to dry.<br />
21. Again, inflate the bladder and check to make sure it is now holding air.<br />
22. Deflate once again.<br />
23. Tie each flying line to the corresponding ends of the bladder.<br />
24. Lay the bladder flat near the center access pocket and fold it, accordion<br />
style, so that you may feed each end back into the sleeve without twisting<br />
the bladder.<br />
25. Starting with one end, feed the bladder into the access pocket.<br />
26. Walk to one end of the leading edge and gently pull on the flying line,<br />
while holding the end of the sleeve. Slowly feed the bladder back into this<br />
side of the sleeve. (Fig. 10)<br />
27. Next, follow the same instructions with the other side of the bladder, until<br />
the valves are near the holes and the bladder is fully inserted.<br />
28. Tuck the ends of the bladder into the corresponding tips.<br />
29. Once the bladder is replaced, pull the valves back into the holes of the<br />
sleeve. (Fig. 11)<br />
30. Next, place the SPRINT valves back into position. (Fig. 12)<br />
31. Making sure not to catch the internal bladder in the zipper, close the<br />
center LE zipper pocket. Next, fold over wingtip access pockets and secure<br />
the Velcro strips.<br />
32. Re-attach the Airlock Valve Assembly.<br />
33. Partially inflate the Leading Edge to make sure the bladder fits into all four<br />
corners of the sleeve.<br />
34. Reassemble the SPRINT valves and connect the air distribution tubes to<br />
each strut.<br />
12<br />
26<br />
CK07SwitchbladeUserManual.indd 26<br />
8/10/06 3:41:03 AM